
Tag: Connection
Setup a connection to Dynamics 365 Sales
Integration with Business Central is done through Dataverse, and you will find lots of standard settings and tables that are provided by the integration.
This is the Third post in the series. If you want to go to previous post click here.
From the series of steps this post is dedicated to Step-2:
Before you start make sure you have below information ready with you:
- URL for the Dataverse environment (Dynamics 365 Sales) that you want to connect to
- The user’s name and password of an account that has administrator permissions in Business Central and Dataverse.
- The local currency for the company in Business Central must be the same as the base transaction currency in Dataverse.
As a second Step we will setup a Connection to Dynamics 365 Sales.
From Assisted Setup under Connect with other systems group choose Set up a connection to Dynamics 365 Sales, as shown below.

This Step is straight forward, you need to just respond to Next to each page of the Wizard.
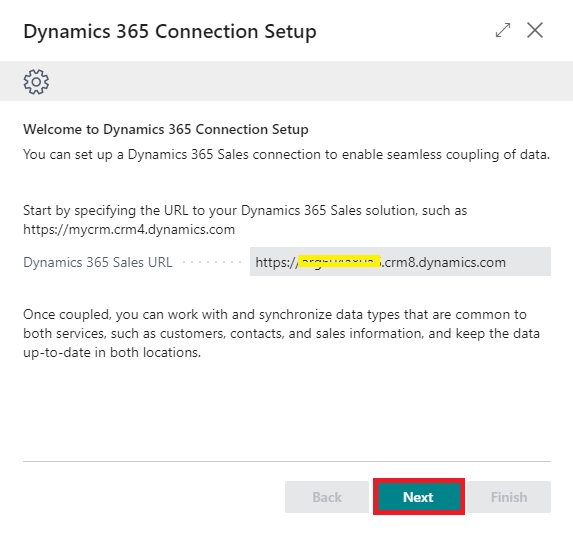
The URL will be same as used in previous step, while Connecting to Dataverse. Click Next.

Optionally, there are advanced settings that can enhance security and enable additional capabilities, such as sales order processing and viewing inventory levels. The following table describes the advanced settings.
Click Finish to complete the Setup.
Next open the Dynamics 365 Connection Setup from TellMe.

Select Connection -> Test Connection

If everything is ok it should show Connection test Successful message.
Go to Dataverse Connection Setup, from Integration -> Integration Solutions
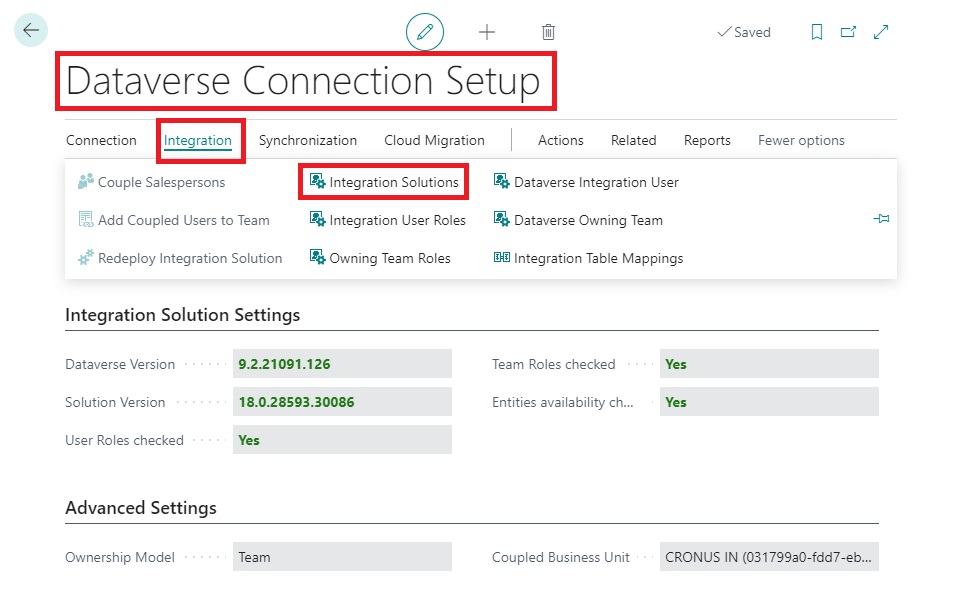
It will list you the solutions deployed.

Same you can find in Dynamics 365 Sales -> Settings -> Solutions

For more details you can have a look to Microsoft docs
Integrating with Dynamics 365 Sales
Now you are good to proceed with Next Step.
You can jump to Next Step from here.
Setup a connection to Dataverse
Integration with Business Central is done through Dataverse, and you will find lots of standard settings and tables that are provided by the integration.
This is the Second post in the series. If you want to go to previous post click here.
From the series of steps this post is dedicated to Step-1:
Create connection to integrate and synchronize data with another Dynamics 365 business app, such as Dynamics 365 Sales.
As a first Step we will setup a connection to Dataverse.
Before you start make sure you have below information ready with you:
- URL for the Dataverse environment that you want to connect to
- The user’s name and password of an account that has administrator permissions in Business Central and Dataverse.
- The local currency for the company in Business Central must be the same as the base transaction currency in Dataverse.
From Assisted Setup under Connect with other systems group choose Set up a connection to Dataverse, as shown below.

This will start the Setup wizard, just follow and provide your information asked on each page.
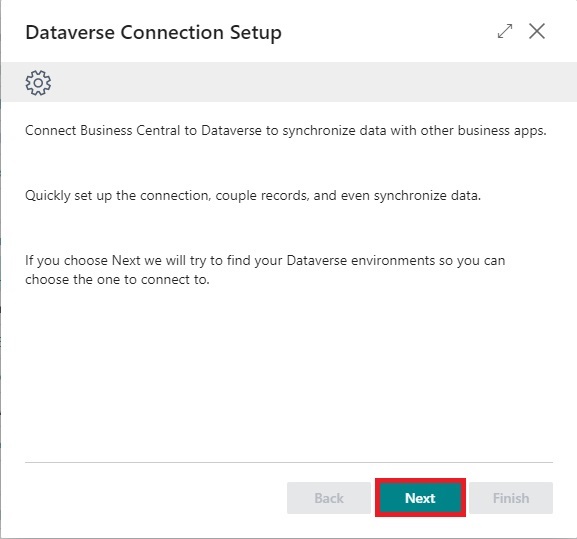
Click Next to Start configuring Dataverse & Business Central connection.

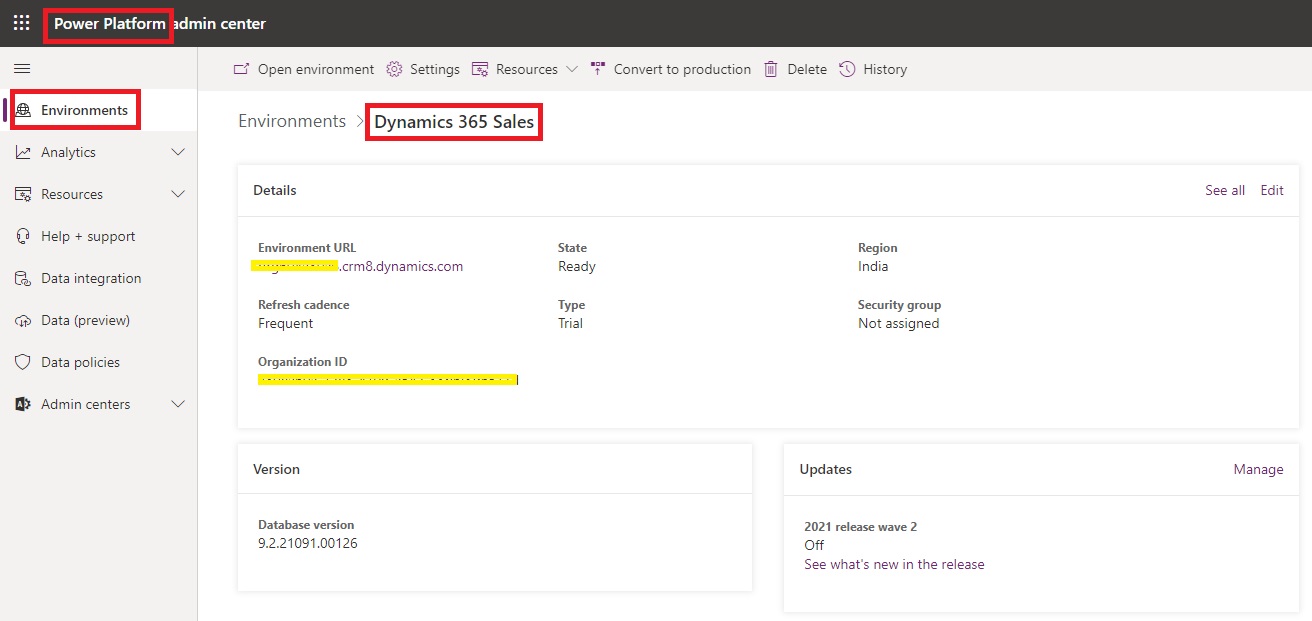
Here you can select your Dataverse Environment or can enter manually, above screen shows where you can find this url from.
Sign in with an administrator user account and give consent to the application that will be used to connect to Dataverse.
Choose Sign in with administrator user.
After Sign in with administrator user turns green and bold, choose Next.

Select Ownership and Click Next.

Click on Finish to complete the Setup.
Next open the Dataverse Connection Setup from TellMe.

Select from Connection -> Test Connection

You can check Microsoft docs for more information
Connect to Microsoft Dataverse
If all are OK it should show the Connection test Successful message.
Now you are good to proceed with Next Step.
You can jump to Next Step from here.

Integration in Business Central with Dataverse/ Common Data Services/ Dynamics 365 Sales/ Power Apps
In this post I will discuss about how we can Synchronize data to Custom Tables using Dataverse.
This post is divided in series of small posts, one post for each involved step.
You follow each post link in sequence and at end we will achieve the final Goal set in starting of this post.
This post will walkthrough setting up an integration between a Custom table Prospects in Business Central and a Custom table Prospects in Microsoft Dataverse.
One thing important keep in mind while doing all the steps we need to use the Admin login you used to setup these environments.
Also, the Base Currency of Business Central & Dataverse Environment should be same else you will run into issue.
If the currencies of Business Central and Dataverse do not match, similar message will be displayed.
LCY Code XXX does not match ISO Currency Code XXX of the Dataverse base currency.
The Base Currency defined for Dataverse after setup is not possible to change however you can match it in Business Central by changing LCY Code in General Ledger Setup.
Let’s start with introduction to environment we are going to use, throughout the process and steps described below.
Introduction to Environment:
Before we start with the Steps Involved, let me introduce with the environment which I am going to use in this walkthrough.
Business Central Environment:

Dynamics 365 Sale Environment:
Setup required to Connect with external system:
You can find below options in Business Central Assisted Setup.

The following are the Steps we will follow:
- Setup a connection to Dataverse
- Setup a connection to Dynamics 365 Sales
- Create New Table(s) and Page(s) in Business Central
- Create New Table(s) in Dataverse
- Using AL Table Proxy Generator Tool to create Integration Table(s)
- Create Integration Codeunit
- Create Actions on the Page for managing Coupling and Synchronization
- Package & Deploy the Extension
- Updating the default Mappings
- Check Permissions
- Testing the Solution
Follow each step above in same sequence.
For more detailed insight refer to below Microsoft Documents:
Customizing an Integration with Microsoft Dataverse
Scheduling a Synchronization between Business Central and Dataverse
Hope you enjoyed the learning by example. Wait for next post, will be back soon.
See you in next post soon with similar kind of stuffs.
Till then keep Exploring, learning and sharing with others.
Microsoft Power BI – Part X
Continuing from my previous post. Today we will downloading the dataset into Excel from Power BI Online for analysis.
In case you have missed my previous posts here I present the link to all previous posts below.
Introduction to Power BI and Creating Report from Excel Data, Local Files.
Microsoft Power BI – Part – II
Introduction to few Features of Power BI
Microsoft Power BI – Part – III
Power BI Desktop, Creating Dataset & Reports from In Premise Database installation
Microsoft Power BI – Part – IV
Power BI Gateway usage
Scheduling Refresh of Dataset & Report created using In Premise Database
Microsoft Power BI – Part – VI
Power BI Content Pack
Microsoft Power BI – Part – VII
Power BI Mobile App
Microsoft Power BI – Part – VIII
Power BI Content Pack
Microsoft Power BI – Part – IX
Power BI Publisher for Excel
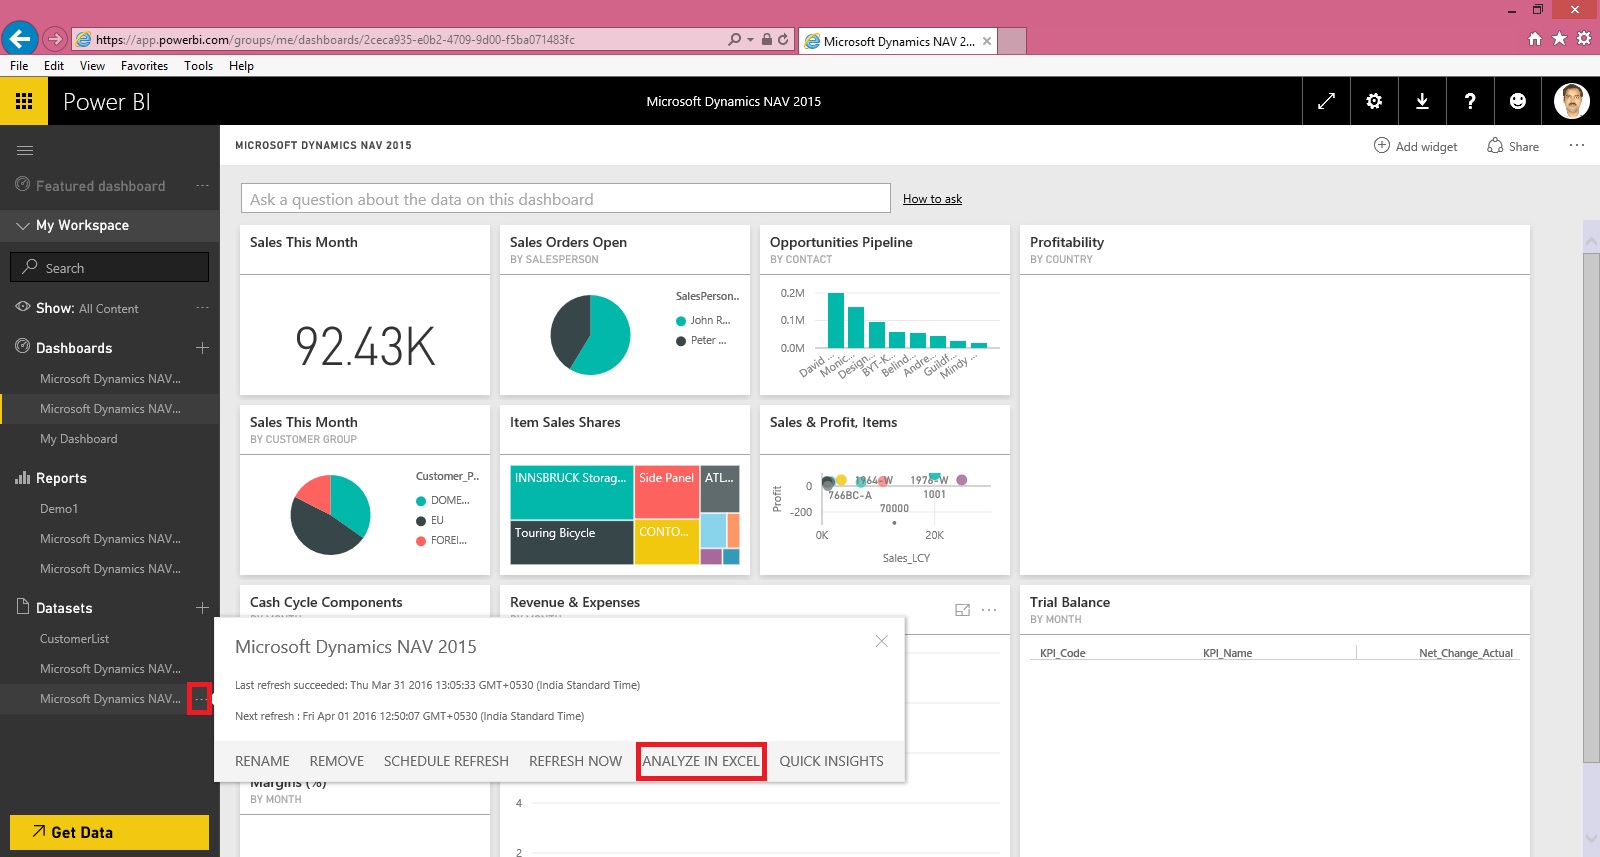
Login to Power BI using your credentials.

Select the Dataset which you wish to analyse, click the three dots on right and from appearing menu choose ANALYZE IN EXCEL.
You will be prompted for Analyse in Excel (preview). If you are running first time please install it.
At the same time you will be prompted for (.odc) MS Office Data Connection file to save/open.
Save and then open the File in Excel.

On opening the file you will be prompted for security concern Enable to allow it.

You will be able to see Pivot Table Fields, containing all of the Tables available in the Dataset.

Now you can play with your data to analyse and create Pivot, Charts and share with others or you can Pin back your result to Power BI Dashboards using concept we used in our previous post.
That’s all for today, I will come up with more features in my future posts.
Till then keep practicing & Learning.
Configuring SSL to Secure the Connection to Microsoft Dynamics NAV Web Client
It is always recommend that you secure Microsoft Dynamics NAV data that is transmitted over the Internet by enabling Secure Sockets Layer (SSL) on the connection to Microsoft Dynamics NAV Web client.
Enabling SSL on a website requires that an SSL certificate is installed on the web server. An SSL certificate is a small file that the web server uses to prove its identity and establish a trusted connection with the browser that is trying to access Microsoft Dynamics NAV Web client.
When a browser connects to the Microsoft Dynamics NAV Web client, the web server replies by sending its certificate to the browser. This certificate contains the web server’s public encryption key and the name of the authority that granted the certificate. The browser verifies the certificate using the authority’s public key.
Note You can configure SSL for the Microsoft Dynamics NAV Web client when you install the Microsoft Dynamics NAV Web Server components.
Obtaining an SSL Certificate
In a production environment, you should obtain an SSL certificate from a certification authority. Some large organizations may have their own certification authorities, and other organizations can request a certificate from a third-party organization. In a test environment or development environment, you can create your own self-signed certificate.
To create a self-signed SSL certificate
Open Internet Information Services (IIS) Manager, on the Start menu, choose Administrative Tools, and then choose Internet Information Service (IIS) Manager.

- In the Connections pane, choose the top-level node for the server.
- On the Home page, under IIS, choose Server Certificates, and then in the Actions pane, choose Open Feature.

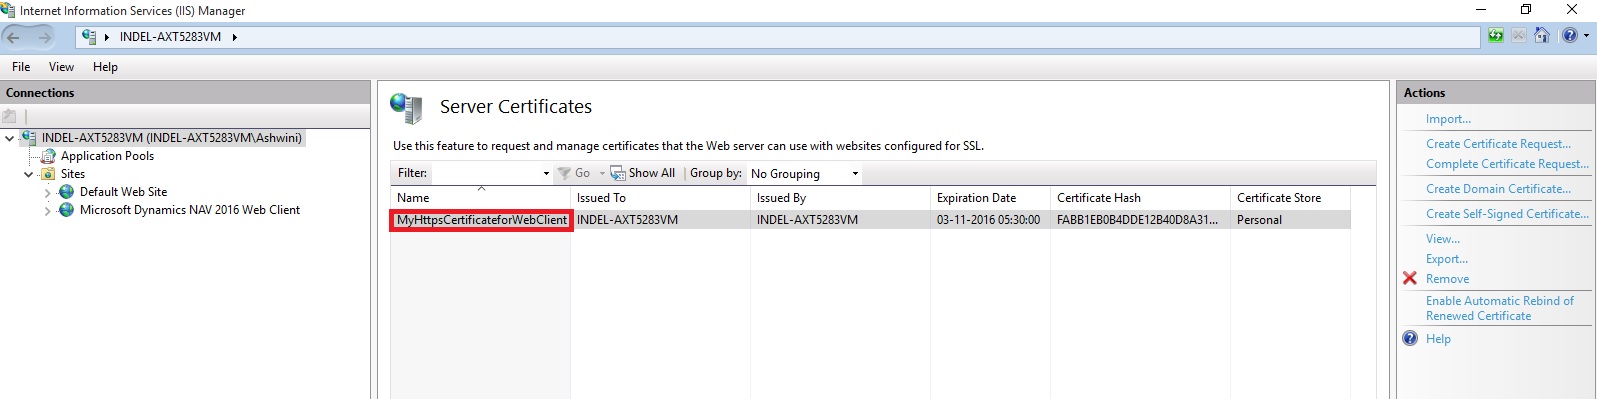
- On the Server Certificates page, choose Create Self-Signed Certificate.
- In the Specify Friendly Name dialog box, type a brief name for the certificate, and then choose the OK button.

The new certificate appears on the Server Certificate page.
Adding an HTTPS Binding That Uses the Certificate on the Microsoft Dynamics NAV Web Client Site
After you get the certificate, you add a binding to the https protocol on the website. When you add the binding, you associate it with the certificate.
To add an https binding with the certificate to the website
- Open Internet Information Services (IIS) Manager.
- In the Connections pane, expand the Sites node, and then choose the Microsoft Dynamics NAV Web client site to which you want to add the binding.
By default, the site has the name Microsoft Dynamics NAV 2016 Web Client.
- In the Actions pane, choose Bindings.

- In the Site Bindings dialog box, choose Add.
- In the Add Site Binding dialog box, set the Type field to https.

You can use the default port 443 or change it to another port. If you change it to another port, you will have to provide the port number in the URL when you try to open the client.
- Set the SSL certificate field to the certificate that you obtained or created for the site.
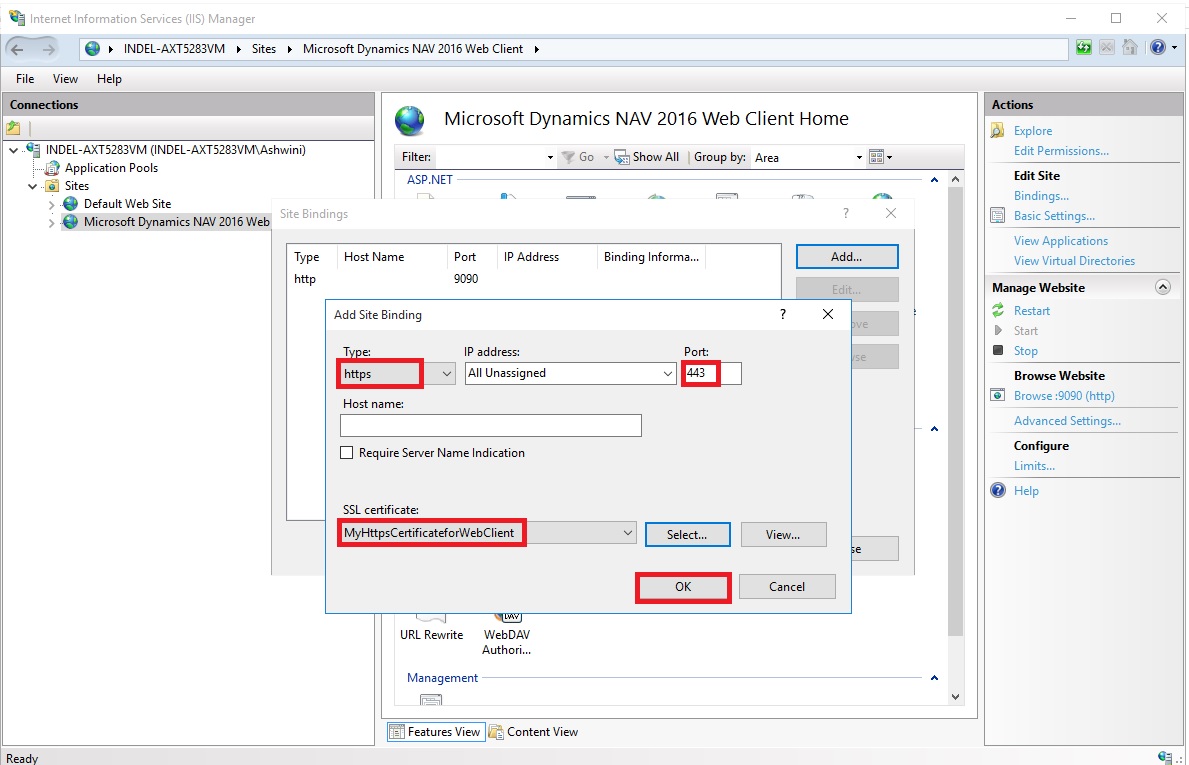
- Choose the OK button, and then choose the Close button.
Redirecting HTTP to HTTPS (Optional)
To ensure that users always access the site that is secured with SSL, you can automatically redirect HTTP requests to HTTPS. This means that users do not have to explicitly include https in the URL in the browser.
For example, the nonsecure URL of the Microsoft Dynamics NAV Web client could be
The secure URL could be
If a user types
the browser automatically redirects to
There are different ways to redirect HTTP requests to HTTPS.
The following procedure describes how to redirect HTTP requests to HTTPS by installing the Microsoft Application Request Routing for IIS 7 and modifying the web.config file for the Microsoft Dynamics NAV Web client.
To redirect HTTP to HTTPS
- Download and install Microsoft Application Request Routing for IIS. You can use one of the following links:
- On the computer that is running Microsoft Dynamics NAV Web Server components, open the web.config file for the web server instance for Microsoft Dynamics NAV Web client. Use a text editor, such as Notepad.
The web.config file is located in the physical path of the web application on IIS. By default, the path is
%systemroot%\inetpub\wwwroot\[VirtualDirectoryName]\WebClient.
For example, the folder for the default Microsoft Dynamics NAV Web client application is
%systemroot%\inetpub\wwwroot\DynamicsNAV90\WebClient.
- In the <system.webServer> element, add the following elements.
<rewrite>
<rules>
<rule name=”Redirect to HTTPS”>
<match url=”(.*)” />
<conditions>
<add input=”{HTTPS}” pattern=”off” ignoreCase=”true” />
</conditions>
<action type=”Redirect” url=”https://{SERVER_NAME}/{R:1}” redirectType=”SeeOther” />
</rule>
</rules>
</rewrite>
- Save the web.config file.
Adding more tables to the Data Model using Existing Connection – In PowerPivot
For Introduction please see PowerPivot for Excel
Recall from my earlier post we have created a connection to SQL Navision Database in my previous post.
PowerPivot Creating a Data Model in Excel 2013
I will be modifying same connection to include more tables to the Data model.

Click on PowerPivot-> Manage.
From the PowerPivot Sheet click on Existing Connections.
This will open Connection Window Listing all available connection to PowerPivot for this Sheet.
Double Click the Connection in my case Nav2015DB_SQL_Connection.

Select first option as we used in previous post and then Next for next Step.

Select Item & Item Ledger Entry Tables and then Finish to import Data to the Sheet.

On Success Click Close to return to Data Model Sheets.

You will find two new sheets have been added to PowerPivot Sheet.
I will come up with more option on this topic in my next post, till then start practicing and stay tuned for more details & Updates on this topic.
Enable SOAP Services and identify connection parameters
Jet express calls Web Services (SOAP) when running reports or accessing information from
Microsoft Dynamics NAV 2015. Using the Microsoft Dynamics NAV Server Administration Tool select the instance that you want to use and check the box next to Enable SOAP Services.
If Jet Express will be used outside a secure network then SSL should be enabled for the SOAP Services to help provide security and data integrity for data communications.

From the Microsoft Dynamics NAV Server Administration Tool record the
- Credential Type
- Server Name
- Instance (note: for performance reasons, it is strongly recommended that a separate instance be created solely for use by Jet Express)
- SOAP Services Port
- Whether SSL is enabled for SOAP Services
This information is required for configuring your data source connection in Jet Express on client machines.
Note – You cannot run both Jet Express and Jet Essentials on the same computer.
Checkout Upcoming posts for more information.
How to: Test the ADCS Connection
The following procedure demonstrates how to use Windows Services and Telnet to test your Automated Data Capture System connection.
Before you can begin, you must install the ADCS component as part of a customized installation of Microsoft Dynamics NAV. For more information, see my earlier post Installing ADCS
To configure and start the Microsoft Dynamics NAV VT100 Plugin service
From the Windows Start menu, in the Start Search box, enter services.msc, and then press the Enter key. The Services window opens.
Right-click the Microsoft Dynamics NAV VT100Plugin service, and then choose Properties.
To specify the user account that the service can use to log on, choose the Log On tab.

To specify an account, choose This account, choose Browse, and then specify a user account in the Select User dialog box. When you are finished, choose the OK button. The format is as follows:
<Domain>\<Windows User ID>
Note: To complete testing, you must also add the same user to Microsoft Dynamics NAV, with an appropriate permission set.
Type the password for the user account in Password and in Confirm password, and then choose the OK button.
On the General tab, choose Start.
To verify that the service is running
Start the Windows Event Viewer. From the Windows Start menu, in the Start Search box, enter eventvwr.msc, and then press the Enter key.
In the Windows Logs console tree, choose Application, and then locate event information for the Microsoft Dynamics NAV VT100 Plugin.

Testing Your Connection
In the following procedure, you will open a terminal connection and use HyperTerminal to simulate using handheld devices. HyperTerminal is a program that you can use to connect to other computers, Telnet sites, bulletin board systems (BBSs), online services, and host computers. HyperTerminal connections are made using a modem, a null modem cable (used to emulate modem communication), or an Ethernet connection.
Note: HyperTerminal is no longer included with Windows. You can usually find a free downloadable version on the Internet.
To test your ADCS connection
Start your HyperTerminal application.
Enter a name for the connection. Choose the OK button.
In the Connect Using list, select TCP/IP (Winsock).
The following table describes the details of a local installation on one machine.
| Detail | Description | Example |
| Host Address | IP address of the machine that is running the VT100 Plug-in service. | localhost |
| Port Number | Port number that the VT100 Plug-in is listening on. | 6666 |
Choose the OK button. The HyperTerminal window opens.

Enter a user ID and password. Press Enter after every step.

Select a warehouse activity option. For example, enter 1 in the Choose field if you want to simulate working with pick documents.
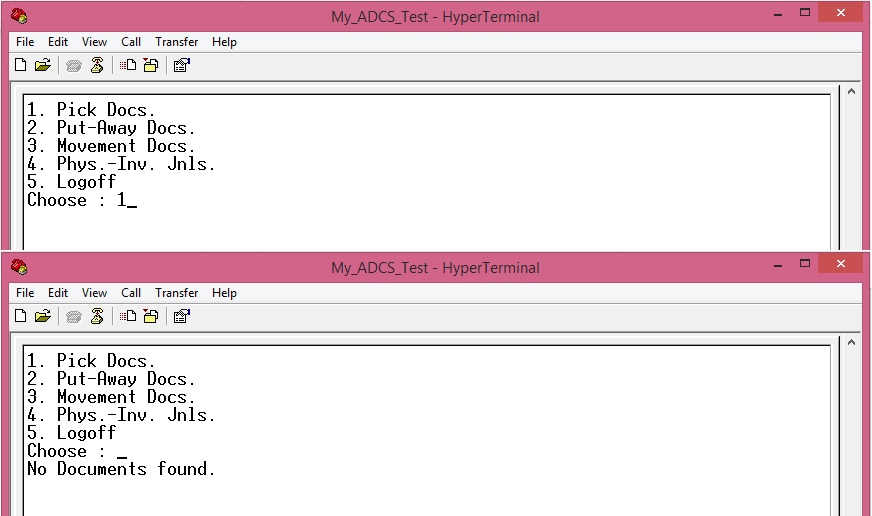
You can review the data about warehouse picks in Microsoft Dynamics NAV. For example, you can use the data in the CRONUS International Ltd. demonstration database to send information from and to Microsoft Dynamics NAV.
Note: To see the interaction between Microsoft Dynamics NAV and ADCS, in CRONUS International Ltd., you can use warehouse activities that are located in the White warehouse. It is preconfigured to use ADCS.

You must be logged in to post a comment.