
Category: Tip & Tricks
Migration from BC-14 (On-Prem) to BC-21 (SAAS)
Business Central – Basics

Integrating with Business Central – using Web Service
This is fourth post in this series, if you wish to see first post, you can access here.
In second post I discussed about, how to create Azure Functions, you can access here.
In previous post I discussed about, how to Integrate Azure Functions in Business Central, you can access here.
In this post we will discuss how to make available QR Image using API by exposing as Web Service.
Let’s cut the theoretical part and coming directly to the solution.
This post is very short and as an answer to query from one of the blog readers, who regularly gives feedback and suggest topic he wish from me. Sometime it is not possible to write post for every query, but I try to pick some which I find interesting. Converting any topic into post is quite time taking, solution can be of 10 mins but presenting same in form of blog takes 2-3 hours, sometimes even more.
Some time appropriate environment is not available where I can put the solution and take screenshots to present as blog.
Since this topic is part of current series, I am writing posts on, so I was able to easily pick this topic.
Requirement is to add capability to get QR Image we generated in our previous posts using Web Service/ API/ OData/ JSON Base64Text.
To get this working we will first create a Codeunit with appropriate methods and expose it as Web Service.
Step – 1.
Create Codeunit & Add below method.

Step – 2
Publish above Codeunit as Web Service.
Step – 3
Copy SOAP URL
[SOAP URL]
Convert to ODataV4 URL by making necessary modification as below:
[ODataV4 URL]
Similarly, your $metadata URL will be:
Run the metadata URL in browser:
Search for your function created above, you should get definition as below:
<Action Name=”QRCodeGenerator_GetQRSetImageAsJSON”>
<Parameter Name=”qRSetId” Type=”Edm.Int32″/>
<ReturnType Type=”Edm.String”/>
</Action>
Let’s test the above URL for function using Postman to see the result:

[POST] – https://api.businesscentral.dynamics.com/v2.0/1e4fc386-962e-4a20-8364-d5aeb65e2485/Test/ODataV4/QRCodeGenerator_GetQRSetImageAsJSON?Company=CRONUS USA, Inc.
Authorization: Basic Auth
Username: ASHWINI.TRIPATHI
Password: xjAtAtTaFhgXkgR4M5WoHapotvJNmqJ5//XBYK2v5s4= (Web Service Access Key)
JSON Parameter to Function: (Body raw:JSON)
{
“qRSetId” : “6”
}
Result Body:
{
“@odata.context”: “https://api.businesscentral.dynamics.com/v2.0/1e4fc386-962e-4a20-8364-d5aeb65e2485/Test/ODataV4/$metadata#Edm.String”,
“value”: “iVBORw0KGgoAAAANSUhEUgAAApQAAAKUAQMAAACAATp/AAAAAXNSR0IArs4c6QAAAARnQU1BAACxjwv8YQUAAAAGUExURQAAAP///6XZn90AAAAJcEhZcwAADsMAAA7DAcdvqGQAAAHtSURBVHja7dpbasMwEAXQ2YH3v0vvwKVBsZ44DZ4UWs58BEnMHH1eYjuO9NqZTCaTyWQymUwmk8lkMplMJpPJZDKZ/8KMsbb27Ls3St+2bmYymUwmM8Ws58N2b+FiXjQzmUwmk3nTLMN1qkPq6LqZyWQymczPmUdTwxVMJpPJZP6G+di0/7lqH5PJZDKZnzOnK7ZzW2tbNzOZTCaTmWIOtbXw9DM3M5lMJpOZYK6rPvSL9huJywkmk8lkMu+Yz0d9tR7HQ7INl9UWJpPJZDITzDIwv39arVbNTCaTyWRmmS0XbZ5Nq64uM47JZDKZzDfMdmrv4W47ZByTyWQymalm7S2rre0tq+eNxRw4JpPJZDITzDhjq8uu9p5udSLBZDKZTGae+UyxKd4GqWbc3MxkMplMZpZ5EXSdVPuYTCaTyUw12/kh1Dq4rVcZx2QymUzmG+aqinmcU12etdceTCaTyWSmmDHWkHaDNJ8xmUwmk5li1vM6GjFfu60nmEwmk8nMMuvUFGV7zPWjjGMymUwm87ZZt/Pqcc/wXJDJZDKZzE+apSXOV1TRf9HHZDKZTGaiub4i+ijb+48iDiaTyWQyM82h2rZYRFmsYpDJZDKZzHtmVjGZTCaTyWQymUwmk8lkMplMJpPJZDL/rHnsXwW1n/zFqtyZAAAAAElFTkSuQmCC”
}
Copy the Value and use any base64 – image converter tool, search on Google
You will get your QR Image:

Don’t try any URL or Passwords in this post as same is modified, and in images covered to hide actual url & passwords.
Hope you enjoyed learning from this post.
That’s all for this post, but visit again to learn from upcoming posts in this series, will post soon.
See you again in next post, till then keep exploring, learning and sharing with others.

Integrating Azure Function with Business Central
This is third post in this series, if you wish to see first post, you can access here.
In previous post I discussed about first part, how to create Azure Functions, you can access here.
Today in this post I will discuss about second part, how to Integrate previously created Azure Functions in Business Central.
From previous post remember:
On completion you will get the Live AZURE URL, use the URL in same way as for local, to pass parameter append at the end of URL as (?ReqData=Test)
Replace [Test] with the information for which you want to generate the QR Code.
Let’s start with Business Central side customization required, here I am presenting partial design for learning purpose, if you need full functional setup-based configuration for generating QR Code integrated with your system, I have the solution ready, you can connect with me for complete solution for your business. Actual solution has much more capability than what is presented here.
First, we will design a table to store all generated QR Code & assign an QR Set Id, which you can add in your other tables, just like Dim Set Id.
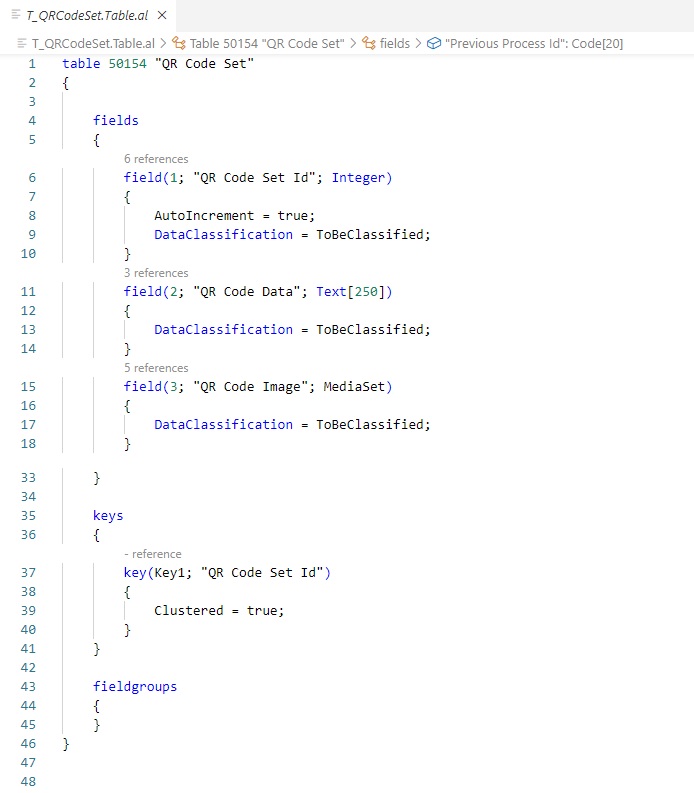
Only bare minimum code is included just to give idea about how we can integrate Azure Functions to Generate QR Code in Business Central.
Next, we will design page for this table.

Next, we will design page to display QR Set Image generated for QR Code Data.
QR Code Data is text created with information for which QR Code need to be generated.

Next, we will create a function which will generate QR Image using Azure function we created in previous post.
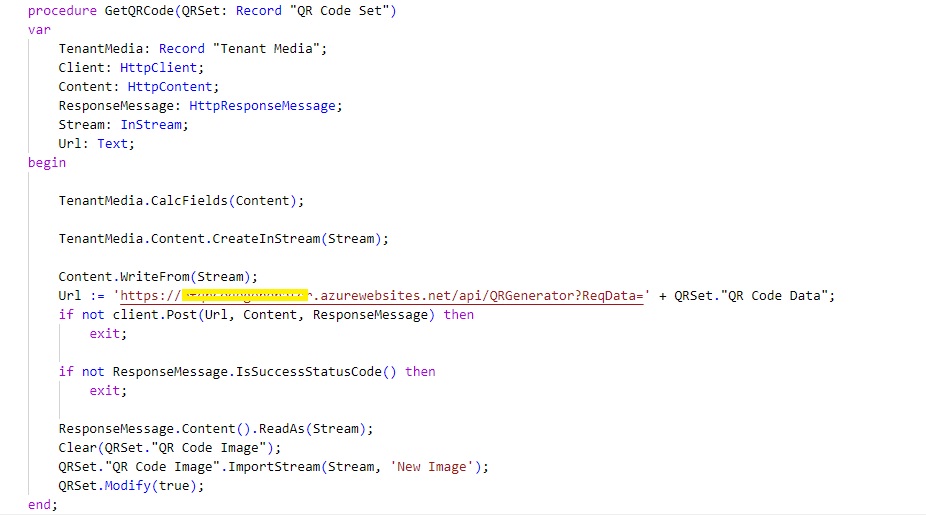
You can create a codeunit and add your function to generate QR Code Image as above. Replace Url with exact you obtained in previous post after deploying your function.
You need to write one more function which create a new record in your table and populate QR Code Data value with the information you wish to generate QR Image for.
Once your QR Code Set Record is ready call this function to Generate QR Code Image for you, based on information you created in QR Code Data.
For Example, add this procedure to any table where you wish to Generate QR Code.
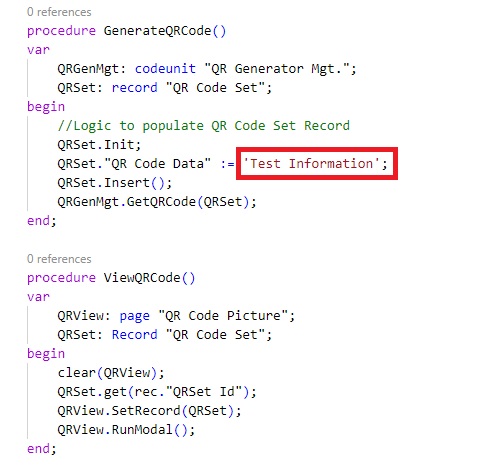
You need to implement your logic for generating QR Code Data, for example you wish to Generate QR Code for Item with information like [ItemNo|Description]
You can populate QR Code data as:
QRSet.”QR Code Data” := Rec.”No.” + ‘|’ + Rec.Description;
Don’t forget to add one field to this table as “QRSet Id” and assign the “QRSet Id” as QRSet.”QR Code Set Id” in above procedure GenerateQRCode after QRSet is Inserted.
Your QR Image will be generated with this information, when you scan you QR Image you will get information that you passed as parameter to “QR Code Data”.
Similarly, you can add below actions to your respective page for above table:

Now build and publish your extension.
Open the page where you added the Action, first call Generate QR Code, this will populate the QR Code Set with the information as per your logic, Get the QR Image from the Azure function and save it into your table QR Code Set. Next you call View QR Code, this will fetch the QR Image from the table and display on screen.
Hope you enjoyed learning from this post.
That’s all for this post, but visit again to learn from upcoming posts in this series, will post soon.
See you again in next post, till then keep exploring, learning and sharing with others.
Creating Azure Functions to generate QR Code
This is second post in this series, if you wish to see previous post, you can access here.
Today in this post I will discuss about first part, how to create Azure Functions.
Before we start, you need some installation to support creating Azure Functions. Use below Links to download & install these packages on the system, where you wish to write, compile & test the Azure functions.
Installation Links:
https://docs.npmjs.com/downloading-and-installing-node-js-and-npm
https://nodejs.org/en/download/
https://dotnet.microsoft.com/download/dotnet/thank-you/sdk-3.1.414-windows-x64-installer
Obviously, you must have an active Azure subscription, to create an Azure Functions App. If you don’t have, you can create an account that gives you a credit to explore Microsoft Azure for 30 days.
Head to Azure portal and sign in with your account.

Create New Function App.

Select your Azure subscription and a resource group or create a new one. Provide a name for your function app. This name will be the prefix for the URL.

You can select the .NET Core runtime and the region that matches your location. Select the Review + create button.
Now, you can create new functions. A function app can contain multiple functions. Each function will be available on:
Before you start to create Function, you need to Install dependencies:
- You should install Visual Studio Code
- You should also install Node.JS
- Run the following command to install the Core Tools package:
npm install -g azure-functions-core-tools@3 –unsafe-perm true
- Next, install the Azure Functions extension for Visual Studio Code.
- Click on the Azure logo in the Activity Bar. Under Azure: Functions, click Sign in to Azure… and follow the on-screen instructions.
Create an Azure Functions project
Click the Create New Project… icon in the Azure: Functions panel.

You will be prompted to choose a directory for your app. Choose an empty directory.

You will then be prompted to select a language for your project. Choose dotnet.


Create a function
If you skipped to provide details, for Functions in above process, you can still initiate later.
Click the Create Function… icon in the Azure: Functions panel.

You will be prompted to choose a template for your function. Select HTTP trigger for getting started.
Screens will be same as shown in above process.
Sample project will be created
As per the information provided by you, in above screens.
KSDQRGenerator.cs auto generated file code will be as below:
using System;
using System.IO;
using System.Threading.Tasks;
using Microsoft.AspNetCore.Mvc;
using Microsoft.Azure.WebJobs;
using Microsoft.Azure.WebJobs.Extensions.Http;
using Microsoft.AspNetCore.Http;
using Microsoft.Extensions.Logging;
using Newtonsoft.Json;

namespace Company.Function
{
    public static class KSDQRGenerator
    {
        [FunctionName("KSDQRGenerator")]
        public static async Task<IActionResult> Run(
            [HttpTrigger(AuthorizationLevel.Anonymous, "get", "post", Route = null)] HttpRequest req,
            ILogger log)
        {
            log.LogInformation("C# HTTP trigger function processed a request.");

            string name = req.Query["name"];

            string requestBody = await new StreamReader(req.Body).ReadToEndAsync();
            dynamic data = JsonConvert.DeserializeObject(requestBody);
            name = name ?? data?.name;

            string responseMessage = string.IsNullOrEmpty(name)
                ? "This HTTP triggered function executed successfully. Pass a name in the query string or in the request body for a personalized response."
                : $"Hello, {name}. This HTTP triggered function executed successfully.";

            return new OkObjectResult(responseMessage);
        }
    }
}

Now you have the Http Template, we will make necessary changes as per our requirement.
In this example we will be using a library – QRCoder to generate the QR Code.
So first we have created a function with Http Trigger.
Made changes to the function as:
/*string name = req.Query["name"];

            string requestBody = await new StreamReader(req.Body).ReadToEndAsync();
            dynamic data = JsonConvert.DeserializeObject(requestBody);
            name = name ?? data?.name;

            string responseMessage = string.IsNullOrEmpty(name)
                ? "This HTTP triggered function executed successfully. Pass a name in the query string or in the request body for a personalized response."
                : $"Hello, {name}. This HTTP triggered function executed successfully.";

            return new OkObjectResult(responseMessage);*/
Replace this part as below code:
            string ReqData = req.Query["ReqData"];

            string requestBody = await new StreamReader(req.Body).ReadToEndAsync();
            dynamic data = JsonConvert.DeserializeObject(requestBody);
            ReqData = ReqData ?? data?.url;
            if (string.IsNullOrEmpty(ReqData))
            {
                return new BadRequestResult();
            }

            var generator = ReqData;
            var payload = generator.ToString();

            using (var qrGenerator = new QRCodeGenerator())
            {
                var qrCodeData = qrGenerator.CreateQrCode(payload, QRCodeGenerator.ECCLevel.Q);
                var qrCode = new PngByteQRCode(qrCodeData);
                var qrCodeAsPng = qrCode.GetGraphic(20);
                return new FileContentResult(qrCodeAsPng, "image/png");
            }
Final Code should look like this:

There are some errors, correct. Next step will resolve the same.
Next, we will add the QRCode nuget package to the dotnet core project using
dotnet add package QRCoder –version 1.4.1


Post completing the command execution, all errors are resolved.
Run your function project locally
Press F5 to run your function app.
The runtime will output a URL for any HTTP functions, which can be copied and run in your browser’s address bar.

Copy the URL of the function & Switch to browser:
In my case: http://localhost:7071/api/KSDQRGenerator?ReqData=Test

If you scan above QRCode, you will get ‘Test’ as we have passed this as a parameter (?ReqData=Test)
To stop debugging, press Shift + F5.
Deploy your code to Azure
Click the Deploy to Function App… () icon in the Azure: Functions panel.


Sign in to your Azure Account, if not done earlier. To test locally you need not to sign in to Azure. But at deployment is must.
When prompted to select a function app, choose KSDQRCodeGenerator (in my case), Function App Created on Azure portal in the starting of this blog post.


Confirm to deployment dialog.

On completion you will get the Live AZURE URL, use the URL in same way as for local, to pass parameter append at the end of URL as (?ReqData=Test)
Replace [Test] with the information for which you want to generate the QR Code.
That’s all for this post, but visit again to learn from upcoming posts in this series, will post soon.
See you again in next post, Till then keep exploring, learning and sharing with others.

QR Code Generator using Azure Functions & Integration with Business Central Cloud Version
Today in this post I will explain how and why you should consider create your own QR Code programmatically internally without the use of public available options.
Quick Response code, is a code that can be easily read by a device having camera attached. QR Codes are commonly used today across various industries.
In todays word hardly you will find any product which don’t have either Barcode or QR Code.
You may find many free QR Code generators available on the internet. It is very convenient to source and quickly generate QR Codes but using their services have areas of risks and concerns for organization to consider.
The potential security risks such as phishing, malware, Malicious website and data tracking few to list.
Solution to this could be organizations should prefer to find an enterprise paid service or to create their own. If any organization decides to build their own QR Code generator, then there are open-source QR Code libraries where they can rely on.
Now to build a full-fledged application will require to consider for all the typical application infrastructure considerations such as networking, security, monitoring, patching and the list keeps growing. There could be many considerations just to provide a simple service and is it worth? Another big fat questions.
Here comes the Azure Functions.
Microsoft Azure is a cloud computing service that is used for building, testing, deploying, and managing applications.
It provides
- software as a service (SaaS),
- platform as a service (PaaS), and
- infrastructure as a service (IaaS).
Azure Functions runs on the Microsoft Azure platform and is used to run small pieces of code, or functions, in the cloud.
With Azure Functions, you only need to focus on a specific function without worrying on the whole application or the infrastructure to run it. Additionally, Azure Functions lets you run your code in a serverless environment without creating a virtual machine or publish any web application.
For Azure functions, you can use development language of your choice, such as C#, F#, Node.js, or PHP.
Because Microsoft Azure is a service, no doubt you have to pay for it. Azure Functions has two types of pricing plans:
Consumption plan – Microsoft Azure provides all the necessary computational resources. Therefore, you don’t need to concentrate on resource management, and you only pay for the time that your code runs.
App service plan – With the app service plan, you can run your functions as you do other web and API applications on Azure. If you are already using app services for other applications, you can run Azure Functions on the same plan without additional costs.
Check for latest Plan online on Azure portal as and when you decide to use the service, or to grab a free trial account. You can list free services available to you if you have azure account using this link here.
Azure Functions Pricing you can check here and free grant per month.
Above links and further links from there will provide detailed information on everything you may require to go with Azure Functions.

Enough for introduction, what we are going to Explore in this series:
- Creating Azure Functions to generate QR Code & Sample Test of Azure Function
- Integrating Azure Function with Business Central
- Integrating with Business Central – using Web Service
- Testing of Extension functionality for QR Code Generation.
Anything else I decide to add more will update this post with links and other topics related to this series.
Make a book mark to this post, I will update the Links in above list as I complete my next post, and add more topics to the list, I further decide to include in this series.
Go through the above links to educate yourself, so that what I explain in upcoming posts, you better co-relate them.
That’s all for this post, but visit again to learn from upcoming posts in this series, will post soon.
See you again in next post, Till then keep exploring, learning and sharing with others.

Test the Solution Integration of Business Central with Dataverse
This is the Twelfth post in the series. If you want to go to previous post click here.
From the series of steps this post is dedicated to Step-Testing:
As a Eleventh Step we will Verify & Test the Integration between Business Central and Dataverse for Custom table we created in both the environments.
Initial Stage post Deploying the Extension, we access the Pages for first time.
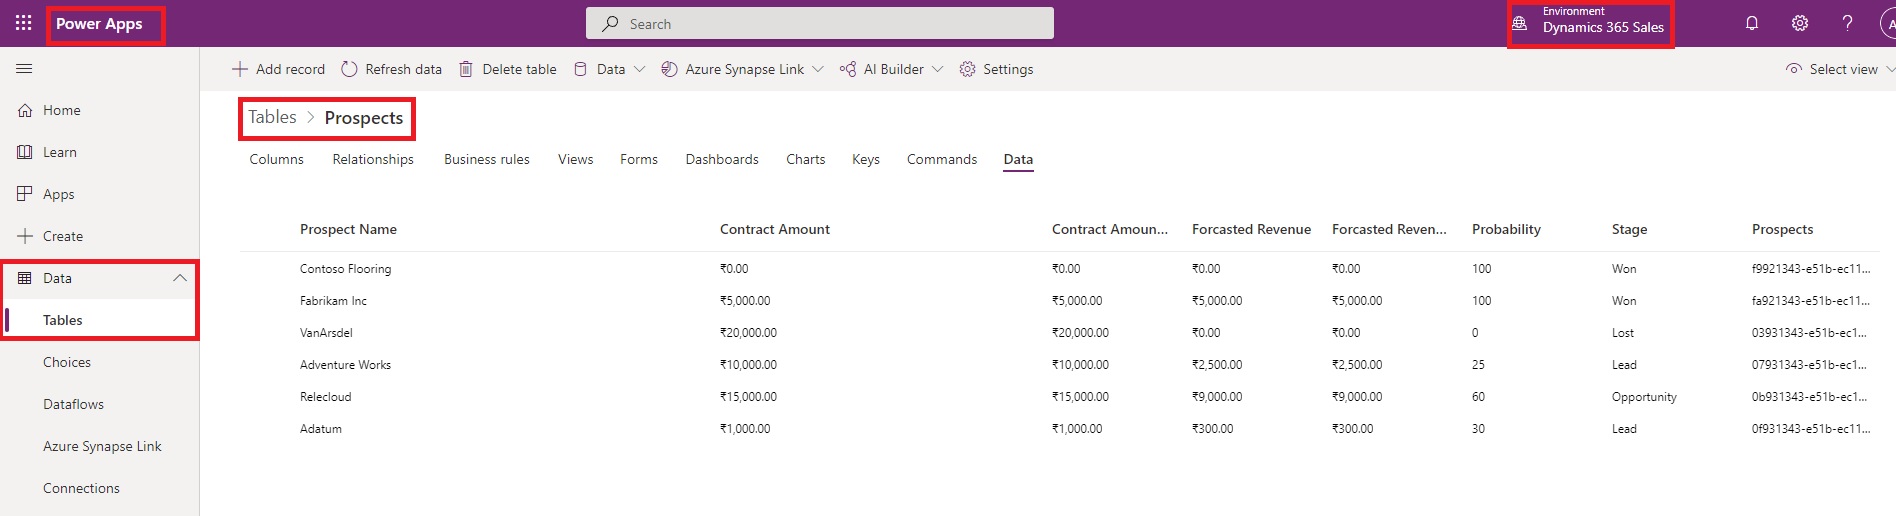
We have below data in Dataverse Prospects table:
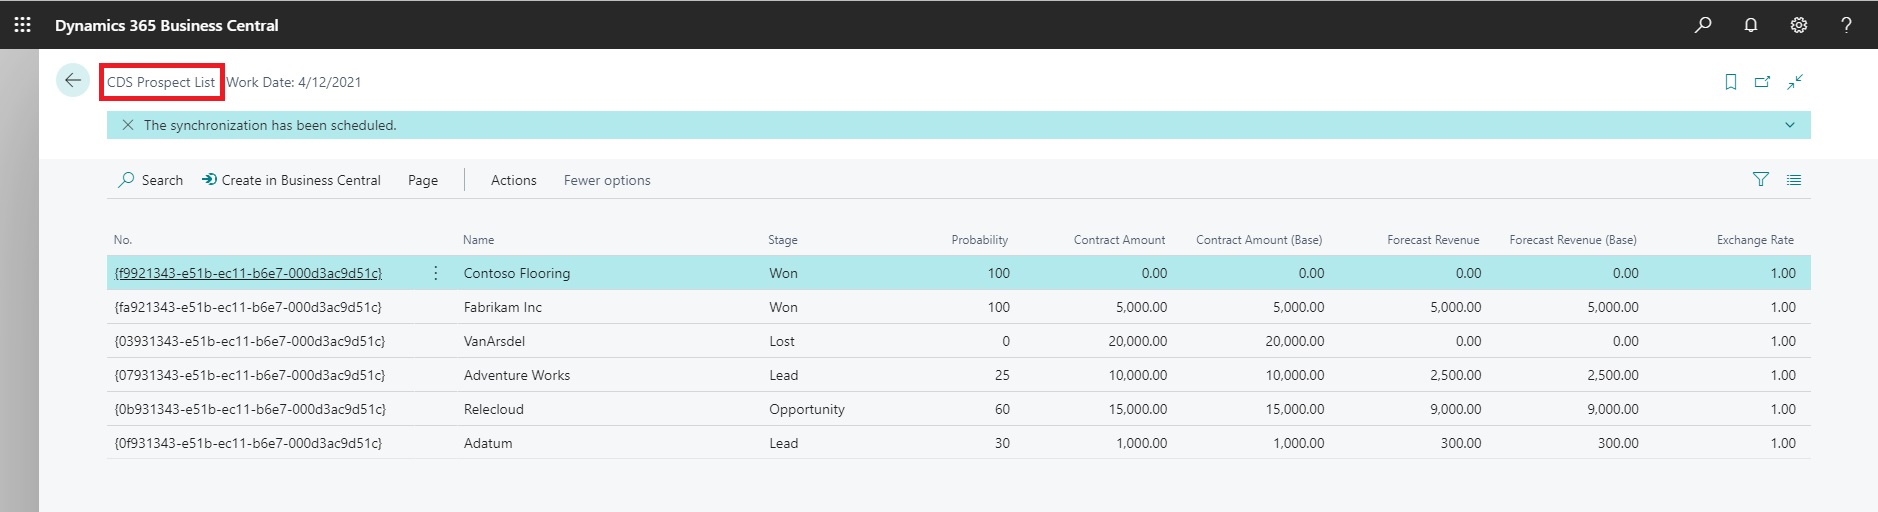
In BC when we access to CDS Prospects Page:
In BC when we access to Prospects Page:

First we will Add one Record in Dataverse:

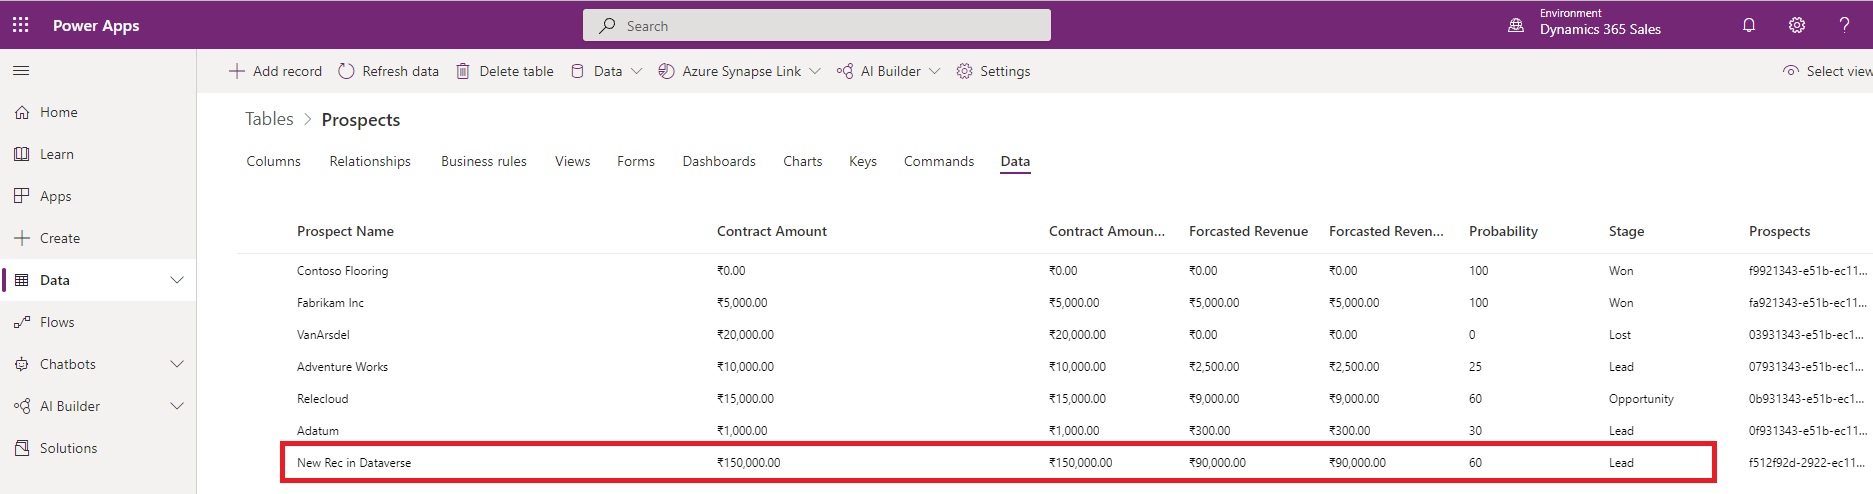
Now if we check CDS Prospects Page:
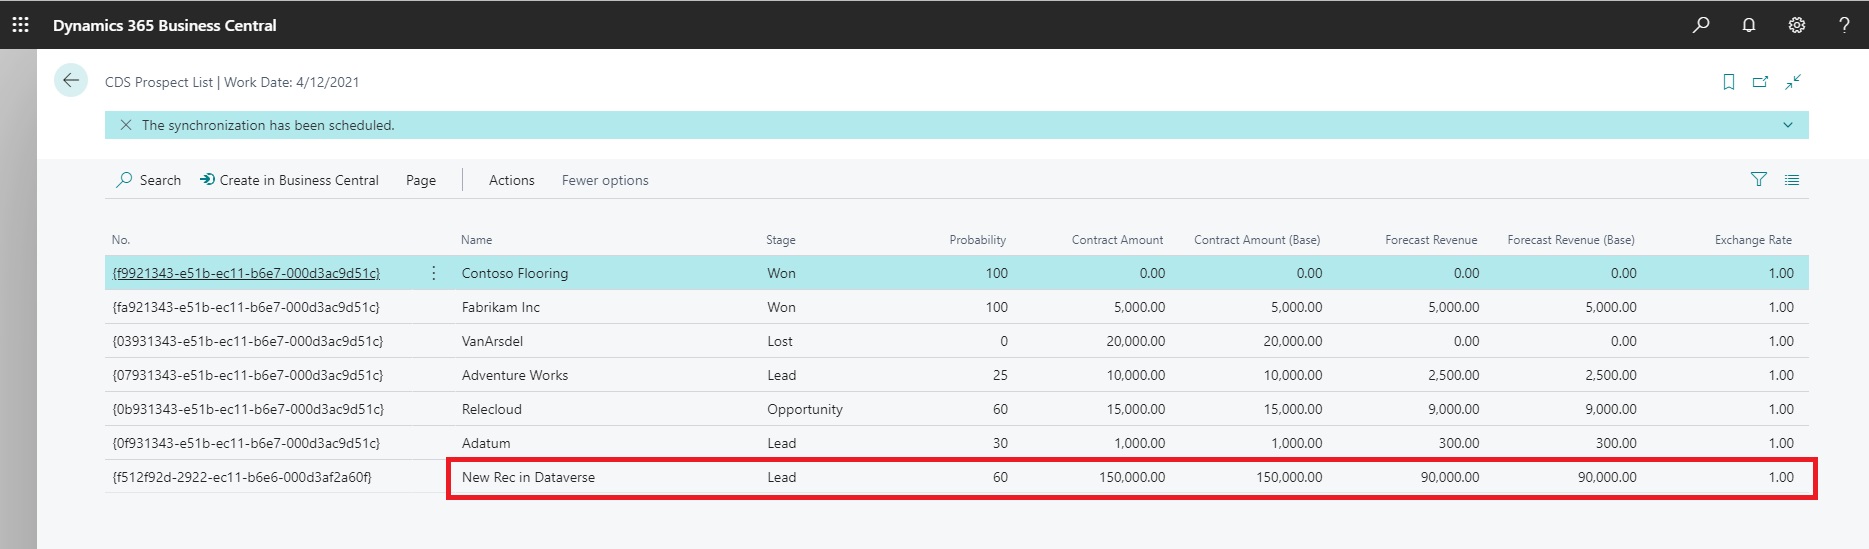
If you remember on CDS Prospects Page we have written code on OnInit trigger to run codeunit – CRM Integration Management, so when page is opened, the data is synchronized to CDS Prospects Page.
On CDS Prospects Page, we have also added action Create in Business Central, if we choose this action:
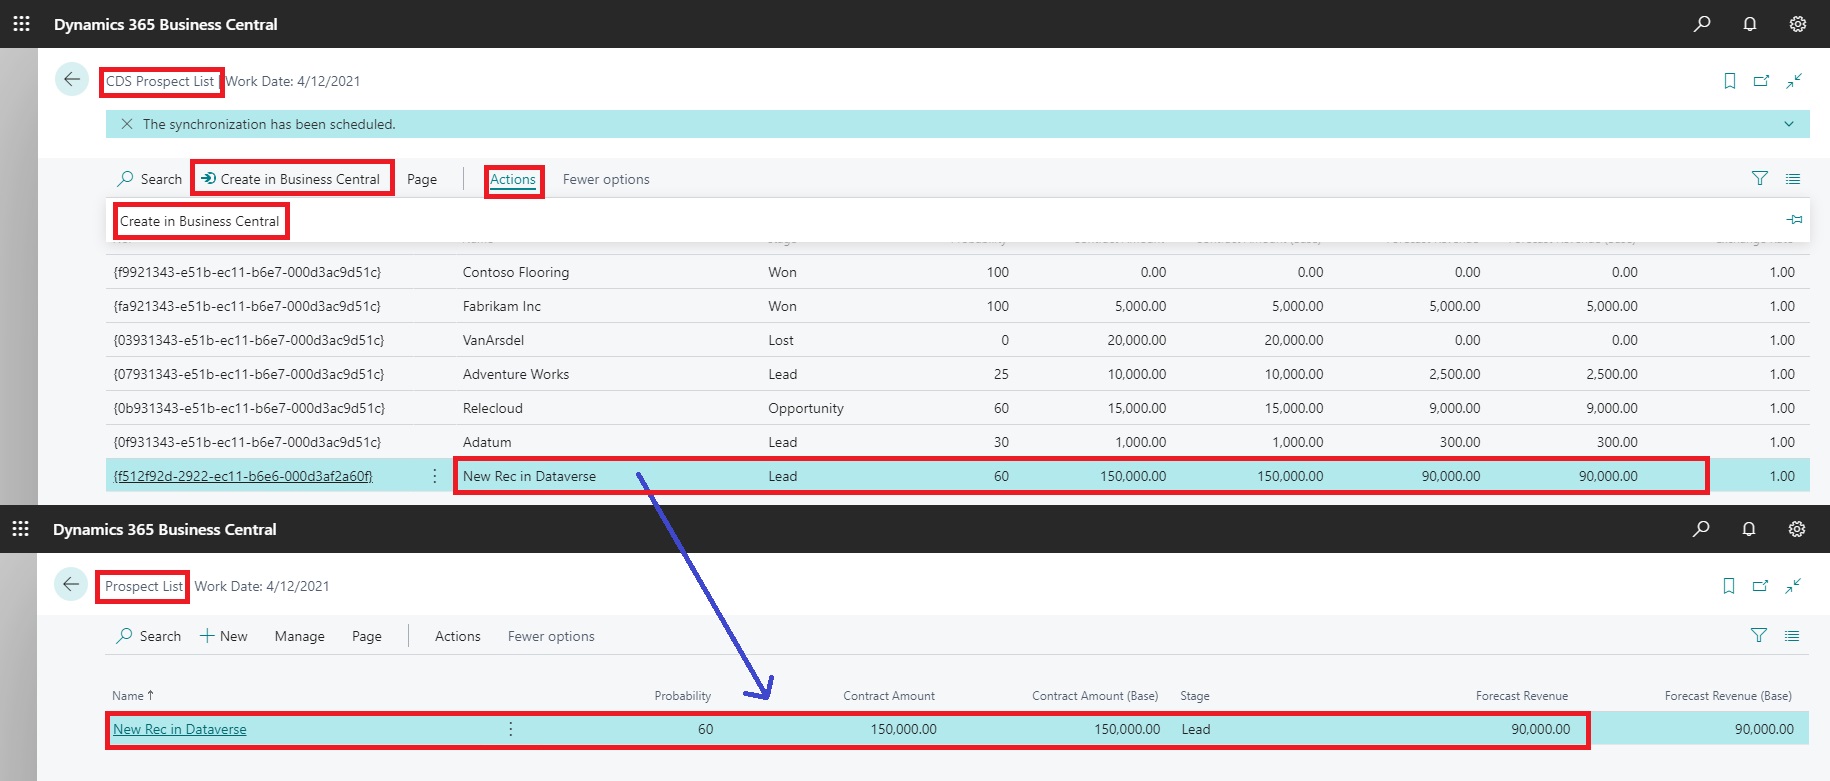
The record in Dataverse will get transferred to Prospect Table in Business Central
Now Let us Add one Record in Business Central, from Prospect Page.
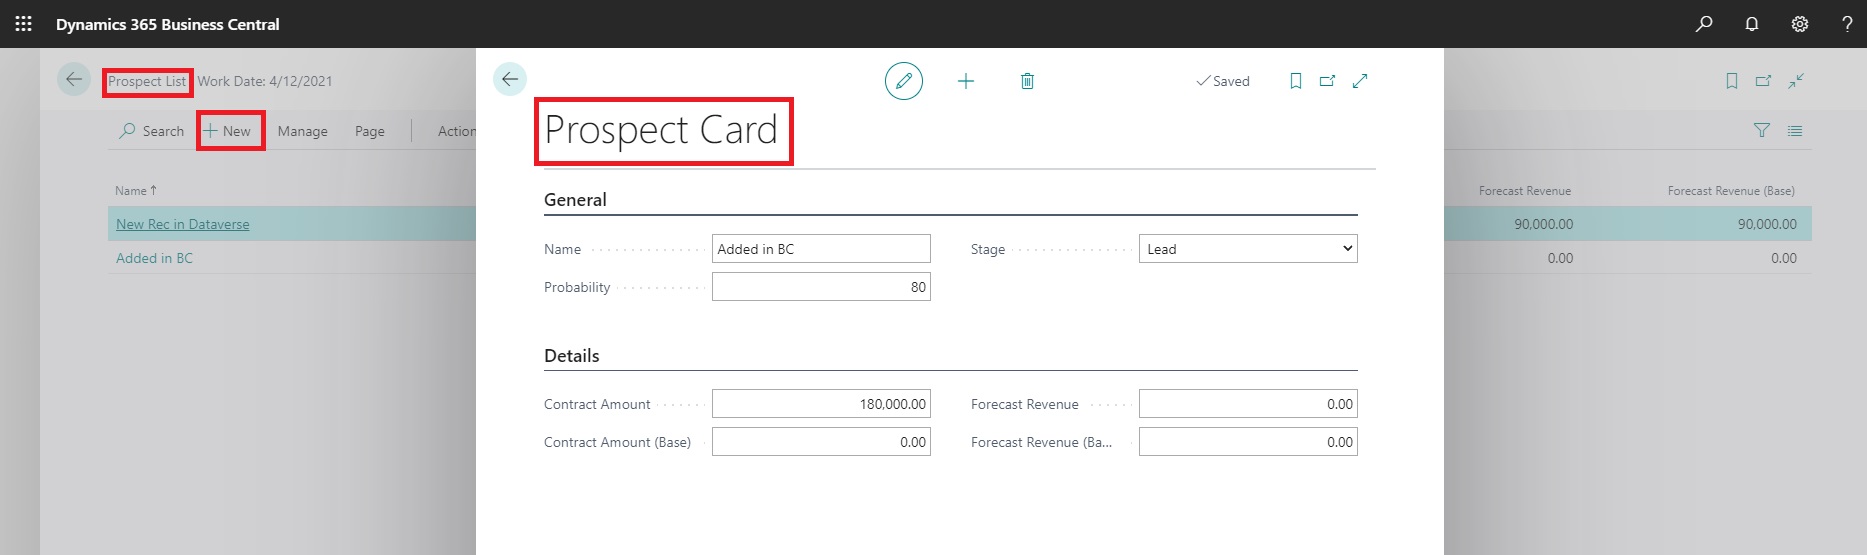
Business logic for calculating Forcast Revenue is not written in BC, but we have in Dataverse table.
When we synchronize data from BC to Dataverse, that will get calculated automatically.
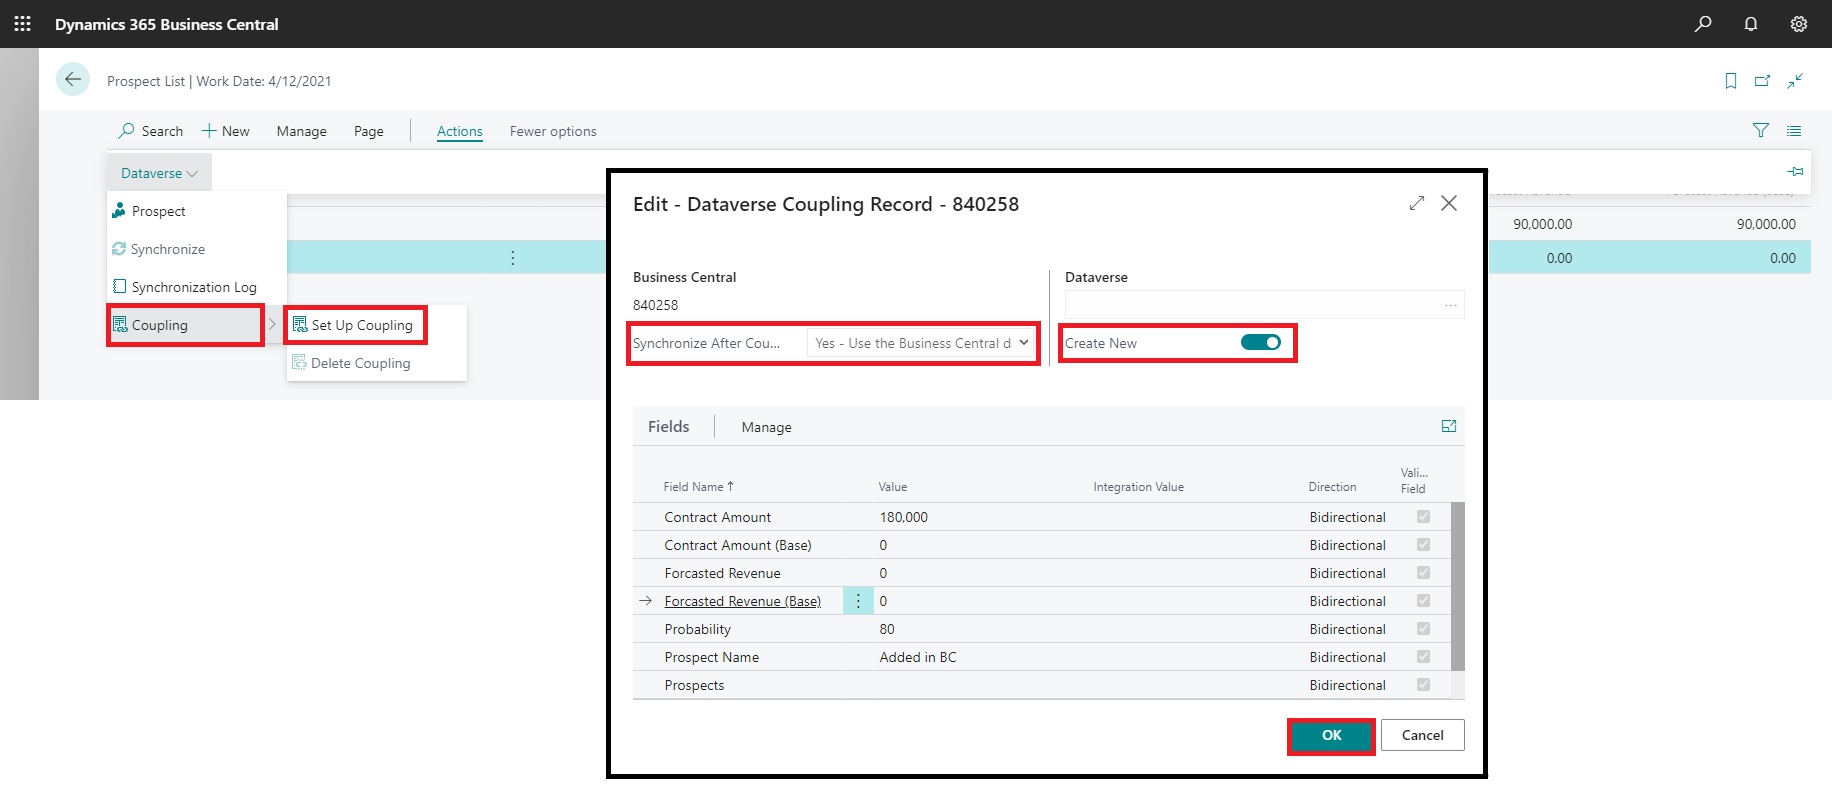
Select the record we just added in BC. Action-> Dataverse-> Coupling-> Setup Coupling
On the new page that opens, Select Create New, And click OK.
Since we have selected Synchronize After Coupling and direction BC to Dataverse, the record will get transferred to Dataverse Table.

Also you can see the other fields too got calculated. Now if we Synchronize back to BC these fields will get updated in BC.
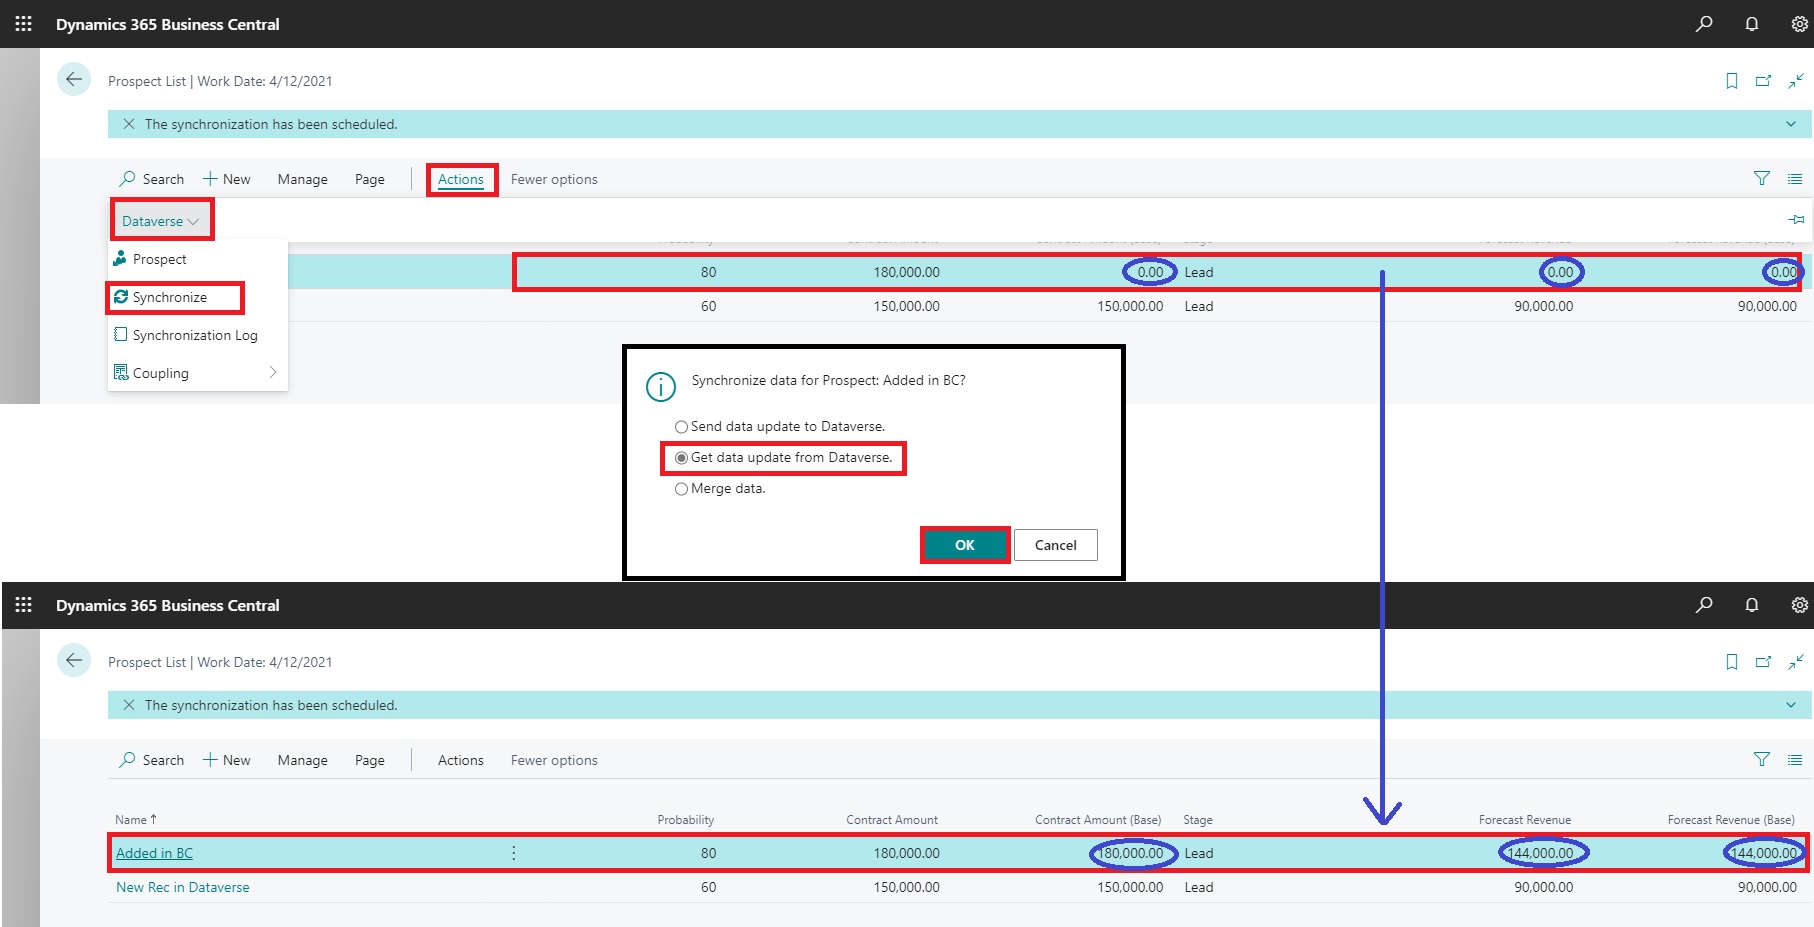
You can see the Synchronization is happening in both directions.
You can make necessary changes to code in sample walkthrough to achieve your desired results.
Hope you enjoyed learning this trick, and will use in your projects, the skill learned from this series of posts.
I will come up with more similar stuffs. Till then keep exploring, learning and sharing with others.
Take care of yourself and your loved ones. Put your mask, maintain safe distance and don’t forget to get vaccinated.
Setup a connection to Dynamics 365 Sales
Integration with Business Central is done through Dataverse, and you will find lots of standard settings and tables that are provided by the integration.
This is the Third post in the series. If you want to go to previous post click here.
From the series of steps this post is dedicated to Step-2:
Before you start make sure you have below information ready with you:
- URL for the Dataverse environment (Dynamics 365 Sales) that you want to connect to
- The user’s name and password of an account that has administrator permissions in Business Central and Dataverse.
- The local currency for the company in Business Central must be the same as the base transaction currency in Dataverse.
As a second Step we will setup a Connection to Dynamics 365 Sales.
From Assisted Setup under Connect with other systems group choose Set up a connection to Dynamics 365 Sales, as shown below.

This Step is straight forward, you need to just respond to Next to each page of the Wizard.
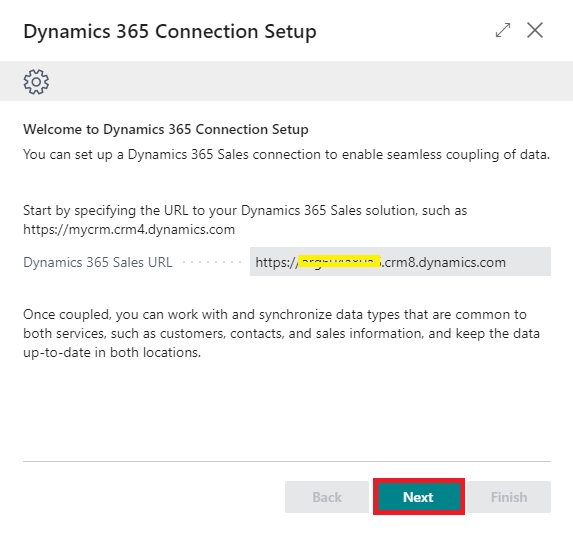
The URL will be same as used in previous step, while Connecting to Dataverse. Click Next.

Optionally, there are advanced settings that can enhance security and enable additional capabilities, such as sales order processing and viewing inventory levels. The following table describes the advanced settings.
Click Finish to complete the Setup.
Next open the Dynamics 365 Connection Setup from TellMe.

Select Connection -> Test Connection

If everything is ok it should show Connection test Successful message.
Go to Dataverse Connection Setup, from Integration -> Integration Solutions
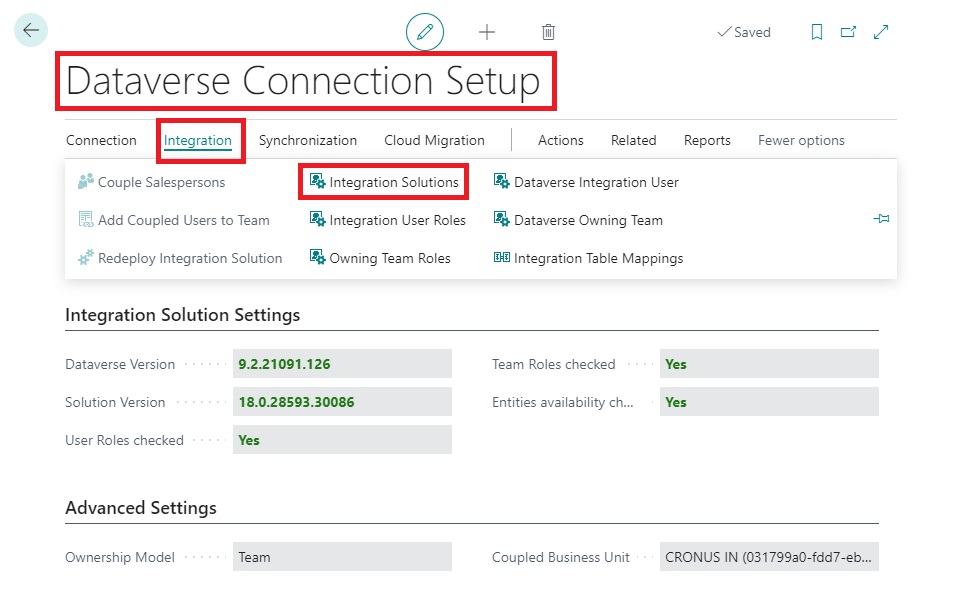
It will list you the solutions deployed.

Same you can find in Dynamics 365 Sales -> Settings -> Solutions

For more details you can have a look to Microsoft docs
Integrating with Dynamics 365 Sales
Now you are good to proceed with Next Step.
You can jump to Next Step from here.
Setup a connection to Dataverse
Integration with Business Central is done through Dataverse, and you will find lots of standard settings and tables that are provided by the integration.
This is the Second post in the series. If you want to go to previous post click here.
From the series of steps this post is dedicated to Step-1:
Create connection to integrate and synchronize data with another Dynamics 365 business app, such as Dynamics 365 Sales.
As a first Step we will setup a connection to Dataverse.
Before you start make sure you have below information ready with you:
- URL for the Dataverse environment that you want to connect to
- The user’s name and password of an account that has administrator permissions in Business Central and Dataverse.
- The local currency for the company in Business Central must be the same as the base transaction currency in Dataverse.
From Assisted Setup under Connect with other systems group choose Set up a connection to Dataverse, as shown below.

This will start the Setup wizard, just follow and provide your information asked on each page.
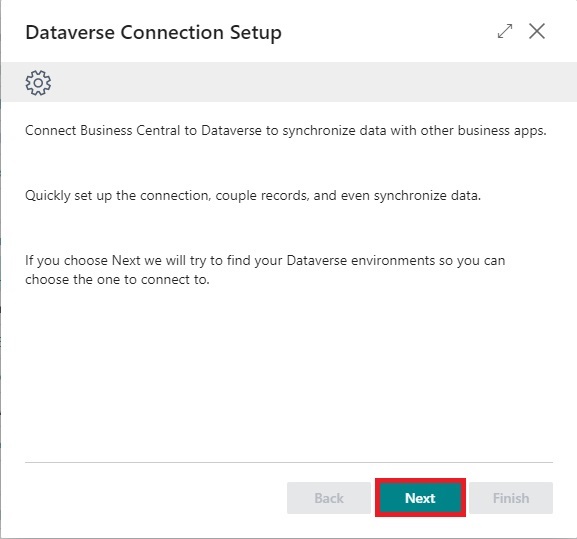
Click Next to Start configuring Dataverse & Business Central connection.

Here you can select your Dataverse Environment or can enter manually, above screen shows where you can find this url from.
Sign in with an administrator user account and give consent to the application that will be used to connect to Dataverse.
Choose Sign in with administrator user.
After Sign in with administrator user turns green and bold, choose Next.

Select Ownership and Click Next.

Click on Finish to complete the Setup.
Next open the Dataverse Connection Setup from TellMe.

Select from Connection -> Test Connection

You can check Microsoft docs for more information
Connect to Microsoft Dataverse
If all are OK it should show the Connection test Successful message.
Now you are good to proceed with Next Step.
You can jump to Next Step from here.

You must be logged in to post a comment.