Authorization, Base64 Convert, Business Central, InStream, Integration, JSON, JsonObject, JsonToken, OData, Post, Postman, SOAP, Tenant Media, Tip & Tricks, URL, Web Access Key, Web Services

Integrating with Business Central – using Web Service

This is fourth post in this series, if you wish to see first post, you can access here.

In second post I discussed about, how to create Azure Functions, you can access here.

In previous post I discussed about, how to Integrate Azure Functions in Business Central, you can access here.

In this post we will discuss how to make available QR Image using API by exposing as Web Service.

Let’s cut the theoretical part and coming directly to the solution.

This post is very short and as an answer to query from one of the blog readers, who regularly gives feedback and suggest topic he wish from me. Sometime it is not possible to write post for every query, but I try to pick some which I find interesting. Converting any topic into post is quite time taking, solution can be of 10 mins but presenting same in form of blog takes 2-3 hours, sometimes even more.

Some time appropriate environment is not available where I can put the solution and take screenshots to present as blog.

Since this topic is part of current series, I am writing posts on, so I was able to easily pick this topic.

Requirement is to add capability to get QR Image we generated in our previous posts using Web Service/ API/ OData/ JSON Base64Text.

To get this working we will first create a Codeunit with appropriate methods and expose it as Web Service.

Step – 1.

Create Codeunit & Add below method.

Step – 2

Publish above Codeunit as Web Service.

Step – 3

Copy SOAP URL

[SOAP URL]

https://api.businesscentral.dynamics.com/v2.0/1e4fc386-962e-4a20-8364-d5aeb65e2485/Test/WS/CRONUS%20USA%2C%20Inc./Codeunit/QRCodeGenerator

Convert to ODataV4 URL by making necessary modification as below:

[ODataV4 URL]

https://api.businesscentral.dynamics.com/v2.0/1e4fc386-962e-4a20-8364-d5aeb65e2485/Test/ODataV4/QRCodeGenerator

Similarly, your $metadata URL will be:

https://api.businesscentral.dynamics.com/v2.0/1e4fc386-962e-4a20-8364-d5aeb65e2485/Test/ODataV4/$metadata

Run the metadata URL in browser:

Search for your function created above, you should get definition as below:

<Action Name=”QRCodeGenerator_GetQRSetImageAsJSON”>

<Parameter Name=”qRSetId” Type=”Edm.Int32″/>

<ReturnType Type=”Edm.String”/>

</Action>

Let’s test the above URL for function using Postman to see the result:

[POST] – https://api.businesscentral.dynamics.com/v2.0/1e4fc386-962e-4a20-8364-d5aeb65e2485/Test/ODataV4/QRCodeGenerator_GetQRSetImageAsJSON?Company=CRONUS USA, Inc.

Authorization:  Basic Auth

Username: ASHWINI.TRIPATHI

Password: xjAtAtTaFhgXkgR4M5WoHapotvJNmqJ5//XBYK2v5s4= (Web Service Access Key)

JSON Parameter to Function: (Body raw:JSON)

{

    “qRSetId” : “6”

}

Result Body:

{

    “@odata.context”: “https://api.businesscentral.dynamics.com/v2.0/1e4fc386-962e-4a20-8364-d5aeb65e2485/Test/ODataV4/$metadata#Edm.String&#8221;,

    “value”: “iVBORw0KGgoAAAANSUhEUgAAApQAAAKUAQMAAACAATp/AAAAAXNSR0IArs4c6QAAAARnQU1BAACxjwv8YQUAAAAGUExURQAAAP///6XZn90AAAAJcEhZcwAADsMAAA7DAcdvqGQAAAHtSURBVHja7dpbasMwEAXQ2YH3v0vvwKVBsZ44DZ4UWs58BEnMHH1eYjuO9NqZTCaTyWQymUwmk8lkMplMJpPJZDKZ/8KMsbb27Ls3St+2bmYymUwmM8Ws58N2b+FiXjQzmUwmk3nTLMN1qkPq6LqZyWQymczPmUdTwxVMJpPJZP6G+di0/7lqH5PJZDKZnzOnK7ZzW2tbNzOZTCaTmWIOtbXw9DM3M5lMJpOZYK6rPvSL9huJywkmk8lkMu+Yz0d9tR7HQ7INl9UWJpPJZDITzDIwv39arVbNTCaTyWRmmS0XbZ5Nq64uM47JZDKZzDfMdmrv4W47ZByTyWQymalm7S2rre0tq+eNxRw4JpPJZDITzDhjq8uu9p5udSLBZDKZTGae+UyxKd4GqWbc3MxkMplMZpZ5EXSdVPuYTCaTyUw12/kh1Dq4rVcZx2QymUzmG+aqinmcU12etdceTCaTyWSmmDHWkHaDNJ8xmUwmk5li1vM6GjFfu60nmEwmk8nMMuvUFGV7zPWjjGMymUwm87ZZt/Pqcc/wXJDJZDKZzE+apSXOV1TRf9HHZDKZTGaiub4i+ijb+48iDiaTyWQyM82h2rZYRFmsYpDJZDKZzHtmVjGZTCaTyWQymUwmk8lkMplMJpPJZDL/rHnsXwW1n/zFqtyZAAAAAElFTkSuQmCC”

}

Copy the Value and use any base64 – image converter tool, search on Google

You will get your QR Image:

Don’t try any URL or Passwords in this post as same is modified, and in images covered to hide actual url & passwords.

Hope you enjoyed learning from this post.

That’s all for this post, but visit again to learn from upcoming posts in this series, will post soon.

See you again in next post, till then keep exploring, learning and sharing with others.

Advertisement
AtomPub, Business Central, EDMX, How To, Information, JSON, OData, REST, RPC, Smtp, SOAP, Tip & Tricks, Web Client, Web Services, WSDL, XML

Web Services – Business Central Part- 2

Today in this post we will continue from where we left our previous post, if you missed or wish to have a look you can find her in this link.

Web Services – Business Central Part- 1

We saw in our previous post, you expose an OData service that can be accessed from a URL by using a web browser or any other HTTP client.

You need the URL of the OData page or query web service

https://server:webserviceport/serverinstance/oData/web service”

If you use the attribute ?$format=atom you will get an AtomPub document

https://KSD-DESKTOP:7748/BC130/OData/Customers?$format=atom

If you use the attribute ?$format=json you will get an JSON document

https://KSD-DESKTOP:7748/BC130/OData/Customers?$format=json

You can obtain service metadata documents for either page or query web services.

https://ksd-desktop:7748/BC130/OData/$metadata

SOAP Web Services

If your client requests another transport protocol than HTTP or HTTPS, then you can use SOAP as it also supports, for example, SMTP.

Microsoft is heavily investing in REST and OData, and certainly with the online apps like Power BI, PowerApps, and others.  So at this point SOAP isn’t the primary choice for web services anymore.

We can find the available SOAP web services at the same page where we define the OData web services.

If we go to the search box and then search for web services, This page is used to enable access to OData and SOAP web services.

ws-001

We could enable OData web services only with the object types of query and pages, and for SOAP web services, we can only enable it for pages and codeunits and not for queries.

For example soap url for my Customers Service will be as below:

https://KSD-DESKTOP:7747/BC130/WS/CRONUS%20International%20Ltd./Page/Customers

You can find some post related to consuming web service and working with web service for older versions but it can be used with business central too.

Exposing & Consuming the Web service from & inside Navision – Part-1

Exposing & Consuming the Web service from & inside Navision – Part-2

Exposing & Consuming the Web service from & inside Navision – Part-3

Exposing & Consuming the Web service from & inside Navision – Part-4

When you are exposing your object for web service, ensure that you use GUIAllowed function to supress the UI. Encapsulate the code that could cause in error, not your entire code.

Also the exceptions must be handled in order to facilitate that your web service don’t end the execution unexpectedly.

You must check with the GuiAllowed function when you are using one of the following dialog functions:

Close, Confirm, Error, Open, StrMenu, Update

The Message function is the only dialog function that doesn’t cause an exception.

Other keywords that you shouldn’t use are:

Page.Run, Page.RunModal, Activate, Report.Run, Report.RunModal, Hyperlink, File.Upload, File.Download

Hope you got some insight on Web Services.

I will come up with more features in other posts, till then keep exploring and learning, and take care of yourself.

API, AtomPub, Business Central, Development Tips, Dynamics 365, EDMX, How To, Information, JSON, OData, REST, RPC, SOAP, Tip & Tricks, Web Services, WSDL, XML

Web Services – Business Central Part- 1

You can use web services in Microsoft Dynamics 365 Business Central to expose data to the outside world.

You can use web services to get data from Microsoft Dynamics 365 Business Central and use it in other applications.

Any application, programing language or program that can work with XML and/or JSON for example: – Power BI, Microsoft PowerApps, a custom .NET program, etc. can connect to Microsoft Dynamics 365 Business Central fetch the available data.

A web service can also be used to create new or update existing data in the application.

Both XML (Extensible Markup Language) and JSON (JavaScript Object Notation) are open-standard file formats that are readable by humans. They are used to send information between clients over web services.

In this post we will discuss some terminology and differences between SOAP and OData. We will also learn on how to configure these services in Microsoft Dynamics 365 Business Central.

SOAP relies on HTTP(S), SMTP, FTP for message negotiation and transmission.

The most common type of messaging pattern in SOAP is the Remote Procedure Call (RPC), where one network node (the client) sends a request message to another node (the server), and the server sends a response message to the client. It uses SOAP envelope, which defines the message structure and how to process it.

A SOAP service exposes a WSDL (Web Services Description Language) file that describes how the service can be called, what parameters it expects and what data structure it returns. This file is an XML based document, and is targeted to be read by machines, not by humans.

OData (Open Data Protocol) is an open protocol that is designed to use and query RESTful APIs. An API (Application Programming Interface) is a set of routines and protocols that is used to communicate between different software components.

OData is built upon REST services and can be used to query REST services. By providing extra query parameters to a URL, you can for example limit or filter the result set.

SOAP exposes a WSDL document, OData exposes an EDMX document, which contains metadata for all the published web services.

You can see all the available OData web services by going to the search box and search for web services.  This page is used to enable access to OData and SOAP web services.

ws-001

OData web services can only be used with object types pages and queries, not with codeunits.  There are two versions of OData you can use, version 3 and version 4.  Version 4 is an enhanced version, and important to know is that version 4 returns JSON where version 3 returns AtomPub documents which are XML documents.

From this window you can add new or manage existing Web Services.

It is simple 2 Step task Add new object give service name and enable Publish checkbox. You will get your OData and/or SOAP URL.

For example: – object type page can be used in OData and in SOAP web services.

Let us explore the Web-Service Urls. For test purpose, I have created a Service with the name Customers for Page Customer Card.

https://ksd-Desktop:7748/BC130/ODataV4/Company(‘CRONUS%20International%20Ltd.&#8217;)/Customers

When we open, for example, our Customers web service, we can have a look at the URL.

First we have our server name and the port it’s using.  “https://ksd-Desktop:7748”

Then we have our instance name, which in our case is BC130.

Then our OData version, so version 4.  “ODataV4”

And then our company name, “Cronus International Ltd”.

And then finally our web service name, which is, in our case, “Customers”.

Let’s try this url, when we execute this url in our browser we get json file listing customers similar to below:

WS-003.jpg

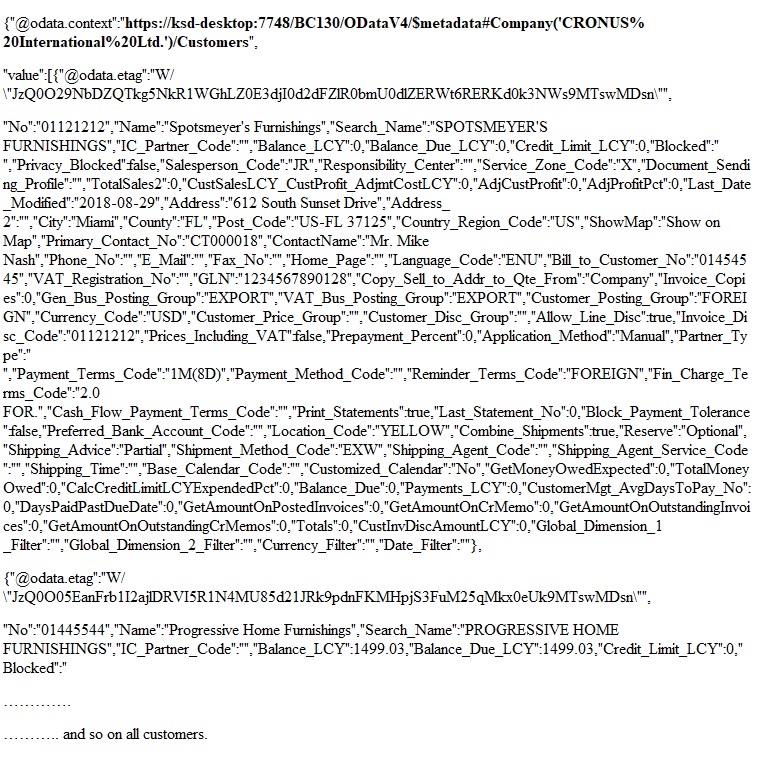
Here etag is the unique identifier of each records, it will be required when you update records, will discuss later.

If I remove my service name then:

https://ksd-desktop:7748/BC130/ODataV4/Company(‘CRONUS%20International%20Ltd.&#8217;)

{“@odata.context”:”https://ksd-desktop:7748/BC130/ODataV4/$metadata#Company/$entity&#8221;,”Name”:”CRONUS International Ltd.”,”Evaluation_Company”:false,”Display_Name”:”CRONUS International Ltd.”,”Id”:”ab76c7b4-3c72-4805-86f7-7d91a10612ce”,”Business_Profile_Id”:””}

If I remove my Company Name then:

https://ksd-desktop:7748/BC130/ODataV4/

WS-004.jpg

If I open the metadata url

https://ksd-desktop:7748/BC130/ODataV4/$metadata

You will get EDMX file which shows metadata about the information in the OData web service.

ws-002

You can see some properties with our data types.  For example, if we scroll down, if we go to Customers, we have our entity type Customers, we can see some properties which our data types and max lengths.  We can also see what properties are primary key.  So this is number and so on.  So all useful information when you’re creating applications that use these OData web services.

Filtering the OData

You can set filter expression to the url few examples as below:

We will use the filter option top for limiting the result to top 5 records of customer.

After our service name, we type question mark, then the dollar sign, and then the word top equals 5.

For example :

https://ksd-desktop:7748/BC130/ODataV4/Company(‘CRONUS%20International%20Ltd.&#8217;)/Customers?$top=5

Now the query will result in only first 5 records for customer.

If we want to see next 5 records then we can append &$skip=5 on above url

https://ksd-desktop:7748/BC130/ODataV4/Company(‘CRONUS%20International%20Ltd.&#8217;)/Customers?$top=5&$skip=5

If you want to see specific customer you can modify url as:

https://ksd-desktop:7748/BC130/ODataV4/Company(‘CRONUS%20International%20Ltd.&#8217;)/Customers(‘10000’)

Please refer to EDMX file to find correct name of the fields if wants to filter on specific fields.

https://ksd-desktop:7748/BC130/ODataV4/Company(‘CRONUS%20International%20Ltd.&#8217;)/Customers(‘10000’)?$select=Name

You will get the result as below for above url query

“@odata.context”:”https://ksd-desktop:7748/BC130/ODataV4/$metadata#Company(‘CRONUS%20International%20Ltd.&#8217;)/Customers/$entity”,”@odata.etag”:”W/\”JzQ0O044eFNmcWdXV0NpYlhTZDhUdTlrdytZUmdQbWRkL2U4TzZ4UEsxNGtod0

E9MTswMDsn\””,”Name”:”The Cannon Group PLC”}

You can add other fields too by appending the url with ‘,’

Customers(‘10000’)?$select=Name,City,Address……………

As told earlier please refer to EDMX file for correct Fields Name or Property it is case sensitive.

You can remove the Primary Key from the url to get list of selected fields for all customers.

Customers?$select=Name,City,Address……………

https://ksd-desktop:7748/BC130/ODataV4/Company(‘CRONUS%20International%20Ltd.&#8217;)/Customers?$orderby=City&$select=Name,City,Address

You can use orderby to sort the data from other than Primary key, by default it is sorted by Primary Key.

You can use desc for descending sort.

https://ksd-desktop:7748/BC130/ODataV4/Company(‘CRONUS%20International%20Ltd.&#8217;)/Customers?$orderby=City desc&$select=Name,City,Address

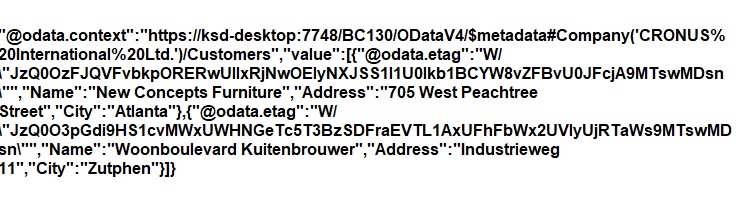
You can use filter to filter specific field values as:

https://ksd-desktop:7748/BC130/ODataV4/Company(‘CRONUS%20International%20Ltd.&#8217;)/Customers?$filter=City eq ‘Zutphen’ or City eq ‘Atlanta’&$select=Name,City,Address

you will get output as:

WS-005.jpg

You can use expressions like [filter=Balance_LCY gt 0] or [filter=Location_Filter eq ‘BLUE’] etc.

I stop here for today. We have seen how the Web Services OData can be used to query records.

We will discuss about other stuffs in our next post in more details.

Till then keep exploring and learning, see you in next post. Take Care of yourself.


AL, API, Business Central, Development Tips, Extension Package, Headline, How To, HTTP, Information, JSON, Role Center, Tip & Tricks, V2, Visual Studio Code

Working with Headline Role Center Page and HTTP Call – Business Central

I am again back with my First post of 2019. Hope you all enjoyed New Year Parties.

Wishing you all readers again Happy New Year.

Today we will play around Role Center Headline Page and add our Message to it.

You have below 9 Headline RC Pages.

1440 Headline RC Business Manager
1441 Headline RC Order Processor
1442 Headline RC Accountant
1443 Headline RC Project Manager
1444 Headline RC Relationship Mgt.
1445 Headline RC Administrator
1446 Headline RC Team Member
1447 Headline RC Prod. Planner
1448 Headline RC Serv. Dispatcher

HLRC-1

So let’s start with our task.

Step: 1 –

To be able to complete today’s customization you will require an account to any API weather forecast provider. Here I provide you with the free service, not all features are free, but sufficient to complete our task.

Open https://openweathermap.org/ page and register to the service. You will receive an API key upon sign up. This is required when you make an API Web Service call.

Step: 2 –

Open your Extension Project and create one New AL file for Page Extension

HLRC-2

We will simply add one field to the Page.

Step: 3 –

This is the main part of this functionality:

We will write a procedure for Querying the current temperature of the city using API call and extract information from the response and add to the Headline.

Response are available in other formats too, but I am using JSON in my example. You can select your format you are comfortable with. You will find all details on the website API section.

Below will be our API call syntax:

http://api.openweathermap.org/data/2.5/weather?q=&#8217; + City +                            ‘&units=metric&APPID=16ea4cf53127aa3baa74d4072381ba62’

To get data in API for current weather in Kelvins do not indicate units parameter into your API call.

To get in Fahrenheit add units=imperial parameter.

To get in Celsius add units=metric parameter.

API Key :- &APPID=16ea4cf53127aa3baa74d4072381ba62 – Compulsory

You will receive JSon response as below:

JSONText Value will be similar to below:

{“coord”:{“lon”:77.41,”lat”:28.67},

“weather”:[{“id”:711,”main”:”Smoke”,”description”:”smoke”,”icon”:”50n”}],

“base”:”stations”,

main“:{“temp“:292.15,”pressure”:1019,”humidity”:48,”temp_min”:292.15,

“temp_max”:292.15},

“visibility”:1800,

“wind”:{“speed”:1,”deg”:210},

“clouds”:{“all”:0},

“dt”:1546432200,

sys“:{“type”:1,”id”:9165,”message”:0.004,”country“:”IN”,”sunrise”:1546393411,

“sunset”:1546430725},

“id”:1271308,

name“:”Ghaziabad”,

“cod”:200}

HLRC-3

Below is the 2 functions used to extract the Information from JSon Response:

HLRC-4

Step: 4 –

Save and Publish your Extension.

Open Web Client, make sure RC Business Manager profile is selected for your account or whichever Headline RC you have extended for above step.

You will see the Temperature of your selected city, as shown in the beginning of the post.

You can use similar concept to add your customized Headline to your Role Center Page.

See you again in my next post with some other concept, tips & tricks. Till then keep exploring and learning. Take care.