
Tag: VS Code

Create Actions on the Page for managing Coupling and Synchronization
This is the Eighth post in the series. If you want to go to previous post click here.
From the series of steps this post is dedicated to Step-7:
As a Seventh Step we will Create Actions on the Page for managing Coupling and Synchronization created in previous post.
On page 50120 Prospects created in previous post
Add Variables:
var
   CRMIntegrationManagement: Codeunit "CRM Integration Management";
   CRMCouplingManagement: Codeunit "CRM Coupling Management";
   CDSIntegrationEnabled: Boolean;
   CDSIsCoupledToRecord: Boolean;
Add Triggers:
trigger OnOpenPage()
begin
    CDSIntegrationEnabled := CRMIntegrationManagement.IsCDSIntegrationEnabled();
end;

trigger OnAfterGetCurrRecord()
begin
    if CDSIntegrationEnabled then
        CDSIsCoupledToRecord := CRMCouplingManagement.IsRecordCoupledToCRM(Rec.RecordId);
end;
Add Actions:
    Actions
    {
        area(Processing)
        {
            group(ActionGroupCDS)
            {
                Caption = 'Dataverse';
                Visible = CDSIntegrationEnabled;

                action(CDSGotoProspect)
                {
                    Caption = 'Prospect';
                    Image = CoupledCustomer;
                    ToolTip = 'Open the coupled Dataverse Prospect.';
                    ApplicationArea = All;

                    trigger OnAction()
                    var
                        CRMIntegrationManagement: Codeunit "CRM Integration Management";
                    begin
                        CRMIntegrationManagement.ShowCRMEntityFromRecordID(Rec.RecordId);
                    end;
                }
                action(CDSSynchronizeNow)
                {
                    Caption = 'Synchronize';
                    ApplicationArea = All;
                    Visible = true;
                    Image = Refresh;
                    Enabled = CDSIsCoupledToRecord;
                    ToolTip = 'Send or get updated data to or from Microsoft Dataverse.';

                    trigger OnAction()
                    var
                        CRMIntegrationManagement: Codeunit "CRM Integration Management";
                    begin
                        CRMIntegrationManagement.UpdateOneNow(Rec.RecordId);
                    end;
                }
                action(ShowLog)
                {
                    Caption = 'Synchronization Log';
                    ApplicationArea = All;
                    Visible = true;
                    Image = Log;
                    ToolTip = 'View integration synchronization jobs for the Prospect table.';

                    trigger OnAction()
                    var
                        CRMIntegrationManagement: Codeunit "CRM Integration Management";
                    begin
                        CRMIntegrationManagement.ShowLog(Rec.RecordId);
                    end;
                }
                group(Coupling)
                {
                    Caption = 'Coupling';
                    Image = LinkAccount;
                    ToolTip = 'Create, change, or delete a coupling between the Business Central record and a Microsoft Dataverse row.';

                    action(ManageCDSCoupling)
                    {
                        Caption = 'Set Up Coupling';
                        ApplicationArea = All;
                        Visible = true;
                        Image = LinkAccount;
                        ToolTip = 'Create or modify the coupling to a Microsoft Dataverse Prospect.';

                        trigger OnAction()
                        var
                            CRMIntegrationManagement: Codeunit "CRM Integration Management";
                        begin
                            CRMIntegrationManagement.DefineCoupling(Rec.RecordId);
                        end;
                    }
                    action(DeleteCDSCoupling)
                    {
                        Caption = 'Delete Coupling';
                        ApplicationArea = All;
                        Visible = true;
                        Image = UnLinkAccount;
                        Enabled = CDSIsCoupledToRecord;
                        ToolTip = 'Delete the coupling to a Microsoft Dataverse Prospect.';

                        trigger OnAction()
                        var
                            CRMCouplingManagement: Codeunit "CRM Coupling Management";
                        begin
                            CRMCouplingManagement.RemoveCoupling(Rec.RecordId);
                        end;
                    }
                }
            }
        }
    }
On page 50122 “CDS Prospect List” created above
Add Variables:
var
    CurrentlyCoupledCDSProspect: Record "CDS cr95d_Prospects";
Add Trigger:
trigger OnInit()
begin
    Codeunit.Run(Codeunit::"CRM Integration Management");
end;
Add Procedure:
procedure SetCurrentlyCoupledCDSProspect(CDSProspect: Record "CDS cr95d_Prospects")
begin
    CurrentlyCoupledCDSProspect := CDSProspect;
end;
Add Action:
Actions
    {
        area(processing)
        {
            action(CreateFromCDS)
            {
                ApplicationArea = All;
                Caption = 'Create in Business Central';
                Promoted = true;
                PromotedCategory = Process;
                ToolTip = 'Generate the table from the coupled Microsoft Dataverse Prospect.';

                trigger OnAction()
                var
                    CDSProspect: Record "CDS cr95d_Prospects";
                    CRMIntegrationManagement: Codeunit "CRM Integration Management";
                begin
                    CurrPage.SetSelectionFilter(CDSProspect);
                    CRMIntegrationManagement.CreateNewRecordsFromCRM(CDSProspect);
                end;
            }
        }
    }
Now you are good to proceed with Next Step.
You can jump to Next Step from here.

Create Integration Codeunit for Business Central & Dataverse Integration
This is the Seventh post in the series. If you want to go to previous post click here.
From the series of steps this post is dedicated to Step-6:
As a Sixth Step we will Create Integration Codeunit in Business Central
codeunit 50120 CDSDataverseEvent
{
}
Add these Procedures
local procedure LookupCDSProspect(SavedCRMId: Guid; var CRMId: Guid; IntTableFilter: Text): Boolean
    var
        CDSProspect: Record "CDS cr95d_Prospects";
        OriginalCDSProspect: Record "CDS cr95d_Prospects";
        OriginalCDSProspectList: Page "CDS Prospect List";
    begin
        if not IsNullGuid(CRMId) then begin
            if CDSProspect.Get(CRMId) then
                OriginalCDSProspectList.SetRecord(CDSProspect);
            if not IsNullGuid(SavedCRMId) then
                if OriginalCDSProspect.Get(SavedCRMId) then
                    OriginalCDSProspectList.SetCurrentlyCoupledCDSProspect(OriginalCDSProspect);
        end;

        CDSProspect.SetView(IntTableFilter);
        OriginalCDSProspectList.SetTableView(CDSProspect);
        OriginalCDSProspectList.LookupMode(true);
        if OriginalCDSProspectList.RunModal = ACTION::LookupOK then begin
            OriginalCDSProspectList.GetRecord(CDSProspect);
            CRMId := CDSProspect.cr95d_ProspectsId;
            exit(true);
        end;
        exit(false);
    end;

local procedure AddEntityTableMapping(CRMEntityTypeName: Text; TableID: Integer; var TempNameValueBuffer: Record "Name/Value Buffer" temporary)
    begin
        TempNameValueBuffer.Init();
        TempNameValueBuffer.ID := TempNameValueBuffer.Count + 1;
        TempNameValueBuffer.Name := CopyStr(CRMEntityTypeName, 1, MaxStrLen(TempNameValueBuffer.Name));
        TempNameValueBuffer.Value := Format(TableID);
        TempNameValueBuffer.Insert();
    end;

local procedure InsertIntegrationTableMapping(var IntegrationTableMapping: Record "Integration Table Mapping"; MappingName: Code[20]; TableNo: Integer; IntegrationTableNo: Integer; IntegrationTableUIDFieldNo: Integer; IntegrationTableModifiedFieldNo: Integer; TableConfigTemplateCode: Code[10]; IntegrationTableConfigTemplateCode: Code[10]; SynchOnlyCoupledRecords: Boolean)
    begin
        IntegrationTableMapping.CreateRecord(MappingName, TableNo, IntegrationTableNo, IntegrationTableUIDFieldNo, IntegrationTableModifiedFieldNo, TableConfigTemplateCode, IntegrationTableConfigTemplateCode, SynchOnlyCoupledRecords, IntegrationTableMapping.Direction::Bidirectional, 'CDS');
    end;

procedure InsertIntegrationFieldMapping(IntegrationTableMappingName: Code[20]; TableFieldNo: Integer; IntegrationTableFieldNo: Integer; SynchDirection: Option; ConstValue: Text; ValidateField: Boolean; ValidateIntegrationTableField: Boolean)
    var
        IntegrationFieldMapping: Record "Integration Field Mapping";
    begin
        IntegrationFieldMapping.CreateRecord(IntegrationTableMappingName, TableFieldNo, IntegrationTableFieldNo, SynchDirection,
            ConstValue, ValidateField, ValidateIntegrationTableField);
    end;
To Add Event Subscriptions, Use the new Shift+Alt+E shortcut in the AL code editor to invoke a list of all events.
Search for Event OnGetCDSTableNo – “CRM Setup Defaults”
[EventSubscriber(ObjectType::Codeunit, Codeunit::"CRM Setup Defaults", 'OnGetCDSTableNo', '', false, false)]

local procedure OnGetCDSTableNo(BCTableNo: Integer; var CDSTableNo: Integer; var handled: Boolean);
    begin
        if BCTableNo = DATABASE::"Prospect" then begin
            CDSTableNo := DATABASE::"CDS cr95d_Prospects";
            handled := true;
        end;
    end;
Search for Event OnLookupCRMTables – “Lookup CRM Tables”
[EventSubscriber(ObjectType::Codeunit, Codeunit::"Lookup CRM Tables", 'OnLookupCRMTables', '', false, false)]

local procedure OnLookupCRMTables(CRMTableID: Integer; NAVTableId: Integer; SavedCRMId: Guid; var CRMId: Guid; IntTableFilter: Text; var Handled: Boolean);
    begin
        if CRMTableID = Database::"CDS cr95d_Prospects" then
            Handled := LookupCDSProspect(SavedCRMId, CRMId, IntTableFilter);
    end;
Search for Event OnAddEntityTableMapping – “CRM Setup Defaults”
[EventSubscriber(ObjectType::Codeunit, Codeunit::"CRM Setup Defaults", 'OnAddEntityTableMapping', '', false, false)]

local procedure OnAddEntityTableMapping(var TempNameValueBuffer: Record "Name/Value Buffer");
    begin
        AddEntityTableMapping('Prospect', DATABASE::"CDS cr95d_Prospects", TempNameValueBuffer);
    end;
Search for Event OnAfterResetConfiguration – “CDS Setup Defaults”
[EventSubscriber(ObjectType::Codeunit, Codeunit::"CDS Setup Defaults", 'OnAfterResetConfiguration', '', false, false)]

local procedure OnAfterResetConfiguration(CDSConnectionSetup: Record "CDS Connection Setup");
    var
        IntegrationTableMapping: Record "Integration Table Mapping";
        IntegrationFieldMapping: Record "Integration Field Mapping";
        CDSProspect: Record "CDS cr95d_Prospects";
        Prospect: Record "Prospect";
    begin
        InsertIntegrationTableMapping(
            IntegrationTableMapping, 'Prospect',
            DATABASE::"Prospect", DATABASE::"CDS cr95d_Prospects", CDSProspect.FieldNo(cr95d_ProspectsId), CDSProspect.FieldNo(ModifiedOn), '', '', true);

        InsertIntegrationFieldMapping('Prospect', Prospect.FieldNo("No."), CDSProspect.FieldNo(cr95d_ProspectsId), IntegrationFieldMapping.Direction::Bidirectional, '', true, false);

        InsertIntegrationFieldMapping('Prospect', Prospect.FieldNo(Name), CDSProspect.FieldNo(cr95d_ProspectName), IntegrationFieldMapping.Direction::Bidirectional, '', true, false);

        InsertIntegrationFieldMapping('Prospect', Prospect.FieldNo(Probability), CDSProspect.FieldNo(cr95d_Probability), IntegrationFieldMapping.Direction::Bidirectional, '', true, false);

        InsertIntegrationFieldMapping('Prospect', Prospect.FieldNo("Contract Amount"), CDSProspect.FieldNo(cr95d_ContractAmount), IntegrationFieldMapping.Direction::Bidirectional, '', true, false);

        InsertIntegrationFieldMapping('Prospect', Prospect.FieldNo("Contract Amount (Base)"), CDSProspect.FieldNo(cr95d_contractamount_Base), IntegrationFieldMapping.Direction::Bidirectional, '', true, false);

        InsertIntegrationFieldMapping('Prospect', Prospect.FieldNo(Stage), CDSProspect.FieldNo(cr95d_Stage), IntegrationFieldMapping.Direction::Bidirectional, '', true, false);

        InsertIntegrationFieldMapping('Prospect', Prospect.FieldNo("Forecast Revenue"), CDSProspect.FieldNo(cr95d_ForcastedRevenue), IntegrationFieldMapping.Direction::Bidirectional, '', true, false);

        InsertIntegrationFieldMapping('Prospect', Prospect.FieldNo("Forecast Revenue (Base)"), CDSProspect.FieldNo(cr95d_forcastedrevenue_Base), IntegrationFieldMapping.Direction::Bidirectional, '', true, false);
    end;
Now you are good to proceed with Next Step.
You can jump to Next Step from here.

Create Custom table & page in Business Central
This is the Fourth post in the series. If you want to go to previous post click here.
From the series of steps this post is dedicated to Step-3:
As a third Step we will Create New Table(s) and Page(s) in Business Central
Below are the AL code for Prospect table, Prospect card page & Prospect list page that will be created in Business Central via Extension, used for Integration with Dataverse.
Table in BC to Integrate from Dataverse
table 50120 "Prospect"
{
    DataClassification = ToBeClassified;
    DrillDownPageID = "Prospects";
    fields
    {
        field(1; "No."; Code[20])
        {
            DataClassification = ToBeClassified;
        }
        field(2; "Name"; Text[50])
        {
            DataClassification = ToBeClassified;
        }
        field(5; "Probability"; Integer)
        {
            DataClassification = ToBeClassified;
        }
        field(6; "Contract Amount"; Decimal)
        {
            DataClassification = ToBeClassified;
        }
        field(7; "Contract Amount (Base)"; Decimal)
        {
            DataClassification = ToBeClassified;
        }
        field(8; "Stage"; Enum "Stage Type")
        {
            DataClassification = ToBeClassified;
        }
        field(11; "Forecast Revenue"; Decimal)
        {
            DataClassification = ToBeClassified;
        }
        field(12; "Forecast Revenue (Base)"; Decimal)
        {
            DataClassification = ToBeClassified;
        }
    }

    keys
    {
        key(key1; Name)
        {
            Clustered = true;
        }
    }
}
Card Page for above Table
page 50121 "Prospect Card"
{
    Caption = 'Prospect Card';
    PageType = Card;
    UsageCategory = Administration;
    SourceTable = "Prospect";

    layout
    {
        area(Content)
        {
            group(General)
            {
                field("Name"; Rec."Name")
                {
                    ApplicationArea = All;
                }
                field(Probability; Rec.Probability)
                {
                    ApplicationArea = All;
                }
                field(Stage; Rec.Stage)
                {
                    ApplicationArea = All;
                }
            }

            group(Details)
            {
                field("Contract Amount"; Rec."Contract Amount")
                {
                    ApplicationArea = All;
                }
                field("Contract Amount (Base)"; Rec."Contract Amount (Base)")
                {
                    ApplicationArea = All;
                }
                field("Forecast Revenue"; Rec."Forecast Revenue")
                {
                    ApplicationArea = All;
                }
                field("Forcast Revenu (Base)"; Rec."Forecast Revenue (Base)")
                {
                    ApplicationArea = All;
                }
            }
        }
    }
}
List Page for above Table
page 50120 Prospects
{
    PageType = List;
    ApplicationArea = All;
    UsageCategory = Lists;
    SourceTable = Prospect;
    Caption = 'Prospect List';
    CardPageId = "Prospect Card";
    Editable = false;

    layout
    {
        area(Content)
        {
            repeater(GroupName)
            {
                field(Name; Rec.Name)
                {
                    ApplicationArea = All;

                }
                field(Probability; Rec.Probability)
                {
                    ApplicationArea = All;

                }
                field("Contract Amount"; Rec."Contract Amount")
                {
                    ApplicationArea = All;

                }
                field("Contract Amount (Base)"; Rec."Contract Amount (Base)")
                {
                    ApplicationArea = All;

                }
                field(Stage; Rec.Stage)
                {
                    ApplicationArea = All;

                }
                field("Forcast Revenue"; Rec."Forecast Revenue")
                {
                    ApplicationArea = All;

                }
                field("Forcast Revenue (Base)"; Rec."Forecast Revenue (Base)")
                {
                    ApplicationArea = All;

                }
            }
        }
    }
}
Enum for field Stage
enum 50120 "Stage Type"
{
    Extensible = true;
    AssignmentCompatibility = true;

    value(0; "Lead") { Caption = 'Lead'; }
    value(1; "Opportunity") { Caption = 'Opportunity'; }
    value(2; "Won") { Caption = 'Won'; }
    value(3; "Lost") { Caption = 'Lost'; }
}
Now you are good to proceed with Next Step.
You can jump to Next Step from here.
Walkthrough Extension Development in Online Sandbox – Business Central
I have my Sandbox environment as below:
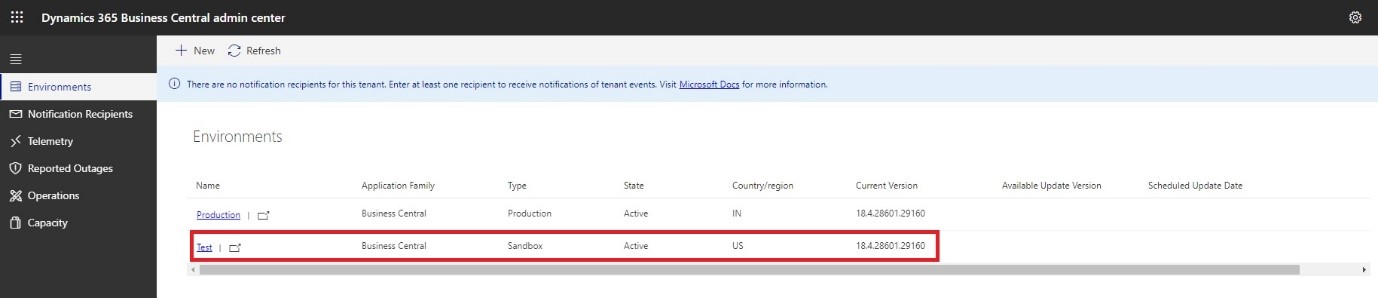
Details of the Sandbox as below:

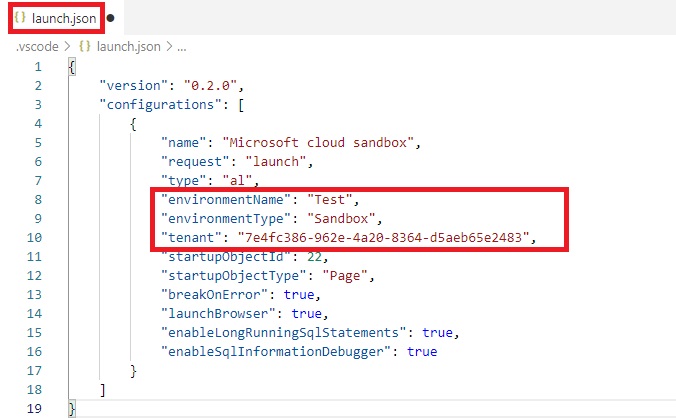
Connecting VS code to above environment.
When you try to Publish the extension, it will ask you to authenticate.

Copy the Link and open in the browser and paste the code in the box as shown below.
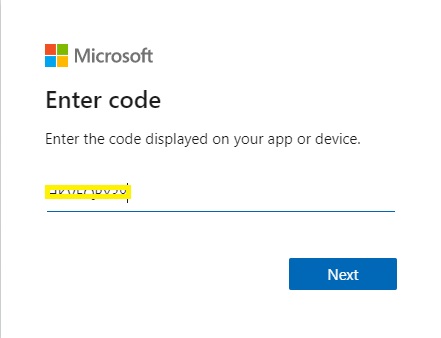
Next it will ask for your Online Instance User Id & Password provide it and on confirmation close the page. It will start deploying the extension.
In this walkthrough I am using below scenario:
Requirement is we need to be able to define some code for dimension combinations. Let me say it will be Sales Code, you can choose name of your choice, this is not Salesperson code.
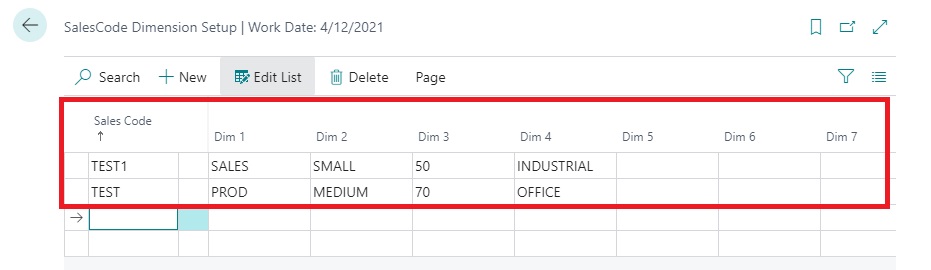
I am assuming these dimensions will follow the sequence as defined on my General Ledger Setup as below:
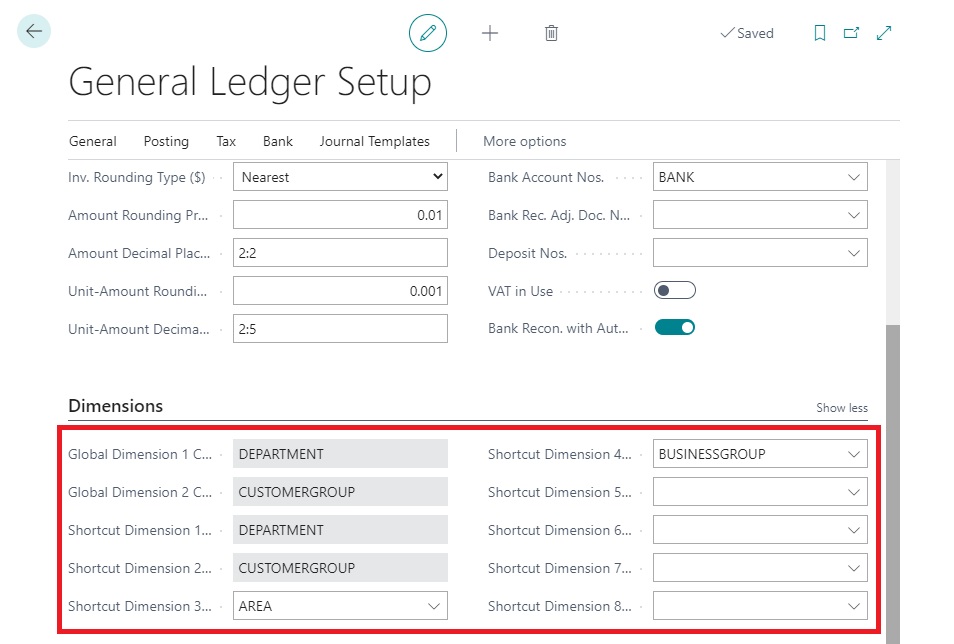
On Sales Order & Invoice user should be able to select this Sales Code and dimensions should be populated on order accordingly.
For tracking purpose this Sales Code should flow to Posted Sales Invoice and Customer Ledger.


So, Let’s Start with the development process:
Step-1 We will Create the Table
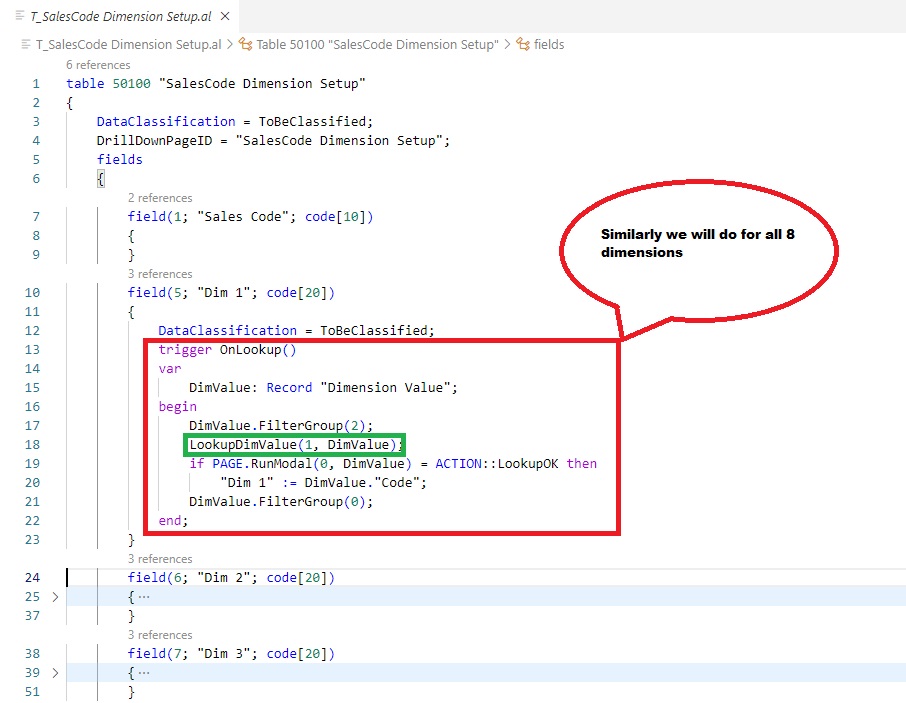
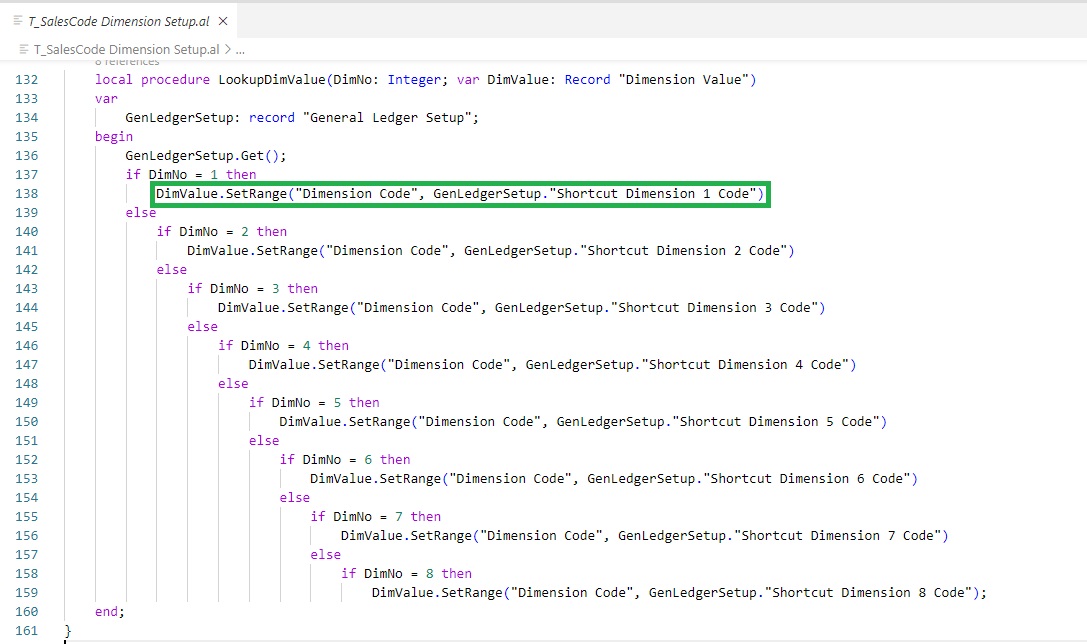
Here is the code for LookupDimValue Function, it will set filter for Dimension Code on Dimension Value table, as per the Dimension No passed. (1 is for Shortcut Dimension defined on General Ledger Setup, similarly for other 8 dimensions)
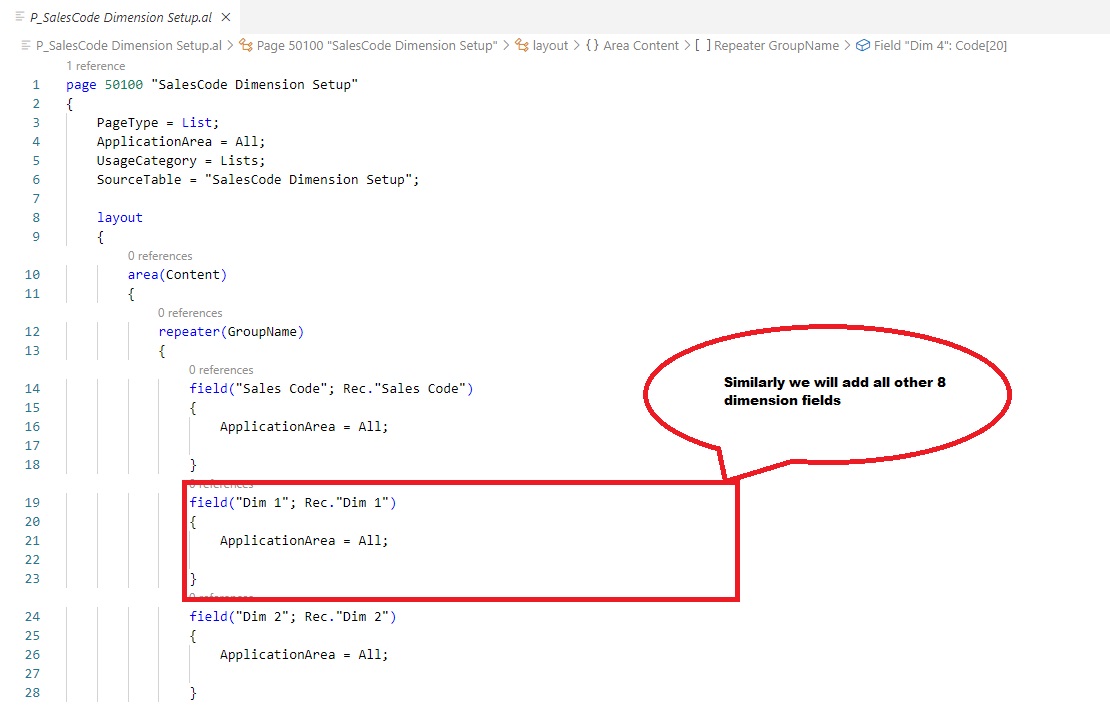
Step-2 Next, we will create the Page for this Setup
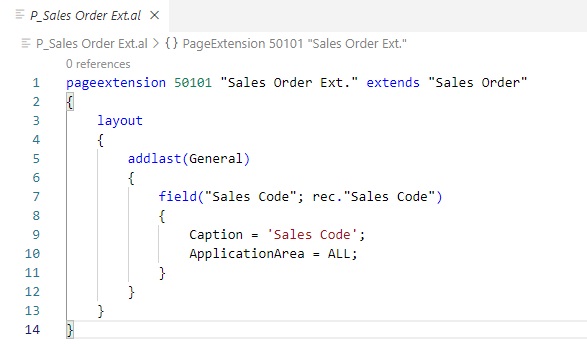
Step-3 Next, we will add the Sales Code field to all required Tables & Pages

Here is the code for AddDim Function. It is assumed that only combination provided in Sales Code Setup will be used. If you have defined Default dimensions or Combinations, those need to be preserved else this code will overwrite them. You will have to find the Data Set Entry, store them in temporary table used in below code and then add all the dimensions from the setup.
When you Select Sales Code on the Order or Invoice it will populate all the dimensions defined in the Setup.

Code for other Tables & Pages
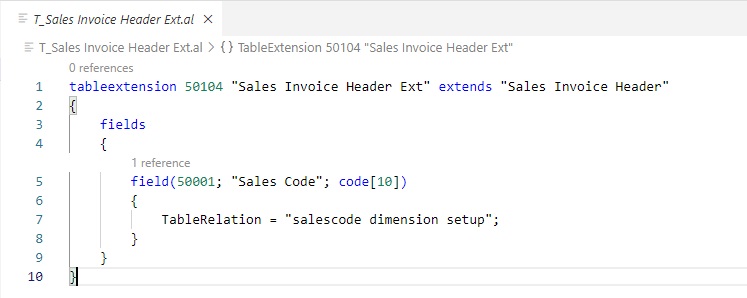

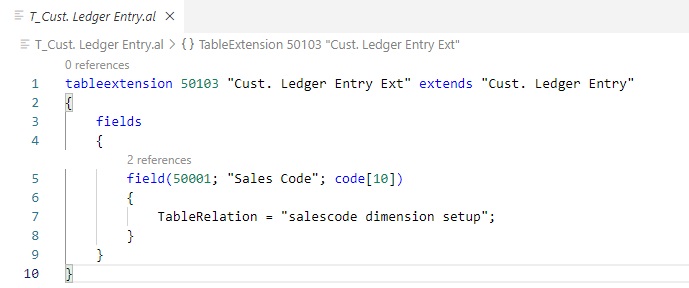


Step-4 Next, we need to take care to flow the Sales Code to the Ledger and Posted documents.
For posted documents we need not to worry it will flow automatically provided we have defined the fields on same Id.
However, for ledger we will require to use Events to pass the data to their destinations. In this case we are only passing to Customer Ledger Entry. For this we will create a Codeunit.
To Add Event Subscriptions, Use the new Shift+Alt+E shortcut in the AL code editor to invoke a list of all events.

Search for the even you are looking for.
When pressing Enter to select an event entry, an event subscriber for the event will be inserted at the cursor position in the active AL code editor window.
Here is the Codeunit Code:

This is not the final code; much more can be done or need to be done before it can be delivered to customer for their use. Purpose of this walkthrough was to demo the way we can customize the solution using extensions and publishing to Online tenant in Sandbox.
Hope you enjoyed the information. Will come with more similar information in my next posts. Till then keep exploring, learning and sharing your knowledge with others.
Remain safe, take care of your loved ones, put your mask, maintain safe distance and don’t forget to get vaccinated.
Update Tracking Line, Post Shipment using Web Services in Business Central
Hi, today I will discuss Web Service with below requirement. You can check other earlier post on this topic using search on right side of this blog page.
I got one request on topic from one of my customer cum blog follower, case study is as follows:
a) Will update Qty to Ship on document using Web Service from other application
b) Update Tracking Line for the Shipment using Web Service from other application
c) Post the Shipment using Web Service from other application
To get this we will create an Extension using VS Code which will have:
a) Codeunit with some functions which will be called using Web Service
b) A XML file to automatically expose above codeunit upon publishing this extension
Let us start how to achieve above requirement:
I have created this in BC16, will be same for other versions too.
Creating a AL Project:
Update your app.json & launch.json as per your environment, authentication, dependencies, port etc.

Creating a Codeunit: (TrackingCodeWS.al)
This function will be used to update “Qty. to Ship” on Sales Line

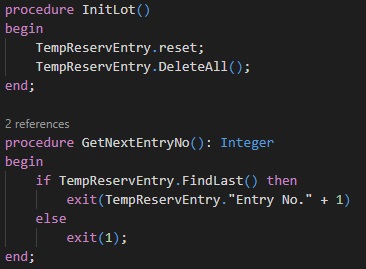
InitLot function as name suggests.
GetNextEntryNo function as name suggests.
It will depend on how you design your codeunit, you may require or not depends on logic how you use them.
AssignLotSalesLine is function which fills the lot details to temp Reservation Entry Table.
CreateReservationEntrySalesLine is the main function which actually makes your Tracking Lines and assign to Sales Line as per information filled in TempReservationEntry table in above function.

PostSalesOrder function is used for posting your Shipment.

Creating XML file to Publish Web Service
This XML file will ensure publishing of Web Service on Install of the Extension. You can directly make entry to Web Service table but benefit of using XML is when to Uninstall your extension the Web Service too will be removed, else if entry made to table you will have to take care to same yourself.

After Install of Extension, your Web Service is automatically Published.

Consume Web Service from Visual Studio
Below is the C# code to consume Web Service created above, you can modify code as per your requirement.

In above code we added Service Reference to Web Service and called functions created in Codeunit.
You can see earlier posts for step wise instruction how to add Web Reference to the Web Service in Visual Studio.
UpdateQtyToShipSalesLine:
Here “1” is used for Document Type = Order,”1008″ is my order no, 10000 is the Line No., 2 is the Quantity to Ship.
AssignLotSalesLine:
“L0001” & “L0002” is my Lot No, Serial No. is blank in this case, 1 is the Quantity, last three parameter is same as in above function call.
PostSalesOrder:
First 2 Parameter is same as above function call Document Type & Order No, third parameter is Ship = TRUE, Fourth Parameter is Invoice = FALSE.
Conclusion
This post gives you overall Idea how you can use Web Service to handle Sales Document from Web Service, you can make required modification to achieve exactly as per your requirement.
Control Add-In in Business Central
Today I will discuss about how we can create control add-in using VS Code & Extensions in Business Central.
We can create a control add-in the same way we created pages or code units. In Visual Studio we can use the code snippet T control add-in to generate a new control add-in.
It will better to create a fresh Extension Project in VS Code for control add in.
Step – 1 : Preparation
Create a New project, and add Folder Structure to arrange your files.
You can find steps in this post : Bare Minimum Steps to Start with fresh Extension Project for Business Central
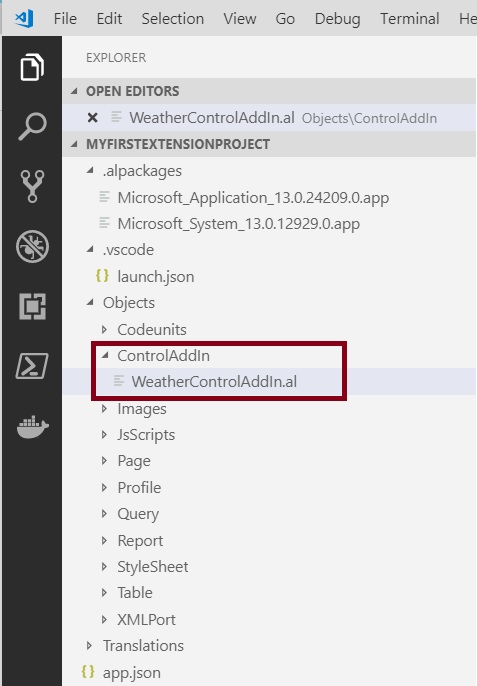
I will create below Folder:
- ControlAddIn
- Images
- JsScript
- Page
- StyleSheet
Step – 2 : Create Control Add-In
In control add-in folder I’m going to create a new control add-in. So new file.
Use the snippet, T control add-in, to create a control add-in.
Give the name to your control add-in in my example I have used “WeatherControlAddIn”
A control add-in works with JavaScript files that can execute some code. The scripts property is used to reference these JavaScript files. They can be local files or references to external files over http or HTTPS. A very commonly used JavaScript library is jQuery. JQuery makes it a lot easier to write JavaScript code and it reduces the lines of code significantly. In our case any such files will be saved in JsScripts folder under Extension-> Objects Folder as setup above. One file we will create for StartupScript as Start.js.
Now let’s include jQuery. We have to download jQuery from the Internet. So if we open our Web browser and we go to the jQuery website, we can click the download jQuery button over here. But instead of really downloading the jQuery files, we are going to reference them online.
Open the site: https://jquery.com/

Click on Download jQuery v3.3.1 large button as shown above.
Scroll down to find: – Microsoft CDN (Content Delivery Network)
Microsoft also has a CDN for jQuery. We take that one.
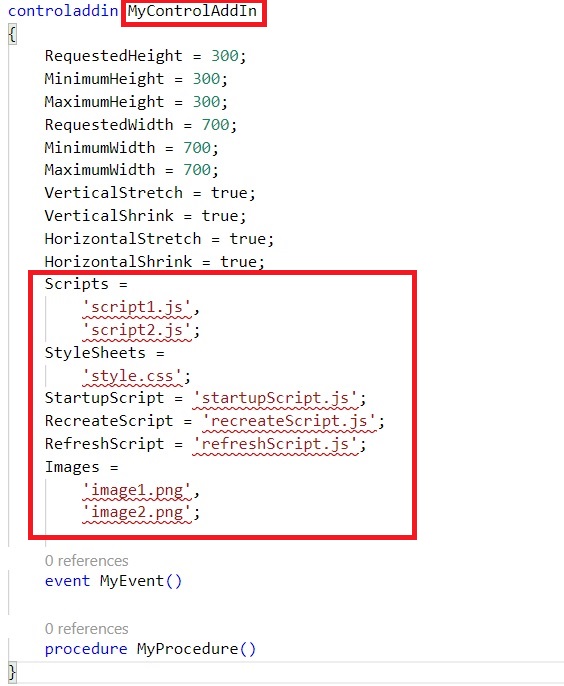
Copy the link to the latest one. Add this to our Scripts property in our control add-in.
Use the URL of jQuery file. There’s also a property start-up script which you can use to call a special script that runs when the page where you have implemented your control add-in is loaded. Now let’s add our start.js script over here. So because it’s in the folder script, we have to “Objects/JsScripts/Start.js”. Now, there’s also a recreate and a refresh script. We are not going to use them in this demo project, so remove them. And with the images and the style sheets properties you can specify additional style to the control add-in.
Scripts = ‘https://ajax.aspnetcdn.com/ajax/jQuery/jquery-3.3.1.js’;
StyleSheets = ‘Objects/StyleSheet/StyleSheet.css’;
StartupScript = ‘Objects/JsScripts/Start.js’;
Images = ‘Objects/Images/Weather.jpg” />
I am using dummy image to display on my control add-in, select your image accordingly and place it in Images folder.
We will look into StyleSheet.css and Start.js later in below post.

This is how your WeatherControlAddIn.al should look like.
Step – 3 : Create Style Sheet
I will be adding a CSS file to this with the name StyleSheet.css. In this CSS file I can apply some layout styles to give my control add-in a color or let it choose a certain font and so on and so on. But remember there are some guidelines on which styles to apply. I’m going to set my image to a width 200 pixels. So in CSS, this is image. Width, 200 pixels, and a margin top of 25 pixels. And then I need to reference it in my style sheet properties. This is ‘Objects/StyleSheet/StyleSheet.css’ and of course in the folder StyleSheet.
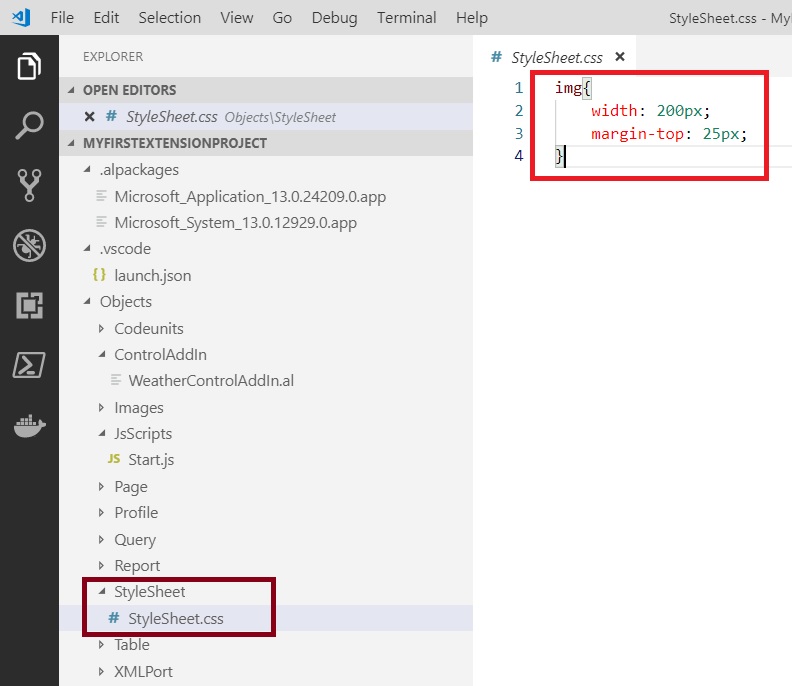
You can apply your knowledge about stylesheets to decorate your add-in accordingly, for demo purpose I have just set the width and top margin of the image.
Similarly I have downloaded an image from internet related to weather and copied to Images Folder.
Now set the path of both the files in your control add-in as shown above.
Step – 4 : Create CardPart Page
Now, our control add-in will run in a CardPart. So we have to create a page. Let’s create a new file and call this WeatherCardPart.al. This is a page. So T page. Let’s give it an ID and a name. WeatherCardPart. Now the source table will be customer. And the page type is CardPart.
Your Page should look similar to below:

We have added our ControlAddIn on the CardPart.
Next we will pass data from our Navision to the JQuery Script to process, to do so we have added a local procedure GetCustomer, remember above in control add-in we added signature of this procedure. Now it’s time to implement that function.
We have created a JsonObject to store our data and pass to Control Add-In.
This function gets called from OnAfterGetRecord trigger of the Page.
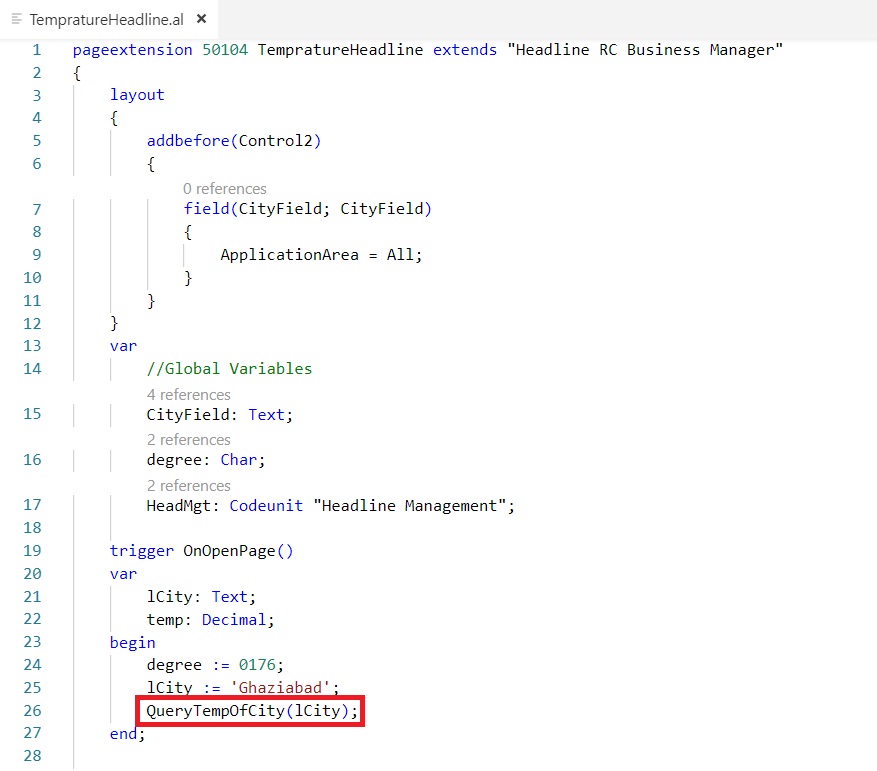
You may be wondering about function call QueryTempOfCity, this is the same function which we used in our earlier post to call API and get temperature of specified city then updated the Headline of the RC Page.
If you missed you can find that post here: Working with Headline Role Center Page and HTTP Call – Business Central
I have copied some functions from that post and changed a little bit and added to this page, it should be like below:

This function will take City as parameter and query from API and return the current temperature of that city. This function is explained in referenced post above.
Step – 5 : Create Page Extension
CardPart runs in a factbox on a page. So let’s create a page extension on the customer card. So new page. Let’s call this customercardextension.al. which extends the customer card. Add a factbox in the factboxes, and this is a part — let’s give it a name. WeatherCardPart. And this is of type WeatherCardPart. When adding a part or a factbox, then need to set the sub page link. So don’t forget to set the sub page link and this is equal to the number equals field number.

It should be similar to above.
Step – 6 : Create jQuery Script
Here comes the most interesting and difficult part as we are not regular Java Script programmer, but thanks to google, who is always there to help.
We will create our Start.js
You can apply your Java Scripts skill to enhance this, let us keep it simple for learning purpose.
We will extract the information send via GetCustomer function in JsonObject and display in our Control Add-In.

You can say controlAddIn here as main outer container.
We have defined 4 sub containers and with unique id to reference further.
Now we add all this 4 sub-containers to the main container controlAddIn.
Get the values from the Navision CardPard GetCustomer function and decode the JsonObject Customer and extract value from it and assign to these 3 containers.
For 4th we have assigned the image path from Extension using special function Microsoft.Dynamics.NAV.GetImageResource
Step – 7 : Deploy and Test the Control Add-In
So now we are done with Creating of Control Add-In, deploy your extension by using command pallet, Publish you Extension.
Open the Customer Card and you should see your Control Add-In in action.
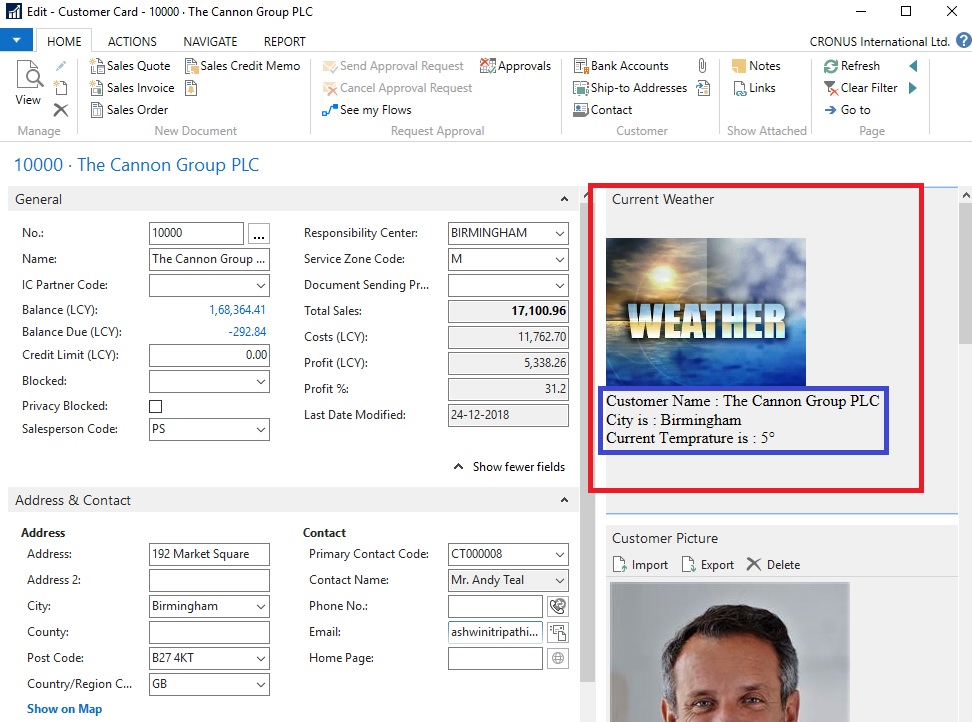
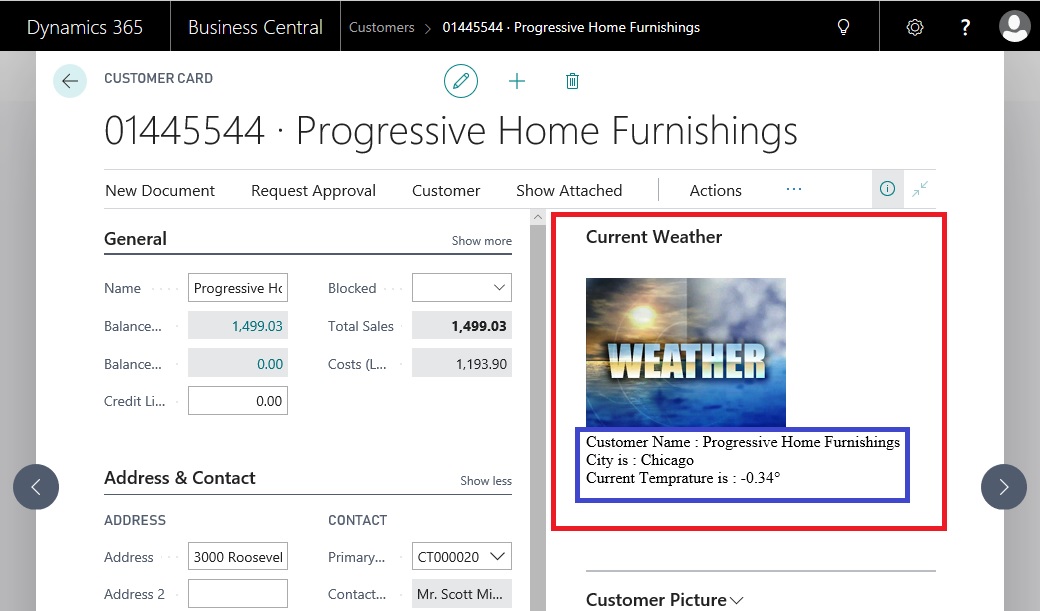
Tested successful. Here we come to the end of our today’s post.
Hope you liked and enjoyed learning the concept in this post.
Will come up with more such interesting concepts in my future posts.
Till then keep exploring and learning. Take Care of yourself.
Working with Headline Role Center Page and HTTP Call – Business Central
I am again back with my First post of 2019. Hope you all enjoyed New Year Parties.
Wishing you all readers again Happy New Year.
Today we will play around Role Center Headline Page and add our Message to it.
You have below 9 Headline RC Pages.
| 1440 | Headline RC Business Manager |
| 1441 | Headline RC Order Processor |
| 1442 | Headline RC Accountant |
| 1443 | Headline RC Project Manager |
| 1444 | Headline RC Relationship Mgt. |
| 1445 | Headline RC Administrator |
| 1446 | Headline RC Team Member |
| 1447 | Headline RC Prod. Planner |
| 1448 | Headline RC Serv. Dispatcher |

So let’s start with our task.
Step: 1 –
To be able to complete today’s customization you will require an account to any API weather forecast provider. Here I provide you with the free service, not all features are free, but sufficient to complete our task.
Open https://openweathermap.org/ page and register to the service. You will receive an API key upon sign up. This is required when you make an API Web Service call.
Step: 2 –
Open your Extension Project and create one New AL file for Page Extension
We will simply add one field to the Page.
Step: 3 –
This is the main part of this functionality:
We will write a procedure for Querying the current temperature of the city using API call and extract information from the response and add to the Headline.
Response are available in other formats too, but I am using JSON in my example. You can select your format you are comfortable with. You will find all details on the website API section.
Below will be our API call syntax:
‘http://api.openweathermap.org/data/2.5/weather?q=’ + City + ‘&units=metric&APPID=16ea4cf53127aa3baa74d4072381ba62’
To get data in API for current weather in Kelvins do not indicate units parameter into your API call.
To get in Fahrenheit add units=imperial parameter.
To get in Celsius add units=metric parameter.
API Key :- &APPID=16ea4cf53127aa3baa74d4072381ba62 – Compulsory
You will receive JSon response as below:
JSONText Value will be similar to below:
{“coord”:{“lon”:77.41,”lat”:28.67},
“weather”:[{“id”:711,”main”:”Smoke”,”description”:”smoke”,”icon”:”50n”}],
“base”:”stations”,
“main“:{“temp“:292.15,”pressure”:1019,”humidity”:48,”temp_min”:292.15,
“temp_max”:292.15},
“visibility”:1800,
“wind”:{“speed”:1,”deg”:210},
“clouds”:{“all”:0},
“dt”:1546432200,
“sys“:{“type”:1,”id”:9165,”message”:0.004,”country“:”IN”,”sunrise”:1546393411,
“sunset”:1546430725},
“id”:1271308,
“name“:”Ghaziabad”,
“cod”:200}

Below is the 2 functions used to extract the Information from JSon Response:

Step: 4 –
Save and Publish your Extension.
Open Web Client, make sure RC Business Manager profile is selected for your account or whichever Headline RC you have extended for above step.
You will see the Temperature of your selected city, as shown in the beginning of the post.
You can use similar concept to add your customized Headline to your Role Center Page.
See you again in my next post with some other concept, tips & tricks. Till then keep exploring and learning. Take care.
AL Basics – Part 2 [Table]
Today we will discuss about tables.
To Create a Table Create filename.al file, as one shown in example. Folder is not compulsory, I am using to just keep my files in arranged way.

You can choose File -> New File or press 【ctrl】+ N or using tool button on Project folder as shown above. Give meaningful name and .al extension is a must.
Once you get your file in editor, you can start coding from scratch or can take the help of Snippet ttable and continue their after.
Let see what happens if I type ttable in the editor window.

As you start typing the assist window will guide you with available options.
You can press anywhere you will get the list of options available for that section.
We will see this in a while.
First let understand different sections in table object where you will write your codes, or set properties etc.
You can remove your Global Variable and Trigger section if you have nothing to define or not required in your case.

Suppose you are in Table property section and want to know what all properties are available in AL you can place your cursor at desired place and press 【ctrl】+ < Space Bar>. A list of options available will be shown to you, you can select required property and complete your syntax.

Similarly you can do in other sections of table structure also, you will always get the list of things you can do in that section.
Let’s complete our one sample table, with few Table Property, Fields and Fields Property, Keys.

This is a sample Table.
I have commented DrillDownPageID & LookupPageID Table Properties as this page are not available at this stage will add later.
I have defined Caption & TableRelation for my field Depot.
Caption for Field “Slot Duration” also Option String and caption for same.
I have defined Primary Key for the table.
I have defined the fieldgroup for Dropdown.
At this moment I don’t want to define Global Variables and Triggers for this table so removed.
We will get into more details in our next post.
Bare Minimum Steps to Start with fresh Extension Project for Business Central
Step-1 Create Project Folder
To create a Project Folder press <Ctrl> + <Shift> + <P> to open command Palette or alternatively you can choose from Menu View -> Command Palette.
Now Select Al: Go!

Enter your Forder & Project Folder Name and press <Enter>
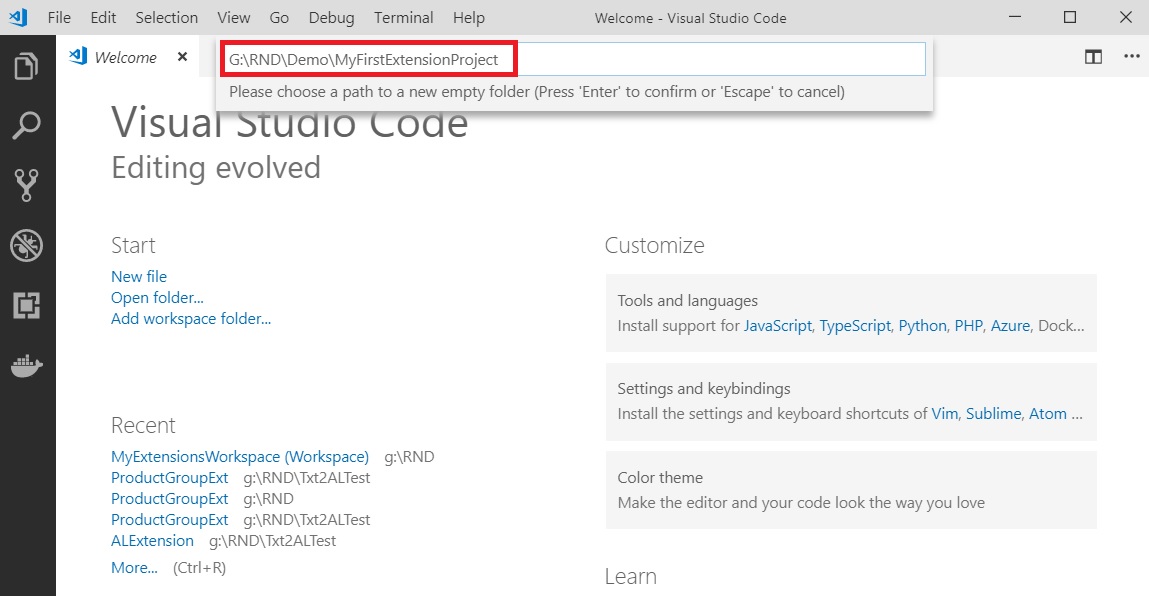
Wait for few seconds and choose “Your Own Server” option.
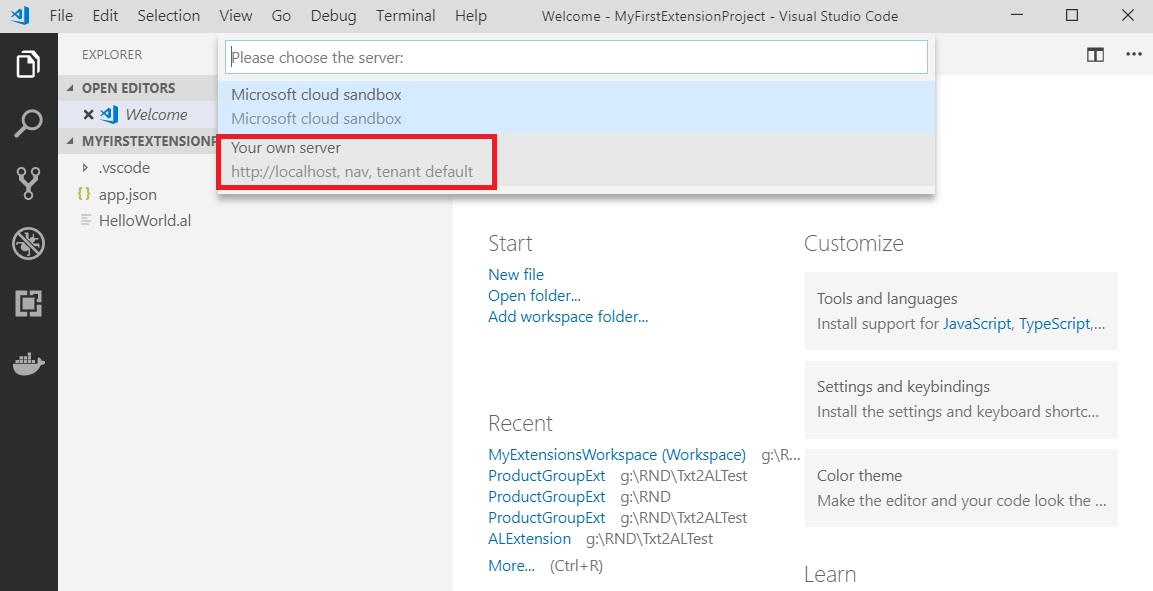
Step -2 Complete your Extension settings & Cleanup
You will land to your project Folder, where few files are created for you by default.

Now we will set our Server connection related changes and remove HelloWorld.al File.

Next we will check our Extension related settings.

Next our Task is to Download Symbols. If Symbol files are missing you will not be able to compile your project. Also any objects referenced for extension will say invalid object.
To Download Symbols again Go to you command pallet out of any 2 methods explained above you are comfortable with.
Step – 3 Download Symbols

Wait for few seconds, if settings of server in launch.json file is correct it should download your symbols.

You will see notification in right bottom corner, else can check the errors in Output Tab of Debugger Window.
You will notice new folder [.alpackages] with 2 files are created. These file contains the definition of your Navision objects.
Next I will prepare my Project Folder for getting started for my Extension development.
Step -4 Prepare your Project Folders to arrange you’re working Files.

Now my Project Folder is ready to start working with Extensions.
We will start creating Files/Objects in our next post.

You must be logged in to post a comment.