
Tag: Extensions
Jet Data Manager Connecting Data Source To Business Central – – Part-1
Jet Analytics delivers fast, flexible dashboards and reports in Excel, Power BI, and in the browser. Now you can bring all your data together in one place to enable everyone in the organization to easily perform sophisticated business analysis from anywhere, without technical expertise. Empower users to make better decisions, faster.
This blog shares information on the steps involved to connect Jet Analytics to the Business Central (Online Tenant)
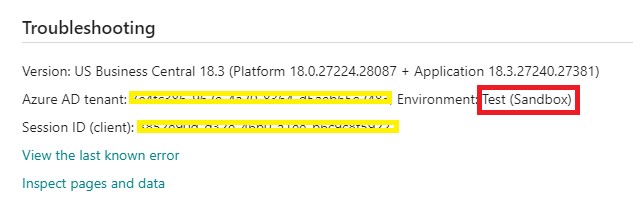
Step 1: Find tenant and environment information

Step 2: Get web services access key
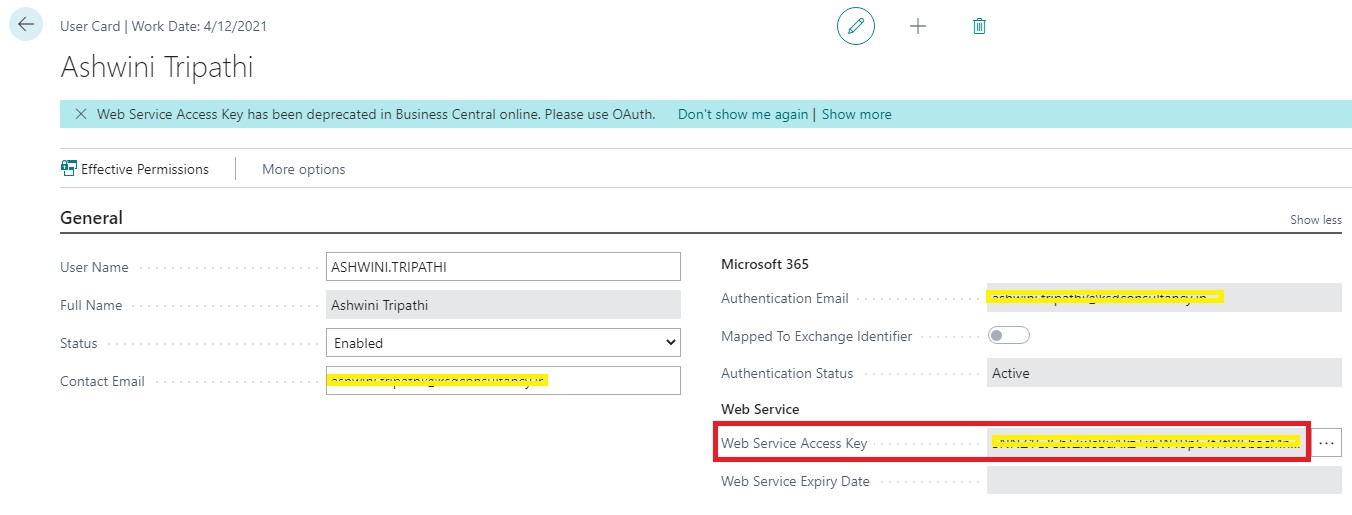
User which will be used to establish the connection to the Business Central data source ensure this user have permission set of either:
- SUPER
- D365 FULL ACCESS
Step 3: Install Jet Analytics Extension
On Extension Management page click Manage → Extension Marketplace And search for Jet Analytics App
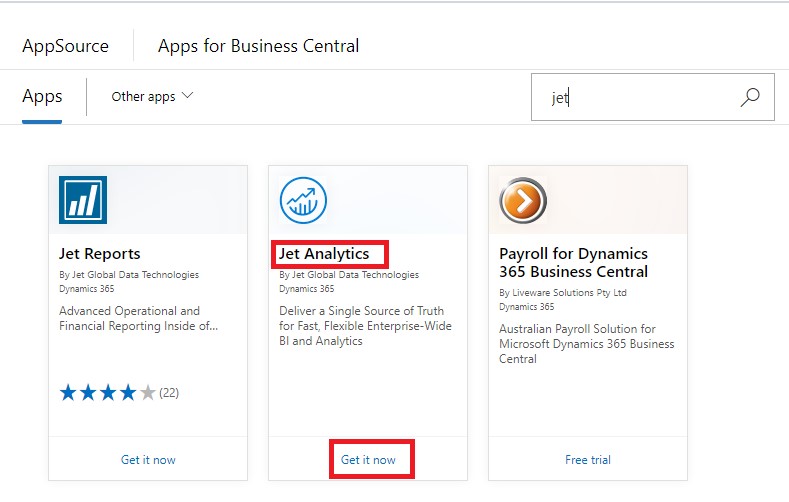
Click -> Get it now to deploy the App
Step 4: Verify extension installation
Click Manage and then Deployment Status

Verify that the status is completed.
Step 5: Allow http client requests


Step 6: Configure Business Central data source in Jet Analytics project


Ensure if your Environment Name is other than Production or Sandbox, you will need to manually enter your Environment name. Like in my case it was Test
Next, we will setup Accounts

You will get (0 selected) at first time in this case this task is already performed so showing count of selected Accounts (Companies in Business Central Database)

Select Template & all desired Companies from the List and hit OK.

Now you can see your table objects in Data Selection Pan.
That’s all for this post rest will discuss in other upcoming posts.
One news I want to share with all readers, now we are Jet Reports Partner, if you have any requirements you can reach to me for License, Deployment, Training or Support.
Extension Install Code
Extension install code is executed when:
- An extension is installed for the first time.
- An uninstalled version is installed again.
This gives you control to write different logics for first time installation of extension and reinstallations of uninstalled extensions.
This is achieved by defining Install Codeunit in your Extension.
First thing first:
- Subtype property of codeunit need to be set to Install
- OnInstallAppPerCompany trigger is triggered when the Extension is Installed first time or subsequent install of same version on Extension.
- DataVersion property one of the important properties which tells you what version of data that you’re dealing with.
- AppVersion, DataVersion, Dependencies, ID, Name, and Publisher. These properties are encapsulated in a ModuleInfo data type. You can access these properties by using the NavApp.GetCurrentModuleInfo and NavApp.GetModuleInfo methods.
- If the DataVersion property equals Version.Create(0,0,0,0), then it’s the first time that the extension is installed because no data exists in the archive.
Sample codeunit can be similar to below:
codeunit <ID> “Name of Codeunit”
{
// Install Logic
Subtype = Install;
trigger OnInstallAppPerCompany();
var
myAppInfo: ModuleInfo;
begin
NavApp.GetCurrentModuleInfo(myAppInfo);
// Get info about the currently executing module
if myAppInfo.DataVersion = Version.Create(0, 0, 0, 0) then
// A ‘DataVersion’ of 0.0.0.0 indicates a ‘fresh/new’ install
HandleFreshInstall
else
HandleReinstall;
// If not a fresh install, then we are Reinstalling the same version of the extension
end;
local procedure HandleFreshInstall();
begin
// Logic to execute on first time this extension is ever installed for this tenant.
// Some possible usages: – Initial data setup for use
end;
local procedure HandleReinstall();
begin
// Logic to execute on reinstalling the same version of this extension back on this tenant.
// Some possible usages: – Data ‘patchup’ work, for example, detecting if new ‘base’
// records have been changed while you have been working ‘offline’.
end;
}
Happy Learning.
Enabling Multilanguage Support to Extensions – Business Central
Microsoft Dynamics 365 Business Central is Multilanguage enabled, which means that you can display the user interface (UI) in different language.
To add a new language to the extension you have built, you must first enable the generation of XLIFF files.
The XLIFF file extension is .xlf.
The support for using the ML properties, such as CaptionML and TooltipML, is being deprecated, so it is recommended to refactor your extension to use the corresponding property, such as Caption or Tooltip, which is being picked up in the .xlf file.
You can use the .xlf translation files approach only for objects from your extension.
It’s an XML-based format used to standardize localization.
Step – 1
To be able to work with translation files, you need to add a Feature to the app.json file.

This Feature is TranslationFile.
Step – 2
When we save our app.json file, we can see immediately that we get some warnings.

This warning is telling us that the Multilanguage syntax is being deprecated and that we have to update to the new syntax.
The new syntax requires us to remove all the ML properties, such as the caption ML and the option caption ML, and we have to use a regular Caption and OptionCaption properties.
We use Labels at place of Text Constants.
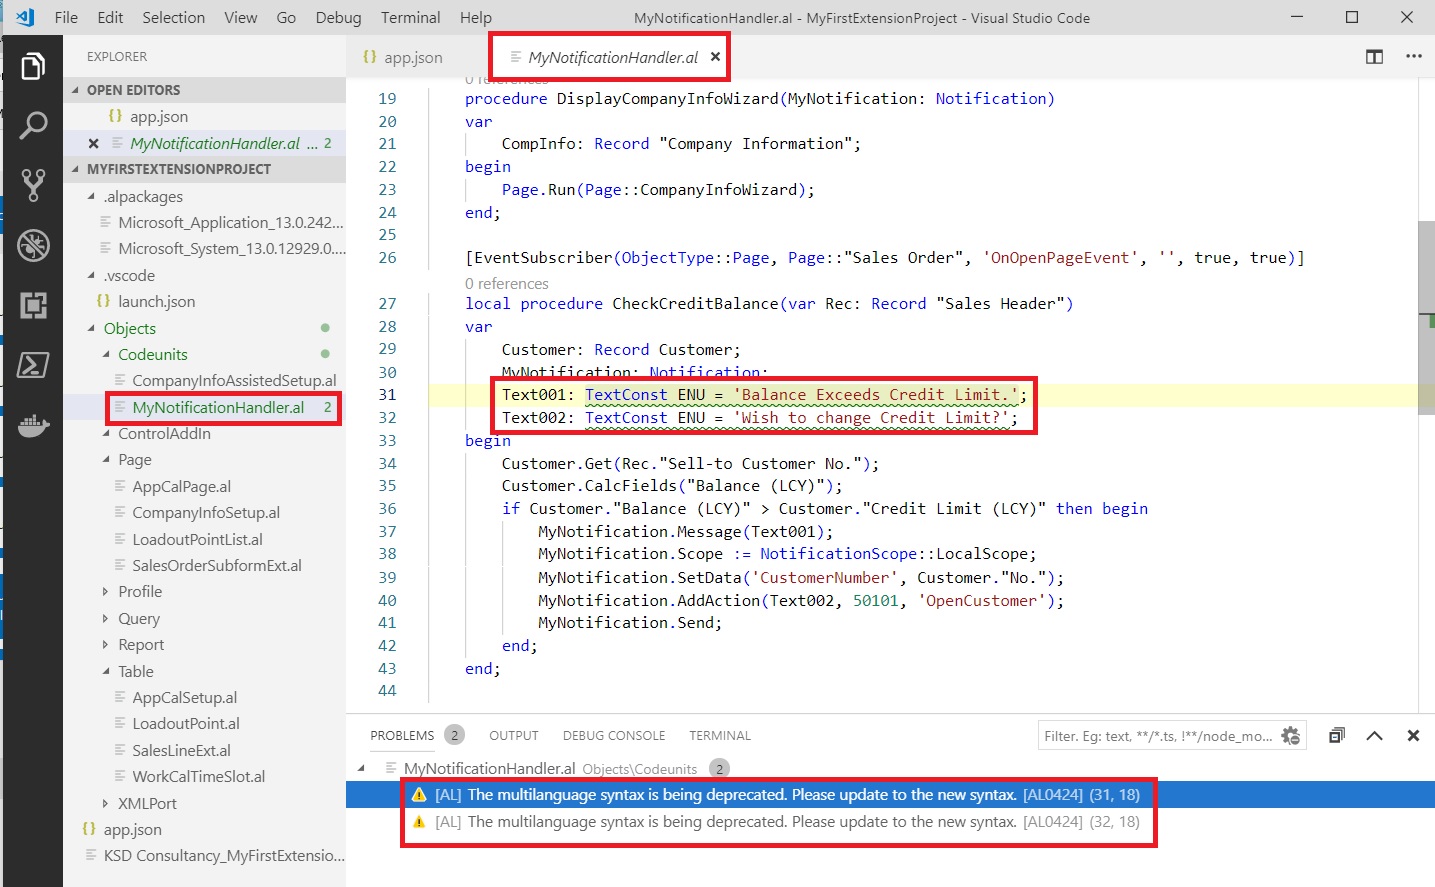
Let’s fix these issues. Any ML properties like Caption ML, Option Caption ML or Text Constants. Replace them with Caption and Label.
Before we start some important points:
- The New translation process decouples translation from development.
- New Label syntax – Default translation & Some attributes.
- Translation file can be combined with the extensions to support Multilanguage.
- Caption & CaptionML cannot be used simultaneously.
- Label syntax have comment, locked and maxLength optional parameters.
- Same syntax for Captions and Labels.
Here after fixing the above errors:

All errors resolved from my Project.
In Nutshell use only Caption, OptionCaption & Label, all translation will be done outside developer environment in xlf file, no more defining in objects.
Step – 3
Build your Package, choose AL:Package.

Once your Package is created error free, you will see new Folder Translations with one xlf file is created.
Every time you build your Package this file gets overwritten. So be cautious.
When you perform your translation make a copy of this file and save with new Name then perform your translation.
Means Translation task will be last process in your Extension building process.
If you add more Captions or Labels later then you will have to take care of them and populate in all of your Language translation Files.
No of Languages your extension supports, you will have that much of translation files and is packaged with your package, no separate installation like in older versions is required to enable MultiLanguage.
Step – 4
Let’s see what this xlf file looks like:

It is in xml format.
If you see “<file datatype=”xml”” you will get your Source-language & target-language. Source & Target is set to same Language.
“<trans-unit id” Specifies each of you Caption and Labels defined in you objects.
“<source>” node specifies Caption or Label in source Language.
You will have to add your “<target>” language translation.
Step – 5
Let make copy of this file in all the supported languages you want.
For example:

I have made 2 files en-US & nl-BE. Naming convention is for your understanding purpose only.
Now you can handover these files to translator and he can perform translation in required language outside your development environment.
You code/IP is safe from external agencies whom you give for translation.
Only what is required for this will be:
[1] Update your Target Language in below line as:
<file datatype=”xml” source-language=”en-US” target-language=”en-US” original=”MyFirstExtensionProject”>
To
<file datatype=”xml” source-language=”en-US” target-language=”nl-BE” original=”MyFirstExtensionProject”>
[2] For every
<source>…</source> add <target>…</target>
<source>Loadout Point</source>
<target>Loadout-punt</target>
There are number of tools available on internet which supports xlf file and give ease your work of translation.
Step – 5
Once you are done with your translation, copy all the translated file to the Translation folder and Build your Solution and deploy on Server.
Change the Language of Client to Dutch and run your Object:

I have translated only one caption shown in red-box.
Please read the points mentioned in the post carefully.
Now you can enable MultiLanguage support for your Extensions.
I will come up with some other topic in my future post.
Till then keep exploring and Learning. Take Care of yourself.
Creating Assisted Setup in AL for Business Central
Today we will see how we can add our Wizard Page to Assisted Setup.
Continuing from previous post this is the second part as both are inter related.
If you have not gone through earlier post see here how to create Wizard Page for Business Central. Creating a Wizard Page in AL for Business Central
Let’s have some overview why we need assisted setup:
What is Assisted Setup?
- List of setup scenarios, presented in list form.
- Uses Wizard Page with relevant options.
- Display Status of activity, completed or incomplete.
- Predefined set of setup scenarios. Like E-Mail Setup, Cash Flow Forecast, Approval Workflows, Connection to other entities like CRM connection etc.
- Possible to add new custom setup scenarios.
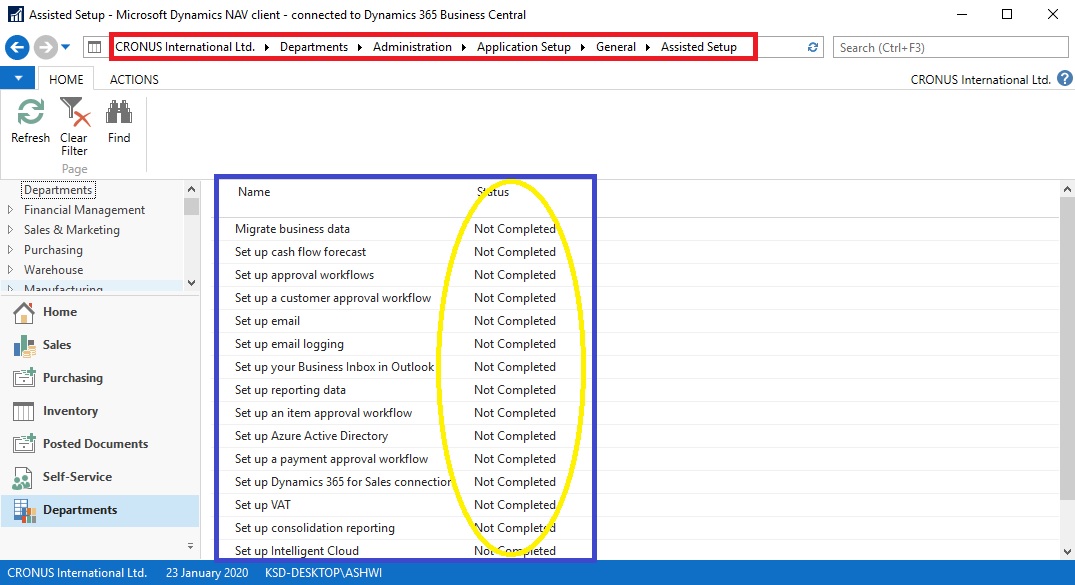
Today we will see how we can add our Wizard Page for Company Information Setup into this List, and how the Status is updated in this list.
So further not going into theory let’s jump to practical Approach.
To add a New Assisted Setup:
- 2 tables are involved Assisted Setup & Aggregated Assisted Setup.
- Need to Subscribe to Event OnRegisteredAssistedSetup and call AddExtensionAssistedSetup.
- Wizard should update the status in the Assisted Setup table.
- Subscribe to Event OnUpdateAssistedSetupStatus to store the updated status.
- Alternatively can determine actual status based on data.
Steps:
Create New Codeunit on available ID and unique name.
Code will be similar to below:

Save the file and publish your Extension.
Now you should be able to locate your Wizard as entry ‘Setup Company Information’

Click to Run your Company Information Setup Wizard.

Complete your Setup by entering information and Click Finish.

If you have completed all the step and provided information, your Status should show Completed.
You may need to re-open the Assisted Setup page.
It was just to give you an idea how we can get this done.
You will require to perform other some more steps to get it functioning smooth.
Sometime later will come up with more details.
Explore the existing Setups and can get more insight on the same.
I have given you the start explore learn and reach to conclusion.
See you again with some other topic in my upcoming post. Till then keep exploring and keep learning.
AL Basics – Part 6 [Publishing & Testing Extension]
Today we will see in our post how we can Publish & Test our Extension.
To be able to follow this steps discussed below you should have gone through my earlier post and your project is ready to continue from where we left in our previous post. If yet not please follow below links and continue their after to this post.
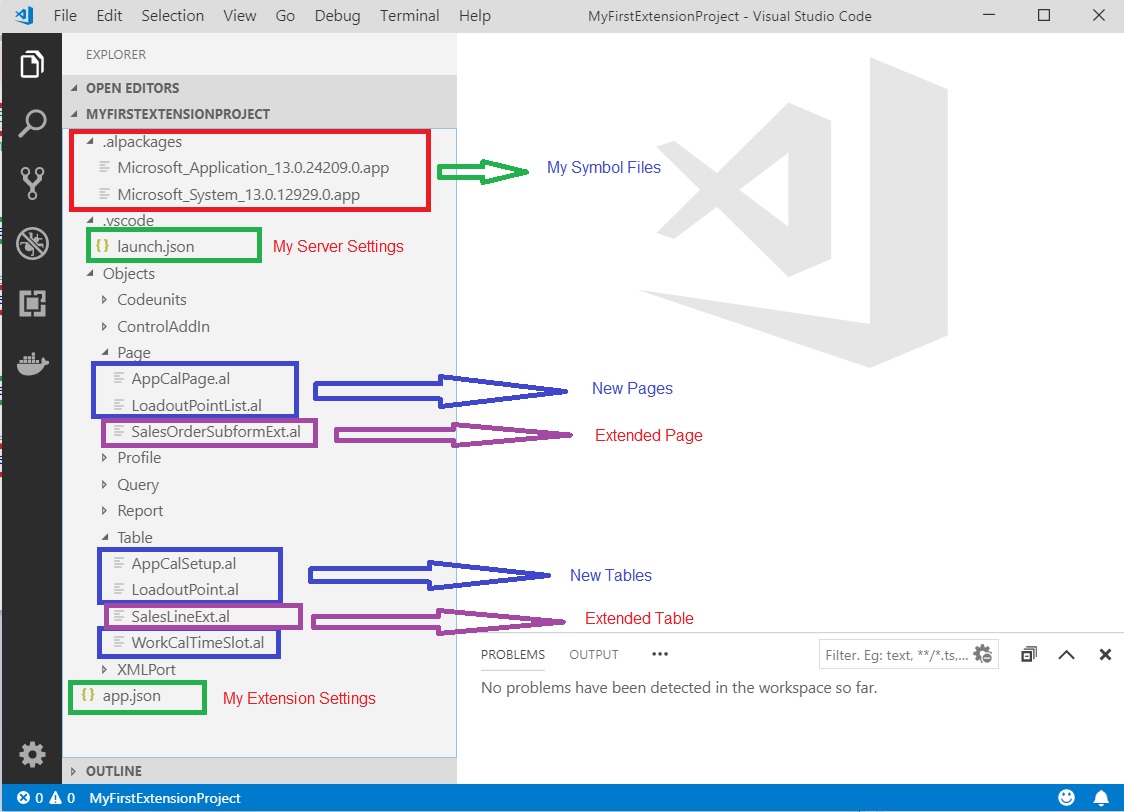
Bare Minimum Steps to Start with fresh Extension Project for Business Central
AL Basics – Part 3 [Table Continued]
AL Basics – Part 5 [Extending Table & Page]
Since we are going to continue same project, reason why I am asking to have it as we will be referencing to the objects we created in above posts.
Let’s begin with our today’s task.
Now we have all required basic stuffs to Publish our Extension.
To Publish your Extension first need to Build and Package your Extension.
Although you can Package & Publish in single command, follow as you feel comfortable.
Press <Ctrl> +<Shift> + <P> to access your Command Pallet.

Chose AL:Package to create Package.
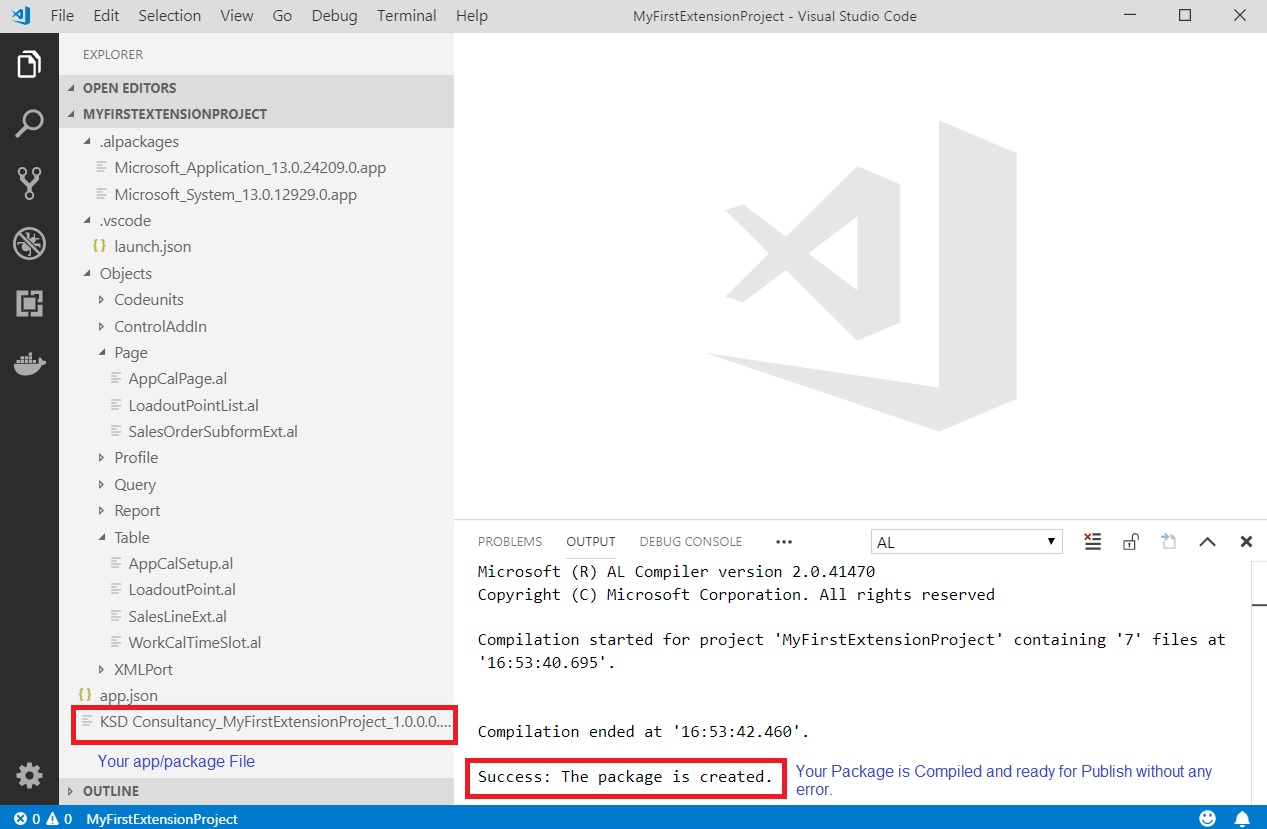
At this stage your package is ready for deployment/Publish.
Next we will Chose AL:Publish from Command Pallet.
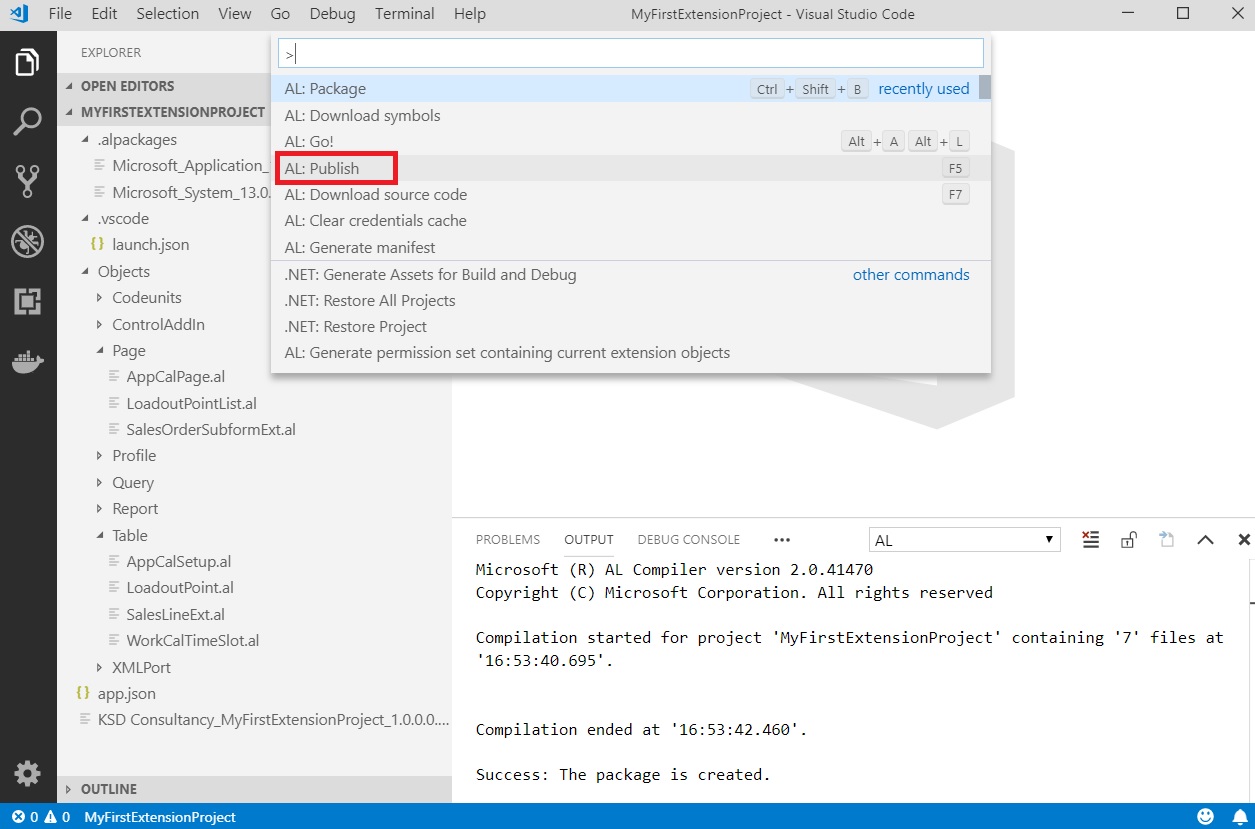
This will create Package and Publish to your server as given in launch.json file.
Just previous step is optional to create Package, but it is helpful in case you want to just create a package but not publish to your server, may be you have tested and creating final package for delivery to your customer.
Whatsoever, we are now ready to test our Package/Extension.
You may get below error:
The request for path /BC130/dev/metadata failed with code InternalServerError. Reason: NetFx40_LegacySecurityPolicy is enabled and must be turned off in the Microsoft.Dynamics.Nav.Server.exe.config file.
Locate the file from installation folder in my case: C:\Program Files\Microsoft Dynamics 365 Business Central\130\Service

Set value to false save and replace the config file.
Restart your Service, and try publishing again.
You may get error:
Error: Could not open the specified startup page. Please check that the server configuration key PublicWebBaseUrl has been properly set.
That’s not a problem you can ignore it, actually it is trying to open WebClient and launch the Object you specified in launch.json file.
Open your Client and browse Extension Management.
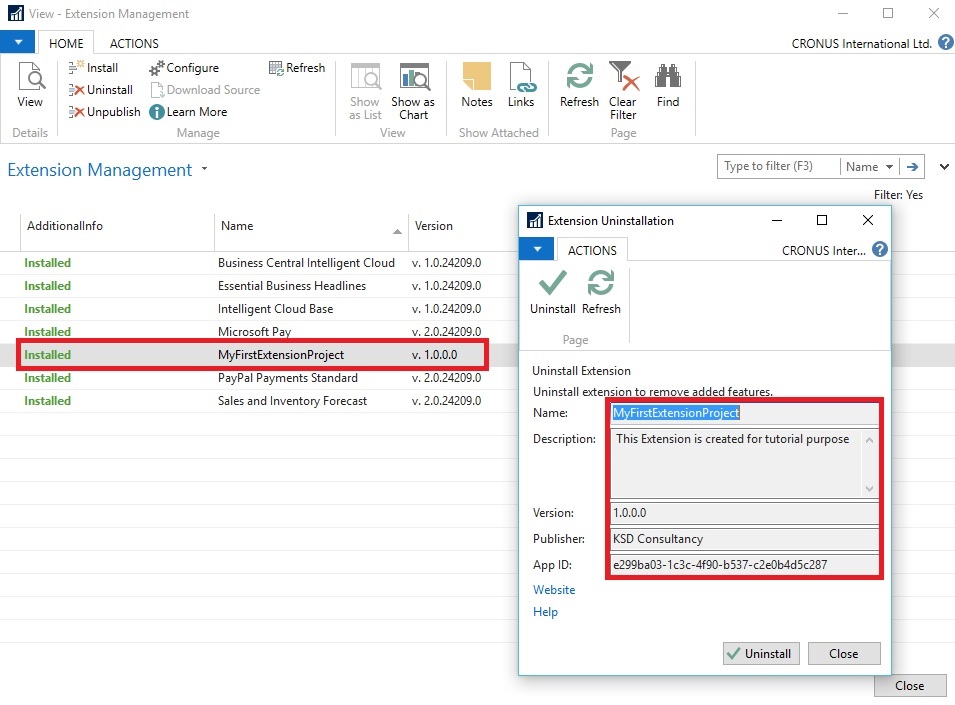
Your Extension is published, & you can check the information that you provided in app.json file is visible.
Now Let’s Test our Extension.
If you remember we have integration point on Sales order line, so to see our extension in action we need to check our Sales Order Line.
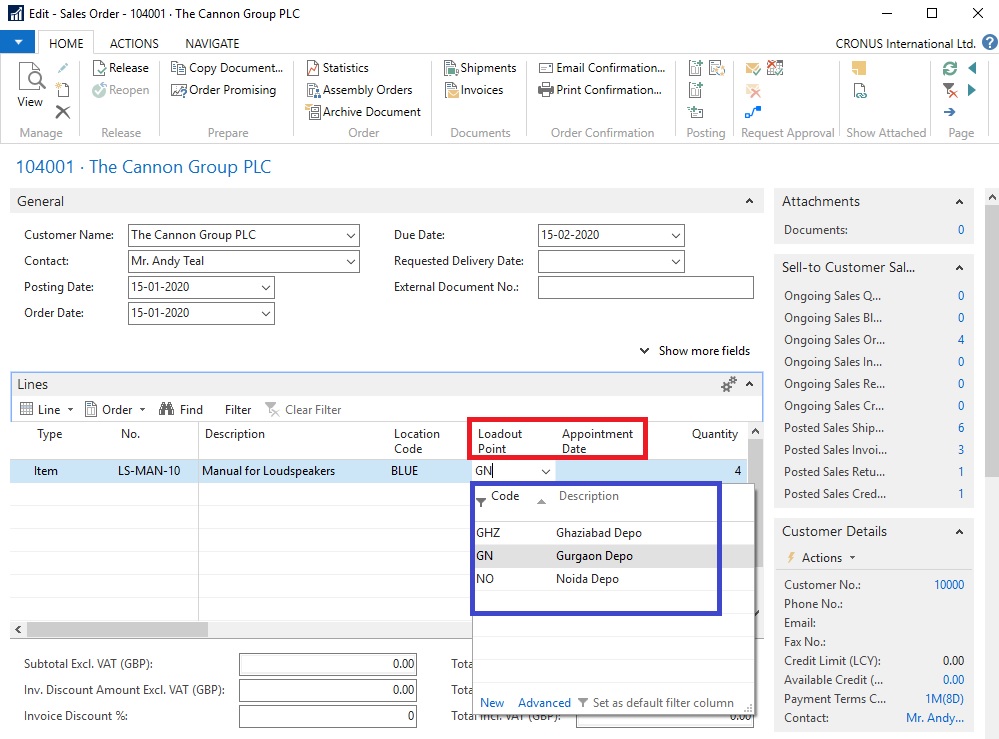
You can see the fields that we added in our Page Extension is visible on Sales Order Line.
You can add your data and start using the extension.
If you remember we also added Appointment Calendar Setup Page to the action on Loadout Point Page.

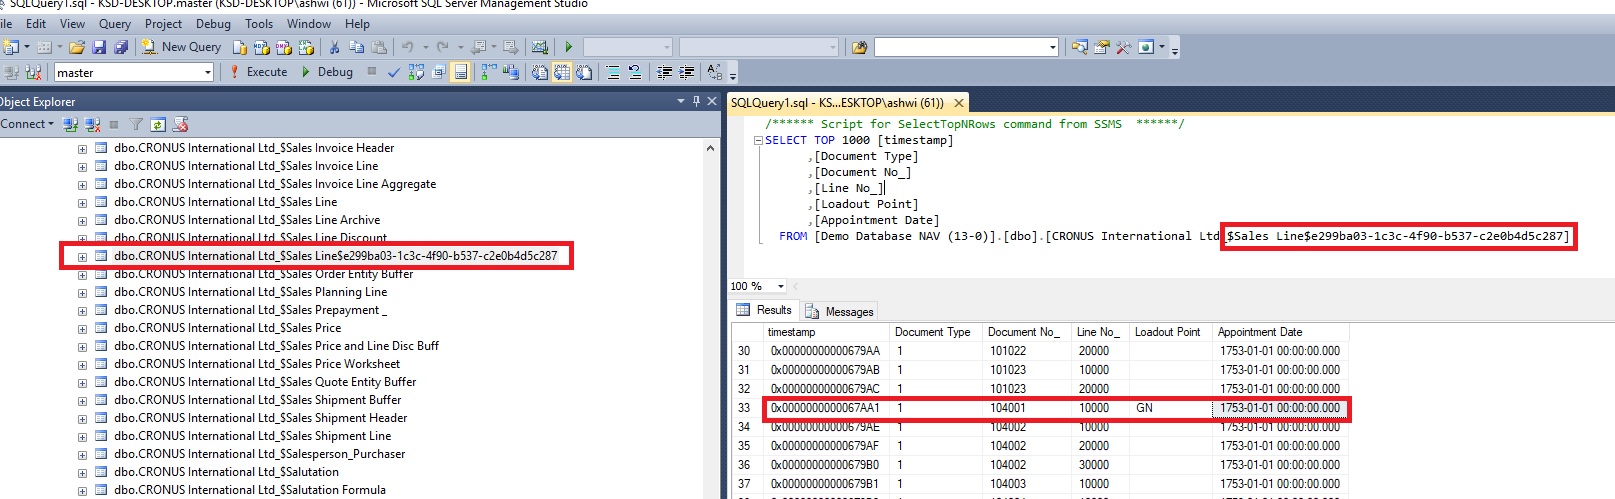
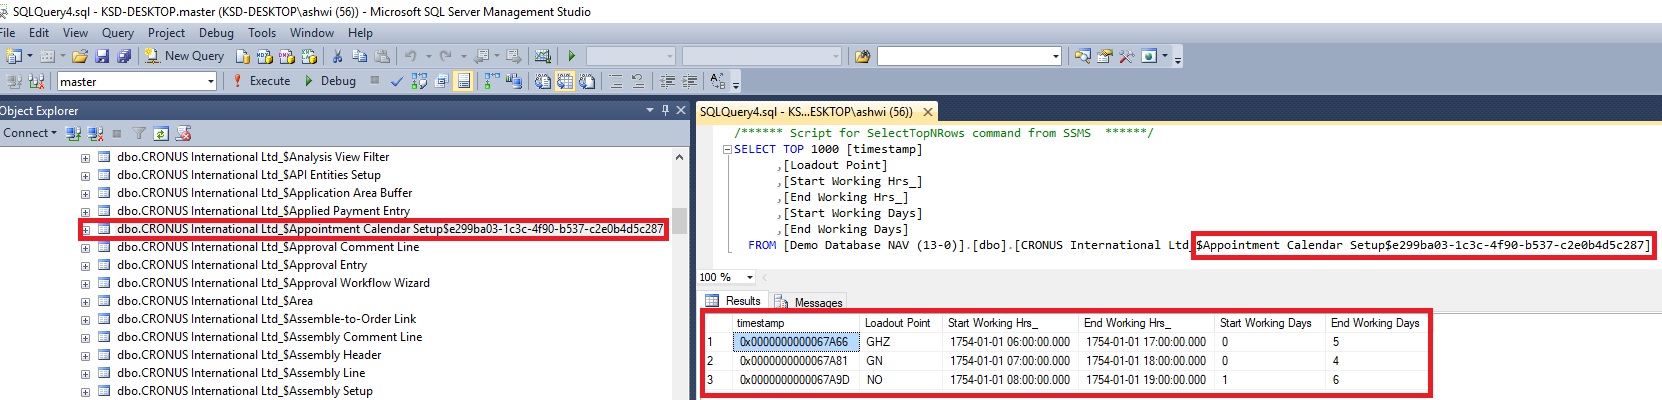
If you check the Objects in your database you will not find these objects in Object designer, so where is my all data stored & saved.
To find them you need to check in your SQL database.
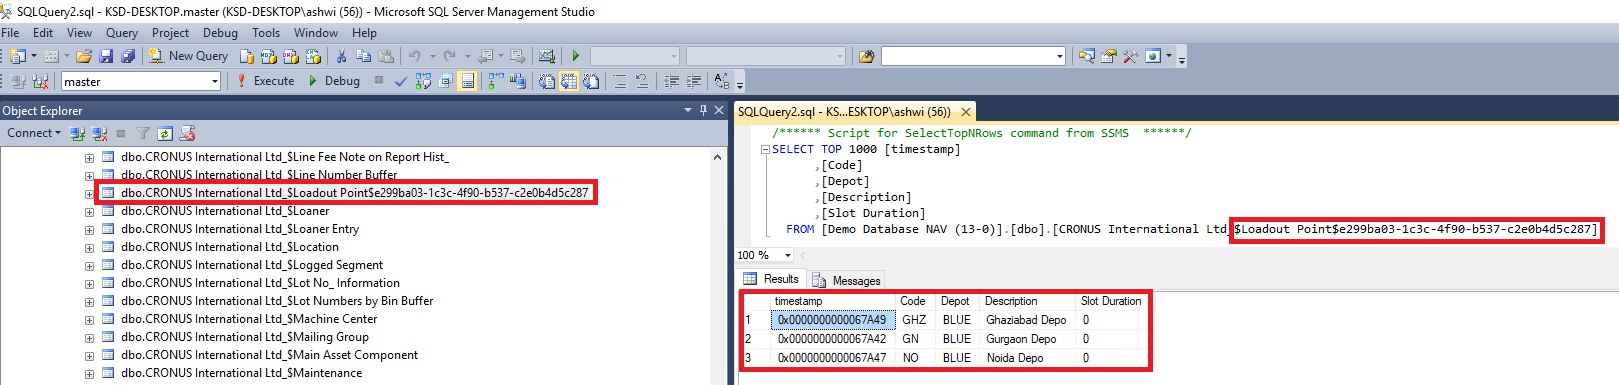
Your Tables are name defined with postfix your application ID.
Sales Line Extended Table data.
Loadout Point Table data.
Working Calendar Time Slot.

Appointment Calendar Setup.
Hope you enjoyed Publishing and playing around with your First Extension.
I will come up with more advanced features and tips on Extensions in upcoming posts.
Keep Learning, remain safe and stay tuned for more in upcoming posts.
AL Basics – Part 4 [Page]
Today we will see how to create pages in AL.
Before we dive into it lets have some basic concept for Pages.
If you navigate in Navision you may be familiar with page types we have in Navision.
Types of Page
- Card Page
- List Page
- CardPart Page
- ListPart Page
- Worksheet Page
- Document Page
- RoleCenter Page
- Confirmation Dialog Page
- ListPlus Page
- StandardDialog Page
- Navigate Page
All above pages are just how we design and use them for specific purpose, I will not go in details what type of page is used for what purpose you can find them in any document or already familiar with.
When we design pages we should have idea of Page Controls
Different Page Controls you have on pages are:
- Actions
- Content Area
- Factbox Area
- RoleCenter Area
All controls are placed in pages using below arrangement
| Type | SubType |
| Container | Content Area |
| FactBox Area | |
| RoleCenter Area | |
| Group | Group (Fast Tabs – on Card Pages) |
| Repeater (List Pages) | |
| CueGroup (Rolecenter Pages) | |
| FixedLayout | |
| Grid layout | |
| Field | Data from Table |
| Part | Display another Page, Chart, System defined features |
Lets understand from below Customer List Page

Let’s create our First Page.
To Create a Page First we will create a File .al.
In Editor we fill type snippet tpage
You will get the options available, select Page of type list, we are going to create List Page.

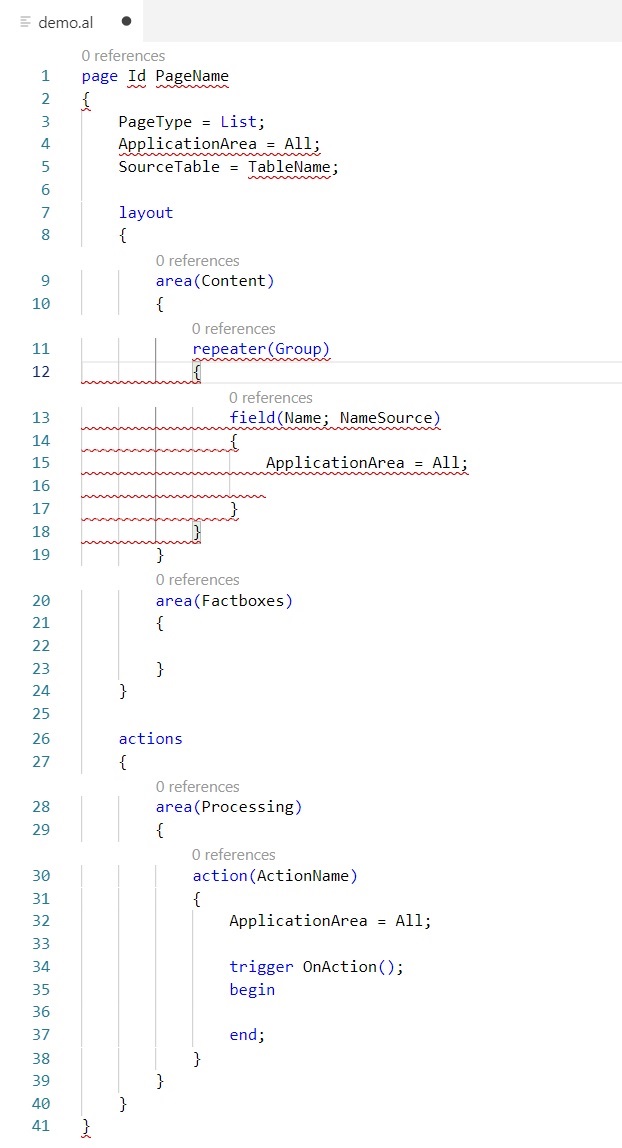
Basic structure of the Page is given to you as below
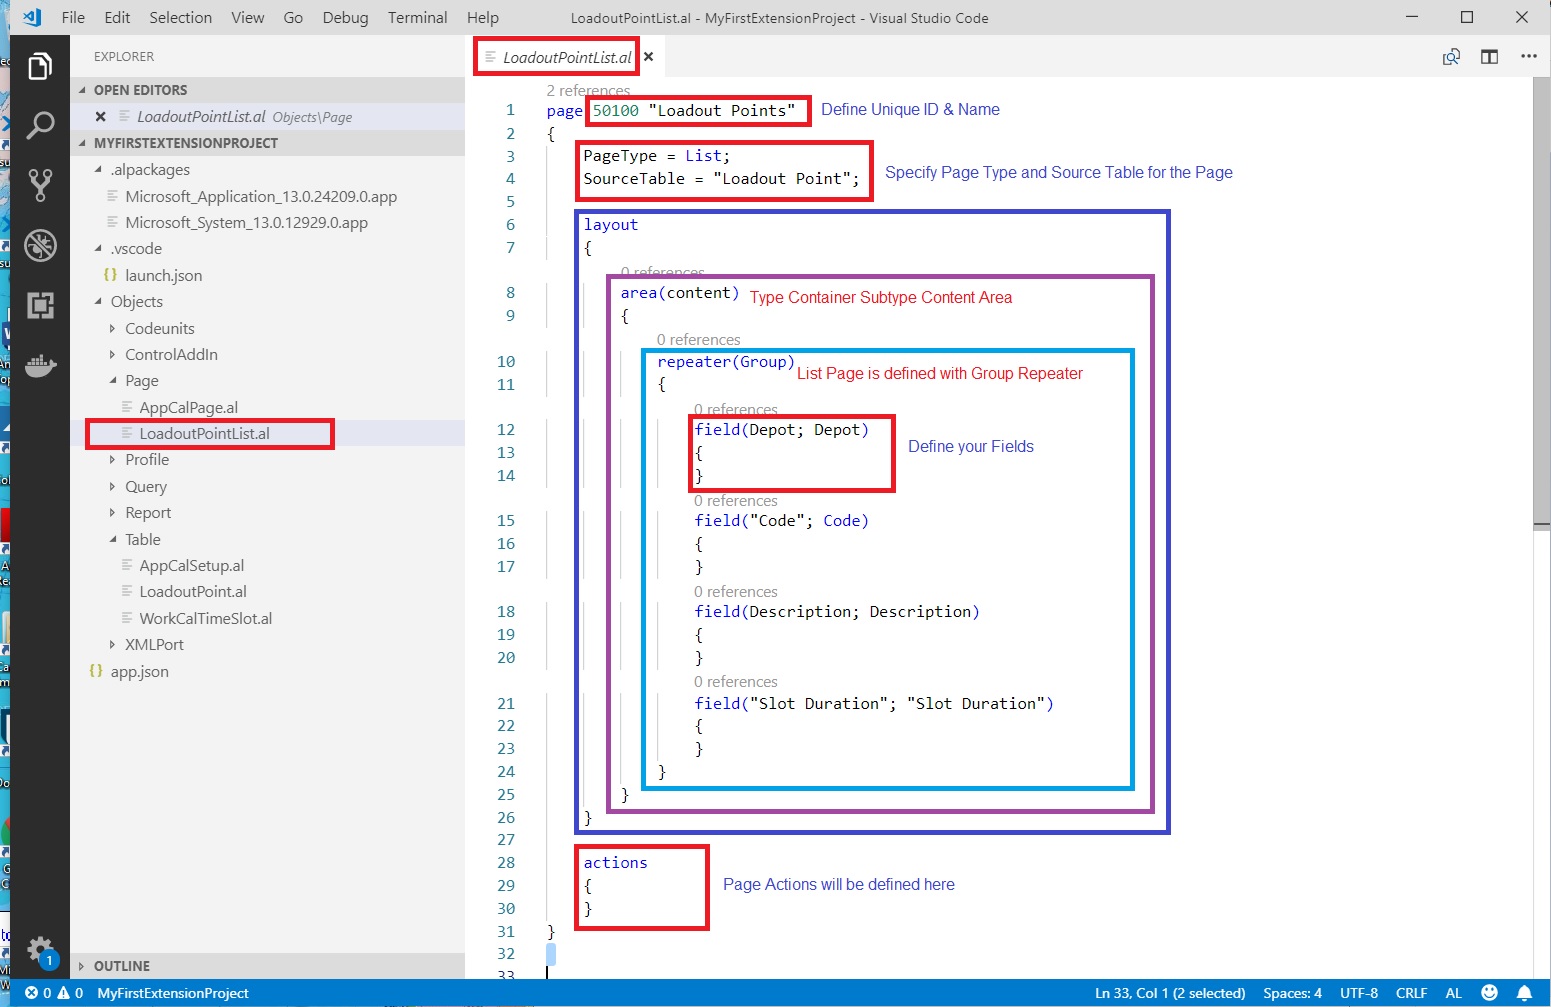
Lets create our LoadoutPointList Page on Table Loadout Point table created in previous post.
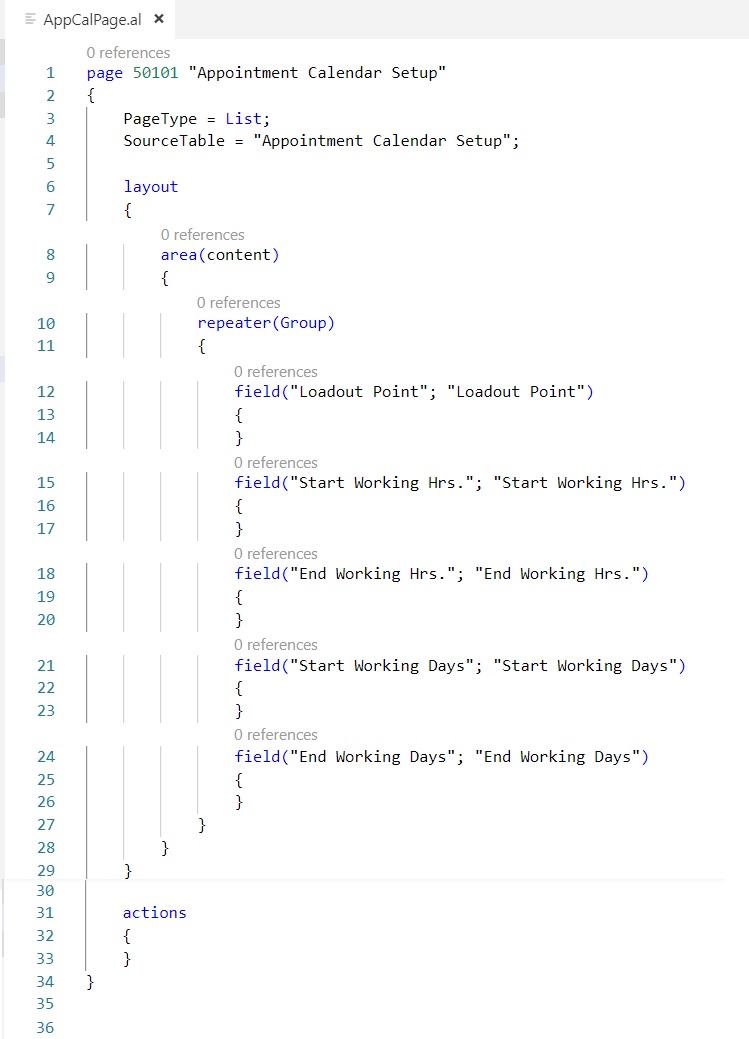
Similarly we will create a Appointment Calendar Setup List Page, final code as below:
Similarly you can design Card Page Also:
I am not creating Page from scratch but will show you few properties, triggers from standard Page e.g.:- Cost Type Card
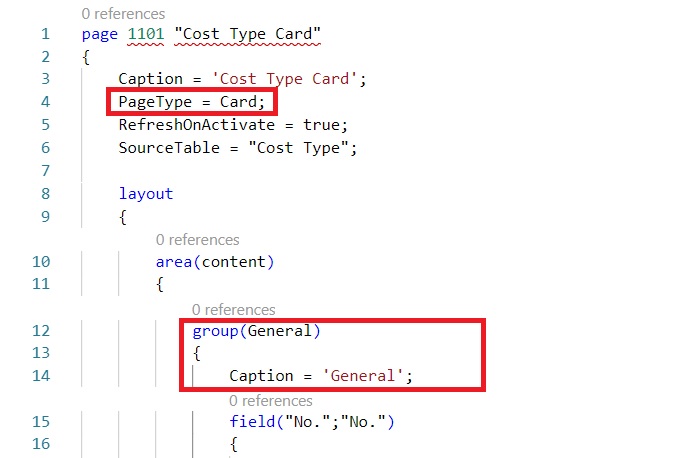
PageType you need to define as Card.
For FastTab you need to define group.
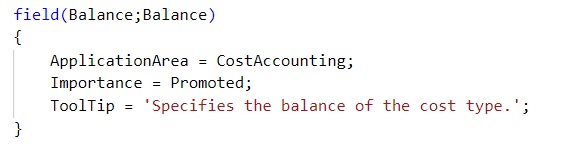
Above is the example of few properties for field control on Page.

To add factboxes to the page you define area(factboxes).
Here systempart for Links & Notes is added.
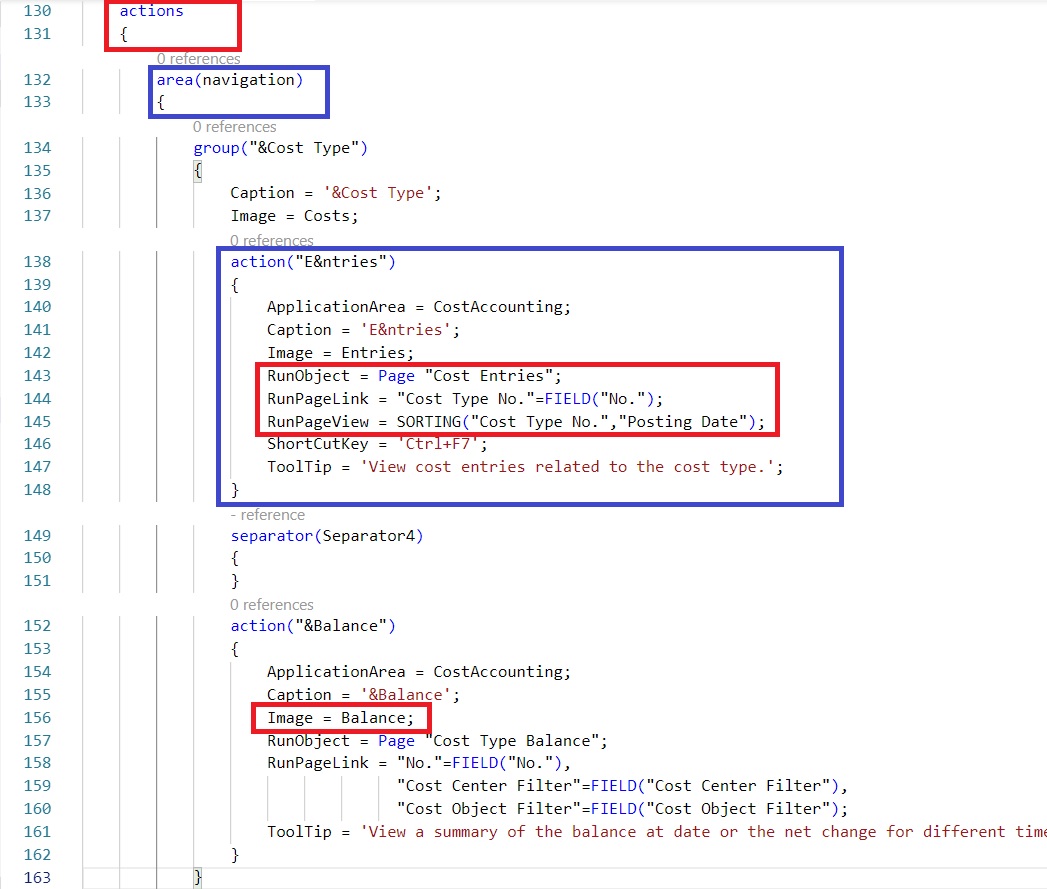
Above is actions to the page. Few properties how to define.
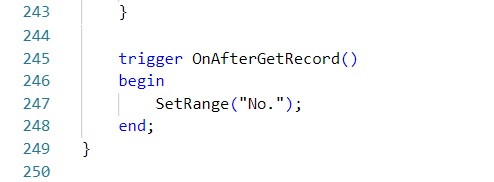
Above is the Page triggers.
Complete code for each objects is not possible to include in post.
But I will give to some tips using which you can explore equivalent AL Code and tryout them.
Suppose you want to see any feature how implemented in Customer Card.
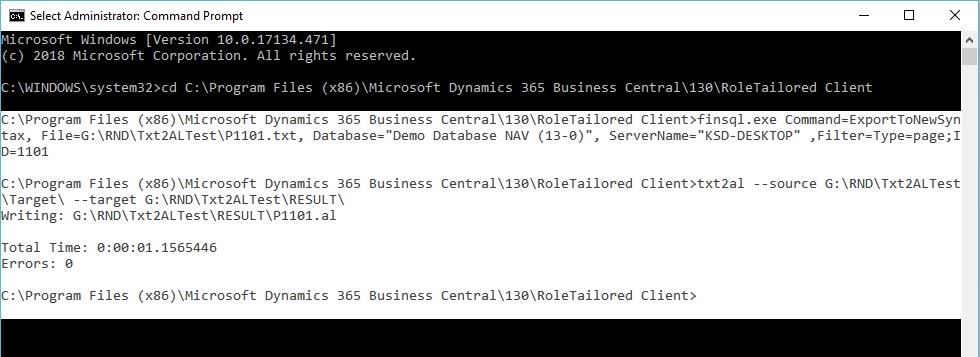
Export that object as text, and convert using txt2al for equivalent al code.
You can refer back to my previous post Quick Start with Extensions for Business Central
Similar method I have explained in this post.
We will explore few more possibilities and Extending to existing Table & Pages in our upcoming post.
Future of Navision is extensions V2?
With the release of Dynamics 365 Business Central a successor of Dynamics NAV, things are going to change. If I am not wrong from year 2020 Modern Development Environment will be the only platform available to developers.
In every NAV upgrades biggest challenge was customizations, since objects are fully accessible to developers, so we customize the solution as we want as a developer spreading unstructured, difficult to maintain, customized code everywhere and in all objects.
The beauty of product is, it is totally customizable and adaptable to customer’s business. Customizing Navision is easy and quick to deploy. C/AL is easy to learn and code.
Due to these heavy customizations and unstructured codes upgrade to new version of the product required long time and efforts. Hard to merge, too much efforts leading to high cost, usually many customer prefer to stay with their current version, and miss new capabilities of product available in future versions of Navision.
With release of NAV 2016 concept of extension was introduced. This introduced the concept of writing code isolated from the core objects and use events to interact with the standard codes. Now create the extension that can be installed or uninstalled any time without affecting the original base layer of the product. We call it extension V1.
These were also developed using C/AL and deployed using PowerShell. But still it always felt like something is missing. Then last year Microsoft came up with release NAV 2018 which introduced second generation of extension, we call it extensions V2.
This introduced completely new development platform based on Visual Studio Code Modern Development Environment. It uses new AL language an evolution of C/AL. Now this will be the future.
Dynamics 365 Business Central platform (on-premise and SaaS) uses this development model. Probably this will be the only development platform available from year 2020.
In Business central base application is now an entire extension based with some system objects in CSIDE, In future release you may not have any more side by side development, you will only be having AL and extensions.
So what next?
- We should now concentrate on learning VS Code and AL as in future this will be the only way to modify the application.
- Now we need to make our self-familiar with the Web Client as Windows Client will be obsolete soon.
- We should start moving our all customization to extensions.
- Now we should start thinking in direction of AL type customization rather than old C/AL type coding practice.
What do you think?
I will come up with more details as progress in this direction. Till then keep learning and sharing with others.
Configuring Visual Studio Code to Use Modern Development Environment with Dynamics NAV 2018
After installing Dynamics NAV 2018, I want to configure Visual Studio Code with Dynamics NAV to use new Development tool.
Before we start lets verify few things and update accordingly.

You can download VS Code from here:-Click to download Visual Studio Code
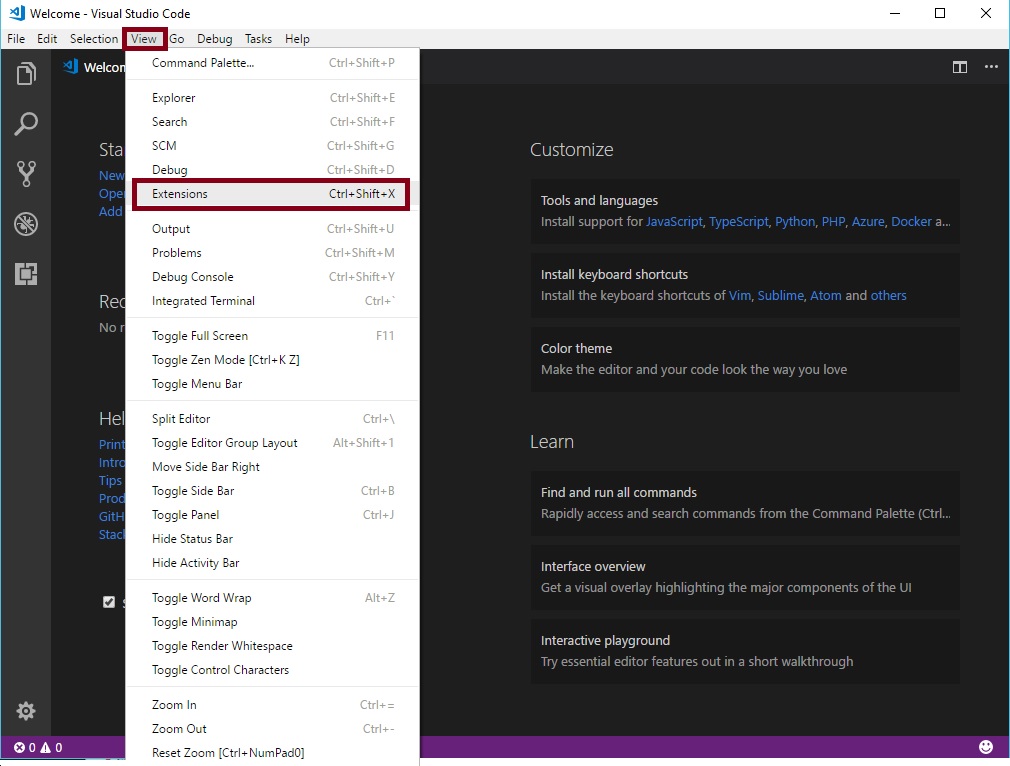
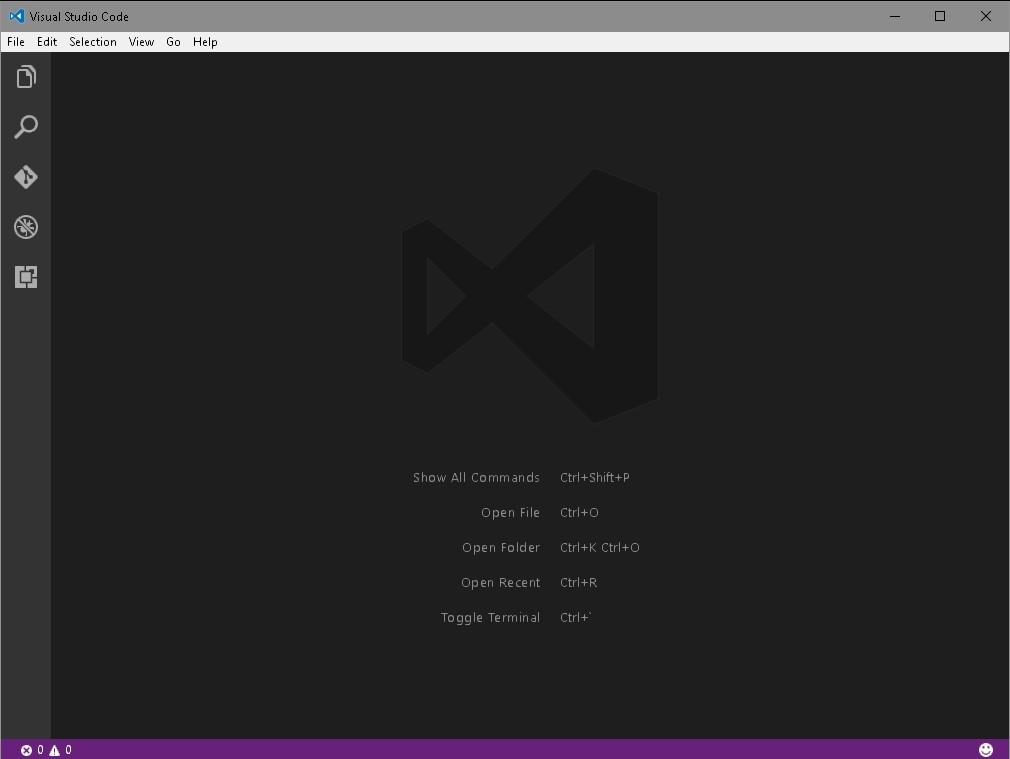
Install and Launch the Visual Studio Code.
Now Click View -> Extensions.
Click on … to open the extension menu.
Click on Install from VSIX

You can find VSIX file on the installation medium path:
“ModernDev\program files\Microsoft Dynamics NAV\110\Modern Development Environment”
or in the
“C:\Program Files (x86)\Microsoft Dynamics NAV\110\Modern Development Environment”

This will install AL Language Version 0.12.15355

Once the Extension installation is complete, follow below steps
Press Alt+A, Alt+L to trigger the Go! Command

Enter Project Name and Press Enter

Choose “Your own server”
Once you select the “Your own server” you will see a code like below in the “launch.json” file.

Update the information to look similar to below:-

I have updated my ServerInstance as DynamicsNAV110 (you check your instance name if changed while installing server)
I have updated my Authentication as Windows (I am using Windows authentication update what yours use accordingly)
I have added Port as 8049 (please check and use accordingly you are using the port, if using default 7049 then this step not required)
Now save your File. And Press <CTRL + F5>.
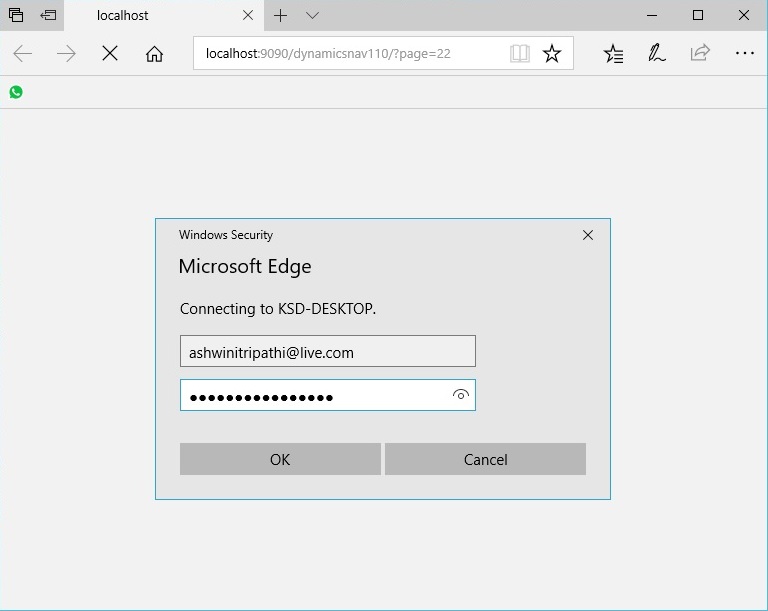
Enter your Credentials.
The server url and the web client url are assumed to be the same. That is not the case. The two settings we talked about above, the server url and the developer port number, are the only settings you need in the launch.json.
When VS Code publishes the extension to the NAV server, the NAV server returns the web client url as a response. This url is then opened in the browser. No setting needed in the launch.json at all.
The NAV server reads that setting from the Web Client Base Url server setting.


Your Extension is published, you can verify as below:

Now you are good to go with developing your Extensions using New Modern Development Tool using AL.
I hope this may have clarified your doubt on how VS Code and the NAV server work together!
I will come with more details as I proceed.
Microsoft Dynamics NAV ‘Tenerife’ Developer Preview
As everyone is aware by now that Preview of Development Tools for Dynamics NAV have been released. Going forward which can be used to build extensions and apps in and for Dynamics NAV.
This tool introduces two flavors which you can try out in preview available on cloud.
[A] Make an extension in the client itself. Business consultants and UX designers will love using this drag-and-drop interface. Rearrange fields, rename groups, and reposition elements to build a perfect extension to support an industry-specific solution or implement a business process optimization.
[B] Use the AL Extension for NAV in Visual Studio Code to build powerful extensions based on tables, pages, and codeunits using the new objects: Page Extensions and Table Extensions. Follow this route to build rich extensions that reuse and extend core business logic in your application.
For more details you can refer to the article published by Dynamics NAV Team Announcing the Preview of Development Tools for Dynamics NAV
You can get a free 30-day trial from https://azure.microsoft.com/free/ that will give you access to everything you need.
Secondly, head over to http://aka.ms/navdeveloperpreview. Login to your Azure Subscription. Select your subscription, resource group, location, name, and a VM Admin Password. Leave the remaining fields as their defaults. Accept the terms, Pin to dashboard and select Purchase. The instance takes about 5 minutes to set up, and the VM will be ready about 15 minutes after Azure says Deployment Succeeded.
You need to follow on screen instructions to get everything setup using above 2 links provided.
I am not going to repeat the steps as you can find them via other blogs or follow the steps as you proceed via using above two links.
Few of my readers were complaining about they don’t have access to Azure Subscription or they have already used up the limit now what to do?
Same situation was with me too, but however I managed to get one and done bit RND, if this can be setup on my PC so that I can give it a try or others can use same steps to get it configured, and give it a try.
However I got succeeded in doing so, now I can do the same in my environment.
The Steps I am going to explain below is not the straight forward, and require bit tricks, as required components are yet not released from Microsoft, may we can get in CU-2, I guess or later when Microsoft is OK to release this feature for everyone.
This action will require several pre-requisite to be fulfilled:
- Visual Studio Code (To be Installed)
- Dynamics Navision Version (10.0.14540)
- Some Modification to web.config to enable designer in Web Client
STEP-1
You can download the Visual Studio Code from this link: Click Here
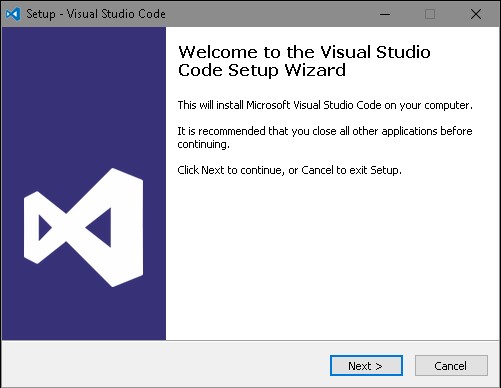
Once file is downloaded install the Visual Studio Code by running VSCodeSetup-1.8.1.exe
And follow the on screen instructions to complete the setup.


STEP-2
Dynamics Navision Version
Make sure you have correct version of Dynamics Navision (10.0.14540)

Else you will not get this option in your Service Window

STEP-3
Modification to web.config
You will need to make necessary settings to web.config file to enable designer in Web Client, this file is located at C:\inetpub\wwwroot\DynamicsNAV100 location where your Web Client is installed.
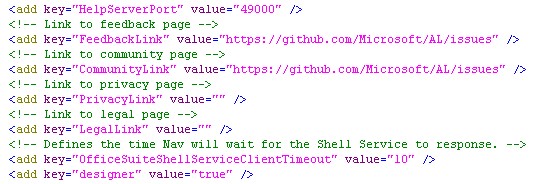

Now you should be ok to use this feature in your environment.
Once things are setup correct you will be able to find the Client Designer Button on right top corner of the Client Window/Browser.
I will come up with more details in my up-coming posts till then keep exploring and learning.

You must be logged in to post a comment.