AL, AL Table Proxy Generator Tool, altpgen, Business Central, Dataverse, Extension, Generator, Integration, Page, Proxy, Table, Tool

Using AL Table Proxy Generator Tool to create Integration Table(s) in Business Central for the Dataverse table

This is the Sixth post in the series. If you want to go to previous post click here.

From the series of steps this post is dedicated to Step-5:

As a fifth Step we will Create Integration Table(s) in Business Central for the Dataverse table created in Step-4

When table(s) are present in Microsoft Dataverse, but not in Business Central, this tool can be run to generate integration or proxy table(s) for the specified table(s).

The AL Table Proxy Generator tool you can find in AL Language extension by name altpgen.exe in the equivalent folder [C:\Users\ashwi\.vscode\extensions\ms-dynamics-smb.al-7.4.502459\bin\]

Run PowerShell ISE as Administrator

Change to folder containing altpgen.exe

Above command should be single line, I have break for clarity of parameters. Below is the sample command.

.\altpgen -project:"C:\Userdata\AL Project\DataVerseIntegration" -packagecachepath:"C:\Userdata\AL Project\DataVerseIntegration\packagecachepath" -serviceuri:"https://xxxxxxxxxxx.crm8.dynamics.com/" -entities:cr95d_prospects -baseid:50125 -tabletype:CDS

When you run the command, it will ask for authentication, provide and continue.

Once you Accept the Permissions request, you can see the output of the command.

Don’t worry for warnings, Your AL file will be generated in specified folder.

Below is the sample of generated file, it is suggested to generate this file using the tool, don’t try to create manually.

table 50126 "CDS cr95d_Prospects"
{
  ExternalName = 'cr95d_prospects';
  TableType = CDS;
  Description = '';

  fields
  {
    field(1;cr95d_ProspectsId;GUID)
    {
      ExternalName = 'cr95d_prospectsid';
      ExternalType = 'Uniqueidentifier';
      ExternalAccess = Insert;
      Description = 'Unique identifier for entity instances';
      Caption = 'Prospects';
    }
    field(2;CreatedOn;Datetime)
    {
      ExternalName = 'createdon';
      ExternalType = 'DateTime';
      ExternalAccess = Read;
      Description = 'Date and time when the record was created.';
      Caption = 'Created On';
    }
    field(4;ModifiedOn;Datetime)
    {
      ExternalName = 'modifiedon';
      ExternalType = 'DateTime';
      ExternalAccess = Read;
      Description = 'Date and time when the record was modified.';
      Caption = 'Modified On';
    }
    field(24;statecode;Option)
    {
      ExternalName = 'statecode';
      ExternalType = 'State';
      ExternalAccess = Modify;
      Description = 'Status of the Prospects';
      Caption = 'Status';
      InitValue = " ";
      OptionMembers = " ", Active, Inactive;
      OptionOrdinalValues = -1, 0, 1;
    }
    field(26;statuscode;Option)
    {
      ExternalName = 'statuscode';
      ExternalType = 'Status';
      Description = 'Reason for the status of the Prospects';
      Caption = 'Status Reason';
      InitValue = " ";
      OptionMembers = " ", Active, Inactive;
      OptionOrdinalValues = -1, 1, 2;
    }
    field(28;VersionNumber;BigInteger)
    {
      ExternalName = 'versionnumber';
      ExternalType = 'BigInt';
      ExternalAccess = Read;
      Description = 'Version Number';
      Caption = 'Version Number';
    }
    field(29;ImportSequenceNumber;Integer)
    {
      ExternalName = 'importsequencenumber';
      ExternalType = 'Integer';
      ExternalAccess = Insert;
      Description = 'Sequence number of the import that created this record.';
      Caption = 'Import Sequence Number';
    }
    field(30;OverriddenCreatedOn;Date)
    {
      ExternalName = 'overriddencreatedon';
      ExternalType = 'DateTime';
      ExternalAccess = Insert;
      Description = 'Date and time that the record was migrated.';
      Caption = 'Record Created On';
    }
    field(31;TimeZoneRuleVersionNumber;Integer)
    {
      ExternalName = 'timezoneruleversionnumber';
      ExternalType = 'Integer';
      Description = 'For internal use only.';
      Caption = 'Time Zone Rule Version Number';
    }
    field(32;UTCConversionTimeZoneCode;Integer)
    {
      ExternalName = 'utcconversiontimezonecode';
      ExternalType = 'Integer';
      Description = 'Time zone code that was in use when the record was created.';
      Caption = 'UTC Conversion Time Zone Code';
    }
    field(33;cr95d_ProspectName;Text[100])
    {
      ExternalName = 'cr95d_prospectname';
      ExternalType = 'String';
      Description = 'Required name field';
      Caption = 'Prospect Name';
    }
    field(34;cr95d_ContractAmount;Decimal)
    {
      ExternalName = 'cr95d_contractamount';
      ExternalType = 'Money';
      Description = '';
      Caption = 'Contract Amount';
    }
    field(37;ExchangeRate;Decimal)
    {
      ExternalName = 'exchangerate';
      ExternalType = 'Decimal';
      ExternalAccess = Read;
      Description = 'Exchange rate for the currency associated with the entity with respect to the base currency.';
      Caption = 'Exchange Rate';
    }
    field(38;cr95d_contractamount_Base;Decimal)
    {
      ExternalName = 'cr95d_contractamount_base';
      ExternalType = 'Money';
      ExternalAccess = Read;
      Description = 'Value of the Contract Amount in base currency.';
      Caption = 'Contract Amount (Base)';
    }
    field(39;cr95d_Probability;Integer)
    {
      ExternalName = 'cr95d_probability';
      ExternalType = 'Integer';
      Description = '';
      Caption = 'Probability';
    }
    field(40;cr95d_Stage;Option)
    {
      ExternalName = 'cr95d_stage';
      ExternalType = 'Picklist';
      Description = '';
      Caption = 'Stage';
      InitValue = Lead;
      OptionMembers = Lead, Opportunity, Won, Lost;
      OptionOrdinalValues = 256080000, 256080001, 256080002, 256080003;
    }
    field(42;cr95d_ForcastedRevenue;Decimal)
    {
      ExternalName = 'cr95d_forcastedrevenue';
      ExternalType = 'Money';
      Description = '';
      Caption = 'Forcasted Revenue';
    }
    field(43;cr95d_forcastedrevenue_Base;Decimal)
    {
      ExternalName = 'cr95d_forcastedrevenue_base';
      ExternalType = 'Money';
      ExternalAccess = Read;
      Description = 'Value of the Forcasted Revenue in base currency.';
      Caption = 'Forcasted Revenue (Base)';
    }
  }
  keys
  {
    key(PK;cr95d_ProspectsId)
    {
      Clustered = true;
    }
    key(Name;cr95d_ProspectName)
    {
    }
  }
  fieldgroups
  {
    fieldgroup(DropDown;cr95d_ProspectName)
    {
    }
  }
}

Create a Page for above table

page 50122 "CDS Prospect List"
{
    Caption = 'CDS Prospect List';
    PageType = List;
    SourceTable = "CDS cr95d_Prospects";
    Editable = false;
    ApplicationArea = All;
    UsageCategory = Lists;
    RefreshOnActivate = true;

    layout
    {
        area(Content)
        {
            repeater(Group)
            {
                field("No."; Rec.cr95d_ProspectsId)
                {
                    Caption = 'No.';
                    ApplicationArea = All;
                }
                field(Name; Rec.cr95d_ProspectName)
                {
                    Caption = 'Name';
                    ApplicationArea = All;
                }
                field(Stage; Rec.cr95d_Stage)
                {
                    Caption = 'Stage';
                    ApplicationArea = All;
                }
                field("Probability"; Rec.cr95d_Probability)
                {
                    Caption = 'Probability';
                    ApplicationArea = All;
                }
                field("Contract Amount"; Rec.cr95d_ContractAmount)
                {
                    Caption = 'Contract Amount';
                    ApplicationArea = All;
                }
                field("Contract Amount (Base)"; Rec.cr95d_contractamount_Base)
                {
                    Caption = 'Contract Amount (Base)';
                    ApplicationArea = All;
                }
                field("Forecast Revenue"; Rec.cr95d_ForcastedRevenue)
                {
                    Caption = 'Forecast Revenue';
                    ApplicationArea = All;
                }
                field("Forecast Revenue (Base)"; Rec.cr95d_forcastedrevenue_Base)
                {
                    Caption = 'Forecast Revenue (Base)';
                    ApplicationArea = All;
                }
                field("Exchange Rate"; Rec.ExchangeRate)
                {
                    Caption = 'Exchange Rate';
                    ApplicationArea = All;
                }
            }
        }
    }
}

You can read more about AL Table Proxy Generator Tool from Microsoft docs

AL Table Proxy Generator

Now you are good to proceed with Next Step.

You can jump to Next Step from here.

Azure, Development Tips, How To, IIS, Information, Instalation & Configuration, NAV 2017, Tenerife, Tip & Tricks, What's New

Microsoft Dynamics NAV ‘Tenerife’ Developer Preview

As everyone is aware by now that Preview of Development Tools for Dynamics NAV have been released. Going forward which can be used to build extensions and apps in and for Dynamics NAV.

This tool introduces two flavors which you can try out in preview available on cloud.

[A] Make an extension in the client itself. Business consultants and UX designers will love using this drag-and-drop interface. Rearrange fields, rename groups, and reposition elements to build a perfect extension to support an industry-specific solution or implement a business process optimization.

[B] Use the AL Extension for NAV in Visual Studio Code to build powerful extensions based on tables, pages, and codeunits using the new objects: Page Extensions and Table Extensions. Follow this route to build rich extensions that reuse and extend core business logic in your application.

For more details you can refer to the article published by Dynamics NAV Team Announcing the Preview of Development Tools for Dynamics NAV

You can get a free 30-day trial from https://azure.microsoft.com/free/ that will give you access to everything you need.

Secondly, head over to http://aka.ms/navdeveloperpreview. Login to your Azure Subscription. Select your subscription, resource group, location, name, and a VM Admin Password. Leave the remaining fields as their defaults. Accept the terms, Pin to dashboard and select Purchase. The instance takes about 5 minutes to set up, and the VM will be ready about 15 minutes after Azure says Deployment Succeeded.

You need to follow on screen instructions to get everything setup using above 2 links provided.

I am not going to repeat the steps as you can find them via other blogs or follow the steps as you proceed via using above two links.

Few of my readers were complaining about they don’t have access to Azure Subscription or they have already used up the limit now what to do?

Same situation was with me too, but however I managed to get one and done bit RND, if this can be setup on my PC so that I can give it a try or others can use same steps to get it configured, and give it a try.

However I got succeeded in doing so, now I can do the same in my environment.

The Steps I am going to explain below is not the straight forward, and require bit tricks, as required components are yet not released from Microsoft, may we can get in CU-2,  I guess or later when Microsoft is OK to release this feature for everyone.

This action will require several pre-requisite to be fulfilled:

  1. Visual Studio Code (To be Installed)
  2. Dynamics Navision Version (10.0.14540)
  3. Some Modification to web.config to enable designer in Web Client


STEP-1

You can download the Visual Studio Code from this link: Click Here

Once file is downloaded install the Visual Studio Code by running VSCodeSetup-1.8.1.exe

And follow the on screen instructions to complete the setup.


td-01td-02td-03td-04td-05td-06td-07td-08td-09

STEP-2

Dynamics Navision Version

Make sure you have correct version of Dynamics Navision (10.0.14540)

td-10

Else you will not get this option in your Service Window

td-11

STEP-3

Modification to web.config

You will need to make necessary settings to web.config file to enable designer in Web Client, this file is located at C:\inetpub\wwwroot\DynamicsNAV100 location where your Web Client is installed.

td-12

td-13


Now you should be ok to use this feature in your environment.

Once things are setup correct you will be able to find the Client Designer Button on right top corner of the Client Window/Browser.

I will come up with more details in my up-coming posts till then keep exploring and learning.


Corfu Navision 2016, Development Tips, How To, Information, Instalation & Configuration, Server, Tip & Tricks

Multilanguage across Conflicting Text Encoding Formats

For more details please see my earlier posts:

Managing Multilanguage support in Navision Overview

How do I translate my ResX Files?

Working with Partner Translation Toolkit

To support users with translated strings across conflicting text encoding formats, you must save the translations to a text file in UTF-8 text encoding format.

This converts the file to Unicode, which Microsoft Dynamics NAV Development Environment cannot import. Instead, you add the files to a dedicated Translations folder on the Microsoft Dynamics NAV Server computer.

The default location of this folder is

C:\Program Files\Microsoft Dynamics NAV\90\Service\Translations.

When you have more than one service instance, there is a Translations folder for each service instance, such as

C:\Program Files\Microsoft Dynamics NAV\90\Service\Instances\MyInstance\Translations.

Microsoft Dynamics NAV Server adds any strings in text files that you place in the relevant Translations folder to the metadata for Microsoft Dynamics NAV.

To add translated strings for a conflicting text encoding format:

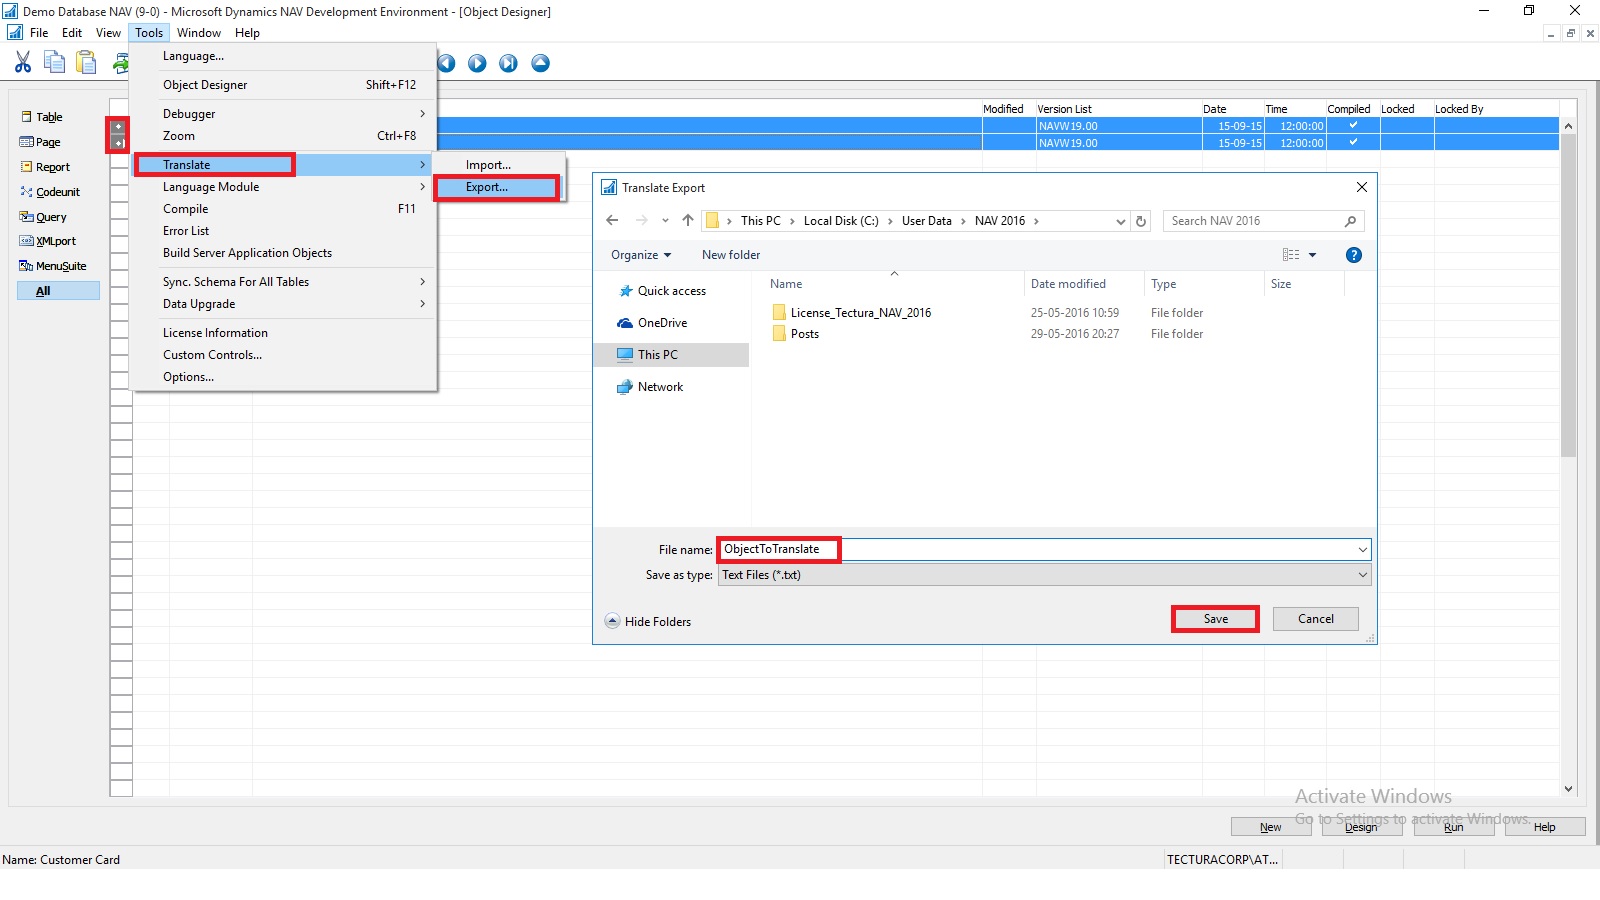
In the development environment, export the strings for the objects that you want to translate.

Translate-1

Select the Objects you wish to add translation, Export and save as text file.

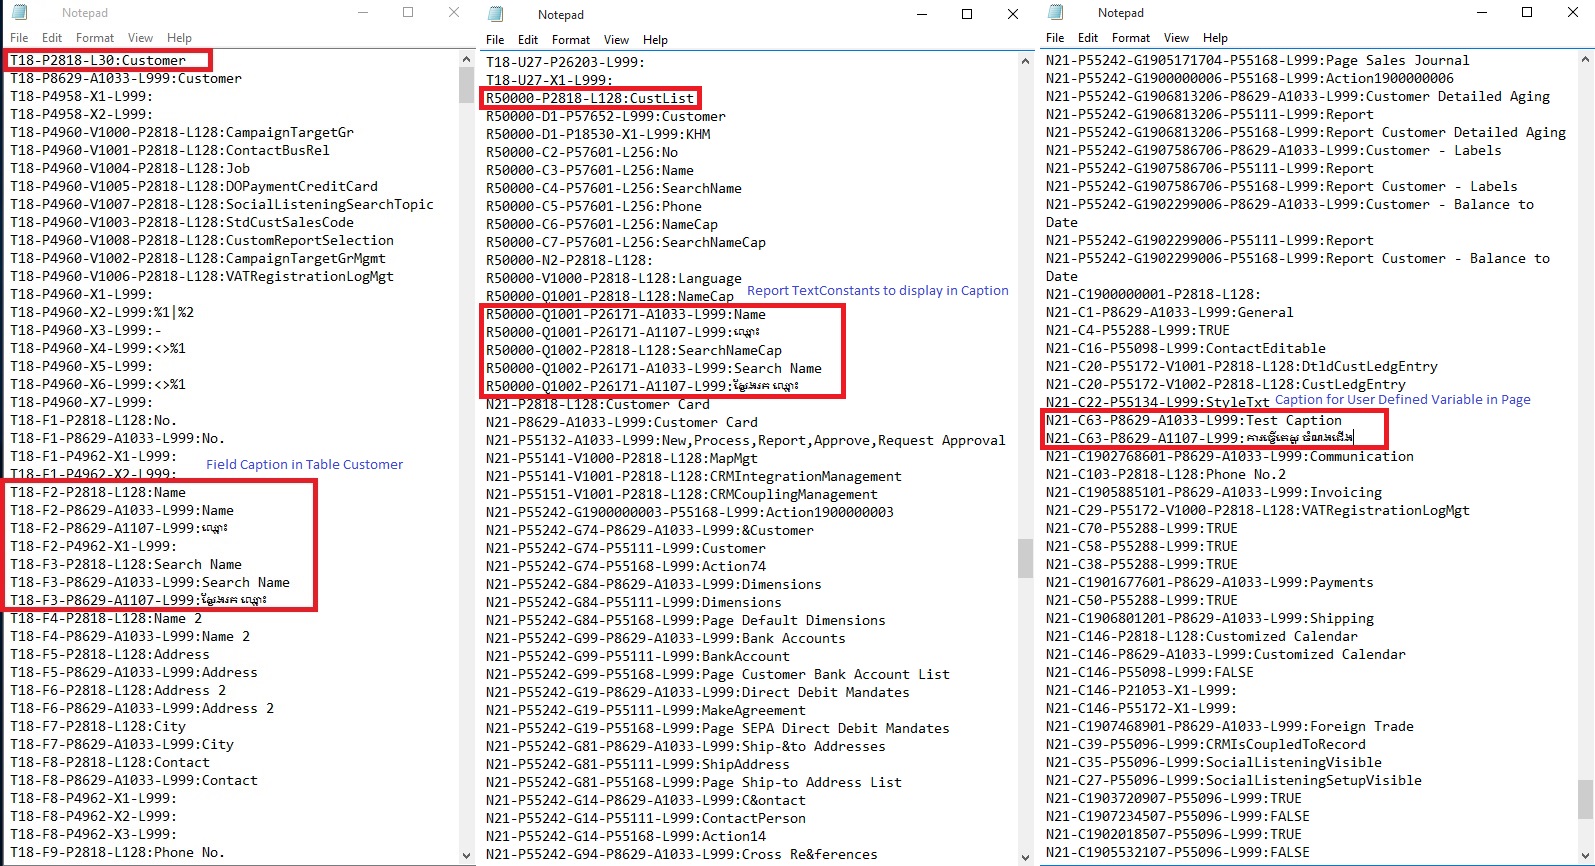
Translate the strings in the resulting text file into desired Language by using your preferred translation process.

Translate-2

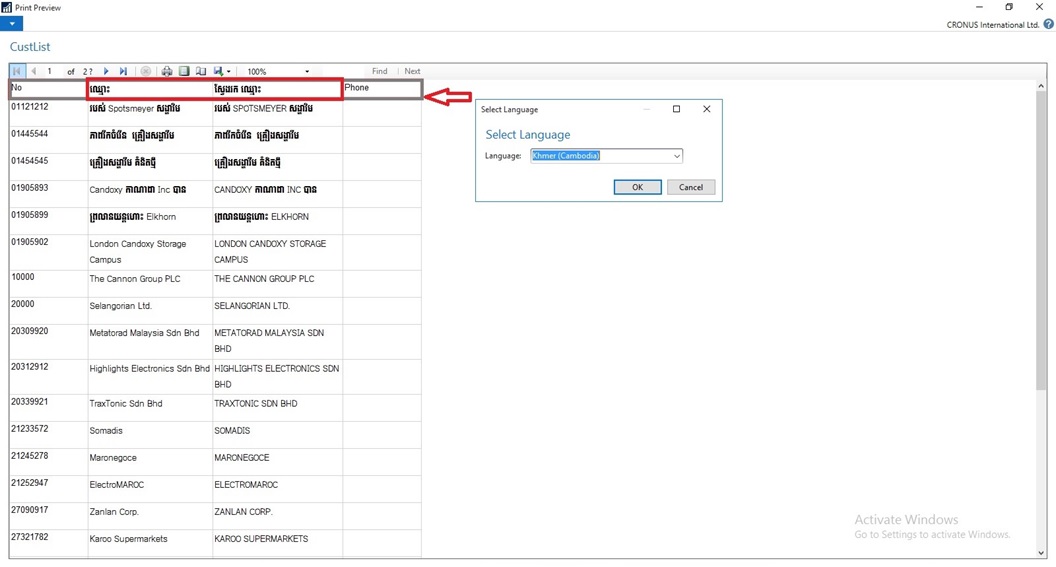
I have translated following Captions in Khmer language:

  1. For Field Name & Search Name in Table Customer (18)
  2. TextConstant in Report CustList (50000) to display Caption for Name & Search Name
  3. Caption for User defined variable in Page Customer Card (21)

When translations are complete, save the translated strings into a text file in the UTF-8 text encoding format. The extension of the file must be .txt.

It is recommend that you remove the other Language strings from the Unicode file before you copy it to the Microsoft Dynamics NAV Server computer.

Microsoft Dynamics NAV Server queries the Translations folder for updated strings, and for performance reasons the folder should only contain strings that you cannot import into the development environment because of conflicting codepages.

Copy the UTF-8 file to the equivalent of

C:\Program Files\Microsoft Dynamics NAV\90\Service\Translations

on the Microsoft Dynamics NAV Server computer.

When you have more than one service instance, there is a Translations folder for each service instance, such as

C:\Program Files\Microsoft Dynamics NAV\90\Service\Instances\MyInstance\Translations.

Restart the Microsoft Dynamics NAV Server instance.

Microsoft Dynamics NAV Server adds the translated strings in the file to the metadata store for the Microsoft Dynamics NAV deployment.

Now Users of this Microsoft Dynamics NAV Server session can now change the user interface language from English to required Language.

The metadata store is updated whenever you add new strings to the Translations folder and then restart the Microsoft Dynamics NAV Server service instance. Cached strings are not deleted from the metadata store when you restart the service instance.


Let us see the effect of this translation. Let’s run the RTC to see the net effect of same.

[A] Customer List in English However Data Stored in Khmer Language

Translate-3

B] Two Captions Changed in Khmer Language for Name & Search Name

Translate-4

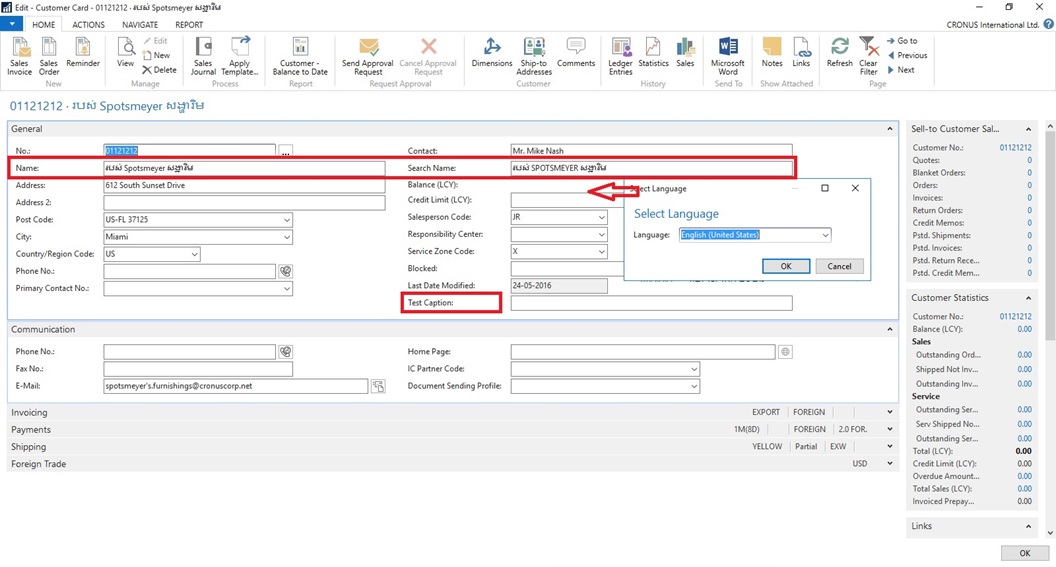
[C] Customer Card in English Language. Selected Captions are changed in Khmer Language

Translate-5

[D] Caption Changed for Name & Search Name to Support Khmer Language also for Field not available in Table the Test Caption

Translate-6

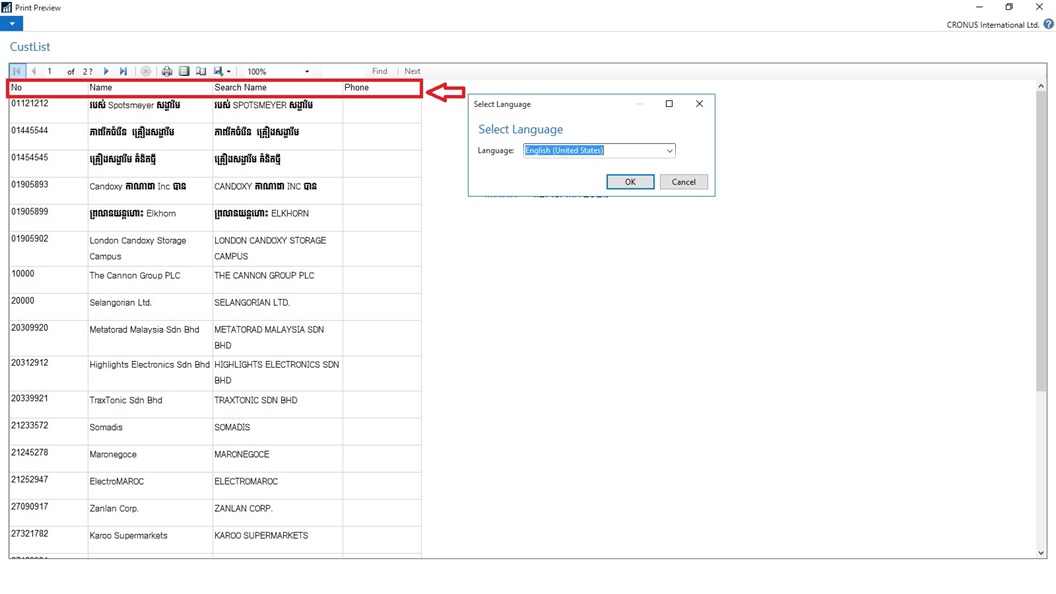
[E] Report Caption in English Language however data in Khmer Language

Translate-7

[F] Report Caption Changed to Khmer Language for Name & Search Name

Translate-8

You can manage Languages using above trick for translate strings across conflicting text encoding formats.

Will comeup with more details in my upcomming posts.


Development Tips

AccessByPermission Property – in Navision 2015

Sets a value for a table field or UI element that determines the permission mask for an object that a user must have to see and access the related page fields or UI element in the client. The UI element will be removed at runtime if the user does not have permissions to a certain object as specified in the Access by Permission window.

AccessByPermission-1
AccessByPermission-2
AccessByPermission-3

Depending on the setting in the UI Elements Removal field in the Microsoft Dynamics NAV Server Administration tool, only user interface (UI) elements on objects in the license or on objects that the user has permissions to will appear in the user interface.

AccessByPermission-4

To make full use of the LicenseFileAndUserPermissions option in the UI Elements Removal field, it is recommended that you assign the special permission set, FOUNDATION, along with the relevant permission sets that define which application objects the user will access.

AccessByPermission-5

The majority of the permission sets that are provided with the CRONUS demonstration database cannot be combined with the FOUNDATION permission set to fully use the UI Elements Removal feature. You must first create or edit the relevant permission sets to avoid that the user is blocked from performing the involved tasks. You must first create or edit the relevant permission sets to avoid that the user is blocked from performing the involved tasks.

If you only use the LicenseFile option in the UI Elements Removal field, then you do not have to edit any permission sets as they will not affect which UI elements are removed.

To specify when UI elements are removed
  1. Open the Microsoft Dynamics NAV Server Administration
  2. In the UI Elements Removal field, choose the relevant option as described in the following table.
Option Description
None All UI elements are displayed, even if the license file does not include the related object and the user does not have permissions to the related object.
LicenseFile A UI element is removed if the related object is not included in the license file.
LicenseFileAndUserPermissions A UI element is removed if the related object is not included in the license file and the user does not have permissions to the object as defined in the AccessByPermission property for the related UI element.

By default, this option is selected.

AccessByPermission-6

When you configure user interfaces in Microsoft Dynamics NAV, you should make sure that the UI Elements Removal field is set to its default, LicenseFileAndUserPermissions, so that you only see the relevant UI elements in the Customize window.

When you develop in Microsoft Dynamics NAV, you should make sure that the UI Elements Removal field is set to its default, None, to make sure that all UI elements are visible when you review your development in the UI.

All types of UI elements will be removed if they relate to objects that are not included in the license or the user does not have the required permission to the objects:

  • Fields
  • Actions
  • Page parts

UI elements that are directly related to an object through the TableRelation or the CalcFormula property can be removed automatically according to the license file and/or user permissions.

For UI elements that are not directly related to an object, you can use the AccessByPermission property to remove the element according to the user’s permission to a related object

All types of UI elements will be removed if they relate to an object to which the user does not have the required permissions:

Fields on pages, including FactBoxes

Actions on pages, including toolbars and navigation panes

Page parts, such as Lines FastTabs

Note

To use this property, the UI Elements Removal field in the Microsoft Dynamics NAV Server Administration tool must be set to LicenseFile or LicenseFileAndUserPermissions.

This Property Applies To

Fields in tables (affecting all related fields on pages)

Fields on pages

Actions on pages

MenuSuite items

Page parts, such as a Lines FastTab

Property Value

When you choose the AssistEdit button, the Access By Permission window opens. Fill the fields as described in the following table.

Field Description
Object Type Specify the type of object to which permission is required to display the UI element.
Object ID Specify the object to which permission is required to display the UI element.
Read Specify if Read permission is required to display the UI element.
or Insert Specify if Insert permission is required to display the UI element.
or Modify Specify if Modify permission is required to display the UI element.
or Delete Specify if Delete permission is required to display the UI element.
or Execute Specify if Execute permission is required to display the UI element.

AccessByPermission-7

Note

If multiple permissions are selected, then one or the other applies.

Example: Remove the Unit Price field if the user does not have permission to the Sales Price table

Open table 27, Item Card, with the Table Designer.

View the properties of field 18, Unit Price.

For the AccessByPermission property, choose the AssistEdit button in the Value field.

In the Access By Permission window, fill the fields as described in the following table.

Field Description
Object Type TableData
Object ID Sales Price
Read Select
Insert Select
Modify Leave blank
Delete Leave blank
Execute Leave blank

Close the Access By Permission window and save the changes on table 27.

All instances of the Unit Price field on pages are now removed if the user does have Read or Insert permission to the Sales Price table.

AccessByPermission-8

Important

If you defined the property for a table field, then all instances of the field on pages are removed. To override the property on an individual page field, delete the permission value after the = sign in the Value field. Do NOT delete the whole string as that will be replicated on the property of the table field.

Note

To use the LicenseFileAndUserPermissions option in the UI Elements Removal field, you must assign the special FOUNDATION permission set to the user along with the relevant application permission sets that define which application objects the user will access. Unlike the BASIC permission set, the FOUNDATION permission set only grants access to application setup and system tables and requires that other assigned permission sets define which specific application objects can be accessed.

Not all of the 167 default permission sets that are provided with Microsoft Dynamics NAV are ready to support the FOUNDATION permission set to remove UI elements according to user permissions. You must therefore edit the relevant permission sets as explained in the following procedures.

To experience how UI elements are removed for a user performing the task to create and edit a new customer, you can create a sample user interface based on default permission sets provided with Microsoft Dynamics NAV.

Special Permission Sets

The following permission sets have special definitions that you should be aware of as you implement permissions and security for Microsoft Dynamics NAV users.

Permission set Definition
SUPER Can read, use, update, and delete all data and all application objects in the scope of your license. Microsoft Dynamics NAV requires that at least one user be assigned this permission set in each database.

You cannot modify permissions for the SUPER permission set.

SUPER (DATA) Can read, use, update, and delete all data. You typically assign this permission set to an accounting manager who needs to work with all data but does not need to change Microsoft Dynamics NAV.

This permission set does not give access to the Object Designer.

SECURITY Can create new users and assign them the same permission sets. Must be able to access the User, User Property, Permission Set, and Access Control tables.

For example, you can create a SECURITY permission set that includes the four required tables and any additional permissions that you want to include. You can then assign this permission set to a user who is a department administrator. This user can then administer permissions for other users in their department.

Only a user who has the SUPER permission set can create and modify a SECURITY permission set. Users who have this permission set can assign the same permissions to other users, but they cannot assign themselves the SUPER permission set.

BASIC Grants Read access to almost all application tables and all system tables.

The main purpose of this permission set is to enable the client to open and show all pages.

When you create a new database, you must import the BASIC permission set from an XML file.

FOUNDATION A prerequisite for all other permission sets. The FOUNDATION permission set grants access to system tables and application setup tables that are required for most application features to work.

Note

This permission set is recommended when using the UI Elements Removal feature to automatically remove UI elements according to user permissions.