Corfu Navision 2016, Development Tips, How To, Information, Instalation & Configuration, Server, Tip & Tricks

Multilanguage across Conflicting Text Encoding Formats

For more details please see my earlier posts:

Managing Multilanguage support in Navision Overview

How do I translate my ResX Files?

Working with Partner Translation Toolkit

To support users with translated strings across conflicting text encoding formats, you must save the translations to a text file in UTF-8 text encoding format.

This converts the file to Unicode, which Microsoft Dynamics NAV Development Environment cannot import. Instead, you add the files to a dedicated Translations folder on the Microsoft Dynamics NAV Server computer.

The default location of this folder is

C:\Program Files\Microsoft Dynamics NAV\90\Service\Translations.

When you have more than one service instance, there is a Translations folder for each service instance, such as

C:\Program Files\Microsoft Dynamics NAV\90\Service\Instances\MyInstance\Translations.

Microsoft Dynamics NAV Server adds any strings in text files that you place in the relevant Translations folder to the metadata for Microsoft Dynamics NAV.

To add translated strings for a conflicting text encoding format:

In the development environment, export the strings for the objects that you want to translate.

Translate-1

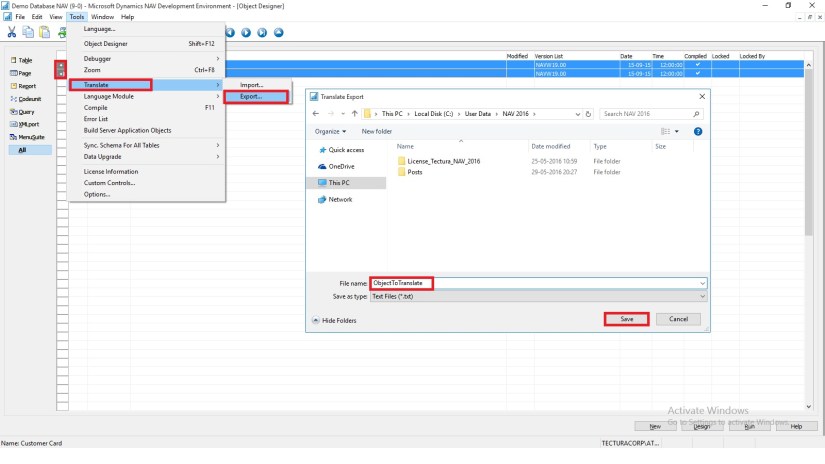
Select the Objects you wish to add translation, Export and save as text file.

Translate the strings in the resulting text file into desired Language by using your preferred translation process.

Translate-2

I have translated following Captions in Khmer language:

  1. For Field Name & Search Name in Table Customer (18)
  2. TextConstant in Report CustList (50000) to display Caption for Name & Search Name
  3. Caption for User defined variable in Page Customer Card (21)

When translations are complete, save the translated strings into a text file in the UTF-8 text encoding format. The extension of the file must be .txt.

It is recommend that you remove the other Language strings from the Unicode file before you copy it to the Microsoft Dynamics NAV Server computer.

Microsoft Dynamics NAV Server queries the Translations folder for updated strings, and for performance reasons the folder should only contain strings that you cannot import into the development environment because of conflicting codepages.

Copy the UTF-8 file to the equivalent of

C:\Program Files\Microsoft Dynamics NAV\90\Service\Translations

on the Microsoft Dynamics NAV Server computer.

When you have more than one service instance, there is a Translations folder for each service instance, such as

C:\Program Files\Microsoft Dynamics NAV\90\Service\Instances\MyInstance\Translations.

Restart the Microsoft Dynamics NAV Server instance.

Microsoft Dynamics NAV Server adds the translated strings in the file to the metadata store for the Microsoft Dynamics NAV deployment.

Now Users of this Microsoft Dynamics NAV Server session can now change the user interface language from English to required Language.

The metadata store is updated whenever you add new strings to the Translations folder and then restart the Microsoft Dynamics NAV Server service instance. Cached strings are not deleted from the metadata store when you restart the service instance.


Let us see the effect of this translation. Let’s run the RTC to see the net effect of same.

[A] Customer List in English However Data Stored in Khmer Language

Translate-3

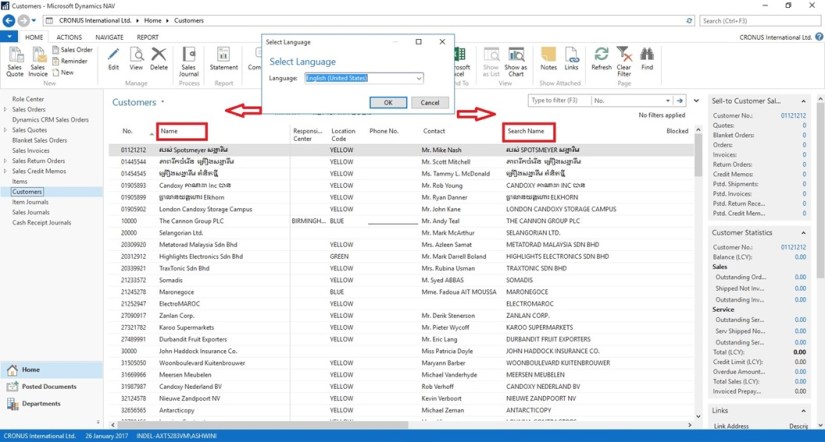
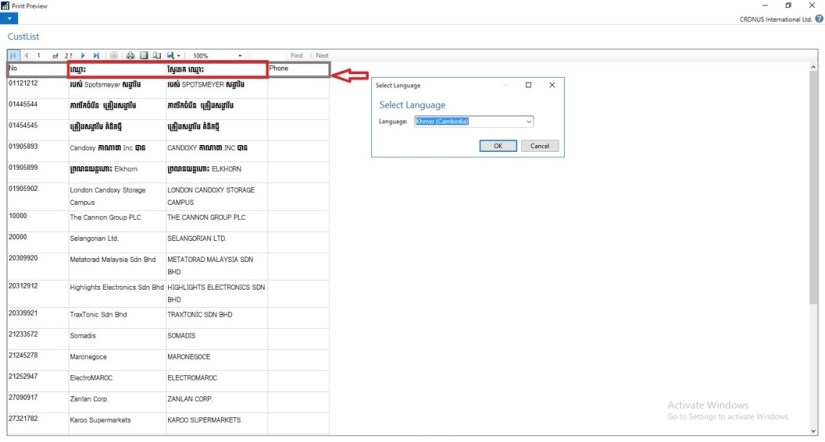
B] Two Captions Changed in Khmer Language for Name & Search Name

Translate-4

[C] Customer Card in English Language. Selected Captions are changed in Khmer Language

Translate-5

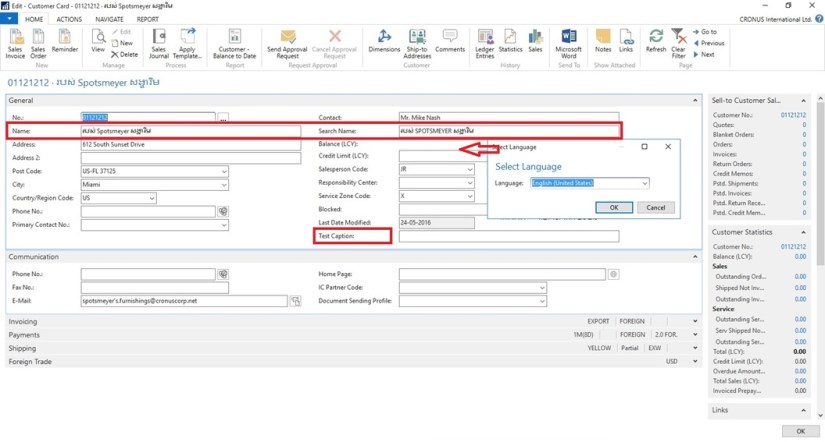
[D] Caption Changed for Name & Search Name to Support Khmer Language also for Field not available in Table the Test Caption

Translate-6

[E] Report Caption in English Language however data in Khmer Language

Translate-7

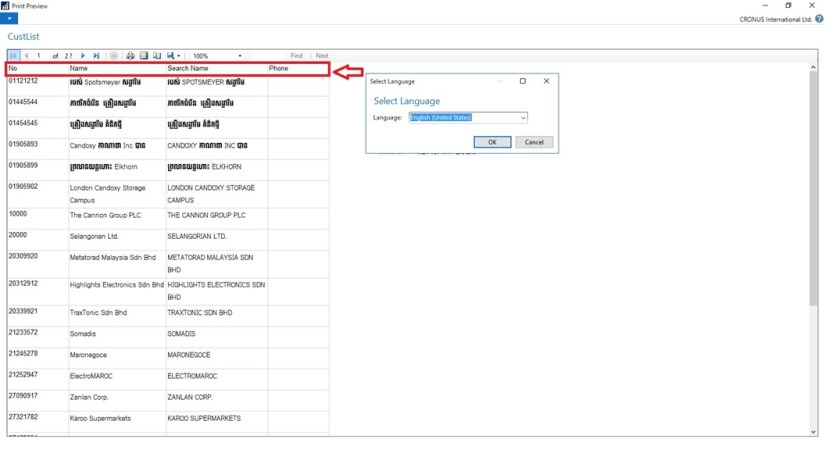
[F] Report Caption Changed to Khmer Language for Name & Search Name

Translate-8

You can manage Languages using above trick for translate strings across conflicting text encoding formats.

Will comeup with more details in my upcomming posts.


Corfu Navision 2016, Development Tips, How To, Information, Instalation & Configuration, Tip & Tricks

How do I translate my ResX Files?

In my earlier post I have given the overview of Managing Multilanguage support in Navision continuing from same today I will discuss about how to translate the resx files for the Languages not available from Microsoft. 

Microsoft Translator for ResX:

To translate resx file you require to download Microsoft Translator for ResX you can use this link to download.

This will help you to translate your required .resx files

Azure Data Market account / Microsoft Translator data service:

You will need an Azure Data Market account, subscribe to Microsoft Translator data service and a register a developer application in order to use the tool.

You can start setting this up here: https://datamarket.azure.com/developer/applications/

Microsoft Translator is a service on the Windows Azure Marketplace that translates text between many languages. This is a billed service that comes with many different pricing plans. For example, one plan allows the translation of 2,000,000 characters per month for free.

PTT-2

Steps to get ready for Translation tool:

  1. Get an account on the Azure Data Market with your Microsoft Live ID.
  2. Login into the Azure Data Market (ADM).
  3. Subscribe to the Microsoft Translator Service
  4. Create an application on top of this service in order to use the service in the ResX Translator tool.
  5. Go the developer application registration
  6. Choose the Register button to create a new application.
  7. Enter your information and choose the Create button.

Make sure you note your Client ID and Client Secret, you will need this if you wish to Translate Resx files using Microsoft Translator Service.

If you remember I have shared the link from where you can download Translation Tool. You will require Customer/Partner Source.

Download the Translation Tool (NAV2016PartnerTranslationsToolkit) and extract the zip file.

Scan the extracted Folder here few important files which will help identifying purpose of these files:

  1. Microsoft.MCSUK.RESXTranslator.exe
  2. Microsoft.MCSUK.RESXTranslator.exe.xml
  3. NAV 2016 Creating Custom Platform Translations.pdf
  4. PartnerTranslations.sln

PTT-3

Each project contains the platform resource files (.resx) for all languages shipped by Microsoft.

The Visual Studio solution file, PartnerTranslations.sln, contains a project for each of the platform assemblies that contain translatable resources. In order to create a custom translation, you add the respective resource files with custom translations to the respective project.

Let us see the directory structure of “NAV2016PartnerTranslationsToolkit\Microsoft.Dynamics.Nav.Language” similar structure is for other projects too.

PTT-4

For detailed help you can refer to “NAV 2016 Creating Custom Platform Translations.pdf” file.

Let’s start with translating our resx files:

Run the “Microsoft.MCSUK.RESXTranslator.exe” Tool

PTT-5

Switch to Advanced Tab.

Enter the Client ID and Client Secret obtained in above step when we registered the Application.

Click on Save.

PTT-6

Switch to Single File Tab.

Browse the .resx file for source language in my case if have selected “Common.Language.Lang.en-US.resx

Translate To choose desired language available from the drop down. In my case I have selected “Hindi”.

Select the Language 3 char code in my case I have selected “hi-IN [HIN] Hindi (India)

Click on Translate Now.

Once resx file is translated you will get the summary of result, click ok to return.

Similarly you translate the rex files for each projects listed above.


PTT-7

Post this step you are ready with all of you resx file translated to desired language.