AL, Business Central, Development Tips, Extension Package, How To, Information, Language Module, Modern Development Tool, Multilanguage, Tip & Tricks, Translations, V2, Visual Studio Code

Enabling Multilanguage Support to Extensions – Business Central

Microsoft Dynamics 365 Business Central is Multilanguage enabled, which means that you can display the user interface (UI) in different language.

To add a new language to the extension you have built, you must first enable the generation of XLIFF files.

The XLIFF file extension is .xlf.

The support for using the ML properties, such as CaptionML and TooltipML, is being deprecated, so it is recommended to refactor your extension to use the corresponding property, such as Caption or Tooltip, which is being picked up in the .xlf file.

You can use the .xlf translation files approach only for objects from your extension.

It’s an XML-based format used to standardize localization.

Step – 1

To be able to work with translation files, you need to add a Feature to the app.json file.

Trans-1

This Feature is TranslationFile.

Step – 2

When we save our app.json file, we can see immediately that we get some warnings.

Trans-2

This warning is telling us that the Multilanguage syntax is being deprecated and that we have to update to the new syntax.

The new syntax requires us to remove all the ML properties, such as the caption ML and the option caption ML, and we have to use a regular Caption and OptionCaption properties.

We use Labels at place of Text Constants.

Trans-3

Let’s fix these issues. Any ML properties like Caption ML, Option Caption ML or Text Constants. Replace them with Caption and Label.

Before we start some important points:

  • The New translation process decouples translation from development.
  • New Label syntax – Default translation & Some attributes.
  • Translation file can be combined with the extensions to support Multilanguage.
  • Caption & CaptionML cannot be used simultaneously.
  • Label syntax have comment, locked and maxLength optional parameters.
  • Same syntax for Captions and Labels.

Here after fixing the above errors:

Trans-4

All errors resolved from my Project.

In Nutshell use only Caption, OptionCaption & Label, all translation will be done outside developer environment in xlf file, no more defining in objects.

Step – 3

Build your Package, choose AL:Package.

Trans-5

Once your Package is created error free, you will see new Folder Translations with one xlf file is created.

Every time you build your Package this file gets overwritten. So be cautious.

When you perform your translation make a copy of this file and save with new Name then perform your translation.

Means Translation task will be last process in your Extension building process.

If you add more Captions or Labels later then you will have to take care of them and populate in all of your Language translation Files.

No of Languages your extension supports, you will have that much of translation files and is packaged with your package, no separate installation like in older versions is required to enable MultiLanguage.

Step – 4

Let’s see what this xlf file looks like:

Trans-6

It is in xml format.

If you see “<file datatype=”xml”” you will get your Source-language & target-language. Source & Target is set to same Language.

“<trans-unit id” Specifies each of you Caption and Labels defined in you objects.

“<source>” node specifies Caption or Label in source Language.

You will have to add your “<target>” language translation.

Step – 5

Let make copy of this file in all the supported languages you want.

For example:

Trans-7

I have made 2 files en-US & nl-BE. Naming convention is for your understanding purpose only.

Now you can handover these files to translator and he can perform translation in required language outside your development environment.

You code/IP is safe from external agencies whom you give for translation.

Only what is required for this will be:

[1] Update your Target Language in below line as:

<file datatype=”xml” source-language=”en-US” target-language=”en-US” original=”MyFirstExtensionProject”>

To

<file datatype=”xml” source-language=”en-US” target-language=”nl-BE” original=”MyFirstExtensionProject”>

[2] For every

<source>…</source> add <target>…</target>

<source>Loadout Point</source>

<target>Loadout-punt</target>

There are number of tools available on internet which supports xlf file and give ease your work of translation.

Step – 5

Once you are done with your translation, copy all the translated file to the Translation folder and Build your Solution and deploy on Server.

Change the Language of Client to Dutch and run your Object:

Trans-8

I have translated only one caption shown in red-box.

Please read the points mentioned in the post carefully.

Now you can enable MultiLanguage support for your Extensions.

I will come up with some other topic in my future post.

Till then keep exploring and Learning. Take Care of yourself.

Corfu Navision 2016, Development Tips, How To, Information, Instalation & Configuration, Server, Tip & Tricks

Multilanguage across Conflicting Text Encoding Formats

For more details please see my earlier posts:

Managing Multilanguage support in Navision Overview

How do I translate my ResX Files?

Working with Partner Translation Toolkit

To support users with translated strings across conflicting text encoding formats, you must save the translations to a text file in UTF-8 text encoding format.

This converts the file to Unicode, which Microsoft Dynamics NAV Development Environment cannot import. Instead, you add the files to a dedicated Translations folder on the Microsoft Dynamics NAV Server computer.

The default location of this folder is

C:\Program Files\Microsoft Dynamics NAV\90\Service\Translations.

When you have more than one service instance, there is a Translations folder for each service instance, such as

C:\Program Files\Microsoft Dynamics NAV\90\Service\Instances\MyInstance\Translations.

Microsoft Dynamics NAV Server adds any strings in text files that you place in the relevant Translations folder to the metadata for Microsoft Dynamics NAV.

To add translated strings for a conflicting text encoding format:

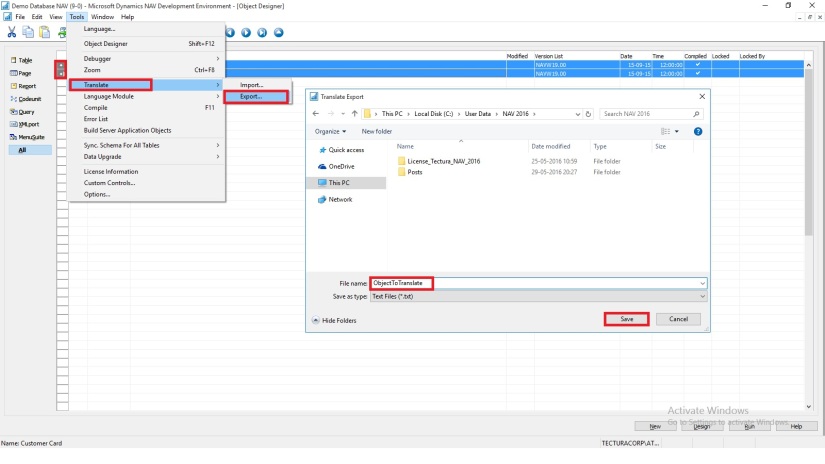
In the development environment, export the strings for the objects that you want to translate.

Translate-1

Select the Objects you wish to add translation, Export and save as text file.

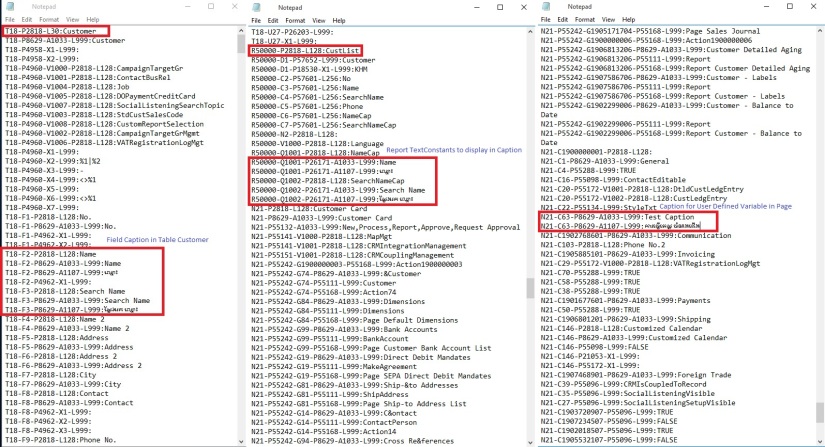
Translate the strings in the resulting text file into desired Language by using your preferred translation process.

Translate-2

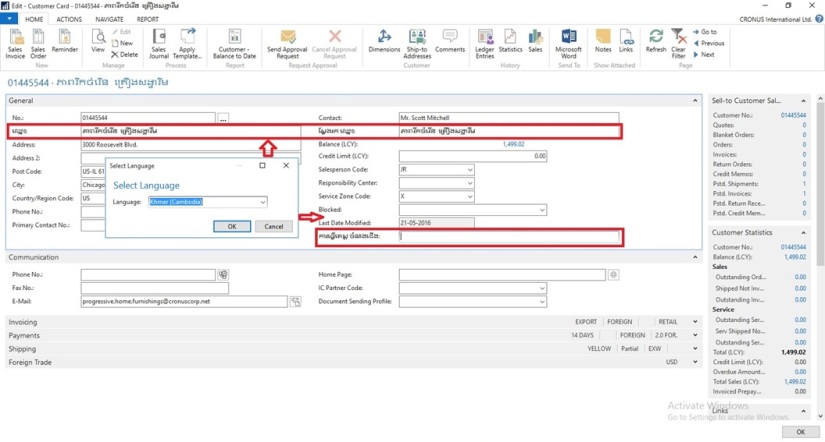
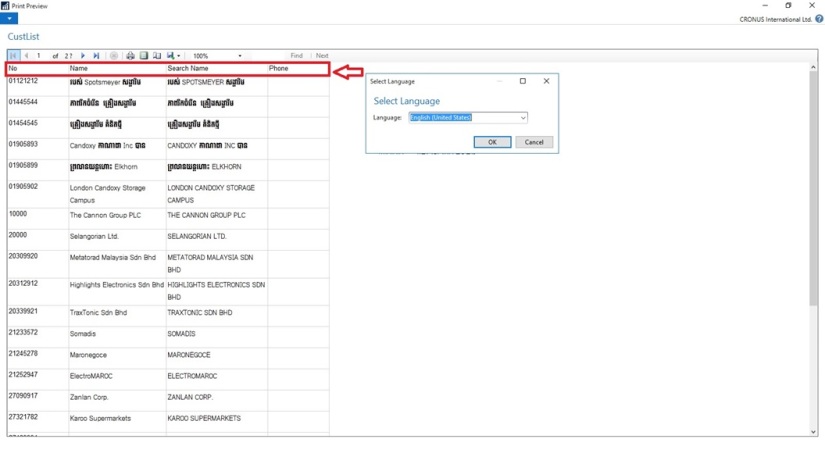
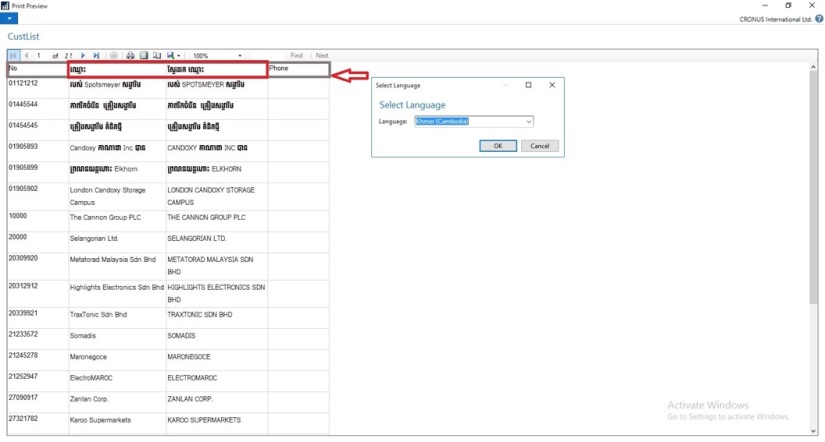
I have translated following Captions in Khmer language:

  1. For Field Name & Search Name in Table Customer (18)
  2. TextConstant in Report CustList (50000) to display Caption for Name & Search Name
  3. Caption for User defined variable in Page Customer Card (21)

When translations are complete, save the translated strings into a text file in the UTF-8 text encoding format. The extension of the file must be .txt.

It is recommend that you remove the other Language strings from the Unicode file before you copy it to the Microsoft Dynamics NAV Server computer.

Microsoft Dynamics NAV Server queries the Translations folder for updated strings, and for performance reasons the folder should only contain strings that you cannot import into the development environment because of conflicting codepages.

Copy the UTF-8 file to the equivalent of

C:\Program Files\Microsoft Dynamics NAV\90\Service\Translations

on the Microsoft Dynamics NAV Server computer.

When you have more than one service instance, there is a Translations folder for each service instance, such as

C:\Program Files\Microsoft Dynamics NAV\90\Service\Instances\MyInstance\Translations.

Restart the Microsoft Dynamics NAV Server instance.

Microsoft Dynamics NAV Server adds the translated strings in the file to the metadata store for the Microsoft Dynamics NAV deployment.

Now Users of this Microsoft Dynamics NAV Server session can now change the user interface language from English to required Language.

The metadata store is updated whenever you add new strings to the Translations folder and then restart the Microsoft Dynamics NAV Server service instance. Cached strings are not deleted from the metadata store when you restart the service instance.


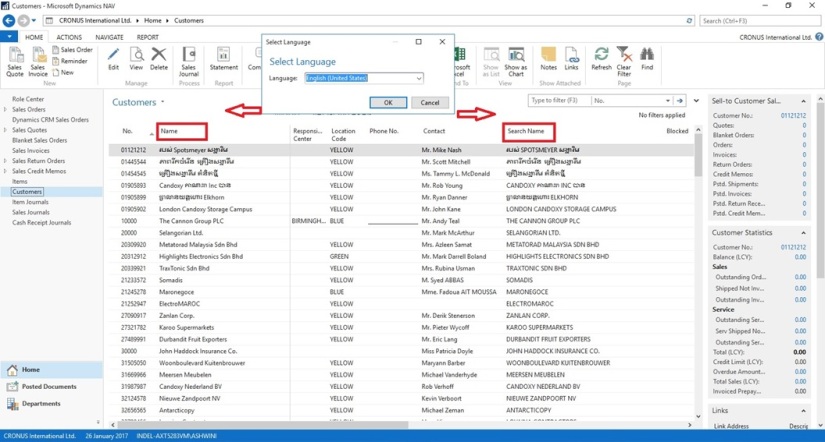
Let us see the effect of this translation. Let’s run the RTC to see the net effect of same.

[A] Customer List in English However Data Stored in Khmer Language

Translate-3

B] Two Captions Changed in Khmer Language for Name & Search Name

Translate-4

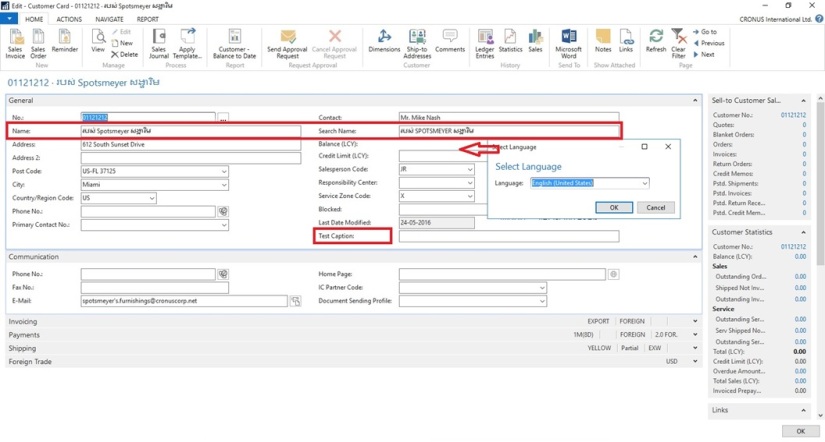
[C] Customer Card in English Language. Selected Captions are changed in Khmer Language

Translate-5

[D] Caption Changed for Name & Search Name to Support Khmer Language also for Field not available in Table the Test Caption

Translate-6

[E] Report Caption in English Language however data in Khmer Language

Translate-7

[F] Report Caption Changed to Khmer Language for Name & Search Name

Translate-8

You can manage Languages using above trick for translate strings across conflicting text encoding formats.

Will comeup with more details in my upcomming posts.


Corfu Navision 2016, Development Tips, How To, Information, Instalation & Configuration, License, Server, Tip & Tricks, Virtual

Working with Partner Translation Toolkit

In my earlier post I have given the overview of Managing Multilanguage support in Navision continuing from same today I will discuss about how to create Language Module for the Languages not available from Microsoft.

Although still we will not be having direct support for all Languages but using this process you can create one.

To be very fair it will not be easy task for all Languages but for few it could help you much to get you work done with little ease.

See few helpful links which will help you getting done your task:-

Platform strings maintained in managed assemblies and fin.stx and fin.etx files

Configuring Microsoft Dynamics NAV Help Server

To work with Partner Translation Toolkit you will require below, make sure you have all before you start with using this Tool:

  1. Visual Studio
  2. WiX Toolset
  3. Microsoft Translator for ResX
  4. Azure Data Market account
  5. Microsoft Translator data service subscribed
  6. Your NAV License File
  7. Finally your efforts

Visual Studio:

If you don’t have make sure you install the latest version of the same.

WiX Toolset:

You will require the WiX Toolset to start with you can download from here. Install WiX Toolset version 3.8 or 3.9

PTT-1

Install the WiX Toolset according to the instructions. In my case it is already installed on my system so getting option for Uninstall.

Building the project you require that you have the WiX Toolset version 3.8 or 3.9 installed on the computer.

Microsoft Translator for ResX:

See my previous post for more details here.

Azure Data Market account / Microsoft Translator data service:

See my previous post for more details here.

Steps to get ready for Translation tool:

See my previous post for more details here. 

Let’s start with building our project:

Step -1:

Run the “Microsoft.MCSUK.RESXTranslator.exe” Tool

See my previous post for more details here.

Step -2:

Run the “Visual Studio” with opening project solution PartnerTranslations.sln

PTT-8

You will see all the projects discussed above is having their own folder in this solution.

Add your all the translated resx files obtained in Step-1 post Translation to respective projects.

PTT-9

Right click on the project folder and choose Add and then Existing Item.

Select the resx file which we translated in Step-1.

In my case I select “Common.Language.Lang.hi-IN.resx”

Similarly you will add these translated files to your all other projects. Be cautious few may have 2-3 files add them all.

PTT-10

The properties of the installation determine which folders are created during the installation of the language packs and what files are placed in the folders. The properties can be found in the Locals.wxi file located in the root directory of the translation kit. Open the Locals.wxi file and change the following properties:

• CountryRegionCode, to one of the country/region codes in Globals.wxi or create a new.

• ModuleLanguage, to the language of your choice.

• LocalLangFolder, to the .Net culture of the satellite assemblies.

• LocalIsoFolder, to the three letter ISO code for your language.

PTT-11

PTT-12

Step -3:

Build the project PartnerTranslations.sln

To build the PartnerTranslation solution from inside Visual Studio, choose Build Solution from the Build menu. This will pick up all translated artifacts, and create three installer files (.msi):

  • Server.msi – Located in the Server\Bin\Debug folder.
  • RTC.msi – Located in the RTC\Bin\Debug folder.
  • WebClient.msi – Located in the WebClient\Bin\Debug folder.

Step-4:

Copy your Language Module Files and install on desired Server & Client

PTT-13

Install – Add your language pack to the W1 version

If have not already done so, install the W1 version of Microsoft Dynamics NAV 2016 from the product media.

Install the new language Pack

Next, install the new language pack on the same computer. To do this, select and click each of the three .msi files listed below, one after the other. The order is not significant:

  • Server\Bin\Debug\Server.msi
  • RTC\Bin\Debug\RTC.msi
  • WebClient\Bin\Debug\WebClient.msi

Each installer quickly shows a dialog, which disappears when the installer has completed.

The language pack is now installed, but you must make some final configuration.

I will comeup with more details in my next posts.


Corfu Navision 2016, Development Tips, How To, Information, Instalation & Configuration, Tip & Tricks

Managing Multilanguage support in Navision Overview

language

Microsoft Dynamics NAV is Multilanguage enabled, which means that you can display the user interface (UI) in different languages.

A Multilanguage version of Microsoft Dynamics NAV is not the same as a localized version.

  • A localized version is a version that is adapted to a local market. All text that is displayed to the user is translated into the local language, and all functional areas are adapted to the requirements of the local market.
  • A Multilanguage version is a localized version that you can run in different languages, but all local functionality remains the same.


Language Module:

To be able to run a localized version in multiple languages, you must install language modules.

Language Module contains translated text strings of Logs & error reporting for:

  • Translated strings for the UI in the Microsoft Dynamics NAV Windows client.
  • Translated strings for the database.
  • Translated strings for Microsoft Dynamics NAV Server, such as for logs and error reporting.
  • Translated strings for the Microsoft Office Outlook Add-in for Microsoft Dynamics NAV.
  • Translated strings for charts on Role Centers in the Microsoft Dynamics NAV Windows client.
  • Localized versions of the client Help.

Language Modules are Binary Files which can’t be changed by any external tools for this you will require Partner Translation Tool Project and Visual Studio.

You can install language modules so that you can view text in the user interface in different languages.

Once you have installed a language module, you can select that language on the Select Language page in the UI to change the language of all text that is displayed in the UI in captions for text boxes, on command buttons, in menus, and so on.

Imp: When you change the language of Microsoft Dynamics NAV, you are not changing the language of the data that is stored in Microsoft Dynamics NAV. Changing the text that is stored as application data is not part of the language modules.

When you install a language module, a subdirectory for the language is created in the Microsoft Dynamics NAV directory structure. The .stx, .etx, .chm, and .hh files for each language are automatically installed in the subdirectory. The name of the subdirectory is the three-letter language code (Abbreviated Name) that is used by Windows for the particular language.

You can use this link to access NAV 2016 downloads for Available – Product, Translation Tool & Language Modules. https://mbs.microsoft.com/customersource/Global/NAV/downloads/product-releases/msdnav2016download


There are 3 main parts for creating translations that works in Dynamics NAV.

  1. Translate the platform by translating the resource file for each DLL file.
  2. Translate all the captions by adding a new language into captionML in each object
  3. Localize development environment by translating .stx and .etx files. These 2 files have to be sent to the Microsoft regional office and sealed by Microsoft. (Only required if you want the Development Environment to be in Unsupported Language as well)


Common available resources for supported/available Language Module.

To work with Language Modules what else you required to know about: You can check below links on MSDN.

  1. Windows Language Virtual Table
  2. How to: Install Language Modules
  3. How to: Add Translated Strings By Importing and Exporting Multilanguage Files
  4. How to: Add Translated Strings By Using the Multilanguage Editor
  5. How to: Uninstall Language Modules
  6. How to: Delete Translated Strings
  7. Multilanguage Development
  8. Viewing the Application in Different Languages


Translated User Interface Strings:

In Microsoft Dynamics NAV, the user interface includes the following types of translatable user interface strings:

Captions for application objects, such as pages, tables, reports, option fields, icons, menus, and so on, that are defined in the CaptionML property for an object. Text messages that are defined in the development environment, such as text constants and error messages that are defined in the C/AL Globals window or the C/AL Locals window.

Text messages and strings that are defined in Microsoft Dynamics NAV Server and Microsoft Dynamics NAV Windows client.

To add a language to the text messages that are defined in the resource files for Microsoft Dynamics NAV Server and Microsoft Dynamics NAV Windows client, special tools are required.

You can manage translations by using text files. In the development environment, you can export all strings for the specified objects to a text file, translate the strings in a translation tool of your choice, and then import the new translations. Then, when you compile the updated objects, the new translations are available to users in the Microsoft Dynamics NAV Windows client.


Multilanguage across Conflicting Text Encoding Formats:

To support users with translated strings across conflicting text encoding formats, you must save the translations to a text file in UTF-8 text encoding format.

This converts the file to Unicode, which Microsoft Dynamics NAV Development Environment cannot import. Instead, you add the files to a dedicated Translations folder on the Microsoft Dynamics NAV Server computer.

The default location of this folder is:

C:\Program Files\Microsoft Dynamics NAV\90\Service\Translations.

When you have more than one service instance, there is a Translations folder for each service instance, such as:

C:\Program Files\Microsoft Dynamics NAV\90\Service\Instances\MyInstance\Translations.

Microsoft Dynamics NAV Server adds any strings in text files that you place in the relevant Translations folder to the metadata for Microsoft Dynamics NAV.


To add translated strings for a conflicting text encoding format:

In the development environment, export the strings for the objects that you want to translate.

Translate the strings in the resulting text file into desired Language by using your preferred translation process.

When translations are complete, save the translated strings into a text file in the UTF-8 text encoding format. The extension of the file must be .txt.

It is recommend that you remove the other Language strings from the Unicode file before you copy it to the Microsoft Dynamics NAV Server computer.

Microsoft Dynamics NAV Server queries the Translations folder for updated strings, and for performance reasons the folder should only contain strings that you cannot import into the development environment because of conflicting codepages.

Copy the UTF-8 file to the Microsoft Dynamics NAV Server computer.

C:\Program Files\Microsoft Dynamics NAV\90\Service\Translations

When you have more than one service instance, there is a Translations folder for each service instance, such as:

C:\Program Files\Microsoft Dynamics NAV\90\Service\Instances\MyInstance\Translations.

Restart the Microsoft Dynamics NAV Server instance.

Microsoft Dynamics NAV Server adds the translated strings in the file to the metadata store for the Microsoft Dynamics NAV deployment.

Now Users of this Microsoft Dynamics NAV Server session can now change the user interface language from English to required Language.

The metadata store is updated whenever you add new strings to the Translations folder and then restart the Microsoft Dynamics NAV Server service instance. Cached strings are not deleted from the metadata store when you restart the service instance.

I will comeup with more details in my upcomming post soon.