Dynamics 365, Information, Tip & Tricks

Microsoft Dynamics 365 – Overview

As we are aware of release of Dynamics 365 in November 2016.

Dynamics 365 for Financials is based on Project “Madeira” which was in public preview in the US and Canada since April 2016.

Dynamics 365 for Financials launched on November 1, 2016 in the United States and Canada, and intends to expand to additional countries in CY2017.

Dynamics 365 for Sales, Dynamics 365 for Marketing, and Dynamics 365 for Customer Service within the Business edition will also be optimized for SMB customers.

Microsoft Dynamics 365 for Financials, Business edition, has launched in the US and Canada! Microsoft Dynamics 365 for Financials is a business management solution that seamlessly connects people and processes.

It’s deeply integrated with Office 365 and includes built-in intelligence. With Microsoft Dynamics 365 for Financials, customers can easily connect their businesses; make better business decisions; and get started quickly, while easily managing growth. From day one, it makes ordering, selling, invoicing, and reporting easier and faster.

Dynamics 365 for Financials is only available as a SaaS offering from Microsoft.

Software as a service is a software licensing and delivery model in which software is licensed on a subscription basis and is centrally hosted. It is sometimes referred to as “on-demand software”. SaaS is typically accessed by users using a thin client via a web browser.

With intelligent business applications across CRM and ERP, Microsoft Dynamics 365 gives you choice.

Start with just what you need to run your business and delight your customers.

2-1

Say start with Financials.

And then add apps as your needs change.

2-2

In short evolve your business on your terms.

You can add more apps from AppSource as required for selected Products, Categories or Industries.

2-3

Each application solves real problems and delivers real value. But combine them and you get the power and possibilities to transform your business.

2-4

Dynamics 365 haves 2 Editions:

  • Enterprise
  • Business

Dynamics 365, Enterprise edition is optimized for organizations with 250+ employees.

Dynamics 365, Business edition is optimized for organizations with 10 – 250 employees.


Applications available in Business for:

Dynamics 365 for Financials is optimized to meet the needs of SMBs with roughly 10 – 250 employees.

These companies typically need more robust capabilities than the financial and accounting packages they started with, but are not yet ready to make a significant investment in highly customized ERP systems.

Dynamics 365 for Financials capabilities span financials management, reporting, fixed assets, supply chain and inventory management, contact/opportunity management, and project management. It also offers multi-company and multi-currency capabilities.


Applications available in Enterprise for:

  • Sales – Turn relationships into revenue with digital intelligence in each deal.
  • Customer Service – Earn customers for life with world-class customer service.
  • Field Service – Optimize your scheduling and use predictive tools to master the service call.
  • Project Service Automation – Create more profitable customer relationships using intelligent tools.
  • Operations – Make data-driven decisions for smarter, more efficient operations.

Other Applications:

  • Marketing – Deliver powerful customer experiences using Adobe Marketing Cloud.


Microsoft Dynamics 365 for Financials is an app in the Dynamics 365, Business edition. Additional apps within the Business edition (Dynamics 365 for Sales, Dynamics 365 for Marketing, and Dynamics 365 for Customer Service) are currently planned to be available in CY2017.


What is the difference between Microsoft Dynamics NAV and Microsoft Dynamics 365 for Financials?

Dynamics NAV is software, available via perpetual, subscription, and/ or SPLA licensing, that can be deployed on-premises or in the cloud and extended using Dynamics NAV Customizations or extensions.

Dynamics 365 for Financials is a new SaaS (cloud – only) service, available only via CSP, which can be extended via apps (validated extensions) in Microsoft AppSource.

Many of the capabilities available in Dynamics NAV will also be available in Dynamics 365 for Financials. However, they will be available in a way that is customer – ready out of the box, so these capabilities may surface differently in Financials than Dynamics NAV.

Microsoft Dynamics 365 for Financials is based on the Microsoft Dynamics NAV platform and several other Microsoft technologies.

It is not compulsory but for seamlessly experience Dynamics 365 for Financials from within Office 365, customers must have an Office 365 subscription that includes Exchange Online.

I will come up with more details in my up coming posts till then keep exploring and learning.


Corfu Navision 2016, Development Tips, How To, Information, Instalation & Configuration, Tip & Tricks

Managing Multilanguage support in Navision Overview

language

Microsoft Dynamics NAV is Multilanguage enabled, which means that you can display the user interface (UI) in different languages.

A Multilanguage version of Microsoft Dynamics NAV is not the same as a localized version.

  • A localized version is a version that is adapted to a local market. All text that is displayed to the user is translated into the local language, and all functional areas are adapted to the requirements of the local market.
  • A Multilanguage version is a localized version that you can run in different languages, but all local functionality remains the same.


Language Module:

To be able to run a localized version in multiple languages, you must install language modules.

Language Module contains translated text strings of Logs & error reporting for:

  • Translated strings for the UI in the Microsoft Dynamics NAV Windows client.
  • Translated strings for the database.
  • Translated strings for Microsoft Dynamics NAV Server, such as for logs and error reporting.
  • Translated strings for the Microsoft Office Outlook Add-in for Microsoft Dynamics NAV.
  • Translated strings for charts on Role Centers in the Microsoft Dynamics NAV Windows client.
  • Localized versions of the client Help.

Language Modules are Binary Files which can’t be changed by any external tools for this you will require Partner Translation Tool Project and Visual Studio.

You can install language modules so that you can view text in the user interface in different languages.

Once you have installed a language module, you can select that language on the Select Language page in the UI to change the language of all text that is displayed in the UI in captions for text boxes, on command buttons, in menus, and so on.

Imp: When you change the language of Microsoft Dynamics NAV, you are not changing the language of the data that is stored in Microsoft Dynamics NAV. Changing the text that is stored as application data is not part of the language modules.

When you install a language module, a subdirectory for the language is created in the Microsoft Dynamics NAV directory structure. The .stx, .etx, .chm, and .hh files for each language are automatically installed in the subdirectory. The name of the subdirectory is the three-letter language code (Abbreviated Name) that is used by Windows for the particular language.

You can use this link to access NAV 2016 downloads for Available – Product, Translation Tool & Language Modules. https://mbs.microsoft.com/customersource/Global/NAV/downloads/product-releases/msdnav2016download


There are 3 main parts for creating translations that works in Dynamics NAV.

  1. Translate the platform by translating the resource file for each DLL file.
  2. Translate all the captions by adding a new language into captionML in each object
  3. Localize development environment by translating .stx and .etx files. These 2 files have to be sent to the Microsoft regional office and sealed by Microsoft. (Only required if you want the Development Environment to be in Unsupported Language as well)


Common available resources for supported/available Language Module.

To work with Language Modules what else you required to know about: You can check below links on MSDN.

  1. Windows Language Virtual Table
  2. How to: Install Language Modules
  3. How to: Add Translated Strings By Importing and Exporting Multilanguage Files
  4. How to: Add Translated Strings By Using the Multilanguage Editor
  5. How to: Uninstall Language Modules
  6. How to: Delete Translated Strings
  7. Multilanguage Development
  8. Viewing the Application in Different Languages


Translated User Interface Strings:

In Microsoft Dynamics NAV, the user interface includes the following types of translatable user interface strings:

Captions for application objects, such as pages, tables, reports, option fields, icons, menus, and so on, that are defined in the CaptionML property for an object. Text messages that are defined in the development environment, such as text constants and error messages that are defined in the C/AL Globals window or the C/AL Locals window.

Text messages and strings that are defined in Microsoft Dynamics NAV Server and Microsoft Dynamics NAV Windows client.

To add a language to the text messages that are defined in the resource files for Microsoft Dynamics NAV Server and Microsoft Dynamics NAV Windows client, special tools are required.

You can manage translations by using text files. In the development environment, you can export all strings for the specified objects to a text file, translate the strings in a translation tool of your choice, and then import the new translations. Then, when you compile the updated objects, the new translations are available to users in the Microsoft Dynamics NAV Windows client.


Multilanguage across Conflicting Text Encoding Formats:

To support users with translated strings across conflicting text encoding formats, you must save the translations to a text file in UTF-8 text encoding format.

This converts the file to Unicode, which Microsoft Dynamics NAV Development Environment cannot import. Instead, you add the files to a dedicated Translations folder on the Microsoft Dynamics NAV Server computer.

The default location of this folder is:

C:\Program Files\Microsoft Dynamics NAV\90\Service\Translations.

When you have more than one service instance, there is a Translations folder for each service instance, such as:

C:\Program Files\Microsoft Dynamics NAV\90\Service\Instances\MyInstance\Translations.

Microsoft Dynamics NAV Server adds any strings in text files that you place in the relevant Translations folder to the metadata for Microsoft Dynamics NAV.


To add translated strings for a conflicting text encoding format:

In the development environment, export the strings for the objects that you want to translate.

Translate the strings in the resulting text file into desired Language by using your preferred translation process.

When translations are complete, save the translated strings into a text file in the UTF-8 text encoding format. The extension of the file must be .txt.

It is recommend that you remove the other Language strings from the Unicode file before you copy it to the Microsoft Dynamics NAV Server computer.

Microsoft Dynamics NAV Server queries the Translations folder for updated strings, and for performance reasons the folder should only contain strings that you cannot import into the development environment because of conflicting codepages.

Copy the UTF-8 file to the Microsoft Dynamics NAV Server computer.

C:\Program Files\Microsoft Dynamics NAV\90\Service\Translations

When you have more than one service instance, there is a Translations folder for each service instance, such as:

C:\Program Files\Microsoft Dynamics NAV\90\Service\Instances\MyInstance\Translations.

Restart the Microsoft Dynamics NAV Server instance.

Microsoft Dynamics NAV Server adds the translated strings in the file to the metadata store for the Microsoft Dynamics NAV deployment.

Now Users of this Microsoft Dynamics NAV Server session can now change the user interface language from English to required Language.

The metadata store is updated whenever you add new strings to the Translations folder and then restart the Microsoft Dynamics NAV Server service instance. Cached strings are not deleted from the metadata store when you restart the service instance.

I will comeup with more details in my upcomming post soon.

PowerBI.com, Tip & Tricks

Power BI – Overview and Learning

Microsoft Power BI is a collection of online services and features that enables you to find and visualize data, share discoveries, and collaborate in intuitive new ways. There are two experiences now available for Power BI: the new experience, generally referred to as Power BI, and the previous experience which is referred to as Power BI for Office 365.


Please check this link:- Overview and Learning

PowerBI-2


Corfu Navision 2016, Warehouse

Warehouse Overview

One of my reader have demanded a Warehouse related query, before jumping to the solution I thought to have a brief overview regarding this topic. As I have not covered this topic in my past posts, so I will be posting couple of posts on this series as and when I get some time and the answer will be in these couple of posts.

Each transactions performed using warehouse is stored in a Warehouse Register.

For each transaction or movement in the warehouse is recorded in Warehouse Entry table.

Warehouse Documents and Warehouse Journal are used to register item movements in the warehouse.

Whenever an item in the warehouse is moved, received, put away, picked, shipped, or adjusted, Warehouse Entries are registered to store the physical information about zone, bin, and quantity

The Bin Content table is used to handle all the different dimensions of the contents of a bin per item, such as unit of measure, maximum quantity, and minimum quantity.

Below is the typical Warehouse Flow:

Flow Diagram

Basic UI Documents

  • Inventory Put-away
  • Inventory Pick
  • Inventory Movement
  • Item Journal
  • Item Reclassification Journal

Advanced UI Documents

  • Warehouse Receipt
  • Put-away Worksheet
  • Warehouse Put-away
  • Pick Worksheet
  • Warehouse Pick
  • Movement Worksheet
  • Warehouse Movement
  • Internal Whse. Pick
  • Internal Whse. Put-away
  • Bin Creation Worksheet
  • Bin Content Creation Worksheet
  • Whse. Item Journal
  • Whse. Item Reclass. Journal


Below are the warehouse-related granules in Navision:

  • Basic Inventory (4010)
  • Bin (4170)
  • Put Away (4180)
  • Warehouse Receipt (4190)
  • Pick (4200)
  • Warehouse Shipment (4210)
  • Warehouse Management Systems (4620)
  • Internal Picks and Put-aways (4630)
  • Automated Data Capture System (4640)
  • Bin Setup (4660)


Granules Vs  UI Documents:

The following table shows which granules are required to define different warehouse complexity levels, which UI documents support each level.

Complexity level Description UI document Minimum granule requirement
1 No dedicated warehouse activity.

Receive/ship posting from orders.

Order Basic Inventory
2 No dedicated warehouse activity.

Receive/ship posting from orders.

Bin code is required.

Order, with bin code Basic Inventory/Bin
3 Basic warehouse activity, order-by-order.

Receive/ship posting from inventory put-away/pick documents.

Bin code is required.

Inventory Put-away/Inventory Movement/Inventory Pick, with bin code Basic Inventory/Bin/

Put Away/Pick

4 Advanced warehouse activity, for multiple orders.

Consolidated receive/ship posting based on warehouse put-away/pick registrations.

Warehouse Receipt/Warehouse Put-away/Warehouse Pick/Warehouse Shipment/Pick Worksheet Basic Inventory/

Warehouse Receipt/

Put Away/

Pick/

Warehouse Shipment

5 Advanced warehouse activity, for multiple orders.

Consolidated receive/ship posting based on warehouse put-away/pick registrations.

Bin code is required.

Warehouse Receipt/Warehouse Put-away/Warehouse Pick/Warehouse Shipment/Pick Worksheet/Put-away Worksheet, with bin code Basic Inventory/Bin/

Warehouse Receipt/

Put Away/Pick/

Warehouse Shipment

6

This level is referred to as “WMS”, since it requires the most advanced granule, Warehouse Management Systems.

Advanced warehouse activity, for multiple orders.

Consolidated receive/ship posting based on warehouse put-away/pick registrations.

Bin code is required.

Zone/class code is optional.

Warehouse workers directed by workflow.

Bin replenishment planning.

Bin ranking.

Bin setup by capacity.

Slotting.

Hand-help device integration.

Warehouse Receipt/Warehouse Put-away/Warehouse Pick/Warehouse Shipment/Warehouse Movement/Pick Worksheet/Put-away Worksheet/Internal Whse. Pick/Internal Warehouse Put-away, with bin/class/zone code

Various worksheets for bin management

ADCS screens

Basic Inventory/Bin/

Put Away/

Warehouse Receipt/

Pick/

Warehouse Shipment/

Warehouse Management Systems/

Internal Picks and Put-aways/

Bin Setup/

Automated Date Capture System/

Bin Setup

I will come up with more details in my next post.

Corfu Navision 2016, Development Tips, Dimension, How To, Information, Instalation & Configuration, upgrade

Design Overview of Dimension handling in Navision 2016

Hold on,

Way of handling Dimension have changed from Navision 2009 not a new concept. Till now everyone is aware of this technical change, but still to keep handy reference today I decided to share the same with community, which can help for new comers in this industry.

Detailed technical insight into the concepts and principles that are used to redesign the dimension entry storing and posting feature in Microsoft Dynamics NAV 2016. Helpful when upgrading from earlier version to 2009.

Dimension Sets

A dimension set is a unique combination of dimension values. It is stored as dimension set entries in the database. Each dimension set entry represents a single dimension value.

The dimension set is identified by a common dimension set ID that is assigned to each dimension set entry that belongs to the dimension set.

Dimension Set Entries

Dimension sets are stored in the Dimension Set Entry table as dimension set entries with the same dimension set ID.

When you add, edit and close the Edit Dimension Set Entries window, a check is performed to see whether the combination of dimension values exists as a dimension set in the table.

If the combination occurs in the table, then the corresponding dimension set ID is assigned to the journal line, document header, or document line.

Otherwise, a new dimension set is added to the table, and the new dimension set ID is assigned to the journal line, document header, or document line.
Performance Improvement
By storing dimension sets once in the database, database space is preserved, and overall performance is improved.

Searching for Dimension Combinations

Building Search Tree
Table 481 Dimension Set Tree Node is used when Microsoft Dynamics NAV evaluates whether a set of dimensions already exists in table 480 Dimension Set Entry table.

The evaluation is performed by recursively traversing the search tree starting at the top level numbered 0.

The top level 0 represents a dimension set with no dimension set entries. The children of this dimension set represent dimension sets with only one dimension set entry.

The children of these dimension sets represent dimension sets with two children, and so on.

Finding Dimension Set ID

At a conceptual level, Parent ID, Dimension, and Dimension Value, in the search tree, are combined and used as the primary key because Microsoft Dynamics NAV traverses the tree in the same order as the dimension entries.

The GET function (record) is used to search for dimension set ID.

DimSet.”Parent ID” := 0;  // ‘root’

IF UserDim.FINDSET THEN

REPEAT

DimSet.GET(DimSet.”Parent ID”,UserDim.DimCode,UserDim.DimValueCode);

UNTIL UserDim.NEXT = 0;

EXIT(DimSet.ID);

However, to preserve the ability of Microsoft Dynamics NAV to rename a dimension and dimension value, table 348 Dimension Value is extended with an integer field of Dimension Value ID.

This table converts the field pair Dimension and Dimension Value to an integer value.

When you rename the dimension and dimension value, the integer value is not changed.

DimSet.”Parent ID” := 0;  // ‘root’IF UserDim.FINDSET THEN  REPEAT      DimSet.GET(DimSet.ParentID,UserDim.”Dimension Value ID”);  UNTIL UserDim.NEXT = 0;EXIT(DimSet.ID);

Table Structure

New Tables

Three new tables have been designed to manage dimension set entries.

Table 480 Dimension Set Entry
Table 480 Dimension Set Entry is a new table. You cannot change this table. After data has been written to the table, you cannot delete or edit it.

Deleting data requires that you check against all occurrences of the dimension set ID in the entire database, including partner solutions.

Field No. Field Name Data Type Comment
1 ID Integer >0.0 is reserved for the empty dimension set. References field 3 in table 481.
2 Dimension Code Code 20 Table relation to table 348.
3 Dimension Value Code Code 20 Table relation to table 349.
4 Dimension Value ID Integer References field 12 in table 349. It is the secondary key that is used when traversing table 481.
5 Dimension Name Text 30 CalcField. Lookup to table 348.
6 Dimension Value Name Text 30 CalcField. Lookup to table 349.

Table 481 Dimension Set Tree Node

Table 481 Dimension Set Tree Node is a new table. You cannot change this table.

It is used to search for a dimension set. If the dimension set is not found, a new set is created.

Field No. Field Name Data Type Comment
1 Parent Dimension Set ID Integer 0 for top level node.
2 Dimension Value ID Integer Table relation to field 12 in table 349.
3 Dimension Set ID Integer AutoIncrement. Used in field 1 in table 480.
4 In Use Boolean False if not in use.

Table 482 Reclas. Dimension Set Buffer
Table 482 Reclas. Dimension Set Buffer is a new table.

The table is used to edit a dimension set ID.

It is required when you edit a dimension value code and a new dimension value code, for example, in the Item Reclas. Journal table.

Field No. Field Name Data Type Comment
1 Dimension Code Code 20 Table relation to table 348.
2 Dimension Value Code Code 20 Table relation to table 349.
3 Dimension Value ID Integer References field 12 in table 349.
4 New Dimension Value Code Code 20 Table relation to table 349.
5 New Dimension Value ID Integer References field 12 in table 349.
6 Dimension Name Text 30 CalcField. Lookup to table 348.
7 Dimension Value Name Text 30 CalcField. Lookup to table 349.
8 New Dimension Value Name Text 30 CalcField. Lookup to table 349.

Modified Tables
All transaction and budget tables have been modified to manage dimension set entries.

Changes to Transaction and Budget Tables
A new field has been added to all transaction and budget tables.

Field No. Field Name Data Type Comment
480 Dimension Set ID Integer References field 1 in table 480.

Changes to Table 83 Item Journal Line
Two new fields have been added to table 83 Item Journal Line.

Field No. Field Name Data Type Comment
480 Dimension Set ID Integer References field 1 in table 480.
481 New Dimension Set ID Integer References field 1 in table 480.

Changes to Table 349 Dimension Value
A new field has been added to table 349 Dimension Value.

Field No. Field Name Data Type Comment
12 Dimension Value ID Integer AutoIncrement. Used for references in table 480 and table 481.

Tables That Get New Field 480 Dimension Set ID
A new field, 480 Dimension Set ID, has been added to the following tables.

For the tables that store posted data, the field only provides a non-editable display of dimensions, which is marked as Drill-down.

For the tables that store working documents, the field is editable. The buffer tables that are used internally do not need editable or non-editable capabilities.

The 480 field is non-editable in the following tables

Table No. Table Name
17 G/L Entry
21 Cust. Ledger Entry
25 Vendor Ledger Entry
32 Item Ledger Entry
110 Sales Shipment Header
111 Sales Shipment Line
112 Sales Invoice Header
113 Sales Invoice Line
114 Sales Cr.Memo Header
115 Sales Cr.Memo Line
120 Purch. Rcpt. Header
121 Purch. Rcpt. Line
122 Purch. Inv. Header
123 Purch. Inv. Line
124 Purch. Cr. Memo Hdr.
125 Purch. Cr. Memo Line
169 Job Ledger Entry
203 Res. Ledger Entry
271 Bank Account Ledger Entry
281 Phys. Inventory Ledger Entry
297 Issued Reminder Header
304 Issued Fin. Charge Memo Header
5107 Sales Header Archive
5108 Sales Line Archive
5109 Purchase Header Archive
5110 Purchase Line Archive
5601 FA Ledger Entry
5625 Maintenance Ledger Entry
5629 Ins. Coverage Ledger Entry
5744 Transfer Shipment Header
5745 Transfer Shipment Line
5746 Transfer Receipt Header
5747 Transfer Receipt Line
5802 Value Entry
5832 Capacity Ledger Entry
5907 Service Ledger Entry
5908 Service Header
5933 Service Order Posting Buffer
5970 Filed Service Contract Header
5990 Service Shipment Header
5991 Service Shipment Line
5992 Service Invoice Header
5993 Service Invoice Line
5994 Service Cr. Memo Header
5995 Service Cr. Memo Line
6650 Return Shipment Header
6651 Return Shipment Line
6660 Return Receipt Header
6661 Return Receipt Line

The 480 field is editable in the following tables

Table No. Table Name
36 Sales Header
37 Sales Line
38 Purchase Header
39 Purchase Line
81 Gen. Journal Line
83 Item Journal Line
89 BOM Journal Line
96 G/L Budget Entry
207 Res. Journal Line
210 Job Journal Line
221 Gen. Jnl. Allocation
246 Requisition Line
295 Reminder Header
302 Finance Charge Memo Header
5405 Production Order
5406 Prod. Order Line
5407 Prod. Order Component
5615 FA Allocation
5621 FA Journal Line
5635 Insurance Journal Line
5740 Transfer Header
5741 Transfer Line
5900 Service Header
5901 Service Item Line
5902 Service Line
5965 Service Contract Header
5997 Standard Service Line
7134 Item Budget Entry
99000829 Planning Component

The 480 field has been added to the following buffer tables.

Table No. Table Name
49 Invoice Post. Buffer
212 Job Posting Buffer
372 Payment Buffer
382 CV Ledger Entry Buffer
461 Prepayment Inv. Line Buffer
5637 FA G/L Posting Buffer
7136 Item Budget Buffer

Codeunit 408 Dimension Management
Codeunit 408 Dimension Management is a function library that handles common tasks that are related to dimensions, such as copying from one table to another or from one document to another.

Many functions are deleted because there is no need for copying between dimension tables at the other hand many functions are modified.

Modified Functions

Function Name Modification Description
CheckDimSetIDComb New function that substitutes the other check functions and takes a Dimension Set ID as an argument instead of a dimension table.
CheckDimSetIDComb

CheckDocDimComb

CheckServContractDimComb

CheckDimBuffer

CheckDimComb

CheckDimValueComb

Delete. All usage should be changed to CheckDimSetIDComb.
GetDefaultDim Modify to return an integer Dimension Set ID instead of a set of records.
CopyJnlLineDimToICJnlDim

CopyICJnlDimToJnlLineDim

CopyDocDimtoICDocDim

CopyICDocDimtoICDocDim

Modify to work with DimSetID -> ICJnlLineDim

Deleted Functions

Functions that are deleted from codeunit 408 in connection with the Dimension Set Entries feature are listed below.

During the upgrade of application code from Microsoft Dynamics NAV 2009 or earlier versions to Microsoft Dynamics NAV 2016, the following functions are not available in Microsoft Dynamics NAV 2016.

If you have customizations that use one or more of the functions, you must upgrade that code accordingly.

InsertJnlLineDim

UpdateJnlLineDefaultDim

GetJnlLineDefaultDim

GetPreviousDocDefaultDim

GetPreviousProdDocDefaultDim

InsertDocDim

UpdateDocDefaultDim

ExtractDocDefaultDim

InsertProdDocDim

UpdateProdDocDefaultDim

InsertServContractDim

UpdateServcontractDim

UpdateDefaultDimNewDimValue

GetDocDim

GetProdDocDim

TypeToTableID1

TypeToTableID2

TypeToTableID3

TypeToTableID4

TypeToTableID5

DeleteJnlLineDim

DeleteDocDim

DeletePostedDocDim

DeleteProdDocDim

DeleteServContractDim

ShowJnlLineDim

SaveJnlLineDim

ShowJnlLineNewDim

SaveJnlLineNewDim

ShowDocDim

SaveDocDim

ShowProdDocDim

SaveProdDocDim

ShowTempDim

SaveTempDim

ShowTempNewDim

SaveTempNewDim

SaveServContractDim

MoveJnlLineDimToLedgEntryDim

MoveDocDimToPostedDocDim

MoveOneDocDimToPostedDocDim

MoveLedgEntryDimToJnlLineDim

MoveDimBufToJnlLineDim

MoveDimBufToLedgEntryDim

MoveDimBufToPostedDocDim

MoveDimBufToGLBudgetDim

CopyJnlLineDimToJnlLineDim

CopyLedgEntryDimToJnlLineDim

CopyDocDimToDocDim

CopyPostedDocDimToPostedDocDim

CopyDocDimToJnlLineDim

CopyDimBufToJnlLineDim

CopyDimBufToDocDim

CopySCDimToDocDim

MoveDocDimToLedgEntryDim

MoveDocDimToDocDim

MoveDocDimArchvToDocDim

MoveLedgEntryDimToDocDim

MoveProdDocDimToProdDocDim

MoveJnlLineDimToProdDocDim

MoveJnlLineDimToDocDim

MoveJnlLineDimToJnlLineDim

CopyLedgEntryDimToLedgEntryDim

MoveTempFromDimToTempToDim

TransferTempToDimToDocDim

MoveJnlLineDimToBuf

CopyICJnlDimToICJnlDim

TestDimValue

TestNewDimValue

MoveDimBufToItemBudgetDim. (Delete because the ItemBudgetDim Table is deleted.

GetServContractDim

MoveTempDimToBuf

UpdateSCInvLineDim

CopyJnlLineDimToBuffer

UpdateDocDefaultDim2

Code Examples of Changed Patterns in Modifications

Posting a Journal Line

Key changes are listed as follows:

  • Journal line dimension tables are removed.
  • A dimension set ID is created in the Dimension Set ID field.

Old Code

ResJnlLine.”Qty. per Unit of Measure” :=  SalesLine.”Qty. per Unit of Measure”;

TempJnlLineDim.DELETEALL;

TempDocDim.RESET;

TempDocDim.SETRANGE( “Table ID”,DATABASE::”Sales Line”);

TempDocDim.SETRANGE( “Line No.”,SalesLine.”Line No.”);

DimMgt.CopyDocDimToJnlLineDim( TempDocDim,TempJnlLineDim);

ResJnlPostLine.RunWithCheck( ResJnlLine,TempJnlLineDim);

New Code

ResJnlLine.”Qty. per Unit of Measure” := SalesLine.”Qty. per Unit of Measure”;

ResJnlLine.”Dimension Set ID” := SalesLine.” Dimension Set ID “;

ResJnlPostLine.Run(ResJnlLine);
Posting a Document
When you post a document in Microsoft Dynamics NAV 2016, you no longer have to copy the document dimensions.

Old Code

DimMgt.MoveOneDocDimToPostedDocDim(

TempDocDim,DATABASE::”Sales Line”,

“Document Type”,

“No.”,

SalesShptLine.”Line No.”,

DATABASE::”Sales Shipment Line”,

SalesShptHeader.”No.”);

New Code

SalesShptLine.”Dimension Set ID”  := SalesLine.”Dimension Set ID”
Editing Dimensions from a Document
You can edit dimensions from a document. For example, you can edit a sales order line.

Old Code

Table 37, function ShowDimensions:

TESTFIELD(“Document No.”);

TESTFIELD(“Line No.”);

DocDim.SETRANGE(“Table ID”,DATABASE::”Sales Line”);

DocDim.SETRANGE(“Document Type”,”Document Type”);

DocDim.SETRANGE(“Document No.”,”Document No.”);

DocDim.SETRANGE(“Line No.”,”Line No.”);

DocDimensions.SETTABLEVIEW(DocDim);

DocDimensions.RUNMODAL;

New Code

Table 37, function ShowDimensions:

“Dimension ID” := DimSetEntry.EditDimensionSet( “Dimension ID”);
Showing Dimensions from Posted Entries
You can show dimensions from posted entries, such as sales shipment lines.

Old Code

Table 111, function ShowDimensions:

TESTFIELD(“No.”);

TESTFIELD(“Line No.”);

PostedDocDim.SETRANGE(“Table ID”,DATABASE::”Sales Shipment Line”);

PostedDocDim.SETRANGE(“Document No.”,”Document No.”);

PostedDocDim.SETRANGE(“Line No.”,”Line No.”);

PostedDocDimensions.SETTABLEVIEW(PostedDocDim);

PostedDocDimensions.RUNMODAL;

New Code

Table 111, function ShowDimensions:

DimSetEntry.ShowDimensionSet(“Dimension ID”);
Getting Default Dimensions for a Document
You can get default dimensions for a document, such as a sales order line.

Old Code

Table 37, function CreateDim()

SourceCodeSetup.GET;

TableID[1] := Type1;

No[1] := No1;

TableID[2] := Type2;

No[2] := No2;

TableID[3] := Type3;

No[3] := No3;

“Shortcut Dimension 1 Code” := ”;

“Shortcut Dimension 2 Code” := ”;

DimMgt.GetPreviousDocDefaultDim( DATABASE::”Sales Header”,”Document Type”,

“Document No.”,0, DATABASE::Customer, “Shortcut Dimension 1 Code”,

“Shortcut Dimension 2 Code”);

DimMgt.GetDefaultDim(TableID,No,SourceCodeSetup.Sales,

“Shortcut Dimension 1 Code”, “Shortcut Dimension 2 Code”);

IF “Line No.” <> 0 THEN

DimMgt.UpdateDocDefaultDim( DATABASE::”Sales Line”,”Document Type”,

“Document No.”,”Line No.”, “Shortcut Dimension 1 Code”, “Shortcut Dimension 2 Code”);

New Code

Table 37, function CreateDim()

SourceCodeSetup.GET;

TableID[1] := Type1;

No[1] := No1;

TableID[2] := Type2;

No[2] := No2;

TableID[3] := Type3;

No[3] := No3;

“Shortcut Dimension 1 Code” := ”;

“Shortcut Dimension 2 Code” := ”;

GetSalesHeader;

“Dimension ID” :=  DimMgt.GetDefaultDimID(

TableID,No,SourceCodeSetup.Sales, “Shortcut Dimension 1 Code”,

“Shortcut Dimension 2 Code”, SalesHeader.”Dimension ID”, DATABASE::”Sales Header”);

Development Tips, Instalation & Configuration, Jet Reports, Office Integration, Report

Jet Express for Word Overview & Installation – for Navision 2015

Jet Express for Word is a new feature available to Microsoft Dynamics users which makes it easy for end users to design documents in Microsoft Word. This feature is part of Jet Express for Microsoft Dynamics NAV and is available to Microsoft Dynamics NAV 2015 users.

Modify Reports in Microsoft Word

Need to change the layout of an invoice or credit memo? Just open the document in Microsoft Word to make changes in a program you already know—no programming required.

Provided you already have reports developed by the Navision professionals. You can only make Layout, Look & Feel changes. For any business logic or including/excluding fields in report will be handled from Navision only as we do.

Design with Flair

You can use document templates that provided by Jet Reports, templates from the Office Store, or create a document from scratch. Add company logos, change fonts, modify fields and customize for multiple regions easily.

Easy to Use

The simple interface allows you to customize or create document layouts using Microsoft Word. Your fields appear in clear text and the search feature makes it quick to add the fields you need.

New functionality in Microsoft Dynamics NAV 2015 allows you to import these document layouts into NAV and run them from within the NAV client.

Software Requirements

  • Microsoft Dynamics NAV 2015
  • Office 2013 Desktop Edition

Supported Languages

  • English, Danish, Dutch, French, German and Spanish
  • More languages will be added soon

Where to get Jet Report Installation Files

You can use this Link, Visit to Jet Reports site here.

JetReportInstallation-1

JetReportInstallation-2

– Download the Jet_Express_for_Word_Installer.zip file

– Right-click the zipped file and select “Extract All”

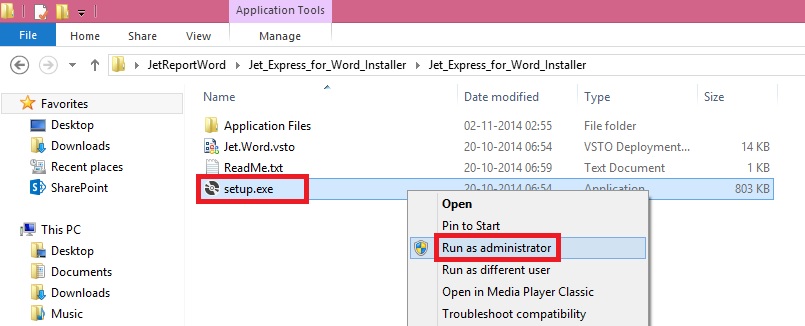
– Right-click the file “setup.exe” and choose “Run as administrator”

JetReportInstallation-3

JetReportInstallation-4

JetReportInstallation-5

Verifying the Installation

Open the Word and you will find one more TAB in Ribbon. [JET]

JetReportInstallation-6

Just in case you don’t find the Tab, Follow below set to enable the same, provided your Installation was successful in previous step without any error.

JetReportInstallation-7

Developer -> COM Add-Ins

Check if Jet Express for Word is enabled, if not select it and say OK.

If already enabled but still you don’t see, disable and enable again. Restart your word now you will be able to see the JET TAB.

I will come up with more information in my upcoming posts.

Instalation & Configuration

ADCS Overview

The Automated Data Capture System (ADCS) solution provides a way for Microsoft Dynamics NAV to communicate with handheld devices through web services. You can test your solution by using the VT100 plug-in.

Note: MS recommend that you install Microsoft Dynamics NAV Server and the VT100 plug-in on separate computers.

Overview and Architecture

ADCS enables you to accurately capture data for inbound, outbound, and internal documents, primarily for warehouse activities.

For example, you can have users scan the bar codes of items in your warehouse as they perform daily tasks, and that information is recorded from these handheld device activities in Microsoft Dynamics NAV.
ADCS-16
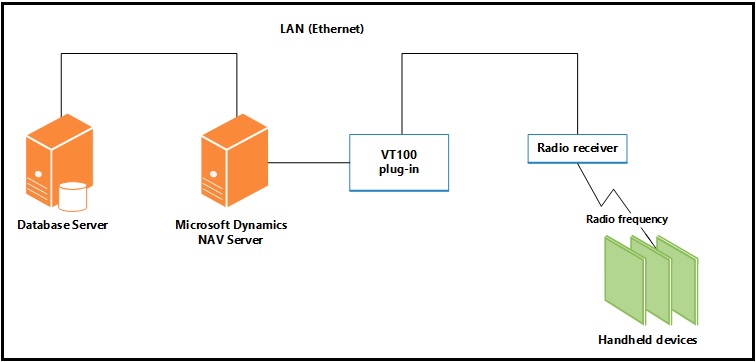
Microsoft Dynamics NAV Server processes the data coming to in from the handheld devices via the plug-in and sends the appropriate response back to the handheld devices via the plug-in.

An XML format is used to send and receive the data.

The VT100 plug-in makes sure that the response from Microsoft Dynamics NAV is directed to the correct handheld device. This reduces the load on the server.

The VT100 plug-in provides the link between the server and the Access Points for the handheld devices and acts as a virtual Telnet server.

All connection requests and data transmissions are handled by this service, and the incoming native protocol is transformed into standard XML that the server can interpret.

After a request has been transformed, the request is forwarded by the VT100 plug-in to the server.

When a reply is received, it is converted from XML into the native protocol of the handheld device.

Function keys are mapped using an XSLT file that you can modify. After the data has been transformed and formatted, it is forwarded to the handheld device.

Design Overview

The following illustration provides a simple diagram of ADCS. The part of the illustration that is shaded, which does not include ADCS, represents what could be developed.
ADCS-17
Consider the following when you deploy an ADCS solution:

You can configure multiple instances of Microsoft Dynamics NAV Server on a single computer, but each instance can only access one company.

Therefore, if you want to access several companies from the same computer, you must configure several Microsoft Dynamics NAV Server instances for NAS Services.

You can only install one instance of the VT100 plug-in on a single computer. The VT100 plug-in can only serve one company but it can communicate with multiple instances of Microsoft Dynamics NAV Server.

This means that all of the instances of the server that use the same VT100 plug-in can only access the same company.

If you want to communicate with more than one company, you must install the VT100 plug-in on more than one computer, one for each company.

Each of the VT100 plug-in installations must then use a separate Microsoft Dynamics NAV Server to access one of the companies.

Note: You can also install the VT100 plug-in multiple times on the same computer, one for each company.

Supported Devices

An ADCS device includes devices such as bar code readers or optical character readers that are used to mechanize the entry of information into the database.

All character-based handheld devices that have a VT100 interface will work with ADCS, although you may have to implement minor adjustments with some models.

When you use a handheld device, you must be able to connect either the Access Point or the RF terminal to the IP or port address of the ADCS server.

If you want to use a graphics-based handheld device, you will have to develop your own plug-in.

You can connect multiple handheld devices to the VT100 plug-in.

However, if performance becomes an issue, you can always add an additional Microsoft Dynamics NAV Server and direct the VT100 plug-in to also connect with the new server to improve performance.

For Step wise Step Installation & Configuration, please follow below posts in order listed below:

Automated Data Capture System Requirements

Installing ADCS

How to: Add Users for ADCS

How to: Enable Web Services for ADCS

How to: Configure ADCS Options

How to: Test the ADCS Connection