Assist Setup, Assisted Setup, BC18, Business Central, Change Log, Cues, Data, Data Classifications, Dynamics 365, Email, Field Monitoring, Fields, Functional Tips, High-Risk, How To, Information, Monitor Field Change Setup, Notification, Office 365, Office Integration, Outlook, Role Center, Settings, Smtp, Start, Stop, Tip & Tricks

Monitor Field Change in Business Central

Field Monitoring is one of great help for superusers in Business Central. You can now configure a list of fields that contain high-risk and business-critical data that you want to be notified about when they are changed.

Changes to high-risk settings in Business Central can be tracked using the Change Log functionality. But sometime only tracking changes is not sufficient and you expect more like you should be notified of changes in fields that contain high-risk and business-critical data, such as bank account numbers, company name, and addresses.

Now setting a list of fields that contain high-risk and business-critical data is possible and you can be notified about when they are changed.

To start with this feature, Look for Assist Setup, I am using BC18 demo database for below steps.

Although it is not necessary to follow Assist Setup, you can do setup from individual pages. But this will ensure you don’t miss any steps.

Click on Next to start with setup. And follow the steps in leading wizard pages.

If you wish to use Data Classification and already have performed data classification you can enable or continue with individual fields using Monitored Fields Worksheet, in upcoming Wizard pages.

It is necessary to have the Sending and user e-mail setup is completed. Here you can select the email ids as required.

You need to add Fields for monitoring enable and click finish, or you can open the Page later and configure. This will Start the Monitoring and Notification service.

In Next step or you can open this page Monitored Fields Worksheet from Tell Me.

Add your table & fields that you wish to Monitor.

If notify is enabled you will receive the mail, else you can view in Monitored Field Log page. You can use Field Monitoring Setup Page from Action bar, or you can separately open this page from Tell Me.

You need to Start the Field Monitoring Setup, if not already done. If you have used Assist setup it will be Started, in case you are doing Manually from each Page, you will need to visit this Page, Setup your Emails and Start the Service.

Before we Start with Testing, it is strongly recommended you Log Off and Login again to Business Central. As logging starts and ends on Login & Logout of user.

Open the Customer Page and make changes to Name, as above we have setup to log Name field of Customer.

If your all setup is OK you should Receive a mail as below.

Some Pages helpful for Field Monitored Service are:

You can Monitor the Mails Status from your Role Centre Cues:

What else you can do for monitoring your data and notifications:

  • If there is a problem sending the email, you can check the detailed information on Email Outbox page.
  • You can view the mail sending record on Sent Emails page.
  • You can view the log of Field Monitoring Setup and Monitoring Fields on Monitored Field Log Entries page.

Hope you enjoyed the information. Will come with more similar information in my next posts. Till then keep exploring, learning and sharing your knowledge with others.

Remain safe, take care of your loved ones, put your mask, maintain safe distance and don’t forget to get vaccinated.

Advertisement
Appointment, Development Tips, Email, How To, Information, NAV 2015, NAV 2016, NAV 2017, NAV 2018, Office 365, Office Integration, Outlook, Tip & Tricks

Programmatically Creating Outlook Appointment in Navision

Dear Friends in this post I will discuss about creating Outlook Appointment from Navision using DotNet Interop. Without going much in theory lets jump to practical approach.

To start with first we need to define some DotNet variables:

Name DataType Subtype
OutlookItemType DotNet Microsoft.Office.Interop.Outlook.OlItemType.
‘Microsoft.Office.Interop.Outlook, Version=15.0.0.0, Culture=neutral, PublicKeyToken=71e9bce111e9429c’
outlookApplication DotNet Microsoft.Office.Interop.Outlook.Application.
‘Microsoft.Office.Interop.Outlook, Version=15.0.0.0, Culture=neutral, PublicKeyToken=71e9bce111e9429c’
outlookApplicationClass DotNet Microsoft.Office.Interop.Outlook.ApplicationClass.
‘Microsoft.Office.Interop.Outlook, Version=15.0.0.0, Culture=neutral, PublicKeyToken=71e9bce111e9429c’
outlookAppItem DotNet Microsoft.Office.Interop.Outlook.AppointmentItem.
‘Microsoft.Office.Interop.Outlook, Version=15.0.0.0, Culture=neutral, PublicKeyToken=71e9bce111e9429c’

I have created a function CreateOutlookAppointment which takes parameters as:


OAP1

And the code as below:

OAP2

To call this function I use below code:

OAP3

The code is itself self-explanatory.

You can add other validations and parameters as per the requirement.

Imp Tip:- Make sure you set for all DotNet Variables RunOnClient = Yes.

On run the output will be as:

OAP4


OAP5


What you are waiting for, go create Appointment and have fun.

See you seen via my next post. Till then keep learning and growing in your career.


Convert to PDF, Development Tips, Email, How To, NAV 2017, Office 365, Office Integration, Report, Tip & Tricks, Word

Mail Sending Option in NAV 2017 with Cover Letter & Attachments –Part 2

Continuing from previous post, further in next step we will apply same feature discussed in earlier post to our custom documents and learn where all places we need to take care development to get it working.

If you have missed First Part you can find here. Mail Sending Option in NAV 2017 with Cover Letter & Attachments –Part 1

In my Example I am using Policy Module:

I am using my Custom Table Policy where Policy Holder is setup as Customer, also few general details related to policy is stored. In nutshell we are concentration on Sending mail to customer as we have done in previous post for sending Invoice details to customer.

Step-1:

In my Policy Table I have added 2 Function as below:

MSI-07


MSI-08

SendRecords()

IF DocumentSendingProfile.LookupProfile(“Policy Holder No.”,FALSE) THEN

SendProfile(DocumentSendingProfile);


SendProfile(VAR DocumentSendingProfile : Record “Document Sending Profile”)

DocumentSendingProfile.Send(

DummyReportSelections.Usage::”Policy Issue”,Rec,”Document No.”,”Policy Holder No.”,

DocTxt,FIELDNO(“Policy Holder No.”),FIELDNO(“Document No.”));

Step-2:

In Table 77 Report Selections add new option to usage field

MSI-09

Step-3:

In Table 60 Document Sending Profile add below customization.

Add Text Constants

MSI-10

Update below function as:

MSI-11

Step-4:

In Table 9657 Custom Report Selection add below customizations.

MSI-12


MSI-13

Step-5:

In Page 9657 Custom Report Selection add below customization.

MSI-14


MSI-15


MSI-16

Step-6:

Create 2 Reports one for Mail Body and one for Attachment. You can use same report as attachment too, it depends on your requirement.

Step-7:

In Page Policy add below customization.

MSI-17


MSI-18

Step-8:

Setup your report Selection as below:

MSI-19

Now you are good to go.

Test your solution/ customization.

This is just a small idea, many lots can be done depending upon your requirements.


Convert to PDF, Development Tips, Email, Functional Tips, How To, Information, Layouts, NAV 2017, Office Integration, Tip & Tricks, What's New, Word

Mail Sending Option in NAV 2017 with Cover Letter & Attachments –Part 1

Generally we get demand for customized mail body to send from Navision. Normally we use templates or html etc. coding to achieve this. In NAV 2017 this feature is now available in product itself. Today we will explore this feature available for Std. documents and learn to setup, further in next step we will apply same to our custom documents and learn where all places we need to take care development to get it working.

The cover letters are created using RDLC or Word layout customization features providing visual consistency with any attached pdf document.

Document Layout for a Customer

MSI-01

For Example say we want to setup different e-Mail body for specific customer. To achieve this we will assign a specific report by customer which will enable us to process multiple formats at the same time. We will use the Customer Layout from the customer card by Document Type to do this.

MSI-02

In above example I am setting up a customized cover letter designed using selected report.

The Send To Email The e-Mail will be sent to the e-Mail provided in the customer card or you can provide an extra e-Mail in this field or you can specify at the time of sending mail if not setup automatic.

Email Body Layout Description = Modern – Email Body (Choose from the Custom Report Layouts)

Use for E-mail Body select this if you wish to include output of selected report as Cover Letter to Email body.

Send and Receive E-Mail

We can now use the Send Email window to have a preview of what our layout will look like and the using the options we can send the e-Mail.

Let’s open a posted invoice for this customer.

MSI-03

On the Posted Sales Invoice click Send, which will open a window with some options, such as:

We can choose Email Prompt for Settings or use Default Settings

We can select how the attachment needs to be attached

We can also have Disk options as PDF or Electronic Documents if we use those.

Click OK. Before e-Mail is sent, we have the possibility to verify the e-Mail address, the subject line, the attachments and as per the Email Body Template, this is how the e-Mail will look like:

MSI-04

When we click OK, an e-Mail is sent to the Customer using the e-Mail Template.

By opening the e-Mail the recipient can see the contents of the invoice which has been sent using the template and the full invoice is also available as an attachment.

MSI-05

You can switch to a manual written message:

By using the Message Content field or

If you are using a client, you can open and edit the message in Outlook

MSI-06

In our next part of this post, we will see how we can enable this feature for our custom Pages & Documents.


Development Tips, Email, How To, Information, Office 365, Office Integration, Smtp, Tip & Tricks

Multiple Line Mail Body Formatting without using Mail Templates

I came across one requirement from one of my customer, so I decided to share the solution with you all.

In today’s post we will see how we can create multi line mail body for SMTP mail.

Lets start with the solution rather than talking of logic.

Step-1: Create a codeunit for the function or decide where you wish to add this function

Step-2: Define Variables

1

you may notice that Variable CRLF is defined as Text with Size 2.

Define all other variables that you may require as per your logic.

Step-3: Write the function. Define your parameters and additional codes you may require as per your logic.

2

In above code notice that I have set last parameter of CreateMessage as FALSE for(HTMLFormatted), this is required else CRLF logic will not work.

Where ever I require New Line I just add CRLF.

3

Step-4: SMTP Mail Setup I am using as below for live.com, you check with yours SMTP details accordingly.

4

Yes we are done now you can execute the above function to generate your mails.

I will come up with more details in my upcoming posts, till then keep exploring and learning.


Cues, Data, Development Tips, Dynamics 365, Email, Extension Package, Functional Tips, How To, Information, Inventory, Job, Machine, Maderia, Multitenancy, NAV 2017, Office 365, Office Integration, Readiness Library, Server, Tip & Tricks

New Changes or features for Application Users in Microsoft Dynamics NAV 2017

Although it is too early to discuss on features and capabilities which we are going to get in our new release, we should wait for exact information post release of same.

Here are few extracts from available documents pre-release of the product.

You will find most of the features similar to which we have discussed in our earlier posts for Madeira Preview Project.


Incoming documents

New modification to the list of incoming documents. Now it will have filtered view, a new field Processed is added, and now by default filter is applied to show only unprocessed incoming documents in the list.

However you can choose to still view all incoming documents in the list using the show Show All action.

When documents are posted, the processed flag is set to Yes, such that incoming documents that have been processed into posted documents are filtered out.

Capability is added to manually switch the Processed flag.

Now OCR supports for document extracting line details, when we send PDF or image files on incoming documents to Lexmark ICS, the 3rd-party provider of OCR services.

You can now create purchase invoices with multi-line details.

Now you can easily correct OCR errors before receiving the document and at the same time configure the service to avoid the known errors in future.

You can use the new Lexmark ICS online experience to visually train and validate the OCR processing of PDF and image files for incoming documents, such as vendor invoices.

From each incoming document record, you can now link directly to the online extracted document to validate the OCR result and train the service with your corrections.

A new Role Center Cue will give users capability to monitor incoming documents that await your OCR validation.


Inventory Items

Item attributes similar to one we saw in Madeira.

Capability to add attributes to your inventory items will make it easy for you to find the right product that your customer wants by filtering on attributes.

You can define your own attribute types, such as Base Material, Colour, Size, or other product dimensions, and attach to your items as a supplement to the built-in item attribute types and values.

When you access your items on documents or list, you can view and filter on the attribute values to limit the list of items.

By using Categorize items you can create a hierarchy of item categories and assign item attributes to each item category.

When you add items to a category, they will inherit the default attributes on the category.

This will ensures to have a common set of attributes on related items, will speed up the assignment of attributes to similar items, and allow filtering and navigating related items easily based on the category.


Smarter sales and purchase documents

Now you can cancel posted sales and purchase credit memos in the same way like you can do for posted sales and purchase invoices.

After performing this action you will find the credit memo is unapplied from the invoice and creates a new invoice that is applied to the credit memo.

This action will bring you to the earlier position where you created the credit memo. (Like Undo)

Package Tracking No. and Shipping Agent Code on sales invoices Posted sales invoices now show the package tracking number and the shipping agent code by default.


Account Categories in the Chart of Accounts

A new capability is added as account categories and sub categories.

Now you can group G/L Accounts to adjust your need for financial reporting.

For each G/L account, now you can specify the account category so that when ledger entries are posted to these accounts they are categorized as per your category.

For each account category, you can now choose from different sub-categories, even you can also create new sub-categories as per your need.

For example, for the G/L account category Expense, you can define as many sub-categories as you need so that you can differentiate between Expenses on different sources.


Payment reconciliation

The Payment Reconciliation journal now will show you total outstanding transactions and outstanding payments.

From there itself you can now look up the list of documents that have not been applied or used in the reconciliation process.

You can now also choose to include outstanding payments and outstanding transactions information in the Payment Reconciliation report.


Jobs

Project Manager Role Center

A new project manager field is added to the Job Card in order to give users clear sense of job ownership.

A new list My Jobs list is added on the Project Manager Role Center which will display jobs with the status of Order by default based on the new project manager field as discussed above.

If a person is assigned as the project manager to 5 jobs and those jobs have the On Order status, those 5 jobs will default on the My Jobs list on the Project Manager Role Center.

A new cue is added to the Project Manager Role Center to Create Job Sales Invoice, so now users will have quick access to this functionality.

On the Project Manager Role Center a new drop down list for Job Reports has been added to the Actions ribbon.

Job cost

A new fact box will be available to the right side of the Job Card to display the job’s cost information.

Now the term Contract is renamed as Billable throughout the Jobs module.

On the Job Card the Allow Schedule/Billable lines and Apply Usage Link options are marked by default for new jobs.

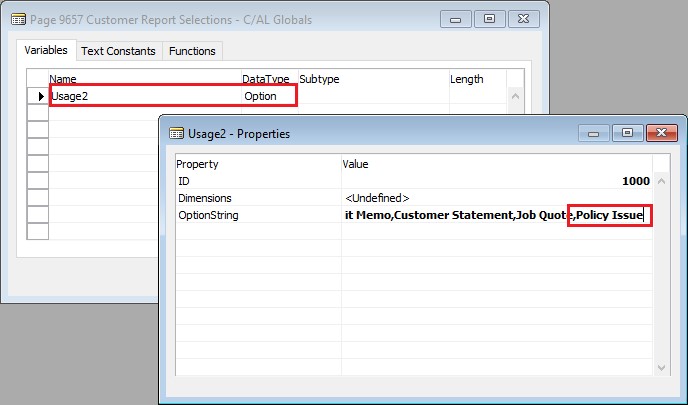
A new report called Job Quote is available so user can send a quote to a customer. This report is available as Word Template so it can be modified using Word and emailed to the contact on the job.


Fixed Assets

Now setting up fixed assets is simpler. A standard setup is provided, but allows you to modify it at anytime you want.

You can register fixed asset as cards with complete information, accounting details, and reporting classification.

You can also register purchases of fixed assets through special fixed asset G/L journals where you can also dispose of fixed assets. The right accounting entries are created automatically.


Simplified Setup for using Dynamics CRM from inside Dynamics NAV

As you are familiar Dynamics NAV includes opportunity management and basic customer relationship management.

You can easily set up a connection with Dynamics CRM to have more benefit from the strong capabilities that Dynamics CRM offers, such as marketing and customer service capabilities.

A new assisted setup guide to the Business Manager home page will be available that will guide you through the setup process. Once you are through with this setup, you’ll have a seamless coupling of Dynamics CRM records with Dynamics NAV records.


Simplified opportunity management and CRM functionality

You will find Dynamics NAV CRM module has been simplified and improved in a number of ways:

  1. At place of CRM wizard pages now you will have card pages, so that they can now also run in the Web client with improved user experience.
  2. Worksheet pages also been replaced by list pages so now you can also use the pages in browsers.
  3. The Contact card has been simplified by marking a number of controls as Additional, so that the page default looks simpler.
  4. Mail merge have been replaced with Word reporting. Also, new Word reporting capabilities added to generate email body content based on the related report and the selected report layout.
  5. A new Sales & Relationship Manager Role Center has been added

New wizard has been created that helps users set up email logging (default public folders, rules, and job queue setup).


Smart notifications give you advice and recommendations

Similar to one which we discussed in our earlier post for Madeira.


Extensions

Microsoft provides the following extensions:

  1. Envestnet Yodlee Bank Feeds
  2. PayPal Payments Standard
  3. QuickBooks Data Migration
  4. Sales and Inventory Forecast

Similar to Madeira few of them we have discussed in our earlier posts, rest will discuss in our upcoming posts.


Office 365

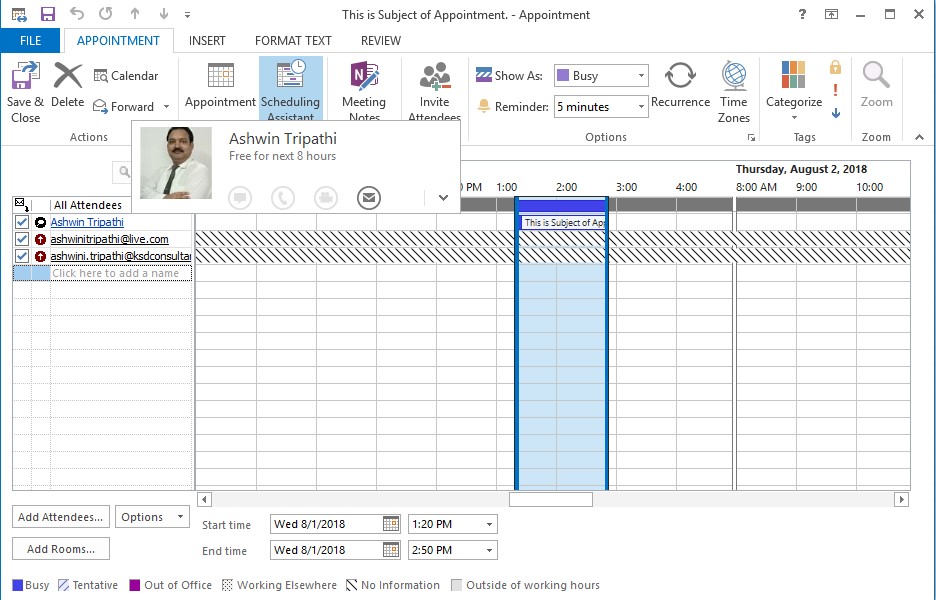
If your organization uses Office 365, Dynamics NAV 2017 includes an add-in so you can invoice your customers based on entries in your Outlook calendar.

From the Contacts List in Dynamics NAV, you can manually synchronize your Dynamics NAV contacts to Office 365 People.

The contacts from Office 365 will sync back to Dynamics NAV as well.

There is a filter that can be applied to the synchronization process so users will only need to sync the contacts they use most often. This same filter is used during the automatic background sync as well. This synchronization process also works with Microsoft Outlook on the desktop.

We will discuss in more details in our upcoming posts. This feature is too available in Madeira.


US financial reports

In the US version of Dynamics 2017, added new four financial reports to the Business Manager and Accountant Role Centers:

  1. Balance Sheet
  2. Income Statement
  3. Cash Flow Statement, and
  4. Retained Earnings Statement

These reports use G/L account categories and sub-categories discussed above to group financial data.


Source:- https://mbs.microsoft.com/Files/partner/NAV/Readiness_Training/ReadinessTrainingNews/WhatsNewDynamicsNAV2017LimitedBeta.pdf

I will come up with more details in my upcoming posts.


Convert to PDF, Development Tips, Excel, How To, Information, Office Integration, Tip & Tricks, Word

Appending other information to Navision Reports

There is always requirement from many customers to Append information to the Navision Reports.

Recently one of my reader have requested me for any such functionality which can help him Append information from Word or Excel Files to Navision Reports.

While searching for solution for such requirement i came across this scope if we can do the same from outside Navision integrating the functionality with Navision.

Although i am not sure how much this post will answere to the requirement raised by my this reader but still this can be an work around to this requirement.

In my previous 2 posts i have answered this approach, Let us assemble all of them to provide solution to this requirement.

Please see my privious posts, i will not repeat already covered part in this post. Here is the link to those posts:

Converting Office Files into PDF from Navision

Merging PDF Files in Navision

In this post i will be using these functions discussed in above posts.

The Same Setup will be applicable to this post too.

PDFConvMerge-2-2

Since we are appending our other information to the Navision Report so we will be at First Step saving our Customer Sales Invoice to PDF.

Later some information which need to be appended to this report is in Word File the path of which is stored on Customer Card.

How to work with Converting Office file to PDF is already discussed in previous post Link shared above.

So Now we have Our Report in PDF and Additional information to be appended to Report is also in PDF. Now it will be easy for us to Merge both the File to have single PDF File.

How to Merge these files is also already discussed in my previous post. Link shared above.

Let us see how we can assemble above both functionality to get our required result.

Approach is very simple, i have created a button on Sales Invoice to Print the Report which performs above discussed process.

PDFConvMerge-5

On Sales Invoice Page I have added one Button which calls my Function to Print & Merge the document, it takes Invoice No & Sell-to Customer No. as a parameter.

PDFConvMerge-6

I have created a function to Save the output of Report to PDF, using standard functionality available in Navision.

PDFConvMerge-7

The PrintSalesInvoice function called from Sales Invoice Page with Invoice No & Sell-to Customer No.

This Function calls the SaveReportAsPDF explained above.

Converts the Office file that is attached on Custommer Card, discussed in previous post Link provided above.

Calls the MergePDFFiles, discussed in previous post Link provided above.

So Now at single click of Button entire task is done for us.

To keep it simple no additional checks and other routine tasks have been included like after task is completed clean up of all temporary files and moving the Result file to desired Location etc.

Now you know the logic so you can tweak the code accordingly to get the functionality working as per your requirement.

Thats all for this post. I will come up with more information in my up coming posts.

You keep you requirements posting to me, i will try my best to answer your queries in form of my future posts, at earliest possible from my end.

Till then kee exploring & Learning.

Convert to PDF, Development Tips, How To, Information, Office Integration, Tip & Tricks, Word

Converting Office Files into PDF from Navision

Today in this post i will walkthrough how we can convert any MS Office File into PDF.

It have been many time required to convert any attached file with the record in Navision to PDF format.

To perform this action we will require a tool which can be downloaded from:

OfficeToPDF download link :- http://officetopdf.codeplex.com/releases/view/118190

Extract and save the OfficeToPDF.exe file to some Folder.

For this Walkthrough i have created a Field in Customer Table to save the File Path of the Office File which we want to convert into PDF.

PDFConvMerge-1

You can add Dialog box to select the File from the specified Folder.

For this demo i have kept it simple Text Field where you can add your File Path and Office File Name. It is assumed that only Office File will be attached here.

For Setup purpose i have created one Setup Table & Page where we will store our other required Folder paths.

PDFConvMerge-2

Here we have given provision to save the Path of the Office to PDF Convertor Tool file Path & Temporay working Folder.

I have used the shared folder for all the paths so that it is not system specific, also make sure you give required permission on this folder for all the operating accounts.

Now our Next task will be to write a function which will perform this conversion part.

PDFConvMerge-3

Above Function Takes the File Name from the Customer Card we stored above on Customer Card. Takes the Path of the Office To PDF Convertor Utility and Tmp working Folder.

Prepares the PDF file Name along with Path stored in Setup.

Prepares the command to invoke Convert Utility using WsShell and returns the PDF file File Name along with path as defined in the Setup.

Now you can use this File for futher purpose as required.

To keep it simple no additional code of test and other required routine task is not added.

Now you know the Logic you can tweak the functionality as per your requirement.

I will comeup with more information in my up comming posts, till then keep exploring and learning.


Azure, Corfu Navision 2016, How To, Information, Instalation & Configuration, Office 365, Office Integration, Tip & Tricks

Configuring Single Sign-On using Office 365 on Navision 2016

Today we will see how we can enable Single Sign-On using Office 365 for Navision 2016.

Before we start we should have Virtual Machine ready on Azure with Navision 2016 installed, Certificates and Nav User is configured. Endpoints are open so that web client can be used from outside Virtual Machine on internet.

It should be hosted on Public IP, then only we will be able to configure it.

For details regarding Azure Subscription you can see my earlier post here.

For details regarding Creating Virtual Machines you can see my earlier post here.

You also need Office 365 Subscription ready for use and you can use the AD of same to configure your Single Sign-On.

Let us start with Admin console of office 365. Click on Azure AD this will create Management Console to work with AD.

SingleSignOn-1

Enter your details and click on Next.

SingleSignOn-2

Enter your details and click on Next, Finally Sign Up.

SingleSignOn-3

It will take few minutes to configure and make it available for you.

SingleSignOn-4

Once your Subscription is ready click on Start Managing my Service.

SingleSignOn-5

From Management Console click on Virtual Machine, if you dont have already to create one for you.

SingleSignOn-6

Select the Virtual Machine in Search for Microsoft Dynamics Nav 2016.

SingleSignOn-7

Select the approprite Virtual Machine from the List.

SingleSignOn-8

Enter your details and Create. For more details see the link provided on top of the post.

SingleSignOn-9

Let us return to our AD, Click on Applications. This will List all you Apps currently available with your AD or office 365.

SingleSignOn-10

Click on Add to configure your Application.

Give a Name and Select Web Application/or Web API, as we are configuring for Web Client today. Click on Next.

SingleSignOn-11

Enter your Web Client URL and Office portal AD URL.  Click on OK.

SingleSignOn-12

Your New application gets registered with your AD.

Select the created Application and Click on View Endpoints.

SingleSignOn-13

Copy the Federation MetaData URL and keep it handy at safe place we will require this in our next step. Close the window we are not performing any changes here.

SingleSignOn-14

Open your Navision User Card.In Office 365 Authentication enter your Office portal user email id which you will be using for Single Sign-On.

SingleSignOn-15

Open your Navision Service Instance configuration and enter Federal MetaData URL which we copied in our previous step.

SingleSignOn-16

Restart you NAV Service.

SingleSignOn-17

Open the Web Client Folder under your IIS. Edit your Web.config file using prefered Editor.

SingleSignOn-18

Enter you Client Service Credentials as AccessControlService.

SingleSignOn-19

Change value of ACS URI as below. You have full explaination of same in the file itself.

SingleSignOn-20

Thats all, Now you open your web client and you will be redirected to Office 365 Login Page, enter your valid office 365 e-mail user id and password you will be authenticated and Web Client is opened.

Thats all for today, I will come up with moredetails in my upcoming posts.

Till then keep exploring and learning.


Development Tips, How To, Information, Instalation & Configuration, Jet Reports, Office Integration, Report, Tip & Tricks, What's New

Jet Professional 2017 – Introduction and Installation

Why to switch to and What’s New in Jet Professional 2017?

Its valid question same came to my mind also when i heard about new Release.

Then i tried to explore a bit about it and got an information about some exciting features introduced with it. I will discuss as i progress with my evaluation and exploration with these features.

Here i am giving bit overview about some features and limit to Installation topic in this post. If you wish to know more you will have to wait for my next few upcomming posts.

As per Jet Report Sources:

Jet Professional 2017 makes sharing your reports easier than ever before!  

Reporting with (and without) the Jet add-in for Excel

The Jet Web Portal is an online interface that provides an easy-to-manage repository for your organization’s reports.

Using the web interface and Office 365 Online, you can allow any of your network users – whether they have Excel and the Jet add-in installed or not – to view reports directly from their web browser.

Jet Mobile for Jet Enterprise

Jet Professional integrates with the Jet Mobile web client – allowing you to log into one site to see and run all your reports – and to see all of your business intelligence dashboards.

And… Jet Mobile for Jet Enterprise includes many new features – making your dashboards more powerful and even easier to use.

What’s New?

Publishing to the Jet Web Portal

The Jet ribbon within Excel includes the ability to publish your reports to the Jet Web Portal.  The Jet Web Portal provides a manageable repository for your organization’s reports. All your users – whether they have Excel and Jet Professional installed or not – can run and view reports directly from their web browser.

What is Jet Web Portal

Jet Professional 2017 represents a new way to manage, run and view your business reports. Designed for today’s always-connected, always-moving workforce, Jet Professional 2016 introduces a new Information Management System that allows business users access to their business reports using virtually any device through a simple web interface.

As a user, you don’t need to install anything to run and view reports. Within the Jet Web Portal, you can quickly find the report that you’re after, specify report parameters, run the report to get up-to-the-minute data and view it in Excel Online.

With features like sharing, search, version control and report permissions, Jet Professional 2017 is a complete report management system.

Will comeup with more detailed about new features in my upcomming posts.

Let us move to Installation part.

To get the installation file go to this link : https://www.jetreports.com/support/product-downloads/

After downloading you will get the Jet Professional Installation Files.Zip, extract it.

Install-1

Befor you start installation make sure no Excel instance is running on your system.

I am doing simple one system Instalation, will come up with more details and other options later.

Double click to Setup file to begin with installation.

Install-2

If you have Activation code enter it or you can continue and activate later.

Install-3

Select instalation type as desired, i am installing All Components.

Install-4

Select the features you want to install, since i am performing complete install, so i am accepting all as suggested by default.

Install-5

Select the Account to run the service, and don’t forget to select Add rules to Windows Firewall. Rest all as default suggested.

Install-6

Select the SQL Instance for Jet Service Database and login method.

Install-7

Select desired ports and host detail or accept as suggested as default.

Install-8

Enter Jet Service Tier details or accept suggested as default.

Now your pre-configuration part is completed. Click on Install to proceed with Jet Components Instalation.

Install-10

Click on Install to proceed.

Install-11

Click on Finish to exit Instalation wizard, your Jet is now installed with above provided configuration.

Install-12

Next Step is to Activate your Jet Professional.

From Jet Tab on Ribbon select Activate Jet Professional.

choose the desired option.

Install-13

Enter your activation code and click on Next.

Install-14

Copy the message and send to the mentioned e-mail id and click Next.

Install-15

Close to exit.

Wait for the Activation Token, it may take upto 24 hours to receive mail with this code.

Install-16

If you check your Start Menu you will find these components got installed.

Install-17

Once you receive your Tocken.

Launch Excel, From Jet Tab, Click on Help from ribbon and select Activate License.

Install-18

Select Enter provided Activation token.

Install-19

Copy the Token you received via mail here and click on Activate.

Install-20

If every thing is fine you will receive the Activation Successful message.

Now you are ready to start with using Jet Professional.

I will come up with more details on this in my upcomming posts till then keep exploring and learning.