Convert to PDF, Development Tips, Email, How To, NAV 2017, Office 365, Office Integration, Report, Tip & Tricks, Word

Mail Sending Option in NAV 2017 with Cover Letter & Attachments –Part 2

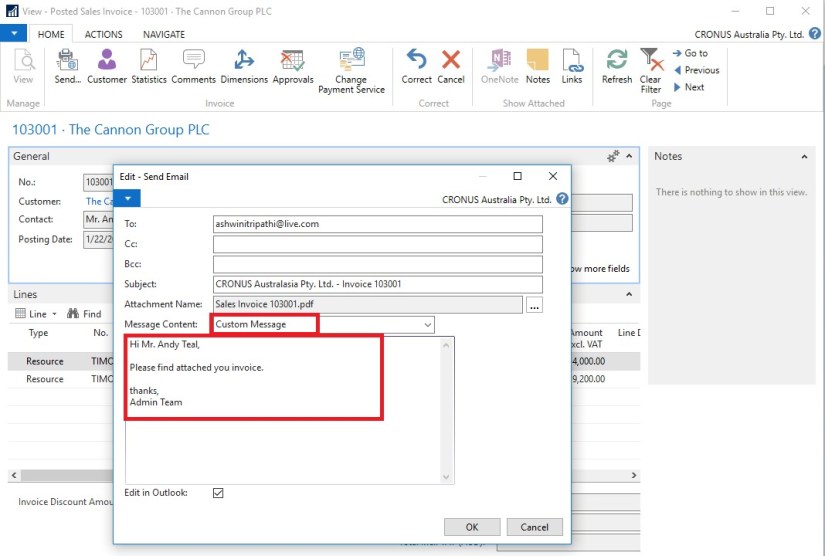
Continuing from previous post, further in next step we will apply same feature discussed in earlier post to our custom documents and learn where all places we need to take care development to get it working.

If you have missed First Part you can find here. Mail Sending Option in NAV 2017 with Cover Letter & Attachments –Part 1

In my Example I am using Policy Module:

I am using my Custom Table Policy where Policy Holder is setup as Customer, also few general details related to policy is stored. In nutshell we are concentration on Sending mail to customer as we have done in previous post for sending Invoice details to customer.

Step-1:

In my Policy Table I have added 2 Function as below:

MSI-07


MSI-08

SendRecords()

IF DocumentSendingProfile.LookupProfile(“Policy Holder No.”,FALSE) THEN

SendProfile(DocumentSendingProfile);


SendProfile(VAR DocumentSendingProfile : Record “Document Sending Profile”)

DocumentSendingProfile.Send(

DummyReportSelections.Usage::”Policy Issue”,Rec,”Document No.”,”Policy Holder No.”,

DocTxt,FIELDNO(“Policy Holder No.”),FIELDNO(“Document No.”));

Step-2:

In Table 77 Report Selections add new option to usage field

MSI-09

Step-3:

In Table 60 Document Sending Profile add below customization.
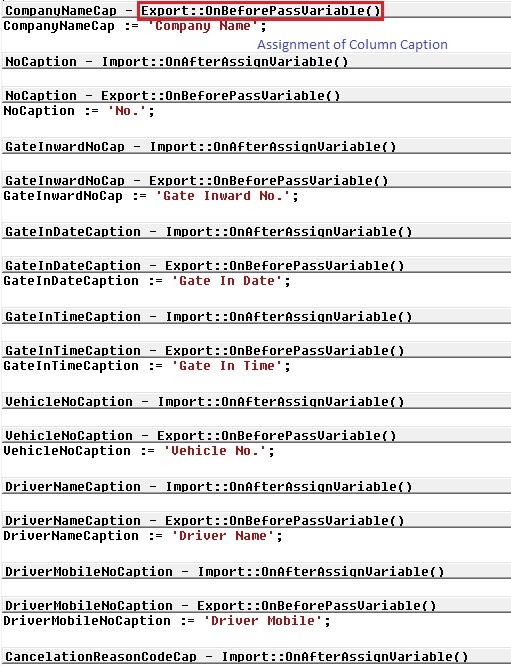
Add Text Constants

MSI-10

Update below function as:

MSI-11

Step-4:

In Table 9657 Custom Report Selection add below customizations.
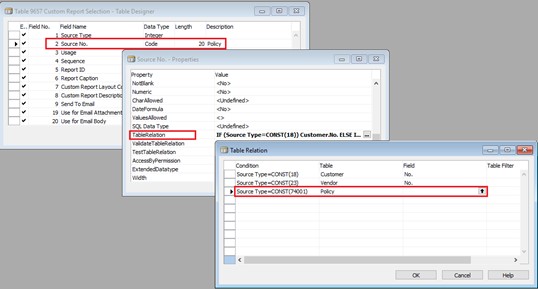
MSI-12


MSI-13

Step-5:

In Page 9657 Custom Report Selection add below customization.

MSI-14


MSI-15


MSI-16

Step-6:

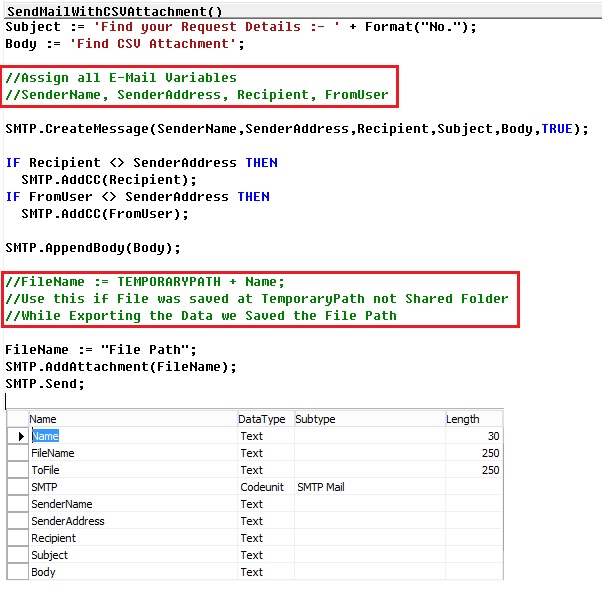
Create 2 Reports one for Mail Body and one for Attachment. You can use same report as attachment too, it depends on your requirement.
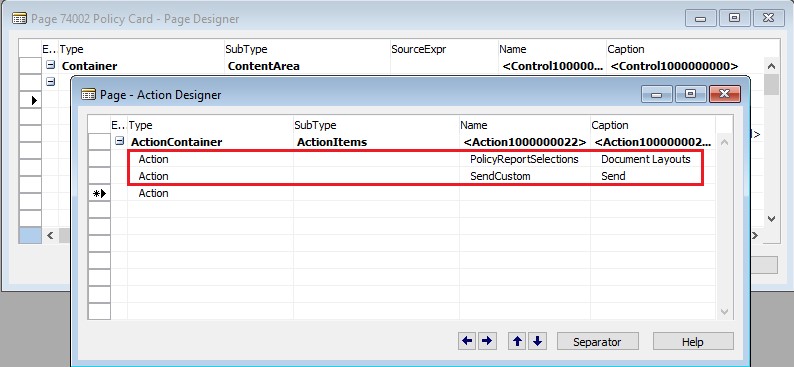
Step-7:

In Page Policy add below customization.

MSI-17


MSI-18

Step-8:

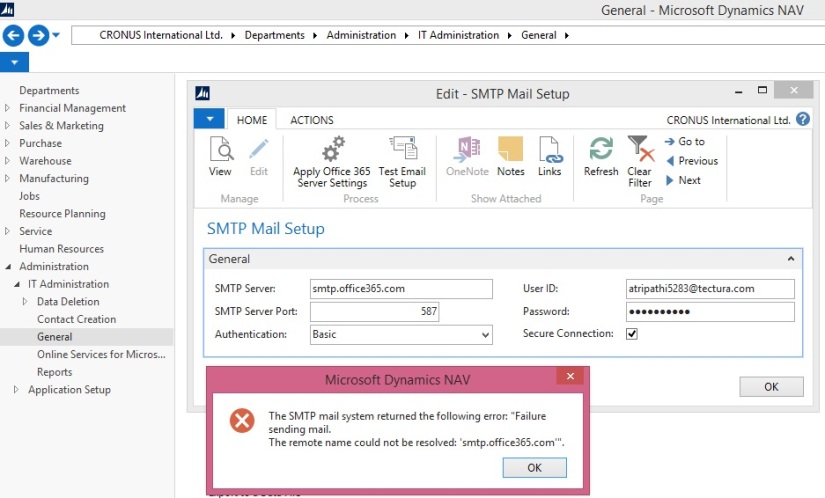
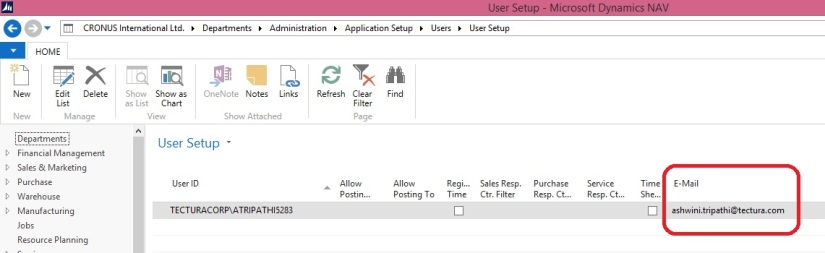
Setup your report Selection as below:

MSI-19

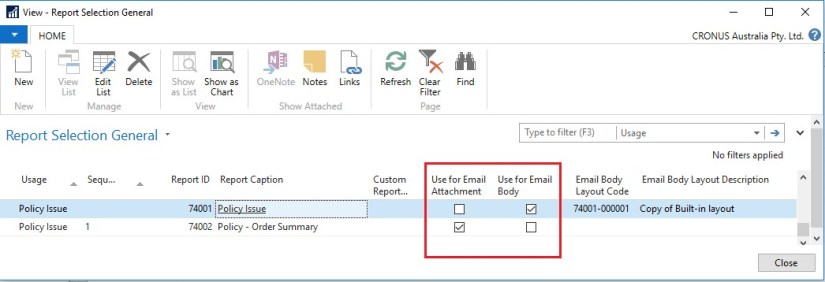
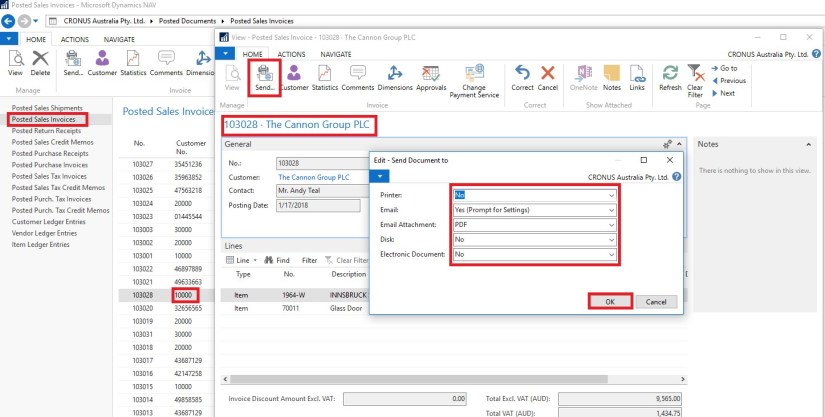
Now you are good to go.

Test your solution/ customization.

This is just a small idea, many lots can be done depending upon your requirements.


Advertisement
Convert to PDF, Development Tips, Email, Functional Tips, How To, Information, Layouts, NAV 2017, Office Integration, Tip & Tricks, What's New, Word

Mail Sending Option in NAV 2017 with Cover Letter & Attachments –Part 1

Generally we get demand for customized mail body to send from Navision. Normally we use templates or html etc. coding to achieve this. In NAV 2017 this feature is now available in product itself. Today we will explore this feature available for Std. documents and learn to setup, further in next step we will apply same to our custom documents and learn where all places we need to take care development to get it working.

The cover letters are created using RDLC or Word layout customization features providing visual consistency with any attached pdf document.

Document Layout for a Customer

MSI-01

For Example say we want to setup different e-Mail body for specific customer. To achieve this we will assign a specific report by customer which will enable us to process multiple formats at the same time. We will use the Customer Layout from the customer card by Document Type to do this.

MSI-02

In above example I am setting up a customized cover letter designed using selected report.

The Send To Email The e-Mail will be sent to the e-Mail provided in the customer card or you can provide an extra e-Mail in this field or you can specify at the time of sending mail if not setup automatic.

Email Body Layout Description = Modern – Email Body (Choose from the Custom Report Layouts)

Use for E-mail Body select this if you wish to include output of selected report as Cover Letter to Email body.

Send and Receive E-Mail

We can now use the Send Email window to have a preview of what our layout will look like and the using the options we can send the e-Mail.

Let’s open a posted invoice for this customer.

MSI-03

On the Posted Sales Invoice click Send, which will open a window with some options, such as:

We can choose Email Prompt for Settings or use Default Settings

We can select how the attachment needs to be attached

We can also have Disk options as PDF or Electronic Documents if we use those.

Click OK. Before e-Mail is sent, we have the possibility to verify the e-Mail address, the subject line, the attachments and as per the Email Body Template, this is how the e-Mail will look like:

MSI-04

When we click OK, an e-Mail is sent to the Customer using the e-Mail Template.

By opening the e-Mail the recipient can see the contents of the invoice which has been sent using the template and the full invoice is also available as an attachment.

MSI-05

You can switch to a manual written message:

By using the Message Content field or

If you are using a client, you can open and edit the message in Outlook

MSI-06

In our next part of this post, we will see how we can enable this feature for our custom Pages & Documents.


Development Tips, Email, How To, Information, Office 365, Office Integration, Smtp, Tip & Tricks

Multiple Line Mail Body Formatting without using Mail Templates

I came across one requirement from one of my customer, so I decided to share the solution with you all.

In today’s post we will see how we can create multi line mail body for SMTP mail.

Lets start with the solution rather than talking of logic.

Step-1: Create a codeunit for the function or decide where you wish to add this function

Step-2: Define Variables

1

you may notice that Variable CRLF is defined as Text with Size 2.

Define all other variables that you may require as per your logic.

Step-3: Write the function. Define your parameters and additional codes you may require as per your logic.

2

In above code notice that I have set last parameter of CreateMessage as FALSE for(HTMLFormatted), this is required else CRLF logic will not work.

Where ever I require New Line I just add CRLF.

3

Step-4: SMTP Mail Setup I am using as below for live.com, you check with yours SMTP details accordingly.

4

Yes we are done now you can execute the above function to generate your mails.

I will come up with more details in my upcoming posts, till then keep exploring and learning.


Development Tips, Email, Excel, How To, Information, Office Integration, Report, Server, Tip & Tricks

Export Data as CSV and send as Attachment to Mail

One of my Follower/Reader have requested for this post.

This post will explain the the below steps:

  • Export the data of table to csv file format. (I am using XMLPort you can use Excell Buffer or any other method to create the file)
  • Attach to Mail and Send.

Step 1.

Create a XMLPort as below.

CSVAttachment-1

Set the Property of XMLPort.

CSVAttachment-2

Set the Property of Integer Data Item.

CSVAttachment-3

Set the Property of Table DataItem for which data to be exported.

CSVAttachment-4

Set the Captions of the Columns in CSV file.

CSVAttachment-5

Write the code to transfer the value of Table columns.

You may find some extra code adjust accordingly as per your requirement.

CSVAttachment-6

Define a function to Setfilter for data to export.

Adjust the code as per your requirement.

CSVAttachment-7

CSVAttachment-8

Step 2.

Here is the function to Export the data to csv File using above created XMLPort.

This function Saves the file to Shared folder, if required you can use TEMPORARYPATH to save your File.

CSVAttachment-9

Step 3.

Send the File as Attachment to the Mail.

CSVAttachment-10

You make required adjustment as per your requirement.

Make sure in case you are using Shared Folder give necessary rights on folder to Service Account and operating User Accounts.

Please respond did you found useful this information.

Their are other ways to achive the same, this was readyly available with me as i have used in one of my project so shared the same.

Stay tuned for more details in my Up comming posts.

Development Tips

Creating File Attachment to Mail for Report

We generally get requirements from clients to send report output as attachment to the mail.

In Microsoft Dynamics Navision 2015 this feature is available at most of the places, but we can design for other earlier versions too.

Long-time back I was having this requirement from one of my client, those days I scanned lots of website and tried lots of method. This one I found compact and easy to use. Their after whenever I get similar requirements I prefer using this.

Today I wish to share the same with others, as I have used it in my several implementations and found it working perfect and tested with several clients.

Let’s see this, it could help someone getting his work done in easy way and can save lots of time from hit and try with several methods.

First step, I will create a function which will help us generating the file on Service tier and down load to local temporary folder, so that we can easily access and attach to our mail.

Let’s give it a meaningful name like: DownloadToClientFileName

I will define two parameters for this Function as below:

Var Name DataType Subtype Length
No ServerFileName Text 250
No ToFile Text 250

I will define Return Value of Function as: Text of Length 250

I will define Local Variables for Function as below:

Name DataType Subtype Length
ClientFileName Text 250
objScript Automation ‘Microsoft Script Control 1.0’.ScriptControl
CR Text 1

Now we will write Code for the Function as below:

ClientFileName := ToFile;

IF NOT DOWNLOAD(ServerFileName, ”, ‘<TEMP>’,”, ClientFileName) THEN

EXIT(”);

IF CREATE(objScript,TRUE,TRUE) THEN

BEGIN

CR := ‘ ‘; CR[1] := 13;

objScript.Language := ‘VBScript’;

objScript.AddCode(

‘function RenameTempFile(fromFile, toFile)’+CR+

‘set fso = createobject(“Scripting.FileSystemObject”)’+CR+

‘set x = createobject(“Scriptlet.TypeLib”)’+CR+

‘path = fso.getparentfoldername(fromFile)’+CR+

‘toPath = path+”\”+left(x.GUID,38)’+CR+

‘fso.CreateFolder toPath’+CR+

‘fso.MoveFile fromFile, toPath+”\”+toFile’+CR+

‘RenameTempFile = toPath’+CR+

‘end function’);

ClientFileName := objScript.Eval(‘RenameTempFile(“‘+ClientFileName+'”,”‘+ToFile+'”)’);

ClientFileName := ClientFileName+’\’+ToFile;

END;

EXIT(ClientFileName);

Second Step, I will write code to call this function to attach the file to Mail and send using SMTP as below:

//SMTP is an Variable of Codeunit SMTP Mail

SMTP.CreateMessage(SenderName,SenderAddress,Recipient,Subject,Body,TRUE);

//SenderName,SenderAddress,Recipent is an email addresses

SMTP.AppendBody(Body);

CLEAR(MailReport);

//MailReport is Variable for Report of which output we want to use as attachment.

//Name & ToFile is Text type variable of Length 250

Name := STRSUBSTNO(‘Estimate No. %1.pdf’, SalesHeader.”No.”);

//Creating File Name

ToFile := Name;

FileName := TEMPORARYPATH + ToFile;

//We are using temporarypath OS Variable to get the path for file

MailReport.SetMailFilters(SalesHeader);

MailReport.SAVEASPDF(FileName);

ToFile := DownloadToClientFileName(FileName, ToFile);

SMTP.AddAttachment(ToFile);

FILE.ERASE(FileName);

SMTP.Send;

Now you can create a template function and use where ever require.

Office Integration

SMTP Setup errors while setting Office 365

Normally we see below Errors while configuring our SMTP in Navision.

Error-1

Check that your User Setup is having valid e-mail id.

Error-2

If you are using Domain make sure you are accessible to your domain. If you are outside you office make sure you are connected using your VPN.

Error-3