Corfu Navision 2016, Data, Development Tips, Dimension, Excel, Functional Tips, How To, Information, Tip & Tricks

Copying data to-and-fro between Excel & Navision

ExcelToNavJnl

One of my reader has requested to show him how to export data from Nav Journal to Excel, perform correction and import back to Navision.

So let us see how can we perform this and what are the limitations.

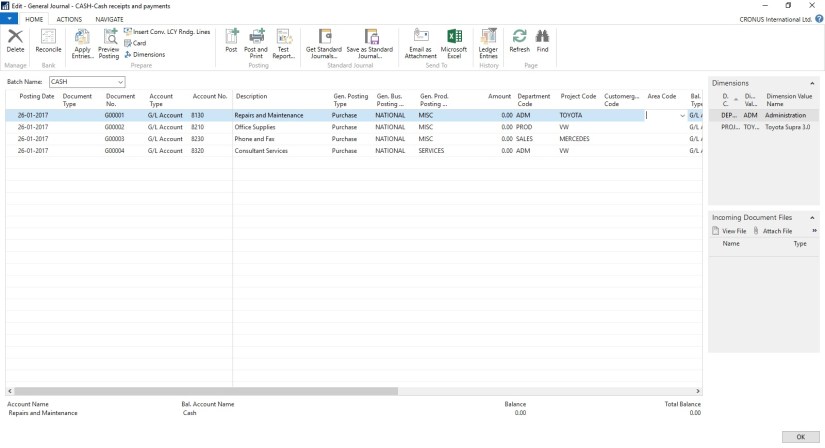
Open the Journal in Navision.

Arrange and show all the Fields that you want to export to Excel on the page.

Fill some sample data. Say single line of Journal, way usually you do.

ExcelToNavJnl-2

Now Send to Excel using options shown in below screen.

ExcelToNavJnl-3

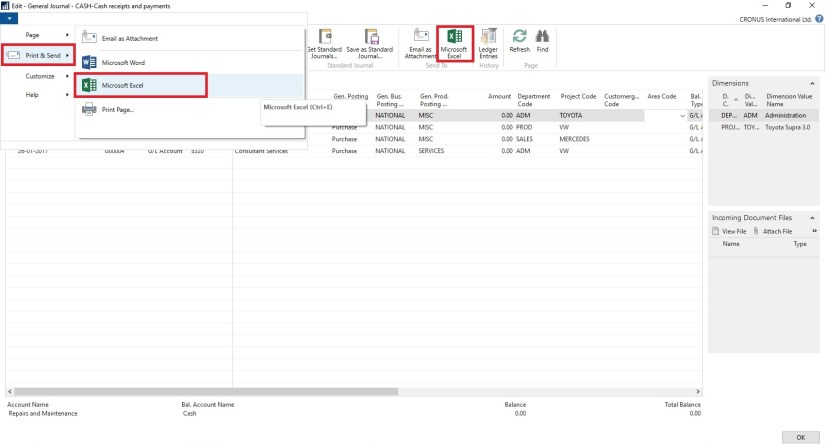
Data will get Exported to Excel.

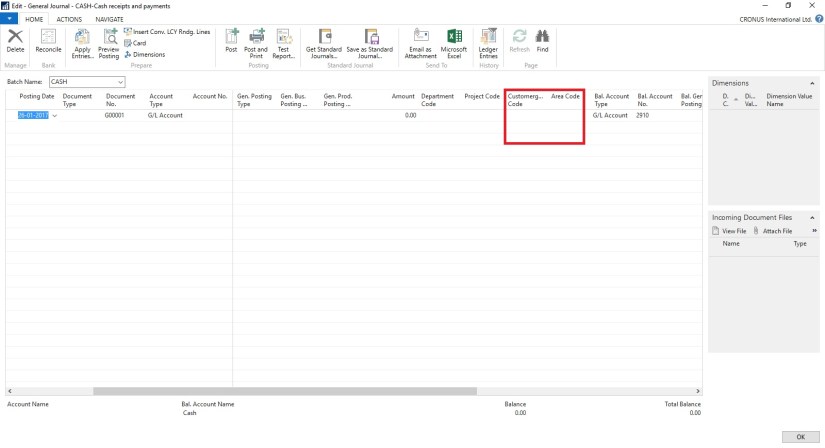
Have you noticed something, with the data that got exported yo Excel?

Your 2 Additional Shortcut dimension was not Exported to Excel. Customer Group Code & Area Code, why?

Since these are not the actual fields in the table and it is calculated on Page level, so you will only be able to export Dim-1 & Dim-2 your Global Dimensions which is available as Field in the Table.

Make sure you enter Dimension Values in Capitals in Excel Columns.

ExcelToNavJnl-4

Now perform required changes to the Journal data.

Insert New Lines, Delete existing Lines or Edit existing Lines.

Make sure you don’t keep more than 30000 to 40000 lines, until this it works fine if more than this either performance is too slow or Navision gets hang while you copy back your data to Navision. Upto 40000 works fine have tested several time. Depending upon your system performance you can decide how much data will be ok for you.

ExcelToNavJnl-5

As we have seen above my 2 additional Dimensions is missing from the exported data. We need to match the columns what we have in our Excel and sequence. So we will hide/remove the additional columns from the Journal to match the sequence from Excel columns before we copy back our data from Excel to Navision.

ExcelToNavJnl-6

Select the Rows in excel containing you data excluding header columns and copy.

Return to your Journal and Paste as shown in above screen.

ExcelToNavJnl-7

Your modified data is imported back to the Journal in Navision.

Now perform the Journal action way you do normally.


Advertisement
Development Tips, Email, Excel, How To, Information, Office Integration, Report, Server, Tip & Tricks

Export Data as CSV and send as Attachment to Mail

One of my Follower/Reader have requested for this post.

This post will explain the the below steps:

  • Export the data of table to csv file format. (I am using XMLPort you can use Excell Buffer or any other method to create the file)
  • Attach to Mail and Send.

Step 1.

Create a XMLPort as below.

CSVAttachment-1

Set the Property of XMLPort.

CSVAttachment-2

Set the Property of Integer Data Item.

CSVAttachment-3

Set the Property of Table DataItem for which data to be exported.

CSVAttachment-4

Set the Captions of the Columns in CSV file.

CSVAttachment-5

Write the code to transfer the value of Table columns.

You may find some extra code adjust accordingly as per your requirement.

CSVAttachment-6

Define a function to Setfilter for data to export.

Adjust the code as per your requirement.

CSVAttachment-7

CSVAttachment-8

Step 2.

Here is the function to Export the data to csv File using above created XMLPort.

This function Saves the file to Shared folder, if required you can use TEMPORARYPATH to save your File.

CSVAttachment-9

Step 3.

Send the File as Attachment to the Mail.

CSVAttachment-10

You make required adjustment as per your requirement.

Make sure in case you are using Shared Folder give necessary rights on folder to Service Account and operating User Accounts.

Please respond did you found useful this information.

Their are other ways to achive the same, this was readyly available with me as i have used in one of my project so shared the same.

Stay tuned for more details in my Up comming posts.

Report

Designing Report Layouts from the Microsoft Dynamics NAV Development Environment

After you have created a dataset for a report, you design the report layout. The report layout determines how the report looks when it is viewed, printed, and saved from the Microsoft Dynamics NAV client. The report layout specifies which fields of the dataset are included in the report and how they are arranged, the format of text that appears on the report (such as font type and color), margins, background images, and more.

You generally display most data in the body of a report, and you use the header to display information before any dataset fields are displayed. For example, you can display a report title, company, and user information in the header of a report.

Report Layout Types

There are two types of report layouts: Word and Client Report Language Definition (RDLC). Word report layouts are based on a Word document (.docx file type) and are created and modified by using Word 2013. RDLC report layouts are .rdlc or .rdl file types that are created and modified by using Visual Studio 2013 or SQL Server Report Builder 3.0.

Built-in and Custom Report Layouts

In the Microsoft Dynamics NAV Development Environment, you can create both an RDLC report layout and Word report layout on a report. These layouts are referred to as built-in layouts because they are part of the report object in the database. This means, for example, if you export the report object as a .fob or .txt file, the RDLC report layout and Word report layout are included. A report can only have one built-in RDLC report layout and one built-in Word report layout. By default, the built-in RDLC report layout is used when the report is run in the Microsoft Dynamics NAV client unless there is only a built-in Word report layout, in which case, the built-in Word report layout is used.

Microsoft Dynamics NAV users can specify whether to use the built-in RDLC or Word report layout on a report from the Microsoft Dynamics NAV Windows client and Microsoft Dynamics NAV Web client. From the client, users can also create custom report layouts that are based on the built-in report layouts. This enables users to have several different layouts for the same report which they can switch among. Custom report layouts are managed from page 9650 Report Layouts in the Microsoft Dynamics NAV client. Unlike built-in report layouts, which are part of the report object, custom report layouts are stored in table 9650 Report Layouts of the database.

Report Layouts in a Multitenant Deployment

In a multitenant Microsoft Dynamics NAV deployment, the built-in report layouts are stored in the application database because they are part of the report objects. Therefore, built-in report layouts are available to all tenants. Custom report layouts are stored in the business data database; therefore they are specific to the tenant. This enables you to create separate report layouts for each tenant.

Report

Import and Export a Word Report Layout

From the Microsoft Dynamics NAV Development Environment, you can import and export built-in Word report layouts of report objects as Word document files (.docx file type). This enables you to modify a built-in Word report layout on a report. For example, you can export a built-in Word report layout to a file on your computer or network. Then, you open the file in Word and modify the report layout. Finally, you import the file back to the report object. The existing built-in Word report layout on the report is overwritten by the content in the imported file.

To export a Word report layout from a report to a file

  1. In the development environment, open the report in Report Dataset Designer as follows.
    1. On the Tools menu, choose Object Designer.
    2. In Object Designer, choose Report, select the report, and then choose the Design button.
  1. On the Tools menu, choose Word Layout, and then choose Export.

Export

  1. Browse to the location where you want to save the exported file, and then choose the Save button.

To import a Word report layout from a file into report

  1. In the development environment, open the report in Report Dataset Designer as follows.
    1. On the Tools menu, choose Object Designer.
    2. In Object Designer, choose Report, select the report, and then choose the Design button.
  1. On the Tools menu, choose Word Layout, and then choose Import.

Import

  1. Locate the file that you want to import, and then choose the Open