Corfu Navision 2016, Data, Development Tips, Dimension, Excel, Functional Tips, How To, Information, Tip & Tricks

Copying data to-and-fro between Excel & Navision

ExcelToNavJnl

One of my reader has requested to show him how to export data from Nav Journal to Excel, perform correction and import back to Navision.

So let us see how can we perform this and what are the limitations.

Open the Journal in Navision.

Arrange and show all the Fields that you want to export to Excel on the page.

Fill some sample data. Say single line of Journal, way usually you do.

ExcelToNavJnl-2

Now Send to Excel using options shown in below screen.

ExcelToNavJnl-3

Data will get Exported to Excel.

Have you noticed something, with the data that got exported yo Excel?

Your 2 Additional Shortcut dimension was not Exported to Excel. Customer Group Code & Area Code, why?

Since these are not the actual fields in the table and it is calculated on Page level, so you will only be able to export Dim-1 & Dim-2 your Global Dimensions which is available as Field in the Table.

Make sure you enter Dimension Values in Capitals in Excel Columns.

ExcelToNavJnl-4

Now perform required changes to the Journal data.

Insert New Lines, Delete existing Lines or Edit existing Lines.

Make sure you don’t keep more than 30000 to 40000 lines, until this it works fine if more than this either performance is too slow or Navision gets hang while you copy back your data to Navision. Upto 40000 works fine have tested several time. Depending upon your system performance you can decide how much data will be ok for you.

ExcelToNavJnl-5

As we have seen above my 2 additional Dimensions is missing from the exported data. We need to match the columns what we have in our Excel and sequence. So we will hide/remove the additional columns from the Journal to match the sequence from Excel columns before we copy back our data from Excel to Navision.

ExcelToNavJnl-6

Select the Rows in excel containing you data excluding header columns and copy.

Return to your Journal and Paste as shown in above screen.

ExcelToNavJnl-7

Your modified data is imported back to the Journal in Navision.

Now perform the Journal action way you do normally.


Convert to PDF, Development Tips, How To, Information, Tip & Tricks

Merging PDF Files in Navision

Many of time we have multiple files in pdf but for some certain reasons we require to merge them to single File.

Continuing from my previous post i am extending my functionality with Merging of Mulitiple pdf files to single pdf file.

PDFConvMerge-2-2

In my Setup Page created in previous post i have added one more field to store the Tool Path & File Name for Merging multiple files.

Based on the dll provided by http://www.pdfsharp.net this post is written.

Visit the Site download the utility and extract the dll file and exe file from the zip and store in same Folder.

The format of command to merge the files at command prompt is similar to:

Command to merge :- pdfmerge output=.\ActionFolder\result.pdf input=.\ActionFolder\1.pdf,.\ActionFolder\2.pdf,.\ActionFolder\3.pdf

We will prepare the Function which will take as parameter the Output & Input File and run the utility to Merge these files to single file using WsShell in Navision.

PDFConvMerge-4

Function is very simple to accept the Input & Output File Names and Prepare Single PDF file from multiple pdf files provided as input (comma seperated List of Files) to the function.

To keep it simple no additional codes for test and other routine job is not added. Now you are familiar with the functionality you can tweak the code accordingly to meet all other requirements.

Thats all for this post. Will comeup with more Information in my upcoming posts.

Till then keep exploring and learning.


Convert to PDF, Development Tips, How To, Information, Office Integration, Tip & Tricks, Word

Converting Office Files into PDF from Navision

Today in this post i will walkthrough how we can convert any MS Office File into PDF.

It have been many time required to convert any attached file with the record in Navision to PDF format.

To perform this action we will require a tool which can be downloaded from:

OfficeToPDF download link :- http://officetopdf.codeplex.com/releases/view/118190

Extract and save the OfficeToPDF.exe file to some Folder.

For this Walkthrough i have created a Field in Customer Table to save the File Path of the Office File which we want to convert into PDF.

PDFConvMerge-1

You can add Dialog box to select the File from the specified Folder.

For this demo i have kept it simple Text Field where you can add your File Path and Office File Name. It is assumed that only Office File will be attached here.

For Setup purpose i have created one Setup Table & Page where we will store our other required Folder paths.

PDFConvMerge-2

Here we have given provision to save the Path of the Office to PDF Convertor Tool file Path & Temporay working Folder.

I have used the shared folder for all the paths so that it is not system specific, also make sure you give required permission on this folder for all the operating accounts.

Now our Next task will be to write a function which will perform this conversion part.

PDFConvMerge-3

Above Function Takes the File Name from the Customer Card we stored above on Customer Card. Takes the Path of the Office To PDF Convertor Utility and Tmp working Folder.

Prepares the PDF file Name along with Path stored in Setup.

Prepares the command to invoke Convert Utility using WsShell and returns the PDF file File Name along with path as defined in the Setup.

Now you can use this File for futher purpose as required.

To keep it simple no additional code of test and other required routine task is not added.

Now you know the Logic you can tweak the functionality as per your requirement.

I will comeup with more information in my up comming posts, till then keep exploring and learning.


How To, Information, PowerShell, Tip & Tricks

An Introduction to PowerShell – basics and how to define Variables

PowerShell is built into Windows, so there is no requirement of separate fee or licensing cost. In addition, different server products come with their own Power Shells, too, which expands the capability to do things you want using PowerShell.

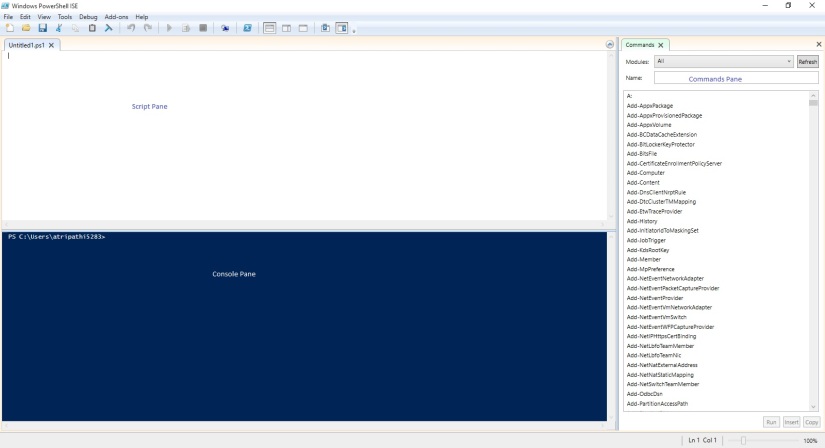
For demo purpose I am using Windows PowerShell ISE.

PS-1

An introduction to scripts

Scripts in PowerShell are basically just text files with the special filename extension of ps1.

To create a script, you enter a series of PowerShell commands in a sequence in a new Notepad file or any text editor you like, and then save that file with extension as .ps1, where name of your file is a friendly description of your script with no spaces.


PS-2

How do I run my scripts?

To run a PowerShell script that you already have, you enter in a PowerShell window either:

The full path (folder and file name) of the script, like so: c:\powershell\myscript.ps1

Or

If your script is in the current directory the console is looking at, use a period and then a backslash, like this: .\myscrip.ps1

Other than this, there is nothing special needed for creating a script in PowerShell. You can simply add the commands you like.


PS-3

How do I define Variables?

In PowerShell, variables always have a dollar sign ($) prefixed before them.

Let us declare few variables right now:

$name = ‘Ashwini’

$anynumber = 111074

$location = ‘Ghaziabad’

$listofnumbers = 15,20,35,40


PS-4

If I want to define a variable with text as its value, I will require to add a single quote on either side of the text value.

Let’s say we want to find out the total number of cmdlets available on the system, we can use:

(get-command).count


PS-5

Let’s declare a variable to store that count in. We’ll call it

$numbersofcmdlets

We will store output in this variable of the (get-command).count .

$numbersofcmdlets = (get-command).count

Now we can use this variable as part of something else.

For a simple example, let’s look at the Write-Host cmdlet, which simply writes text to the screen of the machine hosting the PowerShell session. Write-Host has a lots of capabilities, but in its simplest form, you can just say:

Write-Host “Dynamics Nav Blog Site by Ashwini Tripathi”

You can integrate variables with Write-Host. You just call them with the dollar sign notation and work them right into your text.

For example, I can say:

Write-Host “There are $numbersofcmdlets commands available for use on this system.”


PS-6

I will come up with more stuffs in my upcoming posts. 

Till then keep practicing and stay tuned for more details.


How To, PowerBI.com, Tip & Tricks

How to add Video Tile on Power BI Dashboard

Previously, a Video Tile released by BI supports YouTube videos. Video tiles allow you to customize your dashboard and add a bit of personal look.

Now the video tile supports Vimeo videos too.

Add a video tile by selecting Add widget from the top right of the dashboard.

PBI Video - 1

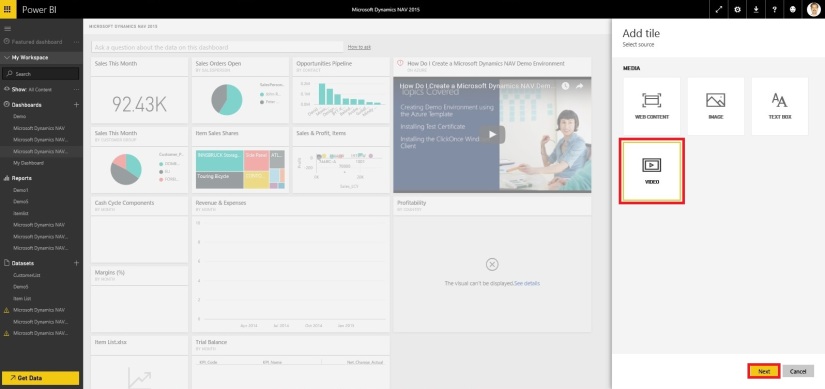
Select Video from Add Tile window.

PBI Video - 2

Press Next Button.

PBI Video - 3

Provide your Title and Subtitle for the Video Tile.

Provide your YouTube or Vimeo video URL.

If required provide custom Link and other properties.

Select Apply to complete your action.

Vimeo URLs come in several different formats this supports most, but not all of these formats. In case your URL doesn’t works try for next format.

I have posted several posts related to Power BI, you can find them using below Links.

Microsoft Power BI – Part – I

Introduction to Power BI and Creating Report from Excel Data, Local Files.

Microsoft Power BI – Part – II

Introduction to few Features of Power BI

Microsoft Power BI – Part – III

Power BI Desktop, Creating Dataset & Reports from In Premise Database installation

Microsoft Power BI – Part – IV

Power BI Gateway usage

Microsoft Power BI – Part – V

Scheduling Refresh of Dataset & Report created using In Premise Database

Microsoft Power BI – Part – VI

Power BI Content Pack

Microsoft Power BI – Part – VII

Power BI Mobile App

Microsoft Power BI – Part – VIII

Power BI Content Pack

Microsoft Power BI – Part – IX

Power BI Publisher for Excel

Microsoft Power BI – Part – X

Analyse in Excel (preview)


Corfu Navision 2016, Development Tips, How To, IIS, Information, Instalation & Configuration

Configuring SSL to Secure the Connection to Microsoft Dynamics NAV Web Client

It is always recommend that you secure Microsoft Dynamics NAV data that is transmitted over the Internet by enabling Secure Sockets Layer (SSL) on the connection to Microsoft Dynamics NAV Web client.

Enabling SSL on a website requires that an SSL certificate is installed on the web server. An SSL certificate is a small file that the web server uses to prove its identity and establish a trusted connection with the browser that is trying to access Microsoft Dynamics NAV Web client.

When a browser connects to the Microsoft Dynamics NAV Web client, the web server replies by sending its certificate to the browser. This certificate contains the web server’s public encryption key and the name of the authority that granted the certificate. The browser verifies the certificate using the authority’s public key.

Note You can configure SSL for the Microsoft Dynamics NAV Web client when you install the Microsoft Dynamics NAV Web Server components.

Obtaining an SSL Certificate

In a production environment, you should obtain an SSL certificate from a certification authority. Some large organizations may have their own certification authorities, and other organizations can request a certificate from a third-party organization. In a test environment or development environment, you can create your own self-signed certificate.

To create a self-signed SSL certificate

Open Internet Information Services (IIS) Manager, on the Start menu, choose Administrative Tools, and then choose Internet Information Service (IIS) Manager.
IIS-1

  • In the Connections pane, choose the top-level node for the server.
  • On the Home page, under IIS, choose Server Certificates, and then in the Actions pane, choose Open Feature.

IIS-2

  • On the Server Certificates page, choose Create Self-Signed Certificate.
  • In the Specify Friendly Name dialog box, type a brief name for the certificate, and then choose the OK button.

IIS-3

The new certificate appears on the Server Certificate page.
IIS-4

Adding an HTTPS Binding That Uses the Certificate on the Microsoft Dynamics NAV Web Client Site

After you get the certificate, you add a binding to the https protocol on the website. When you add the binding, you associate it with the certificate.

To add an https binding with the certificate to the website

  • Open Internet Information Services (IIS) Manager.
  • In the Connections pane, expand the Sites node, and then choose the Microsoft Dynamics NAV Web client site to which you want to add the binding.

By default, the site has the name Microsoft Dynamics NAV 2016 Web Client.

  • In the Actions pane, choose Bindings.

IIS-5

  • In the Site Bindings dialog box, choose Add.
  • In the Add Site Binding dialog box, set the Type field to https.

IIS-6

You can use the default port 443 or change it to another port. If you change it to another port, you will have to provide the port number in the URL when you try to open the client.

  • Set the SSL certificate field to the certificate that you obtained or created for the site.
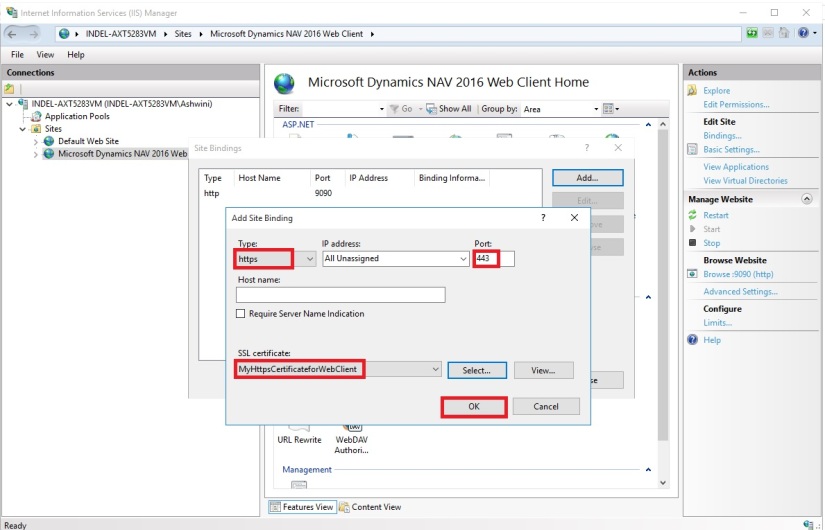
IIS-7

  • Choose the OK button, and then choose the Close button.

Redirecting HTTP to HTTPS (Optional)

To ensure that users always access the site that is secured with SSL, you can automatically redirect HTTP requests to HTTPS. This means that users do not have to explicitly include https in the URL in the browser.

For example, the nonsecure URL of the Microsoft Dynamics NAV Web client could be

http://mywebclient:8080/DynamicsNAV90/WebClient

The secure URL could be

https://MyWebclient:443/DynamicsNAV90/WebClient

If a user types

http://MyWebclient:8080/DynamicsNAV90/WebClient,

the browser automatically redirects to

https://MyWebclient:443/DynamicsNAV90/WebClient


There are different ways to redirect HTTP requests to HTTPS.

The following procedure describes how to redirect HTTP requests to HTTPS by installing the Microsoft Application Request Routing for IIS 7 and modifying the web.config file for the Microsoft Dynamics NAV Web client.

To redirect HTTP to HTTPS

The web.config file is located in the physical path of the web application on IIS. By default, the path is

%systemroot%\inetpub\wwwroot\[VirtualDirectoryName]\WebClient.

For example, the folder for the default Microsoft Dynamics NAV Web client application is

%systemroot%\inetpub\wwwroot\DynamicsNAV90\WebClient.

  • In the <system.webServer> element, add the following elements.

<rewrite>

<rules>

<rule name=”Redirect to HTTPS”>

<match url=”(.*)” />

<conditions>

<add input=”{HTTPS}” pattern=”off” ignoreCase=”true” />

</conditions>

<action type=”Redirect” url=”https://{SERVER_NAME}/{R:1}” redirectType=”SeeOther” />

</rule>

</rules>

</rewrite>


  • Save the web.config file.


Corfu Navision 2016, How To, Information, Permission, User Group

Record Permissions and Apply Permissions Sets to User Groups in Navision 2016

Administrators can record new permission sets in Microsoft Dynamics NAV 2016.

Recording permissions is based on the code coverage functionality.

You can access the various windows and activities in the Microsoft Dynamics NAV Windows client or the Microsoft Dynamics NAV Web client that you want users with this permission set to access.

You must carry out the tasks that you want to record permissions for. Then, you can apply the new permission set to a group of users.

A user group is a combination of roles and users. If you want to change permissions for the user group, the changes are automatically applied to the users who are members of the group.

To help you manage permissions in Microsoft Dynamics NAV for your company, you can set up one or more user groups, add permissions sets to the groups, and then add users to the groups. You can add more than one permission set to a user group.

In the User Groups window, you can set up user groups, add and remove permissions, and you can apply changes to all or specific user groups.
Permission-1

Permission-2

Permission-3

Permission-4

Permission-5
If the default permission sets that are provided with Microsoft Dynamics NAV are not sufficient or not appropriate for your organization, then you can create new permission sets. If the individual object permissions that define a permission set are not adequate, then you can modify a permission set.

You can create a permission set manually, or you can record permissions by navigating in the application.
Permission-6

Permission-7

Permission-8
This starts a recording process that is based on the code coverage functionality in Microsoft Dynamics NAV. You can now access the various windows and activities in the Microsoft Dynamics NAV Windows client or the Microsoft Dynamics NAV Web client that you want users with this permission set to access. You must carry out the tasks that you want to record permissions for.

When you want to finish the recording, return to the Permissions window, and then, on the Actions tab, choose Stop.

Choose Yes to add the recorded permissions to the new permission set, or choose No to cancel.

If you choose Yes, the objects that you accessed are added to the window. In Microsoft Dynamics NAV 2016, only the objects are recorded, so you must specify if users must be able to insert, modify, or delete records in the recorded tables.

Data Model, Development Tips, Excel, How To, PowerPivot, Report

Add Excel Sheet/Table to the PowerPivot Data Model

Download the Excel file from the link provided in previous post.

Import data using copy and paste from Excel sheet or other source for PowerPivot Data Model.

Open the Workbook:

ExcelData-3

Select sheet one by one and Add to Data model of PowerPivot.

ExcelData-4

Make sure all Table/Sheet is added to Data Model of PowerPivot.

I have create a sample Excel File for you which you can down load from the Shared Path using link: http://1drv.ms/1GpZFd4

This file have couple of sheets having data related to Olympics which I have compiled from MS Office support site.

You can find the link on the Menu of my blogsite too to access the shared files.

I will be using this file for couple of walkthrough in my upcoming posts.

Development Tips, Excel, How To, PowerPivot, Report

Add Slicers to PivotTables in PowerPivot

Recall from my earlier post Creating My First Report using PowerPivot in which we created a Items Vs Customer Sales matrix report.

I am going to use same report to demonstrate how we can add slicer to this report.

Slicers are one-click filtering controls that narrow the portion of a data set shown in PivotTables and PivotCharts. Slicers can be used in both Microsoft Excel workbooks and PowerPivot workbooks, to interactively filter and analyze data.
PowerPivot-30

Open the report we created in our previous post.

From Insert Tab select Slicer in the ribbon.
PowerPivot-31

Choose the source Connection/Data model and respond Open.

Select the Customer Table.

Select the Country/Region Code field and OK.
PowerPivot-32

A Slicer will be added to the sheet.

Re-size to fit and drag the Slicer to position at desired location on sheet.

You can give desired Caption to your Slicer by editing the Slicer Caption.

Most important is to select the pivot table on which this Slicer will operate.

Select Report Connection, and from preceding window select the PivotTable.
PowerPivot-33
Above is the screenshot with applied filter on Country/Region Code = DE.

Stay tuned to know more options, I will come up with more details in my upcoming posts.

Till then keep practicing.

Development Tips, Excel, How To, Office Integration, PowerPivot, Report

How to add Filter for data retrieval in PowerPivot Data model.

Recall from previous posts we have added Item Ledger Entry Table to our Data Model of PowerPivot.

Adding more tables to the Data Model using Existing Connection – In PowerPivot

Add relationships to Data Model in PowerPivot

My requirement is to retrieve only records related to Sales.

We will apply filter on Entry Type field to value [1]-[Sales] this way Item Leger Entry Sheet will have only Sales Data.

To do this we will add this filter to the query used for data retrieval.
PowerPivot-15

Select the Sheet for table – Item Ledger Entry from bottom.

Click on Design Tab on Top.

Now From Ribbon choose Table Properties.

PowerPivot-16

Select Query Editor from Switch to.

Add the Filter to your query.

Save your Query.

PowerPivot-17

From Home Tab, Select Refresh from Ribbon.

On Success completion Close the window.

Now your Item Ledger Entry is populated with Fresh data as per the modified Query.

I.e: All Entries which have Entry Type = 1 [Sales].

I will come up with more details in my upcoming post, till then keep practicing and stay tuned for future updates & posts on this topic.