Business Central, CDS, Common Data Services, Dataverse, Dynamics 365 Sales, Integration, Ownership, Permissions, Synchronize, Tip & Tricks, URL

Setup a connection to Dataverse

Integration with Business Central is done through Dataverse, and you will find lots of standard settings and tables that are provided by the integration.

This is the Second post in the series. If you want to go to previous post click here.

From the series of steps this post is dedicated to Step-1:

Create connection to integrate and synchronize data with another Dynamics 365 business app, such as Dynamics 365 Sales.

As a first Step we will setup a connection to Dataverse.

Before you start make sure you have below information ready with you:

  • URL for the Dataverse environment that you want to connect to
  • The user’s name and password of an account that has administrator permissions in Business Central and Dataverse.
  • The local currency for the company in Business Central must be the same as the base transaction currency in Dataverse. 

From Assisted Setup under Connect with other systems group choose Set up a connection to Dataverse, as shown below.

This will start the Setup wizard, just follow and provide your information asked on each page.

Click Next to Start configuring Dataverse & Business Central connection.

Here you can select your Dataverse Environment or can enter manually, above screen shows where you can find this url from.

Sign in with an administrator user account and give consent to the application that will be used to connect to Dataverse.


Choose Sign in with administrator user.

After Sign in with administrator user turns green and bold, choose Next.

Select Ownership and Click Next.

Click on Finish to complete the Setup.

Next open the Dataverse Connection Setup from TellMe.

Select from Connection -> Test Connection

You can check Microsoft docs for more information

Connect to Microsoft Dataverse

If all are OK it should show the Connection test Successful message.

Now you are good to proceed with Next Step.

You can jump to Next Step from here.

Replication, SQL, Tip & Tricks

Database Replication – Part III

This post is in continuation to my earlier post. Please check if you missed.

Database Replication – Part I

Database Replication – Part II

As committed in this post we will continue to cover practical approach, Next step from last post.

Configuring Distribution

We will configure distribution at the Publisher and set the required permissions on the publication and distribution databases. If you have already configured the Distributor, you must first disable publishing and distribution before you begin this process. Do not do this if you must retain an existing replication topology.

Configuring a Publisher with a remote Distributor is outside the scope of this Post.

If you have connected to SQL Server using localhost rather than the actual server name you will be prompted with a warning that SQL Server is unable to connect to server ‘localhost’. Click OK on the warning dialog. In the Connect to Server dialog change the Server name from localhost to the name of your server. Click Connect.

Configuring distribution at the Publisher

  • Connect to the Publisher in SQL Server Management Studio, and then expand the server node.
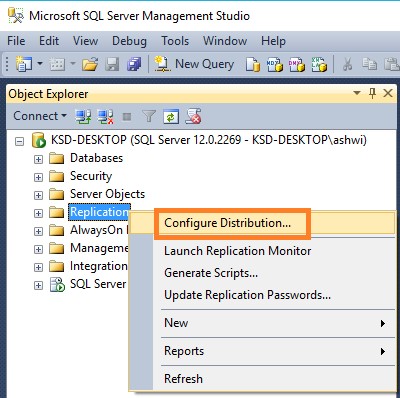
  • Right-click the Replication folder and click Configure Distribution.

DR-10

  • The Distribution Configuration Wizard launches.

DR-11

  • On the Distributor page, select ‘ServerName’ will act as its own Distributor; SQL Server will create a distribution database and log, and then click **Next.

DR-12

  • If the SQL Server is not running, on the SQL ServerAgent Start page, select Yes, configure the SQL Server Agent service to start automatically. Click Next.
  • Enter \\<Machine_Name>\repldata in the Snapshot folder text box, where <Machine_Name> is the name of the Publisher, and then click Next.

DR-13

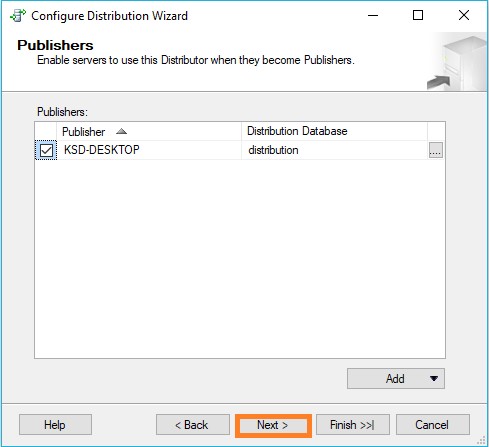
  • Accept the default values on the remaining pages of the wizard.

DR-14DR-15DR-16DR-17DR-18

  • Click Finish to enable distribution.

DR-19

Setting database permissions at the Publisher

  • In SQL Server Management Studio, expand Security, right-click Logins, and then select New Login.

DR-20

  • On the General page, click Search, enter <Machine_Name>\repl_snapshot in the Enter the object name to select box, where <Machine_Name> is the name of the local Publisher server, click Check Names, and then click OK.

DR-21

  • On the User Mapping page, in the Users mapped to this login list select both the distribution and required database (in my case Nav 2018 database).
  • In the Database role membership list select the db_owner role for the login for both databases.
  • Click OK to create the login.

DR-22
  • Repeat steps 1-4 to create a login for the local repl_logreader account. This login must also be mapped to users that are members of the db_owner fixed database role in the distribution and required databases.
  • Repeat steps 1-4 to create a login for the local repl_distribution account. This login must be mapped to a user that is a member of the db_owner fixed database role in the distribution database.
  • Repeat steps 1-4 to create a login for the local repl_merge account. This login must have user mappings in the distribution and required databases.


DR-23


Here we complete configuring our Distribution at Publisher.

We will see next step in our next post.


Azure, Corfu Navision 2016, How To, Information, Instalation & Configuration, Office 365, Office Integration, Tip & Tricks

Configuring Single Sign-On using Office 365 on Navision 2016

Today we will see how we can enable Single Sign-On using Office 365 for Navision 2016.

Before we start we should have Virtual Machine ready on Azure with Navision 2016 installed, Certificates and Nav User is configured. Endpoints are open so that web client can be used from outside Virtual Machine on internet.

It should be hosted on Public IP, then only we will be able to configure it.

For details regarding Azure Subscription you can see my earlier post here.

For details regarding Creating Virtual Machines you can see my earlier post here.

You also need Office 365 Subscription ready for use and you can use the AD of same to configure your Single Sign-On.

Let us start with Admin console of office 365. Click on Azure AD this will create Management Console to work with AD.

SingleSignOn-1

Enter your details and click on Next.

SingleSignOn-2

Enter your details and click on Next, Finally Sign Up.

SingleSignOn-3

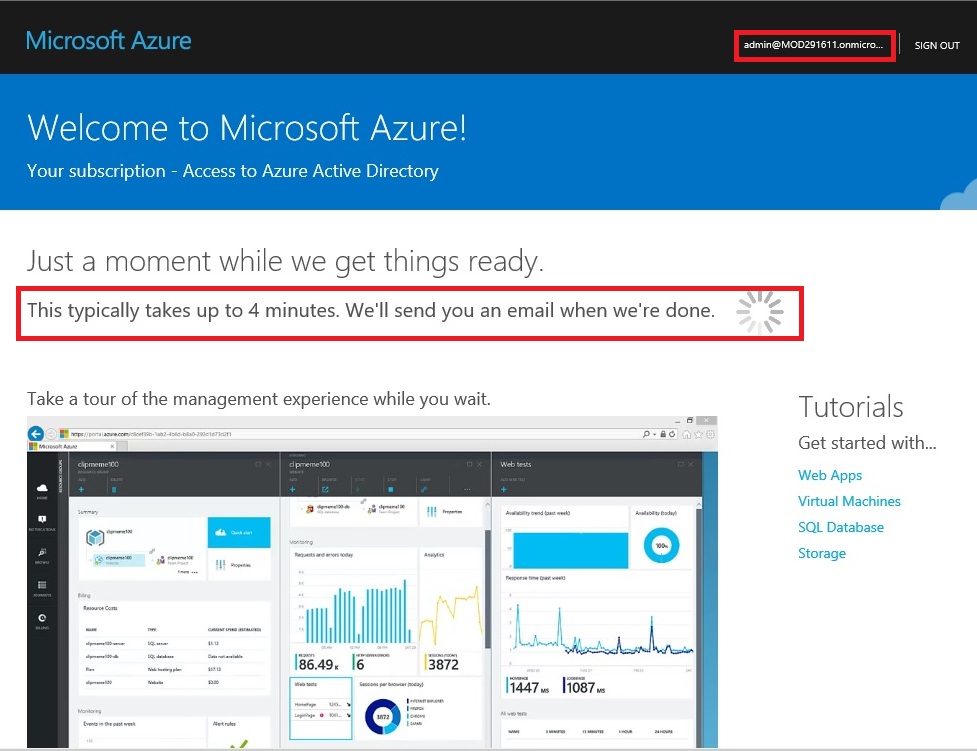
It will take few minutes to configure and make it available for you.

SingleSignOn-4

Once your Subscription is ready click on Start Managing my Service.

SingleSignOn-5

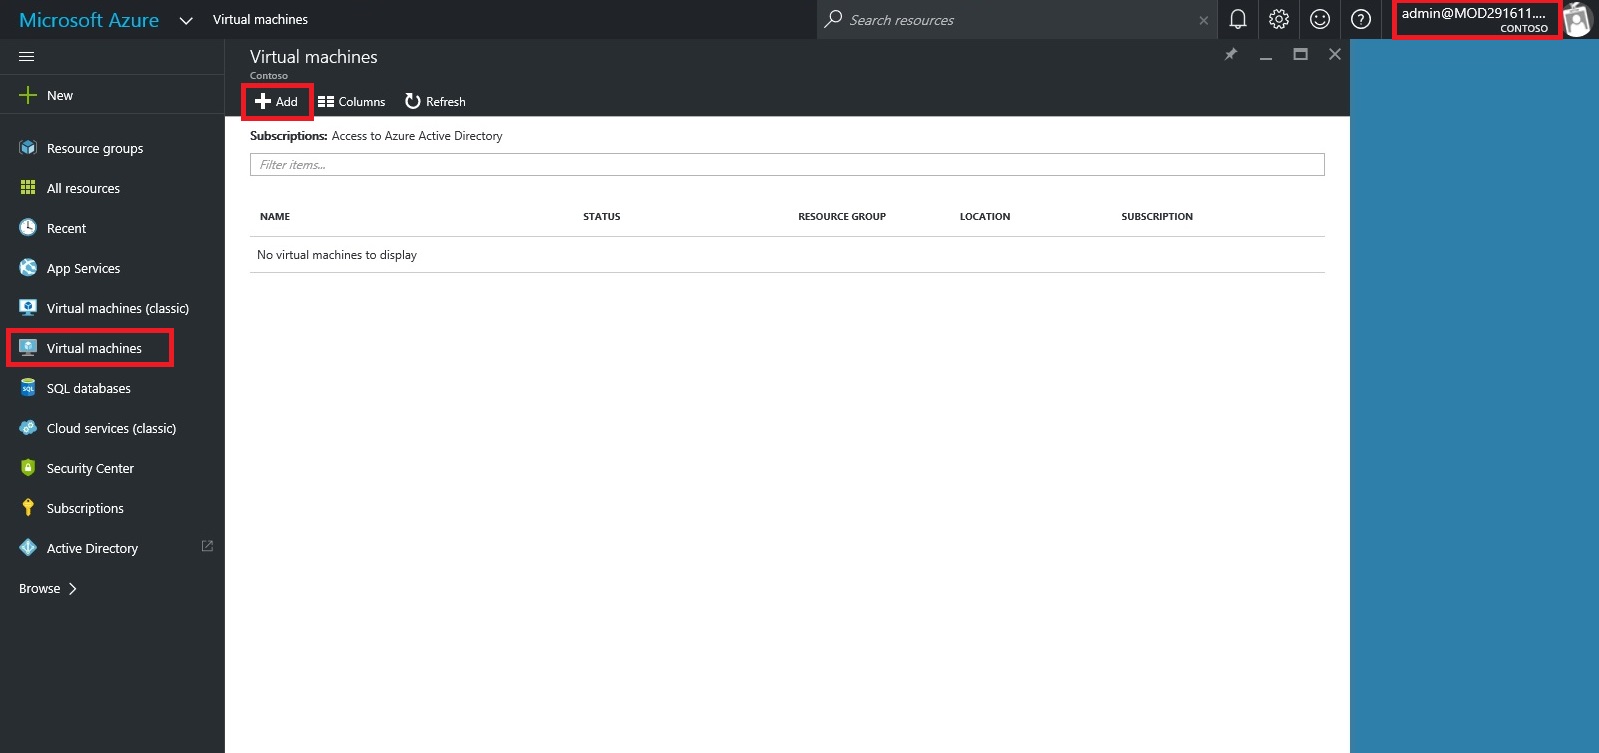
From Management Console click on Virtual Machine, if you dont have already to create one for you.

SingleSignOn-6

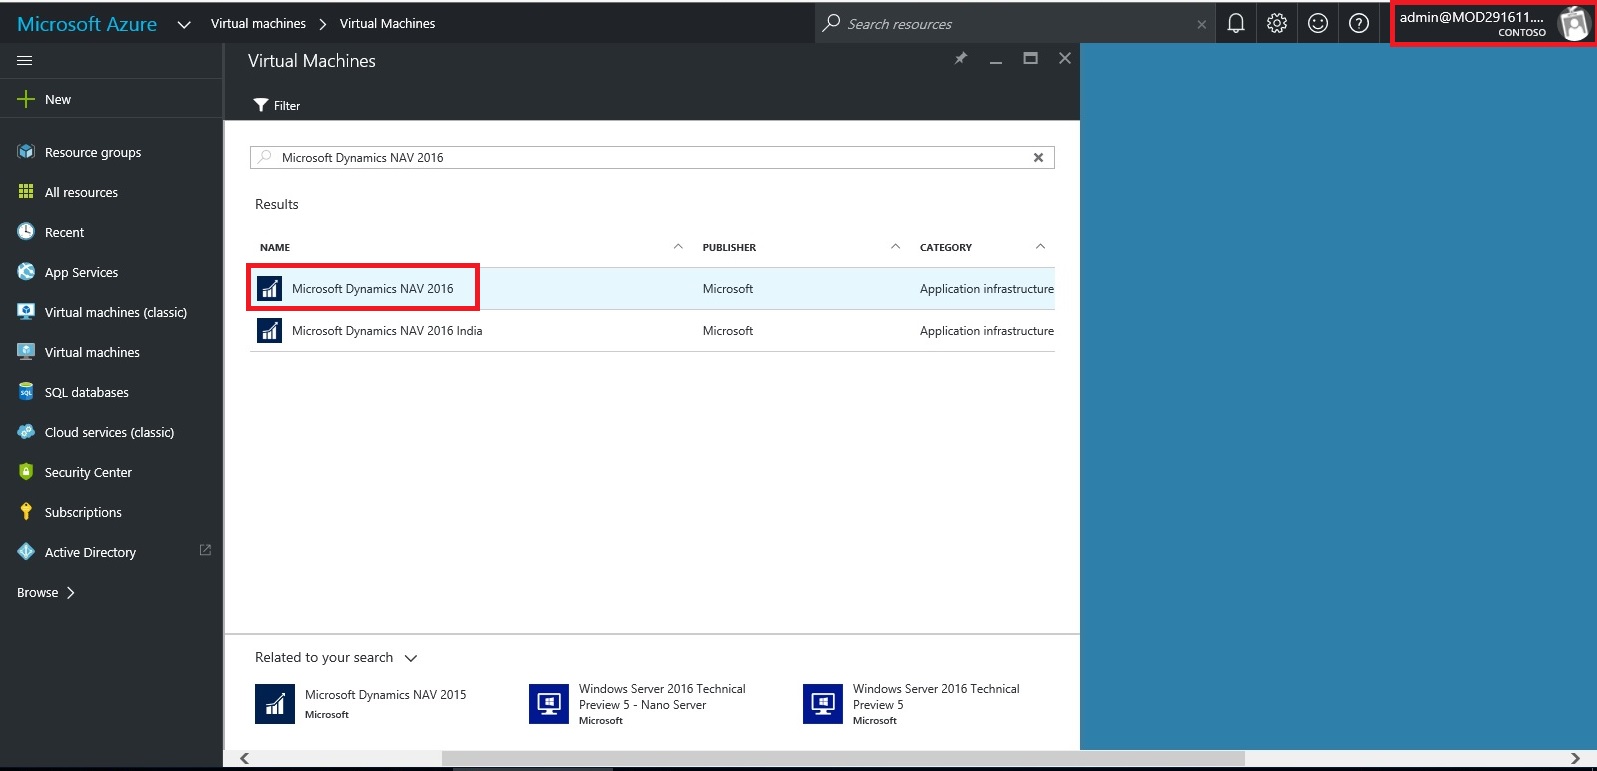
Select the Virtual Machine in Search for Microsoft Dynamics Nav 2016.

SingleSignOn-7

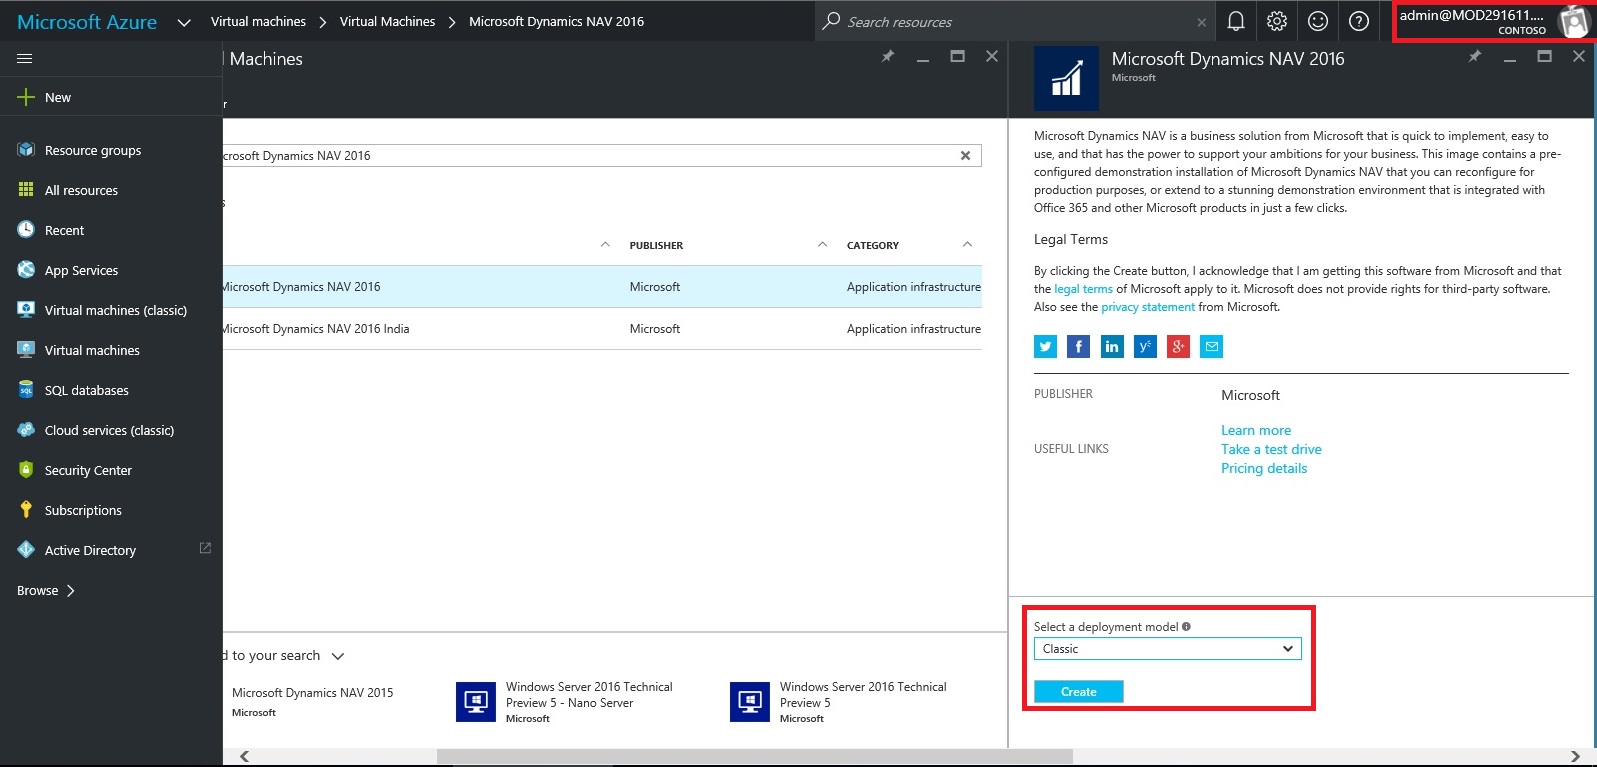
Select the approprite Virtual Machine from the List.

SingleSignOn-8

Enter your details and Create. For more details see the link provided on top of the post.

SingleSignOn-9

Let us return to our AD, Click on Applications. This will List all you Apps currently available with your AD or office 365.

SingleSignOn-10

Click on Add to configure your Application.

Give a Name and Select Web Application/or Web API, as we are configuring for Web Client today. Click on Next.

SingleSignOn-11

Enter your Web Client URL and Office portal AD URL.  Click on OK.

SingleSignOn-12

Your New application gets registered with your AD.

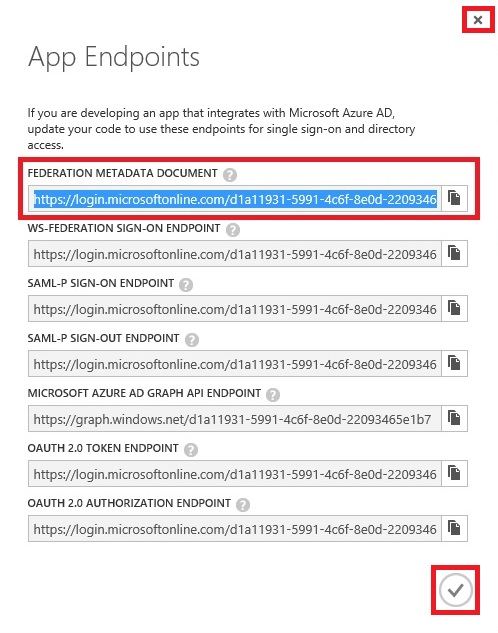
Select the created Application and Click on View Endpoints.

SingleSignOn-13

Copy the Federation MetaData URL and keep it handy at safe place we will require this in our next step. Close the window we are not performing any changes here.

SingleSignOn-14

Open your Navision User Card.In Office 365 Authentication enter your Office portal user email id which you will be using for Single Sign-On.

SingleSignOn-15

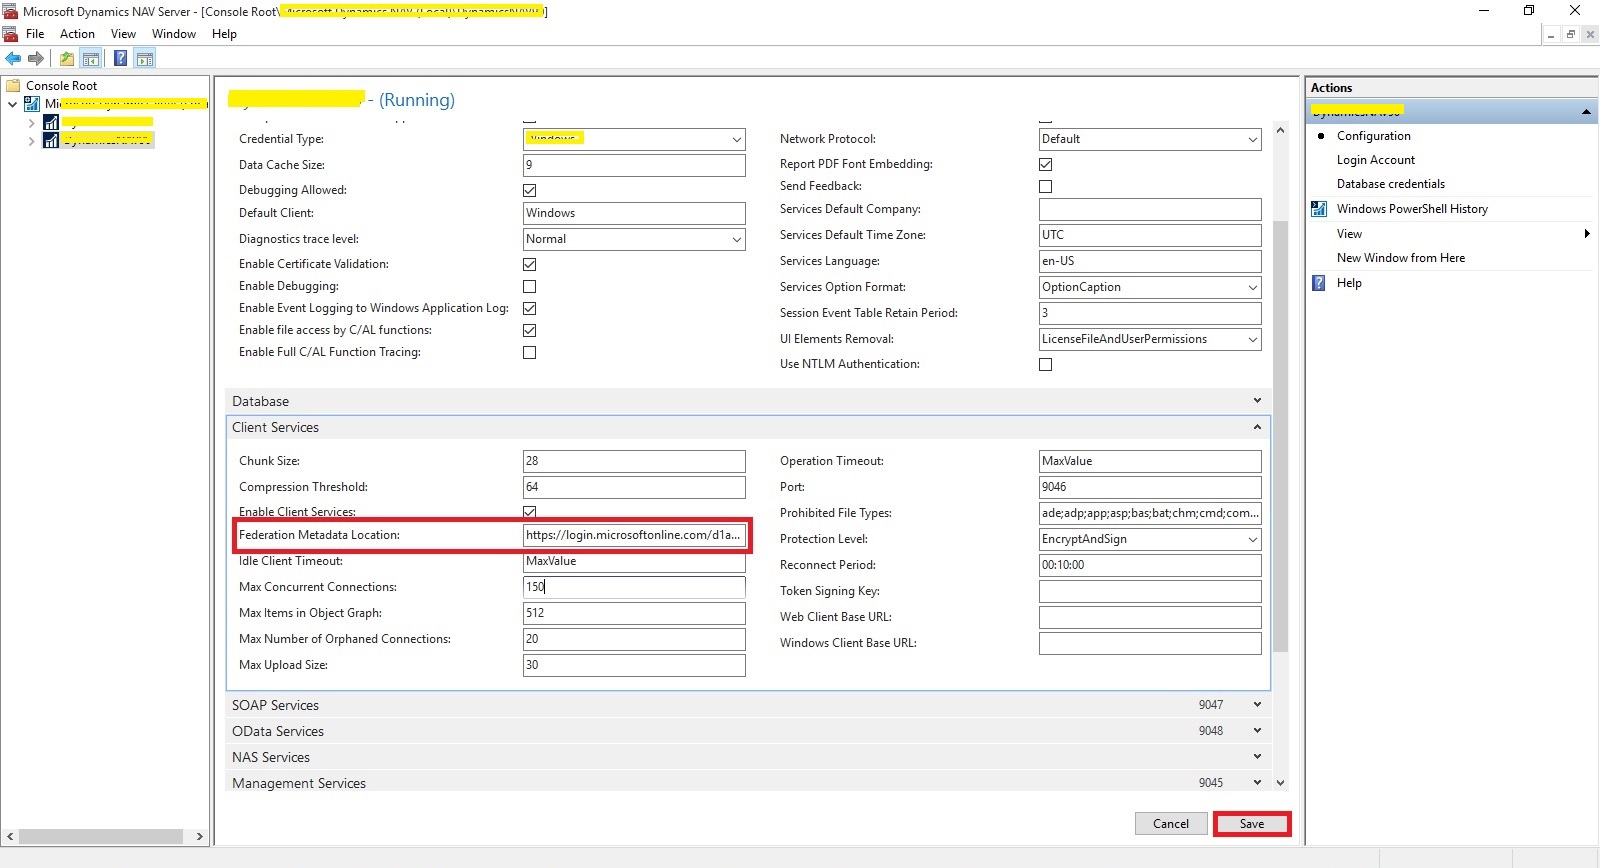
Open your Navision Service Instance configuration and enter Federal MetaData URL which we copied in our previous step.

SingleSignOn-16

Restart you NAV Service.

SingleSignOn-17

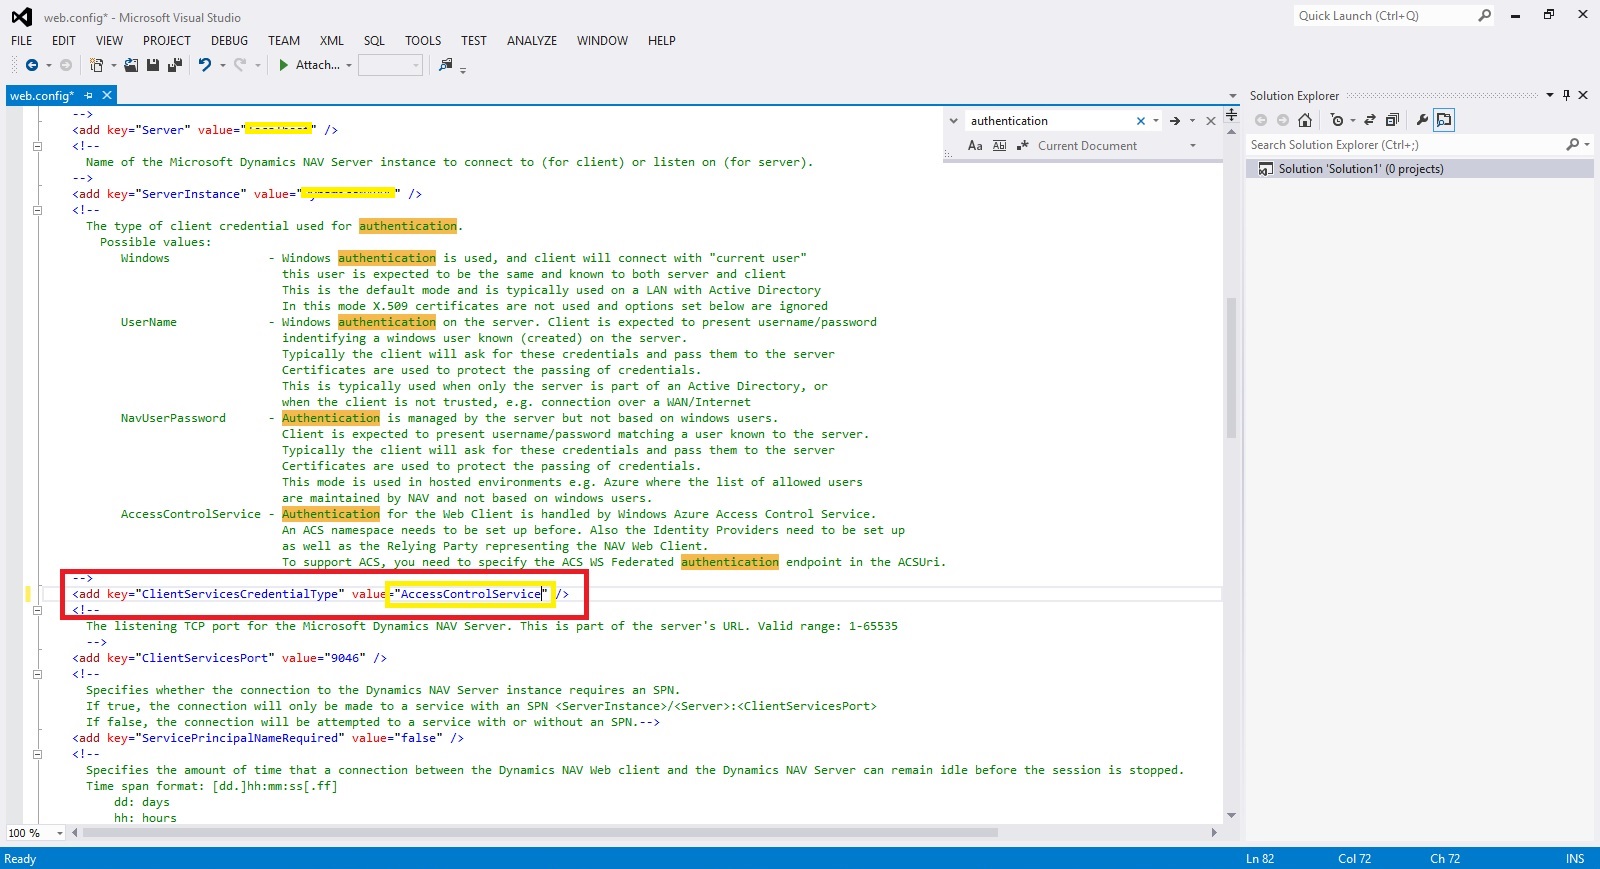
Open the Web Client Folder under your IIS. Edit your Web.config file using prefered Editor.

SingleSignOn-18

Enter you Client Service Credentials as AccessControlService.

SingleSignOn-19

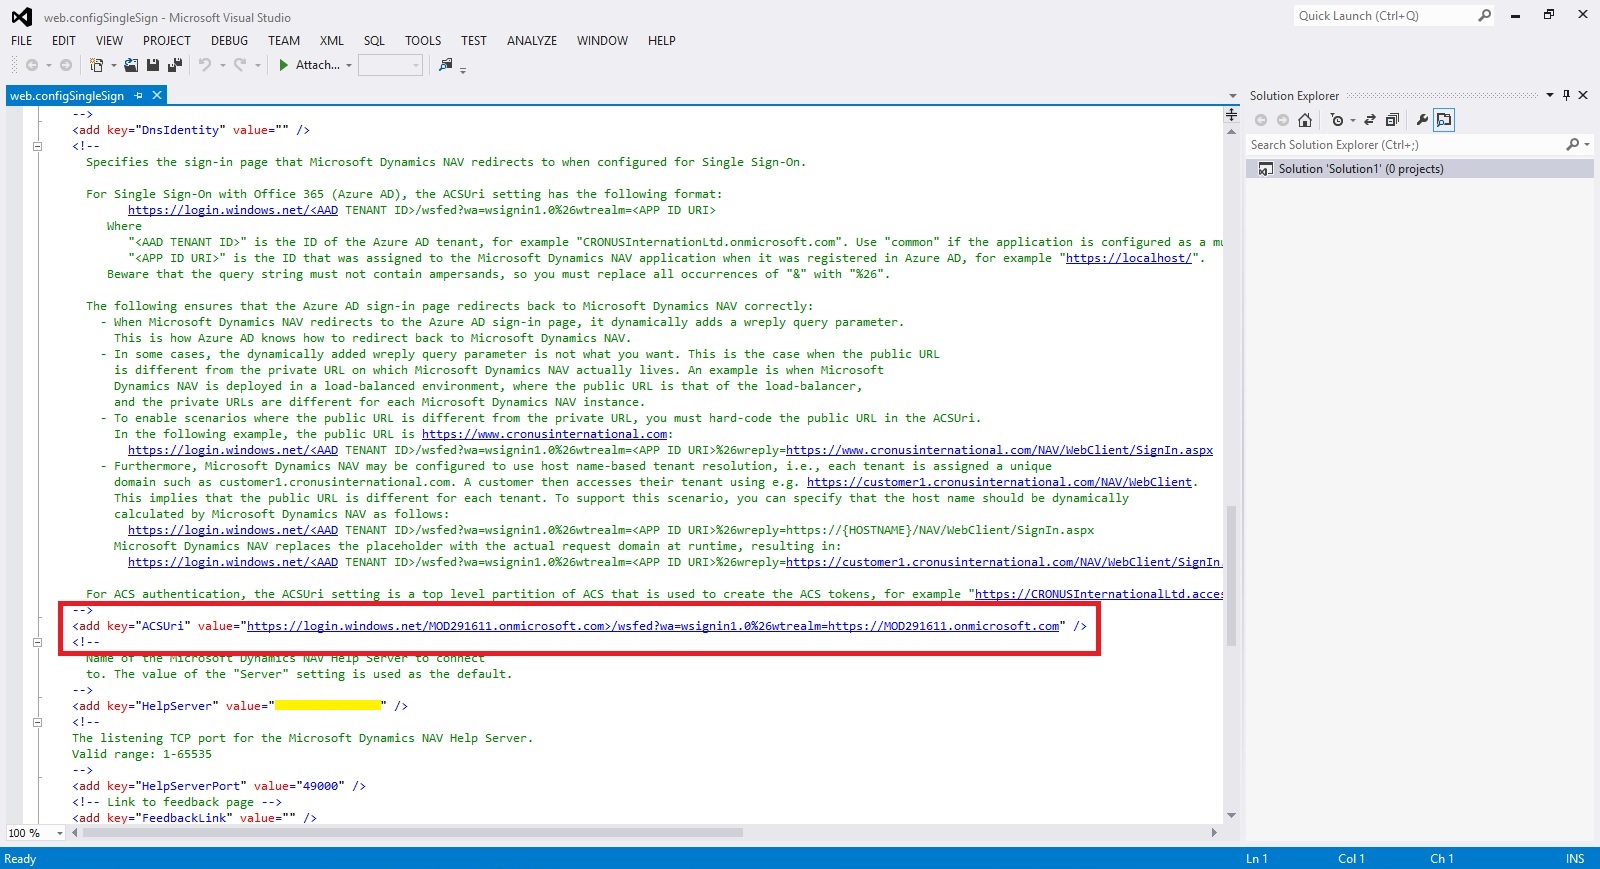
Change value of ACS URI as below. You have full explaination of same in the file itself.

SingleSignOn-20

Thats all, Now you open your web client and you will be redirected to Office 365 Login Page, enter your valid office 365 e-mail user id and password you will be authenticated and Web Client is opened.

Thats all for today, I will come up with moredetails in my upcoming posts.

Till then keep exploring and learning.


Corfu Navision 2016, Development Tips, How To, IIS, Information, Instalation & Configuration

Configuring SSL to Secure the Connection to Microsoft Dynamics NAV Web Client

It is always recommend that you secure Microsoft Dynamics NAV data that is transmitted over the Internet by enabling Secure Sockets Layer (SSL) on the connection to Microsoft Dynamics NAV Web client.

Enabling SSL on a website requires that an SSL certificate is installed on the web server. An SSL certificate is a small file that the web server uses to prove its identity and establish a trusted connection with the browser that is trying to access Microsoft Dynamics NAV Web client.

When a browser connects to the Microsoft Dynamics NAV Web client, the web server replies by sending its certificate to the browser. This certificate contains the web server’s public encryption key and the name of the authority that granted the certificate. The browser verifies the certificate using the authority’s public key.

Note You can configure SSL for the Microsoft Dynamics NAV Web client when you install the Microsoft Dynamics NAV Web Server components.

Obtaining an SSL Certificate

In a production environment, you should obtain an SSL certificate from a certification authority. Some large organizations may have their own certification authorities, and other organizations can request a certificate from a third-party organization. In a test environment or development environment, you can create your own self-signed certificate.

To create a self-signed SSL certificate

Open Internet Information Services (IIS) Manager, on the Start menu, choose Administrative Tools, and then choose Internet Information Service (IIS) Manager.
IIS-1

  • In the Connections pane, choose the top-level node for the server.
  • On the Home page, under IIS, choose Server Certificates, and then in the Actions pane, choose Open Feature.

IIS-2

  • On the Server Certificates page, choose Create Self-Signed Certificate.
  • In the Specify Friendly Name dialog box, type a brief name for the certificate, and then choose the OK button.

IIS-3

The new certificate appears on the Server Certificate page.
IIS-4

Adding an HTTPS Binding That Uses the Certificate on the Microsoft Dynamics NAV Web Client Site

After you get the certificate, you add a binding to the https protocol on the website. When you add the binding, you associate it with the certificate.

To add an https binding with the certificate to the website

  • Open Internet Information Services (IIS) Manager.
  • In the Connections pane, expand the Sites node, and then choose the Microsoft Dynamics NAV Web client site to which you want to add the binding.

By default, the site has the name Microsoft Dynamics NAV 2016 Web Client.

  • In the Actions pane, choose Bindings.

IIS-5

  • In the Site Bindings dialog box, choose Add.
  • In the Add Site Binding dialog box, set the Type field to https.

IIS-6

You can use the default port 443 or change it to another port. If you change it to another port, you will have to provide the port number in the URL when you try to open the client.

  • Set the SSL certificate field to the certificate that you obtained or created for the site.

IIS-7

  • Choose the OK button, and then choose the Close button.

Redirecting HTTP to HTTPS (Optional)

To ensure that users always access the site that is secured with SSL, you can automatically redirect HTTP requests to HTTPS. This means that users do not have to explicitly include https in the URL in the browser.

For example, the nonsecure URL of the Microsoft Dynamics NAV Web client could be

http://mywebclient:8080/DynamicsNAV90/WebClient

The secure URL could be

https://MyWebclient:443/DynamicsNAV90/WebClient

If a user types

http://MyWebclient:8080/DynamicsNAV90/WebClient,

the browser automatically redirects to

https://MyWebclient:443/DynamicsNAV90/WebClient


There are different ways to redirect HTTP requests to HTTPS.

The following procedure describes how to redirect HTTP requests to HTTPS by installing the Microsoft Application Request Routing for IIS 7 and modifying the web.config file for the Microsoft Dynamics NAV Web client.

To redirect HTTP to HTTPS

The web.config file is located in the physical path of the web application on IIS. By default, the path is

%systemroot%\inetpub\wwwroot\[VirtualDirectoryName]\WebClient.

For example, the folder for the default Microsoft Dynamics NAV Web client application is

%systemroot%\inetpub\wwwroot\DynamicsNAV90\WebClient.

  • In the <system.webServer> element, add the following elements.

<rewrite>

<rules>

<rule name=”Redirect to HTTPS”>

<match url=”(.*)” />

<conditions>

<add input=”{HTTPS}” pattern=”off” ignoreCase=”true” />

</conditions>

<action type=”Redirect” url=”https://{SERVER_NAME}/{R:1}” redirectType=”SeeOther” />

</rule>

</rules>

</rewrite>


  • Save the web.config file.


Corfu Navision 2016, Development Tips, How To, Information, Instalation & Configuration

Configuring SQL Server Authentication in Microsoft Dynamics NAV 2016 – Part-3

To configure SQL Authentication on Microsoft NAV Server Instance using Microsoft Dynamics NAV 2016 Administration Shell

  • If you are modifying an existing Microsoft Dynamics NAV Server instance, run the Set-NAVServerConfiguration cmdlet.

Syntax & Parameter explaination:

Set-NAVServerConfiguration (cmdlet)

-KeyName <String>

(The configuration key name. Examine the CustomSettings.config file to determine the correct key name.)

[-Element <String> ]

(Specifies the navigation path from the root element to the appSettings section of the configuration document.)

[-ServerInstance] <String>

(Specifies the name of a Microsoft Dynamics NAV Server instance. The default instance name is DynamicsNAV90. You can specify either the full name of an instance such as MicrosoftDynamicsNavServer$myinstance or the short name such as myinstance.)

-DatabaseCredentials <PSCredential>

(The user name and password of the login account that the Microsoft Dynamics NAV Server instance will use to connect to the Microsoft Dynamics NAV database in SQL Server. This parameter configures the Microsoft Dynamics NAV Server instance to use SQL Server Authentication instead of Windows Authentication on the connection to the database. The login account must be a member of the db_owner role on the database.)

[-Force] (Forces the command to run without asking for user confirmation.)

[-KeyValue <String> ] (The configuration key value.)

[-Confirm] (Prompts you for confirmation before running the cmdlet.)

[-WhatIf] [ <CommonParameters>]

Use the DatabaseCredentials parameter to provide the login credentials of the database user that you want to use to access the application database.

Example:

C:\PS>Set-NAVServerConfiguration MyInstance -KeyName DatabaseServer -KeyValue DatabaseServer.Domain.Com

  • If you are creating a new Microsoft Dynamics NAV Server instance, run the New-NAVServerInstance cmdlet.

Syntax & Parameter explaination:

New-NAVServerInstance

[-ServerInstance] <String>

(Specifies the name of the Microsoft Dynamics NAV Server instance. The default instance name isDynamicsNAV90. You can specify either the full name of an instance, such as MicrosoftDynamicsNavServer$DynamicsNAV90, or the short name, such as DynamicsNAV90. You must use single-quotes around the instance name.)

-ManagementServicesPort <ServicePort>

(Specifies the TCP port that is used to manage the Microsoft Dynamics NAV Server instance. The Management Services port has no exceptions in the firewall, and will only be accessed from the local computer. The port is used by Windows PowerShell for access Microsoft Dynamics NAV Server management data.)

[-ClientServicesCredentialType <String> ]

(The type of client credential used for client authentication.Possible values are: Windows, Username, NavUserPassword and AccessControlService.)

[-ClientServicesPort <ServicePort> ]

(Specifies the listening TCP port for clients such as Microsoft Dynamics NAV Windows client and Microsoft Dynamics NAV Web client.)

[-DatabaseCredentials <PSCredential> ]

(The user name and password of the login account that the Microsoft Dynamics NAV Server instance will use to connect to the Microsoft Dynamics NAV database in SQL Server. This parameter configures the Microsoft Dynamics NAV Server instance to use SQL Server Authentication instead of Windows Authentication on the connection to the database. If the Microsoft Dynamics NAV Server instance is configured for multitenancy, then parameter configure SQL Authentication on the connection to the application database, not the tenant database. The login account must be a member of the db_owner role on the database.)

[-DatabaseInstance <DatabaseInstance> ]

(Specifies the SQL Server instance on which the Microsoft Dynamics NAV database is installed.)

[-DatabaseName <DatabaseName> ]

(Specifies the name of the Microsoft Dynamics NAV database.)

[-DatabaseServer <DatabaseServer> ]

(Specifies the name of the computer on which the SQL Server instance for the Microsoft Dynamics NAV database is installed.)

[-Force] (Forces the command to run without asking for user confirmation.)

[-Multitenant]

(Specifies the Microsoft Dynamics NAV Server instance to be a multitenant instance.)

[-ODataServicesPort <ServicePort> ]

(Specifies the listening HTTP port for Microsoft Dynamics NAV OData web services.)

[-ServiceAccount <ServiceAccount> ]

(Specifies the Windows-based computer account that the Microsoft Dynamics NAV Server instance must use to log on. The default value is NT AUTHORITY\NETWORK SERVICE. Only NetworkService and User values are supported. This parameter accepts values from the enum System.ServiceProcess.ServiceAccount.)

[-ServiceAccountCredential <PSCredential> ]

(Specifies a set of security credentials that you must use when configuring the service account.)

[-ServicesCertificateThumbprint <ClientServicesCertificateThumbprint> ]

(Specifies the certificate thumbprint for the x509 certificate that is going to be used for securing communication with the server. The certificate must be stored in the local machine store and in the personal sub-store in the certificate store. The private key of the certificate must be present and exchangeable. The certificate must be in .pfx format, not .cer format. The certificate can be either self-signed or issued by a trusted certification authority (CA).

When specifying a ServicesCertificateThumbprint, SOAP web services and OData web services become HTTPS.)

[-SOAPServicesPort <ServicePort> ]

(Specifies the listening HTTP port for Microsoft Dynamics NAV SOAP web services.)

[-Confirm] (Prompts you for confirmation before running the cmdlet.)

[-WhatIf] [ <CommonParameters>]

Use the DatabaseCredentials parameter to provide the login credentials of the database user that you want to use to access the application database.

Examples:

C:\PS>New-NAVServerInstance NewInstance -ManagementServicesPort 8099 -ClientServicesPort 8100 -SOAPServicesPort 8101 -ODataServicesPort 8102 –verbose

C:\PS>Get-Credential | New-NAVServerInstance NewInstance -ServiceAccount User -ManagementServicesPort 8099 -ClientServicesPort 8100 -SOAPServicesPort 8101 -ODataServicesPort 8102 –verbose


For Multitenant Environment

  1. Configure SQL Server Authentication with the application database as above.
  2. To configure SQL Authentication with the tenant database, run the Mount-NAVTenant

Syntax & Parameter explaination:

Mount-NAVTenant

[-AlternateId] <System.Collections.ObjectModel.ReadOnlyCollection[string]>

(Specifies the alternative IDs for the tenant, such as host names for the Microsoft Dynamics NAV Web client, SOAP web services, OData web services, or the Microsoft Dynamics NAV Windows client.

If you use alternative IDs for tenant resolution in the Microsoft Dynamics NAV Web client, you must also enable some of the UrlRewrite rules in the Web.Config file for the Microsoft Dynamics NAV Web Server components.)

[-AzureKeyVaultSettings] <Microsoft.Dynamics.Nav.Types.AzureKeyVaultSettings>

(Specifies the Azure key vault settings. This parameter is available only if the EncryptionProvider is set to AzureKeyVault.)

[-ServerInstance] <String>

(Specifies the Microsoft Dynamics NAV Server instance that you want to mount the tenant against, such as DynamicsNAV90. You can specify either the fully qualified name, such as ‘MyServer$DynamicsNAV90’, or the short name, such as ‘DynamicsNAV90’.)

[-DatabaseInstance] <System.String>

(Specifies the name of the SQL Server instance that hosts the database. You can also specify the instance in the DatabaseServer parameter, such as MyServer\MyInstance.)

[-DatabaseName] <System.String>

(Specifies the name of the Microsoft Dynamics NAV database that you want to mount against the Microsoft Dynamics NAV Server instance, such as ‘Demo Database NAV (9-0)’.)

[-DatabaseServer] <System.String>

(Specifies the name of the database server that hosts the Microsoft Dynamics NAV database that you want to mount against the Microsoft Dynamics NAV Server instance.)

[-DefaultCompany] <System.String>

(Specifies the name of the company that NAS services, OData web services, and SOAP web services use if no other company is specified.)

[-DefaultTimeZone] <System.TimeZoneInfo>

(Specifies the default time zone that is used by the NAS services, OData web services, and SOAP web services for this tenant.

You can set the parameter to UTC, ‘Server Time Zone’, or the ID of a Windows Time Zone.

UTC specifies that all business logic for services on the server instance runs in Coordinated Universal Time (UTC).

‘Server Time Zone’ specifies that services use the time zone of the computer that is running Microsoft Dynamics NAV Server instance.

ID of a Windows Time Zone specifies that services use a Windows time zone as defined in the system registry under HKEY_LOCAL_MACHINE\SOFTWARE\Microsoft\Windows NT\CurrentVersion\Time Zones. For example, Romance Standard Time is a valid Windows time zone value.

If this parameter is not specified, the value is taken from the ServicesDefaultTimeZone setting in the CustomSetting.config file for the Microsoft Dynamics NAV Server instance.)

[-NasServicesEnabled]

(Specifies to enable NAS services on the tenant. The default value is false.)

[-RunNasWithAdminRights]

(Specifies the NAS services to run with administrator rights. This grants the NAS service the same permissions as the SUPER permission set in Microsoft Dynamics NAV without having to add the Microsoft Dynamics NAV Server service account as a user. The default is false.)

[[-ApplicationDatabaseCredentials] <PSCredential> ]

(Specifies the user name and password of the login account that the Microsoft Dynamics NAV Server instance will use to access the application database in SQL Server. This parameter configures the Microsoft Dynamics NAV Server instance to use SQL Server Authentication instead of Windows Authentication on the connection to the application database.

The login account must be a member of the db_owner role on the database.

This parameter is only relevant when you set with the ApplicationDatabaseServer and ApplicationDatabaseName parameters )

[[-ApplicationDatabaseName] <System.String> ]

(Specifies the name of the application database to use with the tenant database.

This parameter is only relevant if the Microsoft Dynamics NAV Server instance is configured for multitenancy. This parameter, together with the ApplicationDatabaseServer parameter, enables you to mount a tenant to the same Microsoft Dynamics NAV Server instance as the application database without having to connect a running Microsoft Dynamics NAV Server instance.)

[[-ApplicationDatabaseServer] <System.String> ]

(Specifies the SQL Server name and instance, such as MyServer\MyInstance, that hosts the application database that you want to use with the tenant database,.

This parameter, together with the ApplicationDatabaseName parameter, enables you to mount a tenant to the same Microsoft Dynamics NAV Server instance as the application database without having to connect to a running Microsoft Dynamics NAV Server instance.)

[-AllowAppDatabaseWrite]

(Specifies if the tenant can write to the application database. The default value is false.)

[-DatabaseCredentials <PSCredential> ]

(Specifies the user name and password of the login account that the Microsoft Dynamics NAV Server instance will use to access the tenant database in SQL Server. This parameter configures the Microsoft Dynamics NAV Server instance to use SQL Server Authentication instead of Windows Authentication on the connection to the database.

The login account must be a member of the db_owner role on the database.)

[-EncryptionProvider <Microsoft.Dynamics.Nav.Types.EncryptionProvider> ]

(Specifies the name of the encryption provider.)

[-Force] (Forces the command to run without asking for user confirmation.)

[-OverwriteTenantIdInDatabase]

(Specifies if the Mount-NAVTenant cmdlet must overwrite the tenant ID in the database if the database has been mounted as a tenant earlier. If this is false, and the tenant database has previously been mounted with a different tenant ID, an exception is thrown.)

[-Confirm] (Prompts you for confirmation before running the cmdlet.)

[-WhatIf] [ <CommonParameters>]

Use the DatabaseCredentials parameter to provide the login credentials of the database user that you want to use to access the tenant database.

Examples:

PS C:\> Mount-NAVTenant DynamicsNAV90 -Id ‘Test’ -DatabaseName ‘Test_Database’

PS C:\> Mount-NAVTenant DynamicsNAV90 Test Test_Database

PS C:\> Mount-NAVTenant DynamicsNAV90 -Id ‘Test’ -DatabaseName ‘Test_Database’ -DatabaseCredentials (Get-Credential)

PS C:\> Get-NAVTenant Server1 | Mount-NAVTenant Server2

PS C:\> Get-NAVTenant Server1 | Dismount-NavTenant Server1 -Force | Mount-NAVTenant Server2

PS C:\> Mount-NAVTenant DynamicsNAV90 -Id ‘Test’ -DatabaseName ‘Test_Database’-AlternateId @( “test.mydomain.com”, “http://mydomain.sharepoint.com/sites/teamsite&#8221; )

PS C:\> Mount-NAVTenant -Id ‘Test’ -DatabaseName ‘Test_Database’ -DatabaseCredentials (Get-Credential) -ApplicationDatabaseServer ‘MySQLServer\NAV’ -ApplicationDatabaseName ‘MyNavAppDatabase’ -ApplicationDatabaseCredentials (Get-Credential) -KeyFilePath ‘C:\key\nav.key’ -KeyFilePassword (Get-Credential).Password

Corfu Navision 2016, Development Tips, How To, Information, Instalation & Configuration

Configuring SQL Server Authentication in Microsoft Dynamics NAV 2016 – Part-2

Recall from my previous post Configuring SQL Server Authentication in Microsoft Dynamics NAV 2016 – Part-1, action is almost similar with few small differences when dealing with Multitenant Deployment.
Configure SQL Server Authentication on Microsoft NAV Server Instance in a Multitenant Deployment
How to configure a Microsoft Dynamics NAV database to use SQL Server Authentication with a Microsoft Dynamics NAV Server instance.

To configure a SQL Server Authentication on a Microsoft Dynamics NAV Server instance, you set up the server instance with the login credentials (user name and password) for the user accounts for the application and tenant databases in SQL Server.

To configure SQL Authentication on Microsoft NAV Server Instance using Microsoft Dynamics NAV Server Administration tool

  • Open the Microsoft Dynamics NAV Server Administration tool.
  • In the console tree, which is the left pane, expand the node for the computer that contains the Microsoft Dynamics NAV Server instance, and then select the Microsoft Dynamics NAV Server instance.
  • Configure SQL Server Authentication with the application database as follows:
    • In the Actions pane, choose Database Credentials.
    • On the Database Credentials page, choose the Edit button.
    • Set the Database Authentication Mode to SQL Server Authentication.
    • In the Database User Name field, type the login name for the database user that you want to use to access the Microsoft Dynamics NAV application database in SQL Server.
    • In the Password field, type the login password for the database user that you want to use to access the Microsoft Dynamics NAV database in SQL Server.
    • Choose the Save button, and then on the Enable Encryption on SQL Server Connections dialog box, choose the OK button.

Encryption keys are used to help secure the login credentials over the connection between the Microsoft Dynamics NAV Server instance and the Microsoft Dynamics NAV database in SQL Server.

  • On the Information dialog box about encryption, choose the OK button.

This dialog box is to inform you to enable encryption on SQL Server connections, which is disabled by default.

  • If you want to enable encryption on SQL Server connections, in the Action pane, choose Configuration, and then choose the Edit button. In the Database tab, select Enable Encryption on SQL Connections, choose the Save button, and then the OK button.
  • To configure SQL Server Authentication with the tenant database, mount the tenant to the Microsoft Dynamics NAV Server instance and specify the login credentials (user name and password) for the database user that you want to use to access the Microsoft Dynamics NAV tenant database in SQL Server.

If the tenant is already mounted to the Microsoft Dynamics NAV Server instance, you must dismount the tenant, and mount it again.

Restart the server instance.

Corfu Navision 2016, Development Tips, How To, Information, Instalation & Configuration

Configuring SQL Server Authentication in Microsoft Dynamics NAV 2016 – Part-1

Microsoft Dynamics NAV 2016 supports SQL Server authentication between the Microsoft Dynamics NAV Server instance and the Microsoft Dynamics NAV database in SQL Server. Previously only Windows authentication was supported.

Set Up an Encryption Key

When using SQL Server authentication, Microsoft Dynamics NAV requires an encryption key to encrypt the credentials (user name and password) that the Microsoft Dynamics NAV Server instance uses to connect to the Microsoft Dynamics NAV database in SQL Server.

The encryption key must be installed on the computer where the Microsoft Dynamics NAV Server is installed and also in the database in SQL Server.

In a multitenant deployment, the encryption key must be installed in the application database.

To set up an encryption key, you can use one of the following methods:

  • You can create and import your own encryption key by using Microsoft Dynamics NAV 2016 Administration Shell cmdlets.
  • If you are configuring SQL Server authentication on a Microsoft Dynamics NAV Server instance for the first time, you can use the Microsoft Dynamics NAV Server Administration tool which can automatically create and install a system encryption key. If you decide to use this method, no action is required.

To create and import encryption key

  • In the Microsoft Dynamics NAV 2016 Administration Shell, run the New-NAVEncryptionkey

Create an encryption key and stores it in a file in a specified path on the computer or network.

Syntax

New-NAVEncryptionKey [-KeyPath] <String> [-Force] [-Password <SecureString> ] [-Confirm] [-WhatIf] [ <CommonParameters>]

The New-NAVEncryptionKey cmdlet enables you to specify a destination file for the key and specify a password to protect the file.

This creates a file that contains an encryption key. If you already have an encryption key file, you can skip this step.

Example: New-NAVEncryptionKey  -KeyPath “C:\UserData\SQLKey\MySQLKey” -Password (Get-Credential).Password

SQLServerAuthentication1

  • Run the Import-NAVEncryptionkey cmdlet to install the encryption key on the Microsoft Dynamics NAV Server instance and database.

Imports an encryption key from a file to a Microsoft Dynamics NAV Server instance and database in SQL Server.

Syntax

Import-NAVEncryptionKey [[-ServerInstance] <String> ] [-KeyPath] <String> -ApplicationDatabaseName <String> -ApplicationDatabaseServer <String> [-ApplicationDatabaseCredentials <PSCredential> ] [-Force] [-Password <SecureString> ] [-Confirm] [-WhatIf] [ <CommonParameters>]

Example: Import-NAVEncryptionKey -ServerInstance ‘DynamicsNAV90’ -KeyPath “C:\UserData\SQLKey\MySQLKey.key” -ApplicationDatabaseServer ‘INDEL-AXT5283VM’ -ApplicationDatabaseName ‘Demo Database NAV (9-0)’ -Password (Get-Credential).Password

SQLServerAuthentication2

You cannot import an encryption key on the Microsoft Dynamics NAV Server instance if an encryption key file already exists. You must first delete the encryption key from the computer where Microsoft Dynamics NAV Server is installed.

By default, encryption keys are stored in the C:\ProgramData\Microsoft\Microsoft Dynamics NAV\90\Server\Keys folder.

Configure SQL Authentication on the Database

This section describes how to configure a Microsoft Dynamics NAV database to use SQL Server Authentication with a Microsoft Dynamics NAV Server instance. You can complete the steps in this procedure by using SQL Server Management Studio or Transact-SQL.

Important : In a deployment where the Microsoft Dynamics NAV Server instance is configured as a multitenant server instance, you must complete the following procedure on the application database and tenant database.

To configure SQL Server Authentication on the database in SQL Server

  • Configure the SQL Server instance (Database Engine) that hosts the Microsoft Dynamics NAV database to use SQL Server Authentication.

To use SQL Server authentication, you configure the database instance to mixed authentication mode (SQL Server and Windows Authentication).

In the SQL Server instance, create a login that uses SQL Server authentication.
SQLServerAuthentication3

  • Map the login to a user in the Microsoft Dynamics NAV database, and add the user to the db_owner role of the Microsoft Dynamics NAV database.

SQLServerAuthentication4
Configure SQL Server Authentication on Microsoft NAV Server Instance (Non-Multitenant)
You configure the Microsoft Dynamics NAV Server instance with the login credentials (user name and password) of the user account in the Microsoft Dynamics NAV database in SQL Server that you want to use for authentication. You can do this using the Microsoft Dynamics NAV Server Administration tool or Microsoft Dynamics NAV 2016 Administration Shell.
To configure SQL Authentication on Microsoft NAV Server Instance using Microsoft Dynamics NAV Server Administration tool

  • Open the Microsoft Dynamics NAV Server Administration tool.
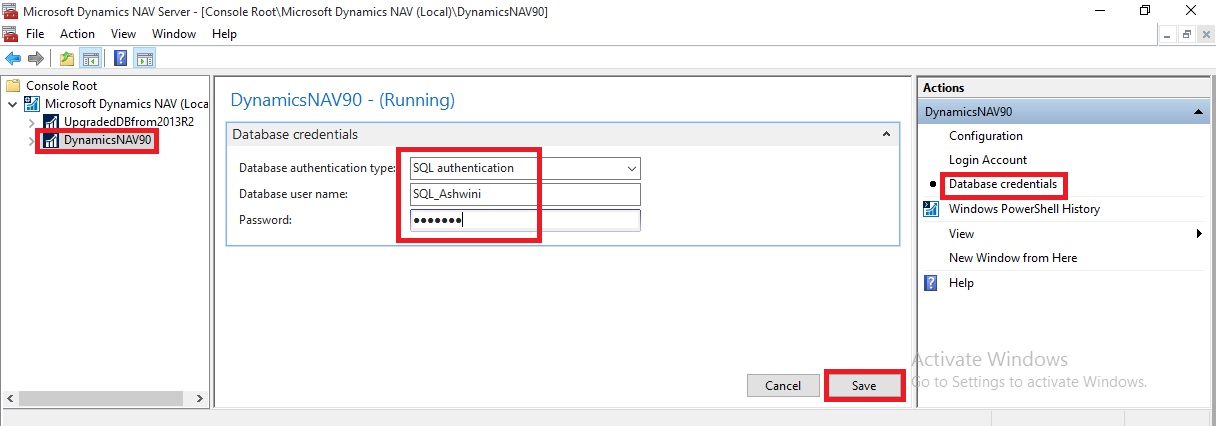
  • In the Actions pane, choose Database Credentials.
  • Set the Database Authentication Type to SQL Authentication.
  • In the Database User Name field, type the login name for the database user that you want to use to access the Microsoft Dynamics NAV database in SQL Server.

In the Password field, type the login password for the database user that you want to use to access the Microsoft Dynamics NAV database in SQL Server.
SQLServerAuthentication5

  • Choose the Save button, and then on the Enable Encryption on SQL Server Connections dialog box, choose the OK button.

SQLServerAuthentication6

Encryption keys are used to help secure the login credentials over the connection between the Microsoft Dynamics NAV Server instance and the Microsoft Dynamics NAV database in SQL Server.

  • On the Information dialog box about encryption, choose the OK button.

This dialog box is to inform you to enable encryption on SQL Server connections, which is disabled by default.
SQLServerAuthentication7

  • If you want to enable encryption on SQL Server connections, in the Action pane, choose Configuration, and then choose the Edit button. In the Database tab, select Enable Encryption on SQL Connections, choose the Save button, and then the OK button.

SQLServerAuthentication8

  • Restart the server instance.

Checkout my upcoming posts for more details on this.

Development Tips, Excel, Instalation & Configuration, Jet Reports, Office Integration, Report

Configuring a Data Source in Jet Express

Select Data Source Settings from the Jet Ribbon

Use the Data Source Version drop down button and select “Dynamics NAV 2013 and later”.

JetExcel-6

Select the Web Service Tab

  • Enter the Server, SOAP Services Port and Instance.
  • If your Web Service is configured to use SSL encryption then check the “Use SSL encryption” box.
  • Pick the Jet_Data_Source codeunit.
  • Pick your default Company.
  • Click Test Connection to ensure connectivity.
  • Click OK.

JetExcel-7
Checkout Upcoming posts for more information.

Development Tips

Configuring Web Services to Use SSL (SOAP and OData)

Secure Sockets Layer (SSL) is a cryptographic protocol that helps provide security and data integrity for data communications over a network.

By encrypting your Microsoft Dynamics NAV web services using SSL, you make your data and the network more secure and more reliable.

Microsoft Dynamics NAV Web Services and SSL

Microsoft Dynamics NAV supports SSL authentication for SOAP and OData web services.

The server authenticates itself to the client, but the client does not authenticate itself to the server.

When the web service client connects to the Microsoft Dynamics NAV Server instance, the server replies by sending its digital certificate to the client. This certificate contains the server’s public encryption key and the name of the authority that granted the certificate. The client verifies the certificate using the authority’s public key.

We have covered above top related to Creating and Implementing Certificates for Microsoft Dynamics NAV Server. If not seen please follow below links for better understanding:

How to create a root CA and a private key file by using the makecert.exe utility

How to create certificate revocation list for the root certification authority

How to create and install a test certificate for the Microsoft Dynamics NAV Server computer

How to grant access to the certificate’s private key to the service account for the Microsoft Dynamics NAV Server

Implementing Security Certificates.

Configuring Microsoft Dynamics NAV Web Services to Use SSL

The first step is to prepare Microsoft Dynamics NAV to use SSL. This involves configuring the relevant Microsoft Dynamics NAV Server instance to specify SSL.

The following procedure uses Microsoft Dynamics NAV Server Administration tool to configure the Microsoft Dynamics NAV Server instance.

  • Choose the Start button, and in the Search programs and files box, type Microsoft Dynamics NAV Administration, and then choose the related link.
  • In Microsoft Dynamics NAV Server Administration tool, in the left pane, under Console Root, expand the node for the Microsoft Dynamics NAV Server computer. This is typically named Microsoft Dynamics NAV (Local), which is the local computer.

The Microsoft Dynamics NAV Server instances on the computer appear in the left pane and center panes.

In the left pane, choose the relevant instance to display settings for that instance in the center pane.

UseSSL-1

  • At the bottom of the center pane, choose Edit.
  • To configure SOAP web services to use SSL, expand the SOAP Web Services tab, and then select the Enable SSL

Make a note of the port that is used by SOAP web services. You will need the port number later on in this walkthrough.

UseSSL-2

  • To configure OData web services to use SSL, expand the OData Web Services tab, and then select the Enable SSL

Make a note of the port that is used by OData web services. You will need the port number later on in this walkthrough
UseSSL-3

  • Choose Save at the bottom of the center pane.
  • In the right pane, under Actions, choose Login Account.
  • Make a note of the service account information. You will need this information later on in this walkthrough.

UseSSL-4

Configuring the Access Control List and the Web Services Ports for SSL

An access control list (ACL) is part of the Windows security infrastructure and features. The ACL controls who can access resources on a computer.

Note

These procedures use the netsh tool (netsh.exe) for configuring the HTTP server. The netsh tool is supplied with Windows 7 and Windows Server 2008.

By default the netsh tool is located in the c:\Windows\System32 folder.

To configure the ACL

  1. On the computer running Microsoft Dynamics NAV Server, open a command prompt as an administrator as follows:
    1. From the Start menu, choose All Programs, and then choose Accessories.
    2. Right-click Command Prompt, and then choose Run as administrator.
  1. At the command prompt, type the following command to change to the Windows\System32 directory.

cd\Windows\System32

  1. To view the ACL for the web services ports to determine if any entries are already using the relevant host name and port, type the following command:

netsh http show urlacl

  1. Each entry is listed by the Reserved URL field, which has the format http://hostname:port. hostname is the name of the computer running the service and port is the port number the service runs on. A ‘+’ (plus sign) in the Reserved URL field represents localhost, which indicates the computer that you are working on.
  2. By default, SOAP and OData web services in Microsoft Dynamics NAV use ports 7047 and 7048, respectively, and connect to a Microsoft Dynamics NAV Server instance named DynamicsNAV80. The default reserved URL entries for these services are: http://+:7047/DynamicsNAV80/ and http://+:7048/DynamicsNAV80/.
  3. You must delete any entries that use the same port as the SOAP or OData web services.

To delete an entry, type the following command:

netsh http delete urlacl url=http://hostname:Port/NAVserver/

Substitute Port with the port number of the SOAP or OData web service and NAVserver with the name of the Microsoft Dynamics NAV Server instance.

For example, to delete the default entries for SOAP and OData, use the following two commands:

netsh http delete urlacl url=http://+:7047/DynamicsNAV80/

netsh http delete urlacl url=http://+:7048/DynamicsNAV80/

  1. To register the ports for the SOAP and OData web service with https, type the following command for each service:

netsh http add urlacl url=https://hostname:port/navserver user=DOMAIN\user

  1. Substitute the following options with the proper values:
Option Description
hostname The name of the computer running Microsoft Dynamics NAV Server. Use + for localhost.
port The port that is used by the web service.
navserver The name of the Microsoft Dynamics NAV Server instance to use with the web service. The default is DynamicsNAV80.
DOMAIN\username The domain and user name of the service account for Microsoft Dynamics NAV Server. If the service account for Microsoft Dynamics NAV Server is Network Service, then use “NT AUTHORITY\NETWORK SERVICE”.
  1. For example, if the service account for Microsoft Dynamics NAV Server has the domain ABC and the user name xyz, and then the command for the SOAP web service is as follows:

netsh http add urlacl url=https://+:7047/DynamicsNAV80 user=”NT AUTHORITY\NETWORK SERVICE”

  1. If the service account for Microsoft Dynamics NAV Server is Network Service, then the command is as follows:

netsh http add urlacl url=https://+:7047/DynamicsNAV80 user=”NT AUTHORITY\NETWORK SERVICE”

  1. To verify that your port has been registered, repeat step 3.

To configure the port to use the SSL certificate

  1. At the command prompt, type the following command to view the current port configurations:

netsh http show sslcert

  1. All port bindings to SSL certificates are listed. Each entry is indicated by the IP:port field, where IP is the IP address that uses the port (0.0.0.0 indicates all IP addresses) and port is the port number.
  2. If SSL is already configured on the address and port that you want to use for SOAP or OData web services, then use the following command to delete the entry:

netsh http delete ssl ipport=ipaddress:port

  1. Substitute ipaddress and port with the IP address and port number of the entry that you want to delete.
  2. For example, to delete the entry on the default SOAP port, use the following command:

netsh http delete ssl ipport=0.0.0.0:7047

  1. To bind an SSL certificate to the SOAP or OData web service port, use the following command:

netsh http add sslcert ipport=ipaddress:port certhash=thumbprint appid={id}

  1. Substitute the following options with the proper values:
Option Description
ipaddress The IP address that can use the web service. Use 0.0.0.0 to include all IP addresses.
port The port that is used by the web service.
thumbprint The certificate thumbprint that you obtained in previous post.
id A 32-digit hexadecimal number that identifies the Microsoft Dynamics NAV application. The id must be in the format {NNNNNNNN-NNNN-NNNN-NNNN-NNNNNNNNNNNN). If you do not know the appid, then use any value, such as {00112233-4455-6677-8899-AABBCCDDEEFF}.
  1. For example, the following command binds a certificate that has the thumbprint c0d0f27095b03d4317e219841024328cef248779 to port 7047 for all IP addresses:

netsh http add sslcert ipport=0.0.0.0:7047 certhash=c0d0f27095b03d4317e219841024328cef248779 appid={00112233-4455-6677-8899-AABBCCDDEEFF}

Imp Note: – Please replace the port and thumbprint values with your valid values.

Restart the Microsoft Dynamics NAV Server Instance

You can use the Microsoft Dynamics NAV Server Administration Tool to restart the Microsoft Dynamics NAV Server instance.

To restart Microsoft Dynamics NAV Server

  1. In Microsoft Dynamics NAV Server Administration tool, in the left pane, under Console Root, choose the Microsoft Dynamics NAV Server computer.
  2. In the center pane, choose the Microsoft Dynamics NAV Server instance that you have configured, and then in the right pane under Actions, choose Restart.
  3. After the instance restarts, close Microsoft Dynamics NAV Server Administration tool.

Verifying the Configuration

You should now be able to use web services that are encrypted with SSL. To verify this, type the following URL in the address bar for your browser.

https://localhost:7047/DynamicsNAV80/WS/services

The page lists any web services that have been published.