
Tag: Azure

Creating Azure Functions to generate QR Code
This is second post in this series, if you wish to see previous post, you can access here.
Today in this post I will discuss about first part, how to create Azure Functions.
Before we start, you need some installation to support creating Azure Functions. Use below Links to download & install these packages on the system, where you wish to write, compile & test the Azure functions.
Installation Links:
https://docs.npmjs.com/downloading-and-installing-node-js-and-npm
https://nodejs.org/en/download/
https://dotnet.microsoft.com/download/dotnet/thank-you/sdk-3.1.414-windows-x64-installer
Obviously, you must have an active Azure subscription, to create an Azure Functions App. If you don’t have, you can create an account that gives you a credit to explore Microsoft Azure for 30 days.
Head to Azure portal and sign in with your account.

Create New Function App.

Select your Azure subscription and a resource group or create a new one. Provide a name for your function app. This name will be the prefix for the URL.

You can select the .NET Core runtime and the region that matches your location. Select the Review + create button.
Now, you can create new functions. A function app can contain multiple functions. Each function will be available on:
Before you start to create Function, you need to Install dependencies:
- You should install Visual Studio Code
- You should also install Node.JS
- Run the following command to install the Core Tools package:
npm install -g azure-functions-core-tools@3 –unsafe-perm true
- Next, install the Azure Functions extension for Visual Studio Code.
- Click on the Azure logo in the Activity Bar. Under Azure: Functions, click Sign in to Azure… and follow the on-screen instructions.
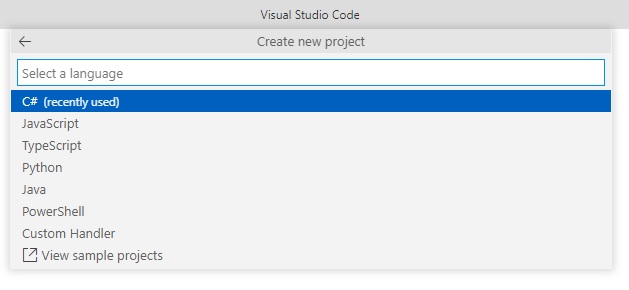
Create an Azure Functions project
Click the Create New Project… icon in the Azure: Functions panel.

You will be prompted to choose a directory for your app. Choose an empty directory.

You will then be prompted to select a language for your project. Choose dotnet.


Create a function
If you skipped to provide details, for Functions in above process, you can still initiate later.
Click the Create Function… icon in the Azure: Functions panel.

You will be prompted to choose a template for your function. Select HTTP trigger for getting started.
Screens will be same as shown in above process.
Sample project will be created
As per the information provided by you, in above screens.
KSDQRGenerator.cs auto generated file code will be as below:
using System;
using System.IO;
using System.Threading.Tasks;
using Microsoft.AspNetCore.Mvc;
using Microsoft.Azure.WebJobs;
using Microsoft.Azure.WebJobs.Extensions.Http;
using Microsoft.AspNetCore.Http;
using Microsoft.Extensions.Logging;
using Newtonsoft.Json;

namespace Company.Function
{
    public static class KSDQRGenerator
    {
        [FunctionName("KSDQRGenerator")]
        public static async Task<IActionResult> Run(
            [HttpTrigger(AuthorizationLevel.Anonymous, "get", "post", Route = null)] HttpRequest req,
            ILogger log)
        {
            log.LogInformation("C# HTTP trigger function processed a request.");

            string name = req.Query["name"];

            string requestBody = await new StreamReader(req.Body).ReadToEndAsync();
            dynamic data = JsonConvert.DeserializeObject(requestBody);
            name = name ?? data?.name;

            string responseMessage = string.IsNullOrEmpty(name)
                ? "This HTTP triggered function executed successfully. Pass a name in the query string or in the request body for a personalized response."
                : $"Hello, {name}. This HTTP triggered function executed successfully.";

            return new OkObjectResult(responseMessage);
        }
    }
}

Now you have the Http Template, we will make necessary changes as per our requirement.
In this example we will be using a library – QRCoder to generate the QR Code.
So first we have created a function with Http Trigger.
Made changes to the function as:
/*string name = req.Query["name"];

            string requestBody = await new StreamReader(req.Body).ReadToEndAsync();
            dynamic data = JsonConvert.DeserializeObject(requestBody);
            name = name ?? data?.name;

            string responseMessage = string.IsNullOrEmpty(name)
                ? "This HTTP triggered function executed successfully. Pass a name in the query string or in the request body for a personalized response."
                : $"Hello, {name}. This HTTP triggered function executed successfully.";

            return new OkObjectResult(responseMessage);*/
Replace this part as below code:
            string ReqData = req.Query["ReqData"];

            string requestBody = await new StreamReader(req.Body).ReadToEndAsync();
            dynamic data = JsonConvert.DeserializeObject(requestBody);
            ReqData = ReqData ?? data?.url;
            if (string.IsNullOrEmpty(ReqData))
            {
                return new BadRequestResult();
            }

            var generator = ReqData;
            var payload = generator.ToString();

            using (var qrGenerator = new QRCodeGenerator())
            {
                var qrCodeData = qrGenerator.CreateQrCode(payload, QRCodeGenerator.ECCLevel.Q);
                var qrCode = new PngByteQRCode(qrCodeData);
                var qrCodeAsPng = qrCode.GetGraphic(20);
                return new FileContentResult(qrCodeAsPng, "image/png");
            }
Final Code should look like this:

There are some errors, correct. Next step will resolve the same.
Next, we will add the QRCode nuget package to the dotnet core project using
dotnet add package QRCoder –version 1.4.1


Post completing the command execution, all errors are resolved.
Run your function project locally
Press F5 to run your function app.
The runtime will output a URL for any HTTP functions, which can be copied and run in your browser’s address bar.

Copy the URL of the function & Switch to browser:
In my case: http://localhost:7071/api/KSDQRGenerator?ReqData=Test

If you scan above QRCode, you will get ‘Test’ as we have passed this as a parameter (?ReqData=Test)
To stop debugging, press Shift + F5.
Deploy your code to Azure
Click the Deploy to Function App… () icon in the Azure: Functions panel.


Sign in to your Azure Account, if not done earlier. To test locally you need not to sign in to Azure. But at deployment is must.
When prompted to select a function app, choose KSDQRCodeGenerator (in my case), Function App Created on Azure portal in the starting of this blog post.


Confirm to deployment dialog.

On completion you will get the Live AZURE URL, use the URL in same way as for local, to pass parameter append at the end of URL as (?ReqData=Test)
Replace [Test] with the information for which you want to generate the QR Code.
That’s all for this post, but visit again to learn from upcoming posts in this series, will post soon.
See you again in next post, Till then keep exploring, learning and sharing with others.

QR Code Generator using Azure Functions & Integration with Business Central Cloud Version
Today in this post I will explain how and why you should consider create your own QR Code programmatically internally without the use of public available options.
Quick Response code, is a code that can be easily read by a device having camera attached. QR Codes are commonly used today across various industries.
In todays word hardly you will find any product which don’t have either Barcode or QR Code.
You may find many free QR Code generators available on the internet. It is very convenient to source and quickly generate QR Codes but using their services have areas of risks and concerns for organization to consider.
The potential security risks such as phishing, malware, Malicious website and data tracking few to list.
Solution to this could be organizations should prefer to find an enterprise paid service or to create their own. If any organization decides to build their own QR Code generator, then there are open-source QR Code libraries where they can rely on.
Now to build a full-fledged application will require to consider for all the typical application infrastructure considerations such as networking, security, monitoring, patching and the list keeps growing. There could be many considerations just to provide a simple service and is it worth? Another big fat questions.
Here comes the Azure Functions.
Microsoft Azure is a cloud computing service that is used for building, testing, deploying, and managing applications.
It provides
- software as a service (SaaS),
- platform as a service (PaaS), and
- infrastructure as a service (IaaS).
Azure Functions runs on the Microsoft Azure platform and is used to run small pieces of code, or functions, in the cloud.
With Azure Functions, you only need to focus on a specific function without worrying on the whole application or the infrastructure to run it. Additionally, Azure Functions lets you run your code in a serverless environment without creating a virtual machine or publish any web application.
For Azure functions, you can use development language of your choice, such as C#, F#, Node.js, or PHP.
Because Microsoft Azure is a service, no doubt you have to pay for it. Azure Functions has two types of pricing plans:
Consumption plan – Microsoft Azure provides all the necessary computational resources. Therefore, you don’t need to concentrate on resource management, and you only pay for the time that your code runs.
App service plan – With the app service plan, you can run your functions as you do other web and API applications on Azure. If you are already using app services for other applications, you can run Azure Functions on the same plan without additional costs.
Check for latest Plan online on Azure portal as and when you decide to use the service, or to grab a free trial account. You can list free services available to you if you have azure account using this link here.
Azure Functions Pricing you can check here and free grant per month.
Above links and further links from there will provide detailed information on everything you may require to go with Azure Functions.

Enough for introduction, what we are going to Explore in this series:
- Creating Azure Functions to generate QR Code & Sample Test of Azure Function
- Integrating Azure Function with Business Central
- Integrating with Business Central – using Web Service
- Testing of Extension functionality for QR Code Generation.
Anything else I decide to add more will update this post with links and other topics related to this series.
Make a book mark to this post, I will update the Links in above list as I complete my next post, and add more topics to the list, I further decide to include in this series.
Go through the above links to educate yourself, so that what I explain in upcoming posts, you better co-relate them.
That’s all for this post, but visit again to learn from upcoming posts in this series, will post soon.
See you again in next post, Till then keep exploring, learning and sharing with others.
Real-Time Dashboard Tile & Streaming Dataset– in Power BI
Power BI have introduced real-time dashboard tiles – a lightweight, simple way to get real-time data onto your dashboard. Real-time tiles can be created in minutes by pushing data to the Power BI REST APIs or from streams you’ve created in Azure Stream Analytics or PubNub, a popular real-time streaming service. Let’s see how we can do in no time.
Login to your Power BI using your credentials.
Go to your dashboard where you wish to add Real Time Streaming Tile, choose “Add a tile”

Select the “Custom streaming data” option
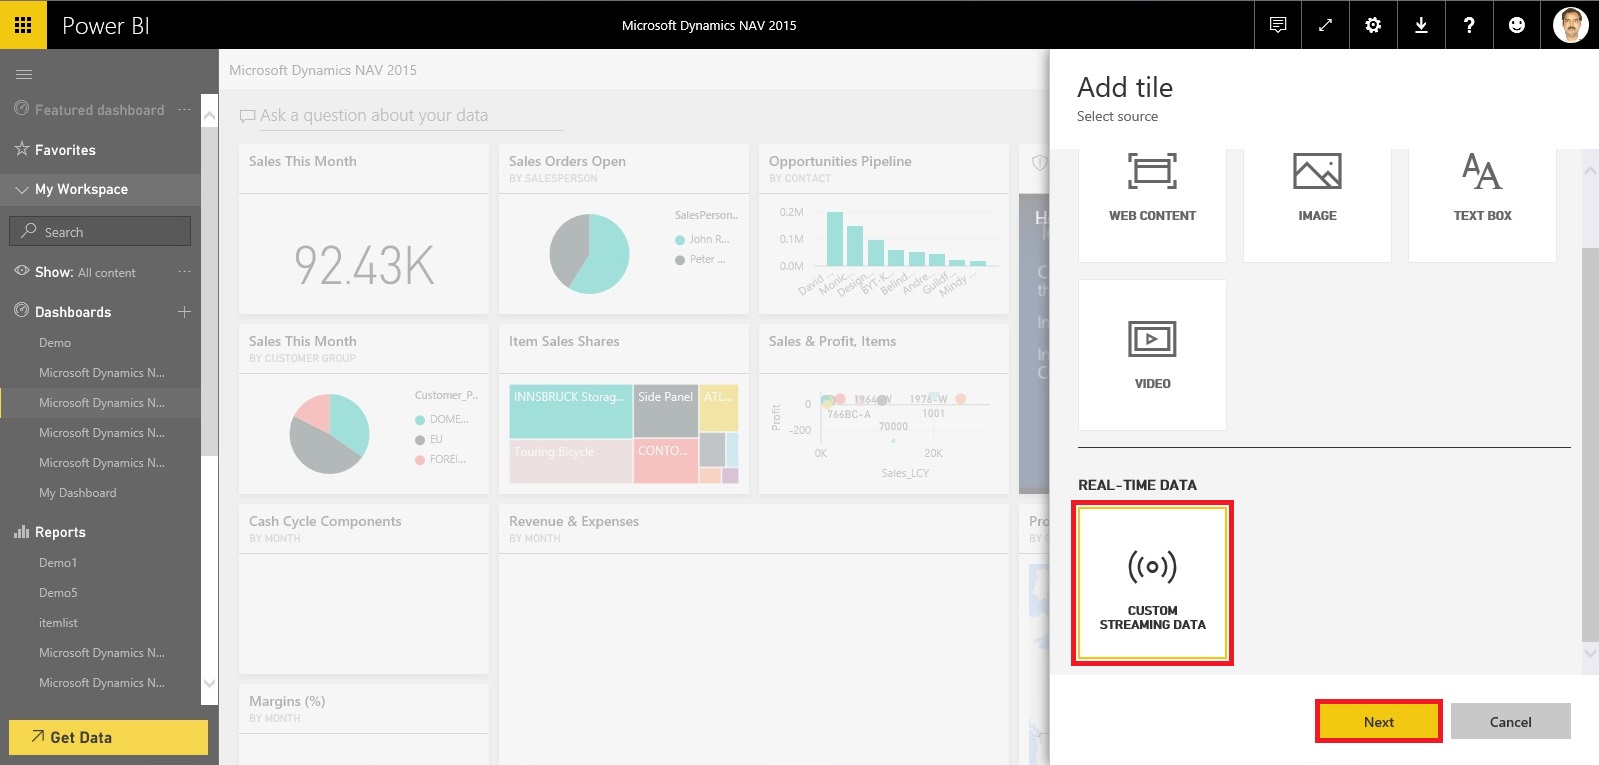
Click on Next.

At first usage you may not be having Streaming Dataset, if you have List will be shown.
Let’s create one for our Example, Click the link – Manage Data.

Click on Add Streaming Dataset.
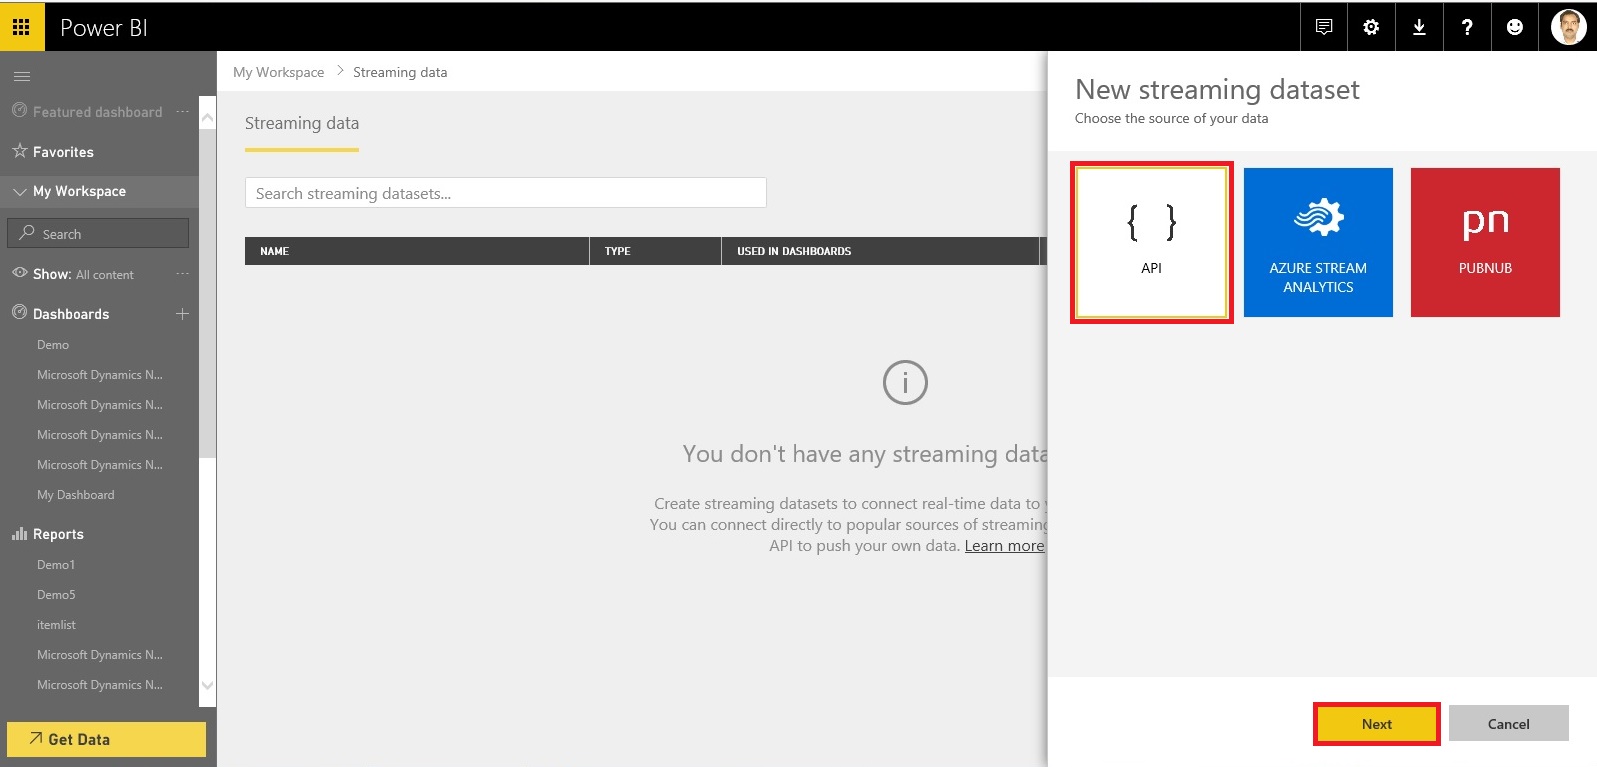
From New Streaming Dataset, Select API and click on Next.

Add your Dataset Name, Fields and Datatypes.
Once you are done, Click on Create.

Copy your Push URL, we will require this to push data to Data Stream.
Click On Done.

Returning to our Previous Step, Now we can see Streaming Dataset Available.
Select your Dataset and Click on Next.

Select the Type of Visualization you want, and Fields to display.
Click on Next.

Give Title, Subtitle to your Tile and click on Apply.

Bravo, you are done, your Tile will be added on your Dashboard.
But hold on, the Value will not come until you add logic to push data to the Tile.
Now we will move to our Next Step, where we will create a program to call Power BI REST API and push Streaming data to our Dashboard. Checkout my next post for same. [App for Power BI REST APIs for Streaming Data]
Till then keep Exploring & Learning. I will return soon with my next post.
Customers with Enterprise Agreement who already have SQL Server Licenses, can use them on Azure Virtual Machines
Now Microsoft Enterprise Agreement customers can bring existing licenses to run SQL Server on Azure Virtual Machines. Since the launch of Azure Virtual Machines, customers can already run SQL Server on Azure Virtual Machines through several existing SQL Server images available in the Azure Gallery, or bring their own images to Azure.
These images and capabilities will continue to be supported so customers can continue to take advantage of pay per use licensing for SQL Server on Azure Virtual Machines.
Starting this week, customers with Enterprise Agreement who already have SQL Server Licenses, can use them on Azure Virtual Machines with Microsoft-certified (BYOL) gallery images. These images will not charge for SQL Server licensing, just for compute cost.
For more details see the Link.
Creating Virtual Machine on Azure
Continuing from my previous post.
In previous post we saw how to register for Free Azure Portal Account, if you missed you can find the link here.
Today we will see how to create Virtual Machine for Dynamics Navision 2016 pre Loaded.
Lets start creating one for our future posts practice.
Open the page : https://azure.microsoft.com/en-us/free/ and follow onscreen Instruction to login to your account.
Login using the account credentials you used for registering on Azure Portal.
Upon signing you will be landed to your dashboard on Portal.
You can see we don’t have any resource on Portal yet.

Lets start creating one.
Click on New from Top right corner.
Choose Virtual Machine.
Enter “Microsoft Dynamics NAV 2016” in the search box, it will list available Virtual Machine images.
Select the one available Virtual Machine for commissioning.
I have choose this because we will get preinstalled NAV 2016 which will save our time.
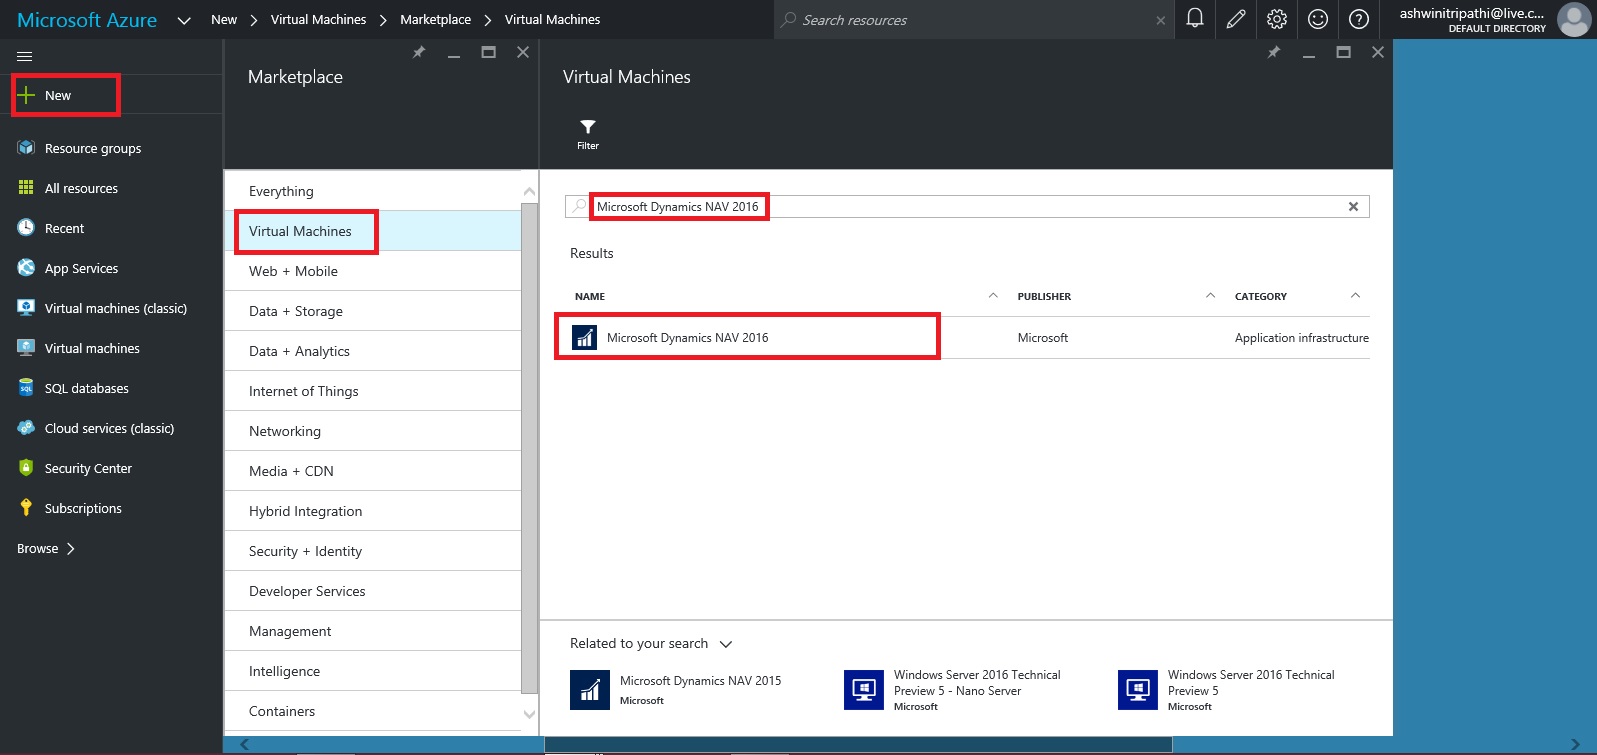
Select Deployment Model, I have choose Classic and click on Create.

Next we will enter Host Name, User Name, Password, other things you adjust as per your need. Click on Create.
Note your User Name & Password you will require this to login to the Server.

Give some time to get created and up your Server.
In the mean time you can explore other things till your Server is up and running for you.
Once it is made available, you can start login and explore your newly created Server.
Where to find my Server?
From the Navigation Bar choose Virtual Machine (classic).
It will list you all Virtual Machines created by you.
Select your Virtual Machine in my case it is NavDemo.
You can find the Server Name and IP of your Virtual Machine.
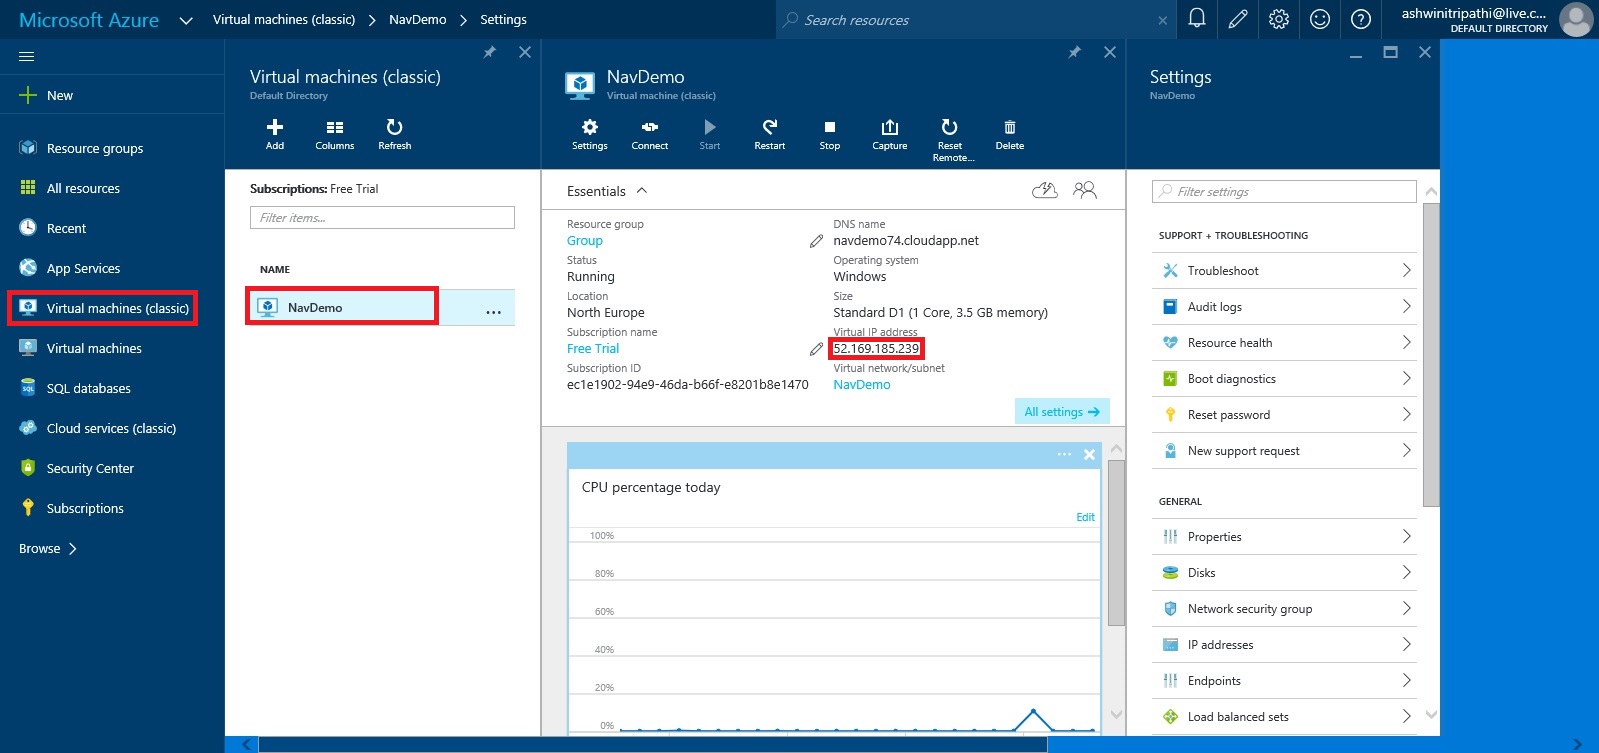
I am using my IP to login to my Server.
Open your Remote Desktop Connection and enter your IP.
The User Name & Password as we created in previous step.
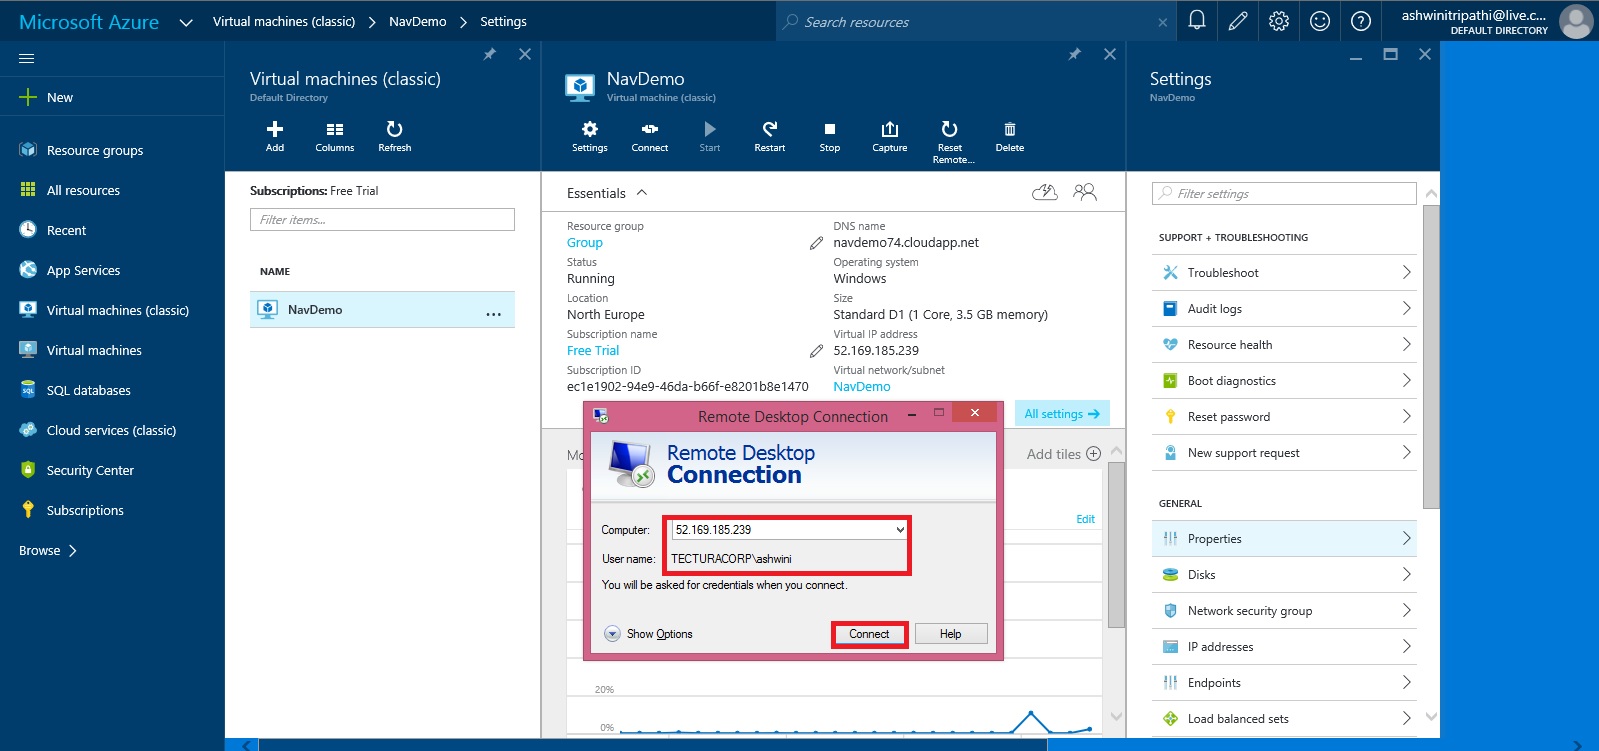
Here I am Login to my Server.
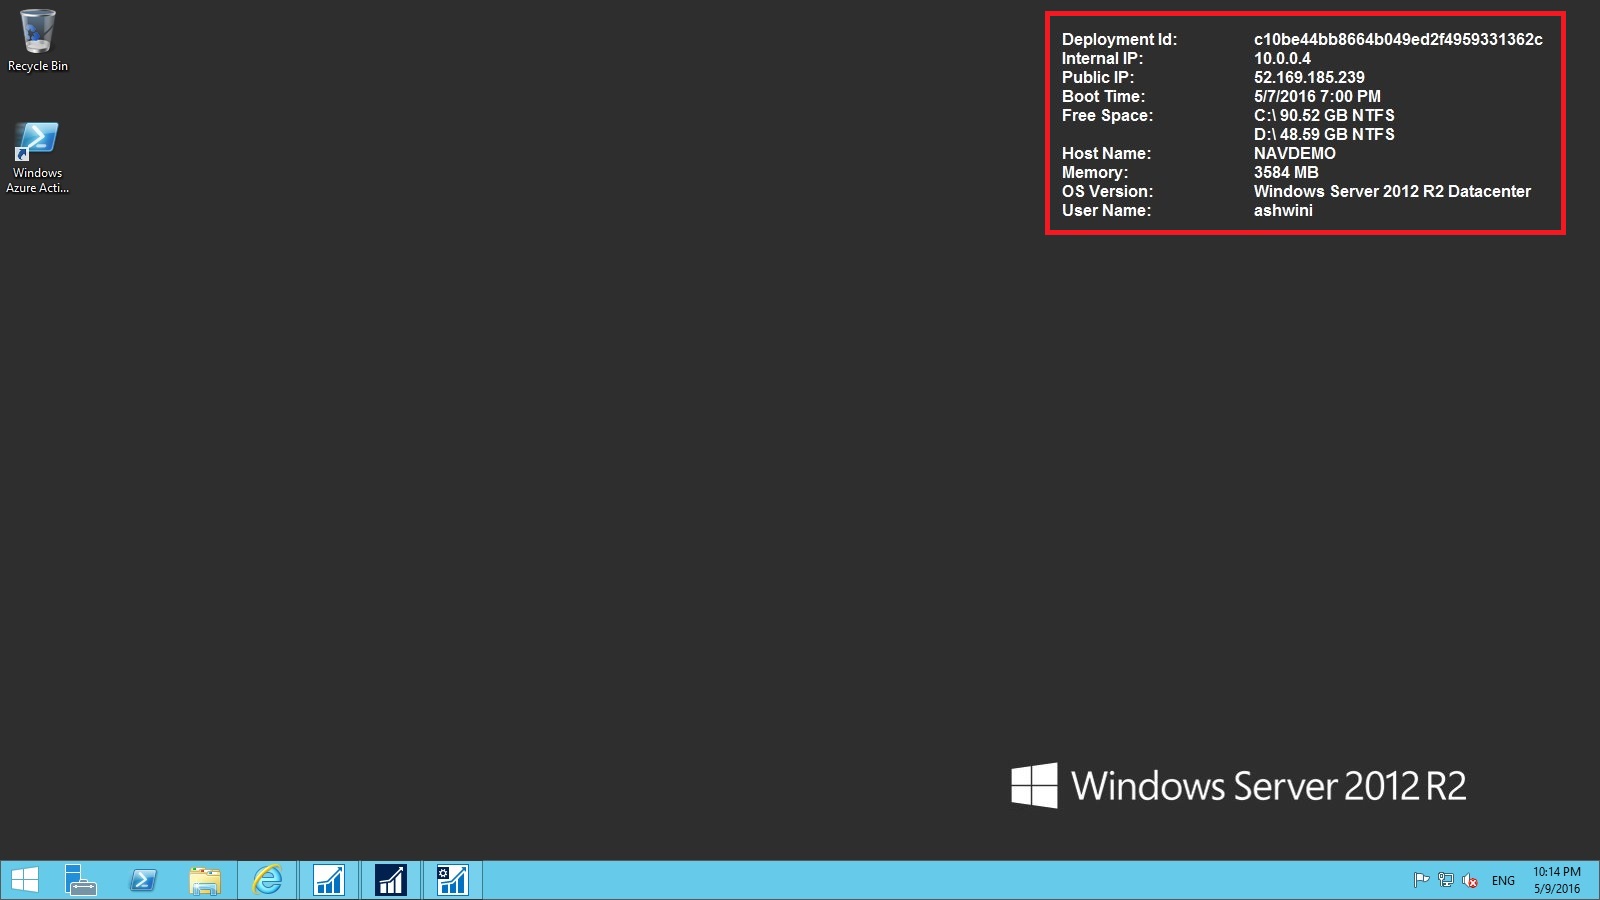
You can see that Dynamics NAV 2016 is already available with my Server.

That’s all for today, we will see more in my upcoming posts.
Till then keep exploring & Learning.
AZURE free Subscription

I will be going with few posts demonstrating the Navision in Azure environment.
To start with we will be required to subscribe to Azure first.
Open page:
https://azure.microsoft.com/en-us/free/
Click on Start now.

Enter your Mobile No to verify you phone no.
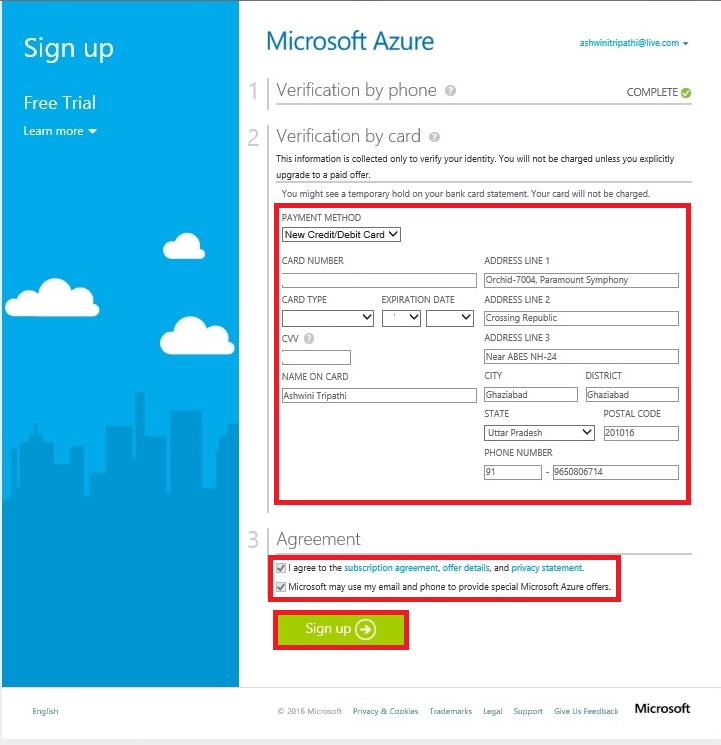
Next you will be required to verify your credit card.
Once both things are verified you can start with Sign up with the Azure Subscription.

Before you start with managing your services on Azure here presented few FAQ.
Few FAQ on Azure Subscription.
Why is my credit card being charged $1 for signing up for the Free Trial offer?
To ensure a valid credit card, Microsoft will charge your credit card $1 when signing up for the Free Trial Offer. This is only an authorization hold, the charge will be reversed within 3-5 business days.
What happens with the services I created after the 30-day trial period ends?
Once the trial period is over, if you have not upgraded to a Pay-As-You-Go Azure subscription, we will decommission your services, and you will not be able to use them anymore.
What do I get when I sign up for a Free Trial?
You receive a $200 credit to spend on Azure services during the trial. You can use this $200 however you want to create and try out any combination of Azure resources. It enables you to explore our cloud entirely for free.
Do I pay anything during the trial?
No – the trial is absolutely free.
Do I have to pay something at the end of the trial?
No – there is absolutely no obligation to buy anything at the end of the trial.
How do I know how much of the $200 I’ve used and how much I have left?
During the trial we display your remaining trial credits at the top of the management portal. You cannot miss it.
What happens if I exceed the $200 free trial credit?
If you exceed your $200 free credit, we will suspend your free trial account. You can optionally upgrade your trial to be a Pay-As-You-Go Azure subscription at this point if you want to continue using and paying for services. If not, don’t worry – you won’t be billed anything.
Please refer to updated FAQ on site at time of using, all information is true as on date of this post, anything can change. https://azure.microsoft.com/en-us/pricing/free-trial-faq/
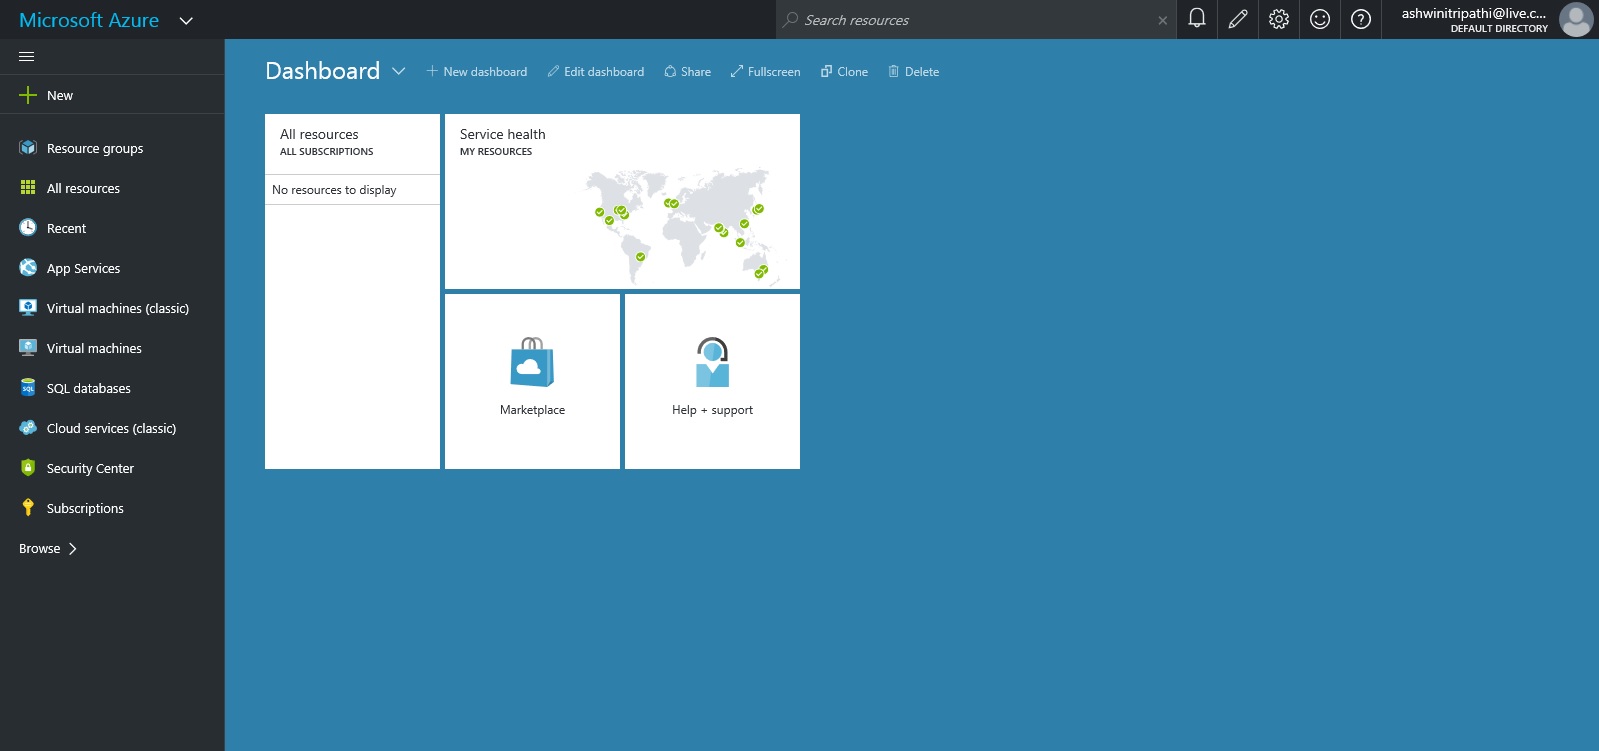
Click Start managing my subscription, you will land to your Dashboard.
Will come with next step in my upcoming post.

You must be logged in to post a comment.