
Tag: Web Services
Business Central – Basics

Integrating with Business Central – using Web Service
This is fourth post in this series, if you wish to see first post, you can access here.
In second post I discussed about, how to create Azure Functions, you can access here.
In previous post I discussed about, how to Integrate Azure Functions in Business Central, you can access here.
In this post we will discuss how to make available QR Image using API by exposing as Web Service.
Let’s cut the theoretical part and coming directly to the solution.
This post is very short and as an answer to query from one of the blog readers, who regularly gives feedback and suggest topic he wish from me. Sometime it is not possible to write post for every query, but I try to pick some which I find interesting. Converting any topic into post is quite time taking, solution can be of 10 mins but presenting same in form of blog takes 2-3 hours, sometimes even more.
Some time appropriate environment is not available where I can put the solution and take screenshots to present as blog.
Since this topic is part of current series, I am writing posts on, so I was able to easily pick this topic.
Requirement is to add capability to get QR Image we generated in our previous posts using Web Service/ API/ OData/ JSON Base64Text.
To get this working we will first create a Codeunit with appropriate methods and expose it as Web Service.
Step – 1.
Create Codeunit & Add below method.

Step – 2
Publish above Codeunit as Web Service.
Step – 3
Copy SOAP URL
[SOAP URL]
Convert to ODataV4 URL by making necessary modification as below:
[ODataV4 URL]
Similarly, your $metadata URL will be:
Run the metadata URL in browser:
Search for your function created above, you should get definition as below:
<Action Name=”QRCodeGenerator_GetQRSetImageAsJSON”>
<Parameter Name=”qRSetId” Type=”Edm.Int32″/>
<ReturnType Type=”Edm.String”/>
</Action>
Let’s test the above URL for function using Postman to see the result:

[POST] – https://api.businesscentral.dynamics.com/v2.0/1e4fc386-962e-4a20-8364-d5aeb65e2485/Test/ODataV4/QRCodeGenerator_GetQRSetImageAsJSON?Company=CRONUS USA, Inc.
Authorization: Basic Auth
Username: ASHWINI.TRIPATHI
Password: xjAtAtTaFhgXkgR4M5WoHapotvJNmqJ5//XBYK2v5s4= (Web Service Access Key)
JSON Parameter to Function: (Body raw:JSON)
{
“qRSetId” : “6”
}
Result Body:
{
“@odata.context”: “https://api.businesscentral.dynamics.com/v2.0/1e4fc386-962e-4a20-8364-d5aeb65e2485/Test/ODataV4/$metadata#Edm.String”,
“value”: “iVBORw0KGgoAAAANSUhEUgAAApQAAAKUAQMAAACAATp/AAAAAXNSR0IArs4c6QAAAARnQU1BAACxjwv8YQUAAAAGUExURQAAAP///6XZn90AAAAJcEhZcwAADsMAAA7DAcdvqGQAAAHtSURBVHja7dpbasMwEAXQ2YH3v0vvwKVBsZ44DZ4UWs58BEnMHH1eYjuO9NqZTCaTyWQymUwmk8lkMplMJpPJZDKZ/8KMsbb27Ls3St+2bmYymUwmM8Ws58N2b+FiXjQzmUwmk3nTLMN1qkPq6LqZyWQymczPmUdTwxVMJpPJZP6G+di0/7lqH5PJZDKZnzOnK7ZzW2tbNzOZTCaTmWIOtbXw9DM3M5lMJpOZYK6rPvSL9huJywkmk8lkMu+Yz0d9tR7HQ7INl9UWJpPJZDITzDIwv39arVbNTCaTyWRmmS0XbZ5Nq64uM47JZDKZzDfMdmrv4W47ZByTyWQymalm7S2rre0tq+eNxRw4JpPJZDITzDhjq8uu9p5udSLBZDKZTGae+UyxKd4GqWbc3MxkMplMZpZ5EXSdVPuYTCaTyUw12/kh1Dq4rVcZx2QymUzmG+aqinmcU12etdceTCaTyWSmmDHWkHaDNJ8xmUwmk5li1vM6GjFfu60nmEwmk8nMMuvUFGV7zPWjjGMymUwm87ZZt/Pqcc/wXJDJZDKZzE+apSXOV1TRf9HHZDKZTGaiub4i+ijb+48iDiaTyWQyM82h2rZYRFmsYpDJZDKZzHtmVjGZTCaTyWQymUwmk8lkMplMJpPJZDL/rHnsXwW1n/zFqtyZAAAAAElFTkSuQmCC”
}
Copy the Value and use any base64 – image converter tool, search on Google
You will get your QR Image:

Don’t try any URL or Passwords in this post as same is modified, and in images covered to hide actual url & passwords.
Hope you enjoyed learning from this post.
That’s all for this post, but visit again to learn from upcoming posts in this series, will post soon.
See you again in next post, till then keep exploring, learning and sharing with others.
Update Tracking Line, Post Shipment using Web Services in Business Central
Hi, today I will discuss Web Service with below requirement. You can check other earlier post on this topic using search on right side of this blog page.
I got one request on topic from one of my customer cum blog follower, case study is as follows:
a) Will update Qty to Ship on document using Web Service from other application
b) Update Tracking Line for the Shipment using Web Service from other application
c) Post the Shipment using Web Service from other application
To get this we will create an Extension using VS Code which will have:
a) Codeunit with some functions which will be called using Web Service
b) A XML file to automatically expose above codeunit upon publishing this extension
Let us start how to achieve above requirement:
I have created this in BC16, will be same for other versions too.
Creating a AL Project:
Update your app.json & launch.json as per your environment, authentication, dependencies, port etc.

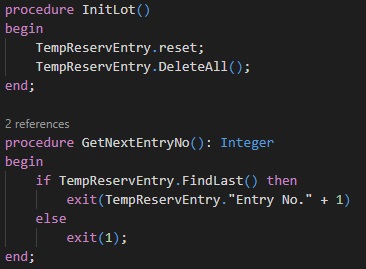
Creating a Codeunit: (TrackingCodeWS.al)
This function will be used to update “Qty. to Ship” on Sales Line

InitLot function as name suggests.
GetNextEntryNo function as name suggests.
It will depend on how you design your codeunit, you may require or not depends on logic how you use them.
AssignLotSalesLine is function which fills the lot details to temp Reservation Entry Table.
CreateReservationEntrySalesLine is the main function which actually makes your Tracking Lines and assign to Sales Line as per information filled in TempReservationEntry table in above function.

PostSalesOrder function is used for posting your Shipment.

Creating XML file to Publish Web Service
This XML file will ensure publishing of Web Service on Install of the Extension. You can directly make entry to Web Service table but benefit of using XML is when to Uninstall your extension the Web Service too will be removed, else if entry made to table you will have to take care to same yourself.

After Install of Extension, your Web Service is automatically Published.

Consume Web Service from Visual Studio
Below is the C# code to consume Web Service created above, you can modify code as per your requirement.

In above code we added Service Reference to Web Service and called functions created in Codeunit.
You can see earlier posts for step wise instruction how to add Web Reference to the Web Service in Visual Studio.
UpdateQtyToShipSalesLine:
Here “1” is used for Document Type = Order,”1008″ is my order no, 10000 is the Line No., 2 is the Quantity to Ship.
AssignLotSalesLine:
“L0001” & “L0002” is my Lot No, Serial No. is blank in this case, 1 is the Quantity, last three parameter is same as in above function call.
PostSalesOrder:
First 2 Parameter is same as above function call Document Type & Order No, third parameter is Ship = TRUE, Fourth Parameter is Invoice = FALSE.
Conclusion
This post gives you overall Idea how you can use Web Service to handle Sales Document from Web Service, you can make required modification to achieve exactly as per your requirement.
API – Business Central Part-1
In today’s post we will discuss about API’s in Business Central.
A Connect app establishes a point-to-point connection between Microsoft Dynamics 365 Business Central and a 3rd party solution or service and is typically created using standard REST API to interchange data.
Any coding language capable of calling REST APIs can be used to develop your Connect app. Because the API uses standard REST, we can use OData to query the results.
The Microsoft Dynamics 365 Business Central API allows you to read and modify business data through apps that are connected and integrated through a single endpoint.
For Example:- You can use the API to get access to customer, vendor and other information, update sales orders, or view overdue payments etc.
Endpoint
Production Endpoint –
Development and Test Endpoint –
On Premise –
https://Server Name:Odata Port/Service Name/api/beta/
I am going to use my as I am running on On Premise :-
Enter the URL to get the list of 44 standard APIs. (Format of the URL for Business Central on-Premise is given as above:

I am using Postman to send GET request to my API endpoint.
Authentication
Azure Active Directory (AAD)
Basic authentication. Username and web service access key as password.
How to get web service access key?

Tips for working with the APIs
Some tips for working with the APIs are:
When you call the endpoint via GET, you get a list of all the available API’s.
When you call the endpoint via GET with $metadata, you get a list of all the available API’s with their metadata.
When you call the endpoint via GET with $filter, you can use the OData Filter Expressions as discussed in earlier post.
Each resource is uniquely identified through an ID.
Microsoft has added to its most of the tables as:
| Enabled | Field No. | Field Name | Data Type | Length | Description |
| Yes | 8000 | Id | GUID |
If you had to make your any table data available through API add this field to your tables. We will look into other aspects later in below post.
The resource ID must be provided in the URL when trying to read or modify a resource or any of its children. The ID is provided in ( ) after the API endpoint. For example, to GET the “CRONUS International Ltd.” company details, you must call:

From above request I get id of my company as : ab76c7b4-3c72-4805-86f7-7d91a10612ce now I will query Entity Item.
https://ksd-desktop:7748/BC130/api/beta/companies(ab76c7b4-3c72-4805-86f7-7d91a10612ce)/items

To enable API we need minimum 2 of the below conditions to be met.
- ID field in table of type GUID
- Page of type API
Let’s see in Business Central how it is setup and understand before we create our own API.
Open the Page API Setup.
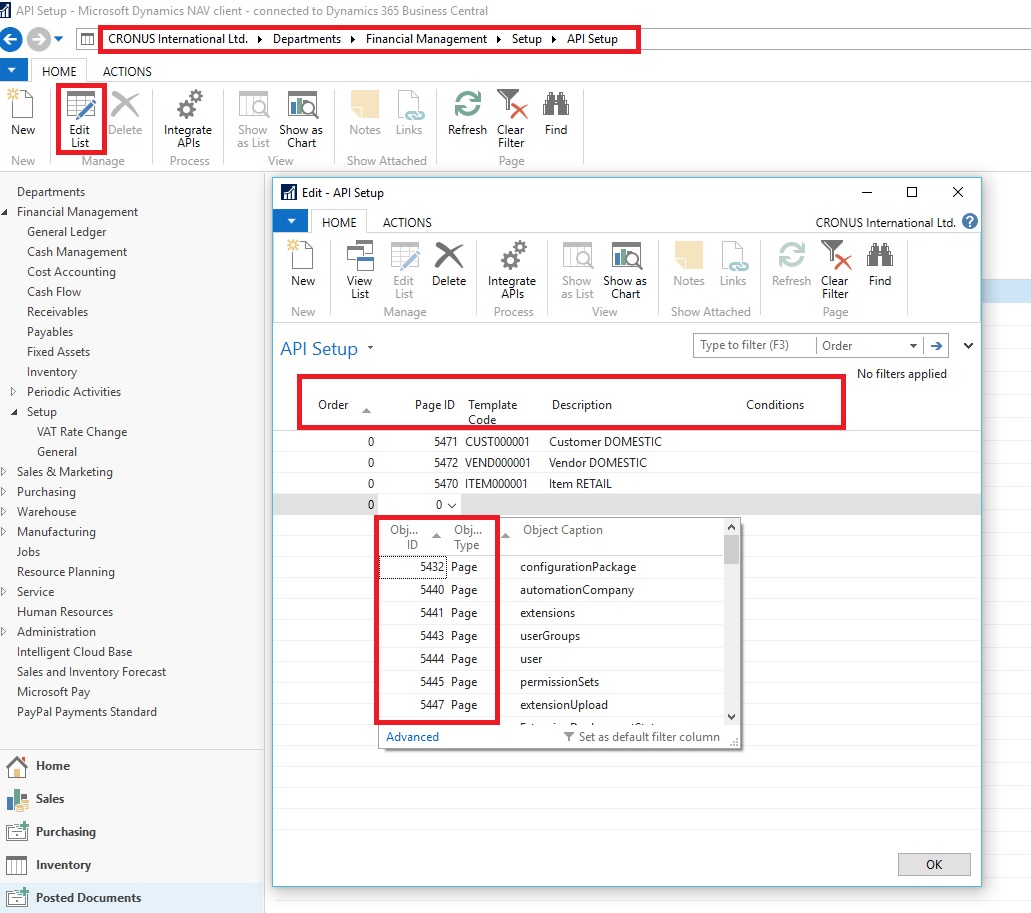
If you Lookup the Page ID, you will get list of Pages that Microsoft have provided as API.
AllObjWithCaption.”Object ID” WHERE (Object Type=CONST(Page),Object Subtype=CONST(API))
This relation is used for the Lookup. Means the Subtype should be defined as API.
Next you have Template Code – Since may be possible we don’t expose all fields or not necessary the values for every field is provided when API is submitted. To fill the default values for those field we assign the Template Code.

Description – you can setup as required.
Conditions – You can define condition when this Template should apply.

Before we move further ensure below setup to Server Instance properties and OData properties. Check and set the ‘Max Page Size’ to number of records you want to integrate.

At the time of writing this post have no idea of how to alter the number of records that can be integrated in Business Central on Cloud may update in future.
I stop here for today’s post. Will come up with more details in my next upcoming post.
Till then keep learning and exploring and take good care of yourself.
Meet you again in my next post with more details.
Web Services – Business Central Part- 2
Today in this post we will continue from where we left our previous post, if you missed or wish to have a look you can find her in this link.
Web Services – Business Central Part- 1
We saw in our previous post, you expose an OData service that can be accessed from a URL by using a web browser or any other HTTP client.
You need the URL of the OData page or query web service
“https://server:webserviceport/serverinstance/oData/web service”
If you use the attribute ?$format=atom you will get an AtomPub document
If you use the attribute ?$format=json you will get an JSON document
You can obtain service metadata documents for either page or query web services.
SOAP Web Services
If your client requests another transport protocol than HTTP or HTTPS, then you can use SOAP as it also supports, for example, SMTP.
Microsoft is heavily investing in REST and OData, and certainly with the online apps like Power BI, PowerApps, and others. So at this point SOAP isn’t the primary choice for web services anymore.
We can find the available SOAP web services at the same page where we define the OData web services.
If we go to the search box and then search for web services, This page is used to enable access to OData and SOAP web services.

We could enable OData web services only with the object types of query and pages, and for SOAP web services, we can only enable it for pages and codeunits and not for queries.
For example soap url for my Customers Service will be as below:
https://KSD-DESKTOP:7747/BC130/WS/CRONUS%20International%20Ltd./Page/Customers
You can find some post related to consuming web service and working with web service for older versions but it can be used with business central too.
Exposing & Consuming the Web service from & inside Navision – Part-1
Exposing & Consuming the Web service from & inside Navision – Part-2
Exposing & Consuming the Web service from & inside Navision – Part-3
Exposing & Consuming the Web service from & inside Navision – Part-4
When you are exposing your object for web service, ensure that you use GUIAllowed function to supress the UI. Encapsulate the code that could cause in error, not your entire code.
Also the exceptions must be handled in order to facilitate that your web service don’t end the execution unexpectedly.
You must check with the GuiAllowed function when you are using one of the following dialog functions:
Close, Confirm, Error, Open, StrMenu, Update
The Message function is the only dialog function that doesn’t cause an exception.
Other keywords that you shouldn’t use are:
Page.Run, Page.RunModal, Activate, Report.Run, Report.RunModal, Hyperlink, File.Upload, File.Download
Hope you got some insight on Web Services.
I will come up with more features in other posts, till then keep exploring and learning, and take care of yourself.
Web Services – Business Central Part- 1
You can use web services in Microsoft Dynamics 365 Business Central to expose data to the outside world.
You can use web services to get data from Microsoft Dynamics 365 Business Central and use it in other applications.
Any application, programing language or program that can work with XML and/or JSON for example: – Power BI, Microsoft PowerApps, a custom .NET program, etc. can connect to Microsoft Dynamics 365 Business Central fetch the available data.
A web service can also be used to create new or update existing data in the application.
Both XML (Extensible Markup Language) and JSON (JavaScript Object Notation) are open-standard file formats that are readable by humans. They are used to send information between clients over web services.
In this post we will discuss some terminology and differences between SOAP and OData. We will also learn on how to configure these services in Microsoft Dynamics 365 Business Central.
SOAP relies on HTTP(S), SMTP, FTP for message negotiation and transmission.
The most common type of messaging pattern in SOAP is the Remote Procedure Call (RPC), where one network node (the client) sends a request message to another node (the server), and the server sends a response message to the client. It uses SOAP envelope, which defines the message structure and how to process it.
A SOAP service exposes a WSDL (Web Services Description Language) file that describes how the service can be called, what parameters it expects and what data structure it returns. This file is an XML based document, and is targeted to be read by machines, not by humans.
OData (Open Data Protocol) is an open protocol that is designed to use and query RESTful APIs. An API (Application Programming Interface) is a set of routines and protocols that is used to communicate between different software components.
OData is built upon REST services and can be used to query REST services. By providing extra query parameters to a URL, you can for example limit or filter the result set.
SOAP exposes a WSDL document, OData exposes an EDMX document, which contains metadata for all the published web services.
You can see all the available OData web services by going to the search box and search for web services. This page is used to enable access to OData and SOAP web services.
OData web services can only be used with object types pages and queries, not with codeunits. There are two versions of OData you can use, version 3 and version 4. Version 4 is an enhanced version, and important to know is that version 4 returns JSON where version 3 returns AtomPub documents which are XML documents.
From this window you can add new or manage existing Web Services.
It is simple 2 Step task Add new object give service name and enable Publish checkbox. You will get your OData and/or SOAP URL.
For example: – object type page can be used in OData and in SOAP web services.
Let us explore the Web-Service Urls. For test purpose, I have created a Service with the name Customers for Page Customer Card.
https://ksd-Desktop:7748/BC130/ODataV4/Company(‘CRONUS%20International%20Ltd.’)/Customers
When we open, for example, our Customers web service, we can have a look at the URL.
First we have our server name and the port it’s using. “https://ksd-Desktop:7748”
Then we have our instance name, which in our case is BC130.
Then our OData version, so version 4. “ODataV4”
And then our company name, “Cronus International Ltd”.
And then finally our web service name, which is, in our case, “Customers”.
Let’s try this url, when we execute this url in our browser we get json file listing customers similar to below:
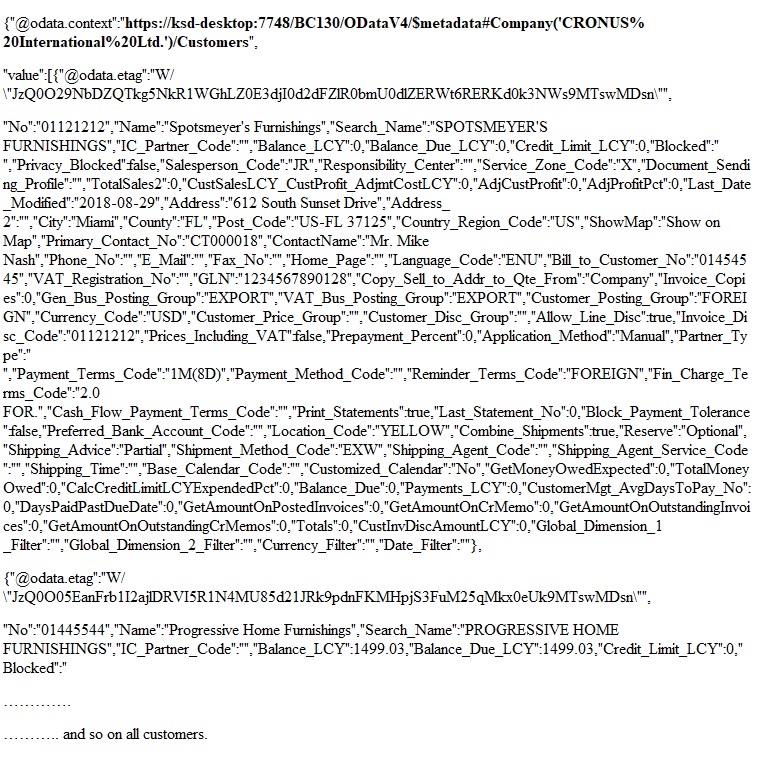
Here etag is the unique identifier of each records, it will be required when you update records, will discuss later.
If I remove my service name then:
https://ksd-desktop:7748/BC130/ODataV4/Company(‘CRONUS%20International%20Ltd.’)
{“@odata.context”:”https://ksd-desktop:7748/BC130/ODataV4/$metadata#Company/$entity”,”Name”:”CRONUS International Ltd.”,”Evaluation_Company”:false,”Display_Name”:”CRONUS International Ltd.”,”Id”:”ab76c7b4-3c72-4805-86f7-7d91a10612ce”,”Business_Profile_Id”:””}
If I remove my Company Name then:

If I open the metadata url
You will get EDMX file which shows metadata about the information in the OData web service.

You can see some properties with our data types. For example, if we scroll down, if we go to Customers, we have our entity type Customers, we can see some properties which our data types and max lengths. We can also see what properties are primary key. So this is number and so on. So all useful information when you’re creating applications that use these OData web services.
Filtering the OData
You can set filter expression to the url few examples as below:
We will use the filter option top for limiting the result to top 5 records of customer.
After our service name, we type question mark, then the dollar sign, and then the word top equals 5.
For example :
https://ksd-desktop:7748/BC130/ODataV4/Company(‘CRONUS%20International%20Ltd.’)/Customers?$top=5
Now the query will result in only first 5 records for customer.
If we want to see next 5 records then we can append &$skip=5 on above url
https://ksd-desktop:7748/BC130/ODataV4/Company(‘CRONUS%20International%20Ltd.’)/Customers?$top=5&$skip=5
If you want to see specific customer you can modify url as:
https://ksd-desktop:7748/BC130/ODataV4/Company(‘CRONUS%20International%20Ltd.’)/Customers(‘10000’)
Please refer to EDMX file to find correct name of the fields if wants to filter on specific fields.
https://ksd-desktop:7748/BC130/ODataV4/Company(‘CRONUS%20International%20Ltd.’)/Customers(‘10000’)?$select=Name
You will get the result as below for above url query
“@odata.context”:”https://ksd-desktop:7748/BC130/ODataV4/$metadata#Company(‘CRONUS%20International%20Ltd.’)/Customers/$entity”,”@odata.etag”:”W/\”JzQ0O044eFNmcWdXV0NpYlhTZDhUdTlrdytZUmdQbWRkL2U4TzZ4UEsxNGtod0
E9MTswMDsn\””,”Name”:”The Cannon Group PLC”}
You can add other fields too by appending the url with ‘,’
Customers(‘10000’)?$select=Name,City,Address……………
As told earlier please refer to EDMX file for correct Fields Name or Property it is case sensitive.
You can remove the Primary Key from the url to get list of selected fields for all customers.
Customers?$select=Name,City,Address……………
https://ksd-desktop:7748/BC130/ODataV4/Company(‘CRONUS%20International%20Ltd.’)/Customers?$orderby=City&$select=Name,City,Address
You can use orderby to sort the data from other than Primary key, by default it is sorted by Primary Key.
You can use desc for descending sort.
https://ksd-desktop:7748/BC130/ODataV4/Company(‘CRONUS%20International%20Ltd.’)/Customers?$orderby=City desc&$select=Name,City,Address
You can use filter to filter specific field values as:
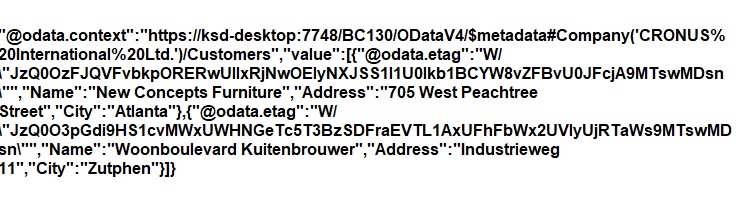
https://ksd-desktop:7748/BC130/ODataV4/Company(‘CRONUS%20International%20Ltd.’)/Customers?$filter=City eq ‘Zutphen’ or City eq ‘Atlanta’&$select=Name,City,Address
you will get output as:
You can use expressions like [filter=Balance_LCY gt 0] or [filter=Location_Filter eq ‘BLUE’] etc.
I stop here for today. We have seen how the Web Services OData can be used to query records.
We will discuss about other stuffs in our next post in more details.
Till then keep exploring and learning, see you in next post. Take Care of yourself.

You must be logged in to post a comment.