
Category: Visual Studio Code

Creating Azure Functions to generate QR Code
This is second post in this series, if you wish to see previous post, you can access here.
Today in this post I will discuss about first part, how to create Azure Functions.
Before we start, you need some installation to support creating Azure Functions. Use below Links to download & install these packages on the system, where you wish to write, compile & test the Azure functions.
Installation Links:
https://docs.npmjs.com/downloading-and-installing-node-js-and-npm
https://nodejs.org/en/download/
https://dotnet.microsoft.com/download/dotnet/thank-you/sdk-3.1.414-windows-x64-installer
Obviously, you must have an active Azure subscription, to create an Azure Functions App. If you don’t have, you can create an account that gives you a credit to explore Microsoft Azure for 30 days.
Head to Azure portal and sign in with your account.

Create New Function App.

Select your Azure subscription and a resource group or create a new one. Provide a name for your function app. This name will be the prefix for the URL.

You can select the .NET Core runtime and the region that matches your location. Select the Review + create button.
Now, you can create new functions. A function app can contain multiple functions. Each function will be available on:
Before you start to create Function, you need to Install dependencies:
- You should install Visual Studio Code
- You should also install Node.JS
- Run the following command to install the Core Tools package:
npm install -g azure-functions-core-tools@3 –unsafe-perm true
- Next, install the Azure Functions extension for Visual Studio Code.
- Click on the Azure logo in the Activity Bar. Under Azure: Functions, click Sign in to Azure… and follow the on-screen instructions.
Create an Azure Functions project
Click the Create New Project… icon in the Azure: Functions panel.

You will be prompted to choose a directory for your app. Choose an empty directory.

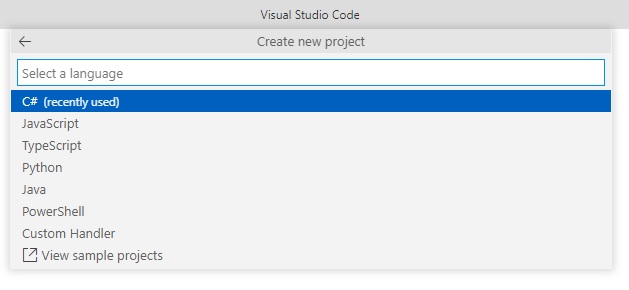
You will then be prompted to select a language for your project. Choose dotnet.


Create a function
If you skipped to provide details, for Functions in above process, you can still initiate later.
Click the Create Function… icon in the Azure: Functions panel.

You will be prompted to choose a template for your function. Select HTTP trigger for getting started.
Screens will be same as shown in above process.
Sample project will be created
As per the information provided by you, in above screens.
KSDQRGenerator.cs auto generated file code will be as below:
using System;
using System.IO;
using System.Threading.Tasks;
using Microsoft.AspNetCore.Mvc;
using Microsoft.Azure.WebJobs;
using Microsoft.Azure.WebJobs.Extensions.Http;
using Microsoft.AspNetCore.Http;
using Microsoft.Extensions.Logging;
using Newtonsoft.Json;

namespace Company.Function
{
    public static class KSDQRGenerator
    {
        [FunctionName("KSDQRGenerator")]
        public static async Task<IActionResult> Run(
            [HttpTrigger(AuthorizationLevel.Anonymous, "get", "post", Route = null)] HttpRequest req,
            ILogger log)
        {
            log.LogInformation("C# HTTP trigger function processed a request.");

            string name = req.Query["name"];

            string requestBody = await new StreamReader(req.Body).ReadToEndAsync();
            dynamic data = JsonConvert.DeserializeObject(requestBody);
            name = name ?? data?.name;

            string responseMessage = string.IsNullOrEmpty(name)
                ? "This HTTP triggered function executed successfully. Pass a name in the query string or in the request body for a personalized response."
                : $"Hello, {name}. This HTTP triggered function executed successfully.";

            return new OkObjectResult(responseMessage);
        }
    }
}

Now you have the Http Template, we will make necessary changes as per our requirement.
In this example we will be using a library – QRCoder to generate the QR Code.
So first we have created a function with Http Trigger.
Made changes to the function as:
/*string name = req.Query["name"];

            string requestBody = await new StreamReader(req.Body).ReadToEndAsync();
            dynamic data = JsonConvert.DeserializeObject(requestBody);
            name = name ?? data?.name;

            string responseMessage = string.IsNullOrEmpty(name)
                ? "This HTTP triggered function executed successfully. Pass a name in the query string or in the request body for a personalized response."
                : $"Hello, {name}. This HTTP triggered function executed successfully.";

            return new OkObjectResult(responseMessage);*/
Replace this part as below code:
            string ReqData = req.Query["ReqData"];

            string requestBody = await new StreamReader(req.Body).ReadToEndAsync();
            dynamic data = JsonConvert.DeserializeObject(requestBody);
            ReqData = ReqData ?? data?.url;
            if (string.IsNullOrEmpty(ReqData))
            {
                return new BadRequestResult();
            }

            var generator = ReqData;
            var payload = generator.ToString();

            using (var qrGenerator = new QRCodeGenerator())
            {
                var qrCodeData = qrGenerator.CreateQrCode(payload, QRCodeGenerator.ECCLevel.Q);
                var qrCode = new PngByteQRCode(qrCodeData);
                var qrCodeAsPng = qrCode.GetGraphic(20);
                return new FileContentResult(qrCodeAsPng, "image/png");
            }
Final Code should look like this:

There are some errors, correct. Next step will resolve the same.
Next, we will add the QRCode nuget package to the dotnet core project using
dotnet add package QRCoder –version 1.4.1


Post completing the command execution, all errors are resolved.
Run your function project locally
Press F5 to run your function app.
The runtime will output a URL for any HTTP functions, which can be copied and run in your browser’s address bar.

Copy the URL of the function & Switch to browser:
In my case: http://localhost:7071/api/KSDQRGenerator?ReqData=Test

If you scan above QRCode, you will get ‘Test’ as we have passed this as a parameter (?ReqData=Test)
To stop debugging, press Shift + F5.
Deploy your code to Azure
Click the Deploy to Function App… () icon in the Azure: Functions panel.


Sign in to your Azure Account, if not done earlier. To test locally you need not to sign in to Azure. But at deployment is must.
When prompted to select a function app, choose KSDQRCodeGenerator (in my case), Function App Created on Azure portal in the starting of this blog post.


Confirm to deployment dialog.

On completion you will get the Live AZURE URL, use the URL in same way as for local, to pass parameter append at the end of URL as (?ReqData=Test)
Replace [Test] with the information for which you want to generate the QR Code.
That’s all for this post, but visit again to learn from upcoming posts in this series, will post soon.
See you again in next post, Till then keep exploring, learning and sharing with others.
Update Tracking Line, Post Shipment using Web Services in Business Central
Hi, today I will discuss Web Service with below requirement. You can check other earlier post on this topic using search on right side of this blog page.
I got one request on topic from one of my customer cum blog follower, case study is as follows:
a) Will update Qty to Ship on document using Web Service from other application
b) Update Tracking Line for the Shipment using Web Service from other application
c) Post the Shipment using Web Service from other application
To get this we will create an Extension using VS Code which will have:
a) Codeunit with some functions which will be called using Web Service
b) A XML file to automatically expose above codeunit upon publishing this extension
Let us start how to achieve above requirement:
I have created this in BC16, will be same for other versions too.
Creating a AL Project:
Update your app.json & launch.json as per your environment, authentication, dependencies, port etc.

Creating a Codeunit: (TrackingCodeWS.al)
This function will be used to update “Qty. to Ship” on Sales Line

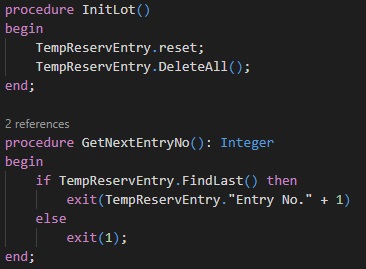
InitLot function as name suggests.
GetNextEntryNo function as name suggests.
It will depend on how you design your codeunit, you may require or not depends on logic how you use them.
AssignLotSalesLine is function which fills the lot details to temp Reservation Entry Table.
CreateReservationEntrySalesLine is the main function which actually makes your Tracking Lines and assign to Sales Line as per information filled in TempReservationEntry table in above function.

PostSalesOrder function is used for posting your Shipment.

Creating XML file to Publish Web Service
This XML file will ensure publishing of Web Service on Install of the Extension. You can directly make entry to Web Service table but benefit of using XML is when to Uninstall your extension the Web Service too will be removed, else if entry made to table you will have to take care to same yourself.

After Install of Extension, your Web Service is automatically Published.

Consume Web Service from Visual Studio
Below is the C# code to consume Web Service created above, you can modify code as per your requirement.

In above code we added Service Reference to Web Service and called functions created in Codeunit.
You can see earlier posts for step wise instruction how to add Web Reference to the Web Service in Visual Studio.
UpdateQtyToShipSalesLine:
Here “1” is used for Document Type = Order,”1008″ is my order no, 10000 is the Line No., 2 is the Quantity to Ship.
AssignLotSalesLine:
“L0001” & “L0002” is my Lot No, Serial No. is blank in this case, 1 is the Quantity, last three parameter is same as in above function call.
PostSalesOrder:
First 2 Parameter is same as above function call Document Type & Order No, third parameter is Ship = TRUE, Fourth Parameter is Invoice = FALSE.
Conclusion
This post gives you overall Idea how you can use Web Service to handle Sales Document from Web Service, you can make required modification to achieve exactly as per your requirement.
Extension Install Code
Extension install code is executed when:
- An extension is installed for the first time.
- An uninstalled version is installed again.
This gives you control to write different logics for first time installation of extension and reinstallations of uninstalled extensions.
This is achieved by defining Install Codeunit in your Extension.
First thing first:
- Subtype property of codeunit need to be set to Install
- OnInstallAppPerCompany trigger is triggered when the Extension is Installed first time or subsequent install of same version on Extension.
- DataVersion property one of the important properties which tells you what version of data that you’re dealing with.
- AppVersion, DataVersion, Dependencies, ID, Name, and Publisher. These properties are encapsulated in a ModuleInfo data type. You can access these properties by using the NavApp.GetCurrentModuleInfo and NavApp.GetModuleInfo methods.
- If the DataVersion property equals Version.Create(0,0,0,0), then it’s the first time that the extension is installed because no data exists in the archive.
Sample codeunit can be similar to below:
codeunit <ID> “Name of Codeunit”
{
// Install Logic
Subtype = Install;
trigger OnInstallAppPerCompany();
var
myAppInfo: ModuleInfo;
begin
NavApp.GetCurrentModuleInfo(myAppInfo);
// Get info about the currently executing module
if myAppInfo.DataVersion = Version.Create(0, 0, 0, 0) then
// A ‘DataVersion’ of 0.0.0.0 indicates a ‘fresh/new’ install
HandleFreshInstall
else
HandleReinstall;
// If not a fresh install, then we are Reinstalling the same version of the extension
end;
local procedure HandleFreshInstall();
begin
// Logic to execute on first time this extension is ever installed for this tenant.
// Some possible usages: – Initial data setup for use
end;
local procedure HandleReinstall();
begin
// Logic to execute on reinstalling the same version of this extension back on this tenant.
// Some possible usages: – Data ‘patchup’ work, for example, detecting if new ‘base’
// records have been changed while you have been working ‘offline’.
end;
}
Happy Learning.
Working with Collections
Today we will learn three types of collections supported by AL.
A collection is a complex type that contains multiple values in one variable.
You can’t have values with different types in the same collection. For example, you can’t add date values in a collection that only allows integer values.
The three types of collections that AL supports are:
- Array
- List
- Dictionary
We will discuss about each type of collections in this post with examples.
Let’s start with most familiar collection we have used with old versions of Navision too, yes you are right, I am talking about Arrays.
Arrays
Arrays are complex variables that contain a group of values with the same data type.
An array holds multiple values, and these values are stored in the elements of the array. You can access these values by using the index, which can also be a value that is stored in another variable. With this design, you can create a loop where you increment a certain variable to loop through every element in an array.
By using the Dimension property, you can define how many dimensions that the array will hold.
When creating a variable of an array data type, you first need to define how many elements that you’ll have in the array. The most commonly used array is the one-dimensional array, which is a list of elements with the same data type.
You can represent an array as a row of values.
To create an array, use the following code:
SalesAmount: array[10] of Integer;
To access an element in an array, use the array element syntax:
SalesAmount[5] := 0;
Unlike other programming languages array index don’t starts with 0 rather with 1. In above example first element will be 1 and last 10.
Having only one element between the square brackets indicates that you are using a one-dimensional array. If you want to have a multi-dimensional array, use a comma-separated list between the brackets, as follows:
SalesAmount: array[6,9] of Integer;
To access an element in an array, use the array element syntax:
SalesAmount[5,3] := 0;
Lists
The List data type can be compared with an array. The List type can only be used with fundamental types and represents a strongly typed list of values that can be accessed by index.
Therefore, you can have a List type of [Integer], but you cannot have a List type of [Blob].
A List data type doesn’t require you to define how many elements you want to store up front (while an Array data type does).
The List data type has some methods that are used frequently. The methods that are available for a List data type will discuss in a later post.
To create a list, use the following code:
CustomerNames: List of [Text];
To access an element in a list, use the following methods:
To store/add values to list
CustomerNames.Add(‘KSD Consultancy’);
CustomerNames.Add(‘Microsoft India’);
CustomerNames.Add(‘Ashwini Tripathi’);
To retrive values from list
CustomerNames.Get(1);
Dictionary
The Dictionary data type represents a collection of keys and values.
Every key that you create in this dictionary must be unique. The main benefit is that you can immediately get the value for a specific key.
The value can be a type, but it can also be a List or another Dictionary data type.
Blow code sequence will give you idea how to use dictionary data type:
//Declaring List
CustomerNamesIN: List of [Text];
CustomerNamesUS: List of [Text];
CustomerNamesCA: List of [Text];
//Declaring Dictionary
CountryWiseCustomer: Dictionary of [Code[20], List of [Text]];
//Assigning values to List
CustomerNamesIN.Add(‘KSD Consultancy’);
CustomerNamesIN.Add(‘Microsoft India’);
CustomerNamesIn.Add(‘Ashwini Tripathi’);
CustomerNamesUS.Add(‘Paul’);
CustomerNamesUS.Add(‘Linda’);
CustomerNamesCA.Add(‘Eddy’);
CustomerNamesCA.Add(‘Mark’);
//Assigning values to Dictionary
CountryWiseCustomer.Add(‘IN’,CustomerNamesIN);
CountryWiseCustomer.Add(‘US’,CustomerNamesUS);
CountryWiseCustomer.Add(‘CA’,CustomerNamesCA);
//Retrieving value from Dictionary
CountryWiseCustomer.Get(‘IN’).Get(1);
Here is the complete code:
Created new codeunit and declared variables & procedures to manipulate values in Collections.


Added Code to call procedures defined in codeunit, to assign and retrieve values from collections.
Now its time to check output of above code.
Hope you get idea how to work with Collections, you may find more posts in coming days where we may discuss about methods available for collection.
Options VS Enums
To define a variable of type Option, you can’t use the OptionMembers property that’s used on a field of data type Option. You need to list the available options as a comma-separated list after your variable definition.
For example:- Color: Option Red,Green,Yellow;
If you want to reuse the same Option type in other objects (like other codeunits, pages, or tables), you have to redefine all available values. Later, if you decide to add an extra value, you need to modify all objects with this extra value. Options in a table are not extendable with a table extension.
Solution to this is now available as enum.
An enum is a separate object with its own number and name. You can use an Enum object in other object without the need to redefine it at each object level. The Enum object can also be extended with enum extensions.
Lets see example defining and using enum.

I have created a EnumDefinition.al to define my custom enum Color.

I have defined one Function SelectColor to access values.

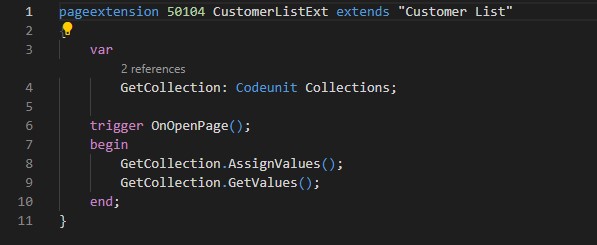
To call the Function and test result created extension of Customer List page and added code to access the value.
Now we can use this Enum throughout the extension in any objects without redefining it as in case of Option.
Let’s Publish the extension and see the result.
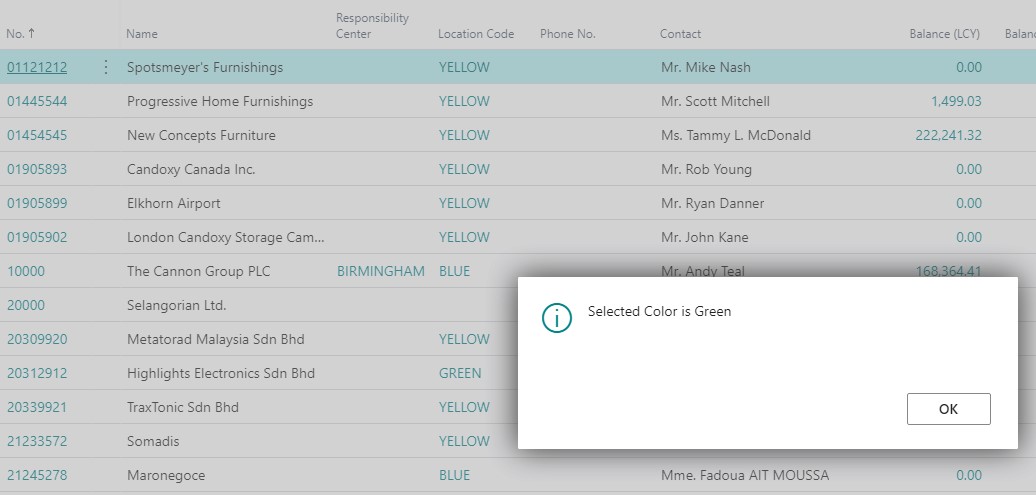
As you can remember from above code, I have selected color Green and have put the code to call of function on trigger of Customer List page, OnOpenPage.
The Enum object can also be extended with enum extensions.
Extending the Enum
Lets create new Extension, app.json file set dependencies to earlier/above Extension.

Next let’s extend our enum Color.

Next let’s create codeunit for function to access value of enum.

To call the Function and test result created extension of Customer List page and added code to access the value.

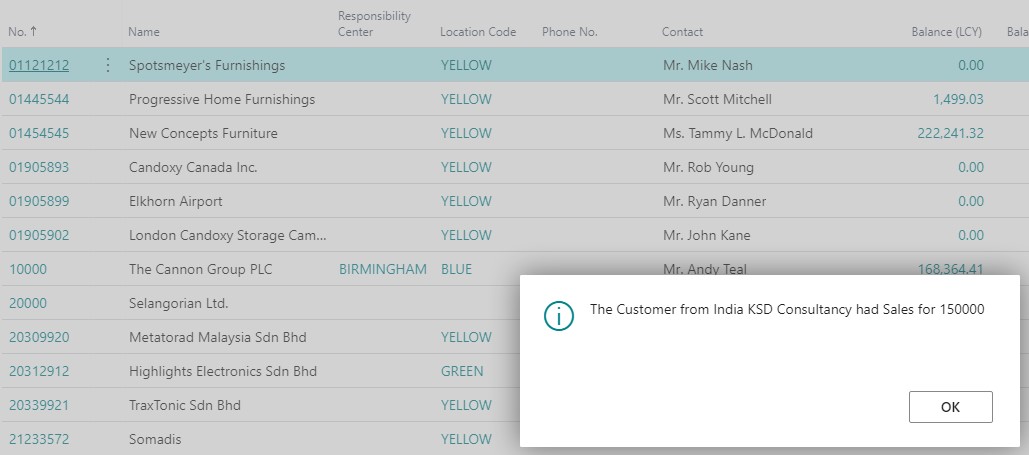
Let’s Publish the extension and see the result.

As you can remember from above code, I have selected color Red & Brown and have put the code to call of function on trigger of Customer List page, OnOpenPage.
Red is from earlier defined Color enum (Red, Green, Yellow), & Brown from extended enum (Blue, Black, Brown).
API – Business Central Part-2
In our previous post we saw basics of API in Navision. Let’s explore further.
If you missed the earlier post you can find here API – Business Central Part-1
Continuing from where we left in previous post.
Someone asked me why we require API when we have web service in place and can achieve same OData either query or filter in same fashion.
So what I am going to explain below will answer to that query.
The API will generate a REST service which returns OData. The API is not the same as the OData web services that we discussed in our earlier post.
There we created an OData web service based on a card page. If there were fields that need to be displayed on a card in the client application but you do not want those fields to expose in the OData web service, you will have to create a second card page to solve this problem. In this case, we create a separate page for our API and only for the API. This page cannot be requested in the client application. It’s also much better concept to separate them from the regular pages.
Also we can apply templates for default value of field, which we will discuss later in below post.
Let’s start with creating our own API.
Each resource is uniquely identified through an ID. As discussed in our earlier post. So let’s start with this, I will start with my earlier created Table LoadoutPoint and add one field ID.
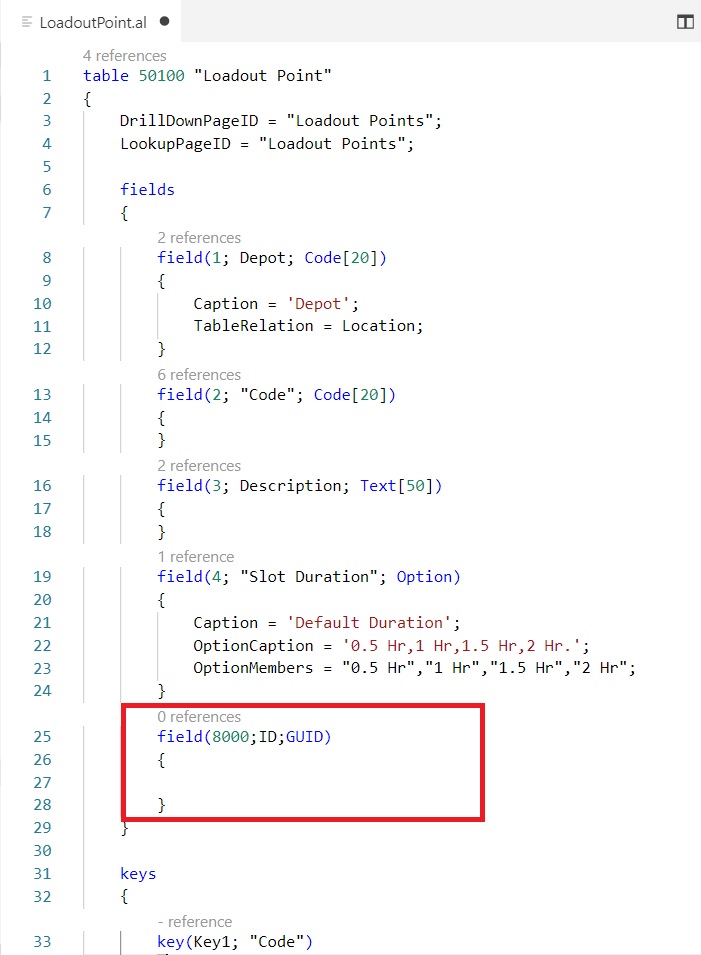
Any new entry in my table will have a unique ID for Loadout Point, so I have added code in OnInsert trigger of the table.

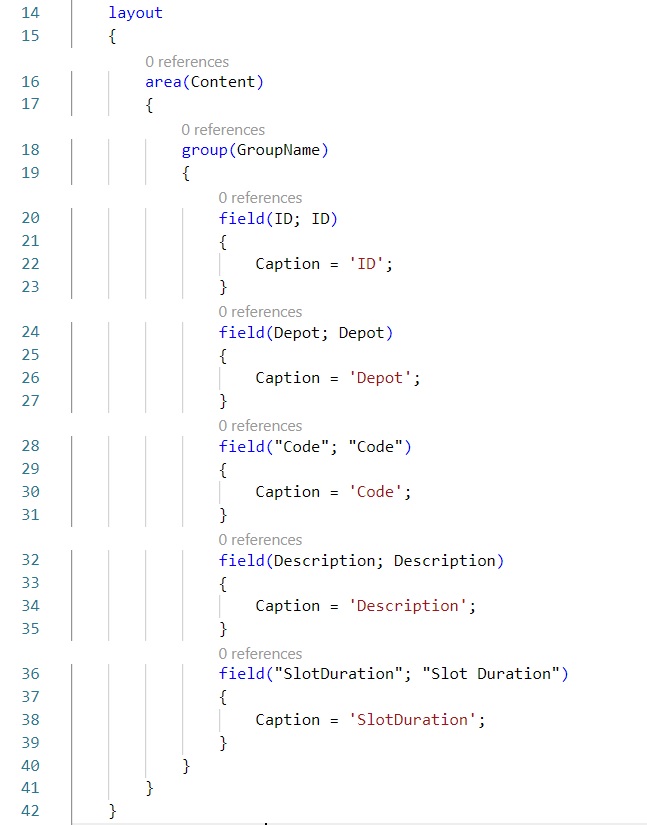
To create an API, you should create a page of type API, instead of a card page or list page.
Use tpage, Page for type API snippet for page structure. You get all the bare minimum properties to be added for API Page.

Then you have to define which fields you would like to include.
Some important rules to be followed for API Pages:
- Fields should be named in the APIs supported format, Any Captions cannot have spaces and special characters. Only AlphaNumeric values permitted.
- When you insert an entity through API endpoint, Business Central don’t run OnInsert trigger on the table.
- And we have assigned the ID for the new record there. So Add Insert(true) for OnInsert Trigger.
- Add business logic to Modify trigger. As external user can change values through API, even the value of the primary key field.
- Add Delete(true) for On Delete trigger. The reason same as above.
So let’s add these 3 trigger in our page too.

Ok so now we have modified Table and Created new API page, now it’s time to publish our app/extension.
Use command palette to publish your app.
Now it’s time to test, let’s access our API page from client and do setup for same.
Search for API Setup Page in the client.

You can define and assign your Template from Template Code field, check with available same Templates how to do it.

Also the conditions when this Template should apply as discussed in earlier post also.
Now let’s access the API from outside the Navision/ Business Central.
I will use Postman to test this.
To get the list of 44 standard APIs.

To get the list of custom APIs.
https://ksd-desktop:7748/BC130/api/ksdconsultancy/app1/v1.0/
Hope you remember when we created API page we assigned few Properties like
APIPublisher = ksdconsultancy, APIGroup = app1, APIVersion = v1.0.
Now we will use those values to access my custom APIs.
See the url those are included after /api/

All information is available in JSON format and further can be confirmed that there are 1000 records. Thus, the number of records integrated here depends on the Max Page Size parameter setup in Navision Server.
What else you can do with APIs:
- Get to fetch or List
- Post to insert records
- Patch to modify records
- Delete to Delete records
- And so on.
- You can extend existing API Pages too, I have yet not tried.
That we may discuss in some other post. Not to complicate this topic more for now I conclude this post here.
Will come up with more details in my upcoming posts, till then keep exploring, learning and take good care of yourself.
Automated Testing in Business Central
Testing is the essential part of the software development process and Cover User Scenarios.
Developers take care of their unit tests and perhaps, some wider coverage when they deliver a finished module. When developer tests the software he only tests scenarios for which he have done development.
In manual testing, since there are usually only humans involved, there will without doubt be discrepancies in the burden that test are conducted. There’s is always the trade-off between whether or not to conduct a full test scenarios for every delivery. In most scenarios tests are performed to areas of application, those are relevant for the current release. Like why should you repeat the purchasing scenarios if you only made a change to the sales process for example?
Automated testing brings a level of insistency and repeatability to testing that is impossible to achieve with just humans. By using a tool that facilitates automated testing, you can run as many test, as many times, as you want with a guarantee that each and every test will run exactly the same way as the first time. You can actually prove that a change in the sales process will not affect the purchasing process.
The key to successful automated testing is that you can link test scenarios to user scenarios. To make your development process itself test-based, by writing proper test at the start of the development process will give you clear and concrete requirements that the software has to meet.
Repeatability of running test scenarios is another key ingredient of automated testing. Manual testing can be very tedious task that can cause a human tester to lose focus. Added project pressure can add to the temptation for tester to skip the unimportant pieces of the test scenarios. How many times do you have to make sure that you can’t enter text string in an amount field for example?
Automated testing is a predefined set of Instructions that always run, no matter what time, no matter how eager the project manager wants the results, no matter how hungry you are, the test scenario is defined and it will execute every instruction every time that the test runs.
It will run exactly the same manner each and every time. You can spin as many sessions you need and simulate real load test. You can potentially scale this up to hundreds or even thousands of users at the same time and really test the limits of your software’s capabilities. Even in larger organizations it will never be possible in a manual test situation.
Manual testing is great to prove that a new piece of software meets the requirements. But what is not always clear is whether a new change in the software has had any adverse effects on existing functionality in other areas. Whereas in case of automated testing provides the capability to prove that all test scenarios can still give you the same test results over time, whenever you make any changes to any part of the software. Since you can schedule automated tests, you can run a full system test overnight or weekend, when you come back at your desk in the next morning you can look at the outcome of the latest test run and focus on just the ones that failed.
Test that are included in the standard business central test toolkit, cover the entire application. You can run the full length of thousands of those test in a matter of hours. So, combined with a build script, you can automate the creation of a new tenant, implement your compiled app, run selected tests and then, evaluate the results in a fraction of the time, which it would take a team of manual testers to do the same thing in hours. Automated testing provides the capability to run a full test set every single day or multiple times a day. If you have that capability, why not use it?
You can organize your development process to include daily build process and include a full sweep of the entire set of tests, and almost guarantee a 100 percent success when you are ready to deliver your software.
Those working on AppSource apps, will not have a choice on matter. Automated testing is mandatory for your app source submission.
Conclusion best way to do testing will be take a fresh demo database of BC, install your app and test the user scenario. If you need to prepare any data is necessary to successfully complete the user scenarios or the test scenarios, the creation of that data should be part of the installation process of your app, and or your test app. Most important feature should be included is the ability to run them in a non-super role, it should not be mandatory to have super rights in order to use your app. Make sure you include the test for non-super users as well.
Oh!! Today lots of lecture. Let’s see how we can implement this, although writing test scripts is not a easy task, require lots of efforts to cover all scenarios and knowing the system well in advance, with clear set of inputs and outputs, else even you pass test scenario chances to fail in real word cannot be avoided.
Below are the steps we follow to create an automated test script. Below is not the full and final, it is just an idea how we can implement this, rest you have to use your experience and skills to complete as per your requirement and project need.
Not compulsory but it will be better if we can use fresh database for this task. We will have only our Extension on which we are going to run this Automated Test and the Extension which we are creating in this post for Auto Test.
Step – 1 : Nav/BC Preparation
If not already imported you need to import Set of objects to enable automated testing. You can find them on installation disk under TestToolKit folder.

If creating a Docker Container use option –includeTestToolkit in the new NavContainer Cmdlet.
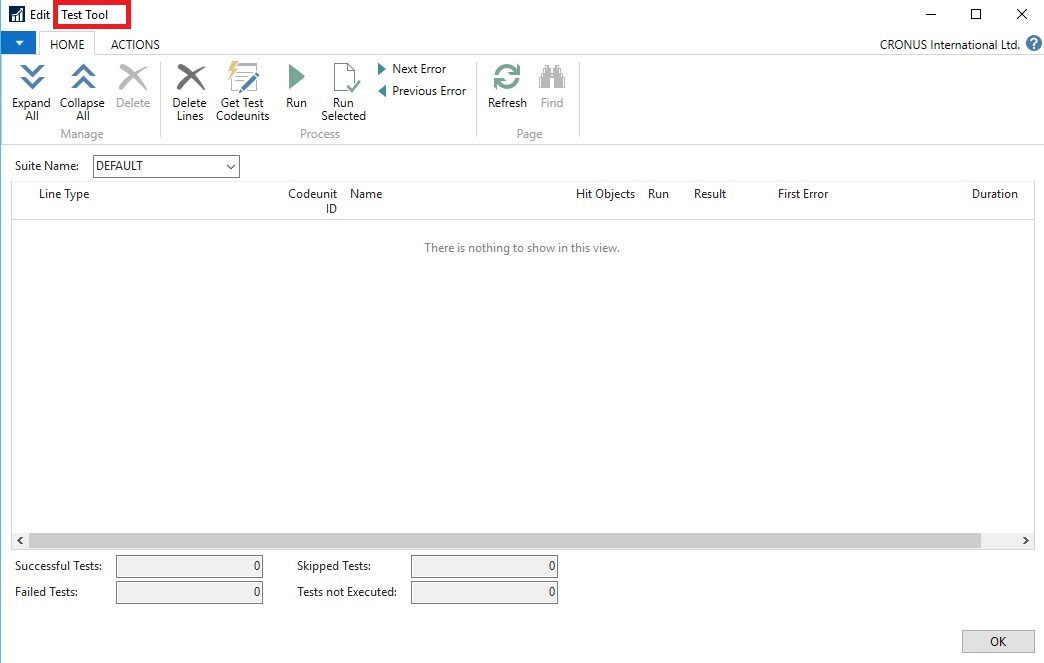
Once you are done now you can run your Test Tool

Hold on, we will come to this later in below post.
Step – 2 : VS Code Project Preparation
Create a New project, and add Folder Structure to arrange your files.
You can find steps in this post : Bare Minimum Steps to Start with fresh Extension Project for Business Central
We need to Specify test target as a dependency. For this it is compulsory to have the apps symbols file to make this work. Install your Extension on this database if not already deployed.
We need to import symbols for the Test Framework as well. So need to specify ‘test’ settings to the app.json file of this project. Specify minimum supported value e.g. 12.0.0.0
Once these two settings are done, now when you hit Download Symbols it will include the Symbols for your Extension and Test Toolkit Objects.

Now you can see 2 additional package symbol files are downloaded.
- KSD Consultancy_MyFirstExtensionProject_1.0.0.0.app
- Microsoft_Test_13.0.24209.0.app
And 2 std. symbol file that gets included when you create any new Extension Project.
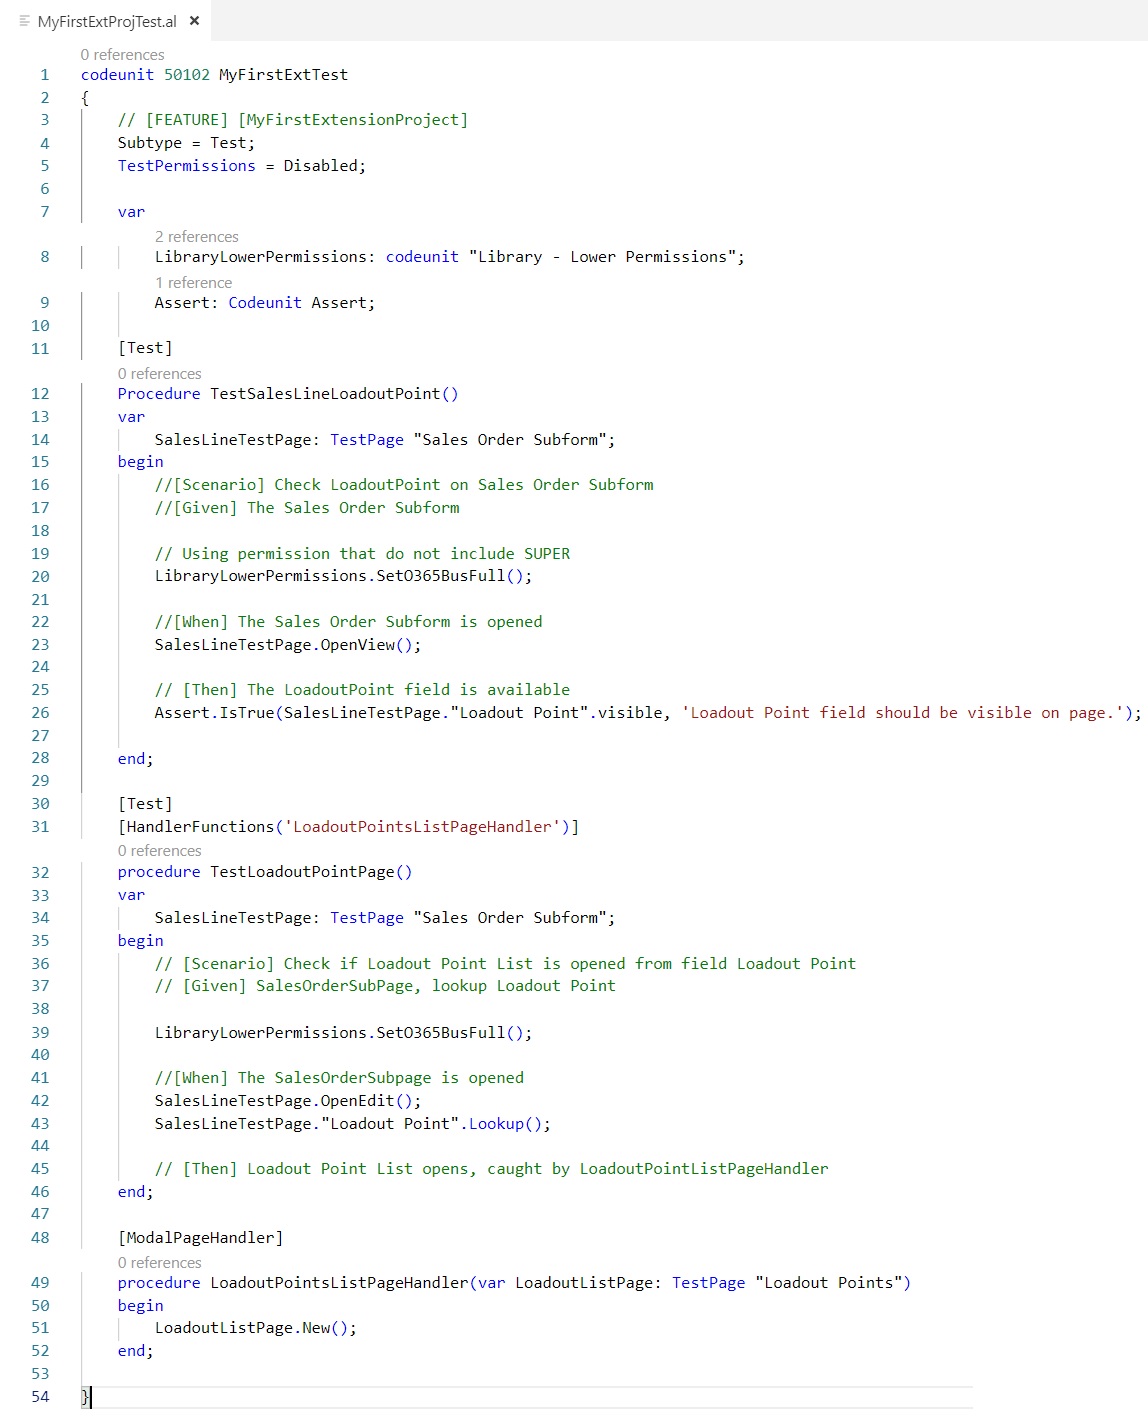
Step – 3 : Writing Test Codeunits
We will create a codeunit of Subtype = ‘Test’
Test procedures are decorated with [Test] attribute
Your OnRun will execute first, followed by other all test procedures.
You can use [TransactionModel] attribute to specify each test procedure is in a separate database transaction.
The output will be Success or Failure.
Failure is any error that is raised by the test code or from the code which is being tested. In either case Other Test procedures will still continue.
Other Features are Test Pages and UI Handlers, we will discuss on same in some other similar post.
AssertError statement is like if I do this error should come, it happens then your test is Success. In this case Failure is actually Success as you knowingly created error.
As I told earlier also this is very complicated area, to write Test Scripts, but if you start practicing from small stuffs eventually you will learn and will able to write a good Test Scripts. You can check out other standard Test Codeunits and update your knowledge how you can write your own Test Scripts.
My sample Test Codeunit looks something like below, it is just for idea in real scenario there should be lots more.
Step – 4 : Deploy & Run the Test App
Publish your Test App.
Go to Extension Management

You will find 2 Extension, The Initial Extension which we created in earlier posts and the Extension we just deployed.
Now open the Test Toolkit Page – 130401
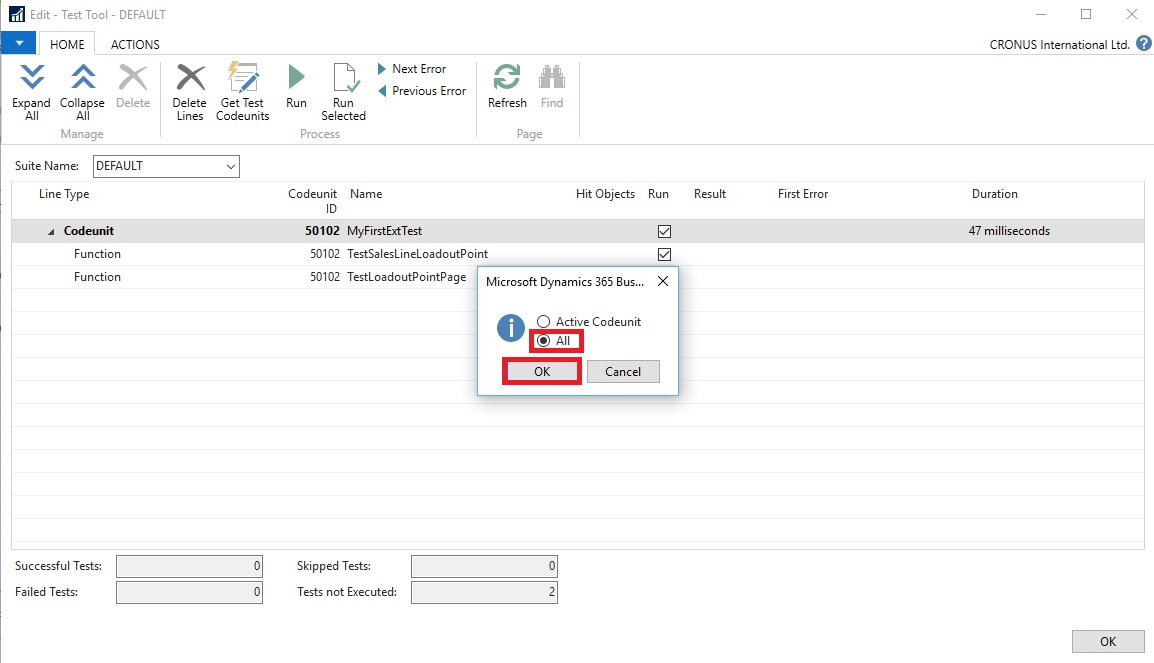
Click on Get Test Codeunits function then Select Test Codeunits

Now Select the Codeunit we just created.

You can select other Codeunits as per the requirement, in my case I am just going to select my Codeunit which we created in this post.
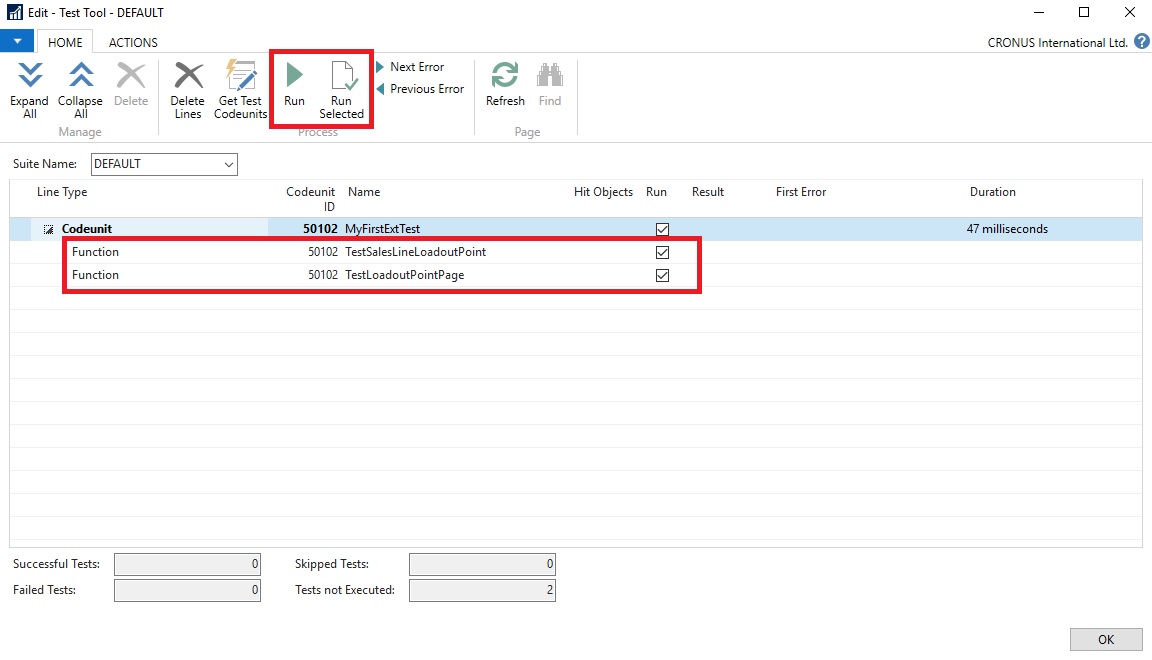
This will list all the functions available in the Test Codeunit.
Now you can select Run all or Run Selected. To test your App, I will select Run All.
Here is the final output of test result
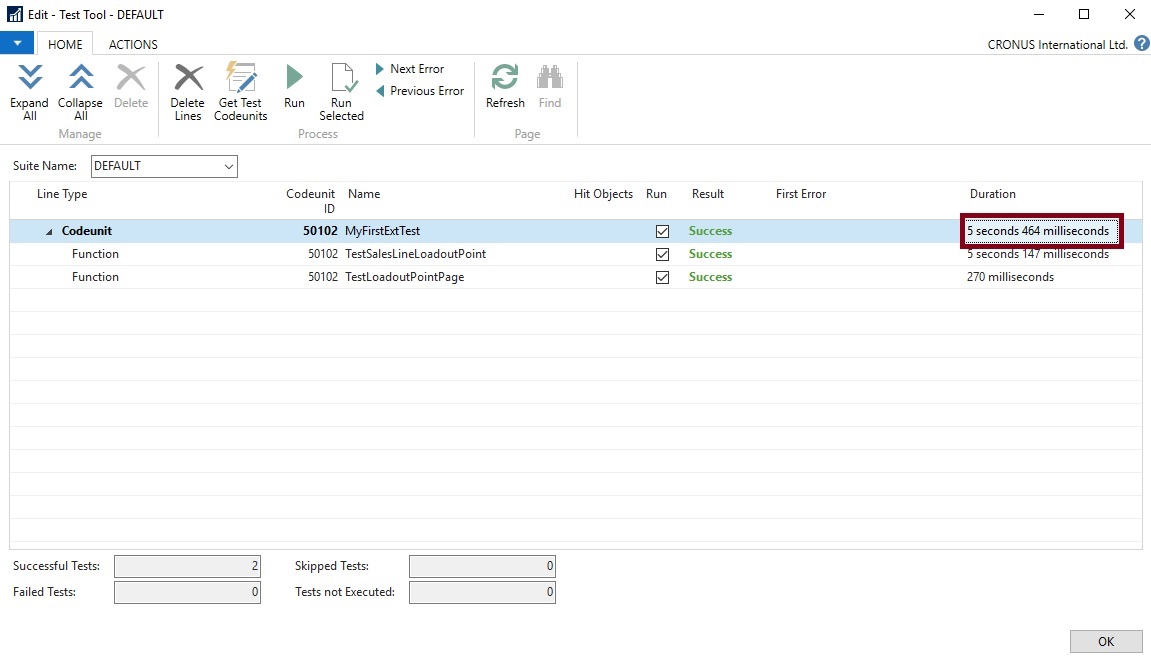
Hope you will agree the test we performed, same if done manually no one can test the same in 6 seconds as this did. And we can perform as many times, and any time.
Once your Test Codeunit in place whenever you make changes to app, you can just run the test and verify that any changes you made have not impacted the existing functionality in any manner.
To save the time in testing, you have to pay in other way in creating the test codeunit as it is not that easy to cover every user scenario in your test codeunit and will require lots of efforts.
But when you are working for App Source you have no choice, you will have to do it.
Today the post got bit longer, but this topic is very complicated and require explanation. Hope you got the starting point from this and will put your efforts to reach to your required conclusion, take help of existing codeunit, nothing will be better than those to learn how Microsoft themselves implements it.
See you again with some more topics, and if get some extra time will try to add more to this post as a second part to this post. Fact is one post is not sufficient for such a huge topic.
Till then keep exploring and learning and take care of yourself.
Control Add-In in Business Central
Today I will discuss about how we can create control add-in using VS Code & Extensions in Business Central.
We can create a control add-in the same way we created pages or code units. In Visual Studio we can use the code snippet T control add-in to generate a new control add-in.
It will better to create a fresh Extension Project in VS Code for control add in.
Step – 1 : Preparation
Create a New project, and add Folder Structure to arrange your files.
You can find steps in this post : Bare Minimum Steps to Start with fresh Extension Project for Business Central
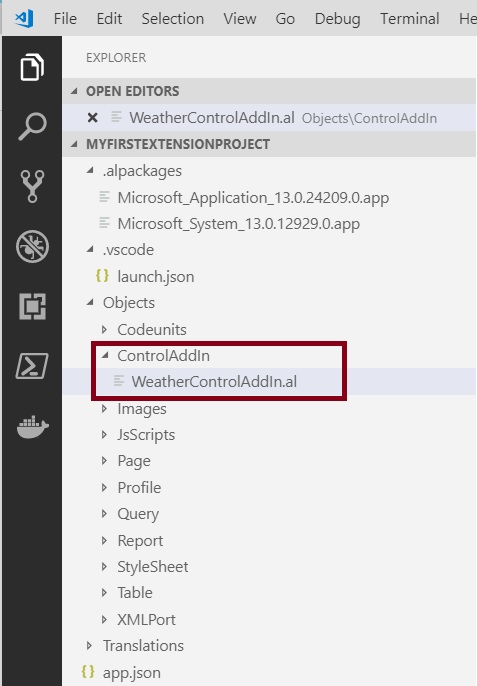
I will create below Folder:
- ControlAddIn
- Images
- JsScript
- Page
- StyleSheet
Step – 2 : Create Control Add-In
In control add-in folder I’m going to create a new control add-in. So new file.
Use the snippet, T control add-in, to create a control add-in.
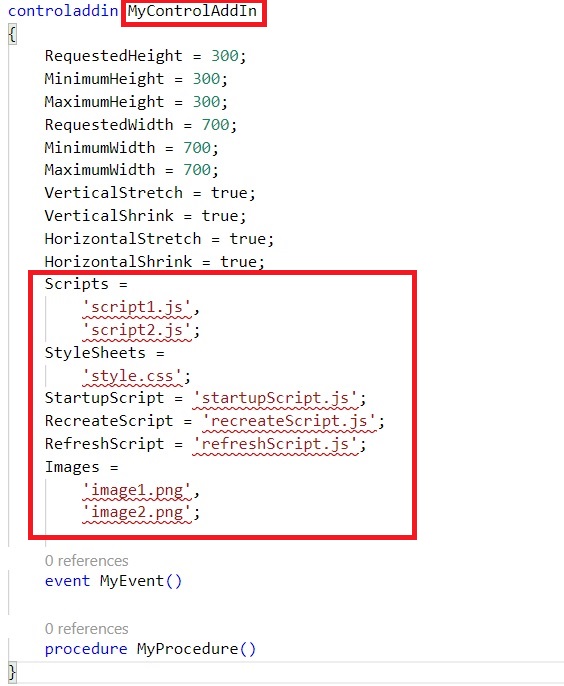
Give the name to your control add-in in my example I have used “WeatherControlAddIn”
A control add-in works with JavaScript files that can execute some code. The scripts property is used to reference these JavaScript files. They can be local files or references to external files over http or HTTPS. A very commonly used JavaScript library is jQuery. JQuery makes it a lot easier to write JavaScript code and it reduces the lines of code significantly. In our case any such files will be saved in JsScripts folder under Extension-> Objects Folder as setup above. One file we will create for StartupScript as Start.js.
Now let’s include jQuery. We have to download jQuery from the Internet. So if we open our Web browser and we go to the jQuery website, we can click the download jQuery button over here. But instead of really downloading the jQuery files, we are going to reference them online.
Open the site: https://jquery.com/

Click on Download jQuery v3.3.1 large button as shown above.
Scroll down to find: – Microsoft CDN (Content Delivery Network)
Microsoft also has a CDN for jQuery. We take that one.
Copy the link to the latest one. Add this to our Scripts property in our control add-in.
Use the URL of jQuery file. There’s also a property start-up script which you can use to call a special script that runs when the page where you have implemented your control add-in is loaded. Now let’s add our start.js script over here. So because it’s in the folder script, we have to “Objects/JsScripts/Start.js”. Now, there’s also a recreate and a refresh script. We are not going to use them in this demo project, so remove them. And with the images and the style sheets properties you can specify additional style to the control add-in.
Scripts = ‘https://ajax.aspnetcdn.com/ajax/jQuery/jquery-3.3.1.js’;
StyleSheets = ‘Objects/StyleSheet/StyleSheet.css’;
StartupScript = ‘Objects/JsScripts/Start.js’;
Images = ‘Objects/Images/Weather.jpg” />
I am using dummy image to display on my control add-in, select your image accordingly and place it in Images folder.
We will look into StyleSheet.css and Start.js later in below post.

This is how your WeatherControlAddIn.al should look like.
Step – 3 : Create Style Sheet
I will be adding a CSS file to this with the name StyleSheet.css. In this CSS file I can apply some layout styles to give my control add-in a color or let it choose a certain font and so on and so on. But remember there are some guidelines on which styles to apply. I’m going to set my image to a width 200 pixels. So in CSS, this is image. Width, 200 pixels, and a margin top of 25 pixels. And then I need to reference it in my style sheet properties. This is ‘Objects/StyleSheet/StyleSheet.css’ and of course in the folder StyleSheet.
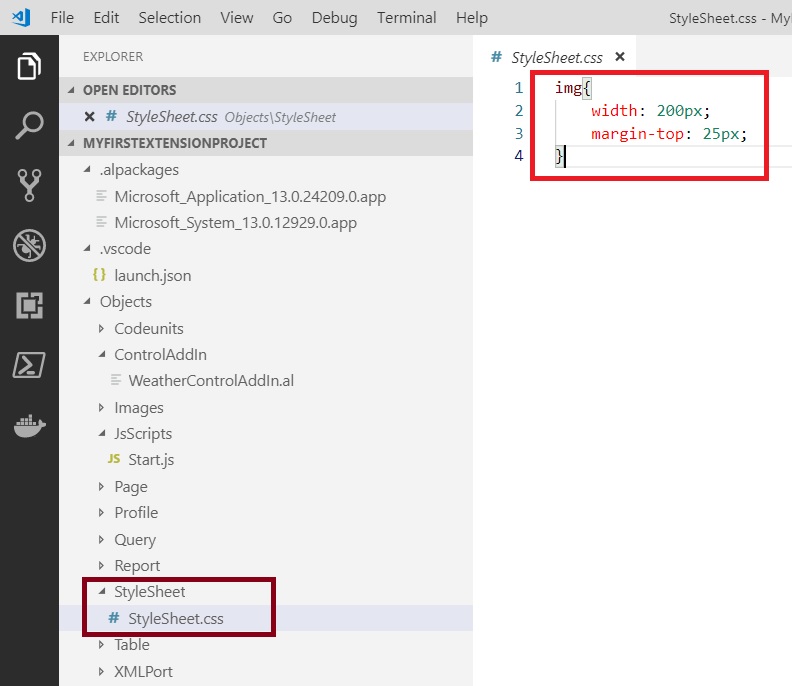
You can apply your knowledge about stylesheets to decorate your add-in accordingly, for demo purpose I have just set the width and top margin of the image.
Similarly I have downloaded an image from internet related to weather and copied to Images Folder.
Now set the path of both the files in your control add-in as shown above.
Step – 4 : Create CardPart Page
Now, our control add-in will run in a CardPart. So we have to create a page. Let’s create a new file and call this WeatherCardPart.al. This is a page. So T page. Let’s give it an ID and a name. WeatherCardPart. Now the source table will be customer. And the page type is CardPart.
Your Page should look similar to below:

We have added our ControlAddIn on the CardPart.
Next we will pass data from our Navision to the JQuery Script to process, to do so we have added a local procedure GetCustomer, remember above in control add-in we added signature of this procedure. Now it’s time to implement that function.
We have created a JsonObject to store our data and pass to Control Add-In.
This function gets called from OnAfterGetRecord trigger of the Page.
You may be wondering about function call QueryTempOfCity, this is the same function which we used in our earlier post to call API and get temperature of specified city then updated the Headline of the RC Page.
If you missed you can find that post here: Working with Headline Role Center Page and HTTP Call – Business Central
I have copied some functions from that post and changed a little bit and added to this page, it should be like below:

This function will take City as parameter and query from API and return the current temperature of that city. This function is explained in referenced post above.
Step – 5 : Create Page Extension
CardPart runs in a factbox on a page. So let’s create a page extension on the customer card. So new page. Let’s call this customercardextension.al. which extends the customer card. Add a factbox in the factboxes, and this is a part — let’s give it a name. WeatherCardPart. And this is of type WeatherCardPart. When adding a part or a factbox, then need to set the sub page link. So don’t forget to set the sub page link and this is equal to the number equals field number.

It should be similar to above.
Step – 6 : Create jQuery Script
Here comes the most interesting and difficult part as we are not regular Java Script programmer, but thanks to google, who is always there to help.
We will create our Start.js
You can apply your Java Scripts skill to enhance this, let us keep it simple for learning purpose.
We will extract the information send via GetCustomer function in JsonObject and display in our Control Add-In.

You can say controlAddIn here as main outer container.
We have defined 4 sub containers and with unique id to reference further.
Now we add all this 4 sub-containers to the main container controlAddIn.
Get the values from the Navision CardPard GetCustomer function and decode the JsonObject Customer and extract value from it and assign to these 3 containers.
For 4th we have assigned the image path from Extension using special function Microsoft.Dynamics.NAV.GetImageResource
Step – 7 : Deploy and Test the Control Add-In
So now we are done with Creating of Control Add-In, deploy your extension by using command pallet, Publish you Extension.
Open the Customer Card and you should see your Control Add-In in action.
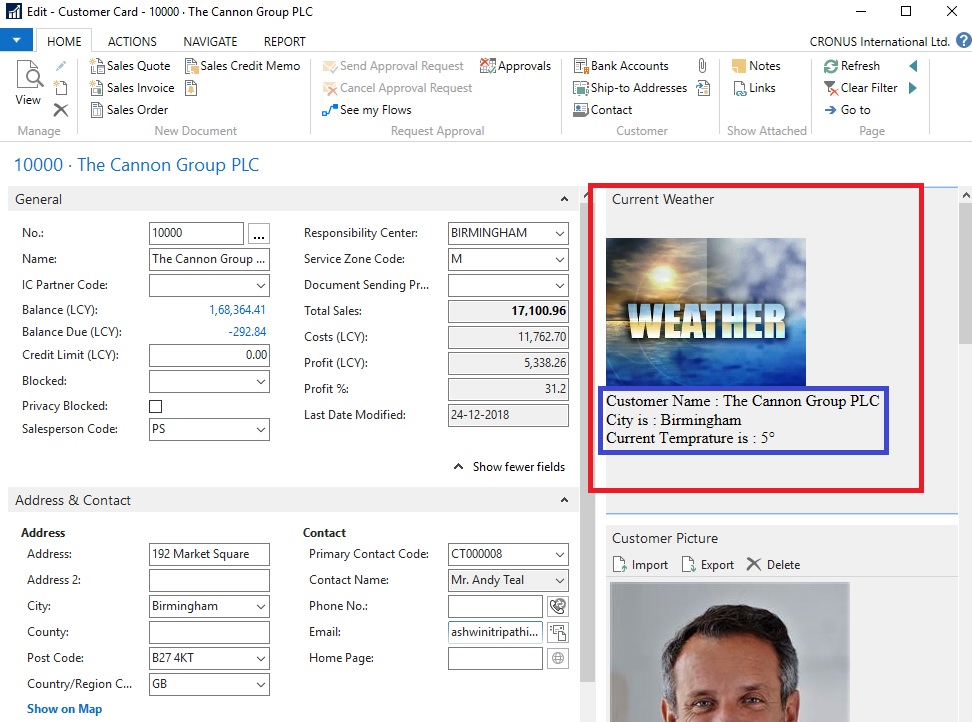
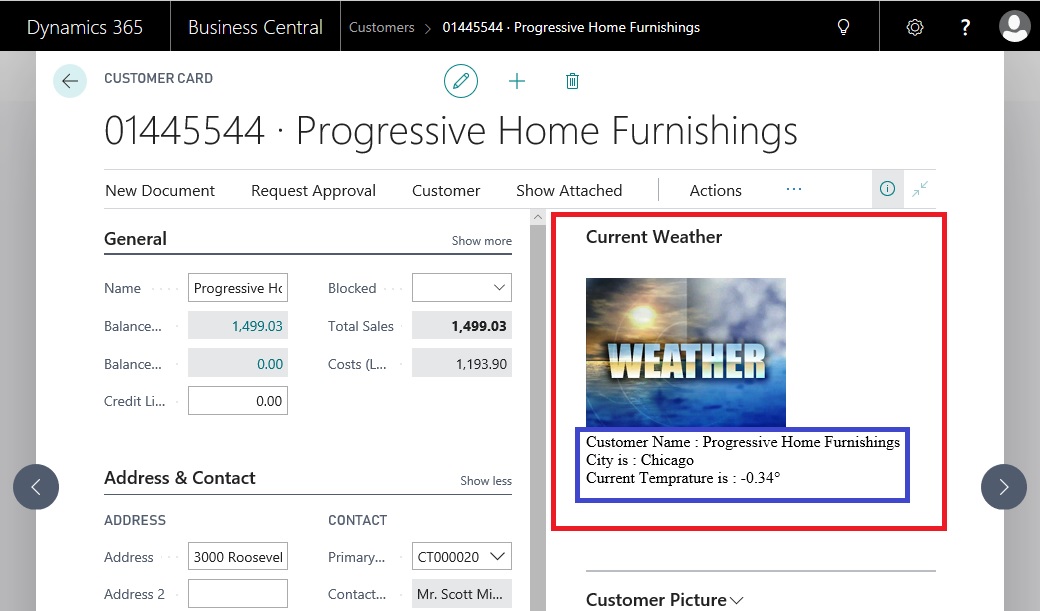
Tested successful. Here we come to the end of our today’s post.
Hope you liked and enjoyed learning the concept in this post.
Will come up with more such interesting concepts in my future posts.
Till then keep exploring and learning. Take Care of yourself.
Fieldgroup in Business Central
In today’s post we will see the usage of Fieldgroup and available options.
Today’s topic is very simple and straight forward.
Field groups are used to determine which columns you have available when you have a table relation to a field.
Another usage of field groups is when we go to a list page in Web Client like the customer list, we have a number of views of the customer list.

We have the normal list view, but there’s also two tiles layouts, the tall tiles and the regular tiles. When I select one of those layouts, I can see the number of the customer, the name, the contact and two decimal values, which are the balance and the balance due.

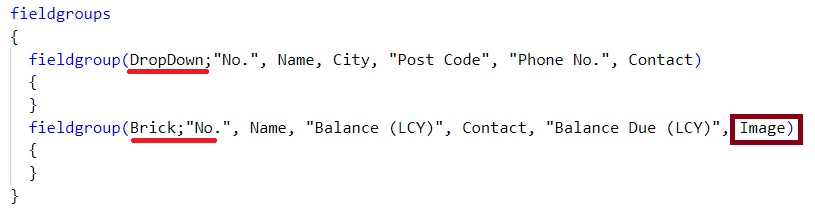
To have a tiles layout like this, you have to create a field group with the name brick, and then you have to specify all the fields you want to display. You can only have six fields in a tile and an image.
If the last field in your brick layout is media or media set field, in this case a picture for the customer table, then that will be the media set field which is used in the application. So the positions of your fields are very important.

It’s very important that your tables which are used in lists in the phone client and the tablet client, that you define a brick layout, because it’s a way that you can manage how, where and what information needs to be displayed.
Hope you find the information useful, and practice accordingly.
See you again in next post with some new topic, tips & tricks.
Till then keep exploring and learning, take good care of yourself.

You must be logged in to post a comment.