AL, BC14, BC15, BC16, BC17, Business Central, Codeunit, Development Tips, Enum, Extension, How To, Install, JSON, SOAP, Tip & Tricks, V1, V2, Visual Studio Code, Wave 1, Wave 2, Web Client, Web Services, XML

Update Tracking Line, Post Shipment using Web Services in Business Central

Hi, today I will discuss Web Service with below requirement. You can check other earlier post on this topic using search on right side of this blog page.

I got one request on topic from one of my customer cum blog follower, case study is as follows:

a) Will update Qty to Ship on document using Web Service from other application

b) Update Tracking Line for the Shipment using Web Service from other application

c) Post the Shipment using Web Service from other application

To get this we will create an Extension using VS Code which will have:

a) Codeunit with some functions which will be called using Web Service

b) A XML file to automatically expose above codeunit upon publishing this extension

Let us start how to achieve above requirement:

I have created this in BC16, will be same for other versions too.

Creating a AL Project:

Update your app.json & launch.json as per your environment, authentication, dependencies, port etc.

Creating a Codeunit: (TrackingCodeWS.al)

This function will be used to update “Qty. to Ship” on Sales Line

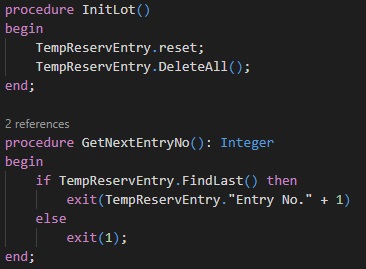
InitLot function as name suggests.

GetNextEntryNo function as name suggests.

It will depend on how you design your codeunit, you may require or not depends on logic how you use them.

AssignLotSalesLine is function which fills the lot details to temp Reservation Entry Table.

CreateReservationEntrySalesLine is the main function which actually makes your Tracking Lines and assign to Sales Line as per information filled in TempReservationEntry table in above function.

PostSalesOrder function is used for posting your Shipment.

Creating XML file to Publish Web Service

This XML file will ensure publishing of Web Service on Install of the Extension. You can directly make entry to Web Service table but benefit of using XML is when to Uninstall your extension the Web Service too will be removed, else if entry made to table you will have to take care to same yourself.

After Install of Extension, your Web Service is automatically Published.

Consume Web Service from Visual Studio

Below is the C# code to consume Web Service created above, you can modify code as per your requirement.

In above code we added Service Reference to Web Service and called functions created in Codeunit.

You can see earlier posts for step wise instruction how to add Web Reference to the Web Service in Visual Studio.

UpdateQtyToShipSalesLine:

Here “1” is used for Document Type = Order,”1008″ is my order no, 10000 is the Line No., 2 is the Quantity to Ship.

AssignLotSalesLine:

“L0001” & “L0002” is my Lot No, Serial No. is blank in this case, 1 is the Quantity, last three parameter is same as in above function call.

PostSalesOrder:

First 2 Parameter is same as above function call Document Type & Order No, third parameter is Ship = TRUE, Fourth Parameter is Invoice = FALSE.

Conclusion

This post gives you overall Idea how you can use Web Service to handle Sales Document from Web Service, you can make required modification to achieve exactly as per your requirement.

Advertisement
AL, API, Business Central, Development Tips, Extension Package, How To, Information, JSON, Modern Development Tool, OData, Tip & Tricks, V2, Visual Studio Code, What's New

API – Business Central Part-2

In our previous post we saw basics of API in Navision. Let’s explore further.

If you missed the earlier post you can find here API – Business Central Part-1

Continuing from where we left in previous post.

Someone asked me why we require API when we have web service in place and can achieve same OData either query or filter in same fashion.

So what I am going to explain below will answer to that query.

The API will generate a REST service which returns OData.  The API is not the same as the OData web services that we discussed in our earlier post.

There we created an OData web service based on a card page.  If there were fields that need to be displayed on a card in the client application but you do not want those fields to expose in the OData web service, you will have to create a second card page to solve this problem.  In this case, we create a separate page for our API and only for the API.  This page cannot be requested in the client application.  It’s also much better concept to separate them from the regular pages.

Also we can apply templates for default value of field, which we will discuss later in below post.

Let’s start with creating our own API.

Each resource is uniquely identified through an ID. As discussed in our earlier post. So let’s start with this, I will start with my earlier created Table LoadoutPoint and add one field ID.

api009

Any new entry in my table will have a unique ID for Loadout Point, so I have added code in OnInsert trigger of the table.

api010

To create an API, you should create a page of type API, instead of a card page or list page.

Use tpage, Page for type API snippet for page structure. You get all the bare minimum properties to be added for API Page.

api011

Then you have to define which fields you would like to include.

api012

Some important rules to be followed for API Pages:

  • Fields should be named in the APIs supported format, Any Captions cannot have spaces and special characters. Only AlphaNumeric values permitted.
  • When you insert an entity through API endpoint, Business Central don’t run OnInsert trigger on the table.
  • And we have assigned the ID for the new record there. So Add Insert(true) for OnInsert Trigger.
  • Add business logic to Modify trigger. As external user can change values through API, even the value of the primary key field.
  • Add Delete(true) for On Delete trigger. The reason same as above.

So let’s add these 3 trigger in our page too.

api013

Ok so now we have modified Table and Created new API page, now it’s time to publish our app/extension.

Use command palette to publish your app.

Now it’s time to test, let’s access our API page from client and do setup for same.

Search for API Setup Page in the client.

api014

You can define and assign your Template from Template Code field, check with available same Templates how to do it.

api015

Also the conditions when this Template should apply as discussed in earlier post also.

Now let’s access the API from outside the Navision/ Business Central.

I will use Postman to test this.

To get the list of 44 standard APIs.

https://KSD-DESKTOP:7748/BC130/api/beta/

api016

To get the list of custom APIs.

https://ksd-desktop:7748/BC130/api/ksdconsultancy/app1/v1.0/

Hope you remember when we created API page we assigned few Properties like

APIPublisher = ksdconsultancy, APIGroup = app1, APIVersion = v1.0.

Now we will use those values to access my custom APIs.

See the url those are included after /api/

api017

All information is available in JSON format and further can be confirmed that there are 1000 records. Thus, the number of records integrated here depends on the Max Page Size parameter setup in Navision Server.

What else you can do with APIs:

  • Get to fetch or List
  • Post to insert records
  • Patch to modify records
  • Delete to Delete records
  • And so on.
  • You can extend existing API Pages too, I have yet not tried.

That we may discuss in some other post. Not to complicate this topic more for now I conclude this post here.

Will come up with more details in my upcoming posts, till then keep exploring, learning and take good care of yourself.