Add, Add by Dimension, Add by Filter, Add Related Entries, Analysis Views, BC18, Business Central, Change, Combinations, Completed, Correction, Correction Setup, Delete, Dimension, Dimension Corrections, Draft, Dynamics 365, Functional Tips, G/L Entries, G/L Register, General Ledger Entries, History, How To, Information, Modify, Posted General Journal, Reversing, Run, Schedule, Select Manually, Tip & Tricks, Trace, Undo, Updating, Validate, What's New

How can we Correct Dimension in Microsoft Dynamics 365 Business Central?

You can do correction by reversing the journal or creating a credit memo for the document, which will be time consuming and can attract to even more errors.

Now you can correct dimensions for general ledger (G/L) entries to ensure your financial reports is providing you with accurate insights. For G/L entries, you can now

  • change the dimension values
  • add new dimensions
  • remove wrong ones

You can also trace a history of the corrections that you have done and can undo corrections in case you had made a mistake in the corrections itself.

Before you continue let me remind you:

Although the Dimension Correction feature only updates general ledger entries, still it can be helpful in many cases with creating accurate financial reports.

You must decide when to use the corrections because when you perform correction, it will result in differences between the dimensions in finance and sub-ledgers. The earlier you decide on what corrections to use, the less manual corrections you’ll need to do in the future.

I am using BC18 Demo database.

 How to run the Dimension Correction

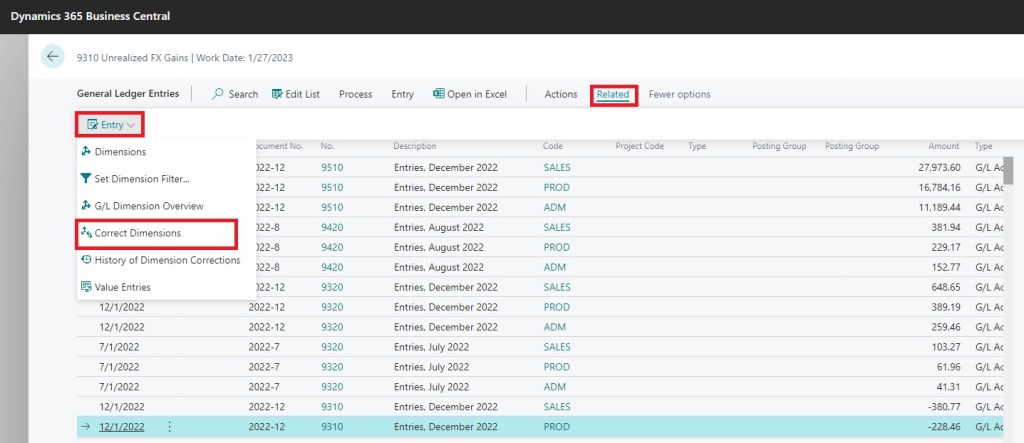
General Ledger Entries. You can change the dimensions for single or multiple entries just by selecting the entries.

G/L Register. You can change the dimension per batch posting. By using “From Entry No.”, “To Entry No.” as a filter for General Ledger Entries.

Posted General Journal. You can use “Document No.” and “Posting Date” as filters for General Ledger Entries.

Search for Dimension Corrections Page.

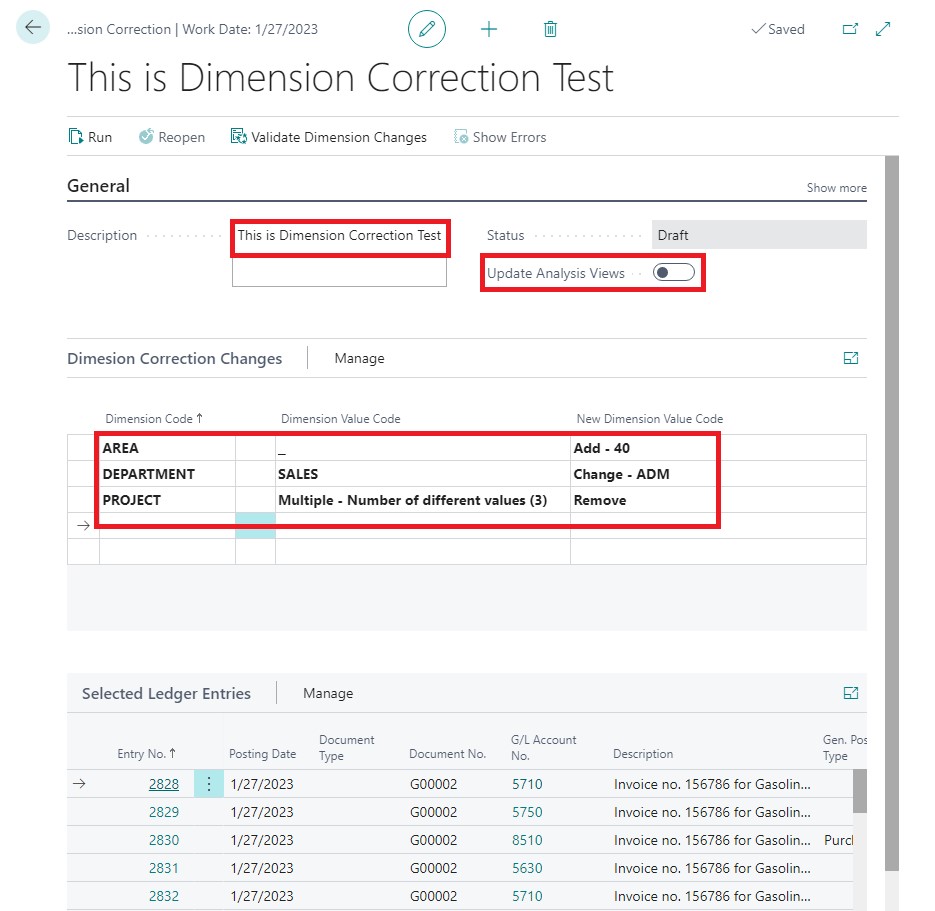
Draft Dimension Correction Screen:

Depending upon from where you Launched the Dimension Correction, it may come with pre-filled or as blank screen.

You have several options to work with dimensions:

  • You can Add New Dimensions
  • You can Remove existing Dimensions
  • You can Change the existing Dimensions

For Selecting Entries to which above changes applies you have different options to work with.

  • Add related entries. This requires at least 1 G/L Entry already to be selected, and then it adds all other G/L Entries with the same “Transaction No”.
  • Select Manually. You can manually select in the G/L Entries by just choosing them.
  • Add by Filter. Here you have all freedom of choice, how to filter your G/L Entries for the dimension corrections.
  • Add by Dimension. This can be useful if you want to change the dimension value Sales to Admin for all G/L entries. So, you find all G/L Entries with the Dimension Sales.

You can omit/remove selected entries, or change selection criteria for your entries to be applied with changes.

Updating Dimension Values

Above we create a Dimension Correction, the Status is initially DRAFT, it means the G/L Entries Dimension is NOT yet updated.

Once you are done in the Dimension change to move forward you have two option to go thru:

  • Click the Validate dimension change then click RUN.
  • Click RUN.

Validate change

This will check if it’s possible to make the dimension changes you specified.

  • Check Dimension Correction Setup.
  • Check Dimension Combinations.

Once the validation run successfully you can see it in the Validation status.

You can choose to run the job immediately or schedule in case you are operating on larger data set.

Next you can now use the Run action button. This will Apply changes to the General Ledger Entry Dimensions.

How to trace the correction

General Ledger Entries. You can see all the dimension corrections that you’ve done for the selected entries.

Search the Dimension Corrections. You can see all the Dimension corrections that you’ve done even the ongoing dimension corrections will be listed here.

Undo a Correction


In the dimension correction page just click the UNDO. This will be executed as a Job. The user will have to choose, how he wants to apply changes: running the job immediately or schedule it.

It is recommended to run the schedule if you are working with larger data set, to avoid the table locking during posting of other transactions.

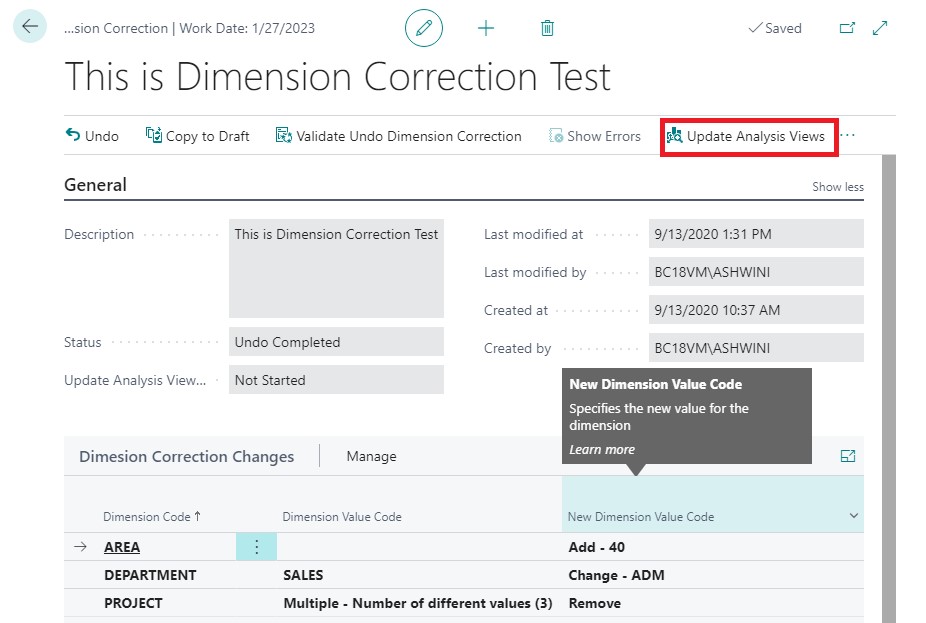
Once the Job execution completes, you will see the status change to UNDO COMPLETED.

How to Update the Analysis Views

From the Dimension Correction page, you can also update you’re Analysis Views by clicking the Update Analysis Views button. This will be executed as a Job. You will have to choose, how you want to apply changes: running the job immediately or schedule it.

It is recommended to run the schedule if you are working with larger dataset, to avoid the table locking during posting of other transactions.

Hope you enjoyed the information. Will come with more similar information in my next posts. Till then keep exploring, learning and sharing your knowledge with others.

Remain safe, take care of your loved ones, put your mask, maintain safe distance and don’t forget to get vaccinated.

Always Ask, Autoinsert, Automatic, BC18, Business Central, Customer, Dynamics 365, Functional Tips, Get Recurring Lines, How To, Information, Lines, Manual, Notification, Purchase Documents, Recurring, Sales Documents, Tip & Tricks, Vendor, What's New

Auto-insert Recurring Sales and Purchase Lines in Business Central

Today in this post we will see how you can automatically insert frequently used sales and purchases more quickly and conveniently in Dynamics365 Business Central.

I am using BC18 Demo Database.

If your company uses repeat orders for customer and vendors, this feature can be helpful to you.

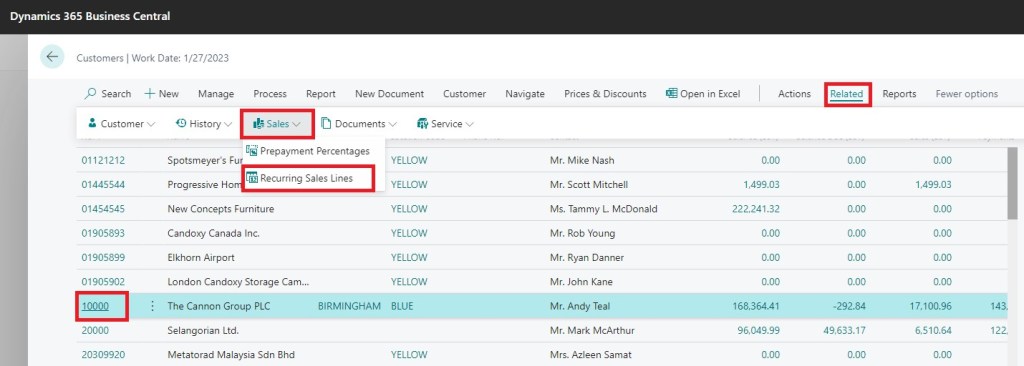
Open your Vendor Card, Select Related-> Purchases-> Recurring Purchase Lines.

In Recurring Purchase Line Setup, Create Code and way you want them to be available on your Purchase Documents.

Next you need to setup the Card for lines that will be part of this code for Purchase Lines.

Navigate to the Recurring Code Setup Page.

Choose the Card.

Enter the lines associated with this Code, that should be entered on Purchase Lines.

Options on Recurring Code Setup.

** Manual, Will be normal Std. Behavior

** Automatic, Lines will be inserted automatically.

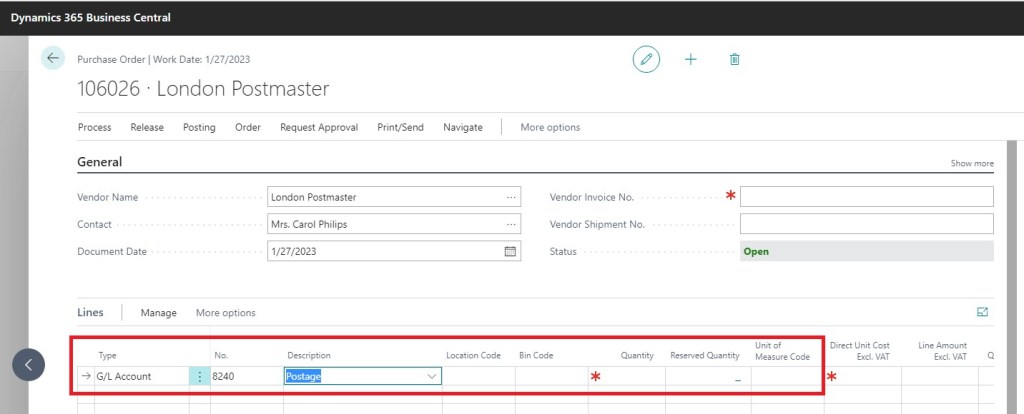
Key in the Vendor Code and press Enter.

This will be helpful if you have single Recurring code setup, as automatic, rest all as manual.

Else Notification will be raised and you have to choose from the list.

** Always Ask, will give you Notification to add.

Key in the Vendor Code and press Enter.

This is helpful when you have multiple setups, and want to choose from the list.

From Notification click on Get Recurring Lines, and select desired code.

Once Lines are inserted on Purchase Lines you can edit the lines as usual in any open orders. Add or Remove Lines, Change the other field values etc.

Similarly, you can setup for Sales Documents too.

Hope you enjoyed the information. Will come with more similar information in my next posts. Till then keep exploring, learning and sharing your knowledge with others.

Remain safe, take care of your loved ones, put your mask, maintain safe distance and don’t forget to get vaccinated.

BC18, Business Central, Dynamics 365, Functional Tips, How To, Information, Sales Documents, Track Package, Wave 2, What's New

Track Packages from Sales Documents in Business Central

Today in this post we will see how you to track items on shipping documents in Business Central.

I am using BC18 demo database.

Before we begin, we need to ensure our Shipping Agent is configured:

Open your Shipping agent and fill the Package Tracking URL you received from your agent.

It is obvious if agent do not provide this feature to track package from website, this will be of no use for that particular agent.

Save the changes and go to Sales Order.

Scroll to Shipping and Billing Fast Tab and fill agent details, as in above screenshot.

Next you post your shipment.

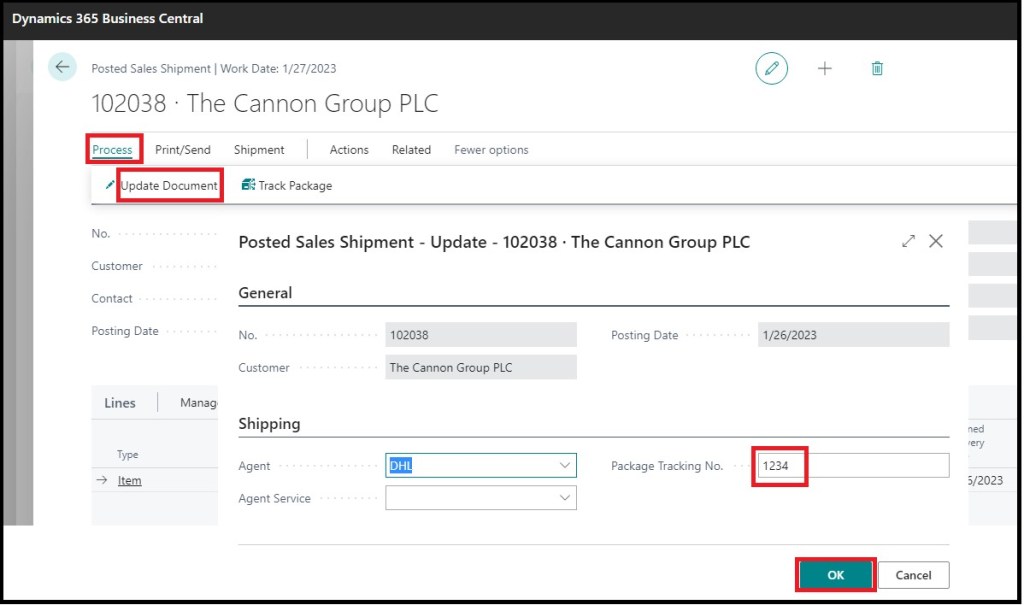
Navigate to your shipment and update tracking information you obtained from your agent.

On Posted Sales Shipment Select Process-> Update Document.

Update the Package Tracking No. you received after shipment from your agent, and save the information.

Now you can track the status of the shipment and keep informed to your customer regarding delivery status.

From Posted Shipment page select Process-> Track Package.

This will land you to the agent web page and update you about the current status of delivery.

Since we are using invalid Tracking Information, you will get your actual status if you provide valid Information.

This feature is available on other Sales Documents type too.

Hope you enjoyed the information. Will come with more similar information in my next posts. Till then keep exploring, learning and sharing your knowledge with others.

Remain safe, take care of your loved ones, put your mask, maintain safe distance and don’t forget to get vaccinated.

Background, BC18, Business Central, Check Financial Journals, Cues, Dynamics 365, Functional Tips, How To, Information, Tip & Tricks, Wave 2, What's New

Check Financial Journals in Background in Business Central

Today we learn how to check financial journals in the background in #Dynamics365 #BusinessCentral in this post.

First thing first, you need to ensure the check mark for the batch in question for Background Error Check should be checked.

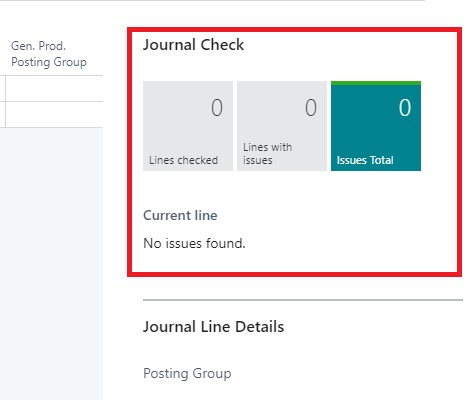
If this is enabled, when you open the batch on right side above Journal Line Details you will see Journal Check Section, which will let you know if Journal have any errors.

Let’s enter few Lines and see how it looks like

To see all errors, you can click on Cue Issues Total to bring summary page of all Issues.

If you have several Lines and you want to focus on lines with issues, you can do it by:

This will filter the lines on journal with issues.

Hope you enjoyed learning this feature, will come up with new post on new topic. Till then keep exploring, learning and sharing with others.

BC18, Business Central, Copy Journal, Functional Tips, How To, Information, Posted General Journals, Tip & Tricks, Wave 2, What's New

Copy Journal function on Posted General Journals in Business Central

Working with large journals can be cumbersome to correct if you make mistakes.

Earlier we used to do customizations for our customers to get this done. But now this feature is available in the product.

Now with the Wave 2 release of Dynamics Business Central you can use the copy journal function on Posted General Journals.

User have ability to reverse the entries based on posted General Journals.

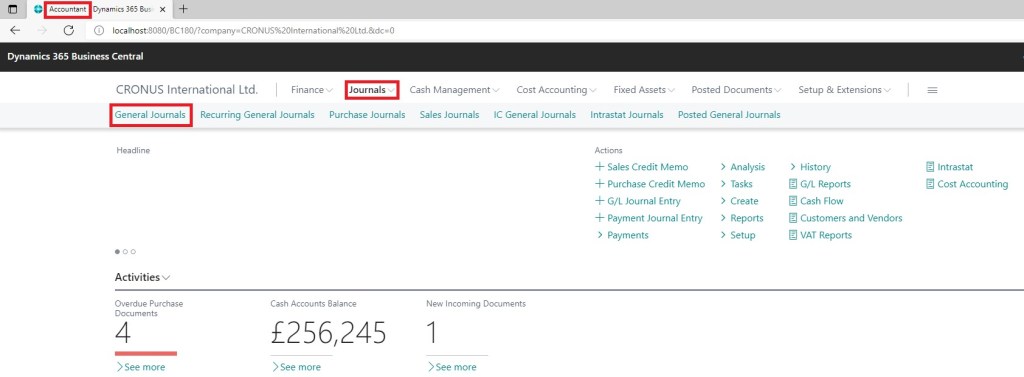
I am using Accountant Profile.

Search for General Journal Template, make sure you have check mark under Copy to Posted Jnl. Lines for template which you wish to use for this purpose.

Journals-> General Journal

Similarly, the Check mark on Batch which you will use for this purpose.

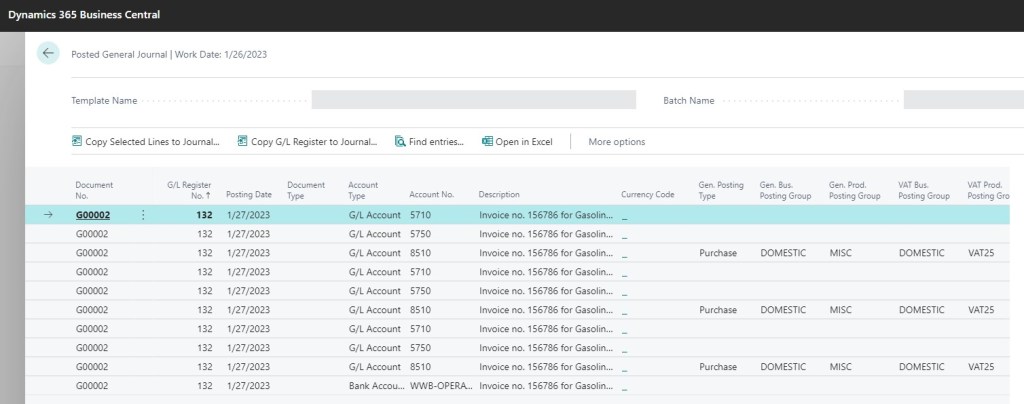
Search for Posted General Journal

You will find no entries as you can see in previous screenshot for Default Batch Copy to Posted General Journal check mark is clear and any entries posted using that batch is not available.

Now put the Check mark and post the entries.

Now re-open Posted General Journal after posting few entries.

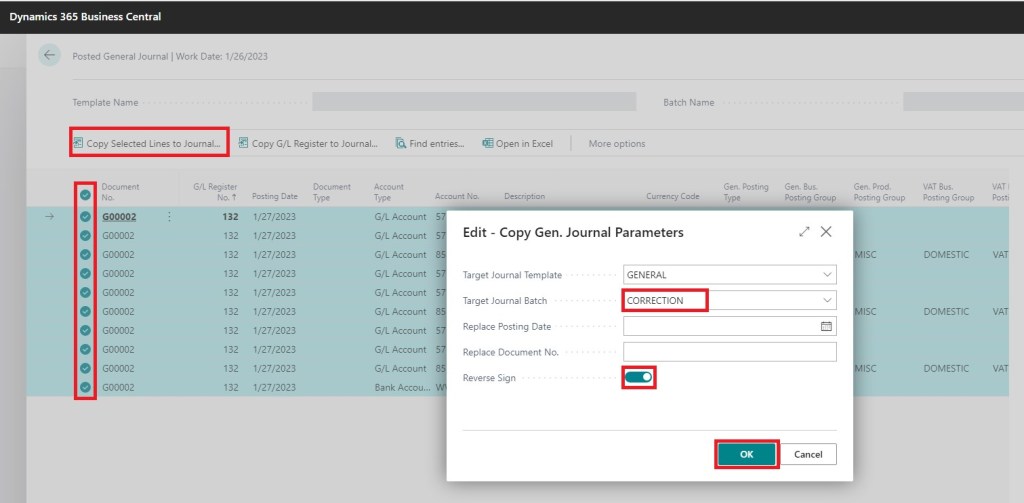
Select the Lines you wish to reverse

Select Copy Selected Line to Journal

Fill the request page, Your Template & Batch to Use, if you wish to change the Posting Date & Document No. If you wish to change the Sign and then press OK.

Your Journal Lines will be created as per the information provided on request page:

Below is the Screenshot after posting the entries:

I have exported to Excel and hidden few columns to show the output.

Entries marked in red rectangle is the entries posted post above operation and options selected on request page.

So now you know how to use this feature, share with your customers and help to make their life easy. Hope you liked and enjoyed learning this feature.

See you in next post, till then keep exploring, learning and sharing with others.

Now we have YouTube channel too, you can find link on Menu, first ever Dynamics Navision & Business Central Channel in Hinglish. You will get videos of demonstration in Mixed Language English as well as in Hindi. This will help both those who are comfortable with English and also with Hindi. Don’t forget to Subscribe and post your suggestions to improve the channel.

Channel Link

https://www.youtube.com/channel/UCm1JWr26UO5GqXiOHWhVD4A

BC14, BC15, BC16, BC17, Business Central, Cumulative Updates, How To, Information, Instalation & Configuration, Install, NAV 2016, NAV 2017, NAV 2018, on-premises, Updates, Wave 1, Wave 2, What's New

Cumulative Updates for Microsoft Dynamics NAV 2016/2017/2018 And BC Released in Mar 2021

Update 17.5 for Microsoft Dynamics 365 Business Central 2020 Release Wave 2 (Application Build 17.5.22499.22546, Platform Build 17.0.22463.22540)

This update replaces previously released updates. You should always install the latest update.

It may be necessary to update your license after you install this hotfix to gain access to new objects that are included in this or a previous update. (This only applies to customer licenses.)

For a list of updates that were released for Microsoft Dynamics 365 Business Central 2020 Release Wave 2, see released updates for Microsoft Dynamics 365 Business Central 2020 Release Wave 2. Updates are intended for new and existing customers who are running Microsoft Dynamics Released Updates for Microsoft Dynamics 365 Business Central 2020 Release Wave 2.

How to obtain the Microsoft Dynamics 365 Business Central 2020 Release Wave 2 files

This update is available for manual download and installation from the Microsoft Download Center.

Update 17.5 for Microsoft Dynamics 365 Business Central  2020 Release Wave 2

How to install a Microsoft Dynamics 365 Business Central on-premises 2020 Release Wave 2 update

See How to install a Microsoft Dynamics 365 Business Central 2020 Release Wave 2 update.

Prerequisites

You must have Microsoft Dynamics 365 Business Central 2020 Release Wave 2 installed to apply this hotfix.

Update 16.11 for Microsoft Dynamics 365 Business Central 2020 Release Wave 1 (Application Build 16.11.22526, Platform Build 16.0.22511)

This update replaces previously released updates. You should always install the latest update.

It may be necessary to update your license after you install this hotfix to gain access to new objects that are included in this or a previous update. (This only applies to customer licenses.)

For a list of updates that were released for Microsoft Dynamics 365 Business Central 2020 Release Wave 1, see released updates for Microsoft Dynamics 365 Business Central 2020 Release Wave 1. Updates are intended for new and existing customers who are running Microsoft Dynamics Released Updates for Microsoft Dynamics 365 Business Central 2020 Release Wave 1.

How to obtain the Microsoft Dynamics 365 Business Central 2020 Release Wave 1 files

This update is available for manual download and installation from the Microsoft Download Center.

Update 16.11 for Microsoft Dynamics 365 Business Central  2020 Release Wave 1

How to install a Microsoft Dynamics 365 Business Central on-premises 2020 Release Wave 1 update

See How to install a Microsoft Dynamics 365 Business Central 2020 Release Wave 1 update.

Prerequisites

You must have Microsoft Dynamics 365 Business Central 2020 Release Wave 1 installed to apply this hotfix.

Update 15.16 for Microsoft Dynamics 365 Business Central 2019 Release Wave 2 (Application Build 15.16.46612, Platform Build 15.0.46600)

This update replaces previously released updates. You should always install the latest update.

It may be necessary to update your license after you install this hotfix to gain access to new objects that are included in this or a previous update. (This only applies to customer licenses.)

For a list of updates that were released for Microsoft Dynamics 365 Business Central 2019 Release Wave 2, see released updates for Microsoft Dynamics 365 Business Central 2019 Release Wave 2. Updates are intended for new and existing customers who are running Microsoft Dynamics Released Updates for Microsoft Dynamics 365 Business Central 2019 Release Wave 2.

How to obtain the Microsoft Dynamics 365 Business Central 2019 Release Wave 2 files

This update is available for manual download and installation from the Microsoft Download Center.

Update 15.16 for Microsoft Dynamics 365 Business Central 2019 Release Wave 2

How to install a Microsoft Dynamics 365 Business Central 2019 Release Wave 2 update

See How to install a Microsoft Dynamics 365 Business Central 2019 Release Wave 2 update.

Prerequisites

You must have Microsoft Dynamics 365 Business Central 2019 Release Wave 2 installed to apply this hotfix.

Cumulative Update 22 for Microsoft Dynamics 365 Business Central April’19 on-premises (Application Build 14.23.46611, Platform Build 14.0.46607)

This cumulative update replaces previously released cumulative updates. You should always install the latest cumulative update.

It may be necessary to update your license after you install this hotfix to gain access to new objects that are included in this or a previous cumulative update. (This applies only to customer licenses.)

For a list of cumulative updates that were released for Microsoft Dynamics 365 Business Central Spring 2019, see released cumulative updates for Microsoft Dynamics 365 Business Central Spring 2019. Cumulative updates are intended for new and existing customers who are running Microsoft Dynamics Released Cumulative Updates for Microsoft Dynamics 365 Business Central Spring 2019.

How to obtain the Microsoft Dynamics 365 Business Central Spring 2019 files

This update is available for manual download and installation from the Microsoft Download Center.

Cumulative update CU 22 for Microsoft Dynamics 365 Business Central Spring 2019 Update on-premises

How to install a Microsoft Dynamics 365 Business Central Spring 2019 cumulative update

See How to install a Microsoft Dynamics 365 Business Central Spring 2019 cumulative update.

Prerequisites

You must have Microsoft Dynamics 365 Business Central Spring 2019 installed to apply this hotfix.

Cumulative Update 39 for Microsoft Dynamics NAV 2018 (Build 46609)

This cumulative update includes all hotfixes and regulatory features that have been released for Microsoft Dynamics NAV 2018, including hotfixes and regulatory features that were released in previous cumulative updates.

This cumulative update replaces previously released cumulative updates. You should always install the latest cumulative update.

It may be necessary to update your license after you install this hotfix to gain access to new objects that are included in this or a previous cumulative update. (This applies only to customer licenses.)

For a list of cumulative updates that were released for Microsoft Dynamics NAV 2018, see released cumulative updates for Microsoft Dynamics NAV 2018. Cumulative updates are intended for new and existing customers who are running Microsoft Dynamics NAV 2018.

How to obtain the Microsoft Dynamics NAV update files

This update is available for manual download and installation from the Microsoft Download Center.

Cumulative update CU 39 for Microsoft Dynamics NAV 2018

How to install a Microsoft Dynamics NAV 2018 cumulative update

See How to install a Microsoft Dynamics NAV 2018 cumulative update.

Prerequisites

You must have Microsoft Dynamics NAV 2018 installed to apply this hotfix.

Cumulative Update 52 for Microsoft Dynamics NAV 2017 (Build 30477)

This cumulative update includes all hotfixes and regulatory features that have been released for Microsoft Dynamics NAV 2017, including hotfixes and regulatory features that were released in previous cumulative updates.

This cumulative update replaces previously released cumulative updates. You should always install the latest cumulative update.

It may be necessary to update your license after implementing this hotfix to gain access to new objects included in this or a previous cumulative update (this only applies to customer licenses).

For a list of cumulative updates released for Microsoft Dynamics NAV 2017, see released cumulative updates for Microsoft Dynamics NAV 2017. Cumulative updates are intended for new and existing customers who are running Microsoft Dynamics NAV 2017.

How to install a Microsoft Dynamics NAV 2017 cumulative update

See How to install a Microsoft Dynamics NAV 2017 cumulative update.

Prerequisites

You must have Microsoft Dynamics NAV 2017 installed to apply this hotfix.

Cumulative Update 65 for Microsoft Dynamics NAV 2016 (Build 52121)

This cumulative update replaces previously released cumulative updates. You should always install the latest cumulative update.

It may be necessary to update your license after you install this hotfix to gain access to new objects that are included in this or a previous cumulative update. (This applies only to customer licenses.)

For a list of cumulative updates that were released for Microsoft Dynamics NAV 2016, see released cumulative updates for Microsoft Dynamics NAV 2016. Cumulative updates are intended for new and existing customers who are running Microsoft Dynamics NAV 2016.

How to obtain the Microsoft Dynamics NAV update files

This update is available for manual download and installation from the Microsoft Download Center.

Cumulative update CU 65 for Microsoft Dynamics NAV 2016

How to install a Microsoft Dynamics NAV 2016 cumulative update

See How to install a Microsoft Dynamics NAV 2016 cumulative update.

Prerequisites

You must have Microsoft Dynamics NAV 2016 installed to apply this hotfix.

Business Central, Cumulative Updates, How To, Information, Instalation & Configuration, NAV 2015, NAV 2016, NAV 2017, NAV 2018, Tip & Tricks, Updates, Wave2, What's New

Cumulative Updates for Microsoft Dynamics NAV 2015/2016/2017/2018 & BC Released in Nov 2019

Cumulative Update 61 for Microsoft Dynamics NAV 2015 (Build 51641)

This cumulative update includes all hotfixes and regulatory features that have been released for Microsoft Dynamics NAV 2015, including hotfixes and regulatory features that were released in previous cumulative updates.
Note You must convert the database if you are upgrading to this cumulative update from a cumulative update earlier than cumulative update 9 (build 41779). For more information, see Converting a Database in Help for Microsoft Dynamics NAV.

This cumulative update replaces previously released cumulative updates. You should always install the latest cumulative update.

It may be necessary to update your license after implementing this hotfix to gain access to new objects included in this or a previous cumulative update (this only applies to customer licenses).

For a list of cumulative updates released for Microsoft Dynamics NAV 2015, see released cumulative updates for Microsoft Dynamics NAV 2015. Cumulative updates are intended for new and existing customers who are running Microsoft Dynamics NAV 2015.

How to obtain the Microsoft Dynamics NAV update files

This update is available for manual download and installation from the Microsoft Download Center.

Cumulative update CU 61 for Microsoft Dynamics NAV 2015

How to install a Microsoft Dynamics NAV 2015 cumulative update

See How to install a Microsoft Dynamics NAV 2015 Cumulative Update.

Prerequisites

You must have Microsoft Dynamics NAV 2015 installed to apply this hotfix.

Cumulative Update 49 for Microsoft Dynamics NAV 2016 (Build 51640)

This cumulative update includes all hotfixes and regulatory features that have been released for Microsoft Dynamics NAV 2016, including hotfixes and regulatory features that were released in previous cumulative updates.
This cumulative update replaces previously released cumulative updates. You should always install the latest cumulative update.

It may be necessary to update your license after implementing this hotfix to gain access to new objects included in this or a previous cumulative update (this only applies to customer licenses).

For a list of cumulative updates released for Microsoft Dynamics NAV 2016, see released cumulative updates for Microsoft Dynamics NAV 2016. Cumulative updates are intended for new and existing customers who are running Microsoft Dynamics NAV 2016.

How to obtain the Microsoft Dynamics NAV update files

This update is available for manual download and installation from the Microsoft Download Center.

Cumulative update CU 49 for Microsoft Dynamics NAV 2016

How to install a Microsoft Dynamics NAV 2016 cumulative update

See How to install a Microsoft Dynamics NAV 2016 cumulative update.

Prerequisites

You must have Microsoft Dynamics NAV 2016 installed to apply this hotfix.

Cumulative Update 36 for Microsoft Dynamics NAV 2017 (Build 30074)

This cumulative update includes all hotfixes and regulatory features that have been released for Microsoft Dynamics NAV 2017, including hotfixes and regulatory features that were released in previous cumulative updates.

This cumulative update replaces previously released cumulative updates. You should always install the latest cumulative update.

It may be necessary to update your license after implementing this hotfix to gain access to new objects included in this or a previous cumulative update (this only applies to customer licenses).

For a list of cumulative updates released for Microsoft Dynamics NAV 2017, see released cumulative updates for Microsoft Dynamics NAV 2017. Cumulative updates are intended for new and existing customers who are running Microsoft Dynamics NAV 2017.

How to obtain the Microsoft Dynamics NAV update files

This update is available for manual download and installation from the Microsoft Download Center.

Cumulative update CU 36 for Microsoft Dynamics NAV 2017

How to install a Microsoft Dynamics NAV 2017 cumulative update

See How to install a Microsoft Dynamics NAV 2017 cumulative update.

Prerequisites

You must have Microsoft Dynamics NAV 2017 installed to apply this hotfix.

Cumulative Update 23 for Microsoft Dynamics NAV 2018 (Build 37606)

This cumulative update includes all hotfixes and regulatory features that have been released for Microsoft Dynamics NAV 2018, including hotfixes and regulatory features that were released in previous cumulative updates.

This cumulative update replaces previously released cumulative updates. You should always install the latest cumulative update.

It may be necessary to update your license after implementing this hotfix to gain access to new objects included in this or a previous cumulative update (this only applies to customer licenses).

For a list of cumulative updates released for Microsoft Dynamics NAV 2018, see released cumulative updates for Microsoft Dynamics NAV 2018. Cumulative updates are intended for new and existing customers who are running Microsoft Dynamics NAV 2018.

How to obtain the Microsoft Dynamics NAV update files

This update is available for manual download and installation from the Microsoft Download Center.

Cumulative update CU 23 for Microsoft Dynamics NAV 2018

How to install a Microsoft Dynamics NAV 2018 cumulative update

See How to install a Microsoft Dynamics NAV 2018 cumulative update.

Prerequisites

You must have Microsoft Dynamics NAV 2018 installed to apply this hotfix.

Cumulative Update 13 for Microsoft Dynamics 365 Business Central on-premises (Application Build 37622, Platform Build 37612)

This cumulative update includes all hotfixes and regulatory features that have been released for Microsoft Dynamics 365 Business Central, including hotfixes and regulatory features that were released in previous cumulative updates.

This cumulative update replaces previously released cumulative updates. You should always install the latest cumulative update.

It may be necessary to update your license after implementing this hotfix to gain access to new objects included in this or a previous cumulative update (this only applies to customer licenses).

For a list of cumulative updates released for Microsoft Dynamics 365 Business Central, see released cumulative updates for Microsoft Dynamics 365 Business Central. Cumulative updates are intended for new and existing customers who are running Microsoft Dynamics Released Cumulative Updates for Microsoft Dynamics 365 Business Central.

How to obtain the Microsoft Dynamics 365 Business Central update files

This update is available for manual download and installation from the Microsoft Download Center.

Cumulative update CU 13 for Microsoft Dynamics 365 Business Central on-premises

How to install a Microsoft Dynamics 365 Business Central cumulative update

See How to install a Microsoft Dynamics 365 Business Central cumulative update.

Prerequisites

You must have Microsoft Dynamics 365 Business Central installed to apply this hotfix.

Cumulative Update 06 for Microsoft Dynamics 365 Business Central Spring 2019 Update on-premises (Application Build 14.7.37609, Platform Build 14.7.37587)

This cumulative update replaces previously released cumulative updates. You should always install the latest cumulative update.

It may be necessary to update your license after implementing this hotfix to gain access to new objects included in this or a previous cumulative update (this only applies to customer licenses).

For a list of cumulative updates released for Microsoft Dynamics 365 Business Central Spring 2019, see released cumulative updates for Microsoft Dynamics 365 Business Central Spring 2019. Cumulative updates are intended for new and existing customers who are running Microsoft Dynamics Released Cumulative Updates for Microsoft Dynamics 365 Business Central Spring 2019.

How to obtain the Microsoft Dynamics 365 Business Central Spring 2019 files

This update is available for manual download and installation from the Microsoft Download Center.

Cumulative update CU 06 for Microsoft Dynamics 365 Business Central Spring 2019 Update on-premises

How to install a Microsoft Dynamics 365 Business Central Spring 2019 cumulative update

See How to install a Microsoft Dynamics 365 Business Central Spring 2019 cumulative update.

Prerequisites

You must have Microsoft Dynamics 365 Business Central Spring 2019 installed to apply this hotfix.


Update 15.1 for Microsoft Dynamics 365 Business Central 2019 Release Wave 2 (Application Build 15.1.38071, Platform Build 15.1.37898)

This update replaces previously released updates. You should always install the latest update.

It may be necessary to update your license after implementing this hotfix to gain access to new objects included in this or a previous update (this only applies to customer licenses).

For a list of updates released for Microsoft Dynamics 365 Business Central 2019 Release Wave 2, see released updates for Microsoft Dynamics 365 Business Central 2019 Release Wave 2. Updates are intended for new and existing customers who are running Microsoft Dynamics Released Updates for Microsoft Dynamics 365 Business Central 2019 Release Wave 2.

How to obtain the Microsoft Dynamics 365 Business Central 2019 Release Wave 2 files

This update is available for manual download and installation from the Microsoft Download Center.

Update 15.1 for Microsoft Dynamics 365 Business Central 2019 Release Wave 2

How to install a Microsoft Dynamics 365 Business Central 2019 Release Wave 2 update

See How to install a Microsoft Dynamics 365 Business Central 2019 Release Wave 2 update.

Prerequisites

You must have Microsoft Dynamics 365 Business Central 2019 Release Wave 2 installed to apply this hotfix.
Business Central, Dynamics 365, Information, Wave 2, What's New

Dynamics 365 Business Central 2019 wave 2 – Released

The 2019 release wave 2 for Business Central delivers plenty of new features and capabilities.

Dynamics NAV customers upgrading to Business Central on premises will enjoy the unique flexibility to continue running on premises, move to the cloud, or adopt a hybrid approach.

You can download the product ​​​from Microsoft Product Download Page. Select your desired country link to download product specific to your country. You will require partner source or customer source login to access.

Direct link to W1 Product is here.

With the 2019 release wave 2, users access Business Central in the browser, Windows 10 desktop app, mobile apps on Android and iOS, or in Outlook.

The 2019 release wave 2 is the first version that does not include the classic development environment (also known as C/SIDE) or the Dynamics NAV Client connected to Business Central (also known as the Windows client).

The modern developer experience based on Visual Studio Code now supports developing large apps such as the base application from Microsoft, and so C/SIDE is discontinued for Business Central going forward.

Business Central 2019 release wave 2 moves to the Modern Support Lifecycle Policy effective October 1, 2019. This policy requires that the customer maintain the Enhancement Plan and deploy updates as noted in the servicing policy.

The Modern Lifecycle Policy requirements are defined below:

  1. Customers must stay current as per the servicing and licensing requirements published for the product or service.
  2. Customers must have the rights to use the product or service.
  3. Microsoft must currently offer support for the product or service.

BC Product Life Cycle

DYNAMICS 365 BUSINESS CENTRAL LICENSING PROGRAMS

License for Dynamics 365 Business Central will be sold through the following programs:

– Cloud Solution Provider Program (CSP) – Dynamics 365 Business Central

– D​​ynamics Price List (DPL) – Dynamics 365 Business Central on-premises ​

This section lists features that are planned to release from October 2019 through March 2020. Because this topic lists features that may not have released yet, delivery timelines may change and projected functionality may not be released

This colour (This feature is released. ) dates shows which features have been released for public preview or early access and for general availability. Below list is updated as per information available at the time of writing this post.

Application enhancements

Feature Enabled for Public preview General availability
Allow non-sequential numbering End users, automatically Oct 1, 2019
Cancel reminders and finance charge memos End users, automatically Aug 1, 2019 Oct 1, 2019
Carry line descriptions to G/L entries when posting End users, automatically Aug 1, 2019 Oct 1, 2019
Create records and convert prospects with better templates End users, automatically Aug 1, 2019 Oct 1, 2019
Use the Copy Document function on blocked lines End users, automatically Aug 1, 2019 Oct 1, 2019
Aged Accounts Payable includes External Document Number field End users, automatically Sep 1, 2019 Oct 1, 2019
Batch-post sales and purchases as scheduled End users, automatically Sep 1, 2019 Oct 1, 2019
Reconcile payables with the External Document Number field End users, automatically Sep 1, 2019 Oct 1, 2019

Application lifecycle management

Feature Enabled for Public preview General availability
Detailed notifications for update events Admins, makers, or analysts, automatically Oct 1, 2019
Multiple production environments Admins, makers, or analysts, automatically Oct 1, 2019
Report production outage in the Business Central Administration Center Admins, makers, or analysts, automatically Oct 2019
Support for performant data upgrade from C/AL tables to AL tables Admins, makers, or analysts, automatically Aug 1, 2019 Oct 1, 2019
Ability to download a database export file Admins, makers, or analysts, automatically Nov 2019

Empower ISV acceleration

Feature Enabled for Public preview General availability
Design for extensibility Admins, makers, or analysts, automatically Aug 1, 2019 Oct 2019

Migrations to Business Central online

Feature Enabled for Public preview General availability
Enhancements for customer migration tools Admins, makers, or analysts, automatically Oct 2019

Modern clients

Feature Enabled for Public preview General availability
Add links to your navigation menu End users, automatically Aug 1, 2019 Oct 1, 2019
Add notes and links to data End users, automatically Aug 1, 2019 Oct 1, 2019
Enhancements to Excel integration End users, automatically Aug 1, 2019 Oct 1, 2019
Filter reports more efficiently End users, automatically Aug 1, 2019 Oct 1, 2019
Full keyboard shortcut support End users, automatically Aug 1, 2019 Oct 1, 2019
General user experience adjustments End users, automatically Aug 1, 2019 Oct 1, 2019
Get an overview of all business features End users, automatically Aug 1, 2019 Oct 1, 2019
Identify the company by a badge End users, automatically Aug 1, 2019 Oct 1, 2019
Longer timeout period for the server connection End users, automatically Aug 1, 2019 Oct 1, 2019
Modern clients only for Business Central Admins, makers, or analysts, automatically Aug 1, 2019 Oct 1, 2019
Personalize actions on your Role Center End users, automatically Aug 1, 2019 Oct 1, 2019
Resize columns with fewer clicks End users, automatically Aug 1, 2019 Oct 1, 2019
Save and personalize list views End users, automatically Aug 1, 2019 Oct 1, 2019
Switch between companies in your business inbox in Outlook End users, automatically Aug 1, 2019 Oct 1, 2019
Multitask across multiple pages End users, automatically Aug 15, 2019 Oct 1, 2019
Customize user profiles without writing code End users, automatically Sep 1, 2019 Oct 1, 2019
Enter data with speed and agility End users, automatically Sep 1, 2019 Oct 1, 2019
Filter option fields by multiple values End users, automatically Sep 1, 2019 Oct 1, 2019

Modern developer tools

Feature Enabled for Public preview General availability
Translating other extensions Admins, makers, or analysts, automatically Oct 1, 2019
Access modifiers Admins, makers, or analysts, automatically Aug 1, 2019 Oct 1, 2019
Attach and debug next Admins, makers, or analysts, automatically Aug 1, 2019 Oct 1, 2019
Base application delivered as AL applications Admins, makers, or analysts, automatically Aug 1, 2019 Oct 1, 2019
Convert tables from C/AL definitions to AL table definitions Admins, makers, or analysts, automatically Aug 1, 2019 Oct 1, 2019
Database insights made available in AL Admins, makers, or analysts, automatically Aug 1, 2019 Oct 1, 2019
Filtering XmlPort Objects End users by admins, makers, or analysts Aug 1, 2019 Oct 1, 2019
Implementing hierarchical menus End users by admins, makers, or analysts Aug 1, 2019 Oct 1, 2019
Improved app dependency handling on build and deploy Admins, makers, or analysts, automatically Aug 1, 2019 Oct 1, 2019
More power to developers using Designer Admins, makers, or analysts, automatically Aug 1, 2019 Oct 1, 2019

Service fundamentals

Feature Enabled for Public preview General availability
New Support Request option in the Business Central Administration Center Admins, makers, or analysts, automatically Oct 2019
Partners can enter support contact details in the Business Central Administration Center Admins, makers, or analysts, automatically Oct 2019
Lock-free number series End users, automatically Aug 1, 2019 Oct 1, 2019
Page background tasks Admins, makers, or analysts, automatically Aug 1, 2019 Oct 1, 2019
Surrogate keys Admins, makers, or analysts, automatically Aug 1, 2019 Oct 1, 2019
Business Central, Information, Updates, What's New

What’s New in Business Central April 2019 Release

April ’19 brings an update to Business Central that aims to enhance current customer satisfaction with the product.

Powerful new features for business users

Keyboard-centric features like speed of data entry and analysis, such as quick entry, list sorting, and data values. Improvements to features related to the customer context, such as work date and the company indicator, options enabling advanced users to be even more productive, such as focus mode, totals for lists, improved search, and the new page inspector. Enhancement related to filters in Excel export, common auto-save experience, and modern interface elements, such as the date picker, refreshed action bar, and all-product navigation.

Performance, reliability, and scalability enhancements

Along with innovative new features, Microsoft invested heavily in boosting performance, reliability, and scalability of Business Central, across the platform and business application.

The experience in the browser will be more responsive using technique of on-demand loading of page elements, server resources are optimized for fast user interaction, and the database has been tuned to handle more data and load it faster.

Users requiring assistance now have a single screen through which to find self-help material, share ideas with the community, and request support that has also been streamlined to reduce response time.

Business Central continues to meet ISO27001, ISO27017, ISO27018, SOC 1 & 2 Type 2, HIPPA BAA, and FERPA industry security and privacy compliance standards. For more details and a list of all certificates, see here.

Accessibility

Business Central is ready to support the diversity of your workforce where both the desktop and mobile interfaces are now highly accessible.

Base application as an app

Microsoft is making big investments in the platform to make it easier for ISVs to get into the cloud. This is achieved by splitting the big application that we have today into a system app and an app on top of that as an extension, compiled in AL using Visual Studio Code.

nfbc-1

Data and AI

The last major investment for the April release is Data and AI future. Strengthen and prepare integration with Dynamics 365 for Sales through CDS and ensure Business Central data contributes to intelligent insights (notes synching, late payment prediction) in Dynamics 365 AI for Sales apps and Business Central users get intelligent insights generated by Dynamics 365 AI for Sales (predictive opportunity scoring).

Borne from Overview of Dynamics 365 Business Central April ’19 release article.

New and planned for Dynamics 365 Business Central

Features that are planned to release between April and September 2019. Previews for some features will start in February 2019.

Below table lists functionality that may not have been released yet. Delivery timelines and projected functionality may change or may not ship (see Microsoft policy).

Productivity enhancements for business users

Feature Release type Online vs on-premises Date
Application enhancements General Availability Both April 2019
List views General Availability Both April 2019
Rich notes and links General Availability Online April 2019
Document focus mode General Availability Both April 2019
Work date indicator General Availability Both April 2019
Context or system indicator General Availability Both After April 2019
Quick Entry General Availability Both April 2019
New keyboard shortcuts General Availability Both April 2019
Autosave indicator General Availability Both April 2019
Improvements to scrolling in lists General Availability Both April 2019
Improved contextual search experience General Availability Both April 2019
Improved all-product navigation General Availability Both After April 2019
Personalization enhancements General Availability Both April 2019

Self-help and support

Feature Release type Online vs on-premises Date
Simplified Help and Support experience General Availability Both April 2019
Page inspection General Availability Both April 2019

Productivity enhancements for administrators

Feature Release type Online vs on-premises Date
Hardening the integration between Business Central and Dynamics 365 for Sales General Availability Both April 2019
Enhancements for application lifecycle management General Availability Both April 2019
Enhancements to the intelligent cloud for Dynamics SMB and Dynamics 365 Business Central General Availability Both April 2019

Powerful features for developers

Feature Release type Online vs on-premises Date
Designer enhancements for developers General Availability Both April 2019
Visual Studio Code and AL General Availability Both April 2019
Application as an app General Availability Both April 2019
Standard Web API General Availability Both April 2019

It is always suggested to see Microsoft Links for more details and any updates in future.


AL, API, Business Central, Development Tips, Extension Package, How To, Information, JSON, Modern Development Tool, OData, Tip & Tricks, V2, Visual Studio Code, What's New

API – Business Central Part-2

In our previous post we saw basics of API in Navision. Let’s explore further.

If you missed the earlier post you can find here API – Business Central Part-1

Continuing from where we left in previous post.

Someone asked me why we require API when we have web service in place and can achieve same OData either query or filter in same fashion.

So what I am going to explain below will answer to that query.

The API will generate a REST service which returns OData.  The API is not the same as the OData web services that we discussed in our earlier post.

There we created an OData web service based on a card page.  If there were fields that need to be displayed on a card in the client application but you do not want those fields to expose in the OData web service, you will have to create a second card page to solve this problem.  In this case, we create a separate page for our API and only for the API.  This page cannot be requested in the client application.  It’s also much better concept to separate them from the regular pages.

Also we can apply templates for default value of field, which we will discuss later in below post.

Let’s start with creating our own API.

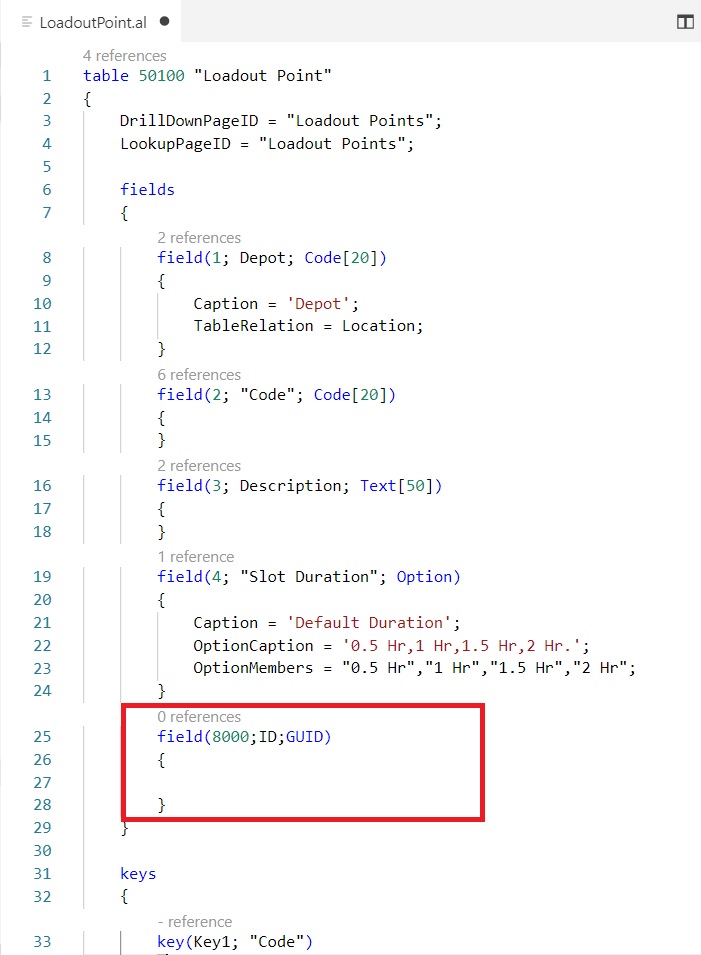
Each resource is uniquely identified through an ID. As discussed in our earlier post. So let’s start with this, I will start with my earlier created Table LoadoutPoint and add one field ID.

api009

Any new entry in my table will have a unique ID for Loadout Point, so I have added code in OnInsert trigger of the table.

api010

To create an API, you should create a page of type API, instead of a card page or list page.

Use tpage, Page for type API snippet for page structure. You get all the bare minimum properties to be added for API Page.

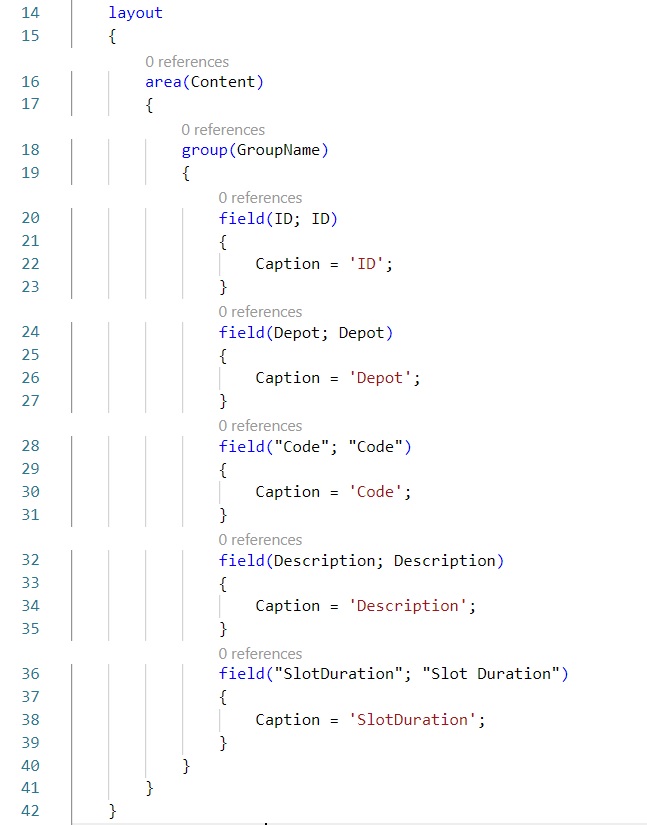
api011

Then you have to define which fields you would like to include.

api012

Some important rules to be followed for API Pages:

  • Fields should be named in the APIs supported format, Any Captions cannot have spaces and special characters. Only AlphaNumeric values permitted.
  • When you insert an entity through API endpoint, Business Central don’t run OnInsert trigger on the table.
  • And we have assigned the ID for the new record there. So Add Insert(true) for OnInsert Trigger.
  • Add business logic to Modify trigger. As external user can change values through API, even the value of the primary key field.
  • Add Delete(true) for On Delete trigger. The reason same as above.

So let’s add these 3 trigger in our page too.

api013

Ok so now we have modified Table and Created new API page, now it’s time to publish our app/extension.

Use command palette to publish your app.

Now it’s time to test, let’s access our API page from client and do setup for same.

Search for API Setup Page in the client.

api014

You can define and assign your Template from Template Code field, check with available same Templates how to do it.

api015

Also the conditions when this Template should apply as discussed in earlier post also.

Now let’s access the API from outside the Navision/ Business Central.

I will use Postman to test this.

To get the list of 44 standard APIs.

https://KSD-DESKTOP:7748/BC130/api/beta/

api016

To get the list of custom APIs.

https://ksd-desktop:7748/BC130/api/ksdconsultancy/app1/v1.0/

Hope you remember when we created API page we assigned few Properties like

APIPublisher = ksdconsultancy, APIGroup = app1, APIVersion = v1.0.

Now we will use those values to access my custom APIs.

See the url those are included after /api/

api017

All information is available in JSON format and further can be confirmed that there are 1000 records. Thus, the number of records integrated here depends on the Max Page Size parameter setup in Navision Server.

What else you can do with APIs:

  • Get to fetch or List
  • Post to insert records
  • Patch to modify records
  • Delete to Delete records
  • And so on.
  • You can extend existing API Pages too, I have yet not tried.

That we may discuss in some other post. Not to complicate this topic more for now I conclude this post here.

Will come up with more details in my upcoming posts, till then keep exploring, learning and take good care of yourself.