AL, Array, BC14, BC17, Business Central, Collection, Development Tips, Dictionary, Dynamics 365, How To, Information, List, Modern Development Tool, on-premises, Tip & Tricks, Visual Studio Code, Wave 1, Wave 2, Web Client

Working with Collections

Today we will learn three types of collections supported by AL.

A collection is a complex type that contains multiple values in one variable.

You can’t have values with different types in the same collection. For example, you can’t add date values in a collection that only allows integer values.

The three types of collections that AL supports are:

  • Array
  • List
  • Dictionary

We will discuss about each type of collections in this post with examples.

Let’s start with most familiar collection we have used with old versions of Navision too, yes you are right, I am talking about Arrays.

Arrays

Arrays are complex variables that contain a group of values with the same data type.

An array holds multiple values, and these values are stored in the elements of the array. You can access these values by using the index, which can also be a value that is stored in another variable. With this design, you can create a loop where you increment a certain variable to loop through every element in an array.

By using the Dimension property, you can define how many dimensions that the array will hold.

When creating a variable of an array data type, you first need to define how many elements that you’ll have in the array. The most commonly used array is the one-dimensional array, which is a list of elements with the same data type.

You can represent an array as a row of values.

To create an array, use the following code:

SalesAmount: array[10] of Integer;

To access an element in an array, use the array element syntax:

SalesAmount[5] := 0;

Unlike other programming languages array index don’t starts with 0 rather with 1. In above example first element will be 1 and last 10.

Having only one element between the square brackets indicates that you are using a one-dimensional array. If you want to have a multi-dimensional array, use a comma-separated list between the brackets, as follows:

SalesAmount: array[6,9] of Integer;

To access an element in an array, use the array element syntax:

SalesAmount[5,3] := 0;

Lists

The List data type can be compared with an array. The List type can only be used with fundamental types and represents a strongly typed list of values that can be accessed by index.

Therefore, you can have a List type of [Integer], but you cannot have a List type of [Blob].

List data type doesn’t require you to define how many elements you want to store up front (while an Array data type does).

The List data type has some methods that are used frequently. The methods that are available for a List data type will discuss in a later post.

To create a list, use the following code:

CustomerNames: List of [Text];

To access an element in a list, use the following methods:

To store/add values to list

CustomerNames.Add(‘KSD Consultancy’);

CustomerNames.Add(‘Microsoft India’);

CustomerNames.Add(‘Ashwini Tripathi’);

To retrive values from list

CustomerNames.Get(1);

Dictionary

The Dictionary data type represents a collection of keys and values.

Every key that you create in this dictionary must be unique. The main benefit is that you can immediately get the value for a specific key.

The value can be a type, but it can also be a List or another Dictionary data type.

Blow code sequence will give you idea how to use dictionary data type:

//Declaring List

CustomerNamesIN: List of [Text];

CustomerNamesUS: List of [Text];

CustomerNamesCA: List of [Text];

//Declaring Dictionary

CountryWiseCustomer: Dictionary of [Code[20], List of [Text]];

//Assigning values to List

CustomerNamesIN.Add(‘KSD Consultancy’);

CustomerNamesIN.Add(‘Microsoft India’);

CustomerNamesIn.Add(‘Ashwini Tripathi’);

CustomerNamesUS.Add(‘Paul’);

CustomerNamesUS.Add(‘Linda’);

CustomerNamesCA.Add(‘Eddy’);

CustomerNamesCA.Add(‘Mark’);

//Assigning values to Dictionary

CountryWiseCustomer.Add(‘IN’,CustomerNamesIN);

CountryWiseCustomer.Add(‘US’,CustomerNamesUS);

CountryWiseCustomer.Add(‘CA’,CustomerNamesCA);

//Retrieving value from Dictionary

CountryWiseCustomer.Get(‘IN’).Get(1);

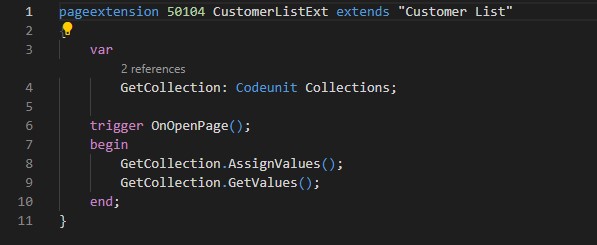
Here is the complete code:

Created new codeunit and declared variables & procedures to manipulate values in Collections.

Added Code to call procedures defined in codeunit, to assign and retrieve values from collections.

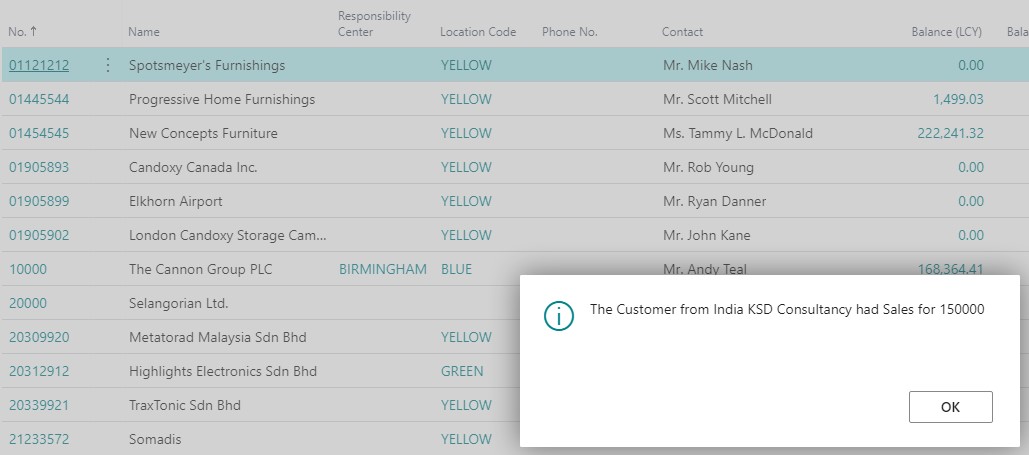
Now its time to check output of above code.

Hope you get idea how to work with Collections, you may find more posts in coming days where we may discuss about methods available for collection.

Advertisement
AL, API, Business Central, Development Tips, Extension Package, How To, Information, JSON, Modern Development Tool, OData, Tip & Tricks, V2, Visual Studio Code, What's New

API – Business Central Part-2

In our previous post we saw basics of API in Navision. Let’s explore further.

If you missed the earlier post you can find here API – Business Central Part-1

Continuing from where we left in previous post.

Someone asked me why we require API when we have web service in place and can achieve same OData either query or filter in same fashion.

So what I am going to explain below will answer to that query.

The API will generate a REST service which returns OData.  The API is not the same as the OData web services that we discussed in our earlier post.

There we created an OData web service based on a card page.  If there were fields that need to be displayed on a card in the client application but you do not want those fields to expose in the OData web service, you will have to create a second card page to solve this problem.  In this case, we create a separate page for our API and only for the API.  This page cannot be requested in the client application.  It’s also much better concept to separate them from the regular pages.

Also we can apply templates for default value of field, which we will discuss later in below post.

Let’s start with creating our own API.

Each resource is uniquely identified through an ID. As discussed in our earlier post. So let’s start with this, I will start with my earlier created Table LoadoutPoint and add one field ID.

api009

Any new entry in my table will have a unique ID for Loadout Point, so I have added code in OnInsert trigger of the table.

api010

To create an API, you should create a page of type API, instead of a card page or list page.

Use tpage, Page for type API snippet for page structure. You get all the bare minimum properties to be added for API Page.

api011

Then you have to define which fields you would like to include.

api012

Some important rules to be followed for API Pages:

  • Fields should be named in the APIs supported format, Any Captions cannot have spaces and special characters. Only AlphaNumeric values permitted.
  • When you insert an entity through API endpoint, Business Central don’t run OnInsert trigger on the table.
  • And we have assigned the ID for the new record there. So Add Insert(true) for OnInsert Trigger.
  • Add business logic to Modify trigger. As external user can change values through API, even the value of the primary key field.
  • Add Delete(true) for On Delete trigger. The reason same as above.

So let’s add these 3 trigger in our page too.

api013

Ok so now we have modified Table and Created new API page, now it’s time to publish our app/extension.

Use command palette to publish your app.

Now it’s time to test, let’s access our API page from client and do setup for same.

Search for API Setup Page in the client.

api014

You can define and assign your Template from Template Code field, check with available same Templates how to do it.

api015

Also the conditions when this Template should apply as discussed in earlier post also.

Now let’s access the API from outside the Navision/ Business Central.

I will use Postman to test this.

To get the list of 44 standard APIs.

https://KSD-DESKTOP:7748/BC130/api/beta/

api016

To get the list of custom APIs.

https://ksd-desktop:7748/BC130/api/ksdconsultancy/app1/v1.0/

Hope you remember when we created API page we assigned few Properties like

APIPublisher = ksdconsultancy, APIGroup = app1, APIVersion = v1.0.

Now we will use those values to access my custom APIs.

See the url those are included after /api/

api017

All information is available in JSON format and further can be confirmed that there are 1000 records. Thus, the number of records integrated here depends on the Max Page Size parameter setup in Navision Server.

What else you can do with APIs:

  • Get to fetch or List
  • Post to insert records
  • Patch to modify records
  • Delete to Delete records
  • And so on.
  • You can extend existing API Pages too, I have yet not tried.

That we may discuss in some other post. Not to complicate this topic more for now I conclude this post here.

Will come up with more details in my upcoming posts, till then keep exploring, learning and take good care of yourself.


API, Business Central, Development Tips, EDMX, How To, Information, JSON, OData, Tip & Tricks

API – Business Central Part-1

In today’s post we will discuss about API’s in Business Central.

A Connect app establishes a point-to-point connection between Microsoft Dynamics 365 Business Central and a 3rd party solution or service and is typically created using standard REST API to interchange data.

Any coding language capable of calling REST APIs can be used to develop your Connect app. Because the API uses standard REST, we can use OData to query the results.

The Microsoft Dynamics 365 Business Central API allows you to read and modify business data through apps that are connected and integrated through a single endpoint.

For Example:- You can use the API to get access to customer, vendor and other information, update sales orders, or view overdue payments etc.

Endpoint

Production Endpoint

https://api.businesscentral.dynamics.com/v1.0/api/beta

Development and Test Endpoint

https://api.businesscentral.dynamics.com/v1.0//api/beta

On Premise

https://Server Name:Odata Port/Service Name/api/beta/

I am going to use my as I am running on On Premise :-

https://KSD-DESKTOP:7748/BC130/api/beta/

Enter the URL to get the list of 44 standard APIs. (Format of the URL for Business Central on-Premise is given as above:

api001

I am using Postman to send GET request to my API endpoint.

Authentication

Azure Active Directory (AAD)

Basic authentication. Username and web service access key as password.


How to get web service access key?

api002


Tips for working with the APIs

Some tips for working with the APIs are:

When you call the endpoint via GET, you get a list of all the available API’s.

When you call the endpoint via GET with $metadata, you get a list of all the available API’s with their metadata.

When you call the endpoint via GET with $filter, you can use the OData Filter Expressions as discussed in earlier post.

Each resource is uniquely identified through an ID.

Microsoft has added to its most of the tables as:

Enabled Field No. Field Name Data Type Length Description
Yes 8000 Id GUID

If you had to make your any table data available through API add this field to your tables. We will look into other aspects later in below post.

The resource ID must be provided in the URL when trying to read or modify a resource or any of its children. The ID is provided in ( ) after the API endpoint. For example, to GET the “CRONUS International Ltd.” company details, you must call:

https://KSD-DESKTOP:7748/BC130/api/beta/companies

api003

From above request I get id of my company as : ab76c7b4-3c72-4805-86f7-7d91a10612ce now I will query Entity Item.

https://ksd-desktop:7748/BC130/api/beta/companies(ab76c7b4-3c72-4805-86f7-7d91a10612ce)/items

api004

To enable API we need minimum 2 of the below conditions to be met.

  • ID field in table of type GUID
  • Page of type API

Let’s see in Business Central how it is setup and understand before we create our own API.

Open the Page API Setup.

api005

If you Lookup the Page ID, you will get list of Pages that Microsoft have provided as API.

AllObjWithCaption.”Object ID” WHERE (Object Type=CONST(Page),Object Subtype=CONST(API))

This relation is used for the Lookup. Means the Subtype should be defined as API.

Next you have Template Code – Since may be possible we don’t expose all fields or not necessary the values for every field is provided when API is submitted. To fill the default values for those field we assign the Template Code.

api006

Description – you can setup as required.

Conditions – You can define condition when this Template should apply.

api007

Before we move further ensure below setup to Server Instance properties and OData properties. Check and set the ‘Max Page Size’ to number of records you want to integrate.

api008

At the time of writing this post have no idea of how to alter the number of records that can be integrated in Business Central on Cloud may update in future.

I stop here for today’s post. Will come up with more details in my next upcoming post.

Till then keep learning and exploring and take good care of yourself.

Meet you again in my next post with more details.