
In today’s post we will discuss about API’s in Business Central.
A Connect app establishes a point-to-point connection between Microsoft Dynamics 365 Business Central and a 3rd party solution or service and is typically created using standard REST API to interchange data.
Any coding language capable of calling REST APIs can be used to develop your Connect app. Because the API uses standard REST, we can use OData to query the results.
The Microsoft Dynamics 365 Business Central API allows you to read and modify business data through apps that are connected and integrated through a single endpoint.
For Example:- You can use the API to get access to customer, vendor and other information, update sales orders, or view overdue payments etc.
Endpoint
Production Endpoint –
Development and Test Endpoint –
On Premise –
https://Server Name:Odata Port/Service Name/api/beta/
I am going to use my as I am running on On Premise :-
Enter the URL to get the list of 44 standard APIs. (Format of the URL for Business Central on-Premise is given as above:

I am using Postman to send GET request to my API endpoint.
Authentication
Azure Active Directory (AAD)
Basic authentication. Username and web service access key as password.
How to get web service access key?

Tips for working with the APIs
Some tips for working with the APIs are:
When you call the endpoint via GET, you get a list of all the available API’s.
When you call the endpoint via GET with $metadata, you get a list of all the available API’s with their metadata.
When you call the endpoint via GET with $filter, you can use the OData Filter Expressions as discussed in earlier post.
Each resource is uniquely identified through an ID.
Microsoft has added to its most of the tables as:
| Enabled | Field No. | Field Name | Data Type | Length | Description |
| Yes | 8000 | Id | GUID |
If you had to make your any table data available through API add this field to your tables. We will look into other aspects later in below post.
The resource ID must be provided in the URL when trying to read or modify a resource or any of its children. The ID is provided in ( ) after the API endpoint. For example, to GET the “CRONUS International Ltd.” company details, you must call:

From above request I get id of my company as : ab76c7b4-3c72-4805-86f7-7d91a10612ce now I will query Entity Item.
https://ksd-desktop:7748/BC130/api/beta/companies(ab76c7b4-3c72-4805-86f7-7d91a10612ce)/items

To enable API we need minimum 2 of the below conditions to be met.
- ID field in table of type GUID
- Page of type API
Let’s see in Business Central how it is setup and understand before we create our own API.
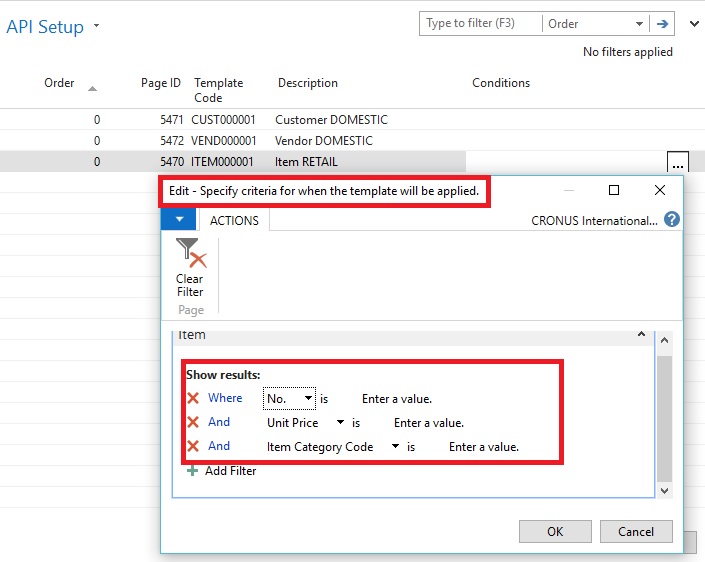
Open the Page API Setup.

If you Lookup the Page ID, you will get list of Pages that Microsoft have provided as API.
AllObjWithCaption.”Object ID” WHERE (Object Type=CONST(Page),Object Subtype=CONST(API))
This relation is used for the Lookup. Means the Subtype should be defined as API.
Next you have Template Code – Since may be possible we don’t expose all fields or not necessary the values for every field is provided when API is submitted. To fill the default values for those field we assign the Template Code.

Description – you can setup as required.
Conditions – You can define condition when this Template should apply.
Before we move further ensure below setup to Server Instance properties and OData properties. Check and set the ‘Max Page Size’ to number of records you want to integrate.

At the time of writing this post have no idea of how to alter the number of records that can be integrated in Business Central on Cloud may update in future.
I stop here for today’s post. Will come up with more details in my next upcoming post.
Till then keep learning and exploring and take good care of yourself.
Meet you again in my next post with more details.


You must be logged in to post a comment.