
Business Central 2023 Wave1 Public Preview is now available.
There are many new features available!

Read more here.

Business Central 2023 Wave1 Public Preview is now available.
There are many new features available!
Read more here.

First released in 1987, acquired by Microsoft in 2002, now called Business Central, Dynamics NAV is one of Microsoft’s most prolific software packages.
After Dynamics NAV 2018, Microsoft discontinued their popular, but on-premises only, ERP solution Dynamics NAV and replaced it with Dynamics 365 Business Central (BC-13). But what is the difference between the two systems, and why should your business make the switch? Let’s take a look at Business Central vs Dynamics NAV.
Microsoft Dynamics NAV was rebranded in 2018 to Microsoft Dynamics Business Central for on-premises and private cloud versions, and Microsoft Dynamics 365 Business Central for the cloud version.
At the time of writing this comparison, BC-21 is available in market.
Since 2018, Dynamics NAV is no longer available for purchase. The only businesses that can use the system are those that already held licenses. Even for those who do still hold licenses, the system no longer receives updates, meaning the software will quickly become outdated and harder to use.
Mainstream Support for Dynamics NAV versions from 2013 to 2017 has already ended, with the 2018 version losing support in January 2023. This deadline is fast approaching, so if you are currently using NAV 2018 you should begin to consider your optimal course of action going forward.
With very little time remaining before the end of Dynamics NAV Mainstream Support in January 2023, the sooner you decide on your course of action, the better.
Microsoft introduced Dynamics 365 Business Central. Business Central is a newer version of Dynamics NAV, offering the same standard functionality in a much more user-friendly way. It’s also SaaS (Software as a Service) meaning it’s accessible from anywhere, with the same security that drives Microsoft 365.
In addition to the functions carried over from Dynamics NAV, the Dynamics 365 Business Central system affords users with access to:
Microsoft Dynamics 365 Business Central helps with day-to-day business processes and operations. Its capabilities include financials, stock management, purchasing and much more, all with real-time data and analytics through Power BI.
Dynamics 365 Business Central is relevant for businesses adopting flexible, hybrid, or remote working models thanks to the scalable, cloud-based architecture and integration with Microsoft 365 and Power BI tools.
It is an all-in-one solution that can be adapted for many industries including software developers, IT services, financial services, healthcare, and educational institutions.
The system also has large user bases in manufacturing, distribution, ecommerce, and retail.
Features and functions are still the same as back in the NAV days, just with a more digital-focused platform. But still differ from old days Dynamics NAV.
Most of the base code of Business Central has been adapted from NAV, and it has enhanced the rich functionality its predecessor offered, with options to deploy as an on-premises or a SaaS cloud solution.
The Dynamics 365 Business Central web client, including its sisters, the tablet and phone clients (by the way, there is no longer a Windows client) has had a makeover!
Features include new and varied fonts to highlight important information such as a headline banner on the Role Centre, a fabulous teal Role Centre with easy navigation, and interestingly capitalised field names on lists!
They are curiously small differences but really nice touches.
Design Tool it’s as good as it used to be! In fact, it’s a very smart design tool. As a ‘non-developer’ you can amend pages, add new fields and save the result as an extension.
When comparing Dynamics NAV to Business Central, you must be aware of the substantial functional upgrades and new capabilities of Dynamics 365 Business Central. Microsoft Dynamics 365 Business Central is an upgrade to Microsoft Dynamics NAV that offers several notable improvements.
You’ll see numerous benefits in your business, including agility, ability to scale quickly, mobility, lower cost of ownership, and more.
Microsoft Dynamics NAV and Microsoft Dynamics 365 Business Central have many similarities, but there are many differences too that make many users move from NAV to Business Central.
You can also choose to deploy Business Central as an on-premises solution if that is a better fit for your organization. However, you may then miss out on integration and cutting-edge features.
While the two systems are similar, there are key differences that make Business Central the preferred option for many businesses:
| Business Central | Dynamics Navision | |
| Dynamics 365 Business Central is a cloud-based ERP solution. With Dynamics 365 Business Central, you can access your data and applications anytime, anywhere, and on any device. D365 Business Central includes a comprehensive set of features and functionality. Business Central is licensed on a per-user basis. With Business Central, you only need to pay for the users who will be using the system. | Dynamics NAV is an on-premises ERP solution. Dynamics NAV requires some customization and third-party add-ons to achieve the same level of functionality. Dynamics NAV is licensed on a per-server basis. Dynamics NAV, you need to pay for the server regardless of how many users are accessing the system. | |
| Integration | Full (All Microsoft Products) | Limited, Version Dependent |
| Objects | 49,999 objects are free to use on cloud | Objects need to be purchased for customizations |
| Search Interface | Advanced, with automatic categorization, smart search (search for misspellings or imprecise terms) | Basic, possibility of data duplication |
| Reporting | Power BI | Limited |
| Deployment | Cloud (No need to maintain servers and backups) although On-Premises option also available. | On-Premises, Cost for Server maintenance and backup management. |
| USER INTERFACE | Web-based app Improved design Much easier to navigate. More productive platform. | Desktop-based |
| Business Central interface uses AL language in the code. Offers more customization than before and helps to make extensions and upgrades much easier to manage in the long term. | Dynamics NAV using C/AL coding | |
| Better integration with other Microsoft products already used by many businesses, including all applications within the Microsoft Dynamics suite, like Microsoft Dynamics 365 Sales (CRM) and Office 365 products, such as Outlook and Excel. | ||
| Offers more automated operations to improve productivity. Native connectivity to Microsoft’s Power Platform (e.g., Power Automate) and powerful workflows and integrations can be created, by end-users without complex coding, sometimes almost no code. | ||
| HOSTING | Business Central is a SaaS solution – sitting on Microsoft’s Azure cloud, which enables you to specify the region where your data is stored and processed. There are many benefits to SaaS solutions, * Greater security * Less risk of data loss and * Better accessibility for your team. * Cloud hosting also works alongside the new coding to make upgrades and extensions much easier to carry out. | Only On-Premises capability. Need to invest in and manage your own in-house servers. |
| UPGRADES | Bi-annual release Sequential upgrades, Which happen automatically. Your systems are always up to date. With the on-premises or private cloud version of Business Central, upgrades are not automatic but are still relatively simpler compared to NAV. Plus, any third-party apps or customizations you have are also designed to be compatible with each new Business Central update. | No Automatic Upgrades. |
| Your business is always using the most optimised version of Business Central. | Fuss and cost of manually updating the software. | |
| If you are apprehensive about an update, there is an option to delay its installation for up to 90 days. However, it’s good idea to staying as up to date as possible. Updates are introduced to improve overall user experience and security. | Hotfixes & Cumulative updates to be handled on own cost. | |
| Business Central, the modifications are made using AL language that creates extensions – leaving the core system untouched and making upgrades a lot easier. | NAV customization was written in C/AL language and was integral to the core system. This meant upgrades were a major undertaking as the whole system needed to be reviewed and potentially redeveloped. | |
| USER LICENSES | Dynamics 365 Business Central uses a monthly/annual subscription model and is available in either (‘Essentials’ or ‘Premium’). Charges per user, meaning fees are based on the number of simultaneous users each month. You also get an option to pay a perpetual license fee. That means you can now Business Central as an operational expense or a capital expense, whichever makes more sense for your business. It also moves from a concurrent user to a named user licensing model. | Perpetual with yearly AMC 16% in license cost. Dynamics NAV is available in Starter Pack & Extended Pack. |
| Business Central users can also benefit from Single Sign On and usability across multiple devices, and across iOS, Android, and PC. | ||
| Remote working much easier, especially as the landscape of working life is becoming a blend of office-based and home working. Flexible and cost-effective for businesses. | ||
| Now your staff can simply log into the web app from any device to get their job done. This makes the ERP solution much more cost-effective and flexible for your business. |
HOW TO TRANSITION TO BUSINESS CENTRAL
Many companies have been using Dynamics NAV for years, so Nav users may be a little wary about making the switch to Business Central. But with even more functionality than the NAV solution and with better usability, you won’t regret taking the first step.
While some Microsoft products, like Office 365, can be bought directly from Microsoft, this is not the case for Business Central. Due to the complexity of the product, Microsoft Business Central must be purchased through an approved Microsoft partner.
The Business Central trial takes a few minutes to load, and you can start using the app.
Dynamics 365 Business Central Licensing
There are two main subscription licensing options:
To use this ERP software, you must license one of these plans. Both plans are licensed by user and are fast to implement as well as easy to configure. There’s also a ‘Team Members‘ licensing option to add on additional users.
The difference between a full user vs. an additional user:
A full user is someone who will be working heavily within Business Central on a daily basis. These will typically be your customer service employees, sales and marketing staff, finance employees, and supply chain managers.
An additional user or team member is a ‘light user’ or users who do not require the full capabilities of Business Central. For instance, they may need to view data reports, log their expenses or time, and other such activities.
Dynamics 365 Business Central Essentials
Microsoft Dynamics 365 Business Central Essentials consists of several modules that are considered essential for any business.
Modules included within Essentials:
Dynamics 365 Business Central Premium
The Premium license has everything in the Essentials license plus service management and manufacturing.
Modules included within Premium:

This is fourth post in this series, if you wish to see first post, you can access here.
In second post I discussed about, how to create Azure Functions, you can access here.
In previous post I discussed about, how to Integrate Azure Functions in Business Central, you can access here.
In this post we will discuss how to make available QR Image using API by exposing as Web Service.
Let’s cut the theoretical part and coming directly to the solution.
This post is very short and as an answer to query from one of the blog readers, who regularly gives feedback and suggest topic he wish from me. Sometime it is not possible to write post for every query, but I try to pick some which I find interesting. Converting any topic into post is quite time taking, solution can be of 10 mins but presenting same in form of blog takes 2-3 hours, sometimes even more.
Some time appropriate environment is not available where I can put the solution and take screenshots to present as blog.
Since this topic is part of current series, I am writing posts on, so I was able to easily pick this topic.
Requirement is to add capability to get QR Image we generated in our previous posts using Web Service/ API/ OData/ JSON Base64Text.
To get this working we will first create a Codeunit with appropriate methods and expose it as Web Service.
Step – 1.
Create Codeunit & Add below method.

Step – 2
Publish above Codeunit as Web Service.
Step – 3
Copy SOAP URL
[SOAP URL]
Convert to ODataV4 URL by making necessary modification as below:
[ODataV4 URL]
Similarly, your $metadata URL will be:
Run the metadata URL in browser:
Search for your function created above, you should get definition as below:
<Action Name=”QRCodeGenerator_GetQRSetImageAsJSON”>
<Parameter Name=”qRSetId” Type=”Edm.Int32″/>
<ReturnType Type=”Edm.String”/>
</Action>
Let’s test the above URL for function using Postman to see the result:

[POST] – https://api.businesscentral.dynamics.com/v2.0/1e4fc386-962e-4a20-8364-d5aeb65e2485/Test/ODataV4/QRCodeGenerator_GetQRSetImageAsJSON?Company=CRONUS USA, Inc.
Authorization: Basic Auth
Username: ASHWINI.TRIPATHI
Password: xjAtAtTaFhgXkgR4M5WoHapotvJNmqJ5//XBYK2v5s4= (Web Service Access Key)
JSON Parameter to Function: (Body raw:JSON)
{
“qRSetId” : “6”
}
Result Body:
{
“@odata.context”: “https://api.businesscentral.dynamics.com/v2.0/1e4fc386-962e-4a20-8364-d5aeb65e2485/Test/ODataV4/$metadata#Edm.String”,
“value”: “iVBORw0KGgoAAAANSUhEUgAAApQAAAKUAQMAAACAATp/AAAAAXNSR0IArs4c6QAAAARnQU1BAACxjwv8YQUAAAAGUExURQAAAP///6XZn90AAAAJcEhZcwAADsMAAA7DAcdvqGQAAAHtSURBVHja7dpbasMwEAXQ2YH3v0vvwKVBsZ44DZ4UWs58BEnMHH1eYjuO9NqZTCaTyWQymUwmk8lkMplMJpPJZDKZ/8KMsbb27Ls3St+2bmYymUwmM8Ws58N2b+FiXjQzmUwmk3nTLMN1qkPq6LqZyWQymczPmUdTwxVMJpPJZP6G+di0/7lqH5PJZDKZnzOnK7ZzW2tbNzOZTCaTmWIOtbXw9DM3M5lMJpOZYK6rPvSL9huJywkmk8lkMu+Yz0d9tR7HQ7INl9UWJpPJZDITzDIwv39arVbNTCaTyWRmmS0XbZ5Nq64uM47JZDKZzDfMdmrv4W47ZByTyWQymalm7S2rre0tq+eNxRw4JpPJZDITzDhjq8uu9p5udSLBZDKZTGae+UyxKd4GqWbc3MxkMplMZpZ5EXSdVPuYTCaTyUw12/kh1Dq4rVcZx2QymUzmG+aqinmcU12etdceTCaTyWSmmDHWkHaDNJ8xmUwmk5li1vM6GjFfu60nmEwmk8nMMuvUFGV7zPWjjGMymUwm87ZZt/Pqcc/wXJDJZDKZzE+apSXOV1TRf9HHZDKZTGaiub4i+ijb+48iDiaTyWQyM82h2rZYRFmsYpDJZDKZzHtmVjGZTCaTyWQymUwmk8lkMplMJpPJZDL/rHnsXwW1n/zFqtyZAAAAAElFTkSuQmCC”
}
Copy the Value and use any base64 – image converter tool, search on Google
You will get your QR Image:

Don’t try any URL or Passwords in this post as same is modified, and in images covered to hide actual url & passwords.
Hope you enjoyed learning from this post.
That’s all for this post, but visit again to learn from upcoming posts in this series, will post soon.
See you again in next post, till then keep exploring, learning and sharing with others.

This is third post in this series, if you wish to see first post, you can access here.
In previous post I discussed about first part, how to create Azure Functions, you can access here.
Today in this post I will discuss about second part, how to Integrate previously created Azure Functions in Business Central.
From previous post remember:
On completion you will get the Live AZURE URL, use the URL in same way as for local, to pass parameter append at the end of URL as (?ReqData=Test)
Replace [Test] with the information for which you want to generate the QR Code.
Let’s start with Business Central side customization required, here I am presenting partial design for learning purpose, if you need full functional setup-based configuration for generating QR Code integrated with your system, I have the solution ready, you can connect with me for complete solution for your business. Actual solution has much more capability than what is presented here.
First, we will design a table to store all generated QR Code & assign an QR Set Id, which you can add in your other tables, just like Dim Set Id.
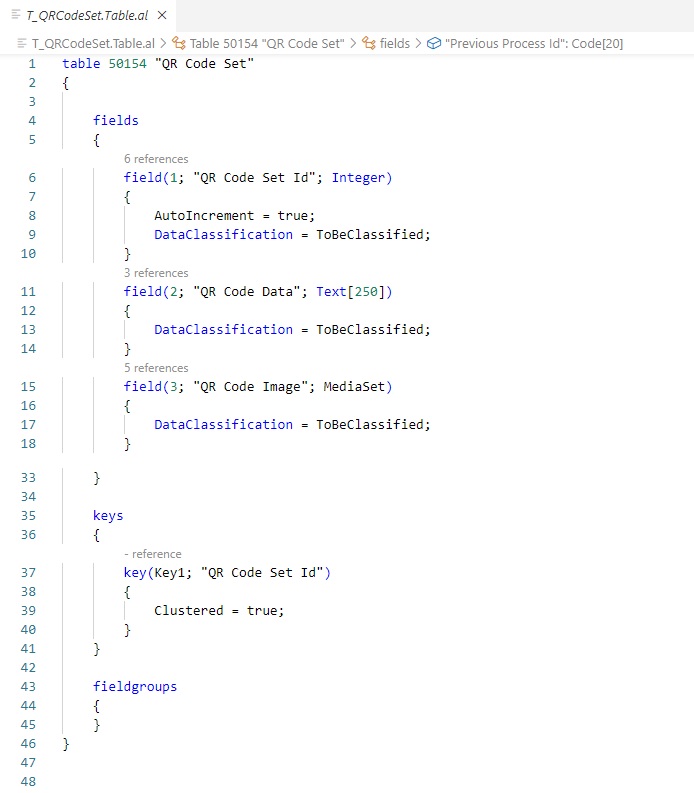
Only bare minimum code is included just to give idea about how we can integrate Azure Functions to Generate QR Code in Business Central.
Next, we will design page for this table.

Next, we will design page to display QR Set Image generated for QR Code Data.
QR Code Data is text created with information for which QR Code need to be generated.

Next, we will create a function which will generate QR Image using Azure function we created in previous post.
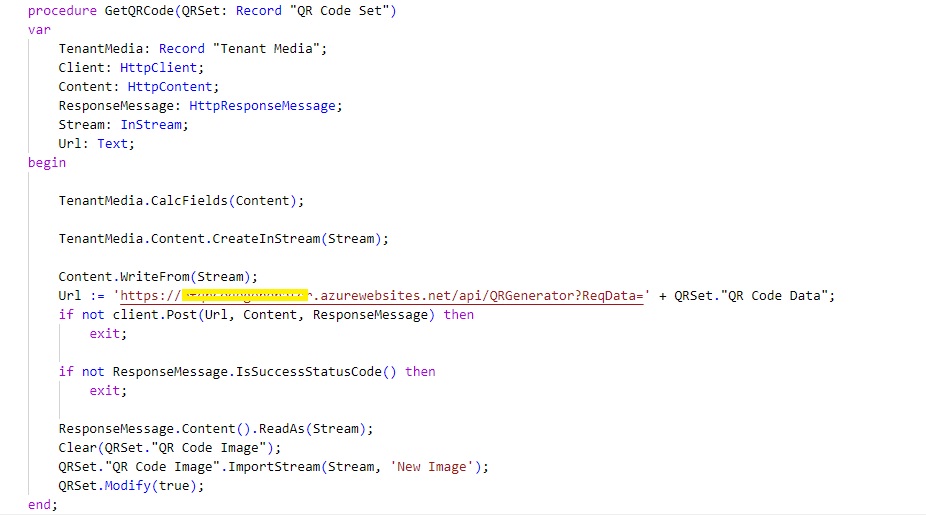
You can create a codeunit and add your function to generate QR Code Image as above. Replace Url with exact you obtained in previous post after deploying your function.
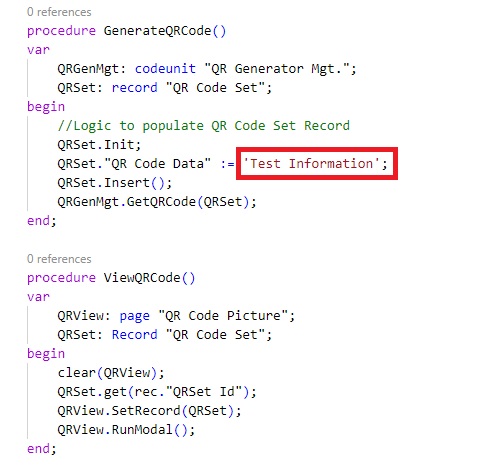
You need to write one more function which create a new record in your table and populate QR Code Data value with the information you wish to generate QR Image for.
Once your QR Code Set Record is ready call this function to Generate QR Code Image for you, based on information you created in QR Code Data.
For Example, add this procedure to any table where you wish to Generate QR Code.
You need to implement your logic for generating QR Code Data, for example you wish to Generate QR Code for Item with information like [ItemNo|Description]
You can populate QR Code data as:
QRSet.”QR Code Data” := Rec.”No.” + ‘|’ + Rec.Description;
Don’t forget to add one field to this table as “QRSet Id” and assign the “QRSet Id” as QRSet.”QR Code Set Id” in above procedure GenerateQRCode after QRSet is Inserted.
Your QR Image will be generated with this information, when you scan you QR Image you will get information that you passed as parameter to “QR Code Data”.
Similarly, you can add below actions to your respective page for above table:

Now build and publish your extension.
Open the page where you added the Action, first call Generate QR Code, this will populate the QR Code Set with the information as per your logic, Get the QR Image from the Azure function and save it into your table QR Code Set. Next you call View QR Code, this will fetch the QR Image from the table and display on screen.
Hope you enjoyed learning from this post.
That’s all for this post, but visit again to learn from upcoming posts in this series, will post soon.
See you again in next post, till then keep exploring, learning and sharing with others.

Today in this post I will explain how and why you should consider create your own QR Code programmatically internally without the use of public available options.
Quick Response code, is a code that can be easily read by a device having camera attached. QR Codes are commonly used today across various industries.
In todays word hardly you will find any product which don’t have either Barcode or QR Code.
You may find many free QR Code generators available on the internet. It is very convenient to source and quickly generate QR Codes but using their services have areas of risks and concerns for organization to consider.
The potential security risks such as phishing, malware, Malicious website and data tracking few to list.
Solution to this could be organizations should prefer to find an enterprise paid service or to create their own. If any organization decides to build their own QR Code generator, then there are open-source QR Code libraries where they can rely on.
Now to build a full-fledged application will require to consider for all the typical application infrastructure considerations such as networking, security, monitoring, patching and the list keeps growing. There could be many considerations just to provide a simple service and is it worth? Another big fat questions.
Here comes the Azure Functions.
Microsoft Azure is a cloud computing service that is used for building, testing, deploying, and managing applications.
It provides
Azure Functions runs on the Microsoft Azure platform and is used to run small pieces of code, or functions, in the cloud.
With Azure Functions, you only need to focus on a specific function without worrying on the whole application or the infrastructure to run it. Additionally, Azure Functions lets you run your code in a serverless environment without creating a virtual machine or publish any web application.
For Azure functions, you can use development language of your choice, such as C#, F#, Node.js, or PHP.
Because Microsoft Azure is a service, no doubt you have to pay for it. Azure Functions has two types of pricing plans:
Consumption plan – Microsoft Azure provides all the necessary computational resources. Therefore, you don’t need to concentrate on resource management, and you only pay for the time that your code runs.
App service plan – With the app service plan, you can run your functions as you do other web and API applications on Azure. If you are already using app services for other applications, you can run Azure Functions on the same plan without additional costs.
Check for latest Plan online on Azure portal as and when you decide to use the service, or to grab a free trial account. You can list free services available to you if you have azure account using this link here.
Azure Functions Pricing you can check here and free grant per month.
Above links and further links from there will provide detailed information on everything you may require to go with Azure Functions.

Enough for introduction, what we are going to Explore in this series:
Anything else I decide to add more will update this post with links and other topics related to this series.
Make a book mark to this post, I will update the Links in above list as I complete my next post, and add more topics to the list, I further decide to include in this series.
Go through the above links to educate yourself, so that what I explain in upcoming posts, you better co-relate them.
That’s all for this post, but visit again to learn from upcoming posts in this series, will post soon.
See you again in next post, Till then keep exploring, learning and sharing with others.

This is the Twelfth post in the series. If you want to go to previous post click here.
From the series of steps this post is dedicated to Step-Testing:
As a Eleventh Step we will Verify & Test the Integration between Business Central and Dataverse for Custom table we created in both the environments.
Initial Stage post Deploying the Extension, we access the Pages for first time.
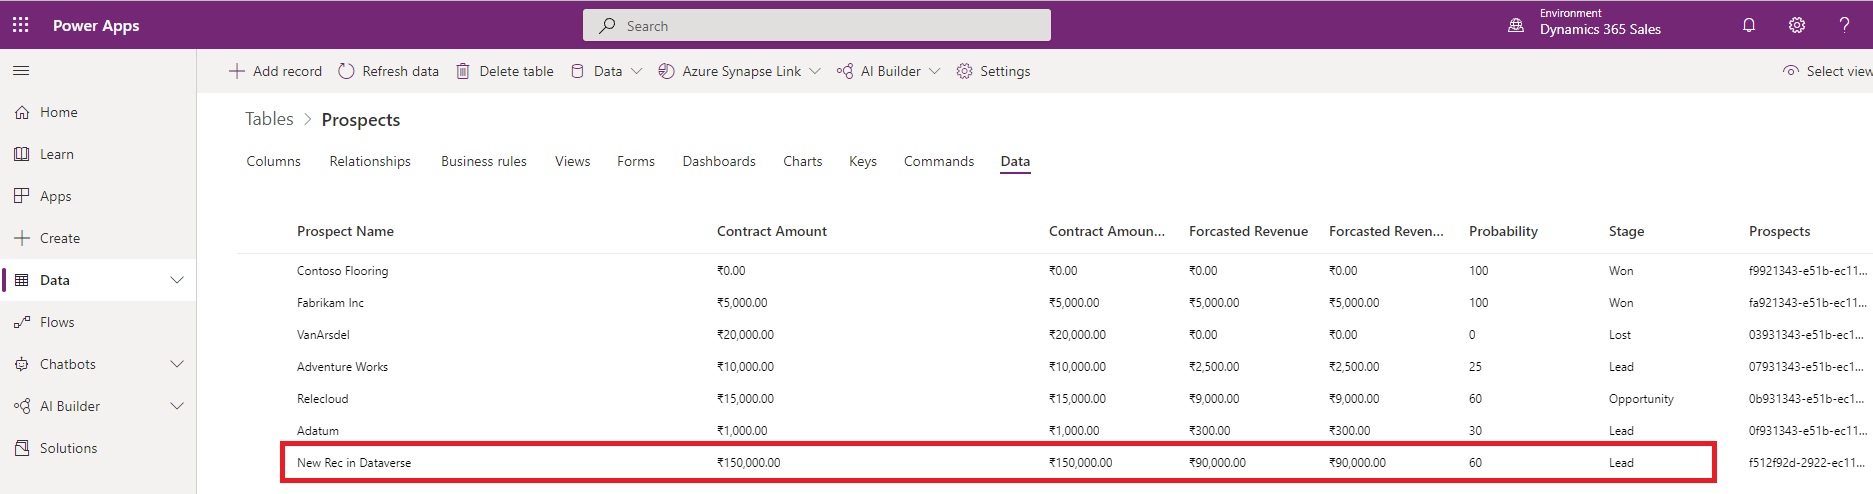
We have below data in Dataverse Prospects table:
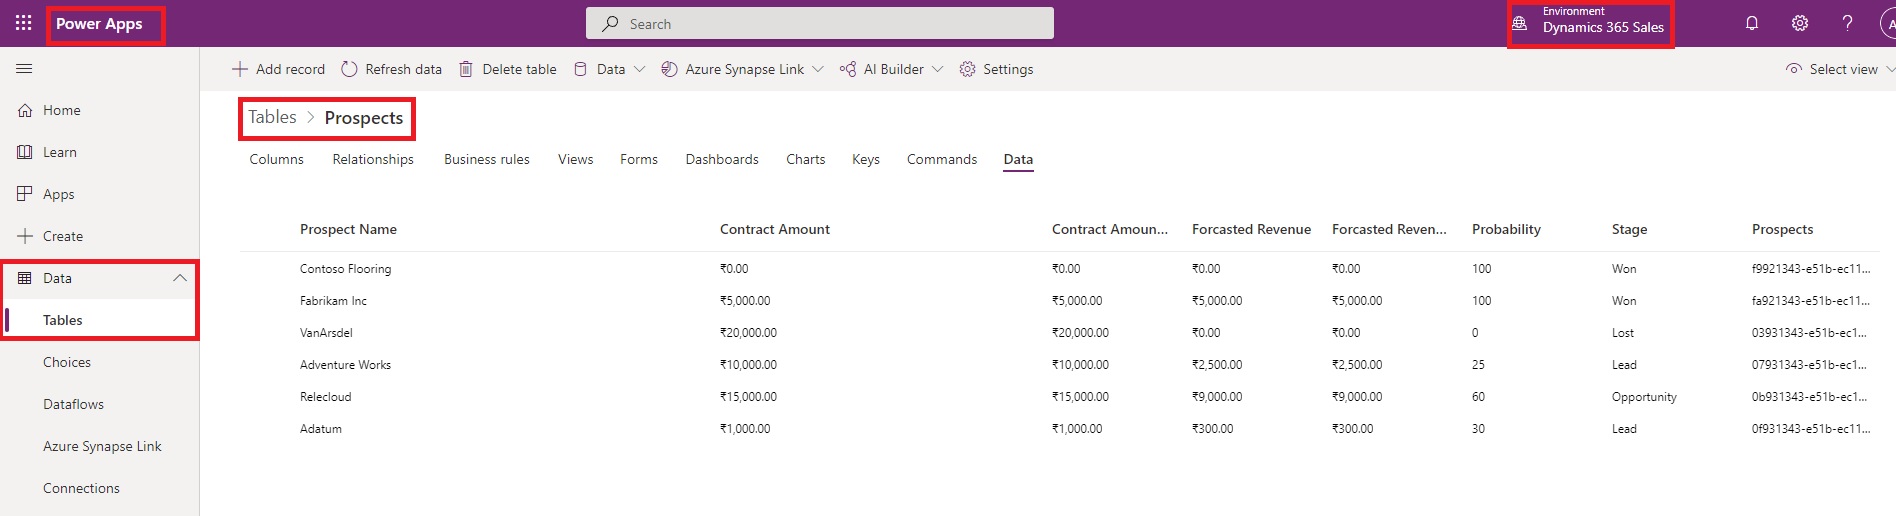
In BC when we access to CDS Prospects Page:
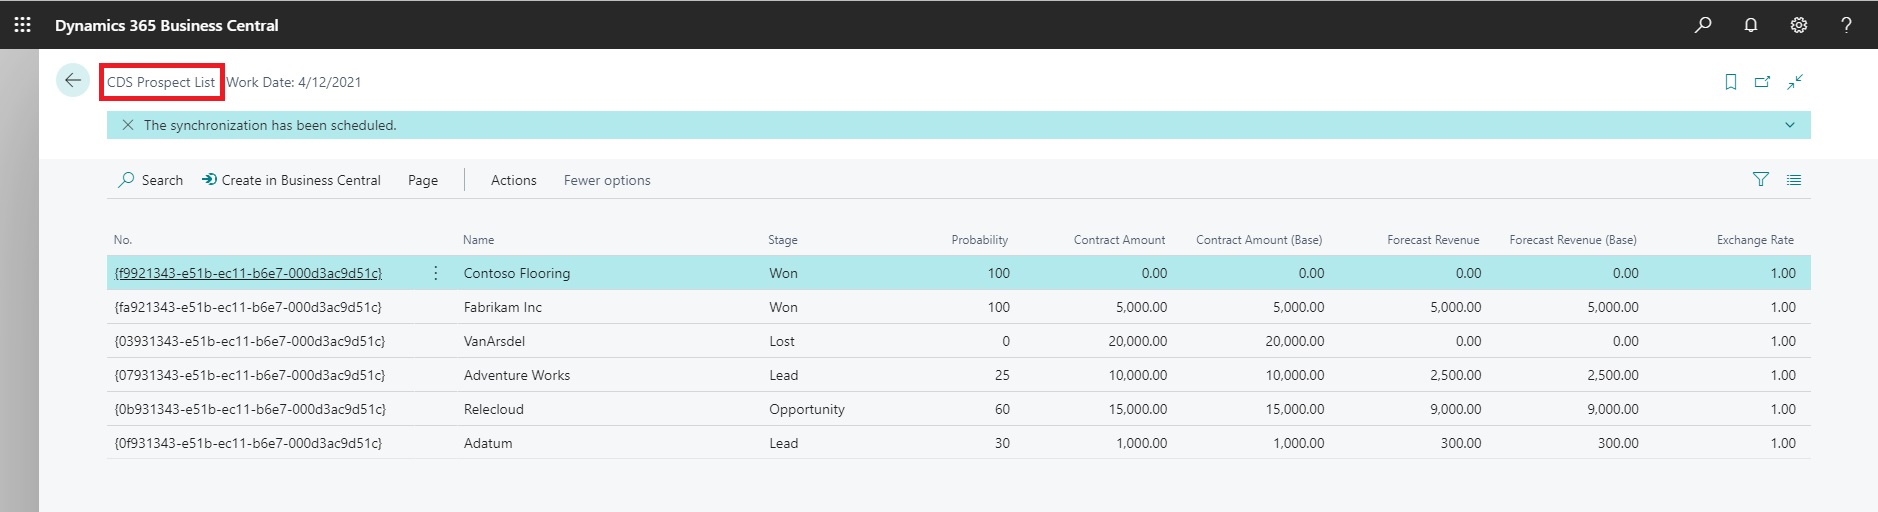
In BC when we access to Prospects Page:

First we will Add one Record in Dataverse:

Now if we check CDS Prospects Page:
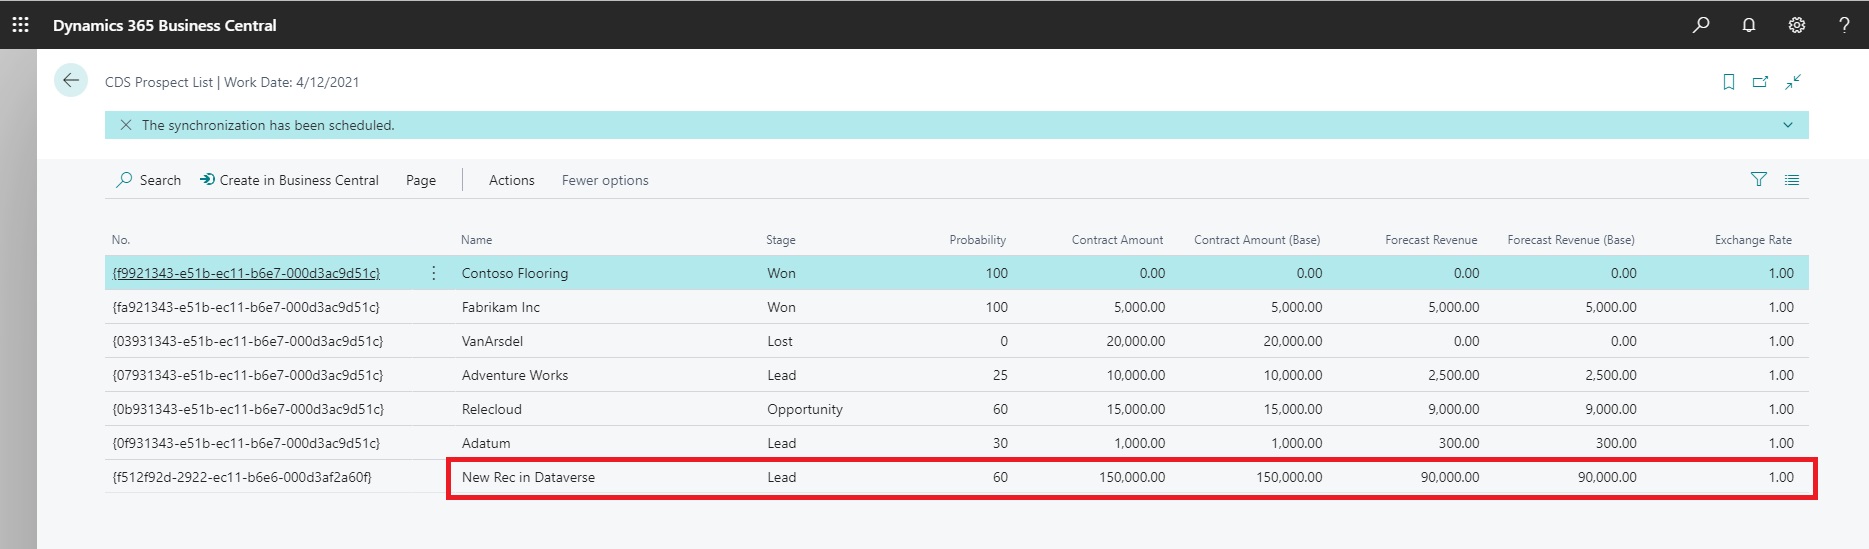
If you remember on CDS Prospects Page we have written code on OnInit trigger to run codeunit – CRM Integration Management, so when page is opened, the data is synchronized to CDS Prospects Page.
On CDS Prospects Page, we have also added action Create in Business Central, if we choose this action:
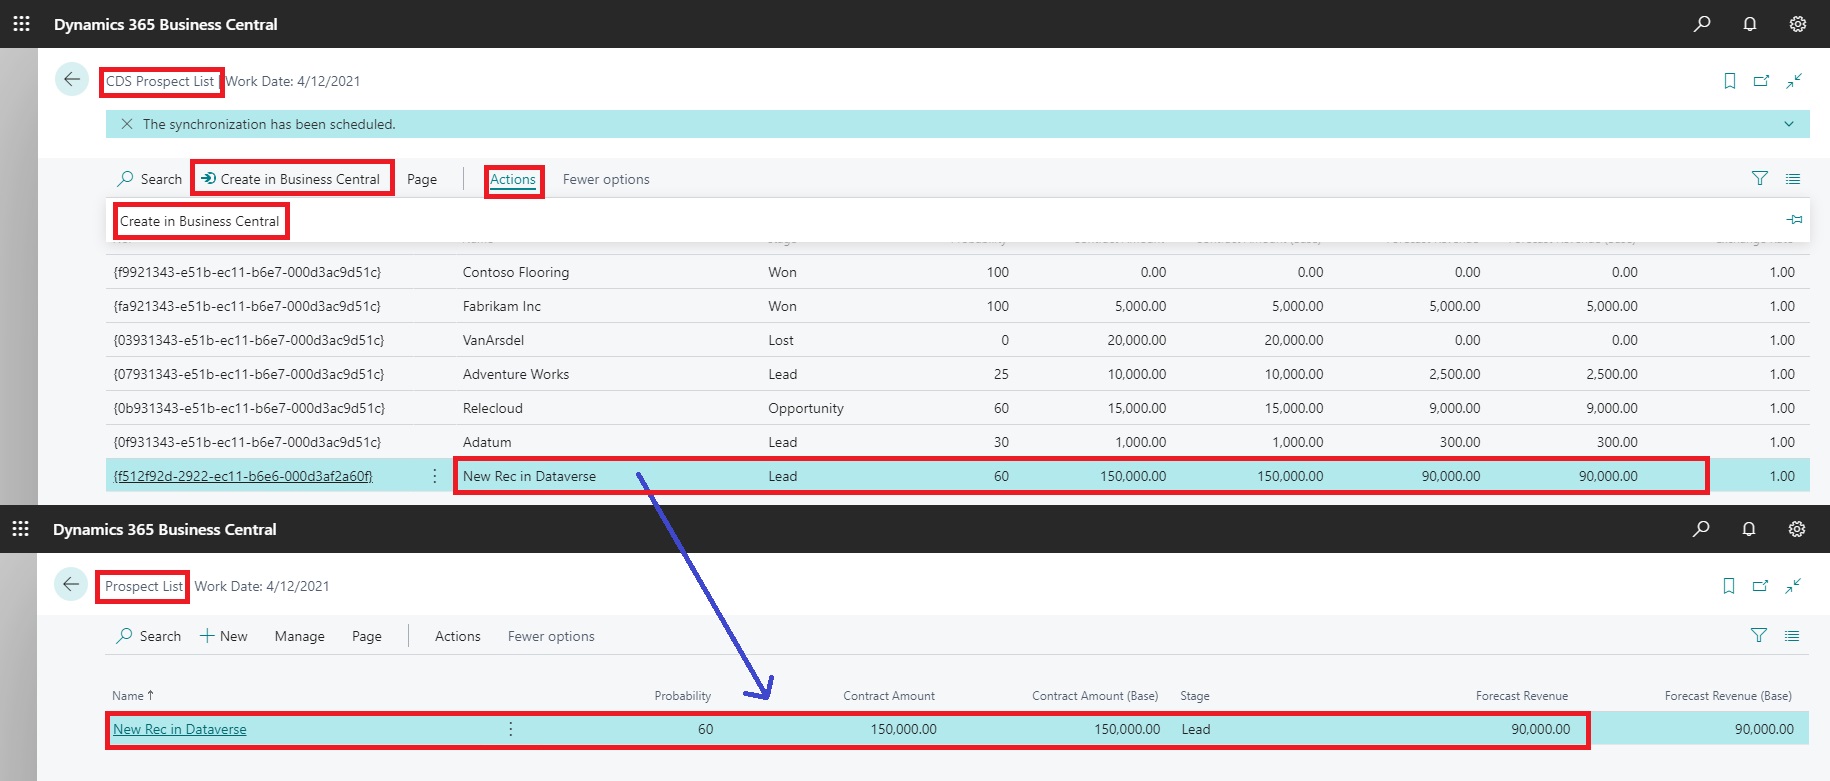
The record in Dataverse will get transferred to Prospect Table in Business Central
Now Let us Add one Record in Business Central, from Prospect Page.
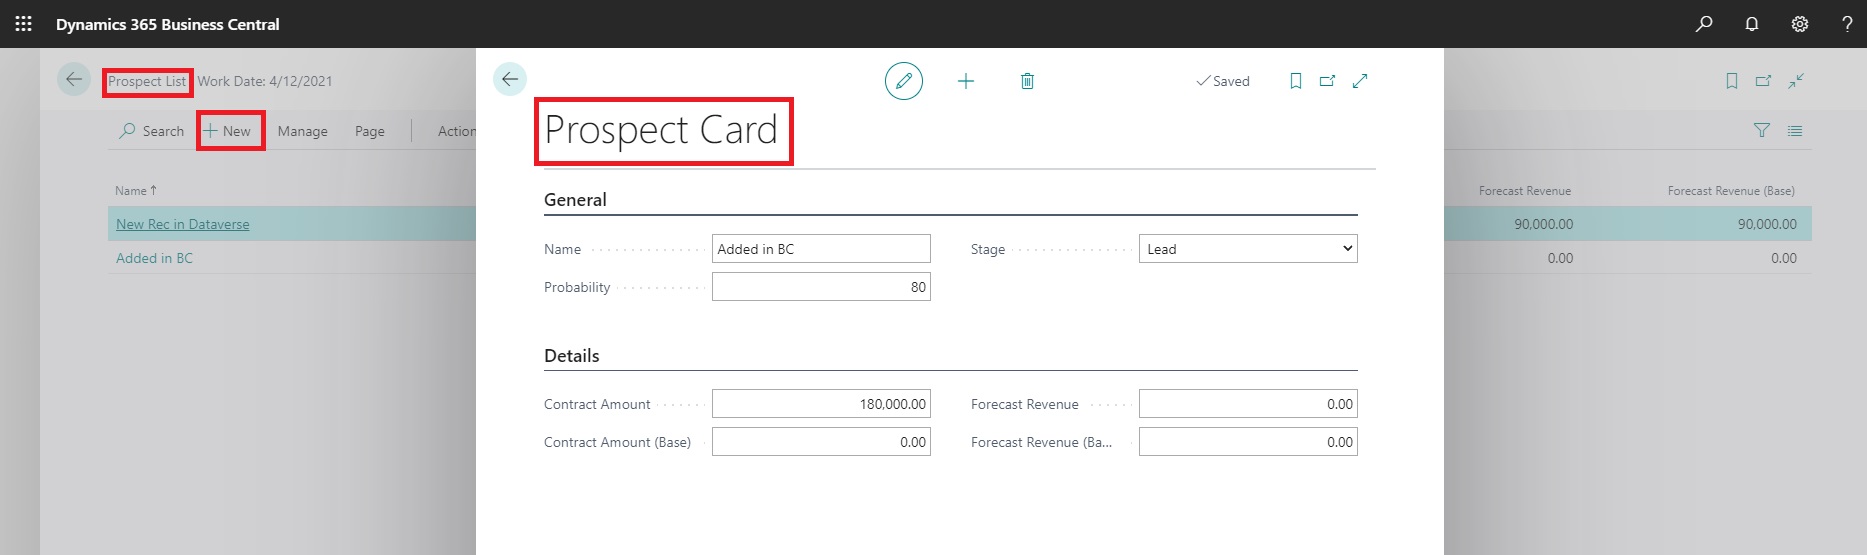
Business logic for calculating Forcast Revenue is not written in BC, but we have in Dataverse table.
When we synchronize data from BC to Dataverse, that will get calculated automatically.
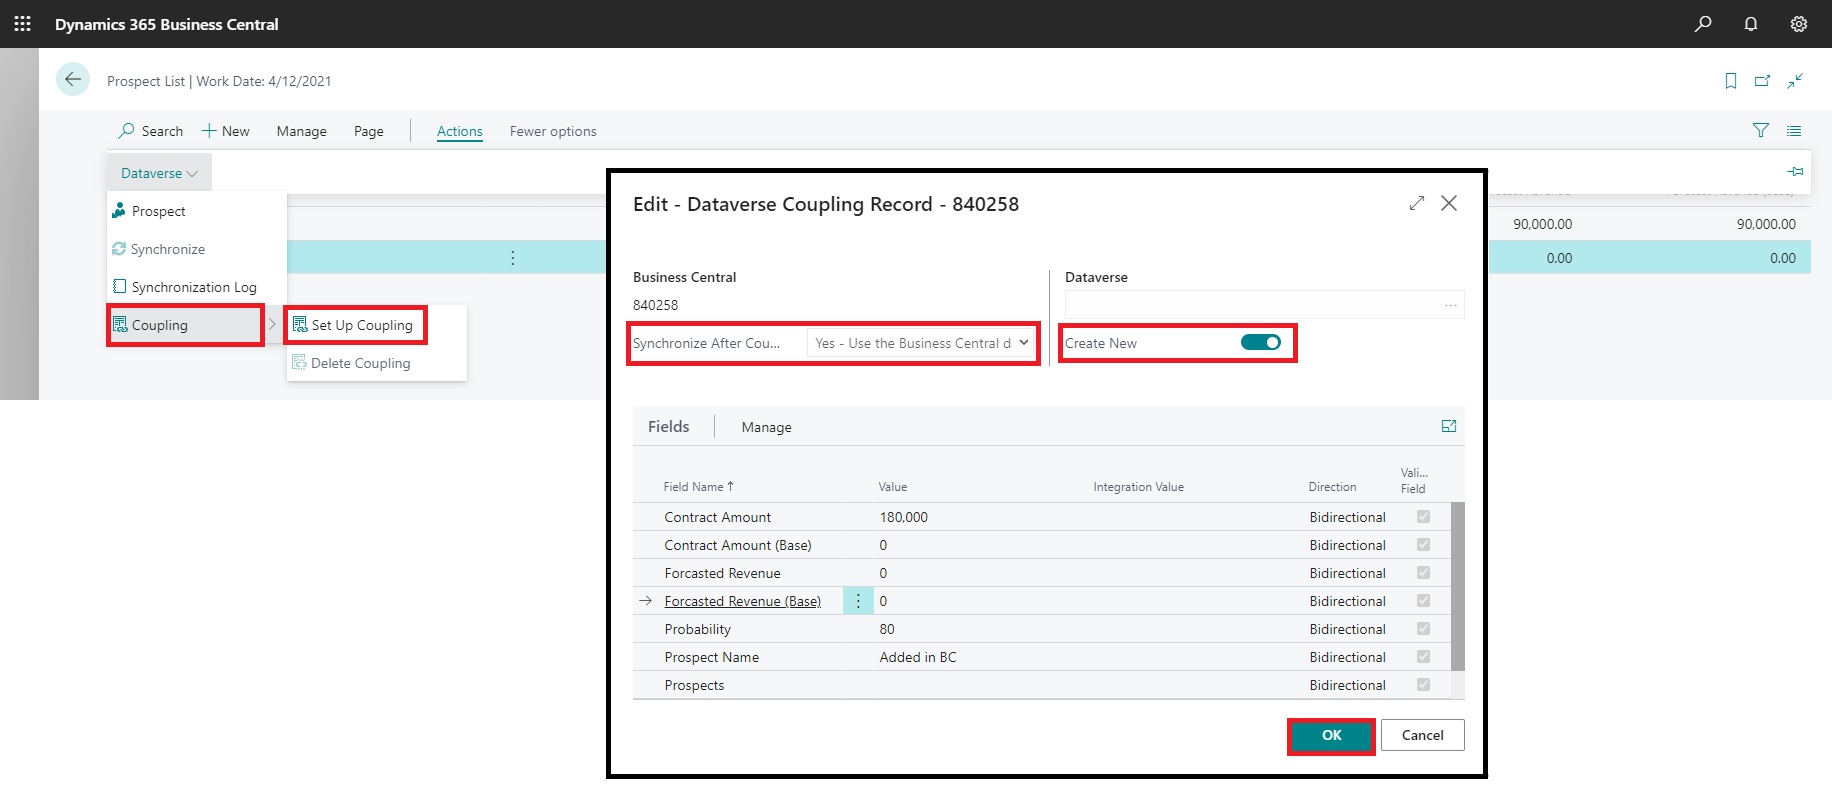
Select the record we just added in BC. Action-> Dataverse-> Coupling-> Setup Coupling
On the new page that opens, Select Create New, And click OK.
Since we have selected Synchronize After Coupling and direction BC to Dataverse, the record will get transferred to Dataverse Table.

Also you can see the other fields too got calculated. Now if we Synchronize back to BC these fields will get updated in BC.
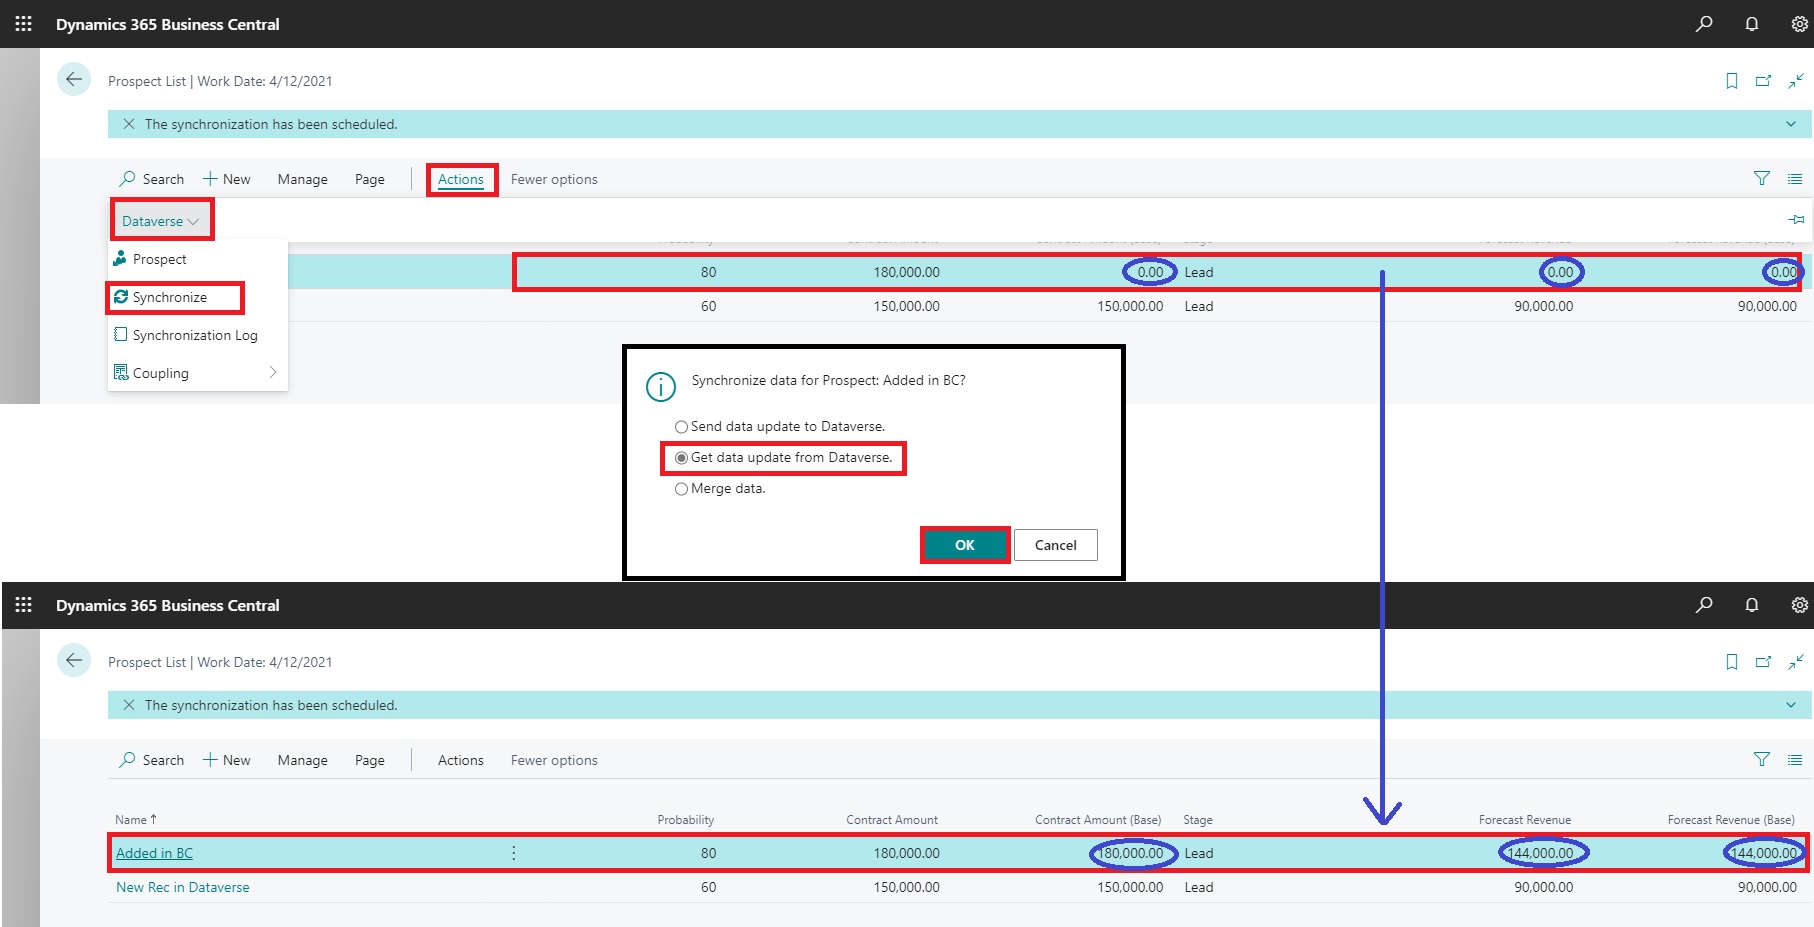
You can see the Synchronization is happening in both directions.
You can make necessary changes to code in sample walkthrough to achieve your desired results.
Hope you enjoyed learning this trick, and will use in your projects, the skill learned from this series of posts.
I will come up with more similar stuffs. Till then keep exploring, learning and sharing with others.
Take care of yourself and your loved ones. Put your mask, maintain safe distance and don’t forget to get vaccinated.

This is the Eleventh post in the series. If you want to go to previous post click here.
From the series of steps this post is dedicated to Step-10:
As a Tenth Step we will Verify & Assign Permissions in Power Apps Environment.
This is the final Step, and we will be done with the goal we set in our first post of this series.
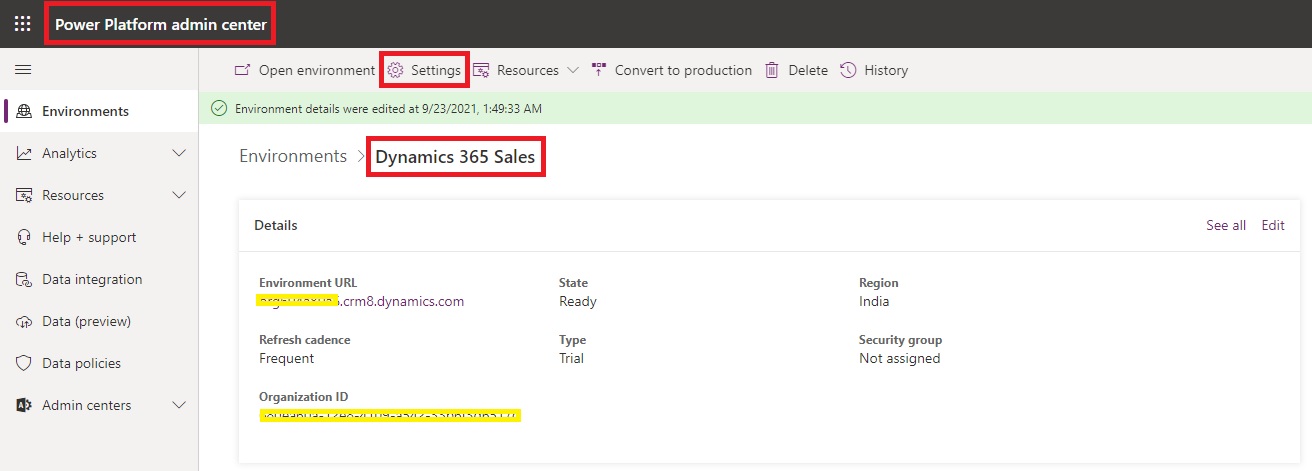
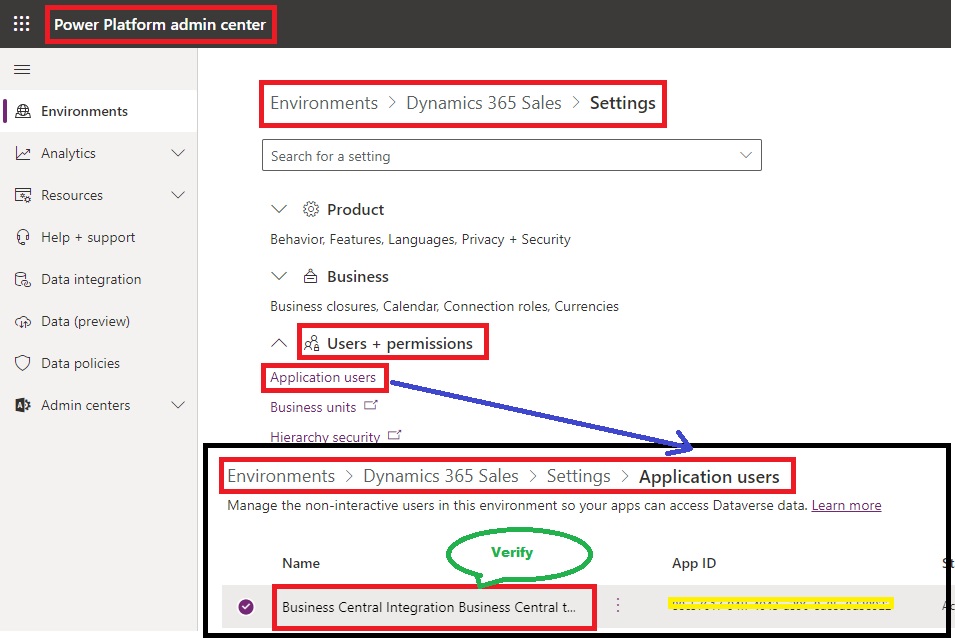
Open your Dynamics 365 Sales Environment and Go To Settings.
Under Users + permissions -> Application users.
On next screen Verify “Business Central Integration Business Central to Common Data Service” is selected. If not then select it from “Edit Security Roles”.
From Settings -> Users + permissions -> Security roles
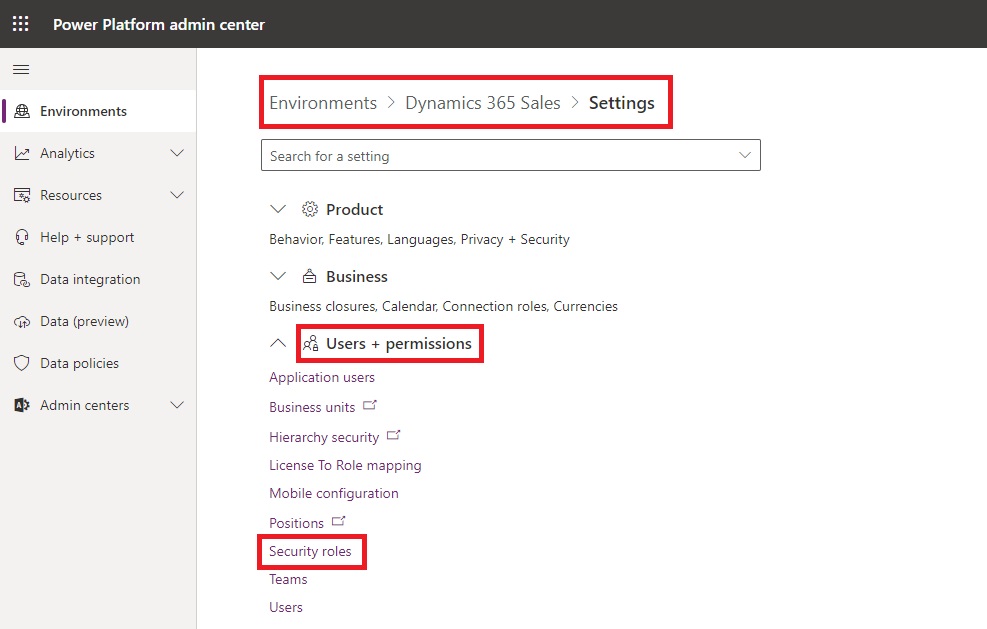
From Security roles select the Business Central Dataverse Integration Then Edit

Select Custom Entities tab and find your table Prospects. Select each circle 4 times to assign Organization, circle should turn completely filled green color.
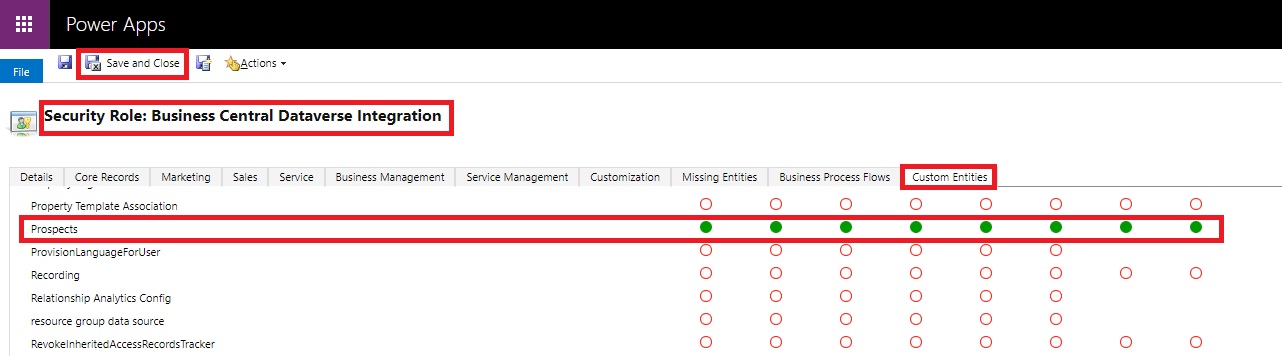
Select Save and Close.
Now you All done with the steps, Ready to test the solution.
In next post we will test the solution, we created in past 10 posts.
Now you are good to proceed with Next Step.
You can jump to Next Step from here.

This is the Tenth post in the series. If you want to go to previous post click here.
From the series of steps this post is dedicated to Step-9:
As a Nineth Step we will Update the default Mappings.
Open the Dataverse Connection Setup using TellMe.
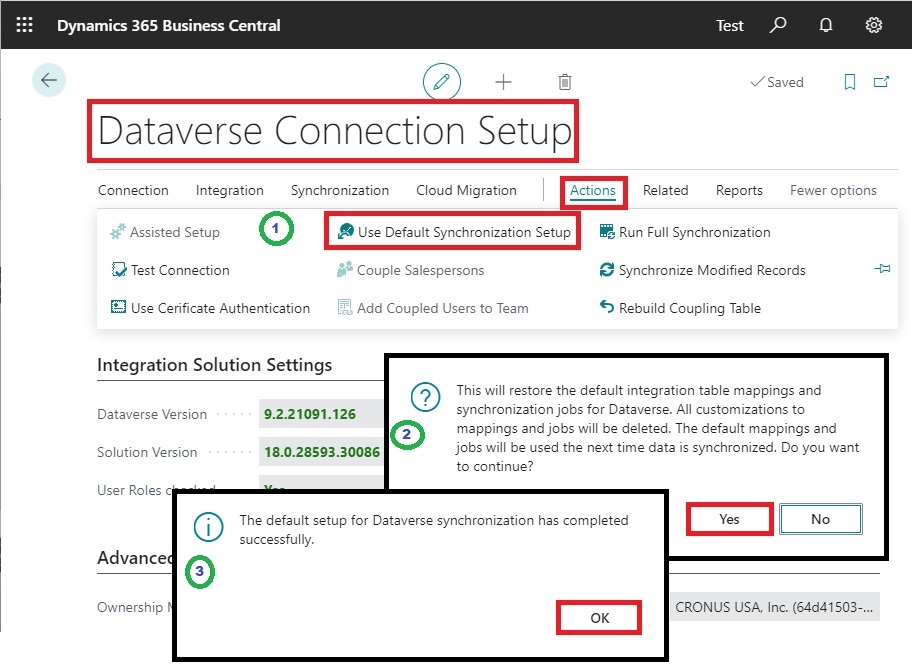
From Actions -> Use Default Synchronization Setup.
Respond Yes to the Confirmation Message.
You will get the confirmation as completed, say OK to continue.
Next open the Microsoft Dynamics 365 Connection Setup from TellMe.

Go To Mapping -> Integration Mappings.
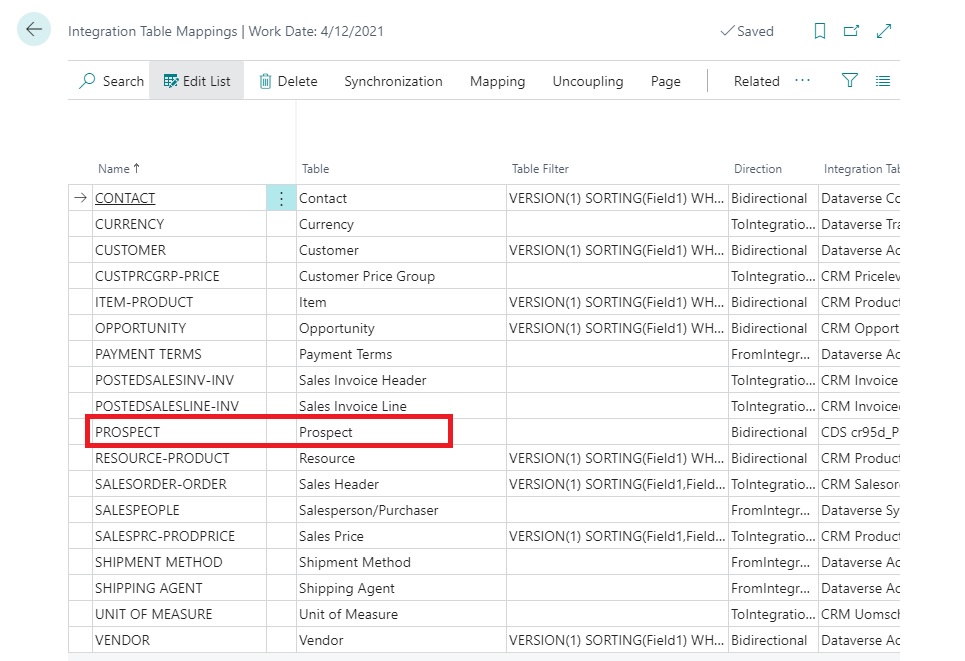
Now you can find your Custom table Prospects.
Go To Fields, you will see Field Mappings for you table as defined in Integration Codeunit in previous step.

Now you are good to proceed with Next Step.
You can jump to Next Step from here.

You must be logged in to post a comment.