Business Central, Dataverse, Dataverse Connection Setup, Dynamics 365 Connection Setup, Fields, Integration, Mappings, Setup, Synchronize

Updating the default Mappings

This is the Tenth post in the series. If you want to go to previous post click here.

From the series of steps this post is dedicated to Step-9:

As a Nineth Step we will Update the default Mappings.

Open the Dataverse Connection Setup using TellMe.

From Actions -> Use Default Synchronization Setup.

Respond Yes to the Confirmation Message.

You will get the confirmation as completed, say OK to continue.

Next open the Microsoft Dynamics 365 Connection Setup from TellMe.

Go To Mapping -> Integration Mappings.

Now you can find your Custom table Prospects.

Go To Fields, you will see Field Mappings for you table as defined in Integration Codeunit in previous step.

Now you are good to proceed with Next Step.

You can jump to Next Step from here.

Advertisement
Assisted Setup, Business Central, Dataverse, Dynamics 365 Connection Setup, Dynamics 365 Sales, Integration, Solutions, Tip & Tricks

Setup a connection to Dynamics 365 Sales

Integration with Business Central is done through Dataverse, and you will find lots of standard settings and tables that are provided by the integration.

This is the Third post in the series. If you want to go to previous post click here.

From the series of steps this post is dedicated to Step-2:

Before you start make sure you have below information ready with you:

  • URL for the Dataverse environment (Dynamics 365 Sales) that you want to connect to
  • The user’s name and password of an account that has administrator permissions in Business Central and Dataverse.
  • The local currency for the company in Business Central must be the same as the base transaction currency in Dataverse. 


As a second Step we will setup a Connection to Dynamics 365 Sales.

From Assisted Setup under Connect with other systems group choose Set up a connection to Dynamics 365 Sales, as shown below.

This Step is straight forward, you need to just respond to Next to each page of the Wizard.

The URL will be same as used in previous step, while Connecting to Dataverse. Click Next.

Optionally, there are advanced settings that can enhance security and enable additional capabilities, such as sales order processing and viewing inventory levels. The following table describes the advanced settings.

Click Finish to complete the Setup.

Next open the Dynamics 365 Connection Setup from TellMe.

Select Connection -> Test Connection

If everything is ok it should show Connection test Successful message.

Go to Dataverse Connection Setup, from Integration -> Integration Solutions

It will list you the solutions deployed.

Same you can find in Dynamics 365 Sales -> Settings -> Solutions

For more details you can have a look to Microsoft docs

Integrating with Dynamics 365 Sales

Now you are good to proceed with Next Step.

You can jump to Next Step from here.

Assist Setup, Assisted Setup, BC18, Business Central, Change Log, Cues, Data, Data Classifications, Dynamics 365, Email, Field Monitoring, Fields, Functional Tips, High-Risk, How To, Information, Monitor Field Change Setup, Notification, Office 365, Office Integration, Outlook, Role Center, Settings, Smtp, Start, Stop, Tip & Tricks

Monitor Field Change in Business Central

Field Monitoring is one of great help for superusers in Business Central. You can now configure a list of fields that contain high-risk and business-critical data that you want to be notified about when they are changed.

Changes to high-risk settings in Business Central can be tracked using the Change Log functionality. But sometime only tracking changes is not sufficient and you expect more like you should be notified of changes in fields that contain high-risk and business-critical data, such as bank account numbers, company name, and addresses.

Now setting a list of fields that contain high-risk and business-critical data is possible and you can be notified about when they are changed.

To start with this feature, Look for Assist Setup, I am using BC18 demo database for below steps.

Although it is not necessary to follow Assist Setup, you can do setup from individual pages. But this will ensure you don’t miss any steps.

Click on Next to start with setup. And follow the steps in leading wizard pages.

If you wish to use Data Classification and already have performed data classification you can enable or continue with individual fields using Monitored Fields Worksheet, in upcoming Wizard pages.

It is necessary to have the Sending and user e-mail setup is completed. Here you can select the email ids as required.

You need to add Fields for monitoring enable and click finish, or you can open the Page later and configure. This will Start the Monitoring and Notification service.

In Next step or you can open this page Monitored Fields Worksheet from Tell Me.

Add your table & fields that you wish to Monitor.

If notify is enabled you will receive the mail, else you can view in Monitored Field Log page. You can use Field Monitoring Setup Page from Action bar, or you can separately open this page from Tell Me.

You need to Start the Field Monitoring Setup, if not already done. If you have used Assist setup it will be Started, in case you are doing Manually from each Page, you will need to visit this Page, Setup your Emails and Start the Service.

Before we Start with Testing, it is strongly recommended you Log Off and Login again to Business Central. As logging starts and ends on Login & Logout of user.

Open the Customer Page and make changes to Name, as above we have setup to log Name field of Customer.

If your all setup is OK you should Receive a mail as below.

Some Pages helpful for Field Monitored Service are:

You can Monitor the Mails Status from your Role Centre Cues:

What else you can do for monitoring your data and notifications:

  • If there is a problem sending the email, you can check the detailed information on Email Outbox page.
  • You can view the mail sending record on Sent Emails page.
  • You can view the log of Field Monitoring Setup and Monitoring Fields on Monitored Field Log Entries page.

Hope you enjoyed the information. Will come with more similar information in my next posts. Till then keep exploring, learning and sharing your knowledge with others.

Remain safe, take care of your loved ones, put your mask, maintain safe distance and don’t forget to get vaccinated.

Azure, Development Tips, Dynamics 365, Functional Tips, How To, Image Analyzer, Information, Instalation & Configuration, NAV 2018, Tip & Tricks, What's New

Image Analysis feature in Dynamics NAV 2018

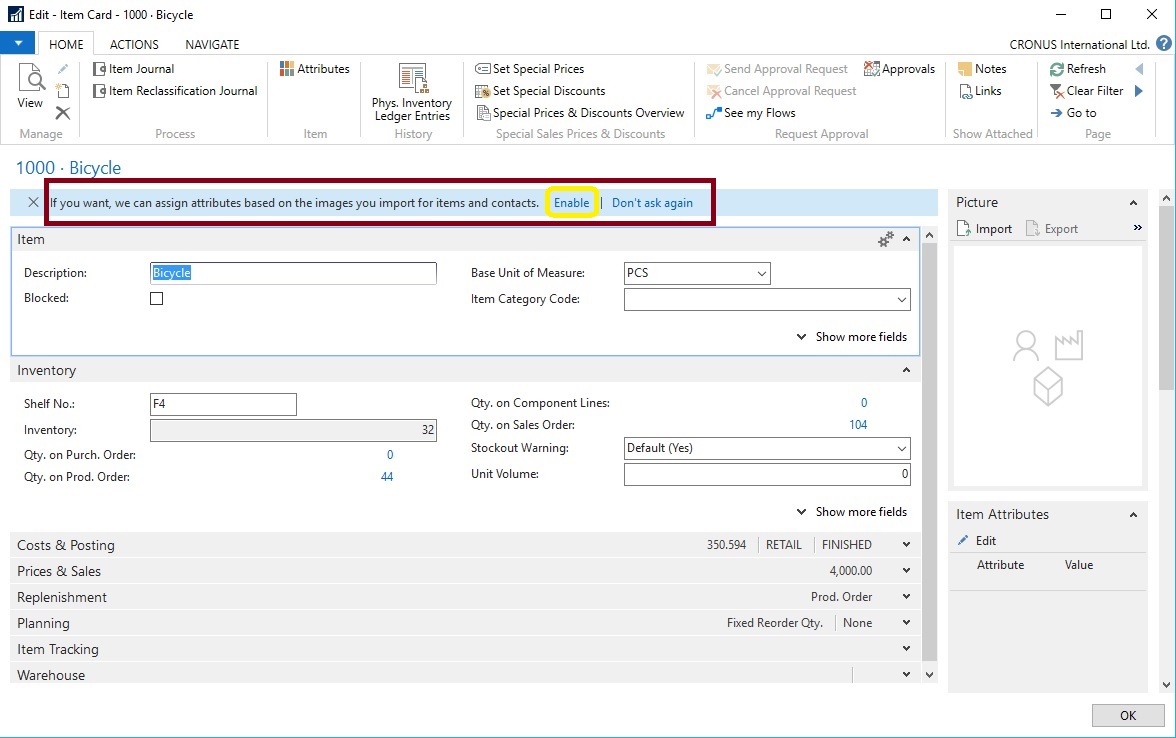
In Dynamics NAV 2018, the Image Analyzer extension uses the Computer Vision API to analyze images that are attached to contact persons and items.

For example, this is useful for items because it lets you build up a stockpile of metadata about what you sell and use it to fine-tune search results when someone is browsing your web shop.

Image Analyzer is free in Dynamics NAV, but there is a limit to the number of items that you can analyze during a certain period of time. By default, you can analyze 100 images per month.

After you enable the extension, Image Analyzer runs each time you import an image to an item or contact person. You will see the attributes, confidence level, and details right away, and can decide what to do with each attribute. If you imported images before you enabled the Image Analyzer extension, you must go to the item or contact cards and choose the Analyze Picture action.

Requirements

There are a few requirements for the images:

  • Image formats: JPEG, PNG, GIF, BMP
  • Maximum file size: Less than 4 MB
  • Image dimensions: Greater than 50 x 50 pixels

How to enable Image Analyzer

To enable the Image Analyzer extension, do one of the following:

Method-1 : Open an item or contact card. In the notification bar, choose Analyze Images, and then follow the steps in the assisted setup guide.


IA-1

This will launch Image Analyser assisted setup guide, follow the step.


IA-2

IA-3

IA-4

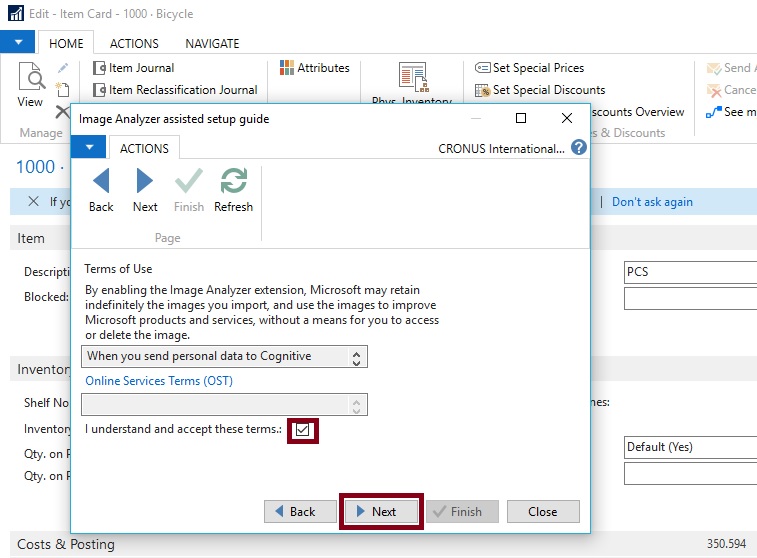
Once you are done It will import your image for Analysing.

IA-5


Method-2 : Access the Service Connections, and then choose Image Analysis Setup.

IA-5.1

Choose the Enable Image Analyzer check box, and then complete the steps in the assisted setup guide.

IA-5.2

For URL and Key follow these steps:

Click on Computer Vision API Documentation

IA-6

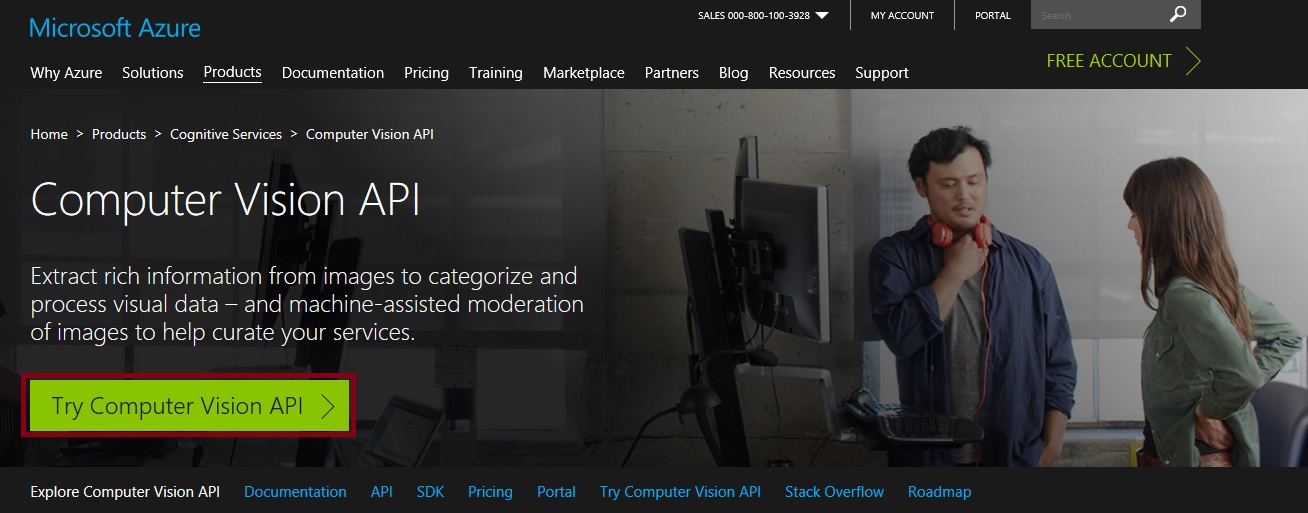
Click on Try Computer Vision API

IA-7

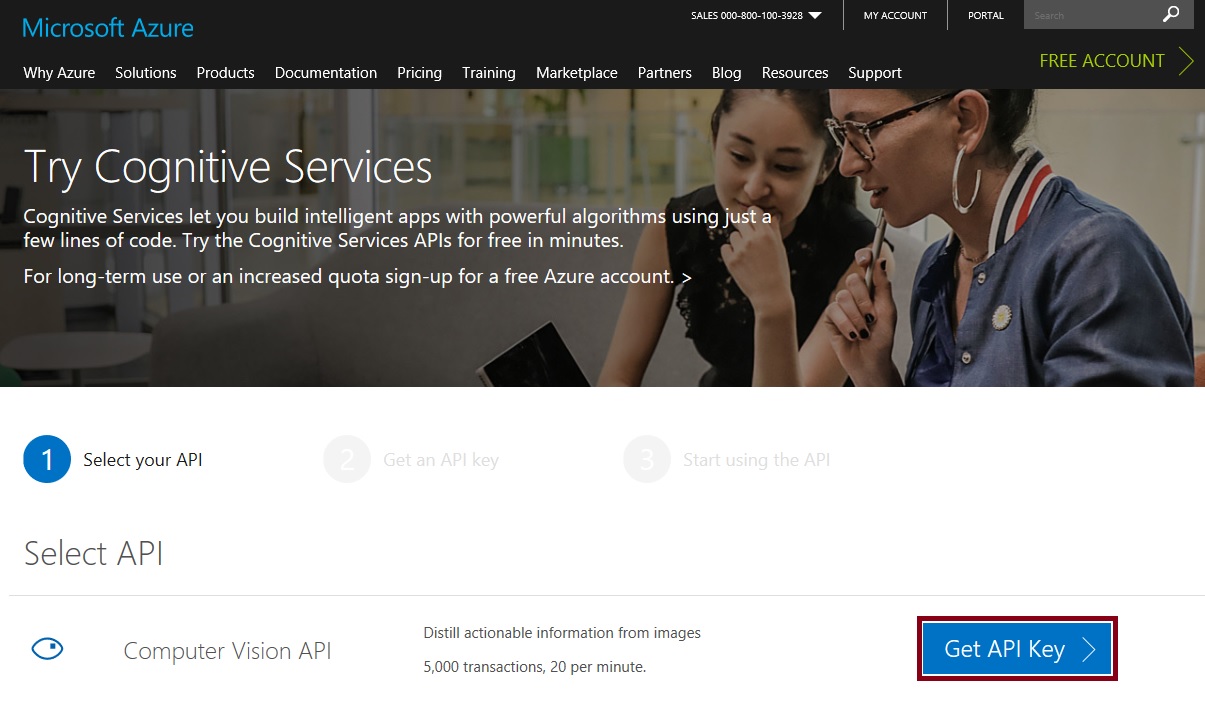
Select your API Computer Vision API and then Get API Key

IA-8

Agree to T & C select your Country/Region and then Next

IA-9

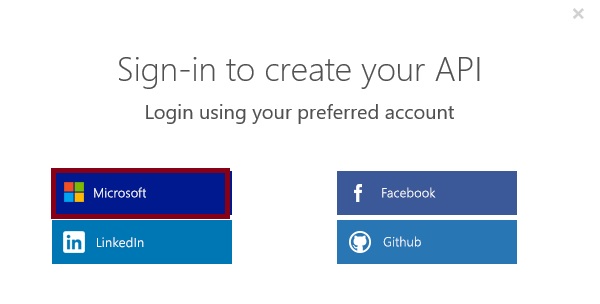
Sign-In with the preferred account sign-in method

IA-10

Once done you will land on page which will have your Endpoint URL and Key

You must add /analyze at the end of the API URI, if it isn’t already there.

IA-11

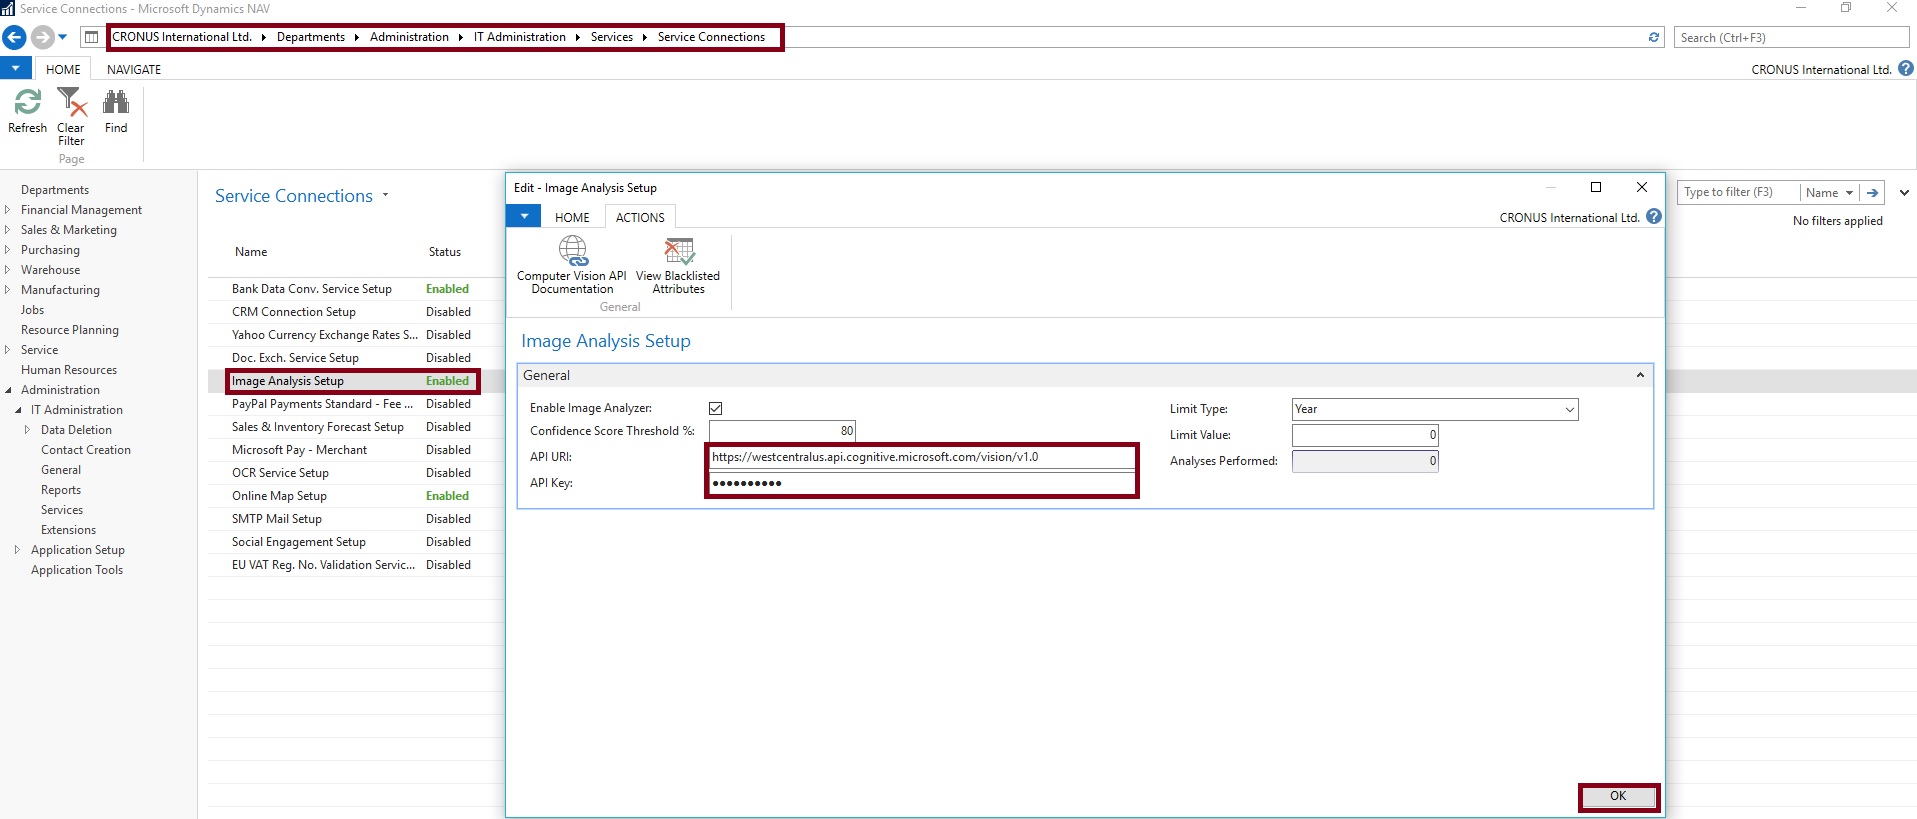
Enter your Endpoint URL and Key and close the window.

IA-12

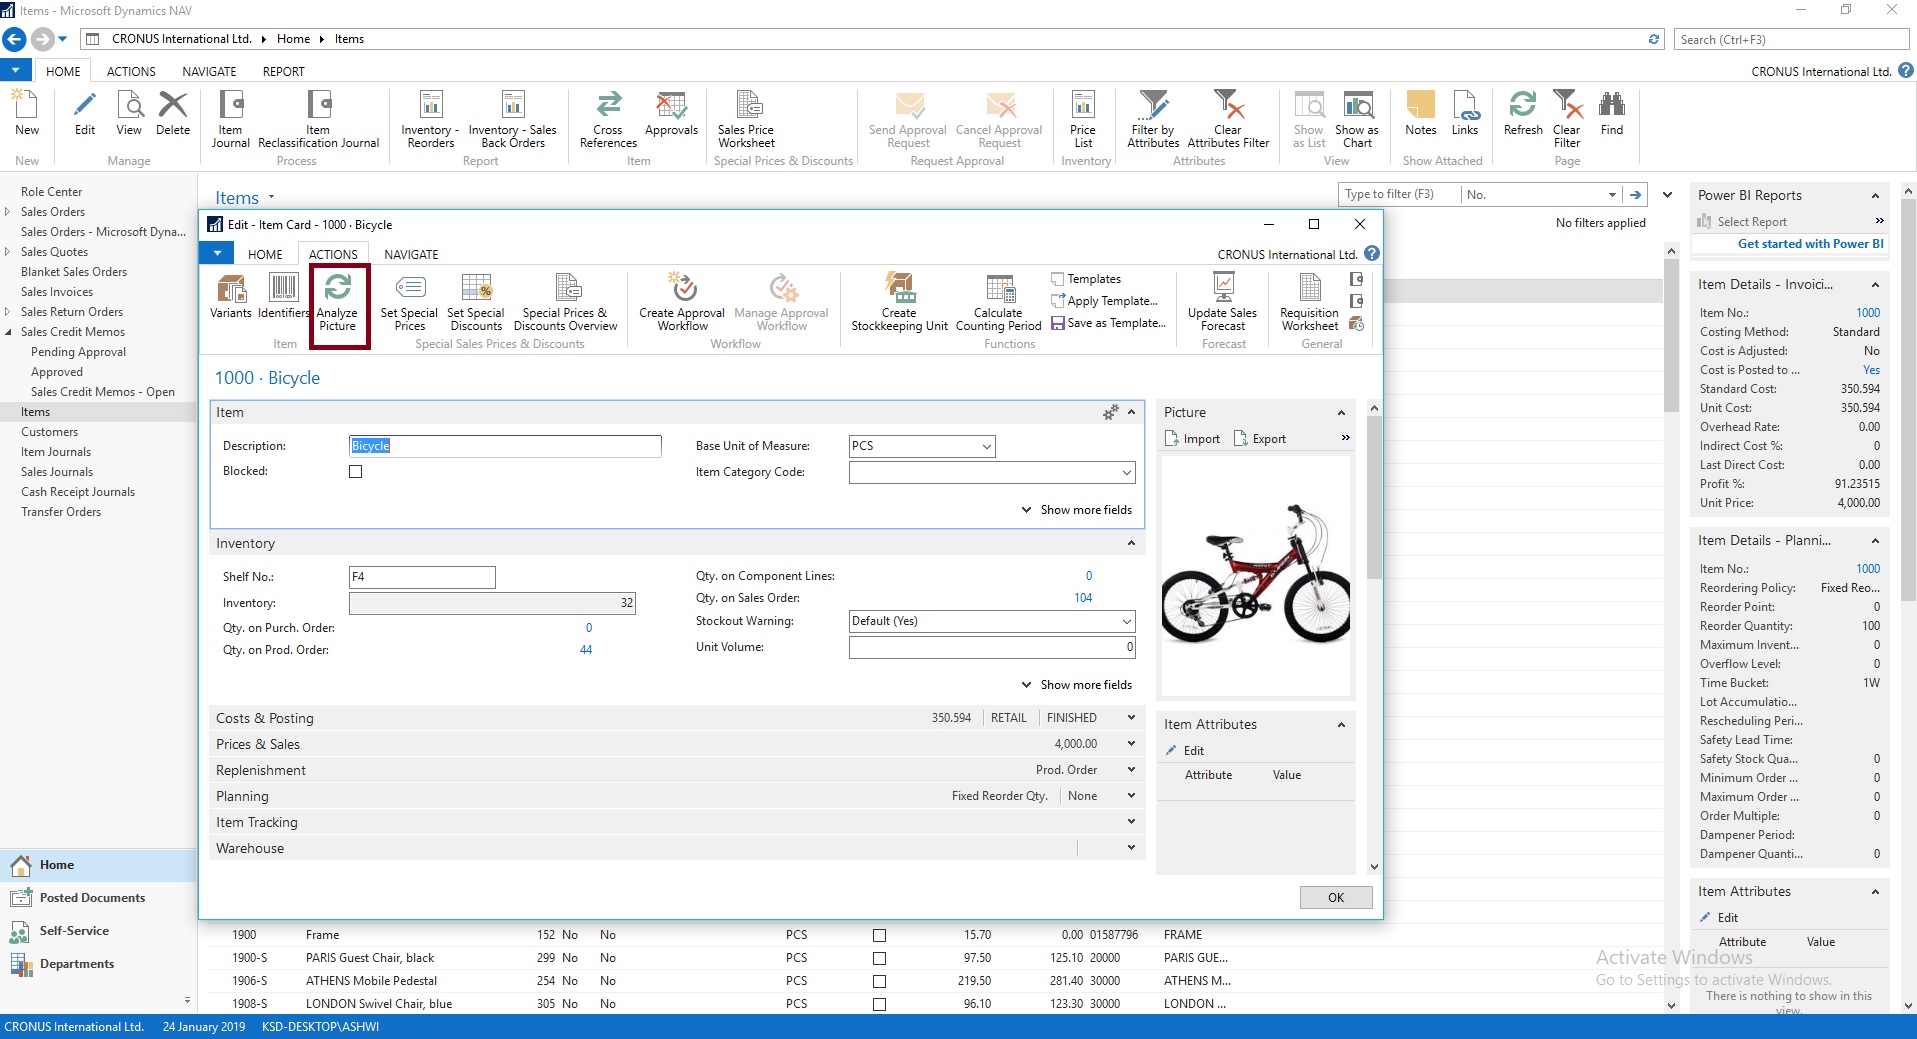
Now you import your Image, or select Analyze Picture if already imported

IA-13

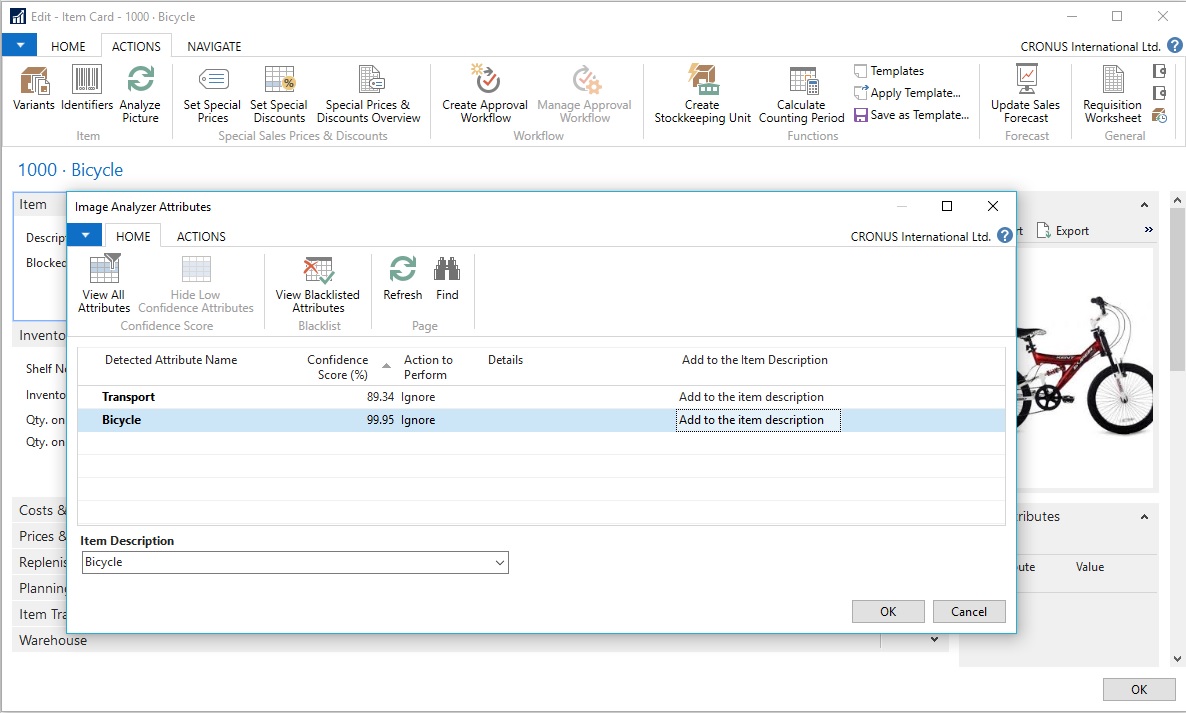
This will analyze the Image and provide you with the Attributes.

The Image Analyzer Attributes page displays the detected attributes, the confidence level, and other details about the attribute. Use the Action to perform options to specify what to do with the attribute.


This is how you enable and configure your Image Analyzer Service.


To see how many analyses you have left in the current period

You can view the number of analyses you’ve done, and how many you can still do, in the current period.

Enter Image Analyzer Setup, and then choose the related link.

The Limit type, Limit value, and Analyzes performed provide the usage information.


To stop using the Image Analyzer extension

Enter Service Connections, and then choose Image Analyzer Setup.

Clear the Enable Image Analyzer check box.


I will come with more details as I proceed.


Functional Tips, How To, Information, Instalation & Configuration, Maderia, Tip & Tricks, What's New

How to Setup Online Bank Feeds in Madeira

You need to be sure : The default company, CRONUS, that launches when you first log in to Project “Madeira” does not have electronic bank feeds enabled. To tryout this feature you must switch to trial Company “My Company“.

In Project “Madeira” you can connect to most of the online banks and download electronic bank feeds for use in bank reconciliation, avoiding tedious, manual reconciliation, reducing errors, and ensuring that your data is refreshed on a frequent basis.

When you log into MyCompany for the first time, a Company Setup wizard will guide you through setting up the basic company information, including using a bank feed service.

Dont forget to select “Use Bank Feed Service” in Company Setup Page to enable this Service.

You can Manage Bank Accounts & Feeds from Bank Account List Page.

BankStatementService-1

If you enable “Use Bank Feed Service” in Company Setup Page, a new section displays in the ribbon as shown in above screenshot with actions so that you can create a new bank account in Project “Madeira” based on the online bank feed, link already existing bank accounts to online bank feeds, unlinking online bank account feeds, or set up automatic download of feeds on a regular schedule.

When you reconcile bank accounts, you can download bank feeds on demand, as well as process automatically downloaded feeds if you have set up already.

In the Payment Reconcilliation Journal, you can import bank statements based on your bank feeds, and Project “Maderia“ will automatically suggest how payments are applied to ledger entries. You can change the application before you post.

Alternatively, you can import bank statements to the Bank Account Reconcilliation window and reconcile the statements with your ledger entries there.

I will come up with more details in my upcoming posts, till then keep practicing and Learning.


Development Tips, Functional Tips, How To, Maderia, Tip & Tricks

Setup Send Documents by Email in Madeira

To enable emails from within Project “Madeira”, start the Set Up Email assisted setup on the Home page. We have already seen this in our previous post, you can find it here.

To offer your customers to pay for sales electronically using a payment service, such as PayPal, you can also have the PayPal information and hyperlink inserted in the email body. We have already covered this in our previous post, you can find it here.

From all supported documents, you initiate emailing by choosing the Send action, on posted documents, or the Post and Send action, on non-posted documents.

Let us Setup document-specific email body for sales invoices.

From the search page find Report Selections Sales:

SetupEmail-10

Fill the Value as shown in below screen in same sequence.

SetupEmail-11

If you want to offer customers to pay for sales electronically, you can set up the related payment service, such as PayPal, and then have the PayPal information and hyperlink inserted in the email body as well. We have already covered this in our previous post, you can find it here.

Will come up with more details & feature explaination in my upcomming posts.


Development Tips, Functional Tips, How To, Information, Maderia, Tip & Tricks

How Do I : Setup or Adjust Item Cost in Madeira


In this post we will see how we can Setup Adjust Cost and how to Run Manually Item Cost Adjust Batch or Schedule the same.

ItemCost-1

Search the Page Inventory Setup using Search Page in Right top corner of your screen.

Search for Inventory Setup Page.

ItemCost-2

Make Sure Automatic Cost Posting is Setup as required.

Also Setup frequency of Automatic Cost Adjustment.

ItemCost-3

Option Behavior
Never Costs are not adjusted when posting
Day Costs are adjusted if posting occurs within one day from the work date
Week Costs are adjusted if posting occurs within one week from the work date
Month Costs are adjusted if posting occurs within one month from the work date
Quarter Costs are adjusted if posting occurs within one quarter from the work date
Year Costs are adjusted if posting occurs within one year from the work date
Always Costs are always adjusted when posting, irrespective of the posting date

Now we will Run the Adjust cost Item Entries Batch.
ItemCost-4

Apply the desired filter for Item or Category as desired.

Next you can run Immediately or can schedule for later execution.

If you require Immediately choose OK.

If you wish to schedule for Later Run choose Schedule.

ItemCost-5

Enter your Date & Time and click OK.

ItemCost-6

To check the status of the Scheduled Run, Search and open the Page Job Queue Log Entries.

ItemCost-7

You can find the Status of your Scheduled Job for Adjust Cost Entries.

ItemCost-8

It’s easy na.

I will come up with more details in my upcoming posts.

Till then keep Exploring & Learning.


Development Tips, How To, Information, Instalation & Configuration, Maderia, Office Integration, Tip & Tricks

Assisted Setup (Office Add-Ins) in Madeira

In this post we will discuss about how to setup Office Add-Ins.

Select Assisted Setup & Tasks from the ribbon of Action Tab.

SetupOfficeAddIn-1

Select Setup Office Add-Ins from the list.

SetupOfficeAddIn-2

Click on Next Button on Welcome Screen.

SetupOfficeAddIn-3

Select Setup for (Organization or you only) and click on Next Button.

SetupOfficeAddIn-4

Enter your E-mail id and Password, click on Next to continue with next step.

SetupOfficeAddIn-5

If you wish to receive few sample mails in your Mail box click on the check box or leave it blank, click on Next Button.

SetupOfficeAddIn-6

That’s it. click on Finish to complete the setup.

SetupOfficeAddIn-7

SetupOfficeAddIn-8

That’s all for this post.

Will come with more details in my upcoming posts.

Till then keep exploring & learning.


Development Tips, How To, Information, Instalation & Configuration, Maderia, Office Integration, Tip & Tricks

Assisted Setup (Email) in Madeira

In this post we will discuss how to setup Email.

Its very easy and single user intervention required.

SetupEmail-1

From Action Tab click on Assisted Setup & Task from the ribbon.

SetupEmail-2

On Welcome screen click on Next Button.

SetupEmail-3

Select the Email Provider and click on Next to continue.

SetupEmail-4

Enter your Email id and password, click on Next Button.

SetupEmail-5

That’s it, click on Finish.

SetupEmail-6


SetupEmail-7


Just required to enter Email id and password, setup is done.

Will come with other option in my next post.

Till then keep exploring and learning.


How To, Information, Instalation & Configuration, Maderia, Tip & Tricks

Assisted Setup (Sales Tax) – in Madeira

Today we will see how Sales Tax setup is done in Madeira. Since preview is limited to US so many of the information may not apply or some different options will be available for other countries. 

Whatsoever may be in final release we will see at that time when finally it will be released. Lets look what is available in this preview.

Login to Madeira using your credentials.

From Action Tab on landing/ Role Center Page on Ribbon click on Assisted Setup & Task.

SalesTax-1

List with available options page is opened.

SalesTax-2

Select Setup Sales Tax to continue.

Welcome Screen appears click on Next Button.

SalesTax-3

Default tax group is created and you can start with other setup, click on Next.

SalesTax-4

We are only talking about Tax since this preview is only for US so options relevant to them only available. 

SalesTax-5

Select the Account for Tax Account (Sales & Purchase) using the Assist button which lists you the Available Accounts in COA.

SalesTax-6

Next City, Country & State related information need to be filled, and then click Next Button to proceed.

SalesTax-7

Depending upon Information provided in Previous Screen it suggests Tax Area Code, click on Next Button to continue.

SalesTax-8

We are done with Setup now we will assign this to Customer, Vendor and Company.

Click on Next to continue.

SalesTax-9

You can Assign the Tax Information to Customer as per entering simple query.

We can assign or we can leave this activity for later.

We have option to schedule a reminder for this activity. Click on Schedule to continue.

SalesTax-10

Enter the Date and Time for Start & Expiry of this reminder.

This will setup a Job for this and keep reminding you so that you have track of, that this activity is still pending and need to be completed.

Once done choose OK Button to continue.

SalesTax-11

You can see this in Jobs Entry Page.

SalesTax-11-1

Similarly you can do for Vendor too.

SalesTax-12

For company it will be applicable if you selected, so no separate screen for same for query based assignment.

Select OK to Continue.

SalesTax-13

We are done with our Tax Setup for Company, Customer & Vendor.


That’s all for today, will come up with more information in my next post.

Till then keep exploring and learning.