BC18, Business Central, Customer, Document Layout, Dynamics 365, Email, Functional Tips, How To, Information, Office 365, Purchase Documents, Sales Documents, Smtp, Tip & Tricks, Vendor

Customer and Vendor Document Layout in Business Central

In this post we will discuss how to setup sending documents to different contacts, specific contacts to use with certain documents.

I am using BC18 Demo Database.

On Customer Card select Related-> Customer-> Document Layouts.

Here we are setting up different type of document should go to different contacts/e-mail ids.

In above example: Quote will go to my personal id, and Order Confirmation to my organization id.

It is important that email setup is done to use this feature, either is Office 365 or SMTP which ever you use.

Let’s quickly Check the output:

1. Sales Quote

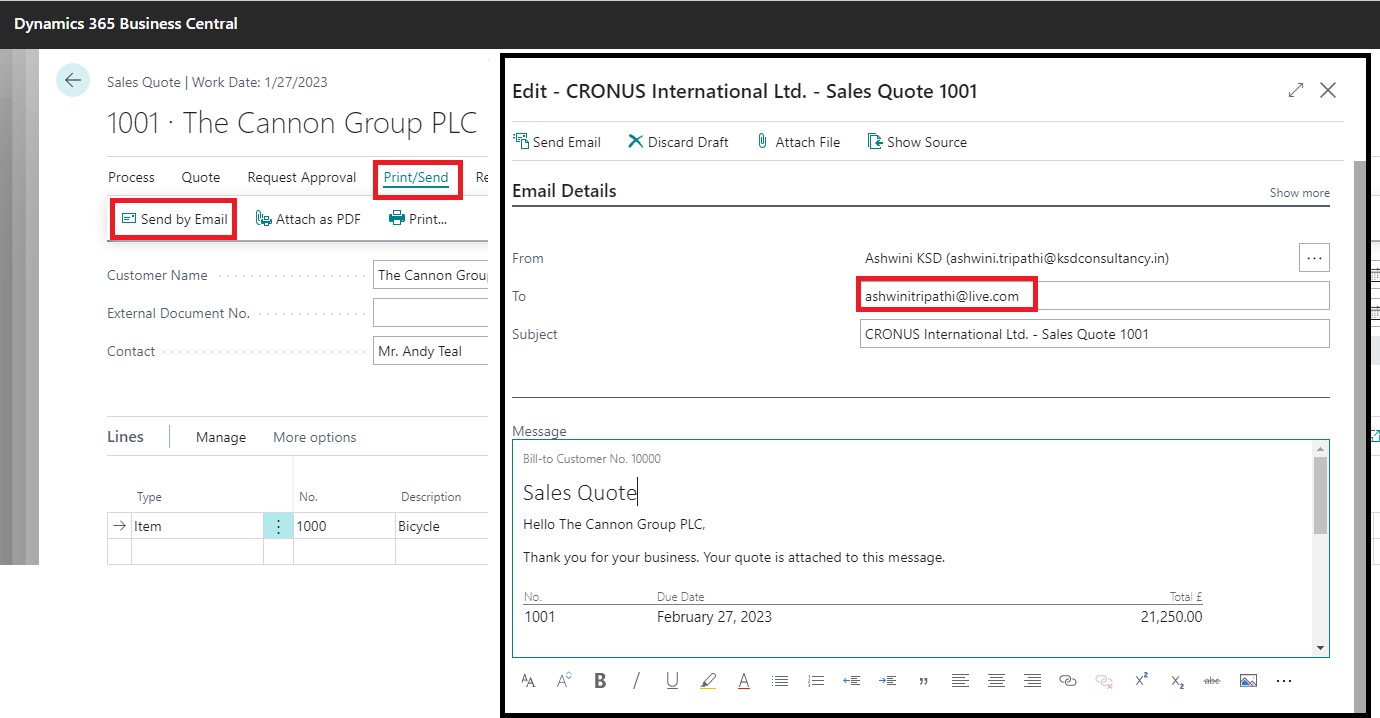
On Quote select Print/Sent-> Send by Email.

2. Order Confirmation

On Sales Order select Print/Send-> Email Confirmation.

You can see different type of documents are picking different e-mail ids of contacts as per our setup done above.

Similarly, you can do for Vendors too:

Hope you enjoyed the information. Will come with more similar information in my next posts. Till then keep exploring, learning and sharing your knowledge with others.

Remain safe, take care of your loved ones, put your mask, maintain safe distance and don’t forget to get vaccinated.

Advertisement
Always Ask, Autoinsert, Automatic, BC18, Business Central, Customer, Dynamics 365, Functional Tips, Get Recurring Lines, How To, Information, Lines, Manual, Notification, Purchase Documents, Recurring, Sales Documents, Tip & Tricks, Vendor, What's New

Auto-insert Recurring Sales and Purchase Lines in Business Central

Today in this post we will see how you can automatically insert frequently used sales and purchases more quickly and conveniently in Dynamics365 Business Central.

I am using BC18 Demo Database.

If your company uses repeat orders for customer and vendors, this feature can be helpful to you.

Open your Vendor Card, Select Related-> Purchases-> Recurring Purchase Lines.

In Recurring Purchase Line Setup, Create Code and way you want them to be available on your Purchase Documents.

Next you need to setup the Card for lines that will be part of this code for Purchase Lines.

Navigate to the Recurring Code Setup Page.

Choose the Card.

Enter the lines associated with this Code, that should be entered on Purchase Lines.

Options on Recurring Code Setup.

** Manual, Will be normal Std. Behavior

** Automatic, Lines will be inserted automatically.

Key in the Vendor Code and press Enter.

This will be helpful if you have single Recurring code setup, as automatic, rest all as manual.

Else Notification will be raised and you have to choose from the list.

** Always Ask, will give you Notification to add.

Key in the Vendor Code and press Enter.

This is helpful when you have multiple setups, and want to choose from the list.

From Notification click on Get Recurring Lines, and select desired code.

Once Lines are inserted on Purchase Lines you can edit the lines as usual in any open orders. Add or Remove Lines, Change the other field values etc.

Similarly, you can setup for Sales Documents too.

Hope you enjoyed the information. Will come with more similar information in my next posts. Till then keep exploring, learning and sharing your knowledge with others.

Remain safe, take care of your loved ones, put your mask, maintain safe distance and don’t forget to get vaccinated.

How To, Information, Instalation & Configuration, Maderia, Tip & Tricks

Assisted Setup (Sales Tax) – in Madeira

Today we will see how Sales Tax setup is done in Madeira. Since preview is limited to US so many of the information may not apply or some different options will be available for other countries. 

Whatsoever may be in final release we will see at that time when finally it will be released. Lets look what is available in this preview.

Login to Madeira using your credentials.

From Action Tab on landing/ Role Center Page on Ribbon click on Assisted Setup & Task.

SalesTax-1

List with available options page is opened.

SalesTax-2

Select Setup Sales Tax to continue.

Welcome Screen appears click on Next Button.

SalesTax-3

Default tax group is created and you can start with other setup, click on Next.

SalesTax-4

We are only talking about Tax since this preview is only for US so options relevant to them only available. 

SalesTax-5

Select the Account for Tax Account (Sales & Purchase) using the Assist button which lists you the Available Accounts in COA.

SalesTax-6

Next City, Country & State related information need to be filled, and then click Next Button to proceed.

SalesTax-7

Depending upon Information provided in Previous Screen it suggests Tax Area Code, click on Next Button to continue.

SalesTax-8

We are done with Setup now we will assign this to Customer, Vendor and Company.

Click on Next to continue.

SalesTax-9

You can Assign the Tax Information to Customer as per entering simple query.

We can assign or we can leave this activity for later.

We have option to schedule a reminder for this activity. Click on Schedule to continue.

SalesTax-10

Enter the Date and Time for Start & Expiry of this reminder.

This will setup a Job for this and keep reminding you so that you have track of, that this activity is still pending and need to be completed.

Once done choose OK Button to continue.

SalesTax-11

You can see this in Jobs Entry Page.

SalesTax-11-1

Similarly you can do for Vendor too.

SalesTax-12

For company it will be applicable if you selected, so no separate screen for same for query based assignment.

Select OK to Continue.

SalesTax-13

We are done with our Tax Setup for Company, Customer & Vendor.


That’s all for today, will come up with more information in my next post.

Till then keep exploring and learning.


Functional Tips

Create a Sales Invoice for a new Customer

In this session we will create a sales invoice for a new customer (Customer we don’t have in our Master).

To follow Step by Step you need to do a small setup:

Open the User Personalization and Set your Profile ID as below:

SINewCustomer-1

Select your Profile as “SMALL BUSINESS

Your Role Center will look like below:

SINewCustomer-2

  • On the Role Center, choose Ongoing Sales Invoices to open the list of ongoing sales Invoices.
  • On the Home tab, in the New group, choose New to create a new sales invoice.
  • In the Customer Name field, type the name of the new customer, and then press Enter or Tab to leave the field

Create the sales invoice for the new customer.

Notice that some fields are marked with red asterisks to tell which fields must be filled.

SINewCustomer-3

  • In the pop-up dialog, choose Yes to create the new customer
  • In the Templates window, select Customer DOMESTIC (or as desired), and then choose the OK button.

SINewCustomer-4

  • The Customer Card window opens in edit mode. Choose the OK button to close it.

SINewCustomer-5

  • The page closes and focus is back on the sales invoice that is now updated with the customer data.
  • In the Sales Invoice window, on the Lines FastTab, create a new line:

         Enter some line data for example : Item No.: 1001, Quantity: 10

  • On the Home tab, in the Posting group, choose Post.
  • Choose Yes.

SINewCustomer-6

  • Choose No to review the posted sales invoice, as of now we don’t require.

Helpful where we require instant Customer registration for recording the Orders. Later we will fill out rest of the details regarding Customer.

Uncategorized

Useful Tips for Technical as well as Functional (Saving Customer/Vendor/Item as Template)

Normally we see Template is created at on Interface and the Customer/Vendor/Item are created via other interface.

We can make it more user friendly, in below article I will show some readymade tips available in Navision It is available in 2013 and 2015, for lover version please verify accordingly.

First Lets have a look at what all is available to us then we will see how we can make the more meaningful to our customers. Obviously if any out of box customization is required that we have to carry out.

Template-CVI-1

Others too available check it out, I will show one of them rest you apply same skill to accomplish others.

Let’s Start with Page 1300 Mini Customer Card what it looks like.

Template-CVI-2

In this Page on Action Tab we have Save as Template the functionality which we are going to use in our Article for today.

Template-CVI-3

Let’s First Link this Page (1300) with our Std. Customer Card Page (21).

I will Add New Action on my Page and set following Properties.

Open the Page 21 in Design Mode & Access View -> Page Actions.

Template-CVI-4

We have added this Link Just for information you can Skip this step, it is not compulsory for what we are going to perform below in next step.

Here other tabs of Mini Customer Card is only visible following certain Conditions. So nothing wrong with code or design. Technical can review the code and find out the reason for same.

Like :

Template-CVI-5

Template-CVI-6

Next we will copy one Functionality from Page 1300 to our Page 21. Save as Template.

Open the Page 1300 in Designer and access to View -> Page Actions.

Template-CVI-7

Save the object no further any coding or Variable definition will be required. As this Functionality is properly designed as plug and Play. Required Variables are defined local and it takes the Current Record as Parameter.

TempMiniCustomerTemplate.SaveAsTemplate(Rec);

Now Open your customer card, scroll to record which you want to save as Template and Select Save as Template from Action Tab. Give the Template name to save and click OK.

Template-CVI-8

Your Template is saved. Now you can use the same to apply to your New Customer.

Now Create New Customer and Select Template to Apply.

Template-CVI-9

Template-CVI-10

You are done.

This way you are able to give something new to your Customer without any major customization.

Similarly you can do for Item & Customer too.

Explore there are few more which will be helpful in certain conditions.