Backup, Corfu Navision 2016, How To, Information, Job, Schedule, SQL, Tip & Tricks

Schedule SQL Job for SQL Database Backup


Today we will see how we can schedule to take daily backup of our database.

Before i start explaining the step i am confirming the version of SQL based on which i am writing this post.

Process will remain same may be screen bit different in different versions of SQL.

SCheduleJob-1

At first we will ensure that SQL Server Agent is running, in case it is not right click and Start it.

SCheduleJob-1

Expand the SQL Server Agent Folder, Select Jobs, Right click and select New Job.

SCheduleJob-1

Provide Name & Description to your New Job.

SCheduleJob-1

Select Page Steps & New from Bottom of the page to define Step for your Job.

SCheduleJob-1

Give name to the Step.

Select Type as Transact Script (T-SQL).

Select Database Name in my case i am selecting Demo Database NAV (9-0)

Write the Script as shown below:

SCheduleJob-1

Here is the Script for your ready reference:

{– Script Start

SET QUOTED_IDENTIFIER off

select getdate() “Start Time”

set nocount on
declare @dbname varchar(36),@cmd varchar(255)

declare dbname_cursor cursor
for select name from master..sysdatabases where name = ‘Demo Database NAV (9-0)’
order by name

open dbname_cursor
fetch dbname_cursor into @dbname

while @@fetch_status = 0
begin
DECLARE @DATE VARCHAR(36)
SELECT @DATE = (select CONVERT(char(8),DATEADD(dd,-30,GETDATE()),112))
if DATABASEPROPERTYEX(@dbname,’Status’) = ‘ONLINE’
begin
select @cmd =’backup database [‘+@dbname+’] to DISK=”C:\User Data\SQL Backup\’+@dbname+’.bak” with init’;
print @cmd
execute (@cmd)
end
fetch dbname_cursor into @dbname
end

close dbname_cursor

deallocate dbname_cursor

select GETDATE() “End Time”

–Script End}

Although above script is for multipurpose like if you want to backup all database on your SQL Server, you can make small tweaking and you are done.

If you would like to backup all the databases on a particular SQL Server, then make the following changes to the code above.

Replace following line of code:

for select name from master..sysdatabases where name = ‘Demo Database NAV (9-0)’

with the following line of code:

for select name from master..sysdatabases where name != ‘tempdb’

This will create a backup file for each database on the server, except for the temp database.

Next : Switch to Advanced Page.

Define other parameters as shown in below screen as per your requirement.

SCheduleJob-1

On Selecting OK, you will return to Job window.

SCheduleJob-1

Select Schedule Page:

Define your Schedule as per your requirement.

SCheduleJob-1

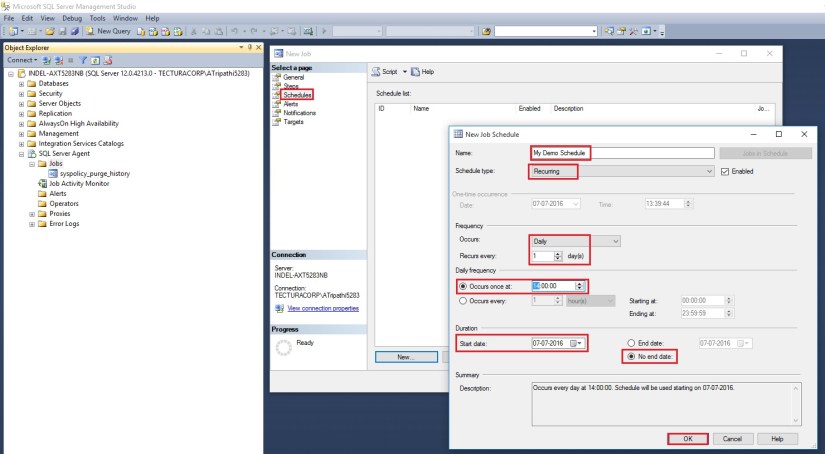
Select OK to return to Job Page.

SCheduleJob-1

Select OK to close and save the JOB.

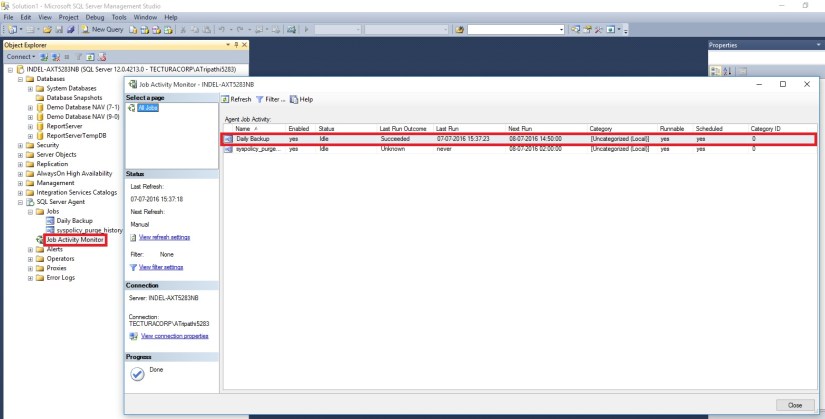
Now our Job is  created and scheduled.

You can see defined Jobs and its Status using Job Activity Monitor.

Before Job is executed

SCheduleJob-1

After executed you can see the Status as.

SCheduleJob-1

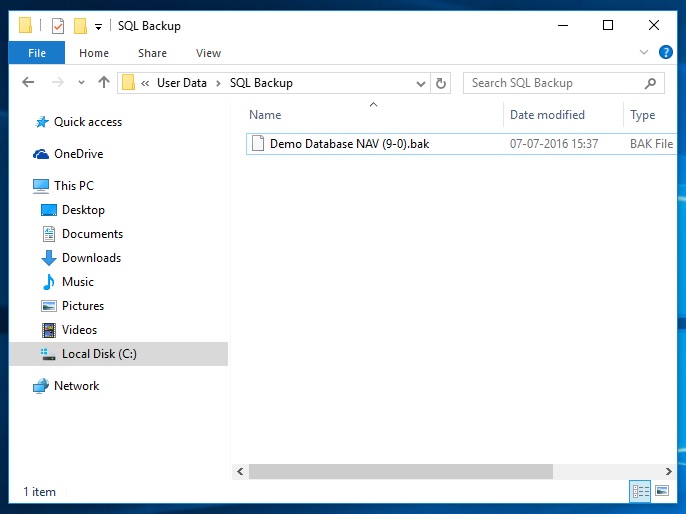
Post execution of Job here is the backup file created at defined path in the Script. Above script will overwrite the file on next execution.

If you want to create new file on every execution you need to modify the script for file name by adding timestamp or any other logic you desire.

SCheduleJob-1

I will come up with more information in my upcomming posts.

thats all for this post.


Advertisement
How To, Information, Instalation & Configuration, Maderia, Tip & Tricks

Assisted Setup (Sales Tax) – in Madeira

Today we will see how Sales Tax setup is done in Madeira. Since preview is limited to US so many of the information may not apply or some different options will be available for other countries. 

Whatsoever may be in final release we will see at that time when finally it will be released. Lets look what is available in this preview.

Login to Madeira using your credentials.

From Action Tab on landing/ Role Center Page on Ribbon click on Assisted Setup & Task.

SalesTax-1

List with available options page is opened.

SalesTax-2

Select Setup Sales Tax to continue.

Welcome Screen appears click on Next Button.

SalesTax-3

Default tax group is created and you can start with other setup, click on Next.

SalesTax-4

We are only talking about Tax since this preview is only for US so options relevant to them only available. 

SalesTax-5

Select the Account for Tax Account (Sales & Purchase) using the Assist button which lists you the Available Accounts in COA.

SalesTax-6

Next City, Country & State related information need to be filled, and then click Next Button to proceed.

SalesTax-7

Depending upon Information provided in Previous Screen it suggests Tax Area Code, click on Next Button to continue.

SalesTax-8

We are done with Setup now we will assign this to Customer, Vendor and Company.

Click on Next to continue.

SalesTax-9

You can Assign the Tax Information to Customer as per entering simple query.

We can assign or we can leave this activity for later.

We have option to schedule a reminder for this activity. Click on Schedule to continue.

SalesTax-10

Enter the Date and Time for Start & Expiry of this reminder.

This will setup a Job for this and keep reminding you so that you have track of, that this activity is still pending and need to be completed.

Once done choose OK Button to continue.

SalesTax-11

You can see this in Jobs Entry Page.

SalesTax-11-1

Similarly you can do for Vendor too.

SalesTax-12

For company it will be applicable if you selected, so no separate screen for same for query based assignment.

Select OK to Continue.

SalesTax-13

We are done with our Tax Setup for Company, Customer & Vendor.


That’s all for today, will come up with more information in my next post.

Till then keep exploring and learning.


Batch Job, Development Tips, Functional Tips

Adjust Item Costs/Prices… batch job

Just purchase one material on different rates with different vendors and consume it in manufacturing or do the negative adjustment and then run the batch job to see the effect.

The batch job is in the inventory section of Finance Module.

BatchJob-1
All this Batch does is updating the CARD Costs and Prices for an Item; it really has no connection to the costs posted to inventory, and in terms of Sales only affects the default sales price of an item. A better name might be “Item Card Cost/Price Update”
BatchJob-2
To test an example, run the batch on a test database, leave the defaults, but change the Adjustment factor to 1.1.
BatchJob-3
When you run this, all the Item Card Prices will be increased by 10%
BatchJob-4

Most of the processes relating to costing, discuss posted documents and entries. Like Posted Sales Invoice and Posted Purchase receipt and Item ledger entry and Value Entry and General Ledger and GL entries. All these tables (and others) are used to calculate the actual costs and prices in Navision, and are what is used for Accounting reporting such as financial Statements. This is all covered under Inventory Costing. The batch processes (periodic Activities) “Post Inventory Cost to G/L” and “Adjust Cost – Item Entries” all belongs in this category. But on the other side BEFORE you post anything you need to do setup, and amongst all the setup, are the fields on the Item card which ARE NOT POSTED to the GL, but are used as the default values before posting. For example Unit Price from the Item card is copied into the Line of a Sales Order as a SUGGESTED sales price. But you can change it here and post a different price. Most of the numbers that you see on the Item card are just defaults or suggestions; they are not the final number that is posted to the GL. All of this is covered by Inventory Setup, and includes the Batch Process “Adjust Item Costs/Prices”.

If you check the code you will find that:
BatchJob-5
In summary

Inventory Setup is what you do to setup Item Costs and Prices BEFORE they hit the GL. (including “Adjust Item Costs/Prices”). Inventory Costing is what you do with entries AFTER they are posted to correct any changes due to the difference between Expected costs and actual costs.
Just go through these steps and you will know what this batch job does-

1. Create a new Item. Complete all the fields with Unit cost and Unit price. Take a note of all the values you write.

2. Create a purchase order for any quantity with Unit cost other than what is on item card and post the order as received & invoiced.

3. Create a sales order with any quantity other than that of Item card and post as shipped and invoiced.

4. Check the invoicing tab on item card and make a note of all values.

5. Repeat steps 2 and 3 for two-three times by changing the cost and prices every time (also note the values)

6. Now run Adjust cost-item entries and check the Invoicing tab on card. The Cost fields must have updated, but not the prices.

7. Now run Adjust item-cost prices with adjustment factor 1.5 and check the values. The Unit price over the card must have been updated with 50%.

You can see that the batch job is used to change the prices (Sales prices) of items. After running this batch job, every time when you make a Sales order, the updated Price will be copied to Sales Order field “Unit price Excluding VAT”.
BatchJob-6

Above listed all fields can be adjusted accordingly, specifying Adjustment Factor and Rounding Method.

Similarly it works for SKU also.

Give it a try to understand it more precisely. Follow above steps defined above.

Report

The New Report Scheduling feature for end users running reports in Microsoft Dynamics Navision 2015


The new Report Scheduling feature for end users running reports:

  • End user can schedule reports for later execution.
  • User can get to his next task quicker.
  • User has an inbox part for viewing the scheduled reports.

 A. Setting up the job queue to run a report

My Customer needs to run a number of long running reports and does not want to wait for them to complete.

The scenario is simplified because a typical customer setup would involve setting up a NAS instance to process the reports.

* Open the Job Queues page.

ReportSchedule-1

* On the Home tab, in the New group, choose New to set up a new job queue

ReportSchedule-2

* In the Code field, type Reports.

* Fill in the Description field My Report Schedule.

* Leave the Job Queue Category Filter field blank.

* On the Home tab, in the Process group, choose Start Job Queue.

* Close the Job Queue Card

ReportSchedule-3

A job queue with no filter runs the reports.

In many customer installations, the reports will be picked up by the DEFAULT job queue


B. Adding the Report Inbox to the Role Center

My Customer wants easy access to the reports that he has scheduled, so he adds the Report Inbox part to the Role Center page.

* To open the Role Center page that you want to customize, in the navigation pane, choose the Home button, then choose the Role Center menu item.

* On the Application menu , choose Customize, and then Customize This Page.

* In the Available Parts pane, select Report Inbox, and then choose the Add button.

* To move the Report Inbox part to top of the second column in the Role Center layout pane, select it and then use the Move buttons.

* (Optional) To add the My Job Queue to the Role Center, in the Available Parts pane, select My Job Queue, and then choose the Add button.

* (Optional) To move the My Job Queue part below the Report Inbox in the Role Center layout pane, select it and then use the Move buttons.

ReportSchedule-4

ReportSchedule-5

* Verify that the Report Inbox appears in the Role Center.

ReportSchedule-6


C.Scheduling a report and viewing the result

* On the Role Center, on the Report tab, choose Customer Order – Summary.

* On the report request window, choose the Print button, and then choose Schedule

ReportSchedule-7

* In the Schedule a Report window that appears, in the Description field type a different text.

* In the Report Output Type field, select the down arrow, and choose PDF.

* Choose the OK button.

ReportSchedule-8

* Go to the Report Inbox on the Role Center and show that the report appears when it is finished running.

* To view the report, select it in the Report Inbox, and then choose Show.

ReportSchedule-9


D. When a scheduled report fails

* Open the Role Center.

* On the Application menu , choose Customize, and then Customize This Page.

* In the Available Parts pane, select My Job Queue, and then choose the Add button.

* To move the My Job Queue part below the Report Inbox in the Role Center layout pane, select it and then use the Move buttons

* In the Role Center, go to the My Job Queue part.

We have already done above step in above steps. Let’s continue with next step. If not already done follow the steps as defined above.

* On the Role Center, on the Reports tab, choose Price List.

* In the Sales Type field select Customer.

* To schedule the report to run later, choose the Print button, then select Schedule.

* In the Schedule a Report window, leave the default values in fields and choose the OK button.

ReportSchedule-10

* When the error shows up in the My Job Queue part, select the error, and then choose Show Error.

* Read the error message, and then choose the OK button to close it.

ReportSchedule-11

* Open the Job Queue Log Entries page.

* Filter the list to display entries whose Status is Error.

* To view the error message, point to the Error message field for the entry, or, select the entry, and then on the Home tab, choose Show Error Message.

* Return to the Role Center, and then run the Price List report again.

* On the report request window, set the Sales Type field to All Customers, choose Print, and then choose Schedule.

* In the Schedule a Report window, leave the default values in fields and choose the OK button.

* In the Report Inbox on the Role Center, view the completed report.

ReportSchedule-12