AL Table Proxy Generator Tool, Assisted Setup, Business Central, CDS, Common Data Services, Coupling, Custom Tables, Dataverse, Deploy, Dynamics 365 Sales, Integration, Mappings, Package, Permissions, Power Apps, Scheduling, Synchronize, Testing

Integration in Business Central with Dataverse/ Common Data Services/ Dynamics 365 Sales/ Power Apps

In this post I will discuss about how we can Synchronize data to Custom Tables using Dataverse.

This post is divided in series of small posts, one post for each involved step.

You follow each post link in sequence and at end we will achieve the final Goal set in starting of this post. 

This post will walkthrough setting up an integration between a Custom table Prospects in Business Central and a Custom table Prospects in Microsoft Dataverse.

One thing important keep in mind while doing all the steps we need to use the Admin login you used to setup these environments.

Also, the Base Currency of Business Central & Dataverse Environment should be same else you will run into issue.

If the currencies of Business Central and Dataverse do not match, similar message will be displayed.

LCY Code XXX does not match ISO Currency Code XXX of the Dataverse base currency.

The Base Currency defined for Dataverse after setup is not possible to change however you can match it in Business Central by changing LCY Code in General Ledger Setup.

Let’s start with introduction to environment we are going to use, throughout the process and steps described below.

Introduction to Environment:

Before we start with the Steps Involved, let me introduce with the environment which I am going to use in this walkthrough. 

Business Central Environment:

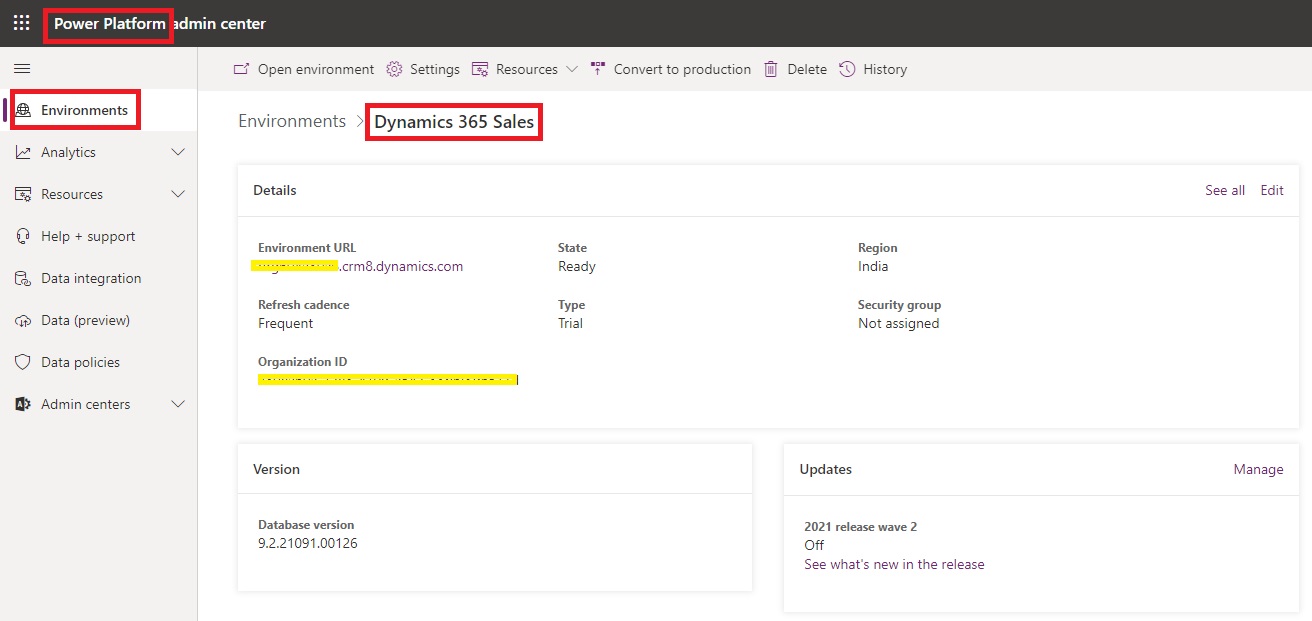
Dynamics 365 Sale Environment:

Setup required to Connect with external system:

You can find below options in Business Central Assisted Setup.

The following are the Steps we will follow:

Follow each step above in same sequence.

For more detailed insight refer to below Microsoft Documents:

Customizing an Integration with Microsoft Dataverse

AL Table Proxy Generator

Scheduling a Synchronization between Business Central and Dataverse

Hope you enjoyed the learning by example. Wait for next post, will be back soon.

See you in next post soon with similar kind of stuffs.

Till then keep Exploring, learning and sharing with others.

Advertisement
PowerBI.com

Microsoft Power BI for Beginners Table of Content

In March I have written few posts on Power BI keeping in mind who are beginners.

In case you have missed here I present the link to all those posts here below.


Microsoft Power BI – Part – I

Introduction to Power BI and Creating Report from Excel Data, Local Files.

Microsoft Power BI – Part – II

Introduction to few Features of Power BI

Microsoft Power BI – Part – III

Power BI Desktop, Creating Dataset & Reports from In Premise Database installation

Microsoft Power BI – Part – IV

Power BI Gateway usage

Microsoft Power BI – Part – V

Scheduling Refresh of Dataset & Report created using In Premise Database

Microsoft Power BI – Part – VI

Power BI Microsoft NAV Content Pack

Microsoft Power BI – Part – VII

Power BI Mobile App

Microsoft Power BI – Part – VIII

Power BI Content Pack

Microsoft Power BI – Part – IX

Power BI Publisher for Excel

Microsoft Power BI – Part – X

ANALYZE IN EXCEL

I will come up with more features and other important details in my future posts.

You can find lots of materials on Power BI here : https://powerbi.microsoft.com/en-us/

https://powerbi.microsoft.com/en-us/learning/

PowerBI-85


Report

The New Report Scheduling feature for end users running reports in Microsoft Dynamics Navision 2015


The new Report Scheduling feature for end users running reports:

  • End user can schedule reports for later execution.
  • User can get to his next task quicker.
  • User has an inbox part for viewing the scheduled reports.

 A. Setting up the job queue to run a report

My Customer needs to run a number of long running reports and does not want to wait for them to complete.

The scenario is simplified because a typical customer setup would involve setting up a NAS instance to process the reports.

* Open the Job Queues page.

ReportSchedule-1

* On the Home tab, in the New group, choose New to set up a new job queue

ReportSchedule-2

* In the Code field, type Reports.

* Fill in the Description field My Report Schedule.

* Leave the Job Queue Category Filter field blank.

* On the Home tab, in the Process group, choose Start Job Queue.

* Close the Job Queue Card

ReportSchedule-3

A job queue with no filter runs the reports.

In many customer installations, the reports will be picked up by the DEFAULT job queue


B. Adding the Report Inbox to the Role Center

My Customer wants easy access to the reports that he has scheduled, so he adds the Report Inbox part to the Role Center page.

* To open the Role Center page that you want to customize, in the navigation pane, choose the Home button, then choose the Role Center menu item.

* On the Application menu , choose Customize, and then Customize This Page.

* In the Available Parts pane, select Report Inbox, and then choose the Add button.

* To move the Report Inbox part to top of the second column in the Role Center layout pane, select it and then use the Move buttons.

* (Optional) To add the My Job Queue to the Role Center, in the Available Parts pane, select My Job Queue, and then choose the Add button.

* (Optional) To move the My Job Queue part below the Report Inbox in the Role Center layout pane, select it and then use the Move buttons.

ReportSchedule-4

ReportSchedule-5

* Verify that the Report Inbox appears in the Role Center.

ReportSchedule-6


C.Scheduling a report and viewing the result

* On the Role Center, on the Report tab, choose Customer Order – Summary.

* On the report request window, choose the Print button, and then choose Schedule

ReportSchedule-7

* In the Schedule a Report window that appears, in the Description field type a different text.

* In the Report Output Type field, select the down arrow, and choose PDF.

* Choose the OK button.

ReportSchedule-8

* Go to the Report Inbox on the Role Center and show that the report appears when it is finished running.

* To view the report, select it in the Report Inbox, and then choose Show.

ReportSchedule-9


D. When a scheduled report fails

* Open the Role Center.

* On the Application menu , choose Customize, and then Customize This Page.

* In the Available Parts pane, select My Job Queue, and then choose the Add button.

* To move the My Job Queue part below the Report Inbox in the Role Center layout pane, select it and then use the Move buttons

* In the Role Center, go to the My Job Queue part.

We have already done above step in above steps. Let’s continue with next step. If not already done follow the steps as defined above.

* On the Role Center, on the Reports tab, choose Price List.

* In the Sales Type field select Customer.

* To schedule the report to run later, choose the Print button, then select Schedule.

* In the Schedule a Report window, leave the default values in fields and choose the OK button.

ReportSchedule-10

* When the error shows up in the My Job Queue part, select the error, and then choose Show Error.

* Read the error message, and then choose the OK button to close it.

ReportSchedule-11

* Open the Job Queue Log Entries page.

* Filter the list to display entries whose Status is Error.

* To view the error message, point to the Error message field for the entry, or, select the entry, and then on the Home tab, choose Show Error Message.

* Return to the Role Center, and then run the Price List report again.

* On the report request window, set the Sales Type field to All Customers, choose Print, and then choose Schedule.

* In the Schedule a Report window, leave the default values in fields and choose the OK button.

* In the Report Inbox on the Role Center, view the completed report.

ReportSchedule-12