Business Central, Dataverse, Dynamics 365 Sales, Integration, Synchronize, Testing, Tip & Tricks

Test the Solution Integration of Business Central with Dataverse

This is the Twelfth post in the series. If you want to go to previous post click here.

From the series of steps this post is dedicated to Step-Testing:

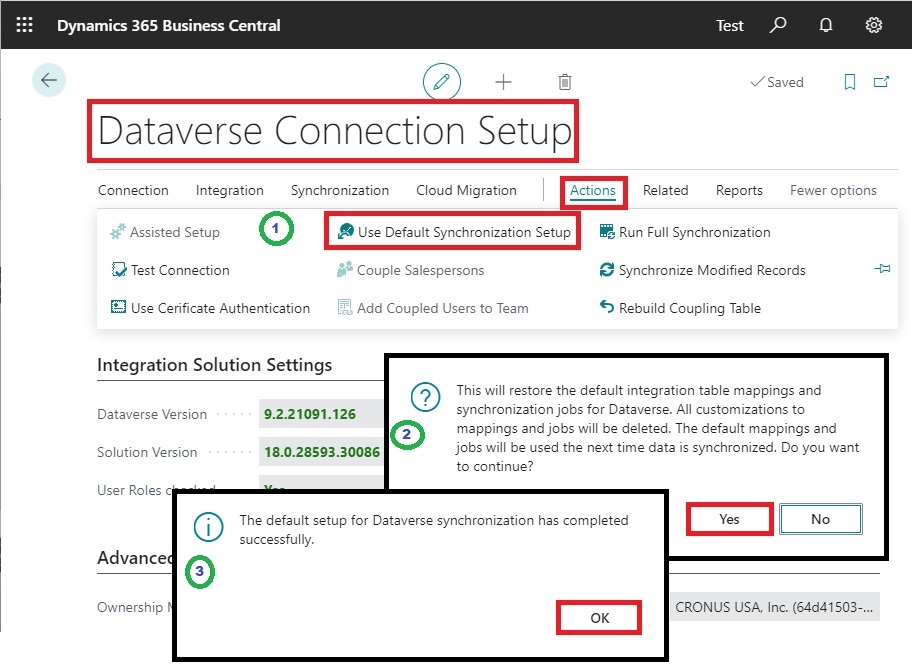
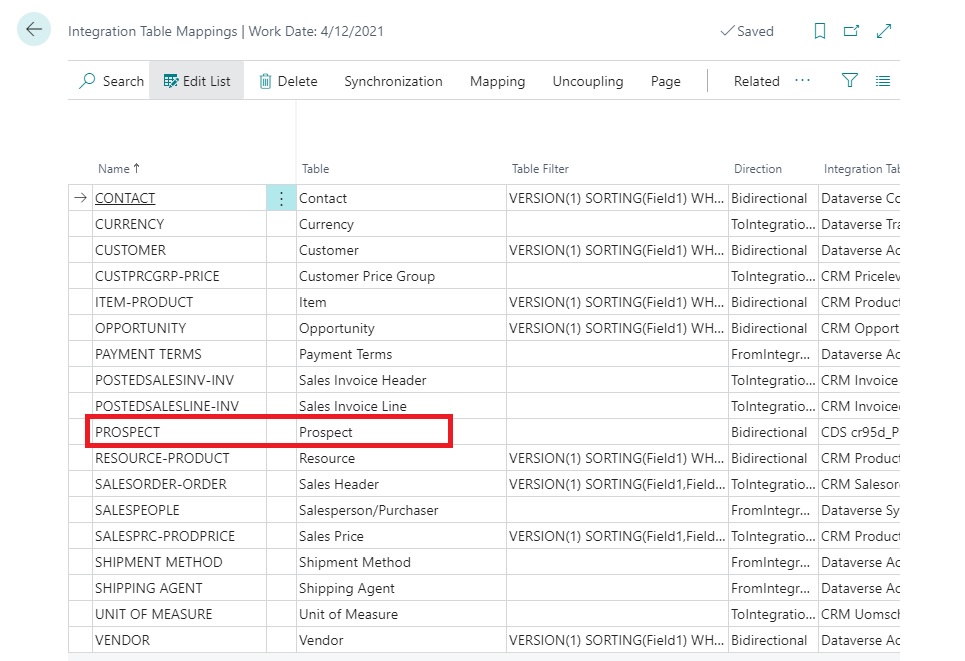
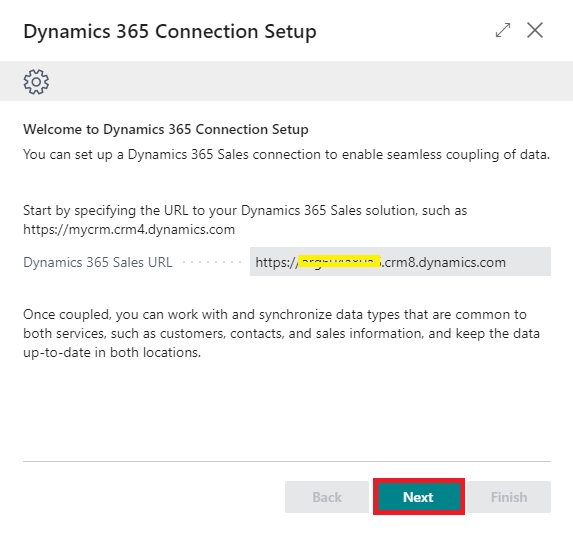
As a Eleventh Step we will Verify & Test the Integration between Business Central and Dataverse for Custom table we created in both the environments.

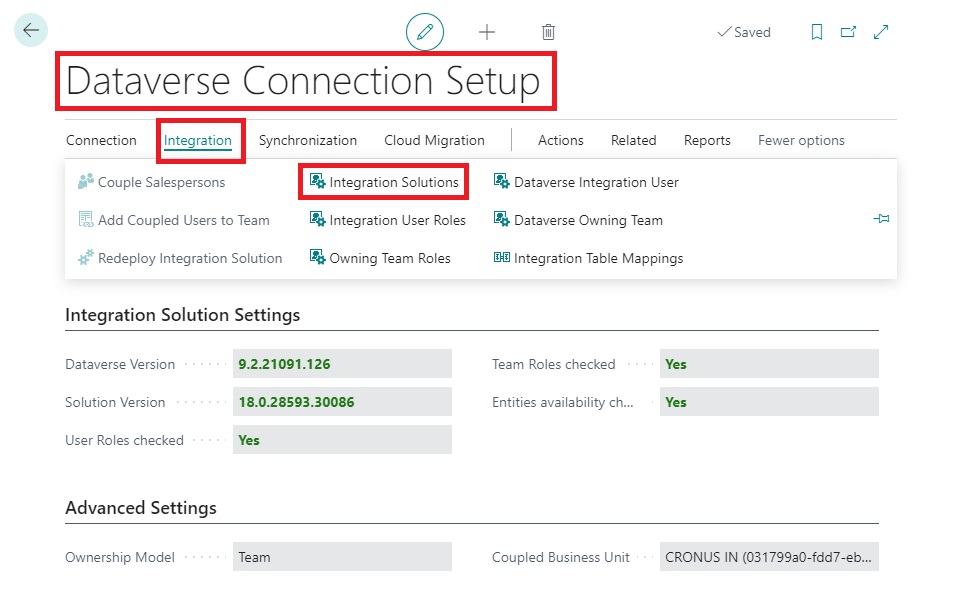
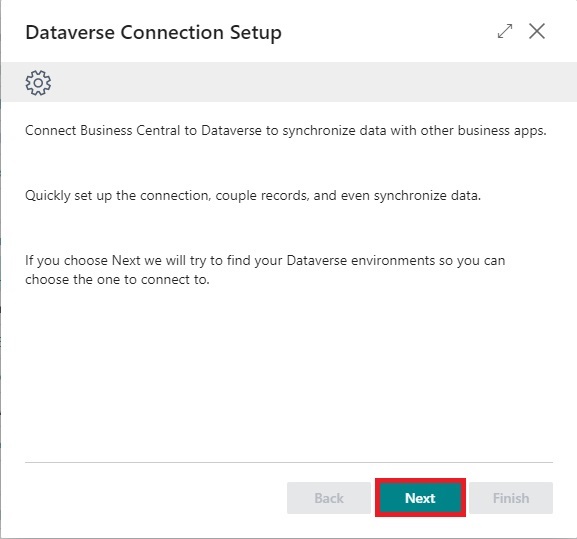
Initial Stage post Deploying the Extension, we access the Pages for first time.

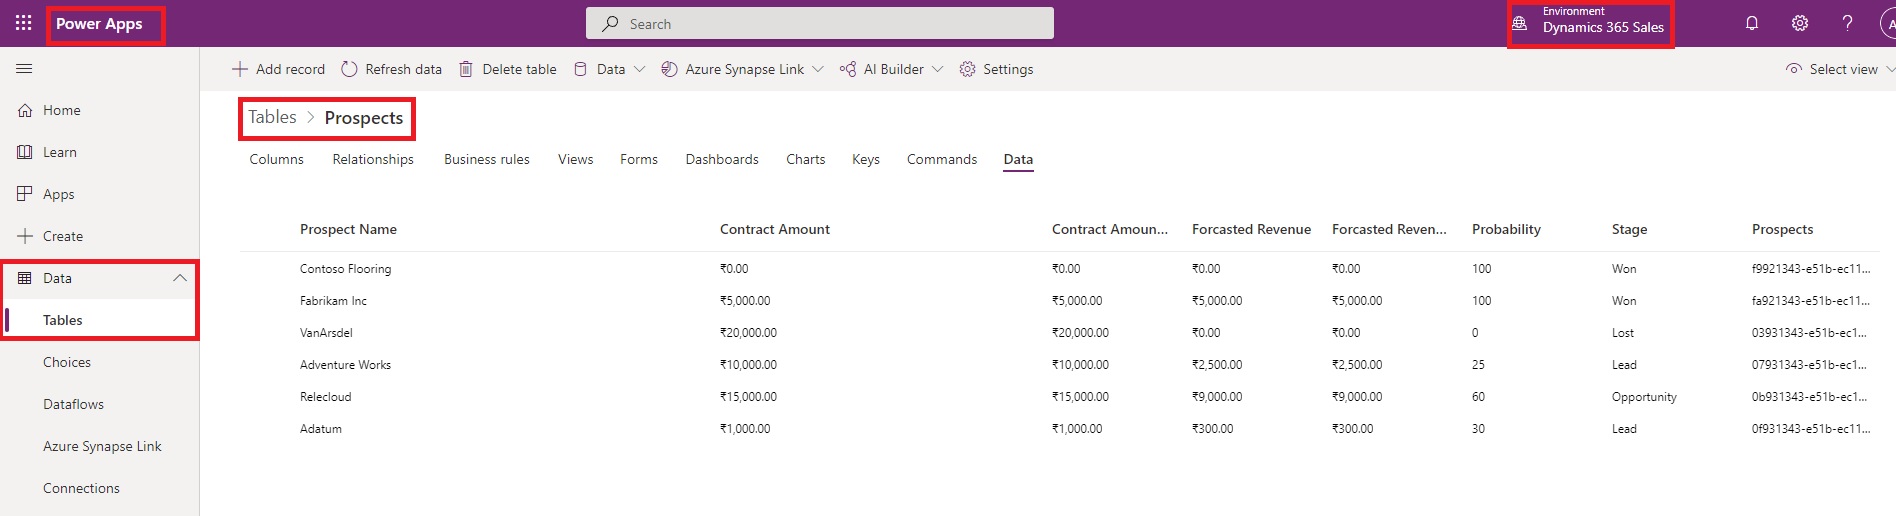
We have below data in Dataverse Prospects table:

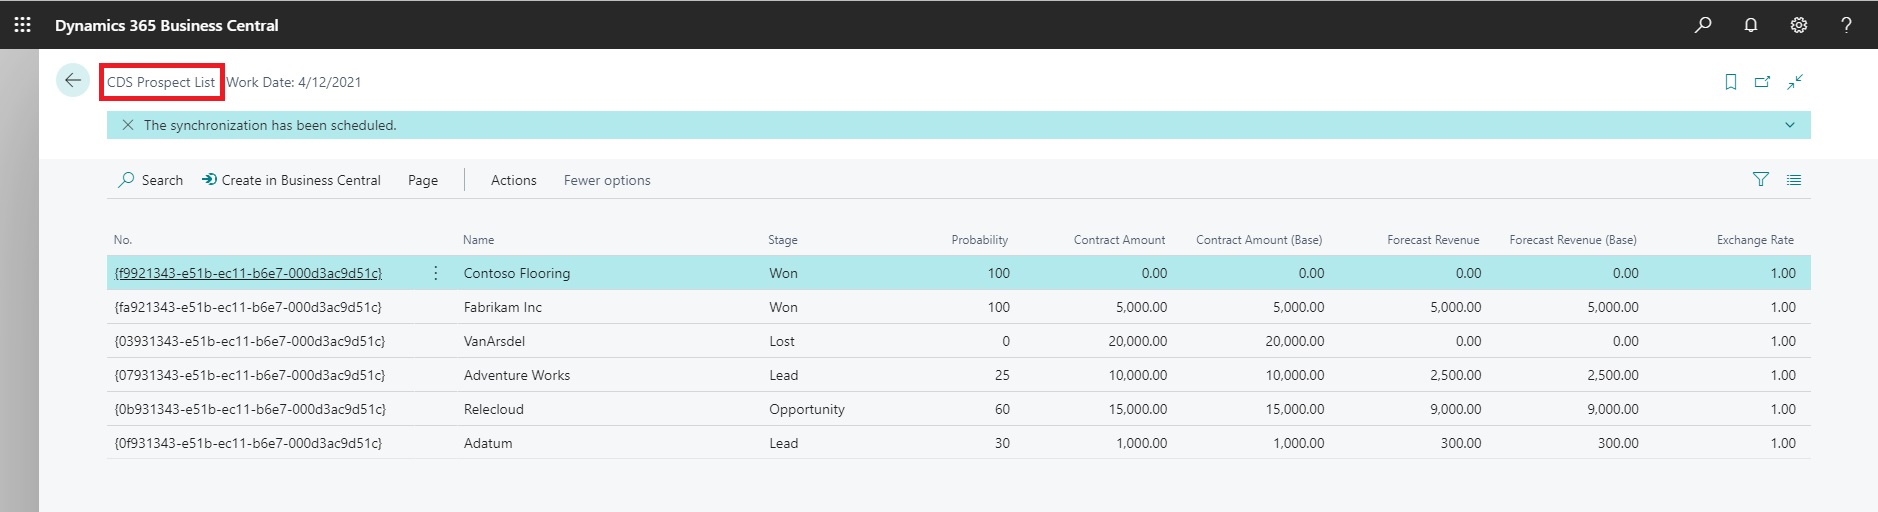
In BC when we access to CDS Prospects Page:

In BC when we access to Prospects Page:

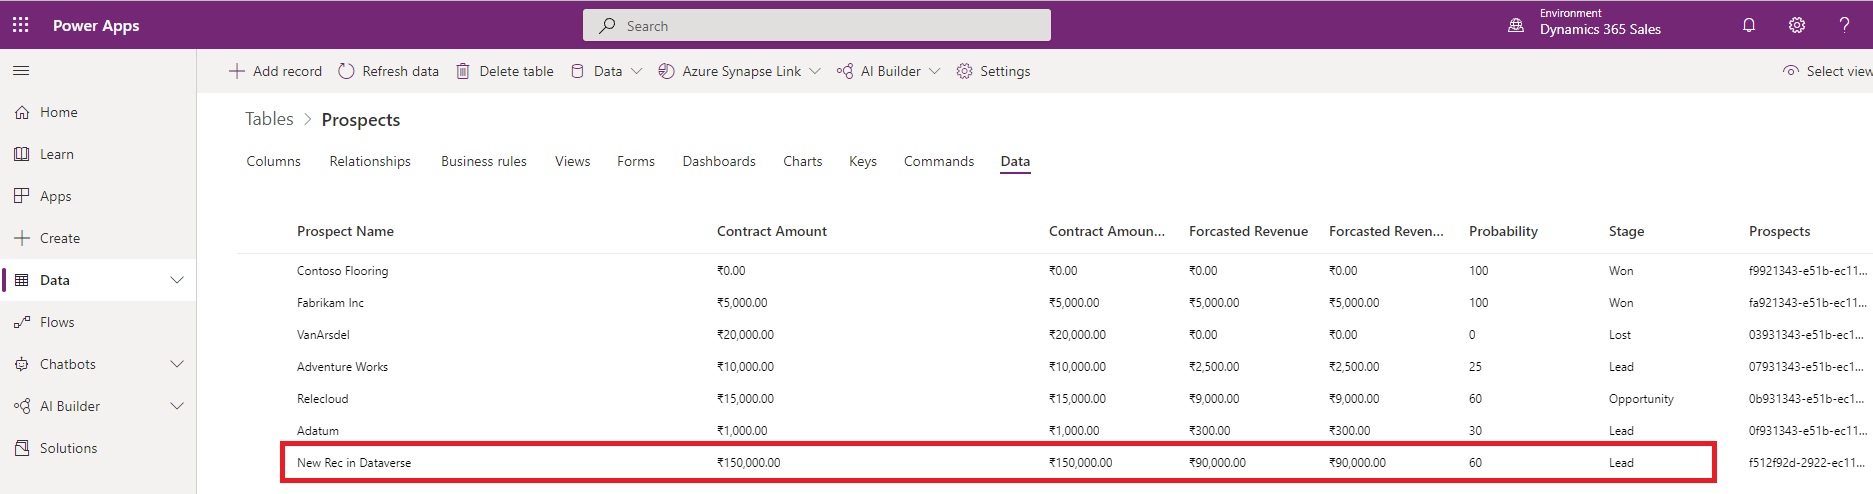
First we will Add one Record in Dataverse:

Now if we check CDS Prospects Page:

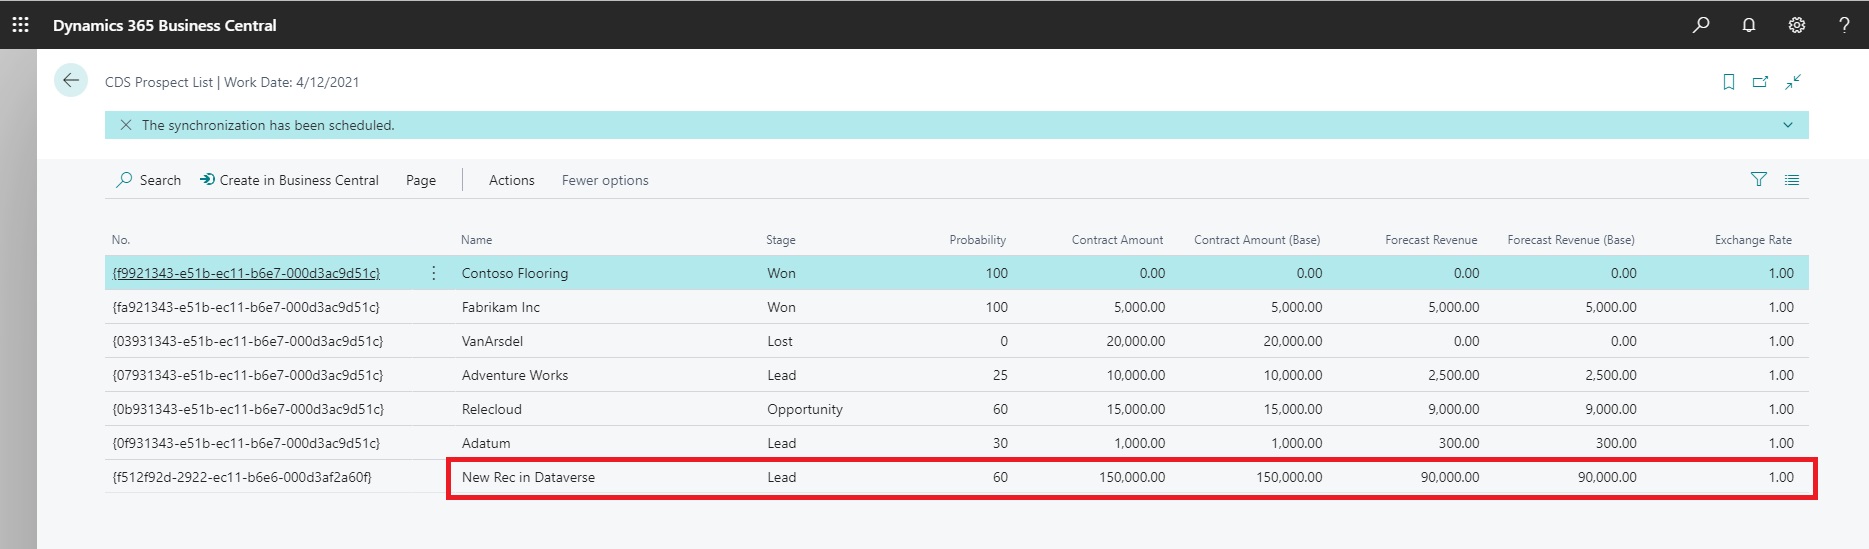
If you remember on CDS Prospects Page we have written code on OnInit trigger to run codeunit – CRM Integration Management, so when page is opened, the data is synchronized to CDS Prospects Page.

On CDS Prospects Page, we have also added action Create in Business Central, if we choose this action:

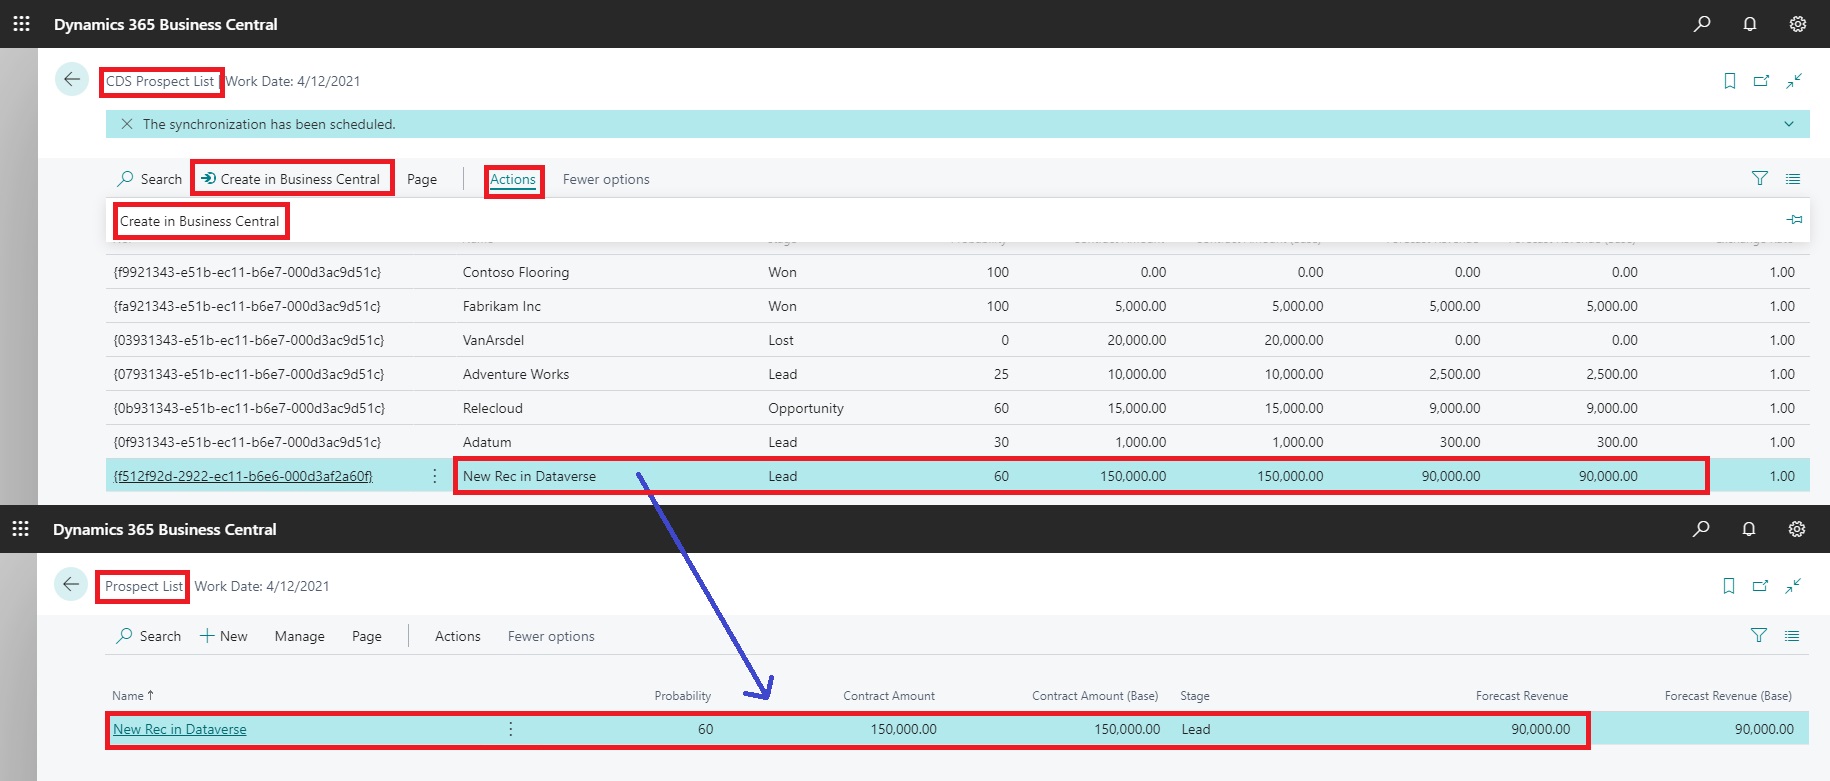
The record in Dataverse will get transferred to Prospect Table in Business Central

Now Let us Add one Record in Business Central, from Prospect Page.

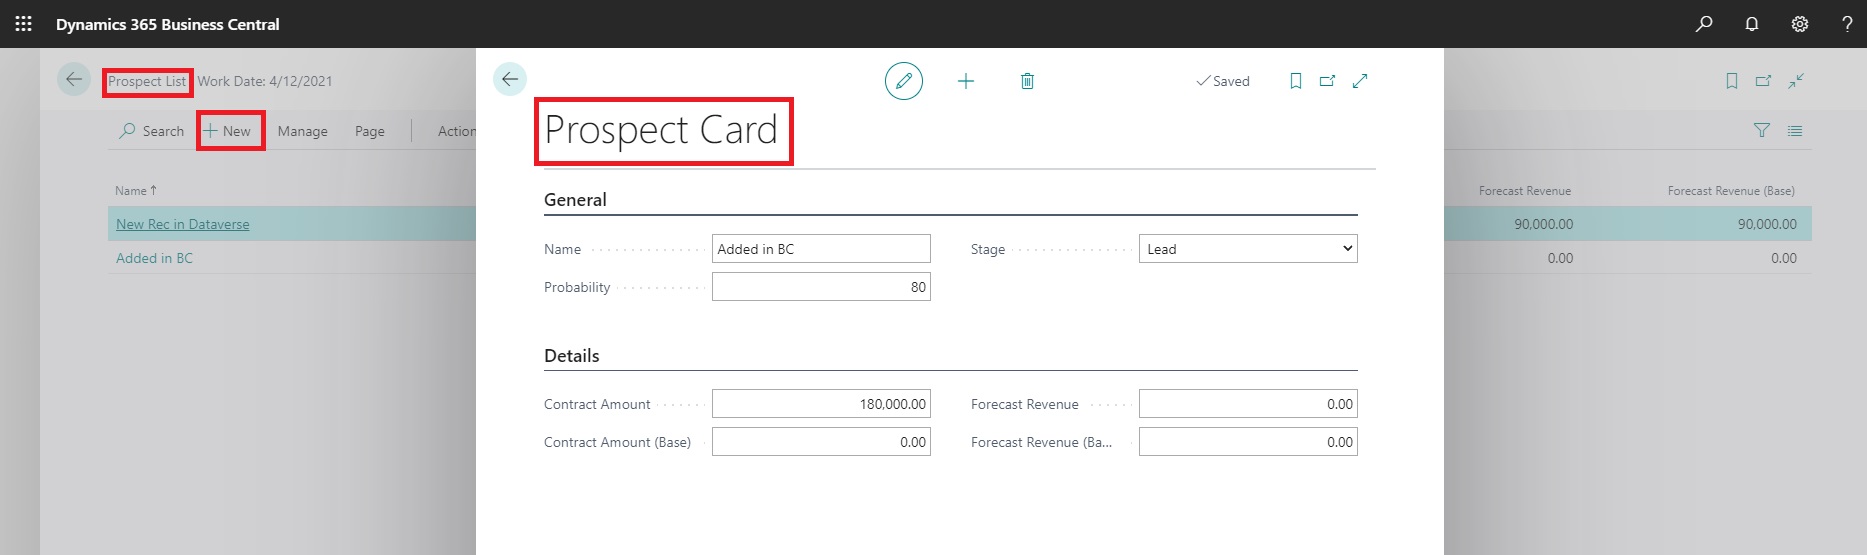
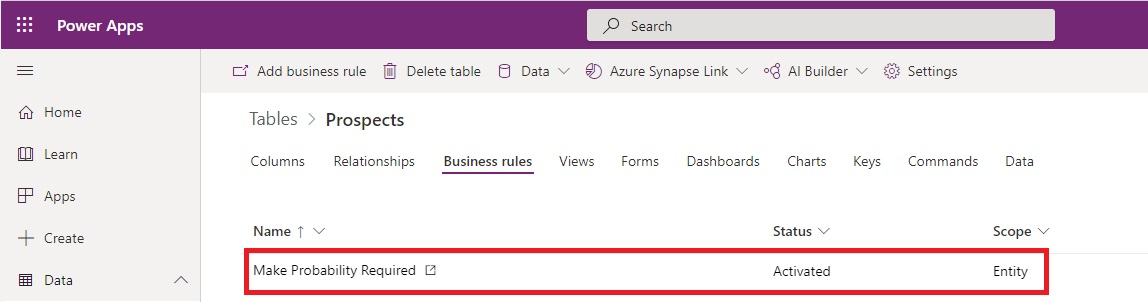
Business logic for calculating Forcast Revenue is not written in BC, but we have in Dataverse table.

When we synchronize data from BC to Dataverse, that will get calculated automatically.

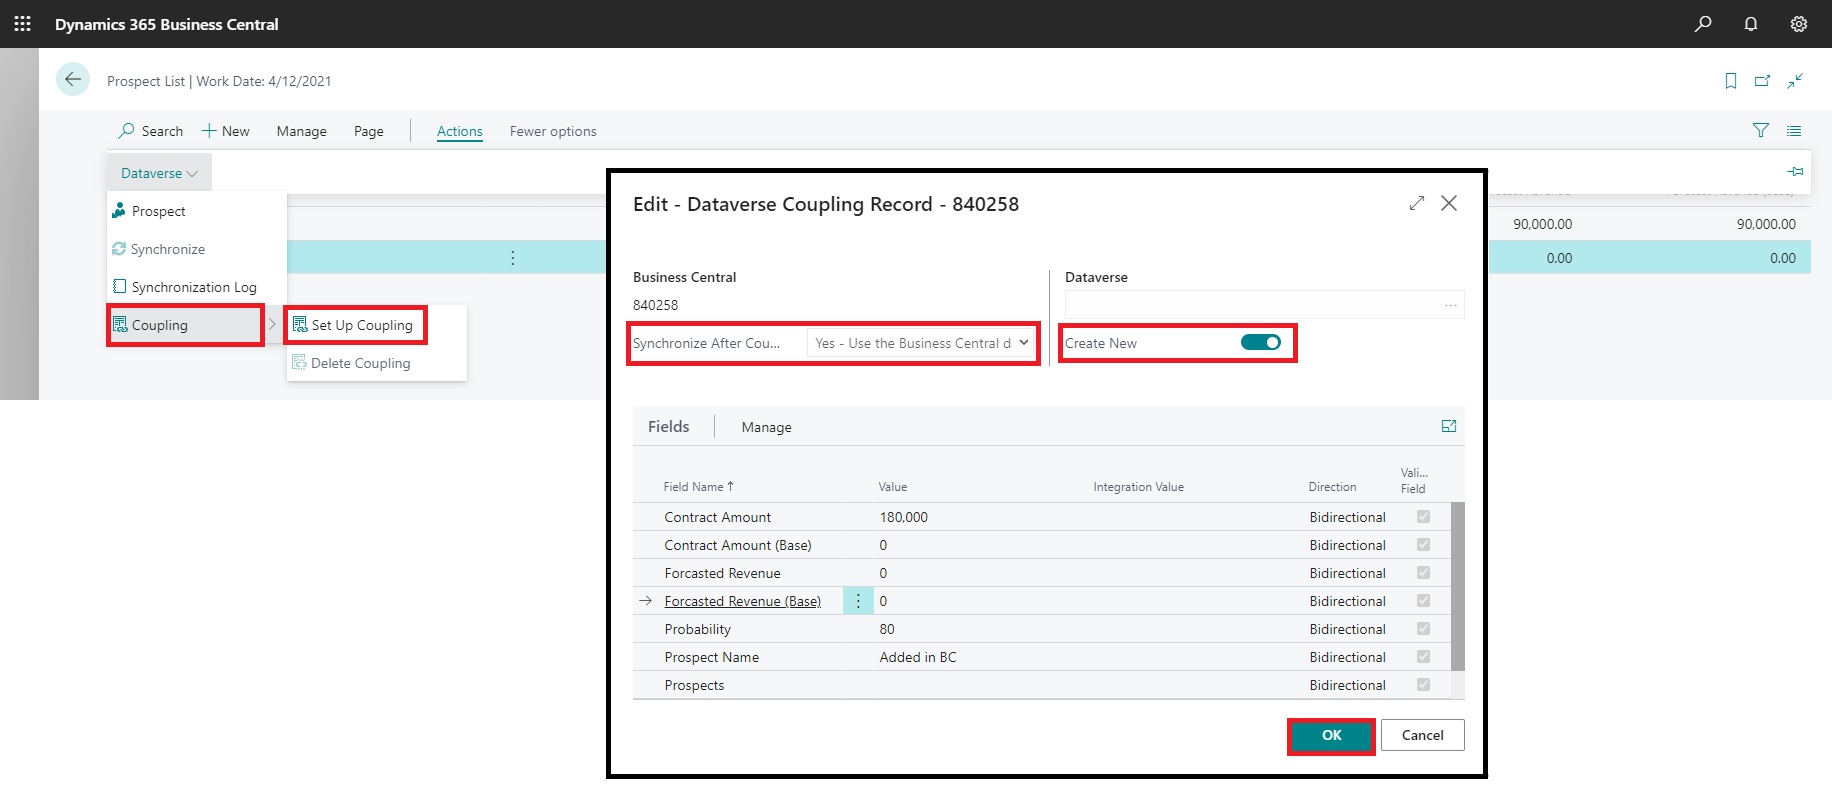
Select the record we just added in BC. Action-> Dataverse-> Coupling-> Setup Coupling

On the new page that opens, Select Create New, And click OK.

Since we have selected Synchronize After Coupling and direction BC to Dataverse, the record will get transferred to Dataverse Table.

Also you can see the other fields too got calculated. Now if we Synchronize back to BC these fields will get updated in BC.

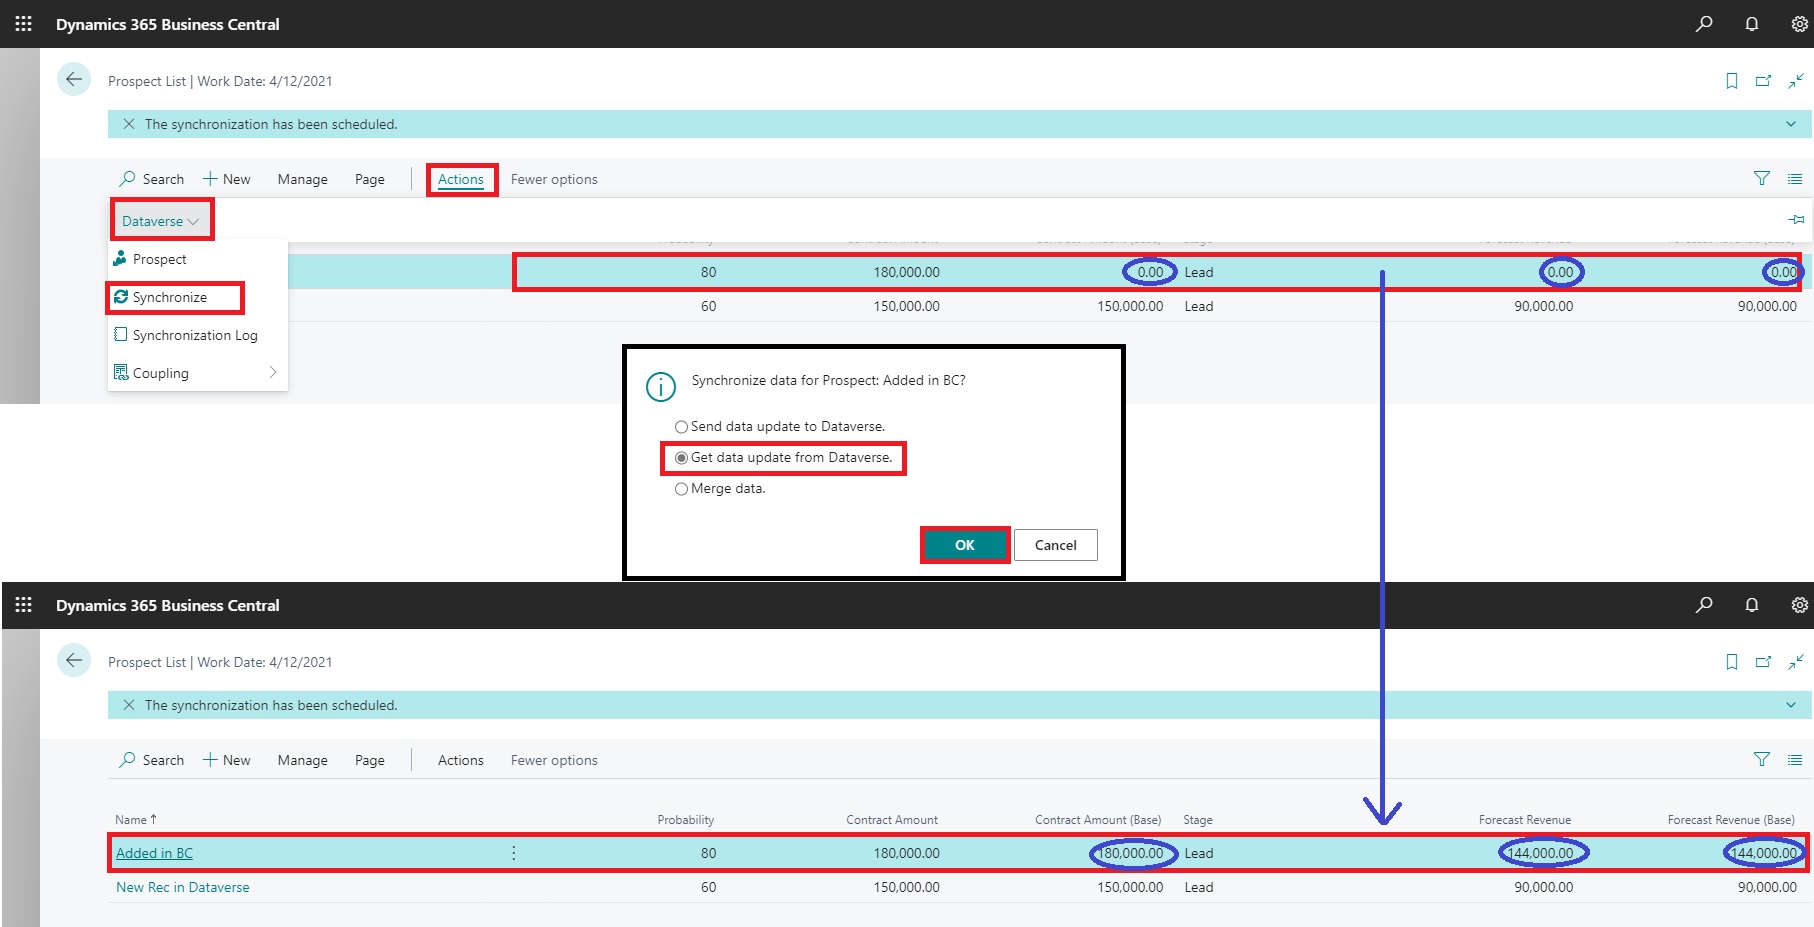
You can see the Synchronization is happening in both directions.

You can make necessary changes to code in sample walkthrough to achieve your desired results.

Hope you enjoyed learning this trick, and will use in your projects, the skill learned from this series of posts.

I will come up with more similar stuffs. Till then keep exploring, learning and sharing with others.

Take care of yourself and your loved ones. Put your mask, maintain safe distance and don’t forget to get vaccinated.

Advertisement
Business Central, Business Central Dataverse Integration, Business Central Integration Business Central to Common Data Service, Dataverse, Dynamics 365 Sales, Integration, Organization, Permission, Power Apps, Roles, Security, Synchronize

Check & Assign Permissions in Power Apps Environment

This is the Eleventh post in the series. If you want to go to previous post click here.

From the series of steps this post is dedicated to Step-10:

As a Tenth Step we will Verify & Assign Permissions in Power Apps Environment.

This is the final Step, and we will be done with the goal we set in our first post of this series.

Open your Dynamics 365 Sales Environment and Go To Settings.

Under Users + permissions -> Application users.

On next screen Verify “Business Central Integration Business Central to Common Data Service” is selected. If not then select it from “Edit Security Roles”.

From Settings -> Users + permissions -> Security roles

From Security roles select the Business Central Dataverse Integration Then Edit

Select Custom Entities tab and find your table Prospects. Select each circle 4 times to assign Organization, circle should turn completely filled green color.

Select Save and Close.

Now you All done with the steps, Ready to test the solution.

In next post we will test the solution, we created in past 10 posts.

Now you are good to proceed with Next Step.

You can jump to Next Step from here.

Business Central, Dataverse, Dataverse Connection Setup, Dynamics 365 Connection Setup, Fields, Integration, Mappings, Setup, Synchronize

Updating the default Mappings

This is the Tenth post in the series. If you want to go to previous post click here.

From the series of steps this post is dedicated to Step-9:

As a Nineth Step we will Update the default Mappings.

Open the Dataverse Connection Setup using TellMe.

From Actions -> Use Default Synchronization Setup.

Respond Yes to the Confirmation Message.

You will get the confirmation as completed, say OK to continue.

Next open the Microsoft Dynamics 365 Connection Setup from TellMe.

Go To Mapping -> Integration Mappings.

Now you can find your Custom table Prospects.

Go To Fields, you will see Field Mappings for you table as defined in Integration Codeunit in previous step.

Now you are good to proceed with Next Step.

You can jump to Next Step from here.

Action, AL, Business Central, Coupling, Dataverse, Dynamics 365 Sales, Extension, Integration, Page, Procedure, Synchronize, Triggers, Varables, VS Code

Create Actions on the Page for managing Coupling and Synchronization

This is the Eighth post in the series. If you want to go to previous post click here.

From the series of steps this post is dedicated to Step-7:

As a Seventh Step we will Create Actions on the Page for managing Coupling and Synchronization created in previous post.

On page 50120 Prospects created in previous post

Add Variables:

var
   CRMIntegrationManagement: Codeunit "CRM Integration Management";
   CRMCouplingManagement: Codeunit "CRM Coupling Management";
   CDSIntegrationEnabled: Boolean;
   CDSIsCoupledToRecord: Boolean;

Add Triggers:

trigger OnOpenPage()
begin
    CDSIntegrationEnabled := CRMIntegrationManagement.IsCDSIntegrationEnabled();
end;

trigger OnAfterGetCurrRecord()
begin
    if CDSIntegrationEnabled then
        CDSIsCoupledToRecord := CRMCouplingManagement.IsRecordCoupledToCRM(Rec.RecordId);
end;

Add Actions:

    Actions
    {
        area(Processing)
        {
            group(ActionGroupCDS)
            {
                Caption = 'Dataverse';
                Visible = CDSIntegrationEnabled;

                action(CDSGotoProspect)
                {
                    Caption = 'Prospect';
                    Image = CoupledCustomer;
                    ToolTip = 'Open the coupled Dataverse Prospect.';
                    ApplicationArea = All;

                    trigger OnAction()
                    var
                        CRMIntegrationManagement: Codeunit "CRM Integration Management";
                    begin
                        CRMIntegrationManagement.ShowCRMEntityFromRecordID(Rec.RecordId);
                    end;
                }
                action(CDSSynchronizeNow)
                {
                    Caption = 'Synchronize';
                    ApplicationArea = All;
                    Visible = true;
                    Image = Refresh;
                    Enabled = CDSIsCoupledToRecord;
                    ToolTip = 'Send or get updated data to or from Microsoft Dataverse.';

                    trigger OnAction()
                    var
                        CRMIntegrationManagement: Codeunit "CRM Integration Management";
                    begin
                        CRMIntegrationManagement.UpdateOneNow(Rec.RecordId);
                    end;
                }
                action(ShowLog)
                {
                    Caption = 'Synchronization Log';
                    ApplicationArea = All;
                    Visible = true;
                    Image = Log;
                    ToolTip = 'View integration synchronization jobs for the Prospect table.';

                    trigger OnAction()
                    var
                        CRMIntegrationManagement: Codeunit "CRM Integration Management";
                    begin
                        CRMIntegrationManagement.ShowLog(Rec.RecordId);
                    end;
                }
                group(Coupling)
                {
                    Caption = 'Coupling';
                    Image = LinkAccount;
                    ToolTip = 'Create, change, or delete a coupling between the Business Central record and a Microsoft Dataverse row.';

                    action(ManageCDSCoupling)
                    {
                        Caption = 'Set Up Coupling';
                        ApplicationArea = All;
                        Visible = true;
                        Image = LinkAccount;
                        ToolTip = 'Create or modify the coupling to a Microsoft Dataverse Prospect.';

                        trigger OnAction()
                        var
                            CRMIntegrationManagement: Codeunit "CRM Integration Management";
                        begin
                            CRMIntegrationManagement.DefineCoupling(Rec.RecordId);
                        end;
                    }
                    action(DeleteCDSCoupling)
                    {
                        Caption = 'Delete Coupling';
                        ApplicationArea = All;
                        Visible = true;
                        Image = UnLinkAccount;
                        Enabled = CDSIsCoupledToRecord;
                        ToolTip = 'Delete the coupling to a Microsoft Dataverse Prospect.';

                        trigger OnAction()
                        var
                            CRMCouplingManagement: Codeunit "CRM Coupling Management";
                        begin
                            CRMCouplingManagement.RemoveCoupling(Rec.RecordId);
                        end;
                    }
                }
            }
        }
    }

On page 50122 “CDS Prospect List” created above

Add Variables:

var
    CurrentlyCoupledCDSProspect: Record "CDS cr95d_Prospects";

Add Trigger:

trigger OnInit()
begin
    Codeunit.Run(Codeunit::"CRM Integration Management");
end;

Add Procedure:

procedure SetCurrentlyCoupledCDSProspect(CDSProspect: Record "CDS cr95d_Prospects")
begin
    CurrentlyCoupledCDSProspect := CDSProspect;
end;

Add Action:

Actions
    {
        area(processing)
        {
            action(CreateFromCDS)
            {
                ApplicationArea = All;
                Caption = 'Create in Business Central';
                Promoted = true;
                PromotedCategory = Process;
                ToolTip = 'Generate the table from the coupled Microsoft Dataverse Prospect.';

                trigger OnAction()
                var
                    CDSProspect: Record "CDS cr95d_Prospects";
                    CRMIntegrationManagement: Codeunit "CRM Integration Management";
                begin
                    CurrPage.SetSelectionFilter(CDSProspect);
                    CRMIntegrationManagement.CreateNewRecordsFromCRM(CDSProspect);
                end;
            }
        }
    }

Now you are good to proceed with Next Step.

You can jump to Next Step from here.

AL, Business Central, Codeunit, Dataverse, Events, Extension, Integration, Procedures, Subscription, VS Code

Create Integration Codeunit for Business Central & Dataverse Integration

This is the Seventh post in the series. If you want to go to previous post click here.

From the series of steps this post is dedicated to Step-6:

As a Sixth Step we will Create Integration Codeunit in Business Central

codeunit 50120 CDSDataverseEvent
{
}

Add these Procedures

local procedure LookupCDSProspect(SavedCRMId: Guid; var CRMId: Guid; IntTableFilter: Text): Boolean
    var
        CDSProspect: Record "CDS cr95d_Prospects";
        OriginalCDSProspect: Record "CDS cr95d_Prospects";
        OriginalCDSProspectList: Page "CDS Prospect List";
    begin
        if not IsNullGuid(CRMId) then begin
            if CDSProspect.Get(CRMId) then
                OriginalCDSProspectList.SetRecord(CDSProspect);
            if not IsNullGuid(SavedCRMId) then
                if OriginalCDSProspect.Get(SavedCRMId) then
                    OriginalCDSProspectList.SetCurrentlyCoupledCDSProspect(OriginalCDSProspect);
        end;

        CDSProspect.SetView(IntTableFilter);
        OriginalCDSProspectList.SetTableView(CDSProspect);
        OriginalCDSProspectList.LookupMode(true);
        if OriginalCDSProspectList.RunModal = ACTION::LookupOK then begin
            OriginalCDSProspectList.GetRecord(CDSProspect);
            CRMId := CDSProspect.cr95d_ProspectsId;
            exit(true);
        end;
        exit(false);
    end;

local procedure AddEntityTableMapping(CRMEntityTypeName: Text; TableID: Integer; var TempNameValueBuffer: Record "Name/Value Buffer" temporary)
    begin
        TempNameValueBuffer.Init();
        TempNameValueBuffer.ID := TempNameValueBuffer.Count + 1;
        TempNameValueBuffer.Name := CopyStr(CRMEntityTypeName, 1, MaxStrLen(TempNameValueBuffer.Name));
        TempNameValueBuffer.Value := Format(TableID);
        TempNameValueBuffer.Insert();
    end;

local procedure InsertIntegrationTableMapping(var IntegrationTableMapping: Record "Integration Table Mapping"; MappingName: Code[20]; TableNo: Integer; IntegrationTableNo: Integer; IntegrationTableUIDFieldNo: Integer; IntegrationTableModifiedFieldNo: Integer; TableConfigTemplateCode: Code[10]; IntegrationTableConfigTemplateCode: Code[10]; SynchOnlyCoupledRecords: Boolean)
    begin
        IntegrationTableMapping.CreateRecord(MappingName, TableNo, IntegrationTableNo, IntegrationTableUIDFieldNo, IntegrationTableModifiedFieldNo, TableConfigTemplateCode, IntegrationTableConfigTemplateCode, SynchOnlyCoupledRecords, IntegrationTableMapping.Direction::Bidirectional, 'CDS');
    end;

procedure InsertIntegrationFieldMapping(IntegrationTableMappingName: Code[20]; TableFieldNo: Integer; IntegrationTableFieldNo: Integer; SynchDirection: Option; ConstValue: Text; ValidateField: Boolean; ValidateIntegrationTableField: Boolean)
    var
        IntegrationFieldMapping: Record "Integration Field Mapping";
    begin
        IntegrationFieldMapping.CreateRecord(IntegrationTableMappingName, TableFieldNo, IntegrationTableFieldNo, SynchDirection,
            ConstValue, ValidateField, ValidateIntegrationTableField);
    end;

To Add Event Subscriptions, Use the new Shift+Alt+E shortcut in the AL code editor to invoke a list of all events.

Search for Event OnGetCDSTableNo“CRM Setup Defaults”

[EventSubscriber(ObjectType::Codeunit, Codeunit::"CRM Setup Defaults", 'OnGetCDSTableNo', '', false, false)]

local procedure OnGetCDSTableNo(BCTableNo: Integer; var CDSTableNo: Integer; var handled: Boolean);
    begin
        if BCTableNo = DATABASE::"Prospect" then begin
            CDSTableNo := DATABASE::"CDS cr95d_Prospects";
            handled := true;
        end;
    end;

Search for Event OnLookupCRMTables“Lookup CRM Tables”

[EventSubscriber(ObjectType::Codeunit, Codeunit::"Lookup CRM Tables", 'OnLookupCRMTables', '', false, false)]

local procedure OnLookupCRMTables(CRMTableID: Integer; NAVTableId: Integer; SavedCRMId: Guid; var CRMId: Guid; IntTableFilter: Text; var Handled: Boolean);
    begin
        if CRMTableID = Database::"CDS cr95d_Prospects" then
            Handled := LookupCDSProspect(SavedCRMId, CRMId, IntTableFilter);
    end;

Search for Event OnAddEntityTableMapping“CRM Setup Defaults”

[EventSubscriber(ObjectType::Codeunit, Codeunit::"CRM Setup Defaults", 'OnAddEntityTableMapping', '', false, false)]

local procedure OnAddEntityTableMapping(var TempNameValueBuffer: Record "Name/Value Buffer");
    begin
        AddEntityTableMapping('Prospect', DATABASE::"CDS cr95d_Prospects", TempNameValueBuffer);
    end;

Search for Event OnAfterResetConfiguration “CDS Setup Defaults”

[EventSubscriber(ObjectType::Codeunit, Codeunit::"CDS Setup Defaults", 'OnAfterResetConfiguration', '', false, false)]

local procedure OnAfterResetConfiguration(CDSConnectionSetup: Record "CDS Connection Setup");
    var
        IntegrationTableMapping: Record "Integration Table Mapping";
        IntegrationFieldMapping: Record "Integration Field Mapping";
        CDSProspect: Record "CDS cr95d_Prospects";
        Prospect: Record "Prospect";
    begin
        InsertIntegrationTableMapping(
            IntegrationTableMapping, 'Prospect',
            DATABASE::"Prospect", DATABASE::"CDS cr95d_Prospects", CDSProspect.FieldNo(cr95d_ProspectsId), CDSProspect.FieldNo(ModifiedOn), '', '', true);

        InsertIntegrationFieldMapping('Prospect', Prospect.FieldNo("No."), CDSProspect.FieldNo(cr95d_ProspectsId), IntegrationFieldMapping.Direction::Bidirectional, '', true, false);

        InsertIntegrationFieldMapping('Prospect', Prospect.FieldNo(Name), CDSProspect.FieldNo(cr95d_ProspectName), IntegrationFieldMapping.Direction::Bidirectional, '', true, false);

        InsertIntegrationFieldMapping('Prospect', Prospect.FieldNo(Probability), CDSProspect.FieldNo(cr95d_Probability), IntegrationFieldMapping.Direction::Bidirectional, '', true, false);

        InsertIntegrationFieldMapping('Prospect', Prospect.FieldNo("Contract Amount"), CDSProspect.FieldNo(cr95d_ContractAmount), IntegrationFieldMapping.Direction::Bidirectional, '', true, false);

        InsertIntegrationFieldMapping('Prospect', Prospect.FieldNo("Contract Amount (Base)"), CDSProspect.FieldNo(cr95d_contractamount_Base), IntegrationFieldMapping.Direction::Bidirectional, '', true, false);

        InsertIntegrationFieldMapping('Prospect', Prospect.FieldNo(Stage), CDSProspect.FieldNo(cr95d_Stage), IntegrationFieldMapping.Direction::Bidirectional, '', true, false);

        InsertIntegrationFieldMapping('Prospect', Prospect.FieldNo("Forecast Revenue"), CDSProspect.FieldNo(cr95d_ForcastedRevenue), IntegrationFieldMapping.Direction::Bidirectional, '', true, false);

        InsertIntegrationFieldMapping('Prospect', Prospect.FieldNo("Forecast Revenue (Base)"), CDSProspect.FieldNo(cr95d_forcastedrevenue_Base), IntegrationFieldMapping.Direction::Bidirectional, '', true, false);
    end;

Now you are good to proceed with Next Step.

You can jump to Next Step from here.

AL, AL Table Proxy Generator Tool, altpgen, Business Central, Dataverse, Extension, Generator, Integration, Page, Proxy, Table, Tool

Using AL Table Proxy Generator Tool to create Integration Table(s) in Business Central for the Dataverse table

This is the Sixth post in the series. If you want to go to previous post click here.

From the series of steps this post is dedicated to Step-5:

As a fifth Step we will Create Integration Table(s) in Business Central for the Dataverse table created in Step-4

When table(s) are present in Microsoft Dataverse, but not in Business Central, this tool can be run to generate integration or proxy table(s) for the specified table(s).

The AL Table Proxy Generator tool you can find in AL Language extension by name altpgen.exe in the equivalent folder [C:\Users\ashwi\.vscode\extensions\ms-dynamics-smb.al-7.4.502459\bin\]

Run PowerShell ISE as Administrator

Change to folder containing altpgen.exe

Above command should be single line, I have break for clarity of parameters. Below is the sample command.

.\altpgen -project:"C:\Userdata\AL Project\DataVerseIntegration" -packagecachepath:"C:\Userdata\AL Project\DataVerseIntegration\packagecachepath" -serviceuri:"https://xxxxxxxxxxx.crm8.dynamics.com/" -entities:cr95d_prospects -baseid:50125 -tabletype:CDS

When you run the command, it will ask for authentication, provide and continue.

Once you Accept the Permissions request, you can see the output of the command.

Don’t worry for warnings, Your AL file will be generated in specified folder.

Below is the sample of generated file, it is suggested to generate this file using the tool, don’t try to create manually.

table 50126 "CDS cr95d_Prospects"
{
  ExternalName = 'cr95d_prospects';
  TableType = CDS;
  Description = '';

  fields
  {
    field(1;cr95d_ProspectsId;GUID)
    {
      ExternalName = 'cr95d_prospectsid';
      ExternalType = 'Uniqueidentifier';
      ExternalAccess = Insert;
      Description = 'Unique identifier for entity instances';
      Caption = 'Prospects';
    }
    field(2;CreatedOn;Datetime)
    {
      ExternalName = 'createdon';
      ExternalType = 'DateTime';
      ExternalAccess = Read;
      Description = 'Date and time when the record was created.';
      Caption = 'Created On';
    }
    field(4;ModifiedOn;Datetime)
    {
      ExternalName = 'modifiedon';
      ExternalType = 'DateTime';
      ExternalAccess = Read;
      Description = 'Date and time when the record was modified.';
      Caption = 'Modified On';
    }
    field(24;statecode;Option)
    {
      ExternalName = 'statecode';
      ExternalType = 'State';
      ExternalAccess = Modify;
      Description = 'Status of the Prospects';
      Caption = 'Status';
      InitValue = " ";
      OptionMembers = " ", Active, Inactive;
      OptionOrdinalValues = -1, 0, 1;
    }
    field(26;statuscode;Option)
    {
      ExternalName = 'statuscode';
      ExternalType = 'Status';
      Description = 'Reason for the status of the Prospects';
      Caption = 'Status Reason';
      InitValue = " ";
      OptionMembers = " ", Active, Inactive;
      OptionOrdinalValues = -1, 1, 2;
    }
    field(28;VersionNumber;BigInteger)
    {
      ExternalName = 'versionnumber';
      ExternalType = 'BigInt';
      ExternalAccess = Read;
      Description = 'Version Number';
      Caption = 'Version Number';
    }
    field(29;ImportSequenceNumber;Integer)
    {
      ExternalName = 'importsequencenumber';
      ExternalType = 'Integer';
      ExternalAccess = Insert;
      Description = 'Sequence number of the import that created this record.';
      Caption = 'Import Sequence Number';
    }
    field(30;OverriddenCreatedOn;Date)
    {
      ExternalName = 'overriddencreatedon';
      ExternalType = 'DateTime';
      ExternalAccess = Insert;
      Description = 'Date and time that the record was migrated.';
      Caption = 'Record Created On';
    }
    field(31;TimeZoneRuleVersionNumber;Integer)
    {
      ExternalName = 'timezoneruleversionnumber';
      ExternalType = 'Integer';
      Description = 'For internal use only.';
      Caption = 'Time Zone Rule Version Number';
    }
    field(32;UTCConversionTimeZoneCode;Integer)
    {
      ExternalName = 'utcconversiontimezonecode';
      ExternalType = 'Integer';
      Description = 'Time zone code that was in use when the record was created.';
      Caption = 'UTC Conversion Time Zone Code';
    }
    field(33;cr95d_ProspectName;Text[100])
    {
      ExternalName = 'cr95d_prospectname';
      ExternalType = 'String';
      Description = 'Required name field';
      Caption = 'Prospect Name';
    }
    field(34;cr95d_ContractAmount;Decimal)
    {
      ExternalName = 'cr95d_contractamount';
      ExternalType = 'Money';
      Description = '';
      Caption = 'Contract Amount';
    }
    field(37;ExchangeRate;Decimal)
    {
      ExternalName = 'exchangerate';
      ExternalType = 'Decimal';
      ExternalAccess = Read;
      Description = 'Exchange rate for the currency associated with the entity with respect to the base currency.';
      Caption = 'Exchange Rate';
    }
    field(38;cr95d_contractamount_Base;Decimal)
    {
      ExternalName = 'cr95d_contractamount_base';
      ExternalType = 'Money';
      ExternalAccess = Read;
      Description = 'Value of the Contract Amount in base currency.';
      Caption = 'Contract Amount (Base)';
    }
    field(39;cr95d_Probability;Integer)
    {
      ExternalName = 'cr95d_probability';
      ExternalType = 'Integer';
      Description = '';
      Caption = 'Probability';
    }
    field(40;cr95d_Stage;Option)
    {
      ExternalName = 'cr95d_stage';
      ExternalType = 'Picklist';
      Description = '';
      Caption = 'Stage';
      InitValue = Lead;
      OptionMembers = Lead, Opportunity, Won, Lost;
      OptionOrdinalValues = 256080000, 256080001, 256080002, 256080003;
    }
    field(42;cr95d_ForcastedRevenue;Decimal)
    {
      ExternalName = 'cr95d_forcastedrevenue';
      ExternalType = 'Money';
      Description = '';
      Caption = 'Forcasted Revenue';
    }
    field(43;cr95d_forcastedrevenue_Base;Decimal)
    {
      ExternalName = 'cr95d_forcastedrevenue_base';
      ExternalType = 'Money';
      ExternalAccess = Read;
      Description = 'Value of the Forcasted Revenue in base currency.';
      Caption = 'Forcasted Revenue (Base)';
    }
  }
  keys
  {
    key(PK;cr95d_ProspectsId)
    {
      Clustered = true;
    }
    key(Name;cr95d_ProspectName)
    {
    }
  }
  fieldgroups
  {
    fieldgroup(DropDown;cr95d_ProspectName)
    {
    }
  }
}

Create a Page for above table

page 50122 "CDS Prospect List"
{
    Caption = 'CDS Prospect List';
    PageType = List;
    SourceTable = "CDS cr95d_Prospects";
    Editable = false;
    ApplicationArea = All;
    UsageCategory = Lists;
    RefreshOnActivate = true;

    layout
    {
        area(Content)
        {
            repeater(Group)
            {
                field("No."; Rec.cr95d_ProspectsId)
                {
                    Caption = 'No.';
                    ApplicationArea = All;
                }
                field(Name; Rec.cr95d_ProspectName)
                {
                    Caption = 'Name';
                    ApplicationArea = All;
                }
                field(Stage; Rec.cr95d_Stage)
                {
                    Caption = 'Stage';
                    ApplicationArea = All;
                }
                field("Probability"; Rec.cr95d_Probability)
                {
                    Caption = 'Probability';
                    ApplicationArea = All;
                }
                field("Contract Amount"; Rec.cr95d_ContractAmount)
                {
                    Caption = 'Contract Amount';
                    ApplicationArea = All;
                }
                field("Contract Amount (Base)"; Rec.cr95d_contractamount_Base)
                {
                    Caption = 'Contract Amount (Base)';
                    ApplicationArea = All;
                }
                field("Forecast Revenue"; Rec.cr95d_ForcastedRevenue)
                {
                    Caption = 'Forecast Revenue';
                    ApplicationArea = All;
                }
                field("Forecast Revenue (Base)"; Rec.cr95d_forcastedrevenue_Base)
                {
                    Caption = 'Forecast Revenue (Base)';
                    ApplicationArea = All;
                }
                field("Exchange Rate"; Rec.ExchangeRate)
                {
                    Caption = 'Exchange Rate';
                    ApplicationArea = All;
                }
            }
        }
    }
}

You can read more about AL Table Proxy Generator Tool from Microsoft docs

AL Table Proxy Generator

Now you are good to proceed with Next Step.

You can jump to Next Step from here.

Business Central, Dataverse, Power Apps, Synchronize, Table

Create Custom table in Dataverse/ Power Apps

This is the Fifth post in the series. If you want to go to previous post click here.

From the series of steps this post is dedicated to Step-4:

As a fourth Step we will Create New Table(s) in Dataverse, below is the structure of the table.

This table will be used to Sync Data between Business Central and Dataverse.

Define all required columns. Same as we have done in Business Central, in previous post.

Next we will define Business Rule, This will make Probability field as mandatory.

See the properties of each component.

Sample data for the table.

If you are not comfortable with creating table in Power Apps environment, I will add one post step wise step how this table was created and data was uploaded in this table. Once this series is completed, will provide link to that post here.

Now you are good to proceed with Next Step.

You can jump to Next Step from here.

AL, Business Central, Dataverse, Enum, Extension, Integration, Page, Table

Create Custom table & page in Business Central

This is the Fourth post in the series. If you want to go to previous post click here.

From the series of steps this post is dedicated to Step-3:

As a third Step we will Create New Table(s) and Page(s) in Business Central

Below are the AL code for Prospect table, Prospect card page & Prospect list page that will be created in Business Central via Extension, used for Integration with Dataverse.

Table in BC to Integrate from Dataverse

table 50120 "Prospect"
{
    DataClassification = ToBeClassified;
    DrillDownPageID = "Prospects";
    fields
    {
        field(1; "No."; Code[20])
        {
            DataClassification = ToBeClassified;
        }
        field(2; "Name"; Text[50])
        {
            DataClassification = ToBeClassified;
        }
        field(5; "Probability"; Integer)
        {
            DataClassification = ToBeClassified;
        }
        field(6; "Contract Amount"; Decimal)
        {
            DataClassification = ToBeClassified;
        }
        field(7; "Contract Amount (Base)"; Decimal)
        {
            DataClassification = ToBeClassified;
        }
        field(8; "Stage"; Enum "Stage Type")
        {
            DataClassification = ToBeClassified;
        }
        field(11; "Forecast Revenue"; Decimal)
        {
            DataClassification = ToBeClassified;
        }
        field(12; "Forecast Revenue (Base)"; Decimal)
        {
            DataClassification = ToBeClassified;
        }
    }

    keys
    {
        key(key1; Name)
        {
            Clustered = true;
        }
    }
}

Card Page for above Table

page 50121 "Prospect Card"
{
    Caption = 'Prospect Card';
    PageType = Card;
    UsageCategory = Administration;
    SourceTable = "Prospect";

    layout
    {
        area(Content)
        {
            group(General)
            {
                field("Name"; Rec."Name")
                {
                    ApplicationArea = All;
                }
                field(Probability; Rec.Probability)
                {
                    ApplicationArea = All;
                }
                field(Stage; Rec.Stage)
                {
                    ApplicationArea = All;
                }
            }

            group(Details)
            {
                field("Contract Amount"; Rec."Contract Amount")
                {
                    ApplicationArea = All;
                }
                field("Contract Amount (Base)"; Rec."Contract Amount (Base)")
                {
                    ApplicationArea = All;
                }
                field("Forecast Revenue"; Rec."Forecast Revenue")
                {
                    ApplicationArea = All;
                }
                field("Forcast Revenu (Base)"; Rec."Forecast Revenue (Base)")
                {
                    ApplicationArea = All;
                }
            }
        }
    }
}

List Page for above Table

page 50120 Prospects
{
    PageType = List;
    ApplicationArea = All;
    UsageCategory = Lists;
    SourceTable = Prospect;
    Caption = 'Prospect List';
    CardPageId = "Prospect Card";
    Editable = false;

    layout
    {
        area(Content)
        {
            repeater(GroupName)
            {
                field(Name; Rec.Name)
                {
                    ApplicationArea = All;

                }
                field(Probability; Rec.Probability)
                {
                    ApplicationArea = All;

                }
                field("Contract Amount"; Rec."Contract Amount")
                {
                    ApplicationArea = All;

                }
                field("Contract Amount (Base)"; Rec."Contract Amount (Base)")
                {
                    ApplicationArea = All;

                }
                field(Stage; Rec.Stage)
                {
                    ApplicationArea = All;

                }
                field("Forcast Revenue"; Rec."Forecast Revenue")
                {
                    ApplicationArea = All;

                }
                field("Forcast Revenue (Base)"; Rec."Forecast Revenue (Base)")
                {
                    ApplicationArea = All;

                }
            }
        }
    }
}

Enum for field Stage

enum 50120 "Stage Type"
{
    Extensible = true;
    AssignmentCompatibility = true;

    value(0; "Lead") { Caption = 'Lead'; }
    value(1; "Opportunity") { Caption = 'Opportunity'; }
    value(2; "Won") { Caption = 'Won'; }
    value(3; "Lost") { Caption = 'Lost'; }
}

Now you are good to proceed with Next Step.

You can jump to Next Step from here.

Assisted Setup, Business Central, Dataverse, Dynamics 365 Connection Setup, Dynamics 365 Sales, Integration, Solutions, Tip & Tricks

Setup a connection to Dynamics 365 Sales

Integration with Business Central is done through Dataverse, and you will find lots of standard settings and tables that are provided by the integration.

This is the Third post in the series. If you want to go to previous post click here.

From the series of steps this post is dedicated to Step-2:

Before you start make sure you have below information ready with you:

  • URL for the Dataverse environment (Dynamics 365 Sales) that you want to connect to
  • The user’s name and password of an account that has administrator permissions in Business Central and Dataverse.
  • The local currency for the company in Business Central must be the same as the base transaction currency in Dataverse. 


As a second Step we will setup a Connection to Dynamics 365 Sales.

From Assisted Setup under Connect with other systems group choose Set up a connection to Dynamics 365 Sales, as shown below.

This Step is straight forward, you need to just respond to Next to each page of the Wizard.

The URL will be same as used in previous step, while Connecting to Dataverse. Click Next.

Optionally, there are advanced settings that can enhance security and enable additional capabilities, such as sales order processing and viewing inventory levels. The following table describes the advanced settings.

Click Finish to complete the Setup.

Next open the Dynamics 365 Connection Setup from TellMe.

Select Connection -> Test Connection

If everything is ok it should show Connection test Successful message.

Go to Dataverse Connection Setup, from Integration -> Integration Solutions

It will list you the solutions deployed.

Same you can find in Dynamics 365 Sales -> Settings -> Solutions

For more details you can have a look to Microsoft docs

Integrating with Dynamics 365 Sales

Now you are good to proceed with Next Step.

You can jump to Next Step from here.

Business Central, CDS, Common Data Services, Dataverse, Dynamics 365 Sales, Integration, Ownership, Permissions, Synchronize, Tip & Tricks, URL

Setup a connection to Dataverse

Integration with Business Central is done through Dataverse, and you will find lots of standard settings and tables that are provided by the integration.

This is the Second post in the series. If you want to go to previous post click here.

From the series of steps this post is dedicated to Step-1:

Create connection to integrate and synchronize data with another Dynamics 365 business app, such as Dynamics 365 Sales.

As a first Step we will setup a connection to Dataverse.

Before you start make sure you have below information ready with you:

  • URL for the Dataverse environment that you want to connect to
  • The user’s name and password of an account that has administrator permissions in Business Central and Dataverse.
  • The local currency for the company in Business Central must be the same as the base transaction currency in Dataverse. 

From Assisted Setup under Connect with other systems group choose Set up a connection to Dataverse, as shown below.

This will start the Setup wizard, just follow and provide your information asked on each page.

Click Next to Start configuring Dataverse & Business Central connection.

Here you can select your Dataverse Environment or can enter manually, above screen shows where you can find this url from.

Sign in with an administrator user account and give consent to the application that will be used to connect to Dataverse.


Choose Sign in with administrator user.

After Sign in with administrator user turns green and bold, choose Next.

Select Ownership and Click Next.

Click on Finish to complete the Setup.

Next open the Dataverse Connection Setup from TellMe.

Select from Connection -> Test Connection

You can check Microsoft docs for more information

Connect to Microsoft Dataverse

If all are OK it should show the Connection test Successful message.

Now you are good to proceed with Next Step.

You can jump to Next Step from here.