Business Central, Business Central Dataverse Integration, Business Central Integration Business Central to Common Data Service, Dataverse, Dynamics 365 Sales, Integration, Organization, Permission, Power Apps, Roles, Security, Synchronize

Check & Assign Permissions in Power Apps Environment

This is the Eleventh post in the series. If you want to go to previous post click here.

From the series of steps this post is dedicated to Step-10:

As a Tenth Step we will Verify & Assign Permissions in Power Apps Environment.

This is the final Step, and we will be done with the goal we set in our first post of this series.

Open your Dynamics 365 Sales Environment and Go To Settings.

Under Users + permissions -> Application users.

On next screen Verify “Business Central Integration Business Central to Common Data Service” is selected. If not then select it from “Edit Security Roles”.

From Settings -> Users + permissions -> Security roles

From Security roles select the Business Central Dataverse Integration Then Edit

Select Custom Entities tab and find your table Prospects. Select each circle 4 times to assign Organization, circle should turn completely filled green color.

Select Save and Close.

Now you All done with the steps, Ready to test the solution.

In next post we will test the solution, we created in past 10 posts.

Now you are good to proceed with Next Step.

You can jump to Next Step from here.

Advertisement
AL, AL Table Proxy Generator Tool, altpgen, Business Central, Dataverse, Extension, Generator, Integration, Page, Proxy, Table, Tool

Using AL Table Proxy Generator Tool to create Integration Table(s) in Business Central for the Dataverse table

This is the Sixth post in the series. If you want to go to previous post click here.

From the series of steps this post is dedicated to Step-5:

As a fifth Step we will Create Integration Table(s) in Business Central for the Dataverse table created in Step-4

When table(s) are present in Microsoft Dataverse, but not in Business Central, this tool can be run to generate integration or proxy table(s) for the specified table(s).

The AL Table Proxy Generator tool you can find in AL Language extension by name altpgen.exe in the equivalent folder [C:\Users\ashwi\.vscode\extensions\ms-dynamics-smb.al-7.4.502459\bin\]

Run PowerShell ISE as Administrator

Change to folder containing altpgen.exe

Above command should be single line, I have break for clarity of parameters. Below is the sample command.

.\altpgen -project:"C:\Userdata\AL Project\DataVerseIntegration" -packagecachepath:"C:\Userdata\AL Project\DataVerseIntegration\packagecachepath" -serviceuri:"https://xxxxxxxxxxx.crm8.dynamics.com/" -entities:cr95d_prospects -baseid:50125 -tabletype:CDS

When you run the command, it will ask for authentication, provide and continue.

Once you Accept the Permissions request, you can see the output of the command.

Don’t worry for warnings, Your AL file will be generated in specified folder.

Below is the sample of generated file, it is suggested to generate this file using the tool, don’t try to create manually.

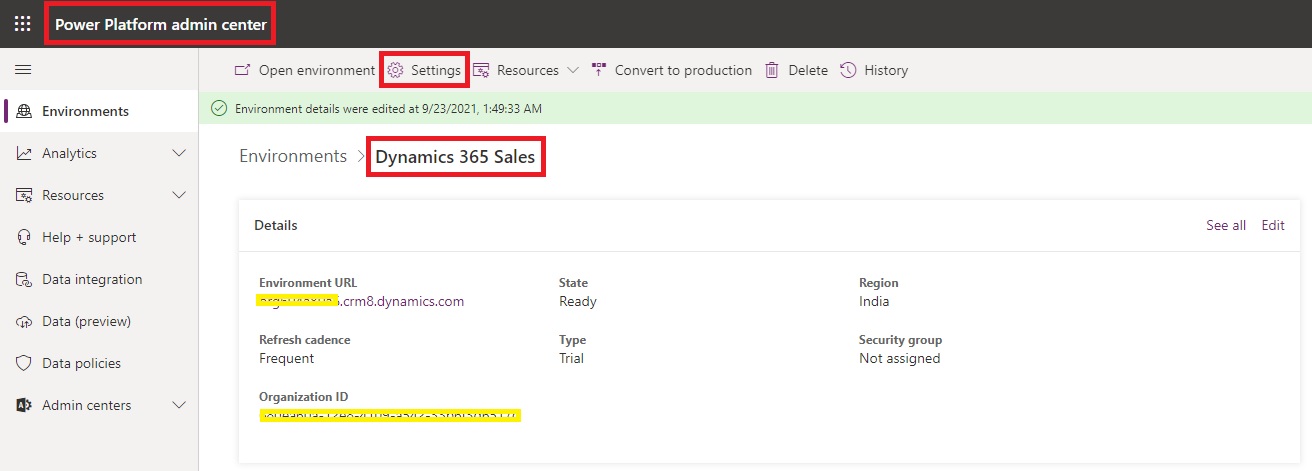
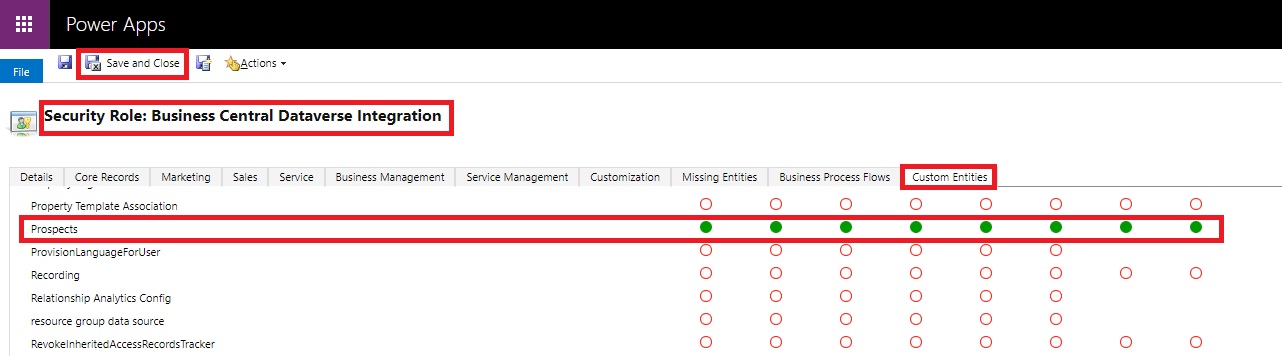
table 50126 "CDS cr95d_Prospects"
{
  ExternalName = 'cr95d_prospects';
  TableType = CDS;
  Description = '';

  fields
  {
    field(1;cr95d_ProspectsId;GUID)
    {
      ExternalName = 'cr95d_prospectsid';
      ExternalType = 'Uniqueidentifier';
      ExternalAccess = Insert;
      Description = 'Unique identifier for entity instances';
      Caption = 'Prospects';
    }
    field(2;CreatedOn;Datetime)
    {
      ExternalName = 'createdon';
      ExternalType = 'DateTime';
      ExternalAccess = Read;
      Description = 'Date and time when the record was created.';
      Caption = 'Created On';
    }
    field(4;ModifiedOn;Datetime)
    {
      ExternalName = 'modifiedon';
      ExternalType = 'DateTime';
      ExternalAccess = Read;
      Description = 'Date and time when the record was modified.';
      Caption = 'Modified On';
    }
    field(24;statecode;Option)
    {
      ExternalName = 'statecode';
      ExternalType = 'State';
      ExternalAccess = Modify;
      Description = 'Status of the Prospects';
      Caption = 'Status';
      InitValue = " ";
      OptionMembers = " ", Active, Inactive;
      OptionOrdinalValues = -1, 0, 1;
    }
    field(26;statuscode;Option)
    {
      ExternalName = 'statuscode';
      ExternalType = 'Status';
      Description = 'Reason for the status of the Prospects';
      Caption = 'Status Reason';
      InitValue = " ";
      OptionMembers = " ", Active, Inactive;
      OptionOrdinalValues = -1, 1, 2;
    }
    field(28;VersionNumber;BigInteger)
    {
      ExternalName = 'versionnumber';
      ExternalType = 'BigInt';
      ExternalAccess = Read;
      Description = 'Version Number';
      Caption = 'Version Number';
    }
    field(29;ImportSequenceNumber;Integer)
    {
      ExternalName = 'importsequencenumber';
      ExternalType = 'Integer';
      ExternalAccess = Insert;
      Description = 'Sequence number of the import that created this record.';
      Caption = 'Import Sequence Number';
    }
    field(30;OverriddenCreatedOn;Date)
    {
      ExternalName = 'overriddencreatedon';
      ExternalType = 'DateTime';
      ExternalAccess = Insert;
      Description = 'Date and time that the record was migrated.';
      Caption = 'Record Created On';
    }
    field(31;TimeZoneRuleVersionNumber;Integer)
    {
      ExternalName = 'timezoneruleversionnumber';
      ExternalType = 'Integer';
      Description = 'For internal use only.';
      Caption = 'Time Zone Rule Version Number';
    }
    field(32;UTCConversionTimeZoneCode;Integer)
    {
      ExternalName = 'utcconversiontimezonecode';
      ExternalType = 'Integer';
      Description = 'Time zone code that was in use when the record was created.';
      Caption = 'UTC Conversion Time Zone Code';
    }
    field(33;cr95d_ProspectName;Text[100])
    {
      ExternalName = 'cr95d_prospectname';
      ExternalType = 'String';
      Description = 'Required name field';
      Caption = 'Prospect Name';
    }
    field(34;cr95d_ContractAmount;Decimal)
    {
      ExternalName = 'cr95d_contractamount';
      ExternalType = 'Money';
      Description = '';
      Caption = 'Contract Amount';
    }
    field(37;ExchangeRate;Decimal)
    {
      ExternalName = 'exchangerate';
      ExternalType = 'Decimal';
      ExternalAccess = Read;
      Description = 'Exchange rate for the currency associated with the entity with respect to the base currency.';
      Caption = 'Exchange Rate';
    }
    field(38;cr95d_contractamount_Base;Decimal)
    {
      ExternalName = 'cr95d_contractamount_base';
      ExternalType = 'Money';
      ExternalAccess = Read;
      Description = 'Value of the Contract Amount in base currency.';
      Caption = 'Contract Amount (Base)';
    }
    field(39;cr95d_Probability;Integer)
    {
      ExternalName = 'cr95d_probability';
      ExternalType = 'Integer';
      Description = '';
      Caption = 'Probability';
    }
    field(40;cr95d_Stage;Option)
    {
      ExternalName = 'cr95d_stage';
      ExternalType = 'Picklist';
      Description = '';
      Caption = 'Stage';
      InitValue = Lead;
      OptionMembers = Lead, Opportunity, Won, Lost;
      OptionOrdinalValues = 256080000, 256080001, 256080002, 256080003;
    }
    field(42;cr95d_ForcastedRevenue;Decimal)
    {
      ExternalName = 'cr95d_forcastedrevenue';
      ExternalType = 'Money';
      Description = '';
      Caption = 'Forcasted Revenue';
    }
    field(43;cr95d_forcastedrevenue_Base;Decimal)
    {
      ExternalName = 'cr95d_forcastedrevenue_base';
      ExternalType = 'Money';
      ExternalAccess = Read;
      Description = 'Value of the Forcasted Revenue in base currency.';
      Caption = 'Forcasted Revenue (Base)';
    }
  }
  keys
  {
    key(PK;cr95d_ProspectsId)
    {
      Clustered = true;
    }
    key(Name;cr95d_ProspectName)
    {
    }
  }
  fieldgroups
  {
    fieldgroup(DropDown;cr95d_ProspectName)
    {
    }
  }
}

Create a Page for above table

page 50122 "CDS Prospect List"
{
    Caption = 'CDS Prospect List';
    PageType = List;
    SourceTable = "CDS cr95d_Prospects";
    Editable = false;
    ApplicationArea = All;
    UsageCategory = Lists;
    RefreshOnActivate = true;

    layout
    {
        area(Content)
        {
            repeater(Group)
            {
                field("No."; Rec.cr95d_ProspectsId)
                {
                    Caption = 'No.';
                    ApplicationArea = All;
                }
                field(Name; Rec.cr95d_ProspectName)
                {
                    Caption = 'Name';
                    ApplicationArea = All;
                }
                field(Stage; Rec.cr95d_Stage)
                {
                    Caption = 'Stage';
                    ApplicationArea = All;
                }
                field("Probability"; Rec.cr95d_Probability)
                {
                    Caption = 'Probability';
                    ApplicationArea = All;
                }
                field("Contract Amount"; Rec.cr95d_ContractAmount)
                {
                    Caption = 'Contract Amount';
                    ApplicationArea = All;
                }
                field("Contract Amount (Base)"; Rec.cr95d_contractamount_Base)
                {
                    Caption = 'Contract Amount (Base)';
                    ApplicationArea = All;
                }
                field("Forecast Revenue"; Rec.cr95d_ForcastedRevenue)
                {
                    Caption = 'Forecast Revenue';
                    ApplicationArea = All;
                }
                field("Forecast Revenue (Base)"; Rec.cr95d_forcastedrevenue_Base)
                {
                    Caption = 'Forecast Revenue (Base)';
                    ApplicationArea = All;
                }
                field("Exchange Rate"; Rec.ExchangeRate)
                {
                    Caption = 'Exchange Rate';
                    ApplicationArea = All;
                }
            }
        }
    }
}

You can read more about AL Table Proxy Generator Tool from Microsoft docs

AL Table Proxy Generator

Now you are good to proceed with Next Step.

You can jump to Next Step from here.

Assisted Setup, Business Central, Dataverse, Dynamics 365 Connection Setup, Dynamics 365 Sales, Integration, Solutions, Tip & Tricks

Setup a connection to Dynamics 365 Sales

Integration with Business Central is done through Dataverse, and you will find lots of standard settings and tables that are provided by the integration.

This is the Third post in the series. If you want to go to previous post click here.

From the series of steps this post is dedicated to Step-2:

Before you start make sure you have below information ready with you:

  • URL for the Dataverse environment (Dynamics 365 Sales) that you want to connect to
  • The user’s name and password of an account that has administrator permissions in Business Central and Dataverse.
  • The local currency for the company in Business Central must be the same as the base transaction currency in Dataverse. 


As a second Step we will setup a Connection to Dynamics 365 Sales.

From Assisted Setup under Connect with other systems group choose Set up a connection to Dynamics 365 Sales, as shown below.

This Step is straight forward, you need to just respond to Next to each page of the Wizard.

The URL will be same as used in previous step, while Connecting to Dataverse. Click Next.

Optionally, there are advanced settings that can enhance security and enable additional capabilities, such as sales order processing and viewing inventory levels. The following table describes the advanced settings.

Click Finish to complete the Setup.

Next open the Dynamics 365 Connection Setup from TellMe.

Select Connection -> Test Connection

If everything is ok it should show Connection test Successful message.

Go to Dataverse Connection Setup, from Integration -> Integration Solutions

It will list you the solutions deployed.

Same you can find in Dynamics 365 Sales -> Settings -> Solutions

For more details you can have a look to Microsoft docs

Integrating with Dynamics 365 Sales

Now you are good to proceed with Next Step.

You can jump to Next Step from here.

Business Central, CDS, Common Data Services, Dataverse, Dynamics 365 Sales, Integration, Ownership, Permissions, Synchronize, Tip & Tricks, URL

Setup a connection to Dataverse

Integration with Business Central is done through Dataverse, and you will find lots of standard settings and tables that are provided by the integration.

This is the Second post in the series. If you want to go to previous post click here.

From the series of steps this post is dedicated to Step-1:

Create connection to integrate and synchronize data with another Dynamics 365 business app, such as Dynamics 365 Sales.

As a first Step we will setup a connection to Dataverse.

Before you start make sure you have below information ready with you:

  • URL for the Dataverse environment that you want to connect to
  • The user’s name and password of an account that has administrator permissions in Business Central and Dataverse.
  • The local currency for the company in Business Central must be the same as the base transaction currency in Dataverse. 

From Assisted Setup under Connect with other systems group choose Set up a connection to Dataverse, as shown below.

This will start the Setup wizard, just follow and provide your information asked on each page.

Click Next to Start configuring Dataverse & Business Central connection.

Here you can select your Dataverse Environment or can enter manually, above screen shows where you can find this url from.

Sign in with an administrator user account and give consent to the application that will be used to connect to Dataverse.


Choose Sign in with administrator user.

After Sign in with administrator user turns green and bold, choose Next.

Select Ownership and Click Next.

Click on Finish to complete the Setup.

Next open the Dataverse Connection Setup from TellMe.

Select from Connection -> Test Connection

You can check Microsoft docs for more information

Connect to Microsoft Dataverse

If all are OK it should show the Connection test Successful message.

Now you are good to proceed with Next Step.

You can jump to Next Step from here.

AL Table Proxy Generator Tool, Assisted Setup, Business Central, CDS, Common Data Services, Coupling, Custom Tables, Dataverse, Deploy, Dynamics 365 Sales, Integration, Mappings, Package, Permissions, Power Apps, Scheduling, Synchronize, Testing

Integration in Business Central with Dataverse/ Common Data Services/ Dynamics 365 Sales/ Power Apps

In this post I will discuss about how we can Synchronize data to Custom Tables using Dataverse.

This post is divided in series of small posts, one post for each involved step.

You follow each post link in sequence and at end we will achieve the final Goal set in starting of this post. 

This post will walkthrough setting up an integration between a Custom table Prospects in Business Central and a Custom table Prospects in Microsoft Dataverse.

One thing important keep in mind while doing all the steps we need to use the Admin login you used to setup these environments.

Also, the Base Currency of Business Central & Dataverse Environment should be same else you will run into issue.

If the currencies of Business Central and Dataverse do not match, similar message will be displayed.

LCY Code XXX does not match ISO Currency Code XXX of the Dataverse base currency.

The Base Currency defined for Dataverse after setup is not possible to change however you can match it in Business Central by changing LCY Code in General Ledger Setup.

Let’s start with introduction to environment we are going to use, throughout the process and steps described below.

Introduction to Environment:

Before we start with the Steps Involved, let me introduce with the environment which I am going to use in this walkthrough. 

Business Central Environment:

Dynamics 365 Sale Environment:

Setup required to Connect with external system:

You can find below options in Business Central Assisted Setup.

The following are the Steps we will follow:

Follow each step above in same sequence.

For more detailed insight refer to below Microsoft Documents:

Customizing an Integration with Microsoft Dataverse

AL Table Proxy Generator

Scheduling a Synchronization between Business Central and Dataverse

Hope you enjoyed the learning by example. Wait for next post, will be back soon.

See you in next post soon with similar kind of stuffs.

Till then keep Exploring, learning and sharing with others.

Replication, SQL, Tip & Tricks

Database Replication – Part III

This post is in continuation to my earlier post. Please check if you missed.

Database Replication – Part I

Database Replication – Part II

As committed in this post we will continue to cover practical approach, Next step from last post.

Configuring Distribution

We will configure distribution at the Publisher and set the required permissions on the publication and distribution databases. If you have already configured the Distributor, you must first disable publishing and distribution before you begin this process. Do not do this if you must retain an existing replication topology.

Configuring a Publisher with a remote Distributor is outside the scope of this Post.

If you have connected to SQL Server using localhost rather than the actual server name you will be prompted with a warning that SQL Server is unable to connect to server ‘localhost’. Click OK on the warning dialog. In the Connect to Server dialog change the Server name from localhost to the name of your server. Click Connect.

Configuring distribution at the Publisher

  • Connect to the Publisher in SQL Server Management Studio, and then expand the server node.
  • Right-click the Replication folder and click Configure Distribution.

DR-10

  • The Distribution Configuration Wizard launches.

DR-11

  • On the Distributor page, select ‘ServerName’ will act as its own Distributor; SQL Server will create a distribution database and log, and then click **Next.

DR-12

  • If the SQL Server is not running, on the SQL ServerAgent Start page, select Yes, configure the SQL Server Agent service to start automatically. Click Next.
  • Enter \\<Machine_Name>\repldata in the Snapshot folder text box, where <Machine_Name> is the name of the Publisher, and then click Next.

DR-13

  • Accept the default values on the remaining pages of the wizard.

DR-14DR-15DR-16DR-17DR-18

  • Click Finish to enable distribution.

DR-19

Setting database permissions at the Publisher

  • In SQL Server Management Studio, expand Security, right-click Logins, and then select New Login.

DR-20

  • On the General page, click Search, enter <Machine_Name>\repl_snapshot in the Enter the object name to select box, where <Machine_Name> is the name of the local Publisher server, click Check Names, and then click OK.

DR-21

  • On the User Mapping page, in the Users mapped to this login list select both the distribution and required database (in my case Nav 2018 database).
  • In the Database role membership list select the db_owner role for the login for both databases.
  • Click OK to create the login.

DR-22

  • Repeat steps 1-4 to create a login for the local repl_logreader account. This login must also be mapped to users that are members of the db_owner fixed database role in the distribution and required databases.
  • Repeat steps 1-4 to create a login for the local repl_distribution account. This login must be mapped to a user that is a member of the db_owner fixed database role in the distribution database.
  • Repeat steps 1-4 to create a login for the local repl_merge account. This login must have user mappings in the distribution and required databases.


DR-23


Here we complete configuring our Distribution at Publisher.

We will see next step in our next post.


Corfu Navision 2016, How To, Information, Permission, User Group

Record Permissions and Apply Permissions Sets to User Groups in Navision 2016

Administrators can record new permission sets in Microsoft Dynamics NAV 2016.

Recording permissions is based on the code coverage functionality.

You can access the various windows and activities in the Microsoft Dynamics NAV Windows client or the Microsoft Dynamics NAV Web client that you want users with this permission set to access.

You must carry out the tasks that you want to record permissions for. Then, you can apply the new permission set to a group of users.

A user group is a combination of roles and users. If you want to change permissions for the user group, the changes are automatically applied to the users who are members of the group.

To help you manage permissions in Microsoft Dynamics NAV for your company, you can set up one or more user groups, add permissions sets to the groups, and then add users to the groups. You can add more than one permission set to a user group.

In the User Groups window, you can set up user groups, add and remove permissions, and you can apply changes to all or specific user groups.
Permission-1

Permission-2

Permission-3

Permission-4

Permission-5
If the default permission sets that are provided with Microsoft Dynamics NAV are not sufficient or not appropriate for your organization, then you can create new permission sets. If the individual object permissions that define a permission set are not adequate, then you can modify a permission set.

You can create a permission set manually, or you can record permissions by navigating in the application.
Permission-6

Permission-7

Permission-8
This starts a recording process that is based on the code coverage functionality in Microsoft Dynamics NAV. You can now access the various windows and activities in the Microsoft Dynamics NAV Windows client or the Microsoft Dynamics NAV Web client that you want users with this permission set to access. You must carry out the tasks that you want to record permissions for.

When you want to finish the recording, return to the Permissions window, and then, on the Actions tab, choose Stop.

Choose Yes to add the recorded permissions to the new permission set, or choose No to cancel.

If you choose Yes, the objects that you accessed are added to the window. In Microsoft Dynamics NAV 2016, only the objects are recorded, so you must specify if users must be able to insert, modify, or delete records in the recorded tables.

Development Tips

AccessByPermission Property – in Navision 2015

Sets a value for a table field or UI element that determines the permission mask for an object that a user must have to see and access the related page fields or UI element in the client. The UI element will be removed at runtime if the user does not have permissions to a certain object as specified in the Access by Permission window.

AccessByPermission-1
AccessByPermission-2
AccessByPermission-3

Depending on the setting in the UI Elements Removal field in the Microsoft Dynamics NAV Server Administration tool, only user interface (UI) elements on objects in the license or on objects that the user has permissions to will appear in the user interface.

AccessByPermission-4

To make full use of the LicenseFileAndUserPermissions option in the UI Elements Removal field, it is recommended that you assign the special permission set, FOUNDATION, along with the relevant permission sets that define which application objects the user will access.

AccessByPermission-5

The majority of the permission sets that are provided with the CRONUS demonstration database cannot be combined with the FOUNDATION permission set to fully use the UI Elements Removal feature. You must first create or edit the relevant permission sets to avoid that the user is blocked from performing the involved tasks. You must first create or edit the relevant permission sets to avoid that the user is blocked from performing the involved tasks.

If you only use the LicenseFile option in the UI Elements Removal field, then you do not have to edit any permission sets as they will not affect which UI elements are removed.

To specify when UI elements are removed
  1. Open the Microsoft Dynamics NAV Server Administration
  2. In the UI Elements Removal field, choose the relevant option as described in the following table.
Option Description
None All UI elements are displayed, even if the license file does not include the related object and the user does not have permissions to the related object.
LicenseFile A UI element is removed if the related object is not included in the license file.
LicenseFileAndUserPermissions A UI element is removed if the related object is not included in the license file and the user does not have permissions to the object as defined in the AccessByPermission property for the related UI element.

By default, this option is selected.

AccessByPermission-6

When you configure user interfaces in Microsoft Dynamics NAV, you should make sure that the UI Elements Removal field is set to its default, LicenseFileAndUserPermissions, so that you only see the relevant UI elements in the Customize window.

When you develop in Microsoft Dynamics NAV, you should make sure that the UI Elements Removal field is set to its default, None, to make sure that all UI elements are visible when you review your development in the UI.

All types of UI elements will be removed if they relate to objects that are not included in the license or the user does not have the required permission to the objects:

  • Fields
  • Actions
  • Page parts

UI elements that are directly related to an object through the TableRelation or the CalcFormula property can be removed automatically according to the license file and/or user permissions.

For UI elements that are not directly related to an object, you can use the AccessByPermission property to remove the element according to the user’s permission to a related object

All types of UI elements will be removed if they relate to an object to which the user does not have the required permissions:

Fields on pages, including FactBoxes

Actions on pages, including toolbars and navigation panes

Page parts, such as Lines FastTabs

Note

To use this property, the UI Elements Removal field in the Microsoft Dynamics NAV Server Administration tool must be set to LicenseFile or LicenseFileAndUserPermissions.

This Property Applies To

Fields in tables (affecting all related fields on pages)

Fields on pages

Actions on pages

MenuSuite items

Page parts, such as a Lines FastTab

Property Value

When you choose the AssistEdit button, the Access By Permission window opens. Fill the fields as described in the following table.

Field Description
Object Type Specify the type of object to which permission is required to display the UI element.
Object ID Specify the object to which permission is required to display the UI element.
Read Specify if Read permission is required to display the UI element.
or Insert Specify if Insert permission is required to display the UI element.
or Modify Specify if Modify permission is required to display the UI element.
or Delete Specify if Delete permission is required to display the UI element.
or Execute Specify if Execute permission is required to display the UI element.

AccessByPermission-7

Note

If multiple permissions are selected, then one or the other applies.

Example: Remove the Unit Price field if the user does not have permission to the Sales Price table

Open table 27, Item Card, with the Table Designer.

View the properties of field 18, Unit Price.

For the AccessByPermission property, choose the AssistEdit button in the Value field.

In the Access By Permission window, fill the fields as described in the following table.

Field Description
Object Type TableData
Object ID Sales Price
Read Select
Insert Select
Modify Leave blank
Delete Leave blank
Execute Leave blank

Close the Access By Permission window and save the changes on table 27.

All instances of the Unit Price field on pages are now removed if the user does have Read or Insert permission to the Sales Price table.

AccessByPermission-8

Important

If you defined the property for a table field, then all instances of the field on pages are removed. To override the property on an individual page field, delete the permission value after the = sign in the Value field. Do NOT delete the whole string as that will be replicated on the property of the table field.

Note

To use the LicenseFileAndUserPermissions option in the UI Elements Removal field, you must assign the special FOUNDATION permission set to the user along with the relevant application permission sets that define which application objects the user will access. Unlike the BASIC permission set, the FOUNDATION permission set only grants access to application setup and system tables and requires that other assigned permission sets define which specific application objects can be accessed.

Not all of the 167 default permission sets that are provided with Microsoft Dynamics NAV are ready to support the FOUNDATION permission set to remove UI elements according to user permissions. You must therefore edit the relevant permission sets as explained in the following procedures.

To experience how UI elements are removed for a user performing the task to create and edit a new customer, you can create a sample user interface based on default permission sets provided with Microsoft Dynamics NAV.

Special Permission Sets

The following permission sets have special definitions that you should be aware of as you implement permissions and security for Microsoft Dynamics NAV users.

Permission set Definition
SUPER Can read, use, update, and delete all data and all application objects in the scope of your license. Microsoft Dynamics NAV requires that at least one user be assigned this permission set in each database.

You cannot modify permissions for the SUPER permission set.

SUPER (DATA) Can read, use, update, and delete all data. You typically assign this permission set to an accounting manager who needs to work with all data but does not need to change Microsoft Dynamics NAV.

This permission set does not give access to the Object Designer.

SECURITY Can create new users and assign them the same permission sets. Must be able to access the User, User Property, Permission Set, and Access Control tables.

For example, you can create a SECURITY permission set that includes the four required tables and any additional permissions that you want to include. You can then assign this permission set to a user who is a department administrator. This user can then administer permissions for other users in their department.

Only a user who has the SUPER permission set can create and modify a SECURITY permission set. Users who have this permission set can assign the same permissions to other users, but they cannot assign themselves the SUPER permission set.

BASIC Grants Read access to almost all application tables and all system tables.

The main purpose of this permission set is to enable the client to open and show all pages.

When you create a new database, you must import the BASIC permission set from an XML file.

FOUNDATION A prerequisite for all other permission sets. The FOUNDATION permission set grants access to system tables and application setup tables that are required for most application features to work.

Note

This permission set is recommended when using the UI Elements Removal feature to automatically remove UI elements according to user permissions.