
Tag: SQL
Database Replication – Part V
This post is in continuation to my earlier post. Please check if you missed.
Database Replication – Part II
Database Replication – Part III
Database Replication – Part IV
As committed in this post we will continue to cover practical approach, Next step from last post.
We will create a subscription using SQL Server Management Studio
To create the subscription
- Connect to the Publisher in SQL Server Management Studio, expand the server node, and then expand the Replication folder.
- In the Local Publications folder, right-click the Nav2018ItemTrans publication, and then click New Subscriptions.

The New Subscription Wizard launches.

- On the Publication page, select Nav2018ItemTrans, and then click Next.

- On the Distribution Agent Location page, select Run all agents at the Distributor, and then click Next.

- On the Subscribers page, if the name of the Subscriber instance is not displayed, click Add Subscriber, click Add SQL Server Subscriber, enter the Subscriber instance name in the Connect to Server dialog box, and then click Connect.
- On the Subscribers page, select the instance name of the Subscriber server, and select under Subscription Database.
- On the New Database dialog box/Select from Drop Down List, enter Nav2018ReplDatabase in the Database name box, click OK, and then click Next.

- In the Distribution Agent Security dialog box, click the ellipsis (…) button, enter <Machine_Name>\repl_distribution in the Process account box, enter the password for this account, click OK.

- Click Next.
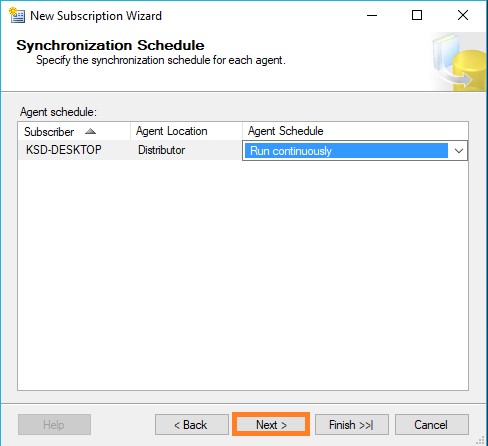
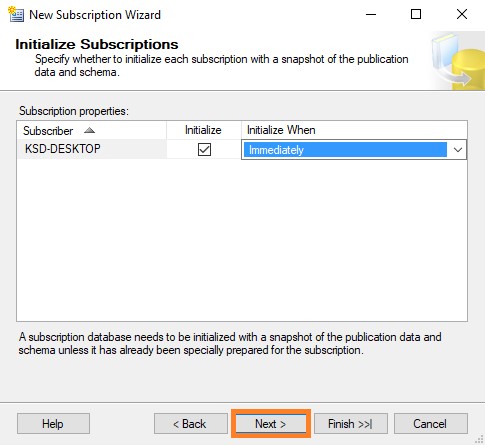
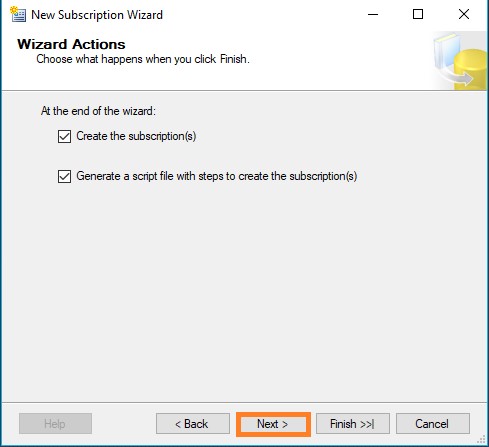
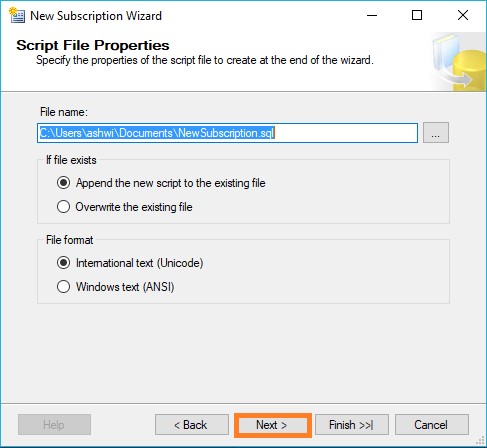
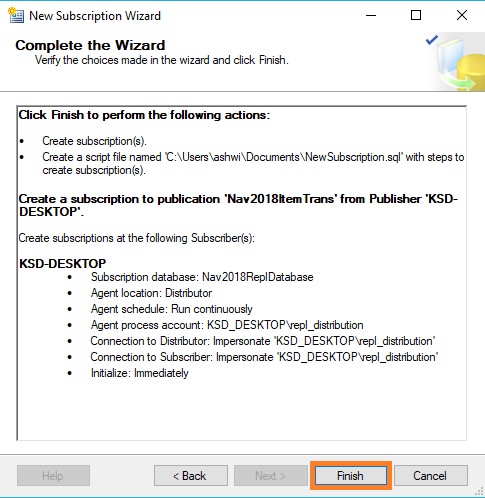
- Click Finish to accept the default values on the remaining pages and complete the wizard.
Setting database permissions at the Subscriber
- Connect to the Subscriber in SQL Server Management Studio, expand Databases, Nav2018ReplDatabase, and Security, right-click Users, and then select New User.
- On the General page, in the User type list, select Windows user.
- Select the User name box and click the ellipsis (…) button, in the Enter the object name to select box type <Machine_Name>\repl_distribution, click Check Names, and then click OK.

- On the Membership page, in Database role membership area, select db_owner, and then click OK to create the user.

When setting up SQL Server replication you might see an error message from the Transactional Replication Log Reader Agent which reads like the following.
Error messages:
- The process could not execute ‘sp_replcmds’ on ”. (Source: MSSQL_REPL, Error number: MSSQL_REPL20011) Get help: http://help/MSSQL_REPL20011
- Cannot execute as the database principal because the principal “dbo” does not exist, this type of principal cannot be impersonated, or you do not have permission. (Source: MSSQLServer, Error number: 15517) Get help: http://help/15517
- The process could not execute ‘sp_replcmds’ on ”. (Source: MSSQL_REPL, Error number: MSSQL_REPL22037) Get help: http://help/MSSQL_REPL22037
Often this error message can come from the database not having a valid owner, or the SQL Server is not being able to correctly identify the owner of the database.
Often this is easiest to fix by changing the database owner by using the sp_changedbowner system stored procedure as shown below. The sa account is a reliable account to use to change the ownership of the database to.
USE PublishedDatabase
GO
EXEC sp_changedbowner ‘sa’
GO
Once the database ownership has been changed the log reader will probably start working right away. If it doesn’t quickly restarting the log reader should resolve the problem.
While this does require changes to the production database, there is no outage required to make these changes.
To view the synchronization status of the subscription
- Connect to the Publisher in SQL Server Management Studio, expand the server node, and then expand the Replication folder.
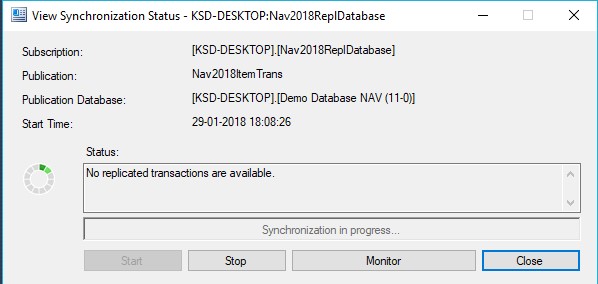
- In the Local Publications folder, expand the Nav2018ItemTrans publication, right-click the subscription in the Nav2018ReplDatabase database, and then click View Synchronization Status.

The current synchronization status of the subscription is displayed.
- If the subscription is not visible under Nav2018ItemTrans, press F5 to refresh the list.
Validating the Subscription and Measuring Latency
We will use tracer tokens to verify that changes are being replicated to the Subscriber and to determine latency, the time it takes for a change made at the Publisher to appear to the Subscriber.
To insert a tracer token and view information on the token
- Connect to the Publisher in SQL Server Management Studio, expand the server node, right-click the Replication folder, and then click Launch Replication Monitor.
- Replication Monitor launches.
- Expand a Publisher group in the left pane, expand the Publisher instance, and then click the Nav2018ItemTrans publication.
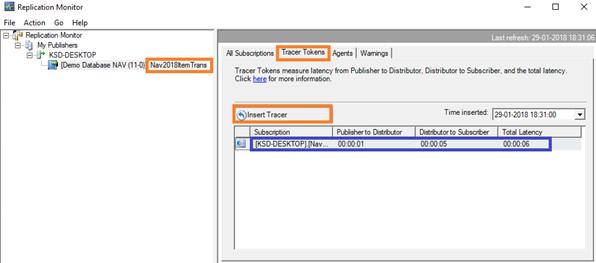
- Click the Tracer Tokens tab.
- Click Insert Tracer.
- View elapsed time for the tracer token in the following columns: Publisher to Distributor, Distributor to Subscriber, Total Latency. A value of Pending indicates that the token has not reached a given point.
This way we are done with Database Replication Setup.
Will come up with more topic soon.
Database Replication – Part III
This post is in continuation to my earlier post. Please check if you missed.
Database Replication – Part II
As committed in this post we will continue to cover practical approach, Next step from last post.
Configuring Distribution
We will configure distribution at the Publisher and set the required permissions on the publication and distribution databases. If you have already configured the Distributor, you must first disable publishing and distribution before you begin this process. Do not do this if you must retain an existing replication topology.
Configuring a Publisher with a remote Distributor is outside the scope of this Post.
If you have connected to SQL Server using localhost rather than the actual server name you will be prompted with a warning that SQL Server is unable to connect to server ‘localhost’. Click OK on the warning dialog. In the Connect to Server dialog change the Server name from localhost to the name of your server. Click Connect.
Configuring distribution at the Publisher
- Connect to the Publisher in SQL Server Management Studio, and then expand the server node.
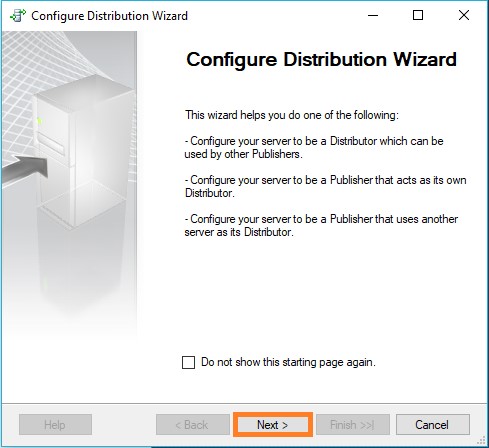
- Right-click the Replication folder and click Configure Distribution.

- The Distribution Configuration Wizard launches.
- On the Distributor page, select ‘ServerName’ will act as its own Distributor; SQL Server will create a distribution database and log, and then click **Next.

- If the SQL Server is not running, on the SQL ServerAgent Start page, select Yes, configure the SQL Server Agent service to start automatically. Click Next.
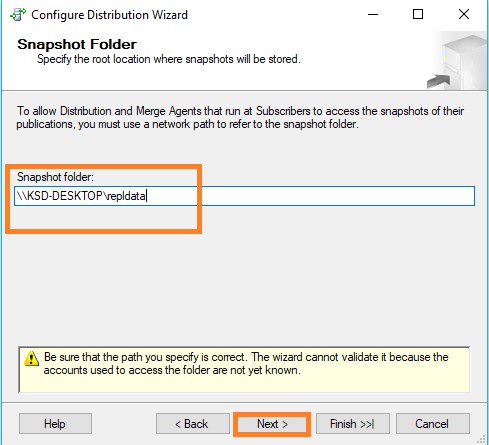
- Enter \\<Machine_Name>\repldata in the Snapshot folder text box, where <Machine_Name> is the name of the Publisher, and then click Next.
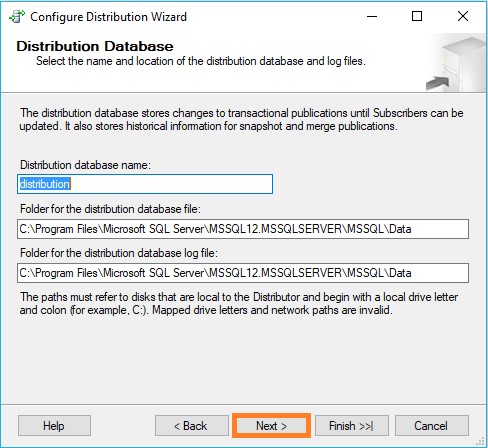
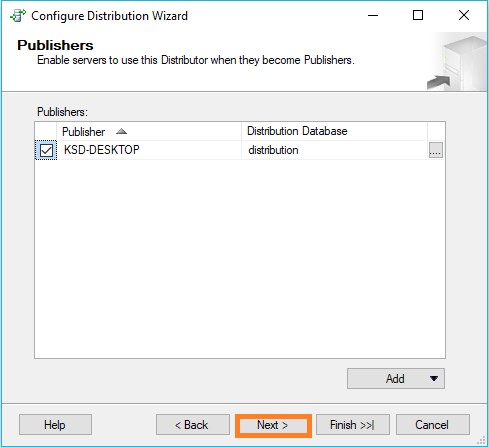
- Accept the default values on the remaining pages of the wizard.
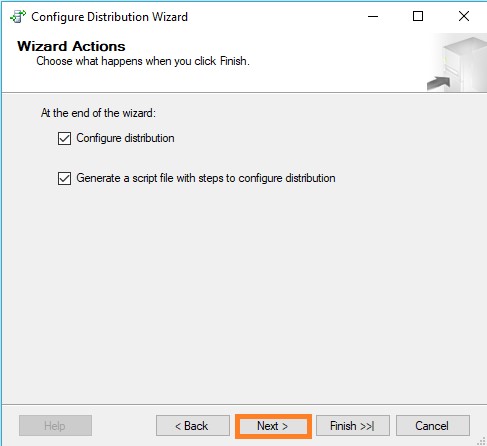
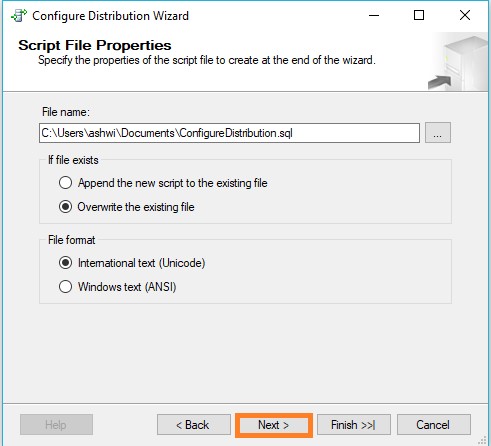
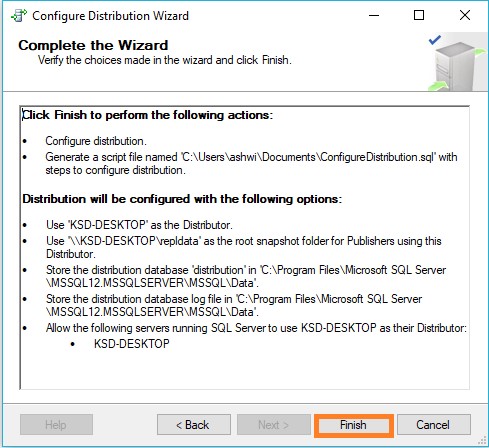
- Click Finish to enable distribution.

Setting database permissions at the Publisher
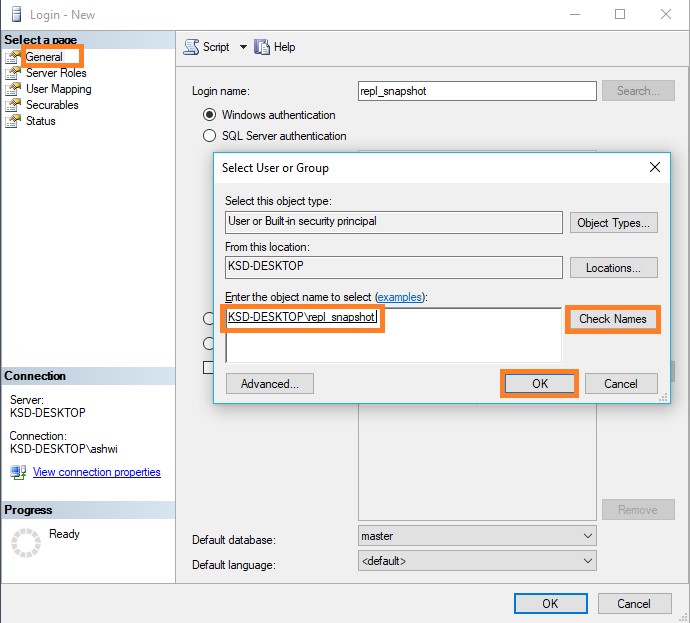
- In SQL Server Management Studio, expand Security, right-click Logins, and then select New Login.

- On the General page, click Search, enter <Machine_Name>\repl_snapshot in the Enter the object name to select box, where <Machine_Name> is the name of the local Publisher server, click Check Names, and then click OK.
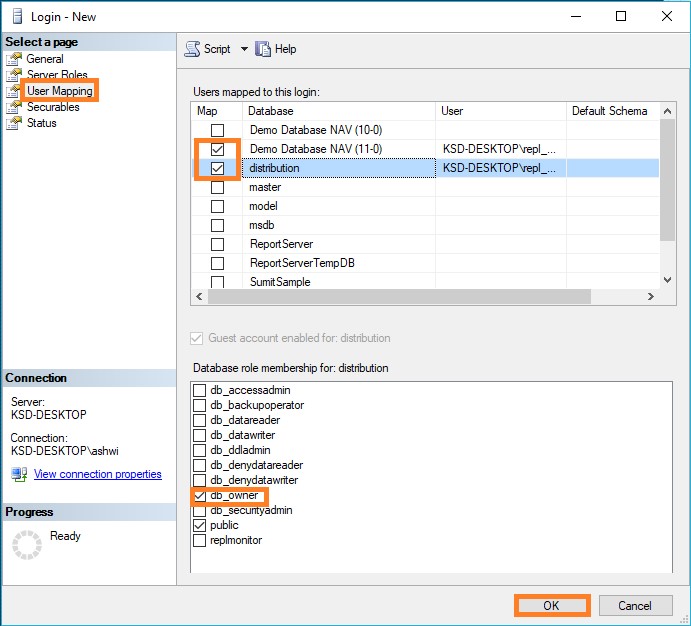
- On the User Mapping page, in the Users mapped to this login list select both the distribution and required database (in my case Nav 2018 database).
- In the Database role membership list select the db_owner role for the login for both databases.
- Click OK to create the login.
- Repeat steps 1-4 to create a login for the local repl_logreader account. This login must also be mapped to users that are members of the db_owner fixed database role in the distribution and required databases.
- Repeat steps 1-4 to create a login for the local repl_distribution account. This login must be mapped to a user that is a member of the db_owner fixed database role in the distribution database.
- Repeat steps 1-4 to create a login for the local repl_merge account. This login must have user mappings in the distribution and required databases.

Here we complete configuring our Distribution at Publisher.
We will see next step in our next post.
Database Replication – Part II
This post is in continuation to my earlier post. Please check if you missed.
As committed in this post we will cover practical approach.
Creating Windows Accounts for Replication
We will create a separate Windows account on the local server for the following agents:
| Agent | Location | Account name |
| Snapshot Agent | Publisher | <machine_name>\repl_snapshot |
| Log Reader Agent | Publisher | <machine_name>\repl_logreader |
| Distribution Agent | Publisher and Subscriber | <machine_name>\repl_distribution |
| Merge Agent | Publisher and Subscriber | <machine_name>\repl_merge |
In my case the Publisher and Distributor share the same instance of SQL Server. The Publisher and Subscriber may share the same instance of SQL Server, but it is not a requirement. If the Publisher and Subscriber share the same instance, the steps that are used to create accounts at the Subscriber are not required.
To create local Windows accounts for replication agents at the Publisher
- At the Publisher, open Computer Management from Administrative Tools in Control Panel.
- In System Tools, expand Local Users and Groups.
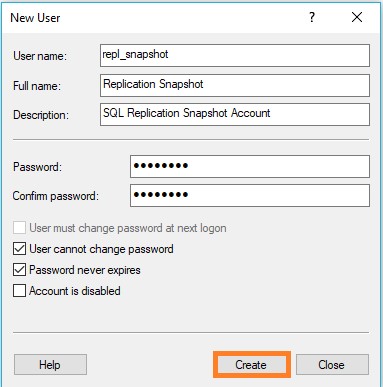
- Right-click Users and then click New User.

- Enter repl_snapshot in the User name box, provide the password and other relevant information, and then click Create to create the repl_snapshot account.
- Repeat the previous step to create the repl_logreader, repl_distribution, and repl_merge accounts.


- Click Close.

To create local Windows accounts for replication agents at the Subscriber
If using different computer, else this step can be skipped.
- At the Subscriber, open Computer Management from Administrative Tools in Control Panel.
- In System Tools, expand Local Users and Groups.
- Right-click Users and then click New User.
- Enter repl_distribution in the User name box, provide the password and other relevant information, and then click Create to create the repl_distribution account.
- Repeat the previous step to create the repl_merge account.
- Click Close.
Preparing the Snapshot Folder
To create a share for the snapshot folder and assign permissions
- In Windows Explorer, navigate to the SQL Server data folder. The default location is C:\Program Files\Microsoft SQL Server\MSSQL.X\MSSQL\Data.
- In my case I am using SQL Replication folder on C: drive
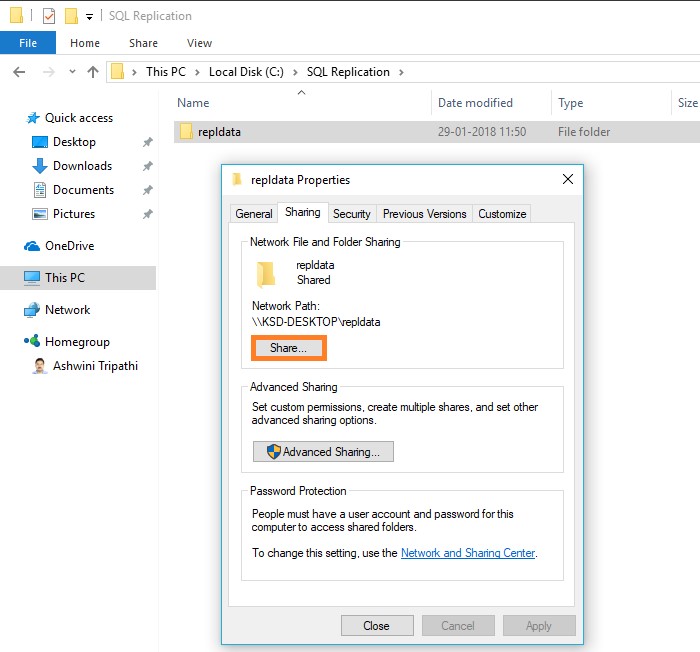
- Create a new folder named repldata.
- Right-click this folder and click Properties.
- On the Sharing tab in the repldata Properties dialog box, click Share.
- In the File Sharing dialog box, click Share, and then click Done.
- On the Security tab, click Edit.
- In the Permissions dialog box, click Add. In the Select User, Computers, Service Account, or Groups text box, type the name of the Snapshot Agent account created in previous step above, as <Machine_Name>\repl_snapshot, where <Machine_Name> is the name of the Publisher. Click Check Names, and then click OK.

- Repeat the previous step to add permissions for the Distribution Agent, as <Machine_Name>\repl_distribution, and for the Merge Agent as <Machine_Name>\repl_merge.
- Verify the following permissions are allowed:
repl_snapshot – Full Control
repl_distribution – Read
repl_merge – Read

- Click OK to close the repldata Properties dialog box and create the repldata share.
Today we have covered initial setup required to start with SQL Database Replication.
We will continue with next step in our next post.
SQL Server Database Backup using PowerShell
In this post we will see how we can take backup of databases from SQL Server using PowerShell and schedule it as a daily run Plan.
Step-1 : We will create Powershell Script to take backup of Databases in SQL Server.

Here is the full Script for your ready refrence.
param( $serverName, $backupDirectory )
[System.Reflection.Assembly]::LoadWithPartialName(“Microsoft.SqlServer.SMO”) | Out-Null
[System.Reflection.Assembly]::LoadWithPartialName(“Microsoft.SqlServer.SmoExtended”) | Out-Null
[System.Reflection.Assembly]::LoadWithPartialName(“Microsoft.SqlServer.ConnectionInfo”) | Out-Null
[System.Reflection.Assembly]::LoadWithPartialName(“Microsoft.SqlServer.SmoEnum”) | Out-Null
$server = New-Object (“Microsoft.SqlServer.Management.Smo.Server”) $serverName
$dbs = $server.Databases
foreach ($database in $dbs | where { $_.IsSystemObject -eq $False })
{
$dbName = $database.Name
$timestamp = Get-Date -format yyyy-MM-dd-HHmmss
$targetPath = $backupDirectory + “\” + $dbName + “_” + $timestamp + “.bak”
$smoBackup = New-Object (“Microsoft.SqlServer.Management.Smo.Backup”)
$smoBackup.Action = “Database”
$smoBackup.BackupSetDescription = “Full Backup of “ + $dbName
$smoBackup.BackupSetName = $dbName + ” Backup”
$smoBackup.Database = $dbName
$smoBackup.MediaDescription = “Disk”
$smoBackup.Devices.AddDevice($targetPath, “File”)
$smoBackup.SqlBackup($server)
“backed up $dbName ($serverName) to $targetPath“
}
Save this Script file as ps1 extension.
You can create the script using even notepad.
Step 2: We will Create Batch file to call PowerShell scrip and to be used in Windows scheduler.

Save as .BAT file. Here is the batch script for ready refrence:
powershell -ExecutionPolicy RemoteSigned
-File “C:\User Data\SQL Backup\Tools\SQLServerBackupAllDatabase.ps1”
-serverName “INDEL-AXT5283NB”
-backupDirectory “C:\User Data\SQL Backup”
>> “C:\User Data\SQL Backup\LOG\\%date%.log”
Step 3 : Create a Windows Scheduler
Open Windows Task Scheduler.
Create New Task as shown below :

Enter Name & Description on General Tab as shown below:

On Trigger Tab create New Trigger and enter details as shown below :

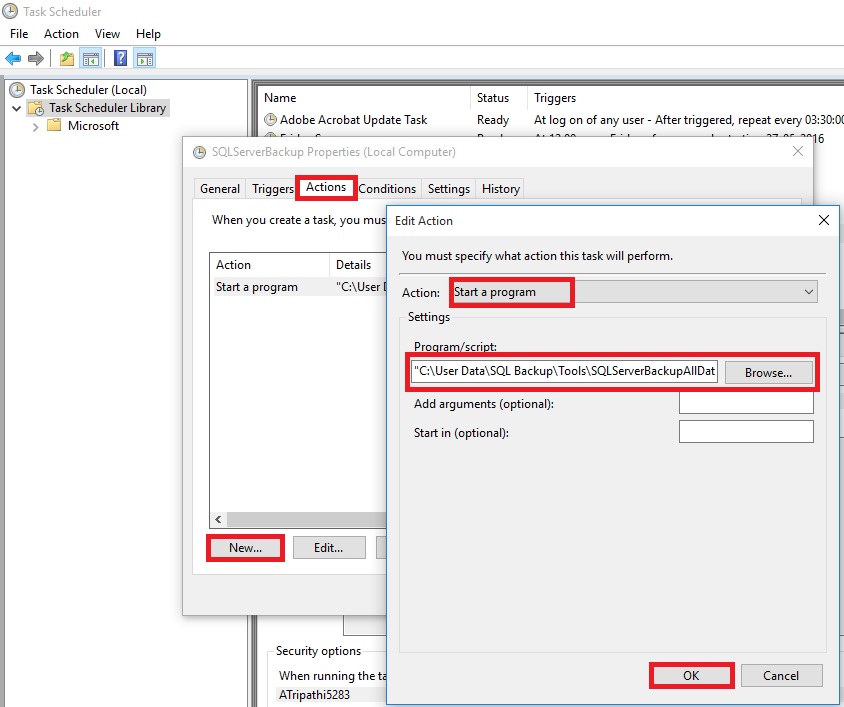
On Action Tab Create Action and enter information as shown below : Here Select the batch file created in Step 2.
In Settings Tab do the setting as shown Below :

Click on OK to Save the Task and return to Task Scheduler Window.
Here you can see the newly created Task.

When Task is executed you will find the backup of databases at defined path in the script.

You can also find Log file at the path defined in batch.

Thats all for this post, will come up will more information in my up comming posts.
Schedule SQL Job for SQL Database Backup
Today we will see how we can schedule to take daily backup of our database.
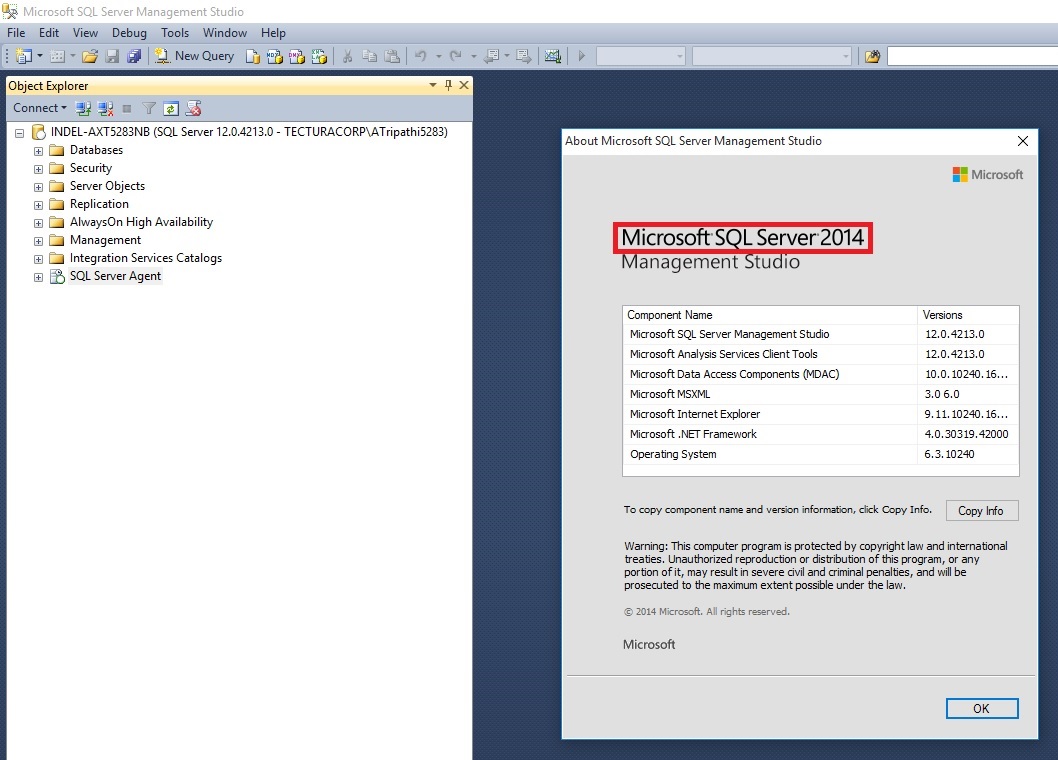
Before i start explaining the step i am confirming the version of SQL based on which i am writing this post.
Process will remain same may be screen bit different in different versions of SQL.
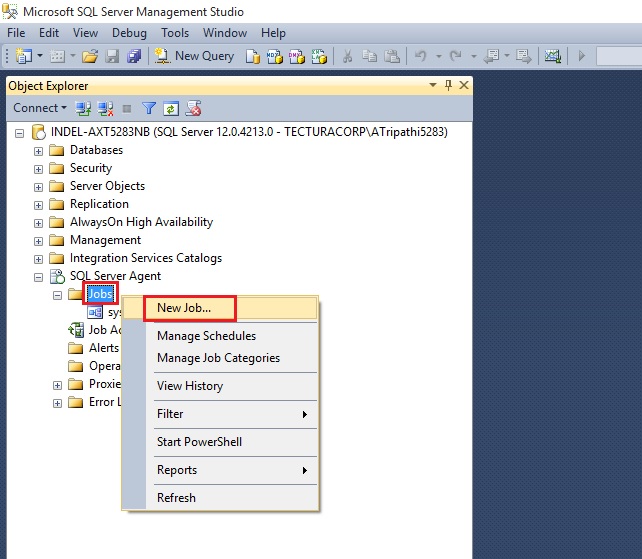
At first we will ensure that SQL Server Agent is running, in case it is not right click and Start it.

Expand the SQL Server Agent Folder, Select Jobs, Right click and select New Job.
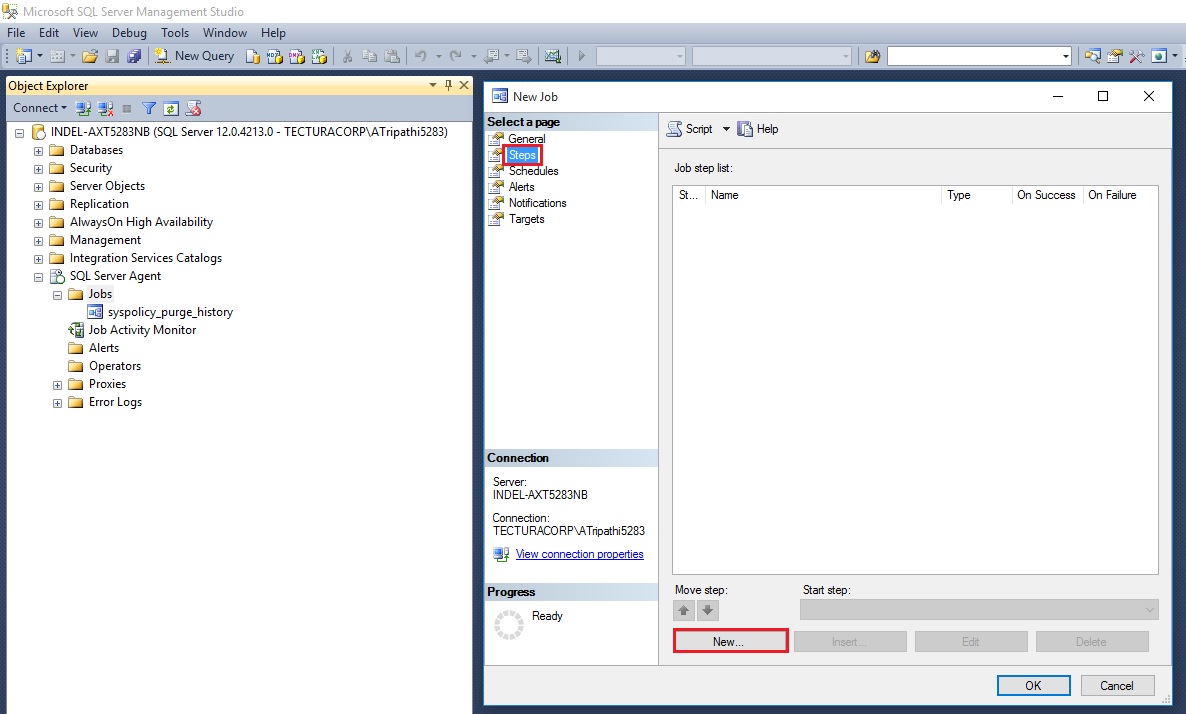
Provide Name & Description to your New Job.

Select Page Steps & New from Bottom of the page to define Step for your Job.
Give name to the Step.
Select Type as Transact Script (T-SQL).
Select Database Name in my case i am selecting Demo Database NAV (9-0)
Write the Script as shown below:

Here is the Script for your ready reference:
{– Script Start
SET QUOTED_IDENTIFIER off
select getdate() “Start Time”
set nocount on
declare @dbname varchar(36),@cmd varchar(255)declare dbname_cursor cursor
for select name from master..sysdatabases where name = ‘Demo Database NAV (9-0)’
order by nameopen dbname_cursor
fetch dbname_cursor into @dbnamewhile @@fetch_status = 0
begin
DECLARE @DATE VARCHAR(36)
SELECT @DATE = (select CONVERT(char(8),DATEADD(dd,-30,GETDATE()),112))
if DATABASEPROPERTYEX(@dbname,’Status’) = ‘ONLINE’
begin
select @cmd =’backup database [‘+@dbname+’] to DISK=”C:\User Data\SQL Backup\’+@dbname+’.bak” with init’;
print @cmd
execute (@cmd)
end
fetch dbname_cursor into @dbname
endclose dbname_cursor
deallocate dbname_cursor
select GETDATE() “End Time”
–Script End}
Although above script is for multipurpose like if you want to backup all database on your SQL Server, you can make small tweaking and you are done.
If you would like to backup all the databases on a particular SQL Server, then make the following changes to the code above.
Replace following line of code:
for select name from master..sysdatabases where name = ‘Demo Database NAV (9-0)’
with the following line of code:
for select name from master..sysdatabases where name != ‘tempdb’
This will create a backup file for each database on the server, except for the temp database.
Next : Switch to Advanced Page.
Define other parameters as shown in below screen as per your requirement.

On Selecting OK, you will return to Job window.

Select Schedule Page:
Define your Schedule as per your requirement.

Select OK to return to Job Page.

Select OK to close and save the JOB.
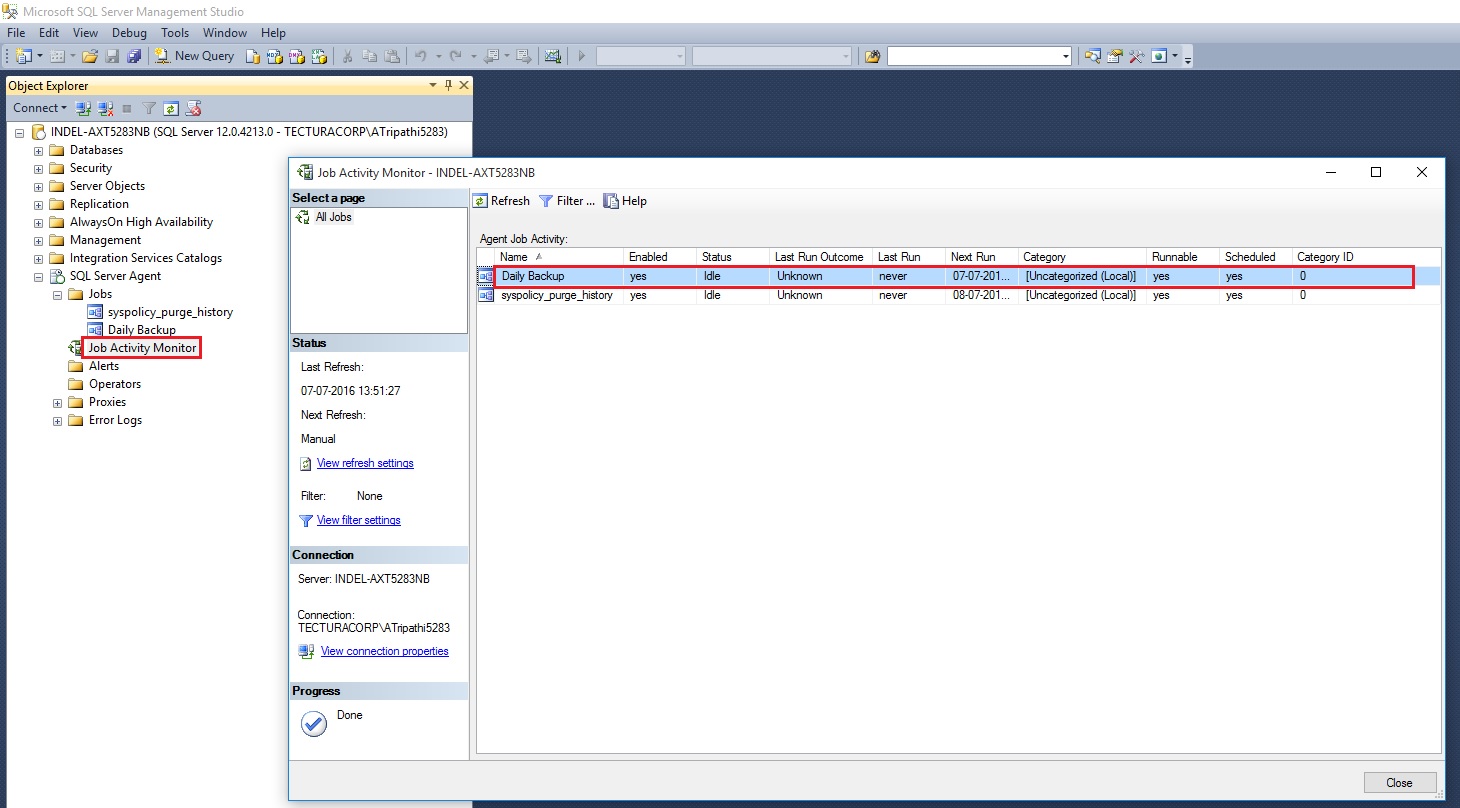
Now our Job is created and scheduled.
You can see defined Jobs and its Status using Job Activity Monitor.
Before Job is executed
After executed you can see the Status as.

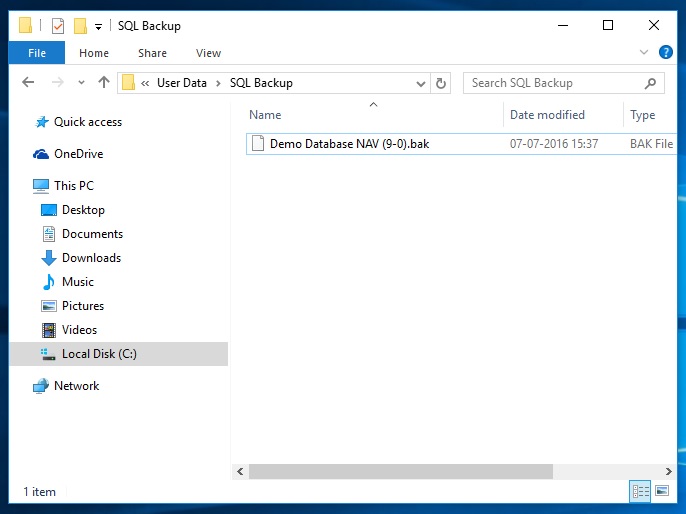
Post execution of Job here is the backup file created at defined path in the Script. Above script will overwrite the file on next execution.
If you want to create new file on every execution you need to modify the script for file name by adding timestamp or any other logic you desire.
I will come up with more information in my upcomming posts.
thats all for this post.
Customers with Enterprise Agreement who already have SQL Server Licenses, can use them on Azure Virtual Machines
Now Microsoft Enterprise Agreement customers can bring existing licenses to run SQL Server on Azure Virtual Machines. Since the launch of Azure Virtual Machines, customers can already run SQL Server on Azure Virtual Machines through several existing SQL Server images available in the Azure Gallery, or bring their own images to Azure.
These images and capabilities will continue to be supported so customers can continue to take advantage of pay per use licensing for SQL Server on Azure Virtual Machines.
Starting this week, customers with Enterprise Agreement who already have SQL Server Licenses, can use them on Azure Virtual Machines with Microsoft-certified (BYOL) gallery images. These images will not charge for SQL Server licensing, just for compute cost.
For more details see the Link.
Configuring SQL Server Authentication in Microsoft Dynamics NAV 2016 – Part-3
To configure SQL Authentication on Microsoft NAV Server Instance using Microsoft Dynamics NAV 2016 Administration Shell
- If you are modifying an existing Microsoft Dynamics NAV Server instance, run the Set-NAVServerConfiguration cmdlet.
Syntax & Parameter explaination:
Set-NAVServerConfiguration (cmdlet)
-KeyName <String>
(The configuration key name. Examine the CustomSettings.config file to determine the correct key name.)
[-Element <String> ]
(Specifies the navigation path from the root element to the appSettings section of the configuration document.)
[-ServerInstance] <String>
(Specifies the name of a Microsoft Dynamics NAV Server instance. The default instance name is DynamicsNAV90. You can specify either the full name of an instance such as MicrosoftDynamicsNavServer$myinstance or the short name such as myinstance.)
-DatabaseCredentials <PSCredential>
(The user name and password of the login account that the Microsoft Dynamics NAV Server instance will use to connect to the Microsoft Dynamics NAV database in SQL Server. This parameter configures the Microsoft Dynamics NAV Server instance to use SQL Server Authentication instead of Windows Authentication on the connection to the database. The login account must be a member of the db_owner role on the database.)
[-Force] (Forces the command to run without asking for user confirmation.)
[-KeyValue <String> ] (The configuration key value.)
[-Confirm] (Prompts you for confirmation before running the cmdlet.)
[-WhatIf] [ <CommonParameters>]
Use the DatabaseCredentials parameter to provide the login credentials of the database user that you want to use to access the application database.
Example:
C:\PS>Set-NAVServerConfiguration MyInstance -KeyName DatabaseServer -KeyValue DatabaseServer.Domain.Com
- If you are creating a new Microsoft Dynamics NAV Server instance, run the New-NAVServerInstance cmdlet.
Syntax & Parameter explaination:
New-NAVServerInstance
[-ServerInstance] <String>
(Specifies the name of the Microsoft Dynamics NAV Server instance. The default instance name isDynamicsNAV90. You can specify either the full name of an instance, such as MicrosoftDynamicsNavServer$DynamicsNAV90, or the short name, such as DynamicsNAV90. You must use single-quotes around the instance name.)
-ManagementServicesPort <ServicePort>
(Specifies the TCP port that is used to manage the Microsoft Dynamics NAV Server instance. The Management Services port has no exceptions in the firewall, and will only be accessed from the local computer. The port is used by Windows PowerShell for access Microsoft Dynamics NAV Server management data.)
[-ClientServicesCredentialType <String> ]
(The type of client credential used for client authentication.Possible values are: Windows, Username, NavUserPassword and AccessControlService.)
[-ClientServicesPort <ServicePort> ]
(Specifies the listening TCP port for clients such as Microsoft Dynamics NAV Windows client and Microsoft Dynamics NAV Web client.)
[-DatabaseCredentials <PSCredential> ]
(The user name and password of the login account that the Microsoft Dynamics NAV Server instance will use to connect to the Microsoft Dynamics NAV database in SQL Server. This parameter configures the Microsoft Dynamics NAV Server instance to use SQL Server Authentication instead of Windows Authentication on the connection to the database. If the Microsoft Dynamics NAV Server instance is configured for multitenancy, then parameter configure SQL Authentication on the connection to the application database, not the tenant database. The login account must be a member of the db_owner role on the database.)
[-DatabaseInstance <DatabaseInstance> ]
(Specifies the SQL Server instance on which the Microsoft Dynamics NAV database is installed.)
[-DatabaseName <DatabaseName> ]
(Specifies the name of the Microsoft Dynamics NAV database.)
[-DatabaseServer <DatabaseServer> ]
(Specifies the name of the computer on which the SQL Server instance for the Microsoft Dynamics NAV database is installed.)
[-Force] (Forces the command to run without asking for user confirmation.)
[-Multitenant]
(Specifies the Microsoft Dynamics NAV Server instance to be a multitenant instance.)
[-ODataServicesPort <ServicePort> ]
(Specifies the listening HTTP port for Microsoft Dynamics NAV OData web services.)
[-ServiceAccount <ServiceAccount> ]
(Specifies the Windows-based computer account that the Microsoft Dynamics NAV Server instance must use to log on. The default value is NT AUTHORITY\NETWORK SERVICE. Only NetworkService and User values are supported. This parameter accepts values from the enum System.ServiceProcess.ServiceAccount.)
[-ServiceAccountCredential <PSCredential> ]
(Specifies a set of security credentials that you must use when configuring the service account.)
[-ServicesCertificateThumbprint <ClientServicesCertificateThumbprint> ]
(Specifies the certificate thumbprint for the x509 certificate that is going to be used for securing communication with the server. The certificate must be stored in the local machine store and in the personal sub-store in the certificate store. The private key of the certificate must be present and exchangeable. The certificate must be in .pfx format, not .cer format. The certificate can be either self-signed or issued by a trusted certification authority (CA).
When specifying a ServicesCertificateThumbprint, SOAP web services and OData web services become HTTPS.)
[-SOAPServicesPort <ServicePort> ]
(Specifies the listening HTTP port for Microsoft Dynamics NAV SOAP web services.)
[-Confirm] (Prompts you for confirmation before running the cmdlet.)
[-WhatIf] [ <CommonParameters>]
Use the DatabaseCredentials parameter to provide the login credentials of the database user that you want to use to access the application database.
Examples:
C:\PS>New-NAVServerInstance NewInstance -ManagementServicesPort 8099 -ClientServicesPort 8100 -SOAPServicesPort 8101 -ODataServicesPort 8102 –verbose
C:\PS>Get-Credential | New-NAVServerInstance NewInstance -ServiceAccount User -ManagementServicesPort 8099 -ClientServicesPort 8100 -SOAPServicesPort 8101 -ODataServicesPort 8102 –verbose
For Multitenant Environment
- Configure SQL Server Authentication with the application database as above.
- To configure SQL Authentication with the tenant database, run the Mount-NAVTenant
Syntax & Parameter explaination:
Mount-NAVTenant
[-AlternateId] <System.Collections.ObjectModel.ReadOnlyCollection[string]>
(Specifies the alternative IDs for the tenant, such as host names for the Microsoft Dynamics NAV Web client, SOAP web services, OData web services, or the Microsoft Dynamics NAV Windows client.
If you use alternative IDs for tenant resolution in the Microsoft Dynamics NAV Web client, you must also enable some of the UrlRewrite rules in the Web.Config file for the Microsoft Dynamics NAV Web Server components.)
[-AzureKeyVaultSettings] <Microsoft.Dynamics.Nav.Types.AzureKeyVaultSettings>
(Specifies the Azure key vault settings. This parameter is available only if the EncryptionProvider is set to AzureKeyVault.)
[-ServerInstance] <String>
(Specifies the Microsoft Dynamics NAV Server instance that you want to mount the tenant against, such as DynamicsNAV90. You can specify either the fully qualified name, such as ‘MyServer$DynamicsNAV90’, or the short name, such as ‘DynamicsNAV90’.)
[-DatabaseInstance] <System.String>
(Specifies the name of the SQL Server instance that hosts the database. You can also specify the instance in the DatabaseServer parameter, such as MyServer\MyInstance.)
[-DatabaseName] <System.String>
(Specifies the name of the Microsoft Dynamics NAV database that you want to mount against the Microsoft Dynamics NAV Server instance, such as ‘Demo Database NAV (9-0)’.)
[-DatabaseServer] <System.String>
(Specifies the name of the database server that hosts the Microsoft Dynamics NAV database that you want to mount against the Microsoft Dynamics NAV Server instance.)
[-DefaultCompany] <System.String>
(Specifies the name of the company that NAS services, OData web services, and SOAP web services use if no other company is specified.)
[-DefaultTimeZone] <System.TimeZoneInfo>
(Specifies the default time zone that is used by the NAS services, OData web services, and SOAP web services for this tenant.
You can set the parameter to UTC, ‘Server Time Zone’, or the ID of a Windows Time Zone.
UTC specifies that all business logic for services on the server instance runs in Coordinated Universal Time (UTC).
‘Server Time Zone’ specifies that services use the time zone of the computer that is running Microsoft Dynamics NAV Server instance.
ID of a Windows Time Zone specifies that services use a Windows time zone as defined in the system registry under HKEY_LOCAL_MACHINE\SOFTWARE\Microsoft\Windows NT\CurrentVersion\Time Zones. For example, Romance Standard Time is a valid Windows time zone value.
If this parameter is not specified, the value is taken from the ServicesDefaultTimeZone setting in the CustomSetting.config file for the Microsoft Dynamics NAV Server instance.)
[-NasServicesEnabled]
(Specifies to enable NAS services on the tenant. The default value is false.)
[-RunNasWithAdminRights]
(Specifies the NAS services to run with administrator rights. This grants the NAS service the same permissions as the SUPER permission set in Microsoft Dynamics NAV without having to add the Microsoft Dynamics NAV Server service account as a user. The default is false.)
[[-ApplicationDatabaseCredentials] <PSCredential> ]
(Specifies the user name and password of the login account that the Microsoft Dynamics NAV Server instance will use to access the application database in SQL Server. This parameter configures the Microsoft Dynamics NAV Server instance to use SQL Server Authentication instead of Windows Authentication on the connection to the application database.
The login account must be a member of the db_owner role on the database.
This parameter is only relevant when you set with the ApplicationDatabaseServer and ApplicationDatabaseName parameters )
[[-ApplicationDatabaseName] <System.String> ]
(Specifies the name of the application database to use with the tenant database.
This parameter is only relevant if the Microsoft Dynamics NAV Server instance is configured for multitenancy. This parameter, together with the ApplicationDatabaseServer parameter, enables you to mount a tenant to the same Microsoft Dynamics NAV Server instance as the application database without having to connect a running Microsoft Dynamics NAV Server instance.)
[[-ApplicationDatabaseServer] <System.String> ]
(Specifies the SQL Server name and instance, such as MyServer\MyInstance, that hosts the application database that you want to use with the tenant database,.
This parameter, together with the ApplicationDatabaseName parameter, enables you to mount a tenant to the same Microsoft Dynamics NAV Server instance as the application database without having to connect to a running Microsoft Dynamics NAV Server instance.)
[-AllowAppDatabaseWrite]
(Specifies if the tenant can write to the application database. The default value is false.)
[-DatabaseCredentials <PSCredential> ]
(Specifies the user name and password of the login account that the Microsoft Dynamics NAV Server instance will use to access the tenant database in SQL Server. This parameter configures the Microsoft Dynamics NAV Server instance to use SQL Server Authentication instead of Windows Authentication on the connection to the database.
The login account must be a member of the db_owner role on the database.)
[-EncryptionProvider <Microsoft.Dynamics.Nav.Types.EncryptionProvider> ]
(Specifies the name of the encryption provider.)
[-Force] (Forces the command to run without asking for user confirmation.)
[-OverwriteTenantIdInDatabase]
(Specifies if the Mount-NAVTenant cmdlet must overwrite the tenant ID in the database if the database has been mounted as a tenant earlier. If this is false, and the tenant database has previously been mounted with a different tenant ID, an exception is thrown.)
[-Confirm] (Prompts you for confirmation before running the cmdlet.)
[-WhatIf] [ <CommonParameters>]
Use the DatabaseCredentials parameter to provide the login credentials of the database user that you want to use to access the tenant database.
Examples:
PS C:\> Mount-NAVTenant DynamicsNAV90 -Id ‘Test’ -DatabaseName ‘Test_Database’
PS C:\> Mount-NAVTenant DynamicsNAV90 Test Test_Database
PS C:\> Mount-NAVTenant DynamicsNAV90 -Id ‘Test’ -DatabaseName ‘Test_Database’ -DatabaseCredentials (Get-Credential)
PS C:\> Get-NAVTenant Server1 | Mount-NAVTenant Server2
PS C:\> Get-NAVTenant Server1 | Dismount-NavTenant Server1 -Force | Mount-NAVTenant Server2
PS C:\> Mount-NAVTenant DynamicsNAV90 -Id ‘Test’ -DatabaseName ‘Test_Database’-AlternateId @( “test.mydomain.com”, “http://mydomain.sharepoint.com/sites/teamsite” )
PS C:\> Mount-NAVTenant -Id ‘Test’ -DatabaseName ‘Test_Database’ -DatabaseCredentials (Get-Credential) -ApplicationDatabaseServer ‘MySQLServer\NAV’ -ApplicationDatabaseName ‘MyNavAppDatabase’ -ApplicationDatabaseCredentials (Get-Credential) -KeyFilePath ‘C:\key\nav.key’ -KeyFilePassword (Get-Credential).Password
Configuring SQL Server Authentication in Microsoft Dynamics NAV 2016 – Part-2
Recall from my previous post Configuring SQL Server Authentication in Microsoft Dynamics NAV 2016 – Part-1, action is almost similar with few small differences when dealing with Multitenant Deployment.
Configure SQL Server Authentication on Microsoft NAV Server Instance in a Multitenant Deployment
How to configure a Microsoft Dynamics NAV database to use SQL Server Authentication with a Microsoft Dynamics NAV Server instance.
To configure a SQL Server Authentication on a Microsoft Dynamics NAV Server instance, you set up the server instance with the login credentials (user name and password) for the user accounts for the application and tenant databases in SQL Server.
To configure SQL Authentication on Microsoft NAV Server Instance using Microsoft Dynamics NAV Server Administration tool
- Open the Microsoft Dynamics NAV Server Administration tool.
- In the console tree, which is the left pane, expand the node for the computer that contains the Microsoft Dynamics NAV Server instance, and then select the Microsoft Dynamics NAV Server instance.
- Configure SQL Server Authentication with the application database as follows:
- In the Actions pane, choose Database Credentials.
- On the Database Credentials page, choose the Edit button.
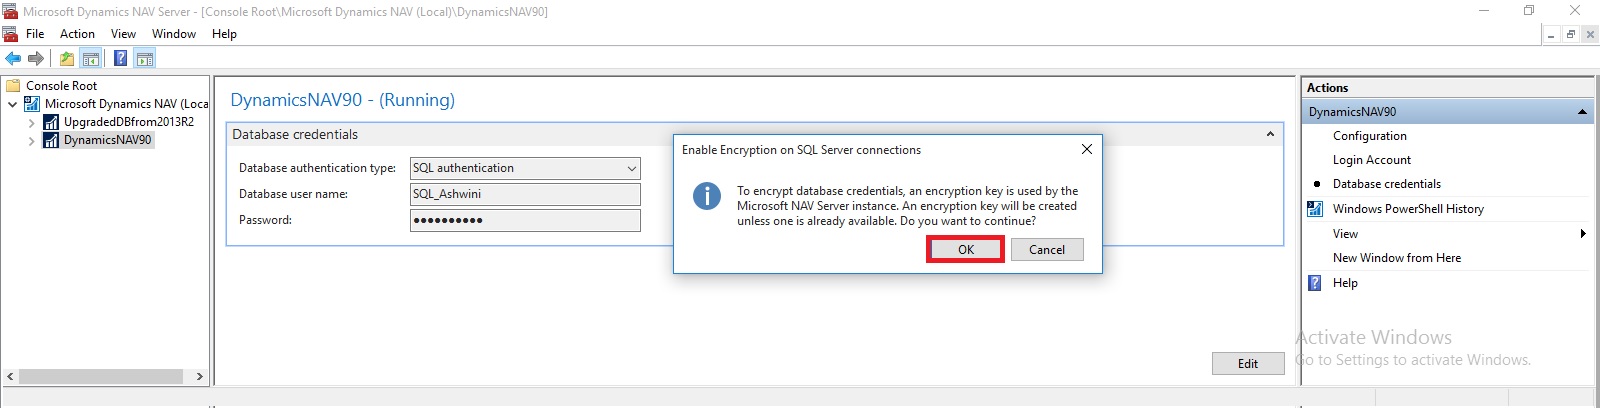
- Set the Database Authentication Mode to SQL Server Authentication.
- In the Database User Name field, type the login name for the database user that you want to use to access the Microsoft Dynamics NAV application database in SQL Server.
- In the Password field, type the login password for the database user that you want to use to access the Microsoft Dynamics NAV database in SQL Server.
- Choose the Save button, and then on the Enable Encryption on SQL Server Connections dialog box, choose the OK button.
Encryption keys are used to help secure the login credentials over the connection between the Microsoft Dynamics NAV Server instance and the Microsoft Dynamics NAV database in SQL Server.
- On the Information dialog box about encryption, choose the OK button.
This dialog box is to inform you to enable encryption on SQL Server connections, which is disabled by default.
- If you want to enable encryption on SQL Server connections, in the Action pane, choose Configuration, and then choose the Edit button. In the Database tab, select Enable Encryption on SQL Connections, choose the Save button, and then the OK button.
- To configure SQL Server Authentication with the tenant database, mount the tenant to the Microsoft Dynamics NAV Server instance and specify the login credentials (user name and password) for the database user that you want to use to access the Microsoft Dynamics NAV tenant database in SQL Server.
If the tenant is already mounted to the Microsoft Dynamics NAV Server instance, you must dismount the tenant, and mount it again.
Restart the server instance.
Configuring SQL Server Authentication in Microsoft Dynamics NAV 2016 – Part-1
Microsoft Dynamics NAV 2016 supports SQL Server authentication between the Microsoft Dynamics NAV Server instance and the Microsoft Dynamics NAV database in SQL Server. Previously only Windows authentication was supported.
Set Up an Encryption Key
When using SQL Server authentication, Microsoft Dynamics NAV requires an encryption key to encrypt the credentials (user name and password) that the Microsoft Dynamics NAV Server instance uses to connect to the Microsoft Dynamics NAV database in SQL Server.
The encryption key must be installed on the computer where the Microsoft Dynamics NAV Server is installed and also in the database in SQL Server.
In a multitenant deployment, the encryption key must be installed in the application database.
To set up an encryption key, you can use one of the following methods:
- You can create and import your own encryption key by using Microsoft Dynamics NAV 2016 Administration Shell cmdlets.
- If you are configuring SQL Server authentication on a Microsoft Dynamics NAV Server instance for the first time, you can use the Microsoft Dynamics NAV Server Administration tool which can automatically create and install a system encryption key. If you decide to use this method, no action is required.
To create and import encryption key
- In the Microsoft Dynamics NAV 2016 Administration Shell, run the New-NAVEncryptionkey
Create an encryption key and stores it in a file in a specified path on the computer or network.
Syntax
New-NAVEncryptionKey [-KeyPath] <String> [-Force] [-Password <SecureString> ] [-Confirm] [-WhatIf] [ <CommonParameters>]
The New-NAVEncryptionKey cmdlet enables you to specify a destination file for the key and specify a password to protect the file.
This creates a file that contains an encryption key. If you already have an encryption key file, you can skip this step.
Example: New-NAVEncryptionKey -KeyPath “C:\UserData\SQLKey\MySQLKey” -Password (Get-Credential).Password

- Run the Import-NAVEncryptionkey cmdlet to install the encryption key on the Microsoft Dynamics NAV Server instance and database.
Imports an encryption key from a file to a Microsoft Dynamics NAV Server instance and database in SQL Server.
Syntax
Import-NAVEncryptionKey [[-ServerInstance] <String> ] [-KeyPath] <String> -ApplicationDatabaseName <String> -ApplicationDatabaseServer <String> [-ApplicationDatabaseCredentials <PSCredential> ] [-Force] [-Password <SecureString> ] [-Confirm] [-WhatIf] [ <CommonParameters>]
Example: Import-NAVEncryptionKey -ServerInstance ‘DynamicsNAV90’ -KeyPath “C:\UserData\SQLKey\MySQLKey.key” -ApplicationDatabaseServer ‘INDEL-AXT5283VM’ -ApplicationDatabaseName ‘Demo Database NAV (9-0)’ -Password (Get-Credential).Password

You cannot import an encryption key on the Microsoft Dynamics NAV Server instance if an encryption key file already exists. You must first delete the encryption key from the computer where Microsoft Dynamics NAV Server is installed.
By default, encryption keys are stored in the C:\ProgramData\Microsoft\Microsoft Dynamics NAV\90\Server\Keys folder.
Configure SQL Authentication on the Database
This section describes how to configure a Microsoft Dynamics NAV database to use SQL Server Authentication with a Microsoft Dynamics NAV Server instance. You can complete the steps in this procedure by using SQL Server Management Studio or Transact-SQL.
Important : In a deployment where the Microsoft Dynamics NAV Server instance is configured as a multitenant server instance, you must complete the following procedure on the application database and tenant database.
To configure SQL Server Authentication on the database in SQL Server
- Configure the SQL Server instance (Database Engine) that hosts the Microsoft Dynamics NAV database to use SQL Server Authentication.
To use SQL Server authentication, you configure the database instance to mixed authentication mode (SQL Server and Windows Authentication).
In the SQL Server instance, create a login that uses SQL Server authentication.

- Map the login to a user in the Microsoft Dynamics NAV database, and add the user to the db_owner role of the Microsoft Dynamics NAV database.

Configure SQL Server Authentication on Microsoft NAV Server Instance (Non-Multitenant)
You configure the Microsoft Dynamics NAV Server instance with the login credentials (user name and password) of the user account in the Microsoft Dynamics NAV database in SQL Server that you want to use for authentication. You can do this using the Microsoft Dynamics NAV Server Administration tool or Microsoft Dynamics NAV 2016 Administration Shell.
To configure SQL Authentication on Microsoft NAV Server Instance using Microsoft Dynamics NAV Server Administration tool
- Open the Microsoft Dynamics NAV Server Administration tool.
- In the Actions pane, choose Database Credentials.
- Set the Database Authentication Type to SQL Authentication.
- In the Database User Name field, type the login name for the database user that you want to use to access the Microsoft Dynamics NAV database in SQL Server.
In the Password field, type the login password for the database user that you want to use to access the Microsoft Dynamics NAV database in SQL Server.

- Choose the Save button, and then on the Enable Encryption on SQL Server Connections dialog box, choose the OK button.
Encryption keys are used to help secure the login credentials over the connection between the Microsoft Dynamics NAV Server instance and the Microsoft Dynamics NAV database in SQL Server.
- On the Information dialog box about encryption, choose the OK button.
This dialog box is to inform you to enable encryption on SQL Server connections, which is disabled by default.

- If you want to enable encryption on SQL Server connections, in the Action pane, choose Configuration, and then choose the Edit button. In the Database tab, select Enable Encryption on SQL Connections, choose the Save button, and then the OK button.

- Restart the server instance.
Checkout my upcoming posts for more details on this.

You must be logged in to post a comment.