Cues, Data, Development Tips, Dynamics 365, Email, Extension Package, Functional Tips, How To, Information, Inventory, Job, Machine, Maderia, Multitenancy, NAV 2017, Office 365, Office Integration, Readiness Library, Server, Tip & Tricks

New Changes or features for Application Users in Microsoft Dynamics NAV 2017

Although it is too early to discuss on features and capabilities which we are going to get in our new release, we should wait for exact information post release of same.

Here are few extracts from available documents pre-release of the product.

You will find most of the features similar to which we have discussed in our earlier posts for Madeira Preview Project.


Incoming documents

New modification to the list of incoming documents. Now it will have filtered view, a new field Processed is added, and now by default filter is applied to show only unprocessed incoming documents in the list.

However you can choose to still view all incoming documents in the list using the show Show All action.

When documents are posted, the processed flag is set to Yes, such that incoming documents that have been processed into posted documents are filtered out.

Capability is added to manually switch the Processed flag.

Now OCR supports for document extracting line details, when we send PDF or image files on incoming documents to Lexmark ICS, the 3rd-party provider of OCR services.

You can now create purchase invoices with multi-line details.

Now you can easily correct OCR errors before receiving the document and at the same time configure the service to avoid the known errors in future.

You can use the new Lexmark ICS online experience to visually train and validate the OCR processing of PDF and image files for incoming documents, such as vendor invoices.

From each incoming document record, you can now link directly to the online extracted document to validate the OCR result and train the service with your corrections.

A new Role Center Cue will give users capability to monitor incoming documents that await your OCR validation.


Inventory Items

Item attributes similar to one we saw in Madeira.

Capability to add attributes to your inventory items will make it easy for you to find the right product that your customer wants by filtering on attributes.

You can define your own attribute types, such as Base Material, Colour, Size, or other product dimensions, and attach to your items as a supplement to the built-in item attribute types and values.

When you access your items on documents or list, you can view and filter on the attribute values to limit the list of items.

By using Categorize items you can create a hierarchy of item categories and assign item attributes to each item category.

When you add items to a category, they will inherit the default attributes on the category.

This will ensures to have a common set of attributes on related items, will speed up the assignment of attributes to similar items, and allow filtering and navigating related items easily based on the category.


Smarter sales and purchase documents

Now you can cancel posted sales and purchase credit memos in the same way like you can do for posted sales and purchase invoices.

After performing this action you will find the credit memo is unapplied from the invoice and creates a new invoice that is applied to the credit memo.

This action will bring you to the earlier position where you created the credit memo. (Like Undo)

Package Tracking No. and Shipping Agent Code on sales invoices Posted sales invoices now show the package tracking number and the shipping agent code by default.


Account Categories in the Chart of Accounts

A new capability is added as account categories and sub categories.

Now you can group G/L Accounts to adjust your need for financial reporting.

For each G/L account, now you can specify the account category so that when ledger entries are posted to these accounts they are categorized as per your category.

For each account category, you can now choose from different sub-categories, even you can also create new sub-categories as per your need.

For example, for the G/L account category Expense, you can define as many sub-categories as you need so that you can differentiate between Expenses on different sources.


Payment reconciliation

The Payment Reconciliation journal now will show you total outstanding transactions and outstanding payments.

From there itself you can now look up the list of documents that have not been applied or used in the reconciliation process.

You can now also choose to include outstanding payments and outstanding transactions information in the Payment Reconciliation report.


Jobs

Project Manager Role Center

A new project manager field is added to the Job Card in order to give users clear sense of job ownership.

A new list My Jobs list is added on the Project Manager Role Center which will display jobs with the status of Order by default based on the new project manager field as discussed above.

If a person is assigned as the project manager to 5 jobs and those jobs have the On Order status, those 5 jobs will default on the My Jobs list on the Project Manager Role Center.

A new cue is added to the Project Manager Role Center to Create Job Sales Invoice, so now users will have quick access to this functionality.

On the Project Manager Role Center a new drop down list for Job Reports has been added to the Actions ribbon.

Job cost

A new fact box will be available to the right side of the Job Card to display the job’s cost information.

Now the term Contract is renamed as Billable throughout the Jobs module.

On the Job Card the Allow Schedule/Billable lines and Apply Usage Link options are marked by default for new jobs.

A new report called Job Quote is available so user can send a quote to a customer. This report is available as Word Template so it can be modified using Word and emailed to the contact on the job.


Fixed Assets

Now setting up fixed assets is simpler. A standard setup is provided, but allows you to modify it at anytime you want.

You can register fixed asset as cards with complete information, accounting details, and reporting classification.

You can also register purchases of fixed assets through special fixed asset G/L journals where you can also dispose of fixed assets. The right accounting entries are created automatically.


Simplified Setup for using Dynamics CRM from inside Dynamics NAV

As you are familiar Dynamics NAV includes opportunity management and basic customer relationship management.

You can easily set up a connection with Dynamics CRM to have more benefit from the strong capabilities that Dynamics CRM offers, such as marketing and customer service capabilities.

A new assisted setup guide to the Business Manager home page will be available that will guide you through the setup process. Once you are through with this setup, you’ll have a seamless coupling of Dynamics CRM records with Dynamics NAV records.


Simplified opportunity management and CRM functionality

You will find Dynamics NAV CRM module has been simplified and improved in a number of ways:

  1. At place of CRM wizard pages now you will have card pages, so that they can now also run in the Web client with improved user experience.
  2. Worksheet pages also been replaced by list pages so now you can also use the pages in browsers.
  3. The Contact card has been simplified by marking a number of controls as Additional, so that the page default looks simpler.
  4. Mail merge have been replaced with Word reporting. Also, new Word reporting capabilities added to generate email body content based on the related report and the selected report layout.
  5. A new Sales & Relationship Manager Role Center has been added

New wizard has been created that helps users set up email logging (default public folders, rules, and job queue setup).


Smart notifications give you advice and recommendations

Similar to one which we discussed in our earlier post for Madeira.


Extensions

Microsoft provides the following extensions:

  1. Envestnet Yodlee Bank Feeds
  2. PayPal Payments Standard
  3. QuickBooks Data Migration
  4. Sales and Inventory Forecast

Similar to Madeira few of them we have discussed in our earlier posts, rest will discuss in our upcoming posts.


Office 365

If your organization uses Office 365, Dynamics NAV 2017 includes an add-in so you can invoice your customers based on entries in your Outlook calendar.

From the Contacts List in Dynamics NAV, you can manually synchronize your Dynamics NAV contacts to Office 365 People.

The contacts from Office 365 will sync back to Dynamics NAV as well.

There is a filter that can be applied to the synchronization process so users will only need to sync the contacts they use most often. This same filter is used during the automatic background sync as well. This synchronization process also works with Microsoft Outlook on the desktop.

We will discuss in more details in our upcoming posts. This feature is too available in Madeira.


US financial reports

In the US version of Dynamics 2017, added new four financial reports to the Business Manager and Accountant Role Centers:

  1. Balance Sheet
  2. Income Statement
  3. Cash Flow Statement, and
  4. Retained Earnings Statement

These reports use G/L account categories and sub-categories discussed above to group financial data.


Source:- https://mbs.microsoft.com/Files/partner/NAV/Readiness_Training/ReadinessTrainingNews/WhatsNewDynamicsNAV2017LimitedBeta.pdf

I will come up with more details in my upcoming posts.


Development Tips, Email, Excel, How To, Information, Office Integration, Report, Server, Tip & Tricks

Export Data as CSV and send as Attachment to Mail

One of my Follower/Reader have requested for this post.

This post will explain the the below steps:

  • Export the data of table to csv file format. (I am using XMLPort you can use Excell Buffer or any other method to create the file)
  • Attach to Mail and Send.

Step 1.

Create a XMLPort as below.

CSVAttachment-1

Set the Property of XMLPort.

CSVAttachment-2

Set the Property of Integer Data Item.

CSVAttachment-3

Set the Property of Table DataItem for which data to be exported.

CSVAttachment-4

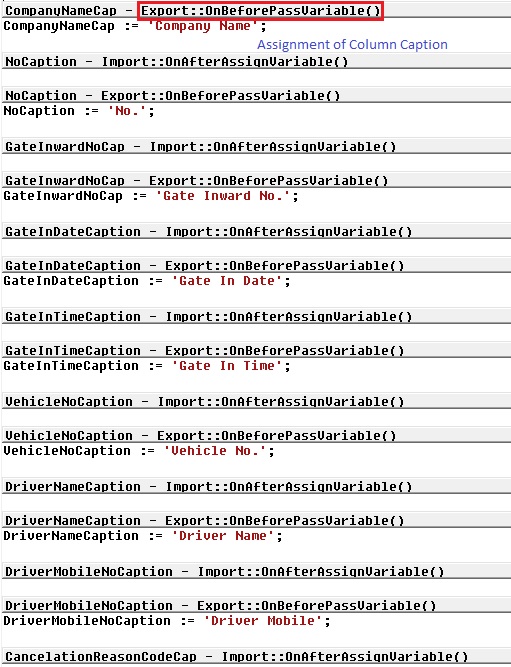
Set the Captions of the Columns in CSV file.

CSVAttachment-5

Write the code to transfer the value of Table columns.

You may find some extra code adjust accordingly as per your requirement.

CSVAttachment-6

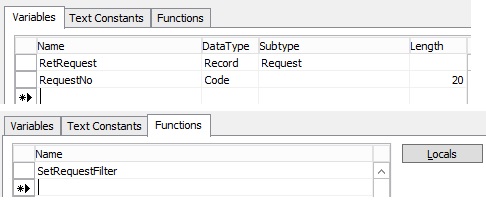
Define a function to Setfilter for data to export.

Adjust the code as per your requirement.

CSVAttachment-7

CSVAttachment-8

Step 2.

Here is the function to Export the data to csv File using above created XMLPort.

This function Saves the file to Shared folder, if required you can use TEMPORARYPATH to save your File.

CSVAttachment-9

Step 3.

Send the File as Attachment to the Mail.

CSVAttachment-10

You make required adjustment as per your requirement.

Make sure in case you are using Shared Folder give necessary rights on folder to Service Account and operating User Accounts.

Please respond did you found useful this information.

Their are other ways to achive the same, this was readyly available with me as i have used in one of my project so shared the same.

Stay tuned for more details in my Up comming posts.

Backup, Development Tips, How To, Information, PowerShell, Schedule, Server, SQL, Tip & Tricks

SQL Server Database Backup using PowerShell

In this post we will see how we can take backup of databases from SQL Server using PowerShell and schedule it as a daily run Plan.

Step-1 : We will create Powershell Script to take backup of Databases in SQL Server.

SCheduleJob-18

Here is the full Script for your ready refrence.

param( $serverName, $backupDirectory )

[System.Reflection.Assembly]::LoadWithPartialName(“Microsoft.SqlServer.SMO”) | Out-Null

[System.Reflection.Assembly]::LoadWithPartialName(“Microsoft.SqlServer.SmoExtended”) | Out-Null

[System.Reflection.Assembly]::LoadWithPartialName(“Microsoft.SqlServer.ConnectionInfo”) | Out-Null

[System.Reflection.Assembly]::LoadWithPartialName(“Microsoft.SqlServer.SmoEnum”) | Out-Null

$server = New-Object (“Microsoft.SqlServer.Management.Smo.Server”) $serverName

$dbs = $server.Databases

foreach ($database in $dbs | where { $_.IsSystemObject -eq $False })

{

$dbName = $database.Name

$timestamp = Get-Date -format yyyy-MM-dd-HHmmss

$targetPath = $backupDirectory + “\” + $dbName + “_” + $timestamp + “.bak”

$smoBackup = New-Object (“Microsoft.SqlServer.Management.Smo.Backup”)

$smoBackup.Action = “Database”

$smoBackup.BackupSetDescription = “Full Backup of “ + $dbName

$smoBackup.BackupSetName = $dbName + ” Backup”

$smoBackup.Database = $dbName

$smoBackup.MediaDescription = “Disk”

$smoBackup.Devices.AddDevice($targetPath, “File”)

$smoBackup.SqlBackup($server)

“backed up $dbName ($serverName) to $targetPath

}

Save this Script file as ps1 extension.

You can create the script using even notepad.


Step 2: We will Create Batch file to call PowerShell scrip and to be used in Windows scheduler.

SCheduleJob-18

Save as .BAT file. Here is the batch script for ready refrence:

powershell -ExecutionPolicy RemoteSigned

-File “C:\User Data\SQL Backup\Tools\SQLServerBackupAllDatabase.ps1”

-serverName “INDEL-AXT5283NB”

-backupDirectory “C:\User Data\SQL Backup”

>> “C:\User Data\SQL Backup\LOG\\%date%.log”

Step 3 : Create a Windows Scheduler

Open Windows Task Scheduler.

Create New Task as shown below :

SCheduleJob-18

Enter Name & Description on General Tab as shown below:

SCheduleJob-18

On Trigger Tab create New Trigger and enter details as shown below :
SCheduleJob-18

On Action Tab Create Action and enter information as shown below : Here Select the batch file created in Step 2.

SCheduleJob-18

In Settings Tab do the setting as shown Below :

SCheduleJob-18

Click on OK to Save the Task and return to Task Scheduler Window.

Here you can see the newly created Task.

SCheduleJob-18

When Task is executed you will find the backup of databases at defined path in the script.

SCheduleJob-26

You can also find Log file at the path defined in batch.

SCheduleJob-27

Thats all for this post, will come up will more information in my up comming posts.

Corfu Navision 2016, Development Tips, How To, Information, Server, Tip & Tricks, What's New

Configuring Session Timeout – Navision 2016

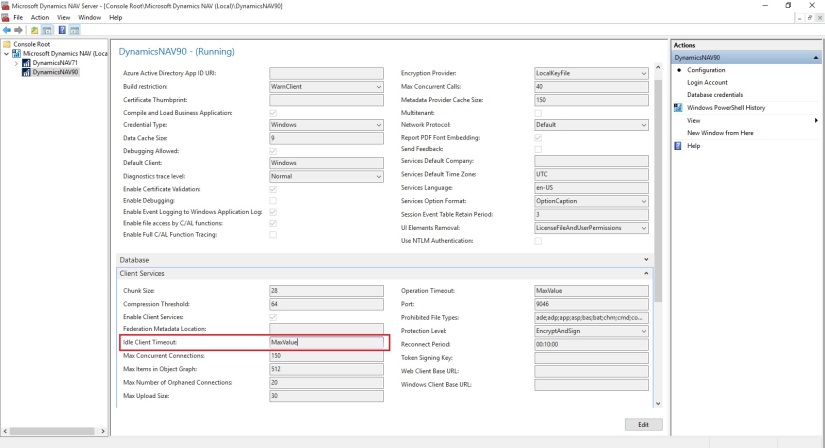
Dynamics NAV Windows client timeout configuration is managed at the service level by setting the Idle Client Timeout setting.

To configure the Dynamics NAV Windows client to time out after 10 minutes of idleness, you will require to set this to 00:10:00 and then restart the Dynamics NAV Server service so that the change comes in effect.

There are some additional settings

ClientServicesReconnectPeriod

ClientServicesMaxNumberOfOrphanedConnections,

When you start the Microsoft Dynamics NAV Windows client or Microsoft Dynamics NAV Web client, a connection is established with the Microsoft Dynamics NAV Server instance and a corresponding session is added on Microsoft Dynamics NAV Server.

Microsoft Dynamics NAV Server includes several timeout settings that determine when a session closes as a result of inactivity over the client connection, lost client connection, or closing of the client.

You can configure this in CustomSettings.config file of Microsoft Dynamics NAV Server.

ClientServicesReconnectPeriod :- This value determines the time during which a client can reconnect to an existing session on Microsoft Dynamics NAV Server before a session closes.

ClientServicesIdleClientTimeout :- This value determines the interval of time that a Microsoft Dynamics NAV client connection can remain inactive before the session is closed.

You can configure this in the ClientSettings.config file of the Microsoft Dynamics NAV Windows client.

ClientServicesKeepAliveInterval :- This value determines the interval of time (in seconds) between keep-alive messages that are sent from the Microsoft Dynamics NAV Windows client to Microsoft Dynamics NAV Server. This value is also used, in part, to define the reconnect period when a connection is lost.

You can configure this in the web.config file of Microsoft Dynamics Web Server for the client.

SessionTimeout :- This value specifies how much of time that session remains open when there is no activity over the connection from the Microsoft Dynamics NAV Web client to Microsoft Dynamics NAV Server.

SessionTimeOut-1

The SessionTimeout setting enables you to set the Microsoft Dynamics NAV Web client inactive session timeout different than for the Microsoft Dynamics NAV Windows client, which is only controlled by the ClientServicesIdleClientTimeout setting.

Typically, this is set the inactive session timeout period on Microsoft Dynamics NAV Web client connections shorter than for the Microsoft Dynamics NAV Windows client.

When the Microsoft Dynamics NAV Windows client is inactive, reliable sessions automatically sends messages from the Microsoft Dynamics NAV Windows client to Microsoft Dynamics NAV Server.

You can control the interval of the keep-alive messages by setting the ClientServicesKeepAliveInterval setting on the Microsoft Dynamics NAV Windows client.

The default value of the ClientServicesKeepAliveInterval setting is 120 seconds (2 minutes).

If there is no activity on the client connection for duration of the load balancer’s idle timeout setting, then the load balancer might redirect the client connection to another server.

To avoid this condition, it is recommend that set the ClientServicesKeepAliveInterval to half the value of the load balancer’s idle timeout setting.

The idle timeout on Windows Azure is around 4 minutes, so the default setting of ClientServicesKeepAliveInterval (2 minutes) should be sufficient.

Occasionally, a Microsoft Dynamics NAV client can lose the network connection to Microsoft Dynamics NAV Server.

You can use ClientServicesReconnectPeriod setting on Microsoft Dynamics NAV Server to control how long a session remains open after the connection is lost to allow time for the client to reconnect to the session.


SessionTimeOut-2

  • The connection is lost and the initial inactivity period starts (default is 4 minutes).
  • After the initial inactivity period, the service channel enters a faulted state. When the service channel is in the faulted state, Microsoft Dynamics NAV Server considers the session with the client as orphaned and waits for it to reconnect.
  • If the client does not reconnect within the time period that is specified by the ClientServicesReconnectPeriod setting (default is 10 minutes), then Microsoft Dynamics NAV Server closes the session.
  • The session is then removed from the Active Session table in the Microsoft Dynamics NAV.

ClientKeepAlive:- This  setting is managed at the user level and located in the ClientUserSettings.config file.

The value of this setting is given in seconds and defines the interval between ‘pulse’ signals sent by the client to prevent the client from going idle in some scenarios, or for some users.


In Dynamics NAV 2016 Cumulative Update 8:

The ClientKeepAlive setting has been moved from the user level to the service level, and is no longer defined in number of seconds but as a time interval, just like the Idle Client Timeout setting.


Before Cumulative Update 8:

  1. In the server configuration file, set Idle Client Timeout  to 00:10:00
  2. In the client configuration file, set ClientKeepAlive  to any value  larger than 600 This value is in seconds, so 600 equals 10 minutes.


SessionTimeOut-3

After Cumulative Update 8:

  1. In the server configuration file, set Idle Client Timeout  to 00:10:00
  2. In the server configuration file, set Keep Alive Interval  to a value larger than 00:10:00

To configure the timeout for the Dynamics NAV Web client, it is sufficient to configure the SessionTimeout setting in the web.config file to the relevant interval – in above example it’s 00:10:00.

For more information you can check out here : https://community.dynamics.com/nav/b/navteam/archive/2016/06/24/configuring-client-timeout


Corfu Navision 2016, Development Tips, How To, Information, Instalation & Configuration, Server, Tip & Tricks

Multilanguage across Conflicting Text Encoding Formats

For more details please see my earlier posts:

Managing Multilanguage support in Navision Overview

How do I translate my ResX Files?

Working with Partner Translation Toolkit

To support users with translated strings across conflicting text encoding formats, you must save the translations to a text file in UTF-8 text encoding format.

This converts the file to Unicode, which Microsoft Dynamics NAV Development Environment cannot import. Instead, you add the files to a dedicated Translations folder on the Microsoft Dynamics NAV Server computer.

The default location of this folder is

C:\Program Files\Microsoft Dynamics NAV\90\Service\Translations.

When you have more than one service instance, there is a Translations folder for each service instance, such as

C:\Program Files\Microsoft Dynamics NAV\90\Service\Instances\MyInstance\Translations.

Microsoft Dynamics NAV Server adds any strings in text files that you place in the relevant Translations folder to the metadata for Microsoft Dynamics NAV.

To add translated strings for a conflicting text encoding format:

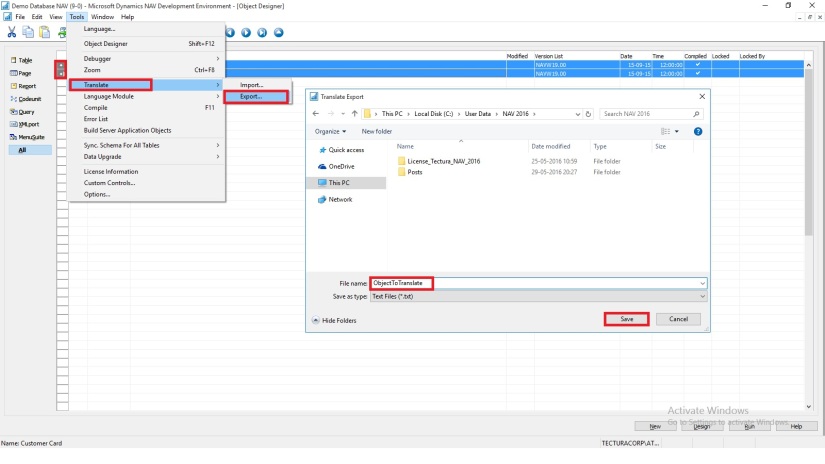
In the development environment, export the strings for the objects that you want to translate.

Translate-1

Select the Objects you wish to add translation, Export and save as text file.

Translate the strings in the resulting text file into desired Language by using your preferred translation process.

Translate-2

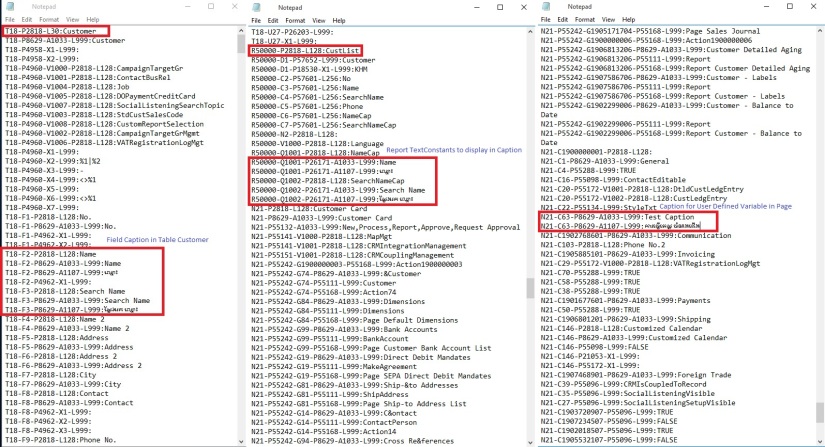
I have translated following Captions in Khmer language:

  1. For Field Name & Search Name in Table Customer (18)
  2. TextConstant in Report CustList (50000) to display Caption for Name & Search Name
  3. Caption for User defined variable in Page Customer Card (21)

When translations are complete, save the translated strings into a text file in the UTF-8 text encoding format. The extension of the file must be .txt.

It is recommend that you remove the other Language strings from the Unicode file before you copy it to the Microsoft Dynamics NAV Server computer.

Microsoft Dynamics NAV Server queries the Translations folder for updated strings, and for performance reasons the folder should only contain strings that you cannot import into the development environment because of conflicting codepages.

Copy the UTF-8 file to the equivalent of

C:\Program Files\Microsoft Dynamics NAV\90\Service\Translations

on the Microsoft Dynamics NAV Server computer.

When you have more than one service instance, there is a Translations folder for each service instance, such as

C:\Program Files\Microsoft Dynamics NAV\90\Service\Instances\MyInstance\Translations.

Restart the Microsoft Dynamics NAV Server instance.

Microsoft Dynamics NAV Server adds the translated strings in the file to the metadata store for the Microsoft Dynamics NAV deployment.

Now Users of this Microsoft Dynamics NAV Server session can now change the user interface language from English to required Language.

The metadata store is updated whenever you add new strings to the Translations folder and then restart the Microsoft Dynamics NAV Server service instance. Cached strings are not deleted from the metadata store when you restart the service instance.


Let us see the effect of this translation. Let’s run the RTC to see the net effect of same.

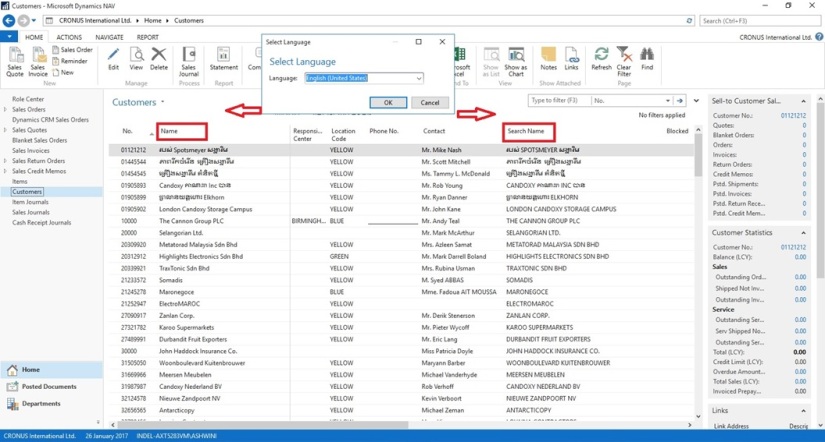
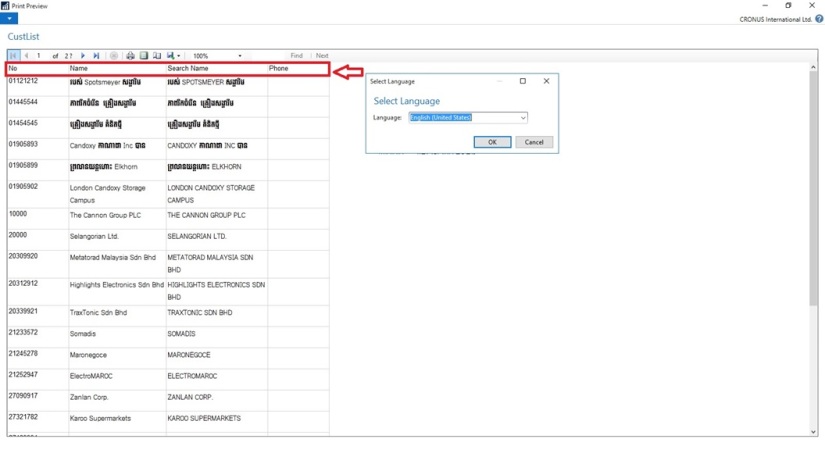
[A] Customer List in English However Data Stored in Khmer Language

Translate-3

B] Two Captions Changed in Khmer Language for Name & Search Name

Translate-4

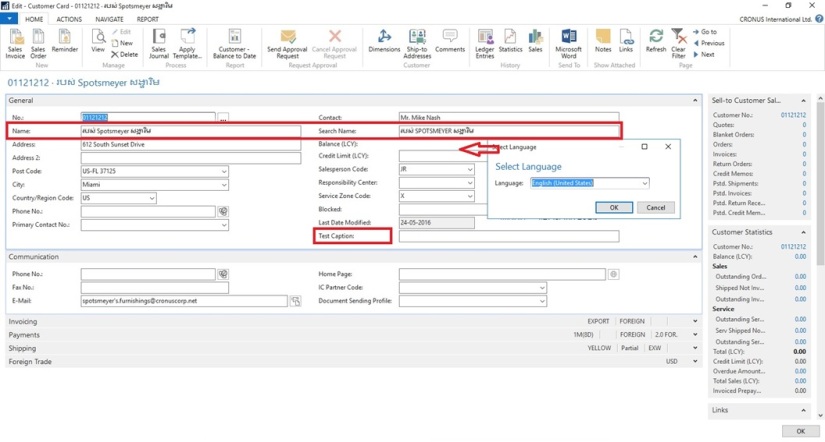
[C] Customer Card in English Language. Selected Captions are changed in Khmer Language

Translate-5

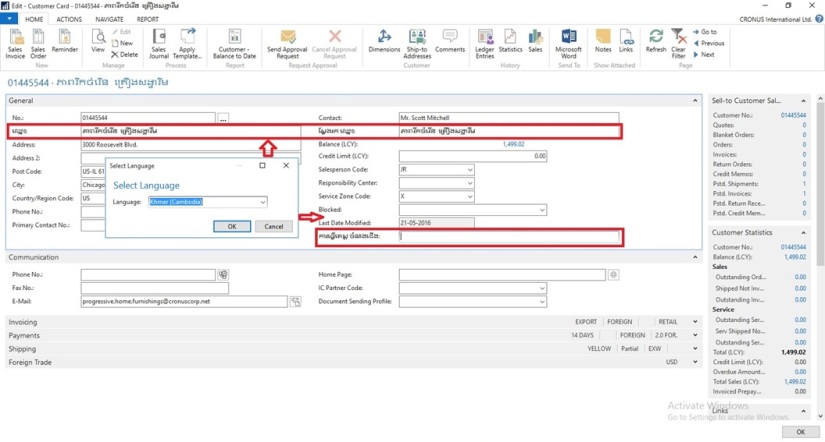
[D] Caption Changed for Name & Search Name to Support Khmer Language also for Field not available in Table the Test Caption

Translate-6

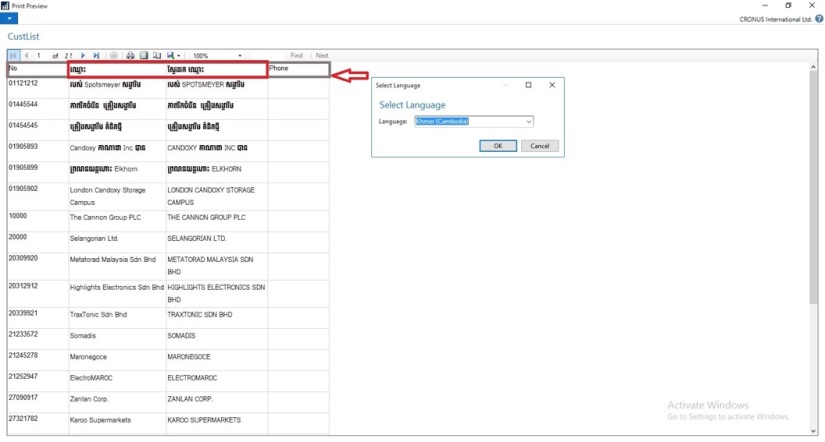
[E] Report Caption in English Language however data in Khmer Language

Translate-7

[F] Report Caption Changed to Khmer Language for Name & Search Name

Translate-8

You can manage Languages using above trick for translate strings across conflicting text encoding formats.

Will comeup with more details in my upcomming posts.


Corfu Navision 2016, Development Tips, How To, Information, Instalation & Configuration, License, Server, Tip & Tricks, Virtual

Working with Partner Translation Toolkit

In my earlier post I have given the overview of Managing Multilanguage support in Navision continuing from same today I will discuss about how to create Language Module for the Languages not available from Microsoft.

Although still we will not be having direct support for all Languages but using this process you can create one.

To be very fair it will not be easy task for all Languages but for few it could help you much to get you work done with little ease.

See few helpful links which will help you getting done your task:-

Platform strings maintained in managed assemblies and fin.stx and fin.etx files

Configuring Microsoft Dynamics NAV Help Server

To work with Partner Translation Toolkit you will require below, make sure you have all before you start with using this Tool:

  1. Visual Studio
  2. WiX Toolset
  3. Microsoft Translator for ResX
  4. Azure Data Market account
  5. Microsoft Translator data service subscribed
  6. Your NAV License File
  7. Finally your efforts

Visual Studio:

If you don’t have make sure you install the latest version of the same.

WiX Toolset:

You will require the WiX Toolset to start with you can download from here. Install WiX Toolset version 3.8 or 3.9

PTT-1

Install the WiX Toolset according to the instructions. In my case it is already installed on my system so getting option for Uninstall.

Building the project you require that you have the WiX Toolset version 3.8 or 3.9 installed on the computer.

Microsoft Translator for ResX:

See my previous post for more details here.

Azure Data Market account / Microsoft Translator data service:

See my previous post for more details here.

Steps to get ready for Translation tool:

See my previous post for more details here. 

Let’s start with building our project:

Step -1:

Run the “Microsoft.MCSUK.RESXTranslator.exe” Tool

See my previous post for more details here.

Step -2:

Run the “Visual Studio” with opening project solution PartnerTranslations.sln

PTT-8

You will see all the projects discussed above is having their own folder in this solution.

Add your all the translated resx files obtained in Step-1 post Translation to respective projects.

PTT-9

Right click on the project folder and choose Add and then Existing Item.

Select the resx file which we translated in Step-1.

In my case I select “Common.Language.Lang.hi-IN.resx”

Similarly you will add these translated files to your all other projects. Be cautious few may have 2-3 files add them all.

PTT-10

The properties of the installation determine which folders are created during the installation of the language packs and what files are placed in the folders. The properties can be found in the Locals.wxi file located in the root directory of the translation kit. Open the Locals.wxi file and change the following properties:

• CountryRegionCode, to one of the country/region codes in Globals.wxi or create a new.

• ModuleLanguage, to the language of your choice.

• LocalLangFolder, to the .Net culture of the satellite assemblies.

• LocalIsoFolder, to the three letter ISO code for your language.

PTT-11

PTT-12

Step -3:

Build the project PartnerTranslations.sln

To build the PartnerTranslation solution from inside Visual Studio, choose Build Solution from the Build menu. This will pick up all translated artifacts, and create three installer files (.msi):

  • Server.msi – Located in the Server\Bin\Debug folder.
  • RTC.msi – Located in the RTC\Bin\Debug folder.
  • WebClient.msi – Located in the WebClient\Bin\Debug folder.

Step-4:

Copy your Language Module Files and install on desired Server & Client

PTT-13

Install – Add your language pack to the W1 version

If have not already done so, install the W1 version of Microsoft Dynamics NAV 2016 from the product media.

Install the new language Pack

Next, install the new language pack on the same computer. To do this, select and click each of the three .msi files listed below, one after the other. The order is not significant:

  • Server\Bin\Debug\Server.msi
  • RTC\Bin\Debug\RTC.msi
  • WebClient\Bin\Debug\WebClient.msi

Each installer quickly shows a dialog, which disappears when the installer has completed.

The language pack is now installed, but you must make some final configuration.

I will comeup with more details in my next posts.


Azure, Corfu Navision 2016, Development Tips, How To, Information, Instalation & Configuration, Machine, Server, Tip & Tricks, Virtual

Creating Virtual Machine on Azure

Continuing from my previous post.

In previous post we saw how to register for Free Azure Portal Account, if you missed you can find the link here.

Today we will see how to create Virtual Machine for Dynamics Navision 2016 pre Loaded.

Lets start creating one for our future posts practice.

Open the page : https://azure.microsoft.com/en-us/free/ and follow onscreen Instruction to login to your account.

Login using the account credentials you used for registering on Azure Portal.

Azure-5

Upon signing you will be landed to your dashboard on Portal.

You can see we don’t have any resource on Portal yet.

Azure-6

Lets start creating one.

Click on New from Top right corner.

Choose Virtual Machine.

Enter “Microsoft Dynamics NAV 2016” in the search box, it will list available Virtual Machine images.

Select the one available Virtual Machine for commissioning.

I have choose this because we will get preinstalled NAV 2016 which will save our time.

Azure-7

Select Deployment Model, I have choose Classic and click on Create.

Azure-8

Next we will enter  Host Name, User Name, Password, other things you adjust as per your need. Click on Create.

Note your User Name & Password you will require this to login to the Server.

Azure-9

Give some time to get created and up your Server.

In the mean time you can explore other things till your Server is up and running for you.

Once it is made available, you can start login and explore your newly created Server.

Where to find my Server?

From the Navigation Bar choose Virtual Machine (classic).

It will list you all Virtual Machines created by you.

Select your Virtual Machine in my case it is NavDemo.

You can find the Server Name and IP of your Virtual Machine.

Azure-10

I am using my IP to login to my Server.

Open your Remote Desktop Connection and enter your IP.

The User Name & Password as we created in previous step.

Azure-11

Here I am Login to my Server.

Azure-12

You can see that Dynamics NAV 2016 is already available with my Server.

Azure-13

That’s all for today, we will see more in my upcoming posts.

Till then keep exploring & Learning.


Development Tips, License, Multitenancy, Server

Uploading License to Tenant in Multitenant Environment

When we deploy solution for Multitenant Environment ever Tenant will be required a Separate License. Depending upon the License agreement with Microsoft every Tenant will either share same License or individual License.

Assume we are implementing Distributor Management System. Where every Tenant is a different Business entity linked with the Parent Group.

In this case the Server & Network is provided by the Parent Group and other Business group will share information but they will use their specific License to use the system, doesn’t matter who pays for fee.

In any case we need to upload License to each database in Multitenancy.

Import-NAVServerLicense

Imports a license file into a Microsoft Dynamics NAV database.

Syntax

Parameter Set: __AllParameterSets

Import-NAVServerLicense [-ServerInstance] <String> [-Database <LicenseDatabase> ] [-Force] [-Tenant <TenantId> ] [-Confirm] [-WhatIf] [ <CommonParameters>]

Parameter Set: LicenseDataSet

Import-NAVServerLicense [-LicenseData] <Byte[]> [-Force] [-Confirm] [-WhatIf] [ <CommonParameters>]

Parameter Set: LicenseFileSet

Import-NAVServerLicense [-LicenseFile] <String> [-Force] [-Confirm] [-WhatIf] [ <CommonParameters>]

Detailed Description

Use the Import-NAVServerLicense cmdlet to import a license file into a Microsoft Dynamics NAV database. If the Microsoft Dynamics NAV Server account specified does not have access to the location where the license file is stored, an error results. Check the Event Log on the Microsoft Dynamics NAV Server computer to see what permissions are required.

After importing a new license, restart all Microsoft Dynamics NAV Server instances to activate the license for client users.

Parameters

-Database<LicenseDatabase>

Specifies the database into which to import the license file. The possible values are described in the following list:

Default = 0

Default; overrides the license file currently in use.

Master = 1

Forces the license file to be global.

NavDatabase = 2

Forces the license file to be local and stored in the Microsoft Dynamics NAV database that is used by the specified Microsoft Dynamics NAV Server instance.

Tenant = 3

Forces the license file to be local and stored in the Microsoft Dynamics NAV database that is used by the tenant that is specified in the Tenant parameter.

Aliases none
Required? false
Position? named
Default Value none
Accept Pipeline Input? false
Accept Wildcard Characters? false

-Force

Forces the command to run without asking for user confirmation.

Aliases none
Required? false
Position? named
Default Value none
Accept Pipeline Input? false
Accept Wildcard Characters? false

-LicenseData<Byte[]>

Specifies the content retrieved from the certificate file by using the Get-Content cmdlet. For more information, see the examples.

Aliases none
Required? true
Position? 2
Default Value none
Accept Pipeline Input? false
Accept Wildcard Characters? false

-LicenseFile<String>

Aliases none
Required? true
Position? 2
Default Value none
Accept Pipeline Input? false
Accept Wildcard Characters? false

-ServerInstance<String>

Specifies the name of a Microsoft Dynamics NAV Server instance. The default instance name is DynamicsNAV80. You can specify either the full name of an instance (such as MicrosoftDynamicsNavServer$myinstance) or the short name (such as myinstance).

Aliases none
Required? true
Position? 1
Default Value none
Accept Pipeline Input? True (ByValue, ByPropertyName)
Accept Wildcard Characters? false

-Tenant<TenantId>

Specifies the ID of the tenant in which you want to import the license, such as Tenant1. This parameter is required unless the specified service instance is not configured to run multiple tenants.

Aliases Id
Required? false
Position? named
Default Value none
Accept Pipeline Input? True (ByPropertyName)
Accept Wildcard Characters? false

-Confirm

Prompts you for confirmation before running the cmdlet.

Required? false
Position? named
Default Value false
Accept Pipeline Input? false
Accept Wildcard Characters? false

-WhatIf

Shows what would happen if the cmdlet runs. The cmdlet is not run.

Required? false
Position? named
Default Value false
Accept Pipeline Input? false
Accept Wildcard Characters? false

<CommonParameters>

This cmdlet supports the common parameters: -Verbose, -Debug, -ErrorAction, -ErrorVariable, -OutBuffer, and -OutVariable.

Inputs

The input type is the type of the objects that you can pipe to the cmdlet.

  • System.String

You can pipe a string that contains a Microsoft Dynamics NAV Server instance name to the cmdlet.

Outputs

The output type is the type of the objects that the cmdlet emits.

  • None

This cmdlet does not generate any output.

Examples

This example imports a license file that is named “fin.flf” from the current directory into the default database.

C:\PS>Import-NAVServerLicense DynamicsNAV80 -LicenseData ([Byte[]]$(Get-Content -Path “fin.flf” -Encoding Byte))

This example imports a license file that is named “fin.flf” from the current directory into the local Microsoft Dynamics NAV database that is used by the MyInstance Microsoft Dynamics NAV Server instance.

C:\PS>Import-NAVServerLicense MyInstance -LicenseData ([Byte[]]$(Get-Content -Path “fin.flf” -Encoding Byte)) -Database NavDatabase

This example imports a license file that is named “fin.flf” from the current directory into the master database.

C:\PS>Import-NAVServerLicense ‘MicrosoftDynamicsNavServer$MyInstance’ -LicenseData ([Byte[]]$(Get-Content -Path “fin.flf” -Encoding Byte)) -Database Master

This example imports a license file that is named “fin.flf” from the current directory into the database that is used by the specified tenant, Tenant1.

C:\PS>Import-NAVServerLicense ‘MicrosoftDynamicsNavServer$MyInstance’ -LicenseData ([Byte[]]$(Get-Content -Path “fin.flf” -Encoding Byte)) -Database Tenant –Tenant Tenant1

Let import the license to the Tenants which we created in our earlier post.

If you missed previous post you can find it here. Adding Tenants to multitenancy Environment

I have created the Folder and placed my Tenants License in this.

License-1

Set-ExecutionPolicy unrestricted -Force

Import-Module ‘C:\Program Files\Microsoft Dynamics NAV\80\Service\NavAdminTool.ps1’

Import-NAVServerLicense MTenantDemo -Tenant ‘Tenant-1’ -LicenseData ([Byte[]]$(Get-Content -Path “C:\User Data\NAV 2015\MultiTenantDemo\Tenant License\Tenant-1.flf” -Encoding Byte))

Import-NAVServerLicense MTenantDemo -Tenant ‘Tenant-2’ -LicenseData ([Byte[]]$(Get-Content -Path “C:\User Data\NAV 2015\MultiTenantDemo\Tenant License\Tenant-2.flf” -Encoding Byte))

Import-NAVServerLicense MTenantDemo -Tenant ‘Tenant-3’ -LicenseData ([Byte[]]$(Get-Content -Path “C:\User Data\NAV 2015\MultiTenantDemo\Tenant License\Tenant-3.flf” -Encoding Byte))

Import-NAVServerLicense MTenantDemo -Tenant ‘Tenant-4’ -LicenseData ([Byte[]]$(Get-Content -Path “C:\User Data\NAV 2015\MultiTenantDemo\Tenant License\Tenant-4.flf” -Encoding Byte))

Import-NAVServerLicense MTenantDemo -Tenant ‘Tenant-5’ -LicenseData ([Byte[]]$(Get-Content -Path “C:\User Data\NAV 2015\MultiTenantDemo\Tenant License\Tenant-5.flf” -Encoding Byte))

Copy the above Script and paste into the Microsoft Dynamics NAV 2015 Administration Shell.

License-2

Our License have now successfully uploaded to respective databases. As the message suggest we need to re-start the service so that new License comes into effect.

You can use above Script to Upload License to individual Tenants, License could be different or same depends how you discussed with Microsoft and purchased.

Development Tips, Multitenancy, Server

Adding Tenants to Multitenancy Environment

In my previous post Creating the Multitenant Environment, We were done with the basic setup for MultiTenantDatabase NAV (8-0) Demo_App, the first Tenant MultiTenantDatabase NAV (8-0) Demo.

All other Tenants can now be created in similar fashion.

It is recommended to create a tenant template, and in turn use this template to make other tenants.

To create a template follow bellow steps:

  • Remove all users leaving only Administrator Account as Super Permission.
  • Remove any Transaction data specific to Company and other Setups
  • Take the backup of the database and keep it as template for other tenant’s database creation. Basically we will restore this database for each new tenant we need to add.

You can restore the database and mount it to the service one by one and rename the company name manually and do other modifications. But if you need to create 100 or 1000 tenants then this process will be quite time taking. To make this step easy we can use CSV file to store all necessary information and create a Shell Script to read information from CSV file and input as parameter to the commands to make this process fast and save with unnecessary effort.

Today I am going to discuss this, as a sample I have taken bare minimum information to get our task done. In real scenario many more things you may require but you can use this as a template and design your CSV and Script accordingly.

Let’s do the Preparation:

AddTenant-1
I have created the Folder structure as shown in above screen shot.

I will keep my CSV File in TenantInfo Folder.

AddTenant-2
I will store my Shell Script in ShellScript Folder.

AddTenant-3

$csv_NAVBuild = Import-Csv “C:\User Data\NAV 2015\MultiTenantDemo\TenantInfo\TenantDetails.csv”

foreach ($line in $csv_NAVBuild)
{
New-NAVDatabase “C:\User Data\NAV 2015\MultiTenantDemo\TenantBackup\TenantBussinessDataBackup.bak” -DatabaseServer $($line.DatabaseServer) -DataFilesDestinationPath “C:\User Data\NAV 2015\MultiTenantDemo\$($line.TenantID).mdf” -LogFilesDestinationPath “C:\User Data\NAV 2015\MultiTenantDemo\$($line.TenantID).ldf” -DatabaseName $($line.TenantID)
Mount-NAVTenant $($line.ServiceName) –Id $($line.TenantID) -DatabaseServer $($line.DatabaseServer) -DatabaseName $($line.TenantID) -OverwriteTenantIdInDatabase -DefaultTimeZone “$($line.DefaultTimeZone)”
Rename-NAVCompany $($line.ServiceName) -Tenant $($line.TenantID) -CompanyName “Tenant-1” -NewCompanyName $($line.TenantID) -Force
}

Save-NAVTenantConfiguration $($line.ServiceName)

I will place my tenant database template file in TenantBackup Folder prepared as per above discussed step. I will take the SQL backup and place the .bak file in this folder.

AddTenant-4
Creating and Mounting Tenants

It is possible to create PowerShell scripts that aids the setup of Tenants. Basically, what the script does, is:

  1. Calls a CSV file (Comma separated file) with settings for all the Tenants
  2. Restores and creates new Tenants based on the tenant template SQL backup
  3. Mounts the new database as a tenant on NAV Server Instance
  4. Renames the default company name to the specified company name
  5. Saves NAV tenant configurations of NAV Server Instance

Open the Microsoft Dynamics NAV 2015 Administrator Shell, Make sure you run it as Administrator. Copy and Paste your above created script.
AddTenant-5
On completion of execution of script, Verify your Tenants are Mounted to the Service using Microsoft Dynamics NAV 2015 Administration.
AddTenant-6
Verify using SQL Server Management your all database is created.

AddTenant-7

Verify that the database Files are created in Specified Folder in the Script.

AddTenant-8

Verify that you are able to login to each Tenant database in RTC.

AddTenant-9

Now you are done with Creating the Tenants and Mounting the same to the Navision Service using CSV file and Shell Script.

Shell Script had made your life so easy, think if manually you have to do it for 5000 tenants how much time will you take to get this task done.

Development Tips, Multitenancy, Security, Server

Creating the Multitenant Environment

Before you start I will recommend to go through my earlier post on Multitenancy Concept & Overview here.

To start with the below steps you will require 2 Accounts preferably Domain Accounts:

  • An Account for running MS Dynamics Navision Service
  • An Administrator account for Database & RTC

How to setup these accounts and what permissions are required for these accounts I would recommend to go through my earlier post on Provisioning the Microsoft Dynamics NAV Server Account here.

Add both the above account to Navision Database with Super permission.

In order to create a multitenant environment (here for Demo Database NAV (8-0)), the following steps need to be done:

  • Take an SQL Backup of the running Demo Database NAV (8-0) database.

Multitenancy-1
Multitenancy-2
Multitenancy-3

  • Restore the newly made SQL Backup to a new database (MultiTenantDatabase NAV (8-0) Demo).

Multitenancy-4
Multitenancy-5
Multitenancy-6
Multitenancy-7

  • On the NAV Server, using the NAV 2015 Administration console, create a new NAV Server Instance named MTenantDemo

Multitenancy-8

  • Edit the instance and set the database to newly created MultiTenantDatabase NAV (8-0) Demo database, and set the instance to be started with NAV Service user.

Multitenancy-9
Multitenancy-10

  • Start MTenantDemo – and see if you can log in
  • Once you have confirmed the MultiTenantDatabase NAV (8-0) Demo database and MTenantDemo is running, split the database in an application part and a data part:
    • Open the NAV 2015 Administration Shell (or Windows PowerShell ISE and load the NavAdminTool)
    • Export the application part from the MultiTenantDatabase NAV (8-0) Demo database to a new database (MultiTenantDatabase NAV (8-0) Demo_App):

Export-NavApplication -DatabaseServer INDEL-AXT5283N1 -DatabaseName ‘MultiTenantDatabase NAV (8-0) Demo’ -DestinationDatabaseName ‘MultiTenantDatabase NAV (8-0) Demo_App’

  • Remove the application part from the MultiTenantDatabase NAV (8-0) Demo database:

Remove-NAVApplication -DatabaseServer INDEL-AXT5283N1 -DatabaseName ‘MultiTenantDatabase NAV (8-0) Demo’

Multitenancy-11
Multitenancy-12

  • Using the NAV 2015 Administration console, edit the MTenantDemo instance and set the database to newly created MultiTenantDatabase NAV (8-0) Demo_App database
    Multitenancy-13
  • And select Multitenant (set it to True):
  • Save and restart MTenantDemo

Multitenancy-14

  • Either through a Powershell commandlet in the NAV 2015 Administration Shell or by using the NAV 2015 Administration console mount a tenant named Tenant-1 on the MTenantDemo NAV Instance:

Multitenancy-15
Multitenancy-16
Multitenancy-17

  • Start NAV using the new tenant:

Multitenancy-18

  • In Companies rename the Company Name to Tenant-1
  • Take an SQL Backup using the MultiTenantDatabase NAV (8-0) Demo_App database, and call it “App_template.bak”
  • Take an SQL Backup using the MultiTenantDatabase NAV (8-0) Demo database, and call it “Tenant_template.bak”

You now have a template you can use when you want to create a application and a tenant.

Restore the Tenant Database as Tenant-2, Tenant-3, Tenant-4, Tenant-5 etc.

Mount the Tenant Databases to NAV Service MTenantDemo as per above steps.

Now you have One Application & 5 Business Data Tenants Mounted.

You will do development in Application Database MultiTenantDatabase NAV (8-0) Demo_App and then Sync your modifications to Business Data Databases named Tenant-1/2/3/4/5 etc.

To Sync your objects to Tenants you will use below script in NAV 2015 Administration Shell:

Set-ExecutionPolicy unrestricted –Force

Import-Module ‘C:\Program Files\Microsoft Dynamics NAV\80\Service\NavAdminTool.ps1’

Sync-NAVTenant MTenantDemo -Force -Tenant ‘MultiTenantDatabase NAV (8-0) Demo’

I will explain in more detail on Creating Tenants, Synchronizing Tenants and uploading License for Tenants in more details in my next upcoming post.