API URL, BC18, Business Central, Data Source, Dynamics 365, Environment, HttpClient Request, Information, Instalation & Configuration, Jet Analytics, Jet Data Manager, Jet Reports, Nav Adapter, Tip & Tricks, Web Access Key

Jet Data Manager Connecting Data Source To Business Central – – Part-1

Jet Analytics delivers fast, flexible dashboards and reports in Excel, Power BI, and in the browser. Now you can bring all your data together in one place to enable everyone in the organization to easily perform sophisticated business analysis from anywhere, without technical expertise. Empower users to make better decisions, faster.

This blog shares information on the steps involved to connect Jet Analytics to the Business Central (Online Tenant)

Step 1: Find tenant and environment information

Step 2: Get web services access key

User which will be used to establish the connection to the Business Central data source ensure this user have permission set of either:

  • SUPER
  • D365 FULL ACCESS

Step 3: Install Jet Analytics Extension

On Extension Management page click Manage → Extension Marketplace And search for Jet Analytics App

Click -> Get it now to deploy the App

Step 4: Verify extension installation 

Click Manage and then Deployment Status

Verify that the status is completed.

Step 5: Allow http client requests

Step 6: Configure Business Central data source in Jet Analytics project

Ensure if your Environment Name is other than Production or Sandbox, you will need to manually enter your Environment name. Like in my case it was Test

Next, we will setup Accounts

You will get (0 selected) at first time in this case this task is already performed so showing count of selected Accounts (Companies in Business Central Database)

Select Template & all desired Companies from the List and hit OK.

Now you can see your table objects in Data Selection Pan.

That’s all for this post rest will discuss in other upcoming posts.

One news I want to share with all readers, now we are Jet Reports Partner, if you have any requirements you can reach to me for License, Deployment, Training or Support.

Advertisement
Development Tips, Dynamics 365, Extension Package, How To, Information, Instalation & Configuration, NAV 2018, Tip & Tricks, Visual Studio Code, What's New

Configuring Visual Studio Code to Use Modern Development Environment with Dynamics NAV 2018

After installing Dynamics NAV 2018, I want to configure Visual Studio Code with Dynamics NAV to use new Development tool.

Before we start lets verify few things and update accordingly.

NDE-1

You can download VS Code from here:-Click to download Visual Studio Code

Install and Launch the Visual Studio Code.

Now Click View -> Extensions.

NDE-2

Click on … to open the extension menu.

Click on Install from VSIX

NDE-3

You can find VSIX file on the installation medium path:

“ModernDev\program files\Microsoft Dynamics NAV\110\Modern Development Environment”

or in the

“C:\Program Files (x86)\Microsoft Dynamics NAV\110\Modern Development Environment”

NDE-4

This will install AL Language Version 0.12.15355

NDE-5

Once the Extension installation is complete, follow below steps

Press Alt+A, Alt+L to trigger the Go! Command

NDE-6

Enter Project Name and Press Enter

NDE-7

Choose “Your own server”

Once you select the “Your own server” you will see a code like below in the “launch.json” file.

NDE-8

Update the information to look similar to below:-

NDE-9

I have updated my ServerInstance as DynamicsNAV110 (you check your instance name if changed while installing server)

I have updated my Authentication as Windows (I am using Windows authentication update what yours use accordingly)

I have added Port as 8049 (please check and use accordingly you are using the port, if using default 7049 then this step not required)

Now save your File. And Press <CTRL + F5>.

NDE-12

Enter your Credentials.

The server url and the web client url are assumed to be the same. That is not the case. The two settings we talked about above, the server url and the developer port number, are the only settings you need in the launch.json.

When VS Code publishes the extension to the NAV server, the NAV server returns the web client url as a response. This url is then opened in the browser. No setting needed in the launch.json at all.

The NAV server reads that setting from the Web Client Base Url server setting.

NDE-13

NDE-11

Your Extension is published, you can verify as below:

NDE-10

Now you are good to go with developing your Extensions using New Modern Development Tool using AL.

I hope this may have clarified your doubt on how VS Code and the NAV server work together!

I will come with more details as I proceed.

Comment or Uncomment Selection, Development Tips

Development Environment Enhancements – in Navision 2015

Auto-generating of C/AL variable and parameter names for complex data types

In the C/AL Globals and C/AL Locals windows, when you add a variable or parameter that has the data type Codeunit, Page, Testpage, Report, Query, or XMLport, the Name field will be automatically generated just by setting the DataType and SubType fields. The generated name is based on the name that is assigned to the associated Microsoft Dynamics NAV object. You can change the generated name as you want.
DevelopmentEnvironmentEnhancement-1

Commenting and uncommenting multiple lines of C/AL Code

The development environment includes the Comment Selection and Uncomment Selection options, which enable you to comment and uncomment multiple lines of C/AL code with the click of a button.

For more information, see my earlier post Commenting and uncommenting multiple lines of C/AL Code

Non-default property values are bold

Microsoft Dynamics NAV objects have many properties that you can view and set from the Properties window in the development environment. Property values that are not the default value of the property appear as bold in the Properties window.
DevelopmentEnvironmentEnhancement-2

C/AL functions are local by default

Unlike in earlier Microsoft Dynamics NAV versions, now when you create a function in the C/AL code of a Microsoft Dynamics NAV object, such as a codeunit or page, the function is set as a local function by default. By default, the Local property of new functions is now set to Yes instead of to No. Being local means that the function is not accessible outside the object in which is it defined.

Development Tips, License, Multitenancy, Server

Uploading License to Tenant in Multitenant Environment

When we deploy solution for Multitenant Environment ever Tenant will be required a Separate License. Depending upon the License agreement with Microsoft every Tenant will either share same License or individual License.

Assume we are implementing Distributor Management System. Where every Tenant is a different Business entity linked with the Parent Group.

In this case the Server & Network is provided by the Parent Group and other Business group will share information but they will use their specific License to use the system, doesn’t matter who pays for fee.

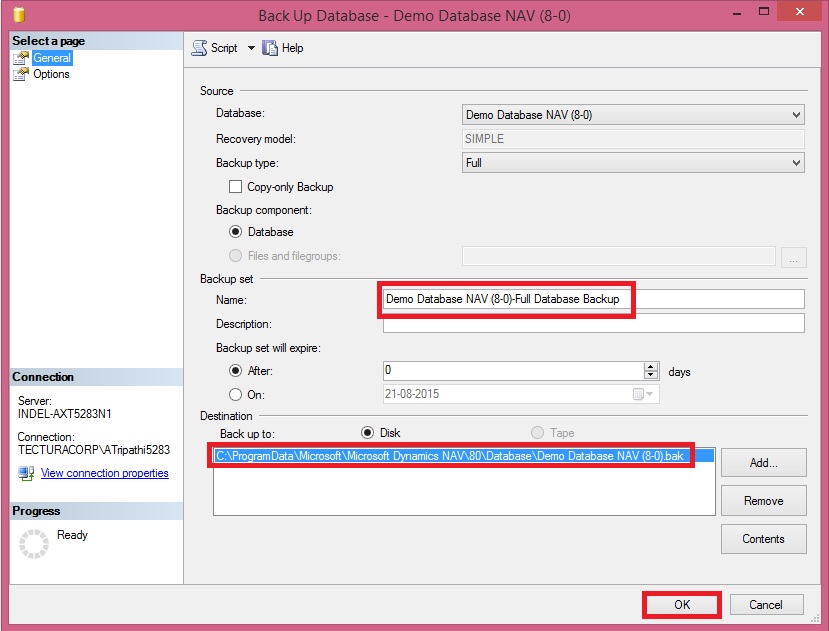
In any case we need to upload License to each database in Multitenancy.

Import-NAVServerLicense

Imports a license file into a Microsoft Dynamics NAV database.

Syntax

Parameter Set: __AllParameterSets

Import-NAVServerLicense [-ServerInstance] <String> [-Database <LicenseDatabase> ] [-Force] [-Tenant <TenantId> ] [-Confirm] [-WhatIf] [ <CommonParameters>]

Parameter Set: LicenseDataSet

Import-NAVServerLicense [-LicenseData] <Byte[]> [-Force] [-Confirm] [-WhatIf] [ <CommonParameters>]

Parameter Set: LicenseFileSet

Import-NAVServerLicense [-LicenseFile] <String> [-Force] [-Confirm] [-WhatIf] [ <CommonParameters>]

Detailed Description

Use the Import-NAVServerLicense cmdlet to import a license file into a Microsoft Dynamics NAV database. If the Microsoft Dynamics NAV Server account specified does not have access to the location where the license file is stored, an error results. Check the Event Log on the Microsoft Dynamics NAV Server computer to see what permissions are required.

After importing a new license, restart all Microsoft Dynamics NAV Server instances to activate the license for client users.

Parameters

-Database<LicenseDatabase>

Specifies the database into which to import the license file. The possible values are described in the following list:

Default = 0

Default; overrides the license file currently in use.

Master = 1

Forces the license file to be global.

NavDatabase = 2

Forces the license file to be local and stored in the Microsoft Dynamics NAV database that is used by the specified Microsoft Dynamics NAV Server instance.

Tenant = 3

Forces the license file to be local and stored in the Microsoft Dynamics NAV database that is used by the tenant that is specified in the Tenant parameter.

Aliases none
Required? false
Position? named
Default Value none
Accept Pipeline Input? false
Accept Wildcard Characters? false

-Force

Forces the command to run without asking for user confirmation.

Aliases none
Required? false
Position? named
Default Value none
Accept Pipeline Input? false
Accept Wildcard Characters? false

-LicenseData<Byte[]>

Specifies the content retrieved from the certificate file by using the Get-Content cmdlet. For more information, see the examples.

Aliases none
Required? true
Position? 2
Default Value none
Accept Pipeline Input? false
Accept Wildcard Characters? false

-LicenseFile<String>

Aliases none
Required? true
Position? 2
Default Value none
Accept Pipeline Input? false
Accept Wildcard Characters? false

-ServerInstance<String>

Specifies the name of a Microsoft Dynamics NAV Server instance. The default instance name is DynamicsNAV80. You can specify either the full name of an instance (such as MicrosoftDynamicsNavServer$myinstance) or the short name (such as myinstance).

Aliases none
Required? true
Position? 1
Default Value none
Accept Pipeline Input? True (ByValue, ByPropertyName)
Accept Wildcard Characters? false

-Tenant<TenantId>

Specifies the ID of the tenant in which you want to import the license, such as Tenant1. This parameter is required unless the specified service instance is not configured to run multiple tenants.

Aliases Id
Required? false
Position? named
Default Value none
Accept Pipeline Input? True (ByPropertyName)
Accept Wildcard Characters? false

-Confirm

Prompts you for confirmation before running the cmdlet.

Required? false
Position? named
Default Value false
Accept Pipeline Input? false
Accept Wildcard Characters? false

-WhatIf

Shows what would happen if the cmdlet runs. The cmdlet is not run.

Required? false
Position? named
Default Value false
Accept Pipeline Input? false
Accept Wildcard Characters? false

<CommonParameters>

This cmdlet supports the common parameters: -Verbose, -Debug, -ErrorAction, -ErrorVariable, -OutBuffer, and -OutVariable.

Inputs

The input type is the type of the objects that you can pipe to the cmdlet.

  • System.String

You can pipe a string that contains a Microsoft Dynamics NAV Server instance name to the cmdlet.

Outputs

The output type is the type of the objects that the cmdlet emits.

  • None

This cmdlet does not generate any output.

Examples

This example imports a license file that is named “fin.flf” from the current directory into the default database.

C:\PS>Import-NAVServerLicense DynamicsNAV80 -LicenseData ([Byte[]]$(Get-Content -Path “fin.flf” -Encoding Byte))

This example imports a license file that is named “fin.flf” from the current directory into the local Microsoft Dynamics NAV database that is used by the MyInstance Microsoft Dynamics NAV Server instance.

C:\PS>Import-NAVServerLicense MyInstance -LicenseData ([Byte[]]$(Get-Content -Path “fin.flf” -Encoding Byte)) -Database NavDatabase

This example imports a license file that is named “fin.flf” from the current directory into the master database.

C:\PS>Import-NAVServerLicense ‘MicrosoftDynamicsNavServer$MyInstance’ -LicenseData ([Byte[]]$(Get-Content -Path “fin.flf” -Encoding Byte)) -Database Master

This example imports a license file that is named “fin.flf” from the current directory into the database that is used by the specified tenant, Tenant1.

C:\PS>Import-NAVServerLicense ‘MicrosoftDynamicsNavServer$MyInstance’ -LicenseData ([Byte[]]$(Get-Content -Path “fin.flf” -Encoding Byte)) -Database Tenant –Tenant Tenant1

Let import the license to the Tenants which we created in our earlier post.

If you missed previous post you can find it here. Adding Tenants to multitenancy Environment

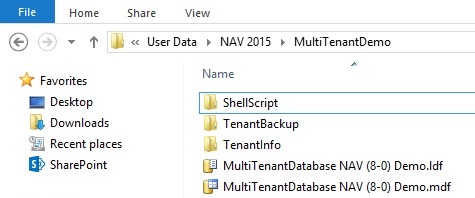
I have created the Folder and placed my Tenants License in this.

License-1

Set-ExecutionPolicy unrestricted -Force

Import-Module ‘C:\Program Files\Microsoft Dynamics NAV\80\Service\NavAdminTool.ps1’

Import-NAVServerLicense MTenantDemo -Tenant ‘Tenant-1’ -LicenseData ([Byte[]]$(Get-Content -Path “C:\User Data\NAV 2015\MultiTenantDemo\Tenant License\Tenant-1.flf” -Encoding Byte))

Import-NAVServerLicense MTenantDemo -Tenant ‘Tenant-2’ -LicenseData ([Byte[]]$(Get-Content -Path “C:\User Data\NAV 2015\MultiTenantDemo\Tenant License\Tenant-2.flf” -Encoding Byte))

Import-NAVServerLicense MTenantDemo -Tenant ‘Tenant-3’ -LicenseData ([Byte[]]$(Get-Content -Path “C:\User Data\NAV 2015\MultiTenantDemo\Tenant License\Tenant-3.flf” -Encoding Byte))

Import-NAVServerLicense MTenantDemo -Tenant ‘Tenant-4’ -LicenseData ([Byte[]]$(Get-Content -Path “C:\User Data\NAV 2015\MultiTenantDemo\Tenant License\Tenant-4.flf” -Encoding Byte))

Import-NAVServerLicense MTenantDemo -Tenant ‘Tenant-5’ -LicenseData ([Byte[]]$(Get-Content -Path “C:\User Data\NAV 2015\MultiTenantDemo\Tenant License\Tenant-5.flf” -Encoding Byte))

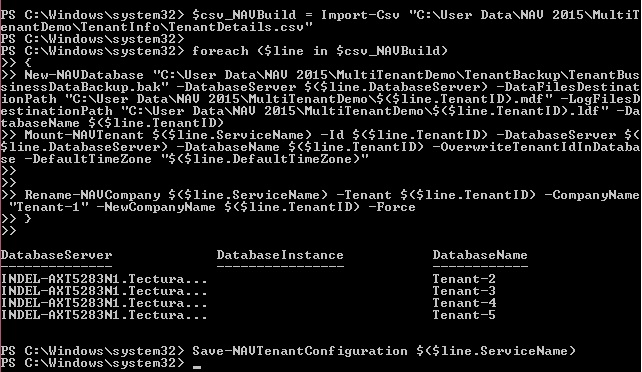
Copy the above Script and paste into the Microsoft Dynamics NAV 2015 Administration Shell.

License-2

Our License have now successfully uploaded to respective databases. As the message suggest we need to re-start the service so that new License comes into effect.

You can use above Script to Upload License to individual Tenants, License could be different or same depends how you discussed with Microsoft and purchased.

Development Tips, Multitenancy, Server

Adding Tenants to Multitenancy Environment

In my previous post Creating the Multitenant Environment, We were done with the basic setup for MultiTenantDatabase NAV (8-0) Demo_App, the first Tenant MultiTenantDatabase NAV (8-0) Demo.

All other Tenants can now be created in similar fashion.

It is recommended to create a tenant template, and in turn use this template to make other tenants.

To create a template follow bellow steps:

  • Remove all users leaving only Administrator Account as Super Permission.
  • Remove any Transaction data specific to Company and other Setups
  • Take the backup of the database and keep it as template for other tenant’s database creation. Basically we will restore this database for each new tenant we need to add.

You can restore the database and mount it to the service one by one and rename the company name manually and do other modifications. But if you need to create 100 or 1000 tenants then this process will be quite time taking. To make this step easy we can use CSV file to store all necessary information and create a Shell Script to read information from CSV file and input as parameter to the commands to make this process fast and save with unnecessary effort.

Today I am going to discuss this, as a sample I have taken bare minimum information to get our task done. In real scenario many more things you may require but you can use this as a template and design your CSV and Script accordingly.

Let’s do the Preparation:

AddTenant-1
I have created the Folder structure as shown in above screen shot.

I will keep my CSV File in TenantInfo Folder.

AddTenant-2
I will store my Shell Script in ShellScript Folder.

AddTenant-3

$csv_NAVBuild = Import-Csv “C:\User Data\NAV 2015\MultiTenantDemo\TenantInfo\TenantDetails.csv”

foreach ($line in $csv_NAVBuild)
{
New-NAVDatabase “C:\User Data\NAV 2015\MultiTenantDemo\TenantBackup\TenantBussinessDataBackup.bak” -DatabaseServer $($line.DatabaseServer) -DataFilesDestinationPath “C:\User Data\NAV 2015\MultiTenantDemo\$($line.TenantID).mdf” -LogFilesDestinationPath “C:\User Data\NAV 2015\MultiTenantDemo\$($line.TenantID).ldf” -DatabaseName $($line.TenantID)
Mount-NAVTenant $($line.ServiceName) –Id $($line.TenantID) -DatabaseServer $($line.DatabaseServer) -DatabaseName $($line.TenantID) -OverwriteTenantIdInDatabase -DefaultTimeZone “$($line.DefaultTimeZone)”
Rename-NAVCompany $($line.ServiceName) -Tenant $($line.TenantID) -CompanyName “Tenant-1” -NewCompanyName $($line.TenantID) -Force
}

Save-NAVTenantConfiguration $($line.ServiceName)

I will place my tenant database template file in TenantBackup Folder prepared as per above discussed step. I will take the SQL backup and place the .bak file in this folder.

AddTenant-4
Creating and Mounting Tenants

It is possible to create PowerShell scripts that aids the setup of Tenants. Basically, what the script does, is:

  1. Calls a CSV file (Comma separated file) with settings for all the Tenants
  2. Restores and creates new Tenants based on the tenant template SQL backup
  3. Mounts the new database as a tenant on NAV Server Instance
  4. Renames the default company name to the specified company name
  5. Saves NAV tenant configurations of NAV Server Instance

Open the Microsoft Dynamics NAV 2015 Administrator Shell, Make sure you run it as Administrator. Copy and Paste your above created script.
AddTenant-5
On completion of execution of script, Verify your Tenants are Mounted to the Service using Microsoft Dynamics NAV 2015 Administration.
AddTenant-6
Verify using SQL Server Management your all database is created.

AddTenant-7

Verify that the database Files are created in Specified Folder in the Script.

AddTenant-8

Verify that you are able to login to each Tenant database in RTC.

AddTenant-9

Now you are done with Creating the Tenants and Mounting the same to the Navision Service using CSV file and Shell Script.

Shell Script had made your life so easy, think if manually you have to do it for 5000 tenants how much time will you take to get this task done.

Development Tips, Multitenancy, Security, Server

Creating the Multitenant Environment

Before you start I will recommend to go through my earlier post on Multitenancy Concept & Overview here.

To start with the below steps you will require 2 Accounts preferably Domain Accounts:

  • An Account for running MS Dynamics Navision Service
  • An Administrator account for Database & RTC

How to setup these accounts and what permissions are required for these accounts I would recommend to go through my earlier post on Provisioning the Microsoft Dynamics NAV Server Account here.

Add both the above account to Navision Database with Super permission.

In order to create a multitenant environment (here for Demo Database NAV (8-0)), the following steps need to be done:

  • Take an SQL Backup of the running Demo Database NAV (8-0) database.

Multitenancy-1
Multitenancy-2
Multitenancy-3

  • Restore the newly made SQL Backup to a new database (MultiTenantDatabase NAV (8-0) Demo).

Multitenancy-4
Multitenancy-5
Multitenancy-6
Multitenancy-7

  • On the NAV Server, using the NAV 2015 Administration console, create a new NAV Server Instance named MTenantDemo

Multitenancy-8

  • Edit the instance and set the database to newly created MultiTenantDatabase NAV (8-0) Demo database, and set the instance to be started with NAV Service user.

Multitenancy-9
Multitenancy-10

  • Start MTenantDemo – and see if you can log in
  • Once you have confirmed the MultiTenantDatabase NAV (8-0) Demo database and MTenantDemo is running, split the database in an application part and a data part:
    • Open the NAV 2015 Administration Shell (or Windows PowerShell ISE and load the NavAdminTool)
    • Export the application part from the MultiTenantDatabase NAV (8-0) Demo database to a new database (MultiTenantDatabase NAV (8-0) Demo_App):

Export-NavApplication -DatabaseServer INDEL-AXT5283N1 -DatabaseName ‘MultiTenantDatabase NAV (8-0) Demo’ -DestinationDatabaseName ‘MultiTenantDatabase NAV (8-0) Demo_App’

  • Remove the application part from the MultiTenantDatabase NAV (8-0) Demo database:

Remove-NAVApplication -DatabaseServer INDEL-AXT5283N1 -DatabaseName ‘MultiTenantDatabase NAV (8-0) Demo’

Multitenancy-11
Multitenancy-12

  • Using the NAV 2015 Administration console, edit the MTenantDemo instance and set the database to newly created MultiTenantDatabase NAV (8-0) Demo_App database
    Multitenancy-13
  • And select Multitenant (set it to True):
  • Save and restart MTenantDemo

Multitenancy-14

  • Either through a Powershell commandlet in the NAV 2015 Administration Shell or by using the NAV 2015 Administration console mount a tenant named Tenant-1 on the MTenantDemo NAV Instance:

Multitenancy-15
Multitenancy-16
Multitenancy-17

  • Start NAV using the new tenant:

Multitenancy-18

  • In Companies rename the Company Name to Tenant-1
  • Take an SQL Backup using the MultiTenantDatabase NAV (8-0) Demo_App database, and call it “App_template.bak”
  • Take an SQL Backup using the MultiTenantDatabase NAV (8-0) Demo database, and call it “Tenant_template.bak”

You now have a template you can use when you want to create a application and a tenant.

Restore the Tenant Database as Tenant-2, Tenant-3, Tenant-4, Tenant-5 etc.

Mount the Tenant Databases to NAV Service MTenantDemo as per above steps.

Now you have One Application & 5 Business Data Tenants Mounted.

You will do development in Application Database MultiTenantDatabase NAV (8-0) Demo_App and then Sync your modifications to Business Data Databases named Tenant-1/2/3/4/5 etc.

To Sync your objects to Tenants you will use below script in NAV 2015 Administration Shell:

Set-ExecutionPolicy unrestricted –Force

Import-Module ‘C:\Program Files\Microsoft Dynamics NAV\80\Service\NavAdminTool.ps1’

Sync-NAVTenant MTenantDemo -Force -Tenant ‘MultiTenantDatabase NAV (8-0) Demo’

I will explain in more detail on Creating Tenants, Synchronizing Tenants and uploading License for Tenants in more details in my next upcoming post.