

This is fourth post in this series, if you wish to see first post, you can access here.
In second post I discussed about, how to create Azure Functions, you can access here.
In previous post I discussed about, how to Integrate Azure Functions in Business Central, you can access here.
In this post we will discuss how to make available QR Image using API by exposing as Web Service.
Let’s cut the theoretical part and coming directly to the solution.
This post is very short and as an answer to query from one of the blog readers, who regularly gives feedback and suggest topic he wish from me. Sometime it is not possible to write post for every query, but I try to pick some which I find interesting. Converting any topic into post is quite time taking, solution can be of 10 mins but presenting same in form of blog takes 2-3 hours, sometimes even more.
Some time appropriate environment is not available where I can put the solution and take screenshots to present as blog.
Since this topic is part of current series, I am writing posts on, so I was able to easily pick this topic.
Requirement is to add capability to get QR Image we generated in our previous posts using Web Service/ API/ OData/ JSON Base64Text.
To get this working we will first create a Codeunit with appropriate methods and expose it as Web Service.
Step – 1.
Create Codeunit & Add below method.

Step – 2
Publish above Codeunit as Web Service.
Step – 3
Copy SOAP URL
[SOAP URL]
Convert to ODataV4 URL by making necessary modification as below:
[ODataV4 URL]
Similarly, your $metadata URL will be:
Run the metadata URL in browser:
Search for your function created above, you should get definition as below:
<Action Name=”QRCodeGenerator_GetQRSetImageAsJSON”>
<Parameter Name=”qRSetId” Type=”Edm.Int32″/>
<ReturnType Type=”Edm.String”/>
</Action>
Let’s test the above URL for function using Postman to see the result:

[POST] – https://api.businesscentral.dynamics.com/v2.0/1e4fc386-962e-4a20-8364-d5aeb65e2485/Test/ODataV4/QRCodeGenerator_GetQRSetImageAsJSON?Company=CRONUS USA, Inc.
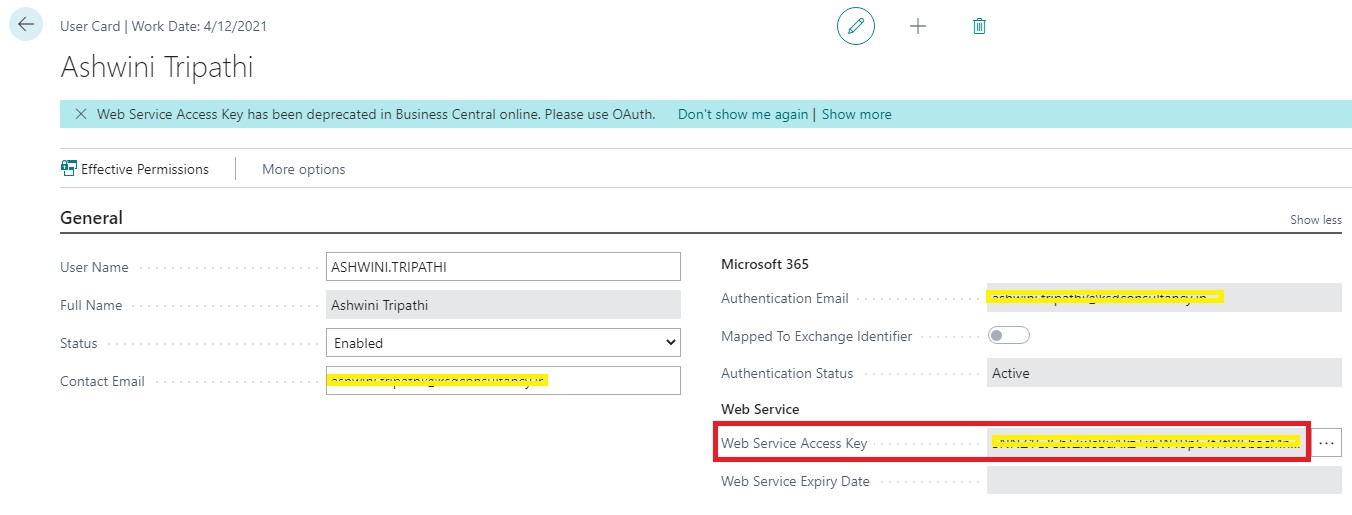
Authorization: Basic Auth
Username: ASHWINI.TRIPATHI
Password: xjAtAtTaFhgXkgR4M5WoHapotvJNmqJ5//XBYK2v5s4= (Web Service Access Key)
JSON Parameter to Function: (Body raw:JSON)
{
“qRSetId” : “6”
}
Result Body:
{
“@odata.context”: “https://api.businesscentral.dynamics.com/v2.0/1e4fc386-962e-4a20-8364-d5aeb65e2485/Test/ODataV4/$metadata#Edm.String”,
“value”: “iVBORw0KGgoAAAANSUhEUgAAApQAAAKUAQMAAACAATp/AAAAAXNSR0IArs4c6QAAAARnQU1BAACxjwv8YQUAAAAGUExURQAAAP///6XZn90AAAAJcEhZcwAADsMAAA7DAcdvqGQAAAHtSURBVHja7dpbasMwEAXQ2YH3v0vvwKVBsZ44DZ4UWs58BEnMHH1eYjuO9NqZTCaTyWQymUwmk8lkMplMJpPJZDKZ/8KMsbb27Ls3St+2bmYymUwmM8Ws58N2b+FiXjQzmUwmk3nTLMN1qkPq6LqZyWQymczPmUdTwxVMJpPJZP6G+di0/7lqH5PJZDKZnzOnK7ZzW2tbNzOZTCaTmWIOtbXw9DM3M5lMJpOZYK6rPvSL9huJywkmk8lkMu+Yz0d9tR7HQ7INl9UWJpPJZDITzDIwv39arVbNTCaTyWRmmS0XbZ5Nq64uM47JZDKZzDfMdmrv4W47ZByTyWQymalm7S2rre0tq+eNxRw4JpPJZDITzDhjq8uu9p5udSLBZDKZTGae+UyxKd4GqWbc3MxkMplMZpZ5EXSdVPuYTCaTyUw12/kh1Dq4rVcZx2QymUzmG+aqinmcU12etdceTCaTyWSmmDHWkHaDNJ8xmUwmk5li1vM6GjFfu60nmEwmk8nMMuvUFGV7zPWjjGMymUwm87ZZt/Pqcc/wXJDJZDKZzE+apSXOV1TRf9HHZDKZTGaiub4i+ijb+48iDiaTyWQyM82h2rZYRFmsYpDJZDKZzHtmVjGZTCaTyWQymUwmk8lkMplMJpPJZDL/rHnsXwW1n/zFqtyZAAAAAElFTkSuQmCC”
}
Copy the Value and use any base64 – image converter tool, search on Google
You will get your QR Image:

Don’t try any URL or Passwords in this post as same is modified, and in images covered to hide actual url & passwords.
Hope you enjoyed learning from this post.
That’s all for this post, but visit again to learn from upcoming posts in this series, will post soon.
See you again in next post, till then keep exploring, learning and sharing with others.


You must be logged in to post a comment.