
Tag: API

Integrating with Business Central – using Web Service
This is fourth post in this series, if you wish to see first post, you can access here.
In second post I discussed about, how to create Azure Functions, you can access here.
In previous post I discussed about, how to Integrate Azure Functions in Business Central, you can access here.
In this post we will discuss how to make available QR Image using API by exposing as Web Service.
Let’s cut the theoretical part and coming directly to the solution.
This post is very short and as an answer to query from one of the blog readers, who regularly gives feedback and suggest topic he wish from me. Sometime it is not possible to write post for every query, but I try to pick some which I find interesting. Converting any topic into post is quite time taking, solution can be of 10 mins but presenting same in form of blog takes 2-3 hours, sometimes even more.
Some time appropriate environment is not available where I can put the solution and take screenshots to present as blog.
Since this topic is part of current series, I am writing posts on, so I was able to easily pick this topic.
Requirement is to add capability to get QR Image we generated in our previous posts using Web Service/ API/ OData/ JSON Base64Text.
To get this working we will first create a Codeunit with appropriate methods and expose it as Web Service.
Step – 1.
Create Codeunit & Add below method.

Step – 2
Publish above Codeunit as Web Service.
Step – 3
Copy SOAP URL
[SOAP URL]
Convert to ODataV4 URL by making necessary modification as below:
[ODataV4 URL]
Similarly, your $metadata URL will be:
Run the metadata URL in browser:
Search for your function created above, you should get definition as below:
<Action Name=”QRCodeGenerator_GetQRSetImageAsJSON”>
<Parameter Name=”qRSetId” Type=”Edm.Int32″/>
<ReturnType Type=”Edm.String”/>
</Action>
Let’s test the above URL for function using Postman to see the result:

[POST] – https://api.businesscentral.dynamics.com/v2.0/1e4fc386-962e-4a20-8364-d5aeb65e2485/Test/ODataV4/QRCodeGenerator_GetQRSetImageAsJSON?Company=CRONUS USA, Inc.
Authorization: Basic Auth
Username: ASHWINI.TRIPATHI
Password: xjAtAtTaFhgXkgR4M5WoHapotvJNmqJ5//XBYK2v5s4= (Web Service Access Key)
JSON Parameter to Function: (Body raw:JSON)
{
“qRSetId” : “6”
}
Result Body:
{
“@odata.context”: “https://api.businesscentral.dynamics.com/v2.0/1e4fc386-962e-4a20-8364-d5aeb65e2485/Test/ODataV4/$metadata#Edm.String”,
“value”: “iVBORw0KGgoAAAANSUhEUgAAApQAAAKUAQMAAACAATp/AAAAAXNSR0IArs4c6QAAAARnQU1BAACxjwv8YQUAAAAGUExURQAAAP///6XZn90AAAAJcEhZcwAADsMAAA7DAcdvqGQAAAHtSURBVHja7dpbasMwEAXQ2YH3v0vvwKVBsZ44DZ4UWs58BEnMHH1eYjuO9NqZTCaTyWQymUwmk8lkMplMJpPJZDKZ/8KMsbb27Ls3St+2bmYymUwmM8Ws58N2b+FiXjQzmUwmk3nTLMN1qkPq6LqZyWQymczPmUdTwxVMJpPJZP6G+di0/7lqH5PJZDKZnzOnK7ZzW2tbNzOZTCaTmWIOtbXw9DM3M5lMJpOZYK6rPvSL9huJywkmk8lkMu+Yz0d9tR7HQ7INl9UWJpPJZDITzDIwv39arVbNTCaTyWRmmS0XbZ5Nq64uM47JZDKZzDfMdmrv4W47ZByTyWQymalm7S2rre0tq+eNxRw4JpPJZDITzDhjq8uu9p5udSLBZDKZTGae+UyxKd4GqWbc3MxkMplMZpZ5EXSdVPuYTCaTyUw12/kh1Dq4rVcZx2QymUzmG+aqinmcU12etdceTCaTyWSmmDHWkHaDNJ8xmUwmk5li1vM6GjFfu60nmEwmk8nMMuvUFGV7zPWjjGMymUwm87ZZt/Pqcc/wXJDJZDKZzE+apSXOV1TRf9HHZDKZTGaiub4i+ijb+48iDiaTyWQyM82h2rZYRFmsYpDJZDKZzHtmVjGZTCaTyWQymUwmk8lkMplMJpPJZDL/rHnsXwW1n/zFqtyZAAAAAElFTkSuQmCC”
}
Copy the Value and use any base64 – image converter tool, search on Google
You will get your QR Image:

Don’t try any URL or Passwords in this post as same is modified, and in images covered to hide actual url & passwords.
Hope you enjoyed learning from this post.
That’s all for this post, but visit again to learn from upcoming posts in this series, will post soon.
See you again in next post, till then keep exploring, learning and sharing with others.
API – Business Central Part-2
In our previous post we saw basics of API in Navision. Let’s explore further.
If you missed the earlier post you can find here API – Business Central Part-1
Continuing from where we left in previous post.
Someone asked me why we require API when we have web service in place and can achieve same OData either query or filter in same fashion.
So what I am going to explain below will answer to that query.
The API will generate a REST service which returns OData. The API is not the same as the OData web services that we discussed in our earlier post.
There we created an OData web service based on a card page. If there were fields that need to be displayed on a card in the client application but you do not want those fields to expose in the OData web service, you will have to create a second card page to solve this problem. In this case, we create a separate page for our API and only for the API. This page cannot be requested in the client application. It’s also much better concept to separate them from the regular pages.
Also we can apply templates for default value of field, which we will discuss later in below post.
Let’s start with creating our own API.
Each resource is uniquely identified through an ID. As discussed in our earlier post. So let’s start with this, I will start with my earlier created Table LoadoutPoint and add one field ID.
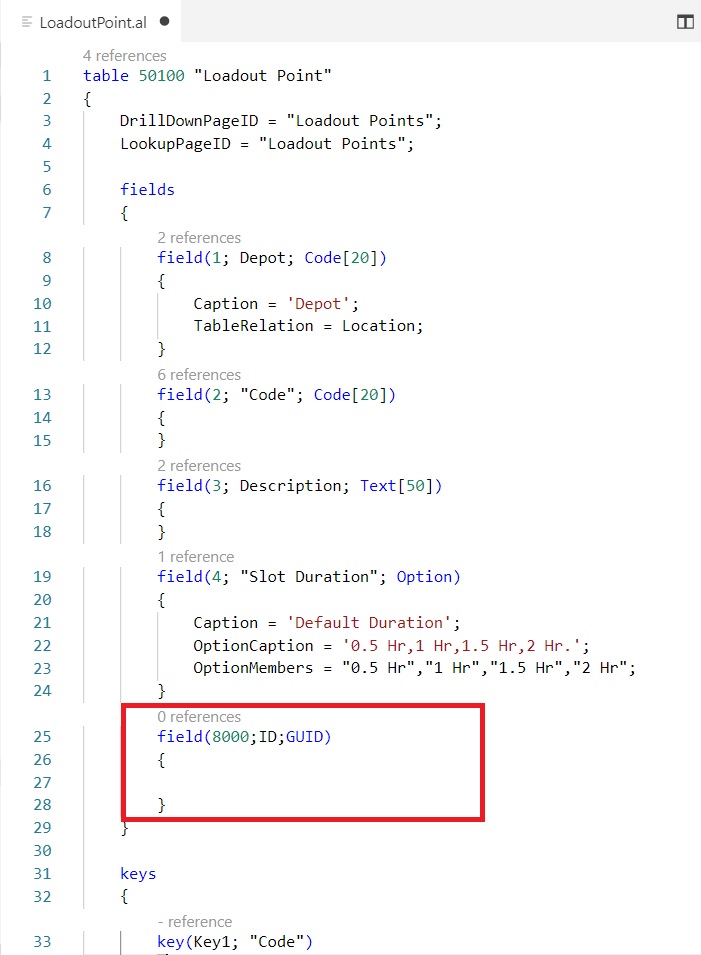
Any new entry in my table will have a unique ID for Loadout Point, so I have added code in OnInsert trigger of the table.

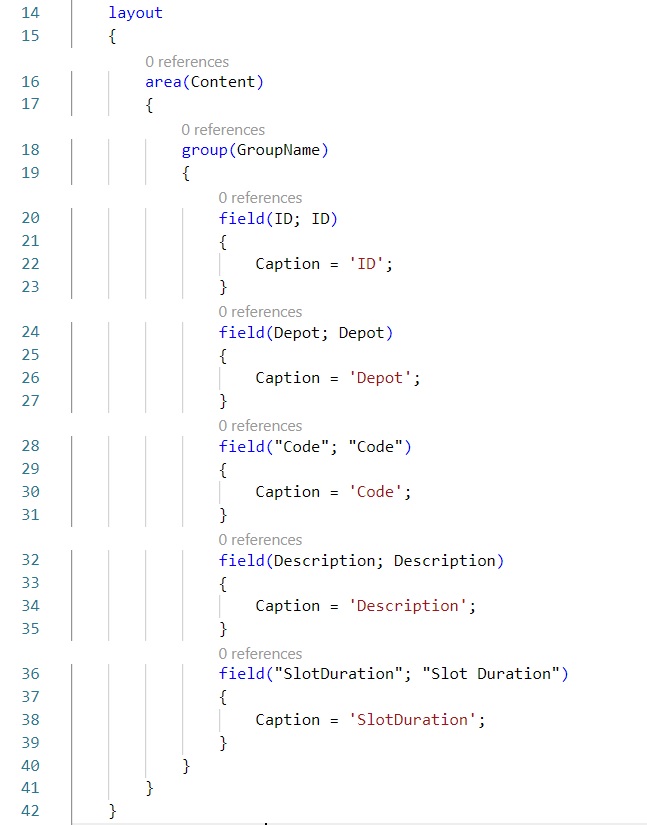
To create an API, you should create a page of type API, instead of a card page or list page.
Use tpage, Page for type API snippet for page structure. You get all the bare minimum properties to be added for API Page.

Then you have to define which fields you would like to include.
Some important rules to be followed for API Pages:
- Fields should be named in the APIs supported format, Any Captions cannot have spaces and special characters. Only AlphaNumeric values permitted.
- When you insert an entity through API endpoint, Business Central don’t run OnInsert trigger on the table.
- And we have assigned the ID for the new record there. So Add Insert(true) for OnInsert Trigger.
- Add business logic to Modify trigger. As external user can change values through API, even the value of the primary key field.
- Add Delete(true) for On Delete trigger. The reason same as above.
So let’s add these 3 trigger in our page too.

Ok so now we have modified Table and Created new API page, now it’s time to publish our app/extension.
Use command palette to publish your app.
Now it’s time to test, let’s access our API page from client and do setup for same.
Search for API Setup Page in the client.

You can define and assign your Template from Template Code field, check with available same Templates how to do it.

Also the conditions when this Template should apply as discussed in earlier post also.
Now let’s access the API from outside the Navision/ Business Central.
I will use Postman to test this.
To get the list of 44 standard APIs.

To get the list of custom APIs.
https://ksd-desktop:7748/BC130/api/ksdconsultancy/app1/v1.0/
Hope you remember when we created API page we assigned few Properties like
APIPublisher = ksdconsultancy, APIGroup = app1, APIVersion = v1.0.
Now we will use those values to access my custom APIs.
See the url those are included after /api/

All information is available in JSON format and further can be confirmed that there are 1000 records. Thus, the number of records integrated here depends on the Max Page Size parameter setup in Navision Server.
What else you can do with APIs:
- Get to fetch or List
- Post to insert records
- Patch to modify records
- Delete to Delete records
- And so on.
- You can extend existing API Pages too, I have yet not tried.
That we may discuss in some other post. Not to complicate this topic more for now I conclude this post here.
Will come up with more details in my upcoming posts, till then keep exploring, learning and take good care of yourself.
API – Business Central Part-1
In today’s post we will discuss about API’s in Business Central.
A Connect app establishes a point-to-point connection between Microsoft Dynamics 365 Business Central and a 3rd party solution or service and is typically created using standard REST API to interchange data.
Any coding language capable of calling REST APIs can be used to develop your Connect app. Because the API uses standard REST, we can use OData to query the results.
The Microsoft Dynamics 365 Business Central API allows you to read and modify business data through apps that are connected and integrated through a single endpoint.
For Example:- You can use the API to get access to customer, vendor and other information, update sales orders, or view overdue payments etc.
Endpoint
Production Endpoint –
Development and Test Endpoint –
On Premise –
https://Server Name:Odata Port/Service Name/api/beta/
I am going to use my as I am running on On Premise :-
Enter the URL to get the list of 44 standard APIs. (Format of the URL for Business Central on-Premise is given as above:

I am using Postman to send GET request to my API endpoint.
Authentication
Azure Active Directory (AAD)
Basic authentication. Username and web service access key as password.
How to get web service access key?

Tips for working with the APIs
Some tips for working with the APIs are:
When you call the endpoint via GET, you get a list of all the available API’s.
When you call the endpoint via GET with $metadata, you get a list of all the available API’s with their metadata.
When you call the endpoint via GET with $filter, you can use the OData Filter Expressions as discussed in earlier post.
Each resource is uniquely identified through an ID.
Microsoft has added to its most of the tables as:
| Enabled | Field No. | Field Name | Data Type | Length | Description |
| Yes | 8000 | Id | GUID |
If you had to make your any table data available through API add this field to your tables. We will look into other aspects later in below post.
The resource ID must be provided in the URL when trying to read or modify a resource or any of its children. The ID is provided in ( ) after the API endpoint. For example, to GET the “CRONUS International Ltd.” company details, you must call:

From above request I get id of my company as : ab76c7b4-3c72-4805-86f7-7d91a10612ce now I will query Entity Item.
https://ksd-desktop:7748/BC130/api/beta/companies(ab76c7b4-3c72-4805-86f7-7d91a10612ce)/items

To enable API we need minimum 2 of the below conditions to be met.
- ID field in table of type GUID
- Page of type API
Let’s see in Business Central how it is setup and understand before we create our own API.
Open the Page API Setup.
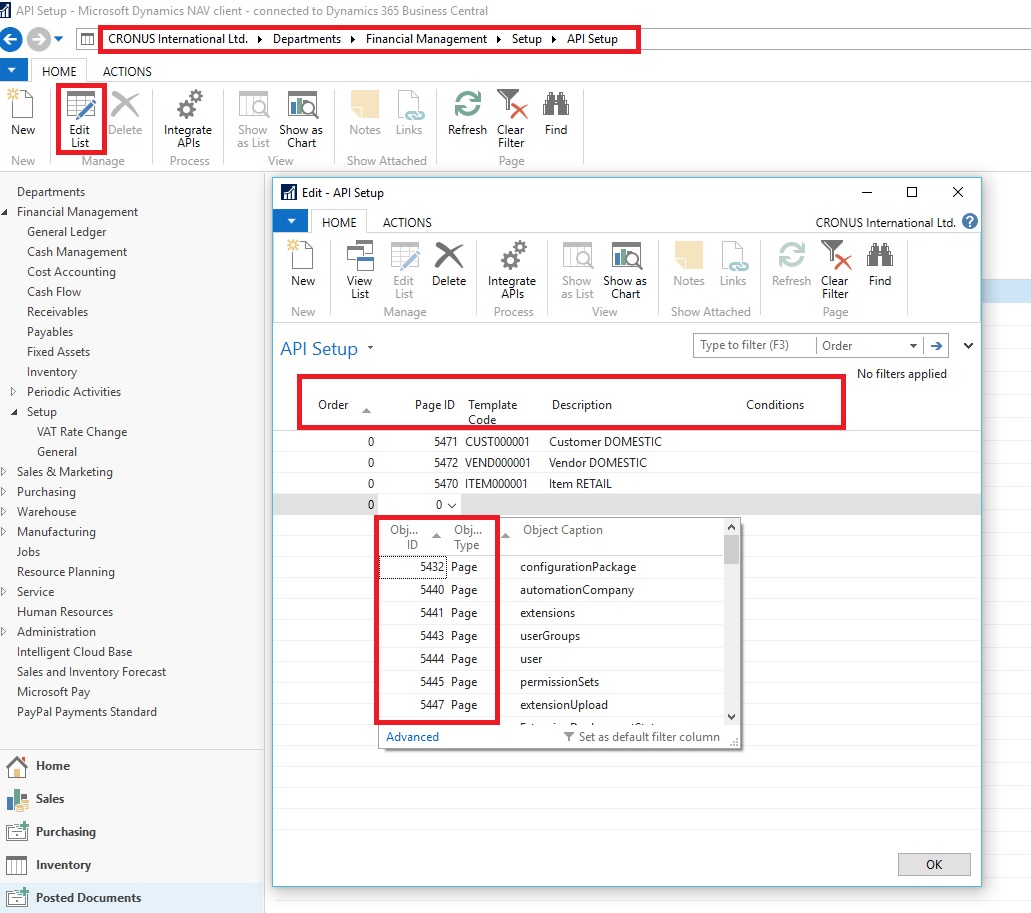
If you Lookup the Page ID, you will get list of Pages that Microsoft have provided as API.
AllObjWithCaption.”Object ID” WHERE (Object Type=CONST(Page),Object Subtype=CONST(API))
This relation is used for the Lookup. Means the Subtype should be defined as API.
Next you have Template Code – Since may be possible we don’t expose all fields or not necessary the values for every field is provided when API is submitted. To fill the default values for those field we assign the Template Code.

Description – you can setup as required.
Conditions – You can define condition when this Template should apply.

Before we move further ensure below setup to Server Instance properties and OData properties. Check and set the ‘Max Page Size’ to number of records you want to integrate.

At the time of writing this post have no idea of how to alter the number of records that can be integrated in Business Central on Cloud may update in future.
I stop here for today’s post. Will come up with more details in my next upcoming post.
Till then keep learning and exploring and take good care of yourself.
Meet you again in my next post with more details.
Web Services – Business Central Part- 1
You can use web services in Microsoft Dynamics 365 Business Central to expose data to the outside world.
You can use web services to get data from Microsoft Dynamics 365 Business Central and use it in other applications.
Any application, programing language or program that can work with XML and/or JSON for example: – Power BI, Microsoft PowerApps, a custom .NET program, etc. can connect to Microsoft Dynamics 365 Business Central fetch the available data.
A web service can also be used to create new or update existing data in the application.
Both XML (Extensible Markup Language) and JSON (JavaScript Object Notation) are open-standard file formats that are readable by humans. They are used to send information between clients over web services.
In this post we will discuss some terminology and differences between SOAP and OData. We will also learn on how to configure these services in Microsoft Dynamics 365 Business Central.
SOAP relies on HTTP(S), SMTP, FTP for message negotiation and transmission.
The most common type of messaging pattern in SOAP is the Remote Procedure Call (RPC), where one network node (the client) sends a request message to another node (the server), and the server sends a response message to the client. It uses SOAP envelope, which defines the message structure and how to process it.
A SOAP service exposes a WSDL (Web Services Description Language) file that describes how the service can be called, what parameters it expects and what data structure it returns. This file is an XML based document, and is targeted to be read by machines, not by humans.
OData (Open Data Protocol) is an open protocol that is designed to use and query RESTful APIs. An API (Application Programming Interface) is a set of routines and protocols that is used to communicate between different software components.
OData is built upon REST services and can be used to query REST services. By providing extra query parameters to a URL, you can for example limit or filter the result set.
SOAP exposes a WSDL document, OData exposes an EDMX document, which contains metadata for all the published web services.
You can see all the available OData web services by going to the search box and search for web services. This page is used to enable access to OData and SOAP web services.

OData web services can only be used with object types pages and queries, not with codeunits. There are two versions of OData you can use, version 3 and version 4. Version 4 is an enhanced version, and important to know is that version 4 returns JSON where version 3 returns AtomPub documents which are XML documents.
From this window you can add new or manage existing Web Services.
It is simple 2 Step task Add new object give service name and enable Publish checkbox. You will get your OData and/or SOAP URL.
For example: – object type page can be used in OData and in SOAP web services.
Let us explore the Web-Service Urls. For test purpose, I have created a Service with the name Customers for Page Customer Card.
https://ksd-Desktop:7748/BC130/ODataV4/Company(‘CRONUS%20International%20Ltd.’)/Customers
When we open, for example, our Customers web service, we can have a look at the URL.
First we have our server name and the port it’s using. “https://ksd-Desktop:7748”
Then we have our instance name, which in our case is BC130.
Then our OData version, so version 4. “ODataV4”
And then our company name, “Cronus International Ltd”.
And then finally our web service name, which is, in our case, “Customers”.
Let’s try this url, when we execute this url in our browser we get json file listing customers similar to below:
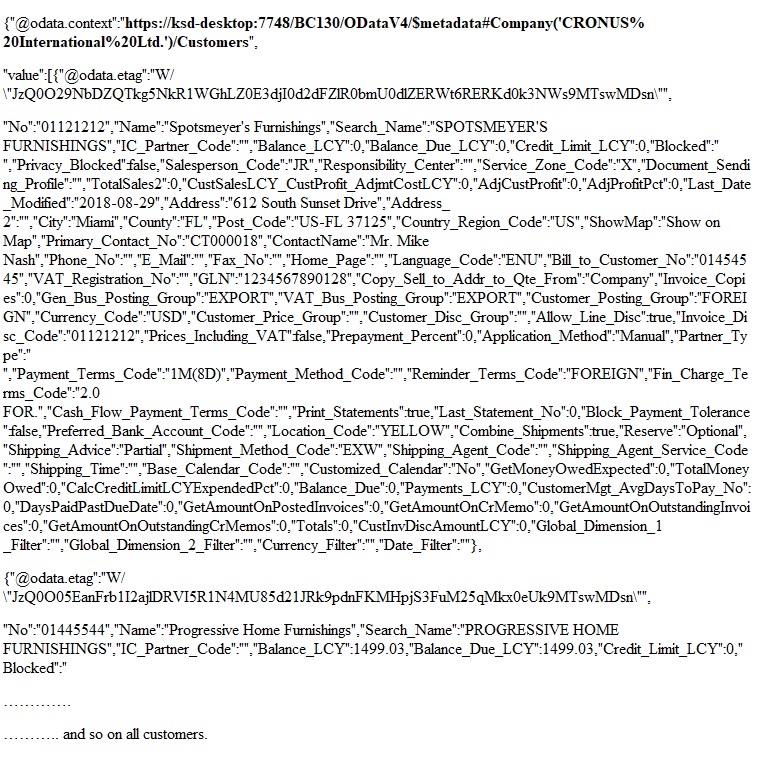
Here etag is the unique identifier of each records, it will be required when you update records, will discuss later.
If I remove my service name then:
https://ksd-desktop:7748/BC130/ODataV4/Company(‘CRONUS%20International%20Ltd.’)
{“@odata.context”:”https://ksd-desktop:7748/BC130/ODataV4/$metadata#Company/$entity”,”Name”:”CRONUS International Ltd.”,”Evaluation_Company”:false,”Display_Name”:”CRONUS International Ltd.”,”Id”:”ab76c7b4-3c72-4805-86f7-7d91a10612ce”,”Business_Profile_Id”:””}
If I remove my Company Name then:

If I open the metadata url
You will get EDMX file which shows metadata about the information in the OData web service.

You can see some properties with our data types. For example, if we scroll down, if we go to Customers, we have our entity type Customers, we can see some properties which our data types and max lengths. We can also see what properties are primary key. So this is number and so on. So all useful information when you’re creating applications that use these OData web services.
Filtering the OData
You can set filter expression to the url few examples as below:
We will use the filter option top for limiting the result to top 5 records of customer.
After our service name, we type question mark, then the dollar sign, and then the word top equals 5.
For example :
https://ksd-desktop:7748/BC130/ODataV4/Company(‘CRONUS%20International%20Ltd.’)/Customers?$top=5
Now the query will result in only first 5 records for customer.
If we want to see next 5 records then we can append &$skip=5 on above url
https://ksd-desktop:7748/BC130/ODataV4/Company(‘CRONUS%20International%20Ltd.’)/Customers?$top=5&$skip=5
If you want to see specific customer you can modify url as:
https://ksd-desktop:7748/BC130/ODataV4/Company(‘CRONUS%20International%20Ltd.’)/Customers(‘10000’)
Please refer to EDMX file to find correct name of the fields if wants to filter on specific fields.
https://ksd-desktop:7748/BC130/ODataV4/Company(‘CRONUS%20International%20Ltd.’)/Customers(‘10000’)?$select=Name
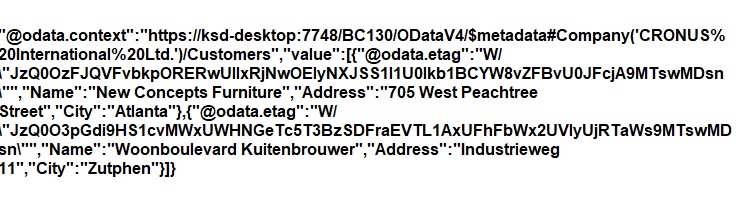
You will get the result as below for above url query
“@odata.context”:”https://ksd-desktop:7748/BC130/ODataV4/$metadata#Company(‘CRONUS%20International%20Ltd.’)/Customers/$entity”,”@odata.etag”:”W/\”JzQ0O044eFNmcWdXV0NpYlhTZDhUdTlrdytZUmdQbWRkL2U4TzZ4UEsxNGtod0
E9MTswMDsn\””,”Name”:”The Cannon Group PLC”}
You can add other fields too by appending the url with ‘,’
Customers(‘10000’)?$select=Name,City,Address……………
As told earlier please refer to EDMX file for correct Fields Name or Property it is case sensitive.
You can remove the Primary Key from the url to get list of selected fields for all customers.
Customers?$select=Name,City,Address……………
https://ksd-desktop:7748/BC130/ODataV4/Company(‘CRONUS%20International%20Ltd.’)/Customers?$orderby=City&$select=Name,City,Address
You can use orderby to sort the data from other than Primary key, by default it is sorted by Primary Key.
You can use desc for descending sort.
https://ksd-desktop:7748/BC130/ODataV4/Company(‘CRONUS%20International%20Ltd.’)/Customers?$orderby=City desc&$select=Name,City,Address
You can use filter to filter specific field values as:
https://ksd-desktop:7748/BC130/ODataV4/Company(‘CRONUS%20International%20Ltd.’)/Customers?$filter=City eq ‘Zutphen’ or City eq ‘Atlanta’&$select=Name,City,Address
you will get output as:
You can use expressions like [filter=Balance_LCY gt 0] or [filter=Location_Filter eq ‘BLUE’] etc.
I stop here for today. We have seen how the Web Services OData can be used to query records.
We will discuss about other stuffs in our next post in more details.
Till then keep exploring and learning, see you in next post. Take Care of yourself.
Control Add-In in Business Central
Today I will discuss about how we can create control add-in using VS Code & Extensions in Business Central.
We can create a control add-in the same way we created pages or code units. In Visual Studio we can use the code snippet T control add-in to generate a new control add-in.
It will better to create a fresh Extension Project in VS Code for control add in.
Step – 1 : Preparation
Create a New project, and add Folder Structure to arrange your files.
You can find steps in this post : Bare Minimum Steps to Start with fresh Extension Project for Business Central
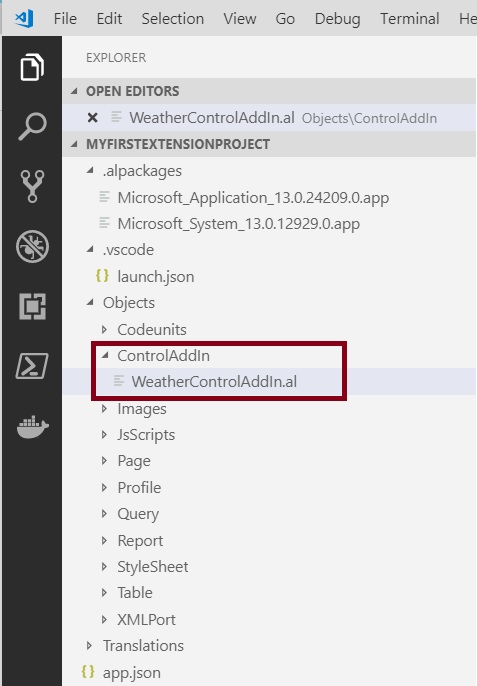
I will create below Folder:
- ControlAddIn
- Images
- JsScript
- Page
- StyleSheet
Step – 2 : Create Control Add-In
In control add-in folder I’m going to create a new control add-in. So new file.
Use the snippet, T control add-in, to create a control add-in.
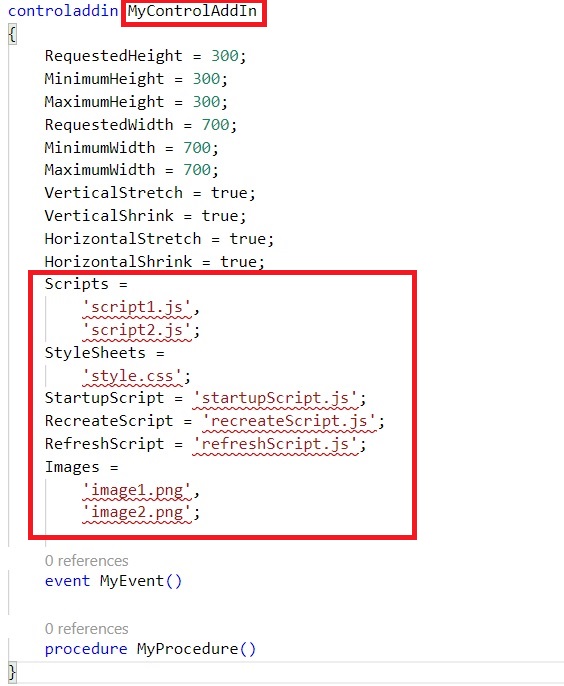
Give the name to your control add-in in my example I have used “WeatherControlAddIn”
A control add-in works with JavaScript files that can execute some code. The scripts property is used to reference these JavaScript files. They can be local files or references to external files over http or HTTPS. A very commonly used JavaScript library is jQuery. JQuery makes it a lot easier to write JavaScript code and it reduces the lines of code significantly. In our case any such files will be saved in JsScripts folder under Extension-> Objects Folder as setup above. One file we will create for StartupScript as Start.js.
Now let’s include jQuery. We have to download jQuery from the Internet. So if we open our Web browser and we go to the jQuery website, we can click the download jQuery button over here. But instead of really downloading the jQuery files, we are going to reference them online.
Open the site: https://jquery.com/

Click on Download jQuery v3.3.1 large button as shown above.
Scroll down to find: – Microsoft CDN (Content Delivery Network)
Microsoft also has a CDN for jQuery. We take that one.
Copy the link to the latest one. Add this to our Scripts property in our control add-in.
Use the URL of jQuery file. There’s also a property start-up script which you can use to call a special script that runs when the page where you have implemented your control add-in is loaded. Now let’s add our start.js script over here. So because it’s in the folder script, we have to “Objects/JsScripts/Start.js”. Now, there’s also a recreate and a refresh script. We are not going to use them in this demo project, so remove them. And with the images and the style sheets properties you can specify additional style to the control add-in.
Scripts = ‘https://ajax.aspnetcdn.com/ajax/jQuery/jquery-3.3.1.js’;
StyleSheets = ‘Objects/StyleSheet/StyleSheet.css’;
StartupScript = ‘Objects/JsScripts/Start.js’;
Images = ‘Objects/Images/Weather.jpg” />
I am using dummy image to display on my control add-in, select your image accordingly and place it in Images folder.
We will look into StyleSheet.css and Start.js later in below post.

This is how your WeatherControlAddIn.al should look like.
Step – 3 : Create Style Sheet
I will be adding a CSS file to this with the name StyleSheet.css. In this CSS file I can apply some layout styles to give my control add-in a color or let it choose a certain font and so on and so on. But remember there are some guidelines on which styles to apply. I’m going to set my image to a width 200 pixels. So in CSS, this is image. Width, 200 pixels, and a margin top of 25 pixels. And then I need to reference it in my style sheet properties. This is ‘Objects/StyleSheet/StyleSheet.css’ and of course in the folder StyleSheet.
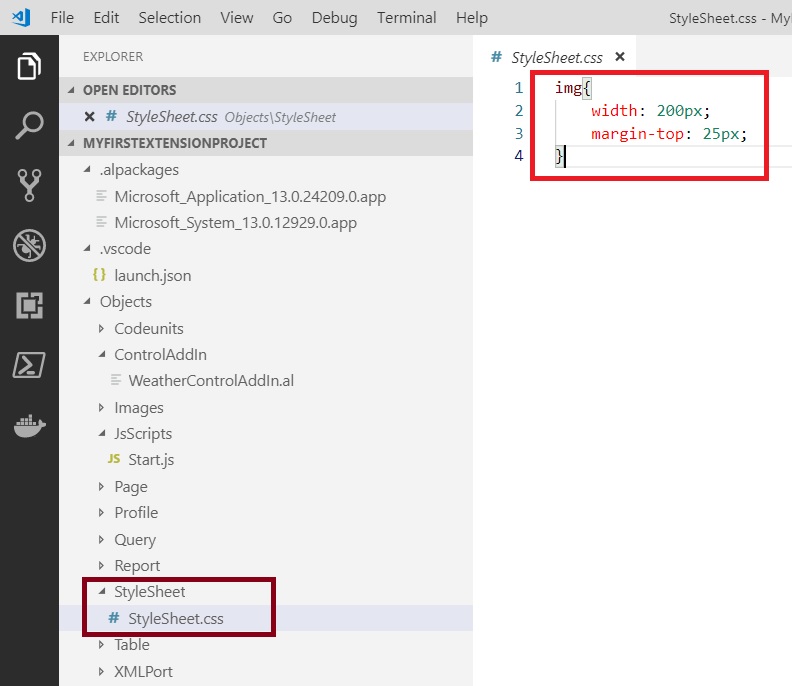
You can apply your knowledge about stylesheets to decorate your add-in accordingly, for demo purpose I have just set the width and top margin of the image.
Similarly I have downloaded an image from internet related to weather and copied to Images Folder.
Now set the path of both the files in your control add-in as shown above.
Step – 4 : Create CardPart Page
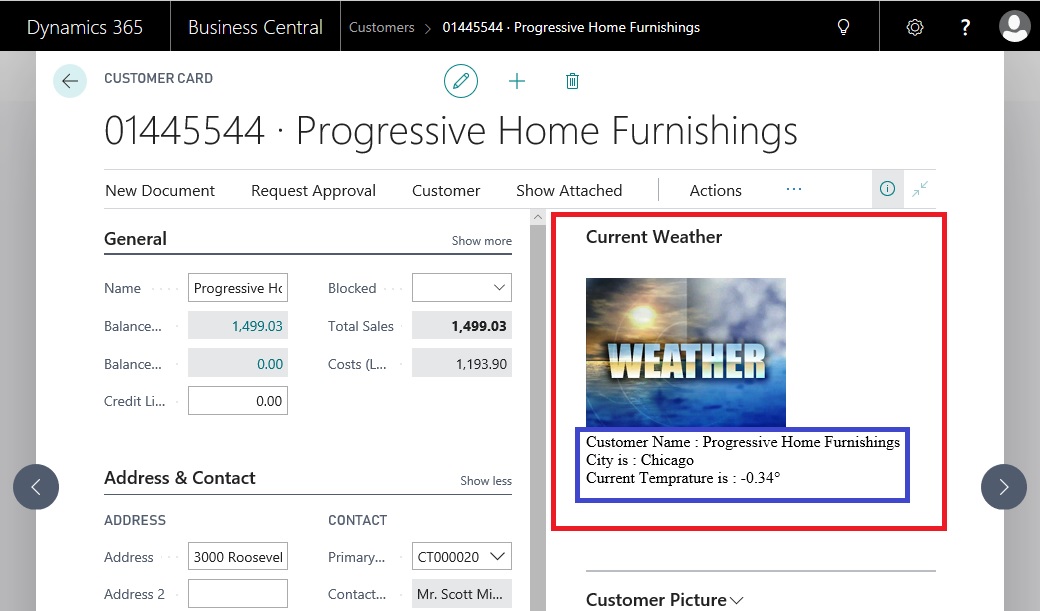
Now, our control add-in will run in a CardPart. So we have to create a page. Let’s create a new file and call this WeatherCardPart.al. This is a page. So T page. Let’s give it an ID and a name. WeatherCardPart. Now the source table will be customer. And the page type is CardPart.
Your Page should look similar to below:

We have added our ControlAddIn on the CardPart.
Next we will pass data from our Navision to the JQuery Script to process, to do so we have added a local procedure GetCustomer, remember above in control add-in we added signature of this procedure. Now it’s time to implement that function.
We have created a JsonObject to store our data and pass to Control Add-In.
This function gets called from OnAfterGetRecord trigger of the Page.
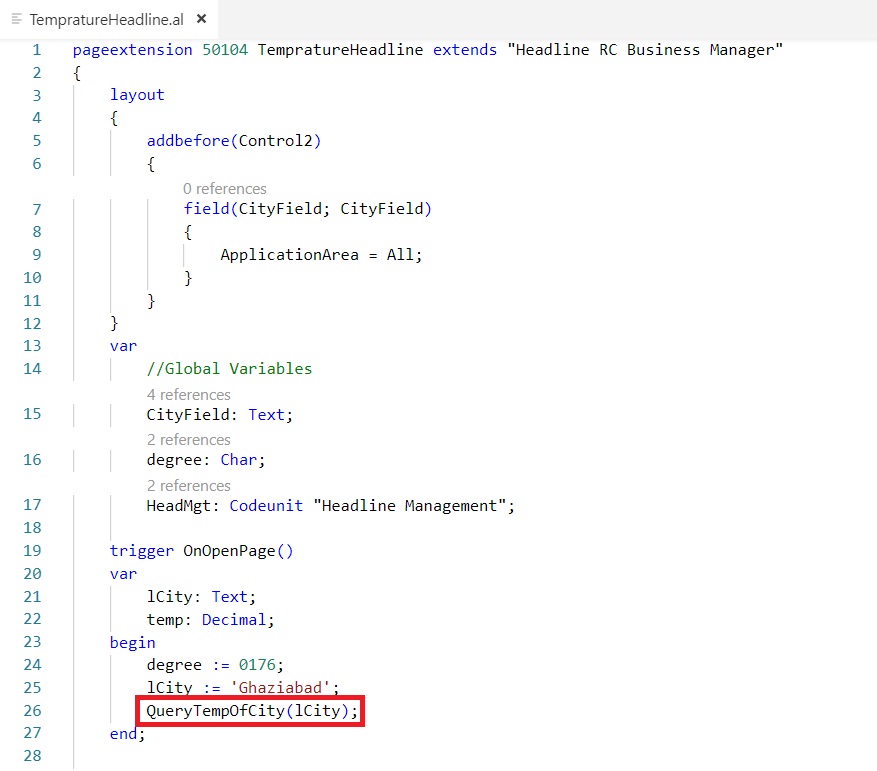
You may be wondering about function call QueryTempOfCity, this is the same function which we used in our earlier post to call API and get temperature of specified city then updated the Headline of the RC Page.
If you missed you can find that post here: Working with Headline Role Center Page and HTTP Call – Business Central
I have copied some functions from that post and changed a little bit and added to this page, it should be like below:

This function will take City as parameter and query from API and return the current temperature of that city. This function is explained in referenced post above.
Step – 5 : Create Page Extension
CardPart runs in a factbox on a page. So let’s create a page extension on the customer card. So new page. Let’s call this customercardextension.al. which extends the customer card. Add a factbox in the factboxes, and this is a part — let’s give it a name. WeatherCardPart. And this is of type WeatherCardPart. When adding a part or a factbox, then need to set the sub page link. So don’t forget to set the sub page link and this is equal to the number equals field number.

It should be similar to above.
Step – 6 : Create jQuery Script
Here comes the most interesting and difficult part as we are not regular Java Script programmer, but thanks to google, who is always there to help.
We will create our Start.js
You can apply your Java Scripts skill to enhance this, let us keep it simple for learning purpose.
We will extract the information send via GetCustomer function in JsonObject and display in our Control Add-In.

You can say controlAddIn here as main outer container.
We have defined 4 sub containers and with unique id to reference further.
Now we add all this 4 sub-containers to the main container controlAddIn.
Get the values from the Navision CardPard GetCustomer function and decode the JsonObject Customer and extract value from it and assign to these 3 containers.
For 4th we have assigned the image path from Extension using special function Microsoft.Dynamics.NAV.GetImageResource
Step – 7 : Deploy and Test the Control Add-In
So now we are done with Creating of Control Add-In, deploy your extension by using command pallet, Publish you Extension.
Open the Customer Card and you should see your Control Add-In in action.
Tested successful. Here we come to the end of our today’s post.
Hope you liked and enjoyed learning the concept in this post.
Will come up with more such interesting concepts in my future posts.
Till then keep exploring and learning. Take Care of yourself.
Working with Headline Role Center Page and HTTP Call – Business Central
I am again back with my First post of 2019. Hope you all enjoyed New Year Parties.
Wishing you all readers again Happy New Year.
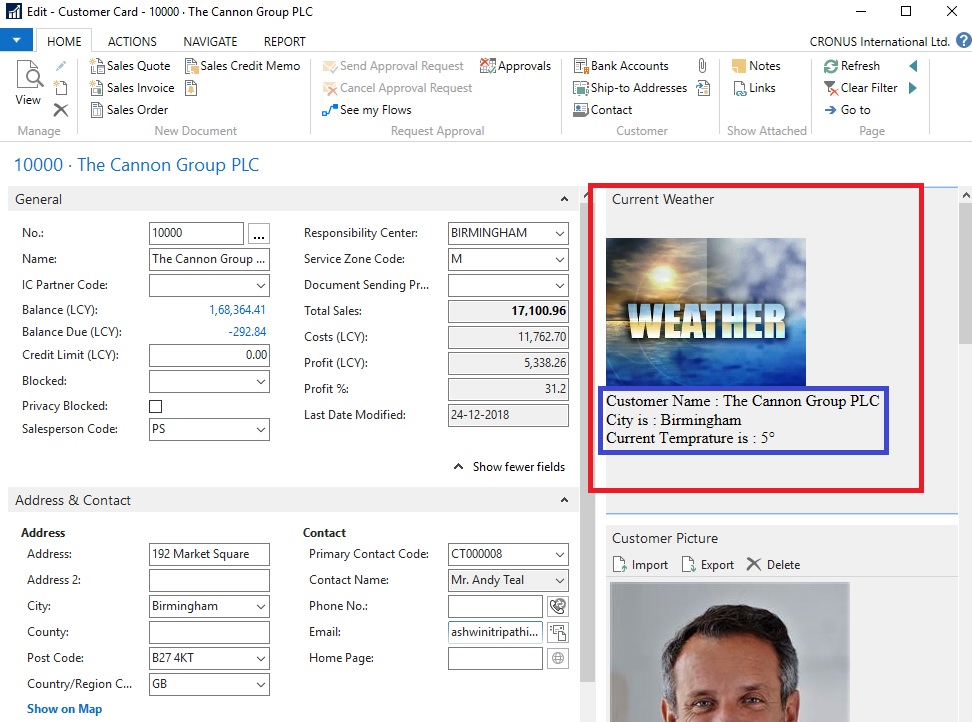
Today we will play around Role Center Headline Page and add our Message to it.
You have below 9 Headline RC Pages.
| 1440 | Headline RC Business Manager |
| 1441 | Headline RC Order Processor |
| 1442 | Headline RC Accountant |
| 1443 | Headline RC Project Manager |
| 1444 | Headline RC Relationship Mgt. |
| 1445 | Headline RC Administrator |
| 1446 | Headline RC Team Member |
| 1447 | Headline RC Prod. Planner |
| 1448 | Headline RC Serv. Dispatcher |

So let’s start with our task.
Step: 1 –
To be able to complete today’s customization you will require an account to any API weather forecast provider. Here I provide you with the free service, not all features are free, but sufficient to complete our task.
Open https://openweathermap.org/ page and register to the service. You will receive an API key upon sign up. This is required when you make an API Web Service call.
Step: 2 –
Open your Extension Project and create one New AL file for Page Extension
We will simply add one field to the Page.
Step: 3 –
This is the main part of this functionality:
We will write a procedure for Querying the current temperature of the city using API call and extract information from the response and add to the Headline.
Response are available in other formats too, but I am using JSON in my example. You can select your format you are comfortable with. You will find all details on the website API section.
Below will be our API call syntax:
‘http://api.openweathermap.org/data/2.5/weather?q=’ + City + ‘&units=metric&APPID=16ea4cf53127aa3baa74d4072381ba62’
To get data in API for current weather in Kelvins do not indicate units parameter into your API call.
To get in Fahrenheit add units=imperial parameter.
To get in Celsius add units=metric parameter.
API Key :- &APPID=16ea4cf53127aa3baa74d4072381ba62 – Compulsory
You will receive JSon response as below:
JSONText Value will be similar to below:
{“coord”:{“lon”:77.41,”lat”:28.67},
“weather”:[{“id”:711,”main”:”Smoke”,”description”:”smoke”,”icon”:”50n”}],
“base”:”stations”,
“main“:{“temp“:292.15,”pressure”:1019,”humidity”:48,”temp_min”:292.15,
“temp_max”:292.15},
“visibility”:1800,
“wind”:{“speed”:1,”deg”:210},
“clouds”:{“all”:0},
“dt”:1546432200,
“sys“:{“type”:1,”id”:9165,”message”:0.004,”country“:”IN”,”sunrise”:1546393411,
“sunset”:1546430725},
“id”:1271308,
“name“:”Ghaziabad”,
“cod”:200}

Below is the 2 functions used to extract the Information from JSon Response:

Step: 4 –
Save and Publish your Extension.
Open Web Client, make sure RC Business Manager profile is selected for your account or whichever Headline RC you have extended for above step.
You will see the Temperature of your selected city, as shown in the beginning of the post.
You can use similar concept to add your customized Headline to your Role Center Page.
See you again in my next post with some other concept, tips & tricks. Till then keep exploring and learning. Take care.
Image Analysis feature in Dynamics NAV 2018
In Dynamics NAV 2018, the Image Analyzer extension uses the Computer Vision API to analyze images that are attached to contact persons and items.
For example, this is useful for items because it lets you build up a stockpile of metadata about what you sell and use it to fine-tune search results when someone is browsing your web shop.
Image Analyzer is free in Dynamics NAV, but there is a limit to the number of items that you can analyze during a certain period of time. By default, you can analyze 100 images per month.
After you enable the extension, Image Analyzer runs each time you import an image to an item or contact person. You will see the attributes, confidence level, and details right away, and can decide what to do with each attribute. If you imported images before you enabled the Image Analyzer extension, you must go to the item or contact cards and choose the Analyze Picture action.
Requirements
There are a few requirements for the images:
- Image formats: JPEG, PNG, GIF, BMP
- Maximum file size: Less than 4 MB
- Image dimensions: Greater than 50 x 50 pixels
How to enable Image Analyzer
To enable the Image Analyzer extension, do one of the following:
Method-1 : Open an item or contact card. In the notification bar, choose Analyze Images, and then follow the steps in the assisted setup guide.
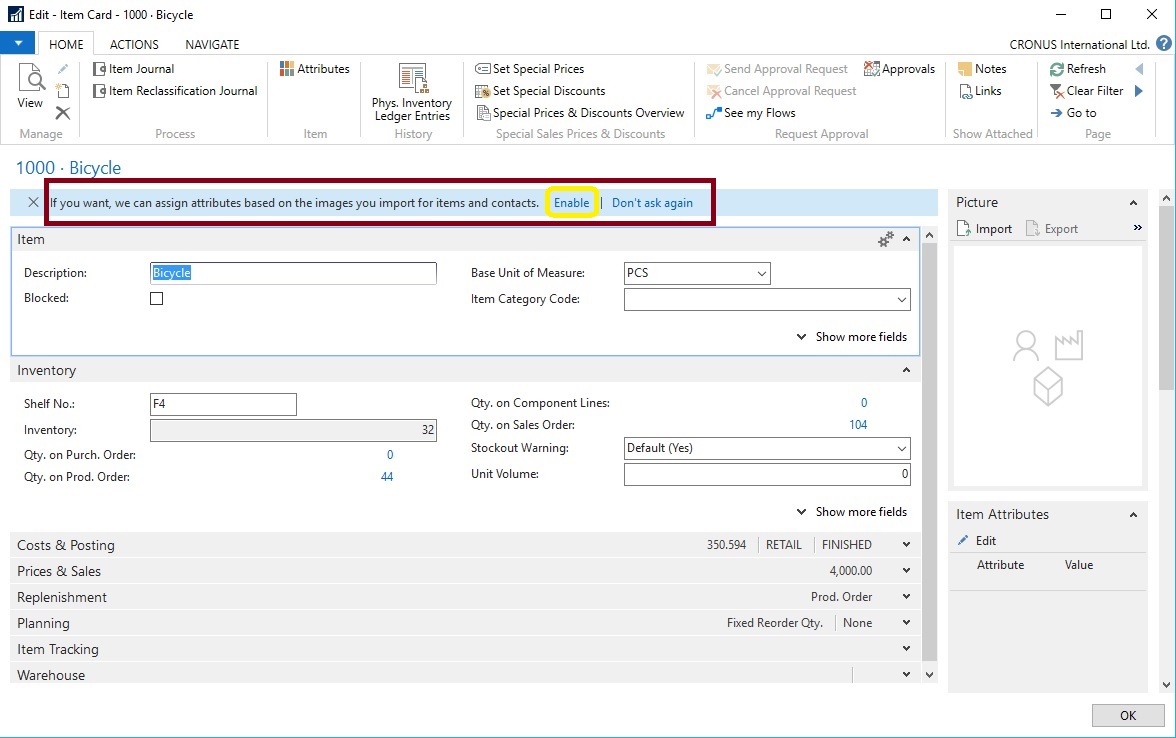
This will launch Image Analyser assisted setup guide, follow the step.

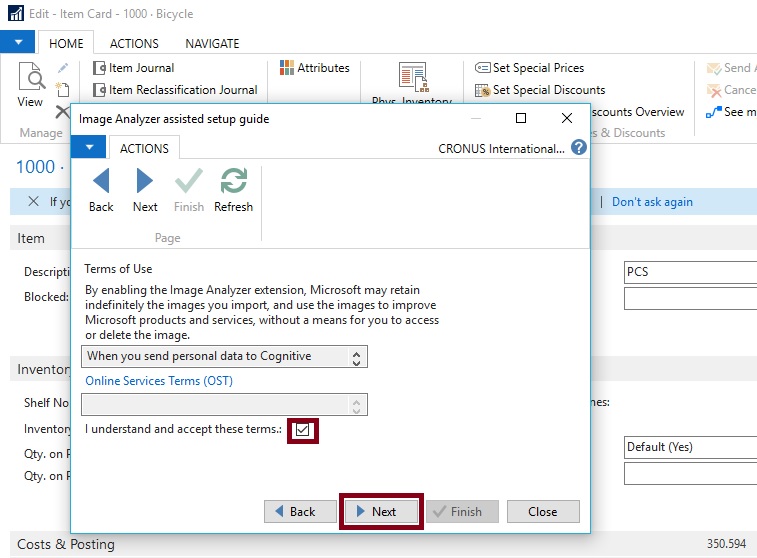

Once you are done It will import your image for Analysing.

Method-2 : Access the Service Connections, and then choose Image Analysis Setup.

Choose the Enable Image Analyzer check box, and then complete the steps in the assisted setup guide.

For URL and Key follow these steps:
Click on Computer Vision API Documentation
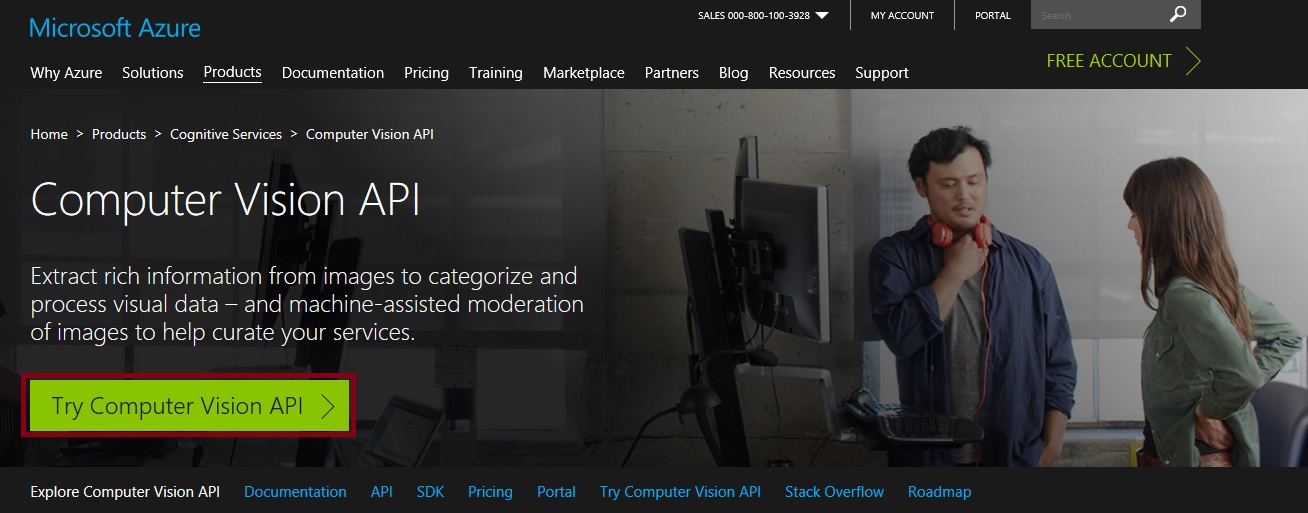
Click on Try Computer Vision API
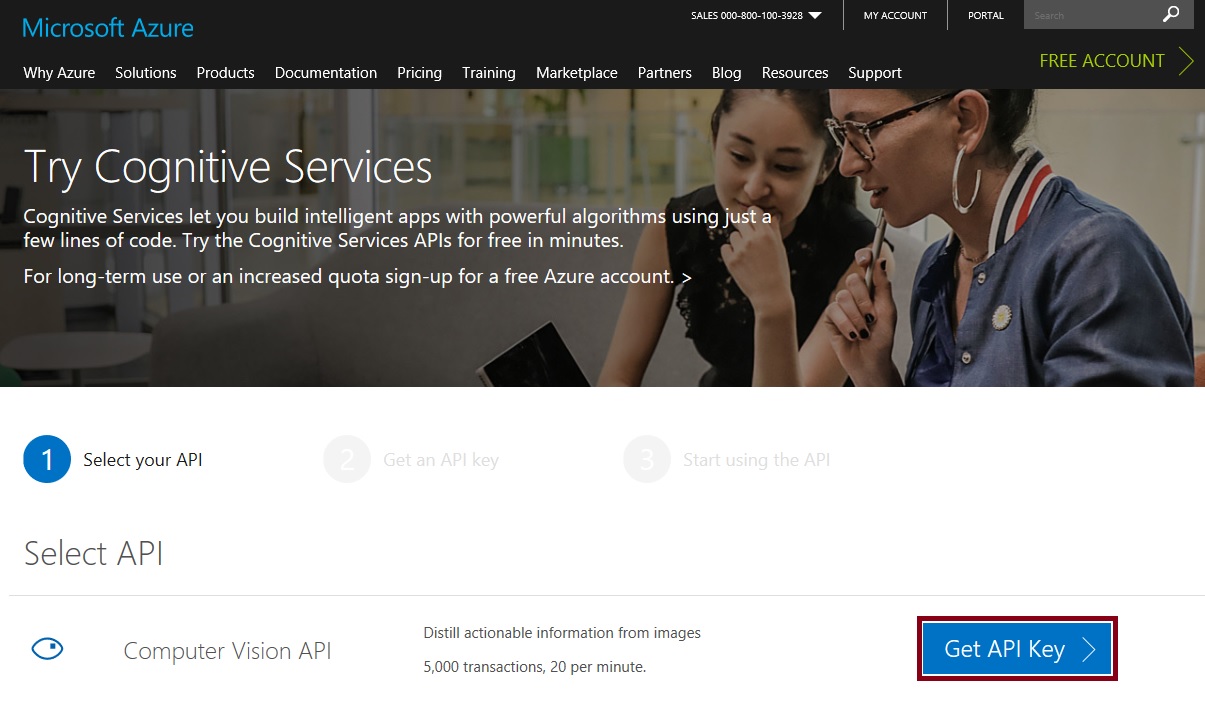
Select your API Computer Vision API and then Get API Key

Agree to T & C select your Country/Region and then Next
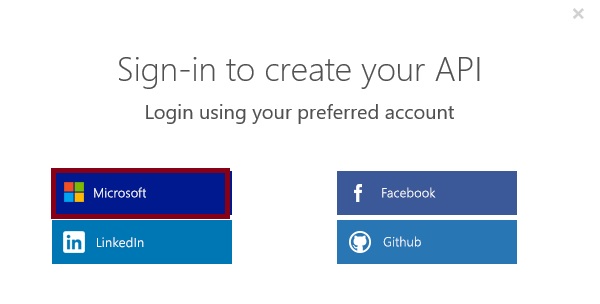
Sign-In with the preferred account sign-in method

Once done you will land on page which will have your Endpoint URL and Key
You must add /analyze at the end of the API URI, if it isn’t already there.
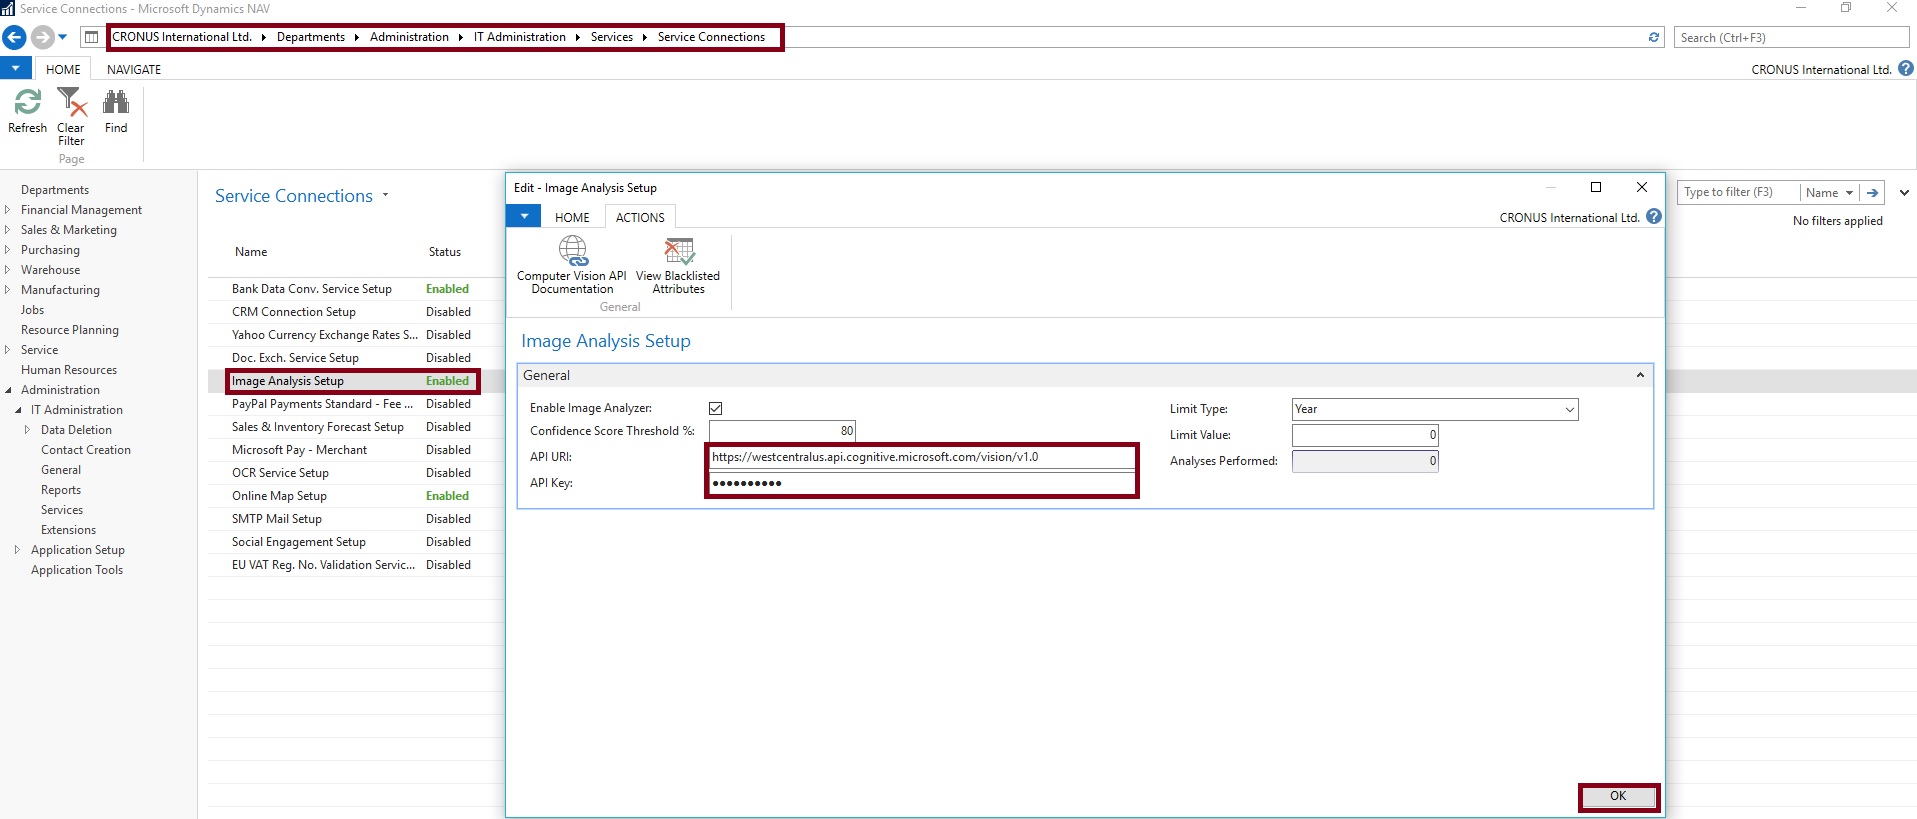
Enter your Endpoint URL and Key and close the window.
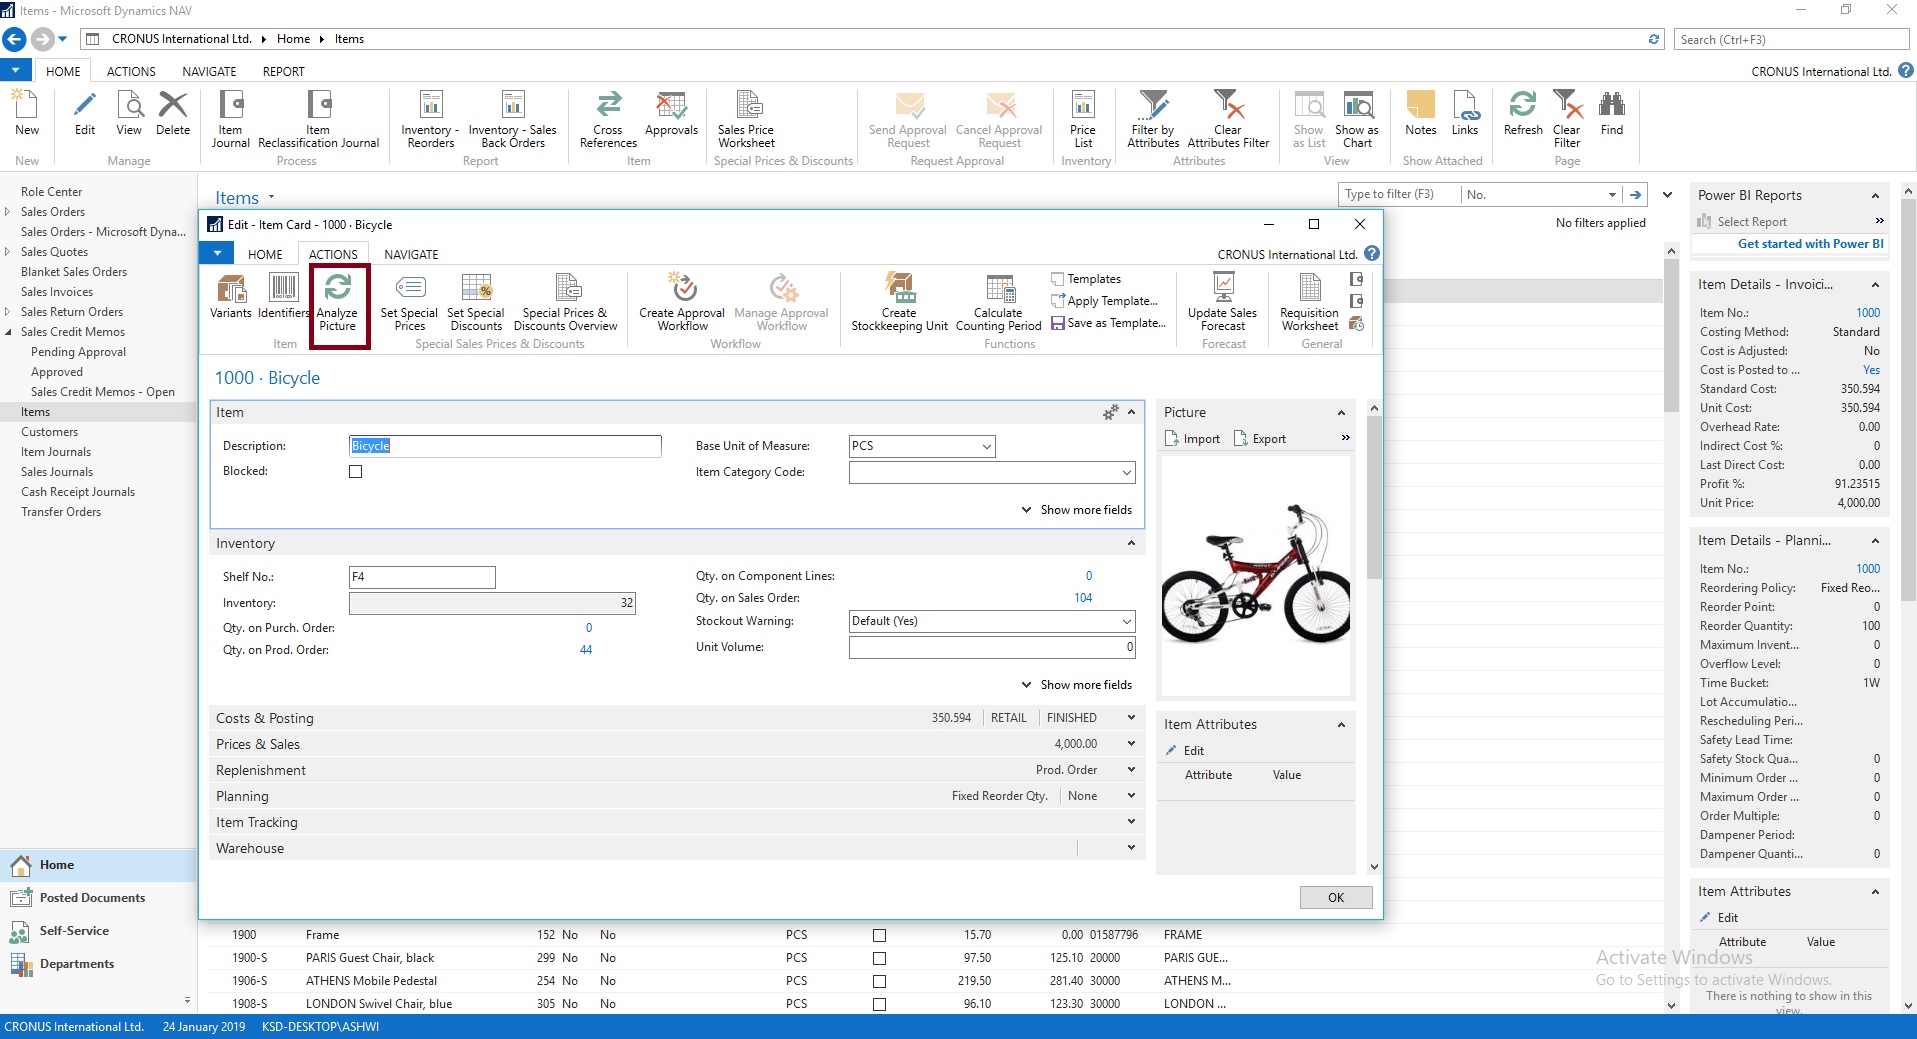
Now you import your Image, or select Analyze Picture if already imported
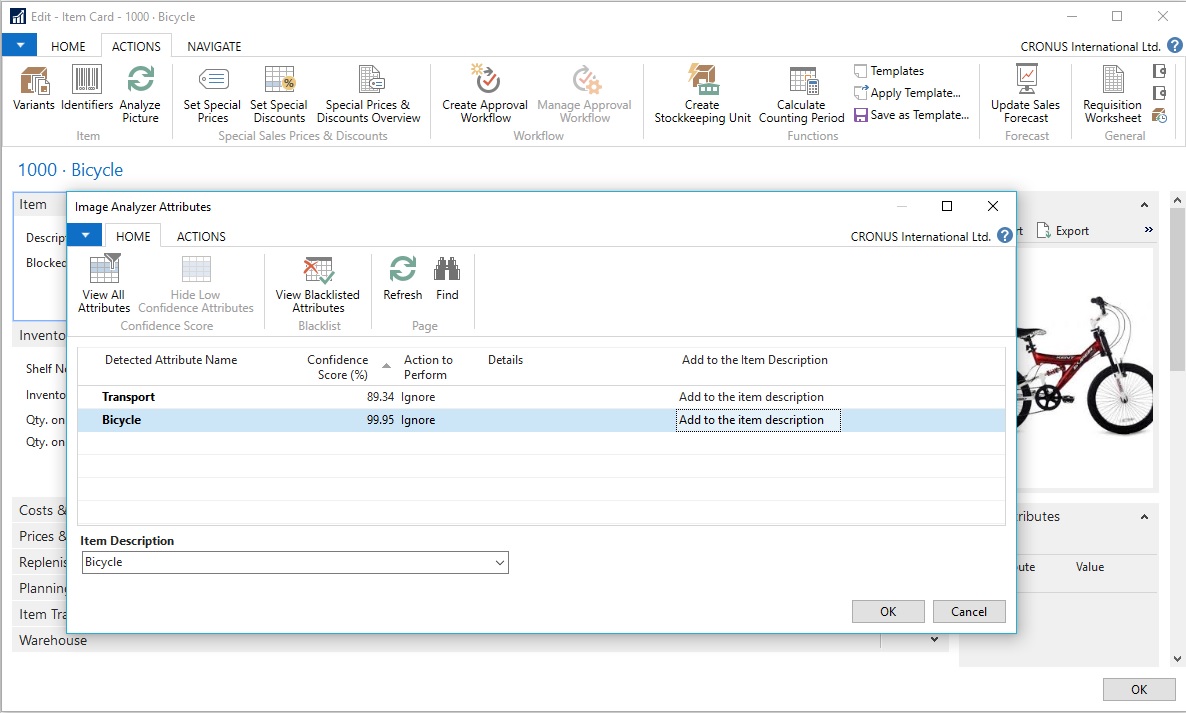
This will analyze the Image and provide you with the Attributes.
The Image Analyzer Attributes page displays the detected attributes, the confidence level, and other details about the attribute. Use the Action to perform options to specify what to do with the attribute.
This is how you enable and configure your Image Analyzer Service.
To see how many analyses you have left in the current period
You can view the number of analyses you’ve done, and how many you can still do, in the current period.
Enter Image Analyzer Setup, and then choose the related link.
The Limit type, Limit value, and Analyzes performed provide the usage information.
To stop using the Image Analyzer extension
Enter Service Connections, and then choose Image Analyzer Setup.
Clear the Enable Image Analyzer check box.
I will come with more details as I proceed.
App for Power BI REST APIs for Streaming Data
In this post we will see how to create app to use the Power BI REST APIs for Streaming Data.
Full documentation: https://powerbi.microsoft.com/documentation/powerbi-service-real-time-streaming/
To run this app follow the steps discussed in my previous post: [Real-Time Dashboard Tile & Streaming Dataset– in Power BI]
Summary as below:
- Go to app.powerbi.com
- Go to streaming data management page by via new dashboard > Add tile > Custom Streaming Data > manage data
- Click “Add streaming dataset”
- Select API, then Next, and give your streaming dataset a name
- Add a field with name “Customer ID”, type Number
- Add a field with name “Customer Name”, type Text
- Add a field with name “Sales Value”, type Number
- Click “Create”
- Copy the “push URL” and paste it as the value of “realTimePushURL” in below app
We will start with new project in Visual Studio.

Create a new Visual C# Console Application.
Open the Program.cs File and write a code as shown below.
This app Uses the WebRequest sample code as documented here: https://msdn.microsoft.com/en-us/library/debx8sh9(v=vs.110).aspx
For your easy here is the code of Program.cs below:
using System;
using System.Collections.Generic;
using System.Linq;
using System.Text;
using System.Threading.Tasks;
using System.Net;
using System.IO;
namespace RealTimeStreaming
{
class Program
{
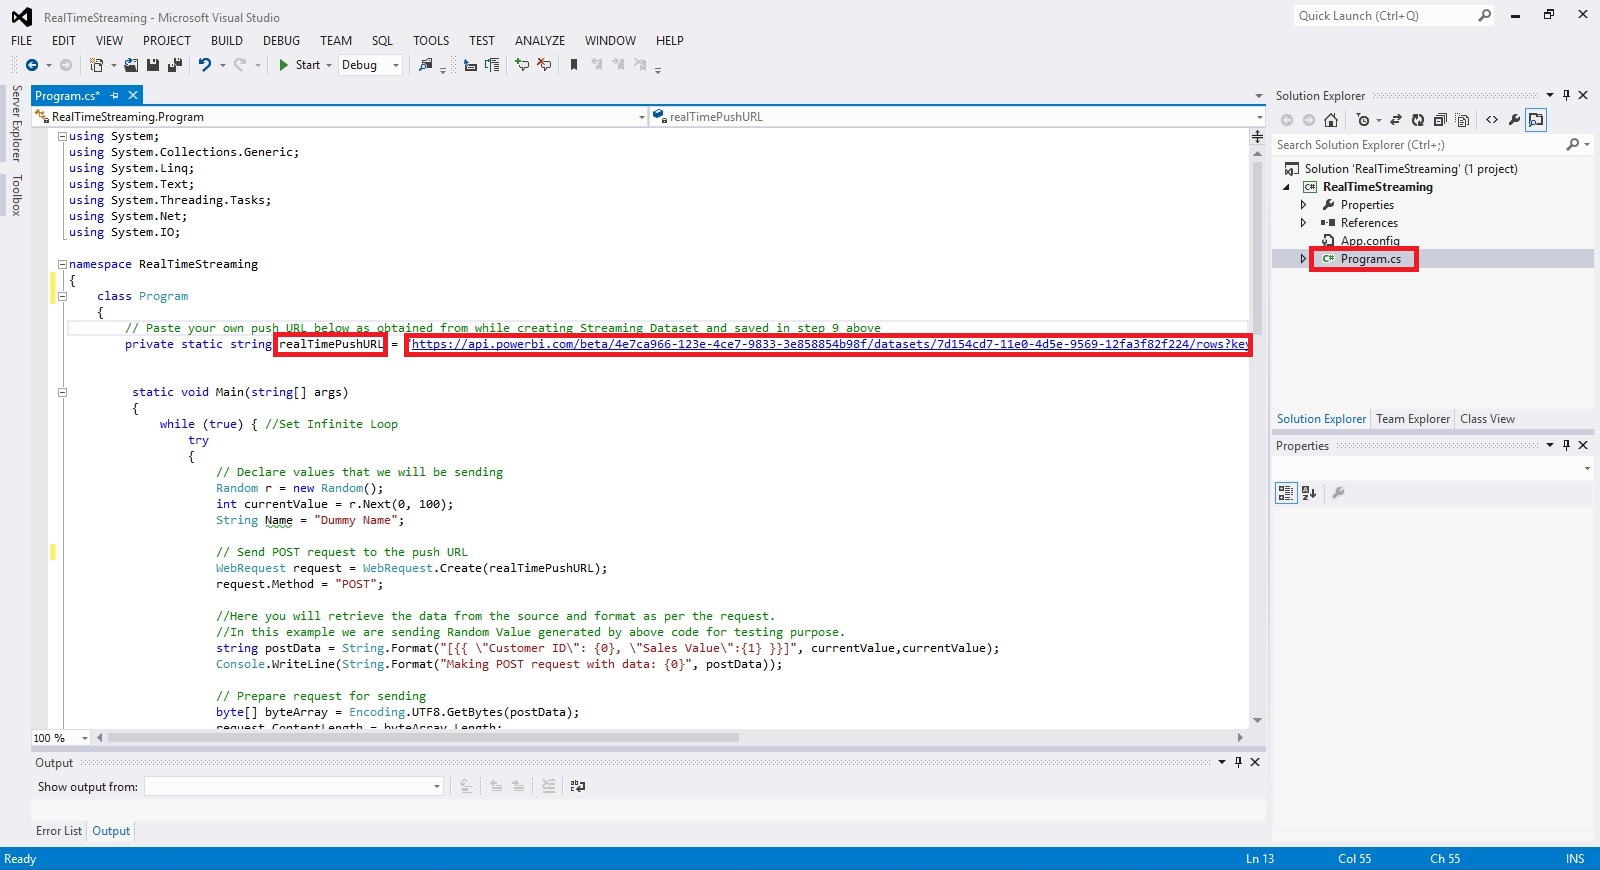
// Paste your own push URL below as obtained from while creating Streaming Dataset and saved in step 9 above
private static string realTimePushURL = “https://api.powerbi.com/beta/4e7ca966-123e-4ce7-9833-3e858854b98f/datasets/7d154cd7-11e0-4d5e-9569-12fa3f82f224/rows?key=mD1nkJOf426PjPPaEQsW9xEg%2FN1EENQ2hRZvXIpHr%2BTXNk3XQpKsR2Jbe5CATiMoLmxjlzSp%2FIMlbe9HL8G4xQ%3D%3D”;
static void Main(string[] args)
{
while (true) { //Set Infinite Loop
try
{
// Declare values that we will be sending
Random r = new Random();
int currentValue = r.Next(0, 100);
String Name = “Dummy Name”;
// Send POST request to the push URL
WebRequest request = WebRequest.Create(realTimePushURL);
request.Method = “POST”;
//Here you will retrieve the data from the source and format as per the request.
//In this example we are sending Random Value generated by above code for testing purpose.
string postData = String.Format(“[{{ \”Customer ID\”: {0}, \”Sales Value\”:{1} }}]”, currentValue,currentValue);
Console.WriteLine(String.Format(“Making POST request with data: {0}”, postData));
// Prepare request for sending
byte[] byteArray = Encoding.UTF8.GetBytes(postData);
request.ContentLength = byteArray.Length;
// Get the request stream.
Stream dataStream = request.GetRequestStream();
// Write the data to the request stream.
dataStream.Write(byteArray, 0, byteArray.Length);
// Close the Stream object.
dataStream.Close();
// Get the response.
WebResponse response = request.GetResponse();
// Display the status.
Console.WriteLine(String.Format(“Service response: {0}”, ((HttpWebResponse)response).StatusCode));
// Get the stream containing content returned by the server.
dataStream = response.GetResponseStream();
// Open the stream using a StreamReader for easy access.
StreamReader reader = new StreamReader(dataStream);
// Read the content.
string responseFromServer = reader.ReadToEnd();
// Display the content.
Console.WriteLine(responseFromServer);
// Clean up the streams.
reader.Close();
dataStream.Close();
response.Close();
}
catch (Exception ex)
{
Console.WriteLine(ex);
}
// Wait 5 second before sending
System.Threading.Thread.Sleep(5000);
} //Infinite Loop ends here.
}
}
}
Compile and Run the Program.

Leave the Program Running and switch to Power BI dashboard. You will see your newly created Tile in previous post will be displaying the Random Value generated by this program updating every 5 seconds.
That’s all with little tweaking to this program you can fetch your data and send the updated data to your Real Time Streaming Dataset.
That’s end to this post.
I will come up with more details in my upcoming posts.
Till then keep Exploring and learning.
Real-Time Dashboard Tile & Streaming Dataset– in Power BI
Power BI have introduced real-time dashboard tiles – a lightweight, simple way to get real-time data onto your dashboard. Real-time tiles can be created in minutes by pushing data to the Power BI REST APIs or from streams you’ve created in Azure Stream Analytics or PubNub, a popular real-time streaming service. Let’s see how we can do in no time.
Login to your Power BI using your credentials.
Go to your dashboard where you wish to add Real Time Streaming Tile, choose “Add a tile”

Select the “Custom streaming data” option
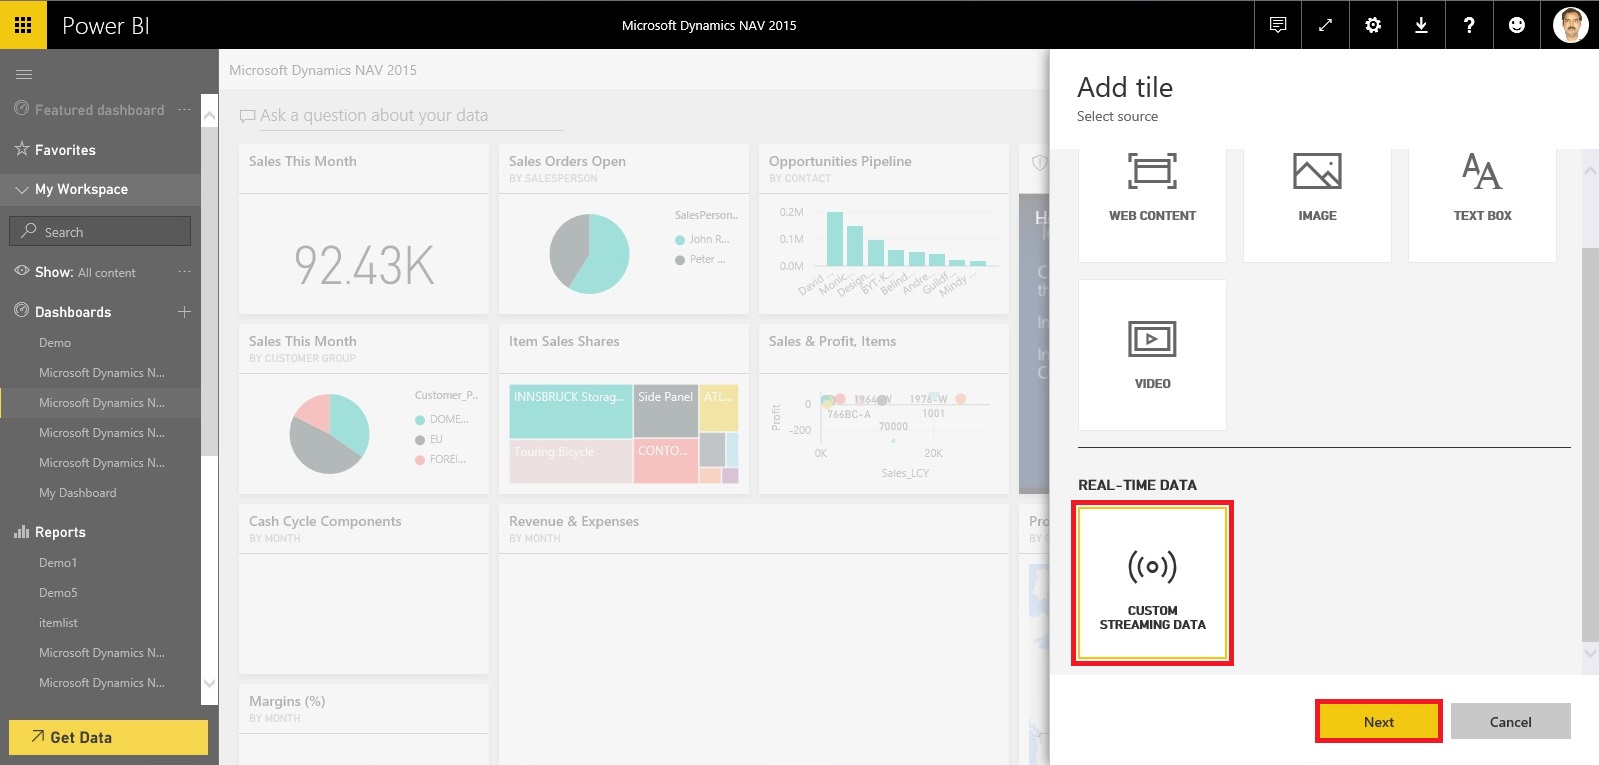
Click on Next.

At first usage you may not be having Streaming Dataset, if you have List will be shown.
Let’s create one for our Example, Click the link – Manage Data.

Click on Add Streaming Dataset.
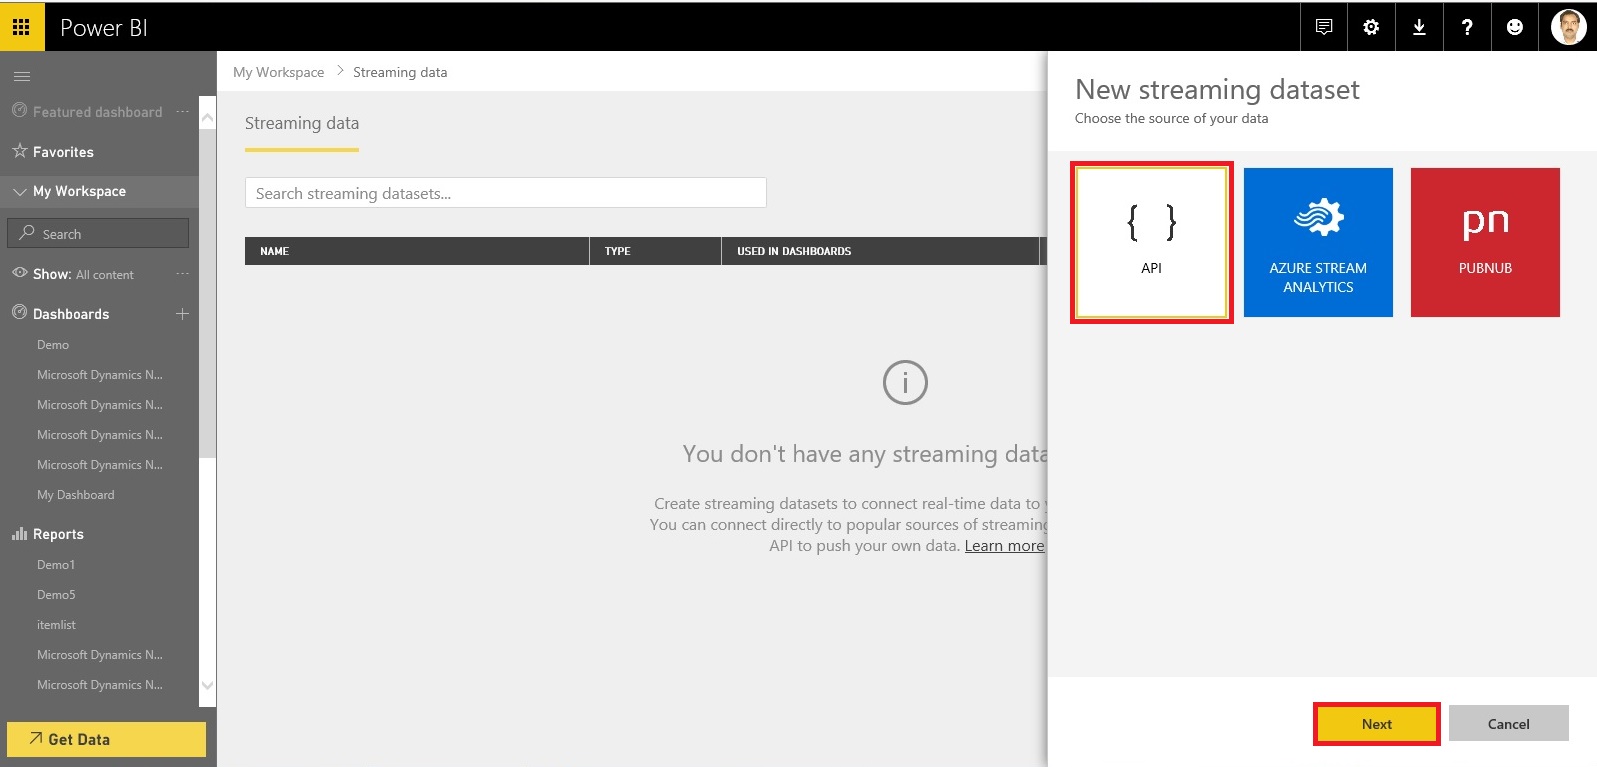
From New Streaming Dataset, Select API and click on Next.

Add your Dataset Name, Fields and Datatypes.
Once you are done, Click on Create.

Copy your Push URL, we will require this to push data to Data Stream.
Click On Done.

Returning to our Previous Step, Now we can see Streaming Dataset Available.
Select your Dataset and Click on Next.

Select the Type of Visualization you want, and Fields to display.
Click on Next.

Give Title, Subtitle to your Tile and click on Apply.

Bravo, you are done, your Tile will be added on your Dashboard.
But hold on, the Value will not come until you add logic to push data to the Tile.
Now we will move to our Next Step, where we will create a program to call Power BI REST API and push Streaming data to our Dashboard. Checkout my next post for same. [App for Power BI REST APIs for Streaming Data]
Till then keep Exploring & Learning. I will return soon with my next post.

You must be logged in to post a comment.