
Tag: Data
Monitor Field Change in Business Central
Field Monitoring is one of great help for superusers in Business Central. You can now configure a list of fields that contain high-risk and business-critical data that you want to be notified about when they are changed.
Changes to high-risk settings in Business Central can be tracked using the Change Log functionality. But sometime only tracking changes is not sufficient and you expect more like you should be notified of changes in fields that contain high-risk and business-critical data, such as bank account numbers, company name, and addresses.
Now setting a list of fields that contain high-risk and business-critical data is possible and you can be notified about when they are changed.
To start with this feature, Look for Assist Setup, I am using BC18 demo database for below steps.

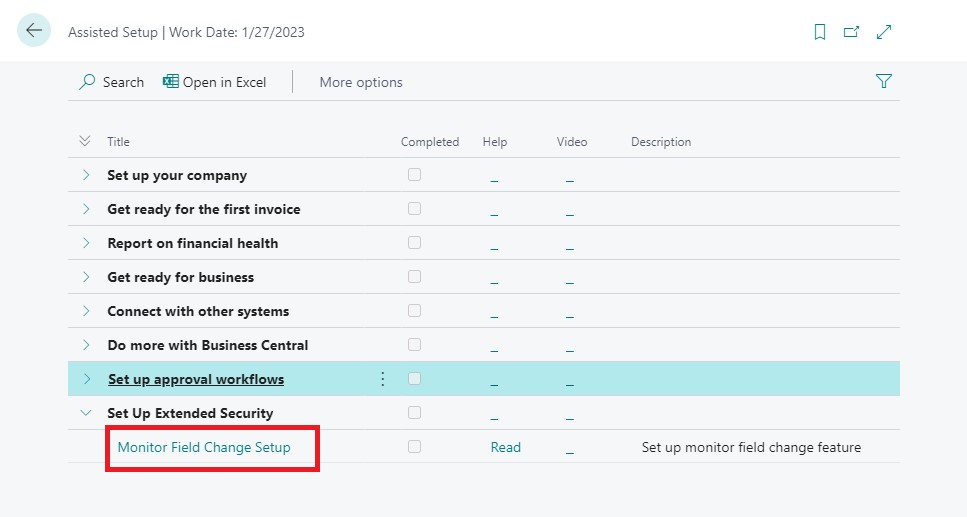
Although it is not necessary to follow Assist Setup, you can do setup from individual pages. But this will ensure you don’t miss any steps.

Click on Next to start with setup. And follow the steps in leading wizard pages.
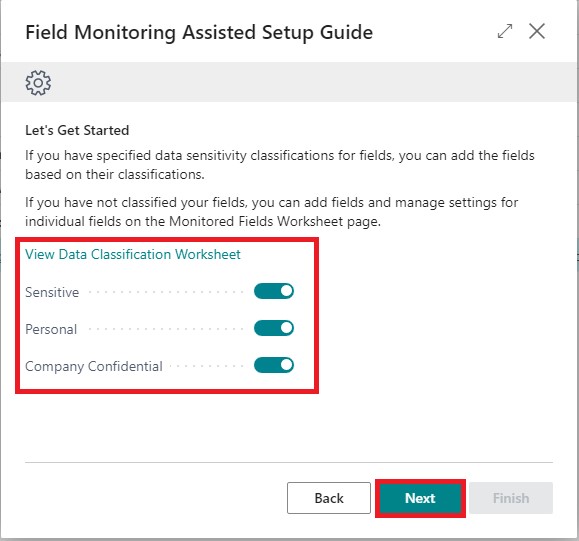
If you wish to use Data Classification and already have performed data classification you can enable or continue with individual fields using Monitored Fields Worksheet, in upcoming Wizard pages.
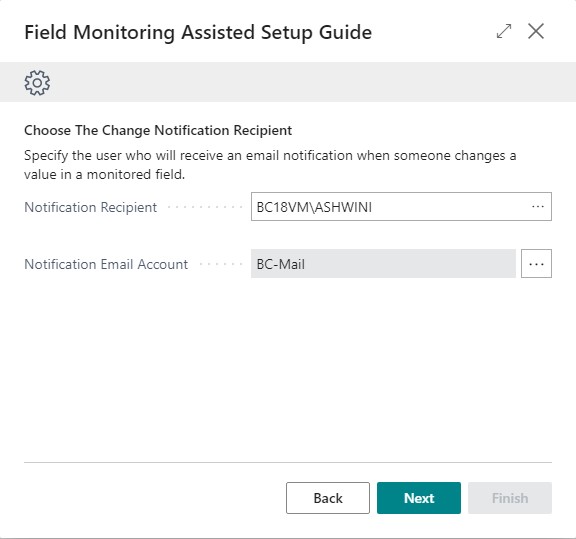
It is necessary to have the Sending and user e-mail setup is completed. Here you can select the email ids as required.

You need to add Fields for monitoring enable and click finish, or you can open the Page later and configure. This will Start the Monitoring and Notification service.
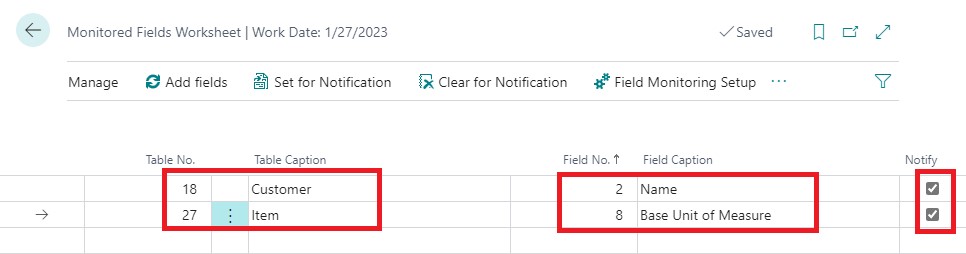
In Next step or you can open this page Monitored Fields Worksheet from Tell Me.
Add your table & fields that you wish to Monitor.
If notify is enabled you will receive the mail, else you can view in Monitored Field Log page. You can use Field Monitoring Setup Page from Action bar, or you can separately open this page from Tell Me.

You need to Start the Field Monitoring Setup, if not already done. If you have used Assist setup it will be Started, in case you are doing Manually from each Page, you will need to visit this Page, Setup your Emails and Start the Service.
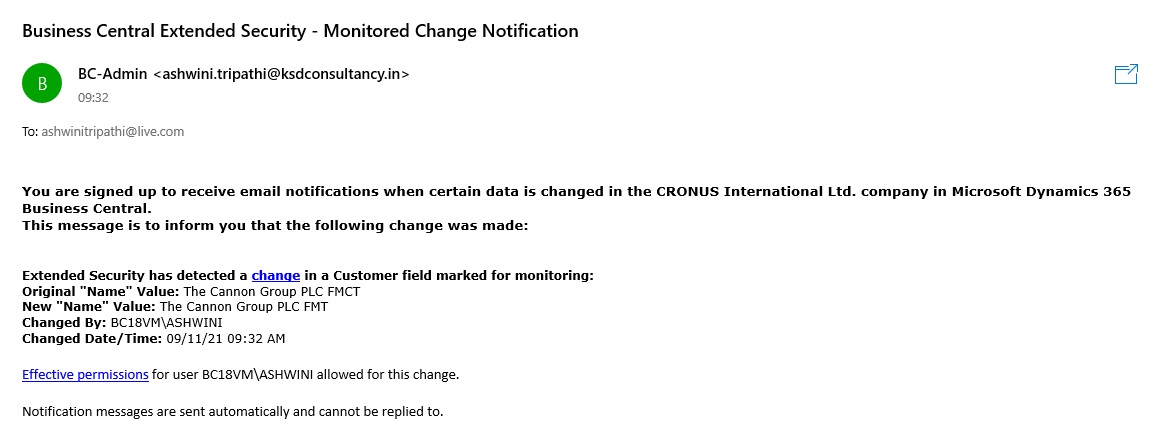
Before we Start with Testing, it is strongly recommended you Log Off and Login again to Business Central. As logging starts and ends on Login & Logout of user.
Open the Customer Page and make changes to Name, as above we have setup to log Name field of Customer.

If your all setup is OK you should Receive a mail as below.
Some Pages helpful for Field Monitored Service are:

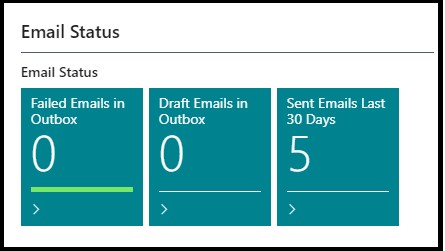
You can Monitor the Mails Status from your Role Centre Cues:
What else you can do for monitoring your data and notifications:
- If there is a problem sending the email, you can check the detailed information on Email Outbox page.
- You can view the mail sending record on Sent Emails page.
- You can view the log of Field Monitoring Setup and Monitoring Fields on Monitored Field Log Entries page.
Hope you enjoyed the information. Will come with more similar information in my next posts. Till then keep exploring, learning and sharing your knowledge with others.
Remain safe, take care of your loved ones, put your mask, maintain safe distance and don’t forget to get vaccinated.
Dynamics 365 2019 release wave 2
Dynamics 365 Business Central: 2019 release wave 2 plan
The first Insider Builds for the Business Central 2019 release wave 2 just became available.
Features that are planned to release from October 2019 through March 2020.
For more information about the above-mentioned features, see the 2019 release wave 2 plan here.
This is also the very first Insider Build that does not include the Windows client (Dynamics NAV client connected to Business Central) as announced earlier.
More features will be unlocked soon along with more information for each one of them.
Dynamics 365 Business Central provides a complete business application solution designed and optimized for SMB organizations. Since its launch in April 2018, Dynamics 365 Business Central has seen increasing adoption by organizations looking to digitally transform their businesses. In the October ’18 update, we updated Business Central to include on-premises deployments as well. The latest version, the April ’19 update, brought an update to Business Central that improves the productivity of users.
The independent software vendor (ISV) ecosystem is important for customers who want vertical or horizontal solutions for Business Central. We will accelerate this ISV ecosystem to begin moving new and existing customers to Business Central online. To achieve that goal, the following development pillars define the 2019 release wave 2 update:
Service fundamentals: Laser focus on performance, reliability, supportability, and security is essential to ensure that service quality remains ahead of the growth in service usage. Accessibility, already in a strong position, must be preserved.
Modern client: With the 2019 release wave 2, users access Business Central in the browser, Windows 10 desktop app, mobile apps on Android and iOS, or in Outlook. We accelerate our investment in speed and productivity features for the modern browser experience, achieving a major milestone in its transformation into a world-class desktop experience for new and expert users alike. 2019 release wave 2 is the first version that does not include the Dynamics NAV Client connected to Business Central (also known as the Windows client). The modern clients now support so many productivity features that the Windows client is discontinued for Business Central going forward. The legacy Dynamics NAV client remains supported in the April ’19 update and earlier versions in alignment with the support lifecycle.
Modern developer tools: the 2019 release wave 2 is the first version that does not include the classic development environment (also known as C/SIDE). The modern developer experience based on Visual Studio Code with Azure DevOps, and an AL language that supports an extension-based approach to customization now supports developing large apps such as the base application from Microsoft, and so C/SIDE is discontinued for Business Central going forward. The classic development environment remains supported in the April ’19 update and earlier versions in alignment with the support lifecycle.
Empower ISV acceleration: The 2019 release wave 2 update delivers a set of features designed to simplify ISV development for new solutions and, specifically, for streamlining the migration from the source code customization model of Dynamics NAV to Business Central. The Dynamics NAV business has been driven by strong vertical ISV solutions, surrounded by add-on solutions. For the 2019 release wave 2 update, our focus will be streamlining the path for ISVs to bring their solutions—and in turn their customers—to Business Central online.
Customer migration tools: After enabling Dynamics NAV ISVs to bring their solutions to Business Central online, the next step is to simplify the journey for existing Dynamics SMB customers coming from Dynamics NAV, Dynamics GP, or Dynamics SL to migrate from their current on-premises solutions to Business Central online. A set of tools already exists; these will be enhanced with the 2019 release wave 2.
Limited extension to the Business Central online localizations is planned for the 2019 release wave 2 in order to prioritize the service fundamentals work ahead of expanding the service footprint. Additional partner-developed localizations will be added following the 2019 release wave 2.
Download the 2019 release wave 2 PDF
New for wave 2: The Power Platform (PowerApps, Microsoft Flow, and Power BI) features coming in the 2019 release wave 2 have been summarized in a separate release plan.

Dynamics 365: 2019 release wave 2 plan
The 2019 release wave 2 enhances artificial intelligence capabilities to help organizations accelerate their transformation of customer service, sales, and marketing functions:
Sales Insights empowers teams with more foresight, to enhance productivity and better anticipate outcomes across the sales lifecycle.
Customer Service Insights provides an actionable view into critical performance metrics, operational data, and emerging trends using industry-leading artificial intelligence.
Virtual Agent for Customer Service enables organizations to create AI-powered bots that chat with customers and provides new opportunities for organizations to improve customer service through digital transformation.
Customer Insights enables every organization to unify and understand their customer data to harness it for intelligent insights and actions.
Market Insights enables business users to gather actionable insights based on what consumers say, seek, and feel about their brands and products.
Fraud Protection enables the e-commerce merchants to drive down fraud loss, increase bank acceptance rates to yield higher revenue, and improve the online shopping experience.
The 2019 release wave 2 continues to add a whole new set of experiences to enhance employee productivity using mixed reality:
Remote Assist empowers technicians to solve problems faster the first time.
Layout provides a new way for space planners to bring designs from concept to completion with confidence and speed.
Product Visualize empowers salespeople to convey the true potential of their products to their customers by harnessing the power of augmented reality on their mobile devices.
Guides is a mixed-reality application for Microsoft HoloLens that enables employees to learn in the flow of work by providing holographic instructions when and where they need them.
Power Platform: 2019 release wave 2 plan
The Microsoft Power Platform enables users and organizations to analyze, act, and automate on the data to digitally transform their businesses. The Power Platform today is comprised of three products – Power BI, PowerApps, and Flow.
For PowerApps, this release wave includes major improvements to enable app makers to build higher-quality apps more easily while still supporting more advanced enterprise and administrator requirements. Improvements in PowerApps focus not only on introducing capabilities but also on simplifying existing concepts to improve maker and end-user productivity in PowerApps and Dynamics 365 apps built upon the Unified Interface.
PowerApps makers can now create a powerful new type of experience called PowerApps Portals, which are web portals that surface data stored in Common Data Service to employees or users outside their organizations.
Microsoft Flow is introducing smarter and more powerful experiences in three key areas. Flow makers get smarter and more powerful experiences. End users of flows can leverage world-class business process capabilities, including working with business processes offline. Finally, there is now much richer tooling for administrators, such as PowerShell cmdlets and the new Power Platform Admin center.
AI Builder (preview) is a brand-new Power Platform capability for teams with the business expertise to easily automate processes and predict outcomes to improve business performance. AI Builder is a turnkey solution that brings the power of Microsoft AI through a point-and-click experience and is directly integrated into PowerApps and Microsoft Flow.
Power BI simplifies how organizations derive insights from transactional and observational data. It helps organizations create a data culture where employees can make decisions based on facts, not opinions. For the upcoming release, Power BI is investing in four key areas that drive a data culture: intuitive experiences, a unified BI platform, big data analytics, and pervasive artificial intelligence (AI).
Data integration provides built-in connectivity to the Power Platform and more, with data across hundreds of business systems, enabling rich and intelligent experiences. The Common Data Model provides semantic consistency for canonical business entities across Dynamics 365 and Common Data Service, increasing value and saving time for application developers, ISV partners, and integrators.
This release plan describes functionality that may not have been released yet. Delivery timelines and projected functionality may change or may not ship (see Microsoft policy).
Here are the key dates for the 2019 release wave 2.
| Milestone | Date | Description |
| Release plans available | June 10, 2019 | Learn about the new capabilities coming in the 2019 release wave 2 (October 2019 – March 2020) across Dynamics 365 and the Power Platform. |
| Release plans available in additional 11 languages | July 8, 2019 | The Dynamics 365 and Power Platform release plans are published in Danish, Dutch, Finnish, French, German, Italian, Japanese, Norwegian, Portuguese (Brazilian), Spanish, and Swedish. |
| Early access available | August 2, 2019 | Try and validate the new features and capabilities that will be a part of the 2019 release wave 2, October update, before they get enabled automatically for your end-users. |
| General availability | October 1, 2019 | Production deployment for the 2019 release wave 2 begins. Specific deployment dates for each country or region or instance will be communicated in advance. |
Database Replication – Part IV
This post is in continuation to my earlier post. Please check if you missed.
Database Replication – Part II
Database Replication – Part III
As committed in this post we will continue to cover practical approach, Next step from last post.
Publishing Data Using Transactional Replication
We will create a transactional publication using SQL Server Management Studio to publish a filtered subset of the Item table in the Nav 2018 sample database. We will also add the SQL Server login used by the Distribution Agent to the publication access list (PAL).
To create a publication and define articles
Connect to the Publisher in SQL Server Management Studio, and then expand the server node.
Expand the Replication folder, right-click the Local Publications folder, and click New Publication.
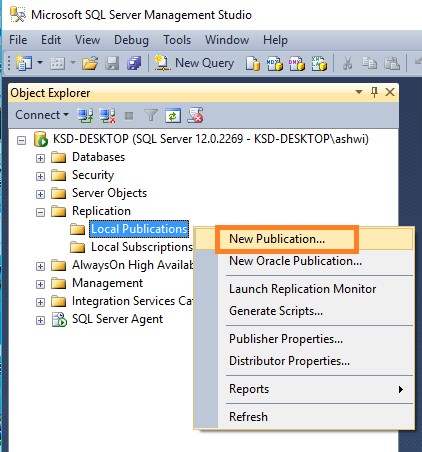
The Publication Configuration Wizard launches.

On the Publication Database page, select Nav 2018 database, and then click Next.

On the Publication Type page, select Transactional publication, and then click Next.

On the Articles page, expand the Tables node, select the check box for table CRONOUS International Ltd_$Item (dbo). Click Next.

On the Filter Table Rows page, click Add.
In the Add Filter dialog box, click the Replenishment System column, click the right arrow to add the column to the Filter statement WHERE clause of the filter query, and modify the WHERE clause as follows:
WHERE [Replenishment System] = 1
Click OK,

Click Next.

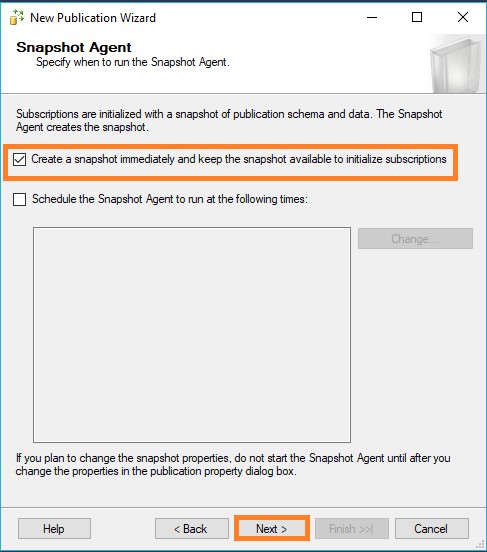
Select the Create a snapshot immediately and keep the snapshot available to initialize subscriptions check box, and click Next.
On the Agent Security page, clear Use the security settings from the Snapshot Agent check box.
Click Security Settings for the Snapshot Agent, enter <Machine_Name>\repl_snapshot in the Process account box, supply the password for this account, and then click OK.

Repeat the previous step to set repl_logreader as the process account for the Log Reader Agent

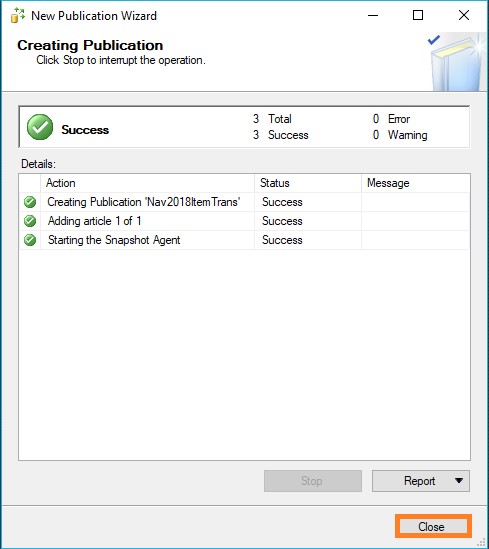
Click Finish.
On the Complete the Wizard page, type Nav2018ItemTrans in the Publication name box, and click Finish.

After the publication is created, click Close to complete the wizard.
To view the status of snapshot generation
- Connect to the Publisher in SQL Server Management Studio, expand the server node, and then expand the Replication folder.
In the Local Publications folder, right-click Nav2018ItemTrans, and then click View Snapshot Agent Status.
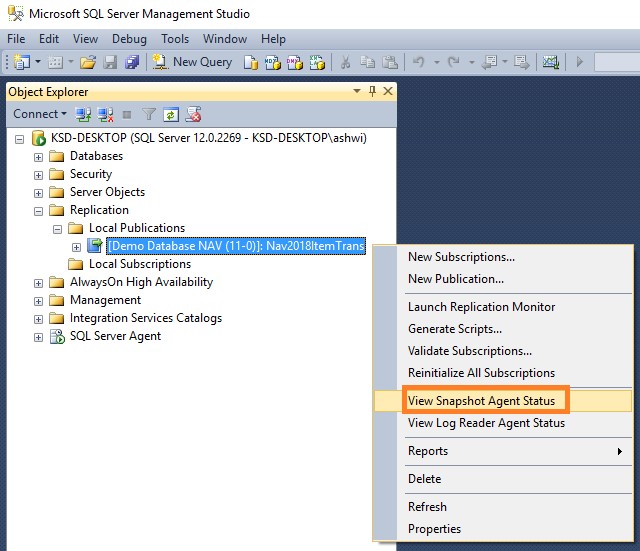
The current status of the Snapshot Agent job for the publication is displayed. Verify that the snapshot job has succeeded.

To add the Distribution Agent login to the PAL
- Connect to the Publisher in SQL Server Management Studio, expand the server node, and then expand the Replication folder.
- In the Local Publications folder, right-click Nav2018ItemTrans, and then click Properties.
- The Publication Properties dialog box is displayed.
- Select the Publication Access List page, and click Add.
In the Add Publication Access dialog box, select <Machine_Name>\repl_distribution and click OK. Click OK.

We will discuss Next step in our upcoming post.
Copying data to-and-fro between Excel & Navision
One of my reader has requested to show him how to export data from Nav Journal to Excel, perform correction and import back to Navision.
So let us see how can we perform this and what are the limitations.
Open the Journal in Navision.
Arrange and show all the Fields that you want to export to Excel on the page.
Fill some sample data. Say single line of Journal, way usually you do.
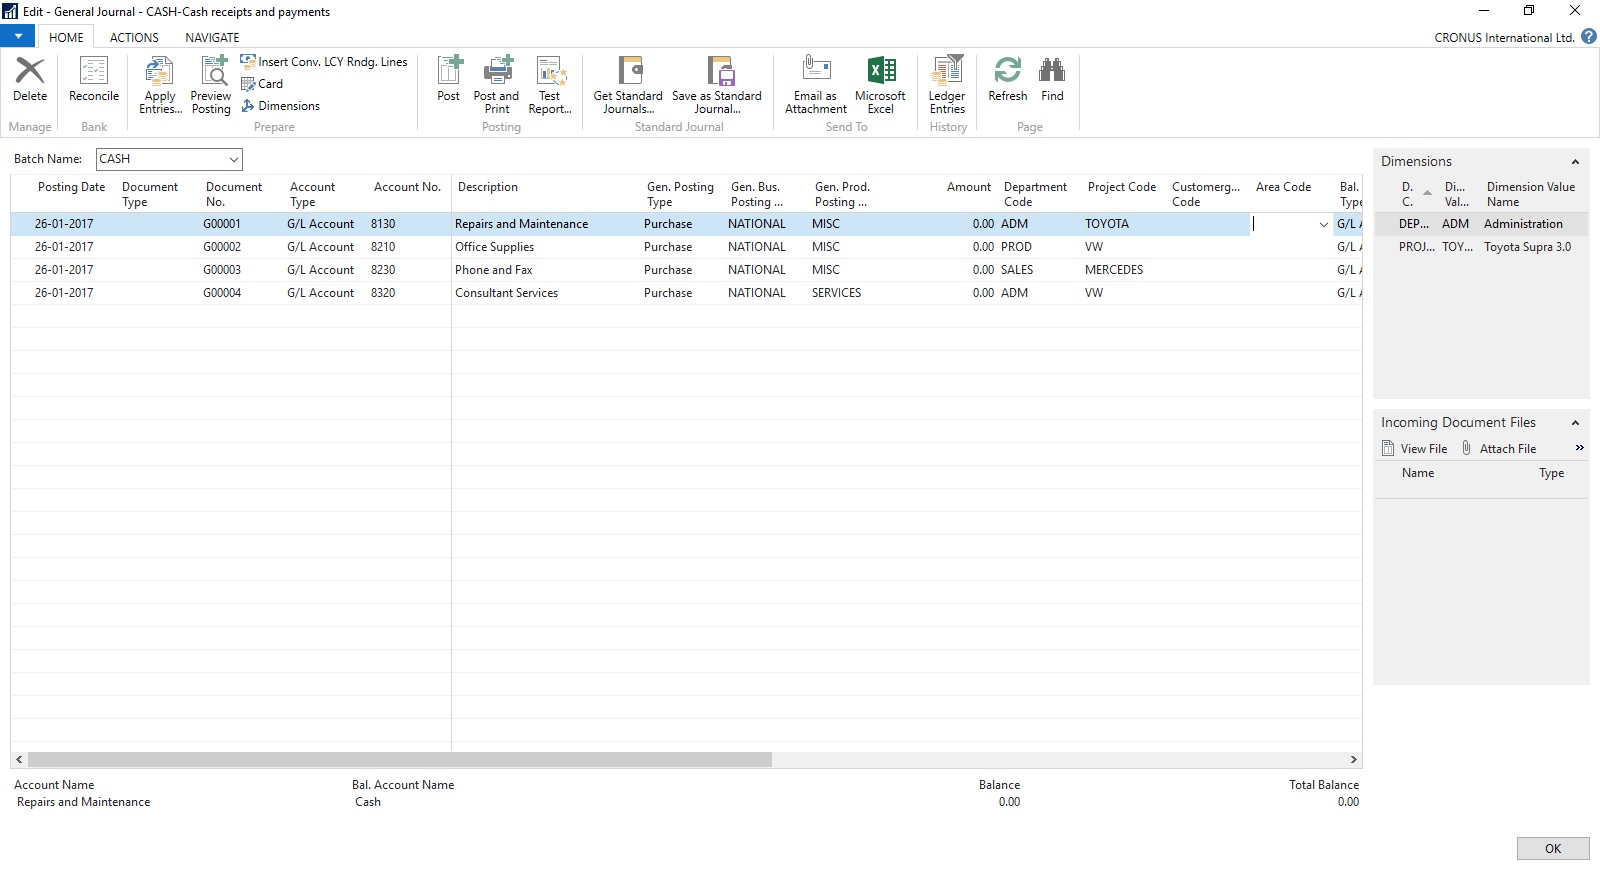
Now Send to Excel using options shown in below screen.

Data will get Exported to Excel.
Have you noticed something, with the data that got exported yo Excel?
Your 2 Additional Shortcut dimension was not Exported to Excel. Customer Group Code & Area Code, why?
Since these are not the actual fields in the table and it is calculated on Page level, so you will only be able to export Dim-1 & Dim-2 your Global Dimensions which is available as Field in the Table.
Make sure you enter Dimension Values in Capitals in Excel Columns.

Now perform required changes to the Journal data.
Insert New Lines, Delete existing Lines or Edit existing Lines.
Make sure you don’t keep more than 30000 to 40000 lines, until this it works fine if more than this either performance is too slow or Navision gets hang while you copy back your data to Navision. Upto 40000 works fine have tested several time. Depending upon your system performance you can decide how much data will be ok for you.

As we have seen above my 2 additional Dimensions is missing from the exported data. We need to match the columns what we have in our Excel and sequence. So we will hide/remove the additional columns from the Journal to match the sequence from Excel columns before we copy back our data from Excel to Navision.
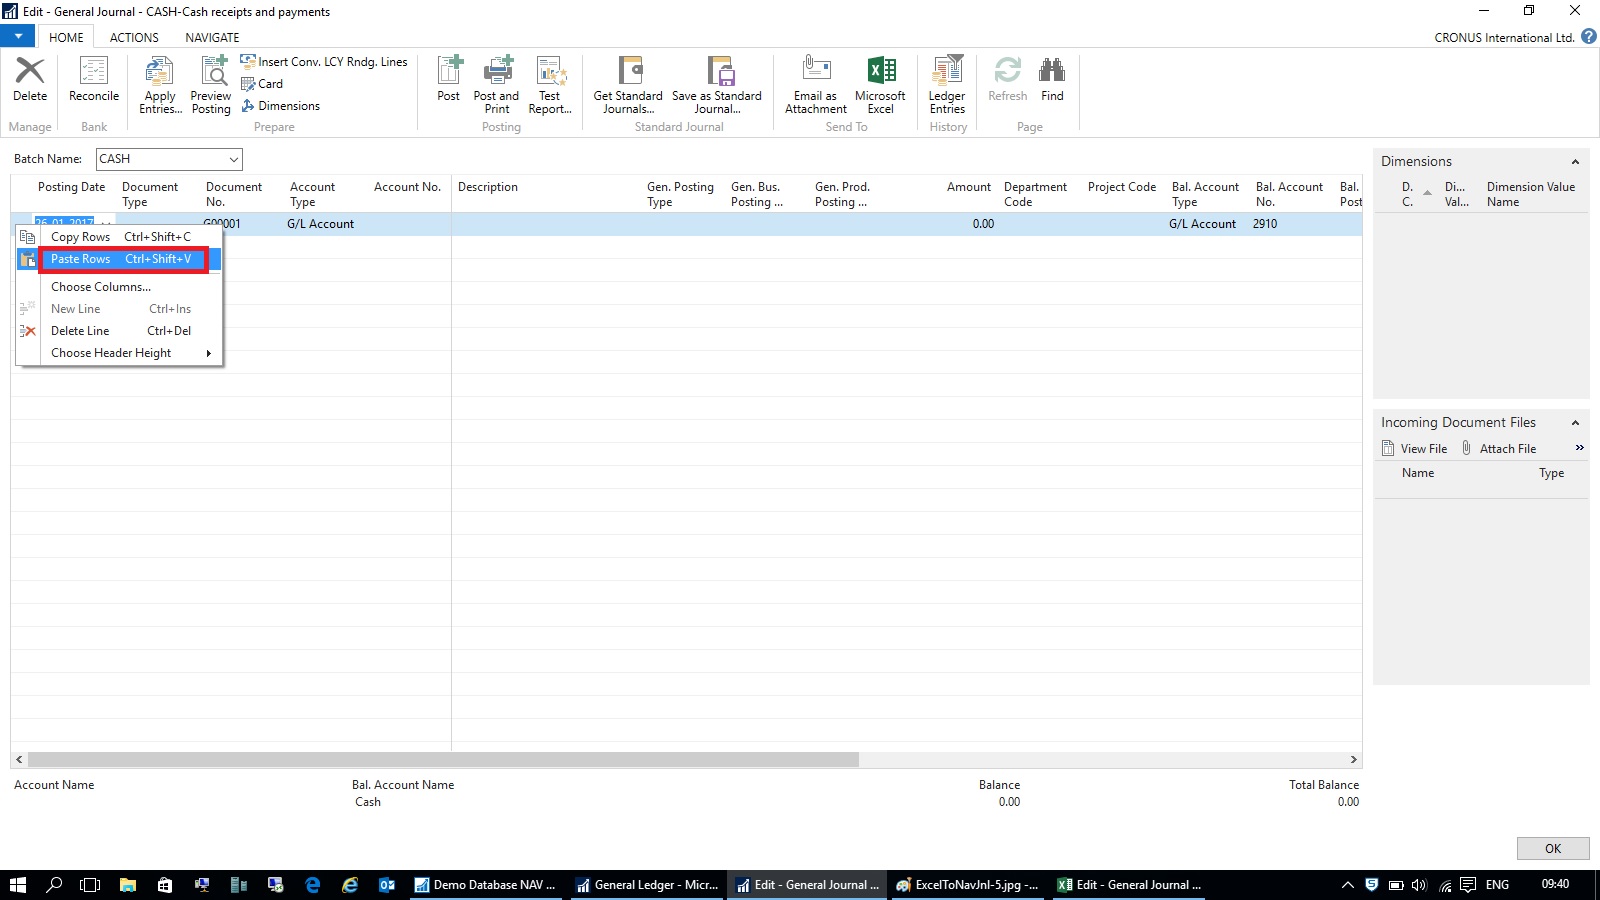
Select the Rows in excel containing you data excluding header columns and copy.
Return to your Journal and Paste as shown in above screen.
Your modified data is imported back to the Journal in Navision.
Now perform the Journal action way you do normally.
App for Power BI REST APIs for Streaming Data
In this post we will see how to create app to use the Power BI REST APIs for Streaming Data.
Full documentation: https://powerbi.microsoft.com/documentation/powerbi-service-real-time-streaming/
To run this app follow the steps discussed in my previous post: [Real-Time Dashboard Tile & Streaming Dataset– in Power BI]
Summary as below:
- Go to app.powerbi.com
- Go to streaming data management page by via new dashboard > Add tile > Custom Streaming Data > manage data
- Click “Add streaming dataset”
- Select API, then Next, and give your streaming dataset a name
- Add a field with name “Customer ID”, type Number
- Add a field with name “Customer Name”, type Text
- Add a field with name “Sales Value”, type Number
- Click “Create”
- Copy the “push URL” and paste it as the value of “realTimePushURL” in below app
We will start with new project in Visual Studio.

Create a new Visual C# Console Application.
Open the Program.cs File and write a code as shown below.
This app Uses the WebRequest sample code as documented here: https://msdn.microsoft.com/en-us/library/debx8sh9(v=vs.110).aspx
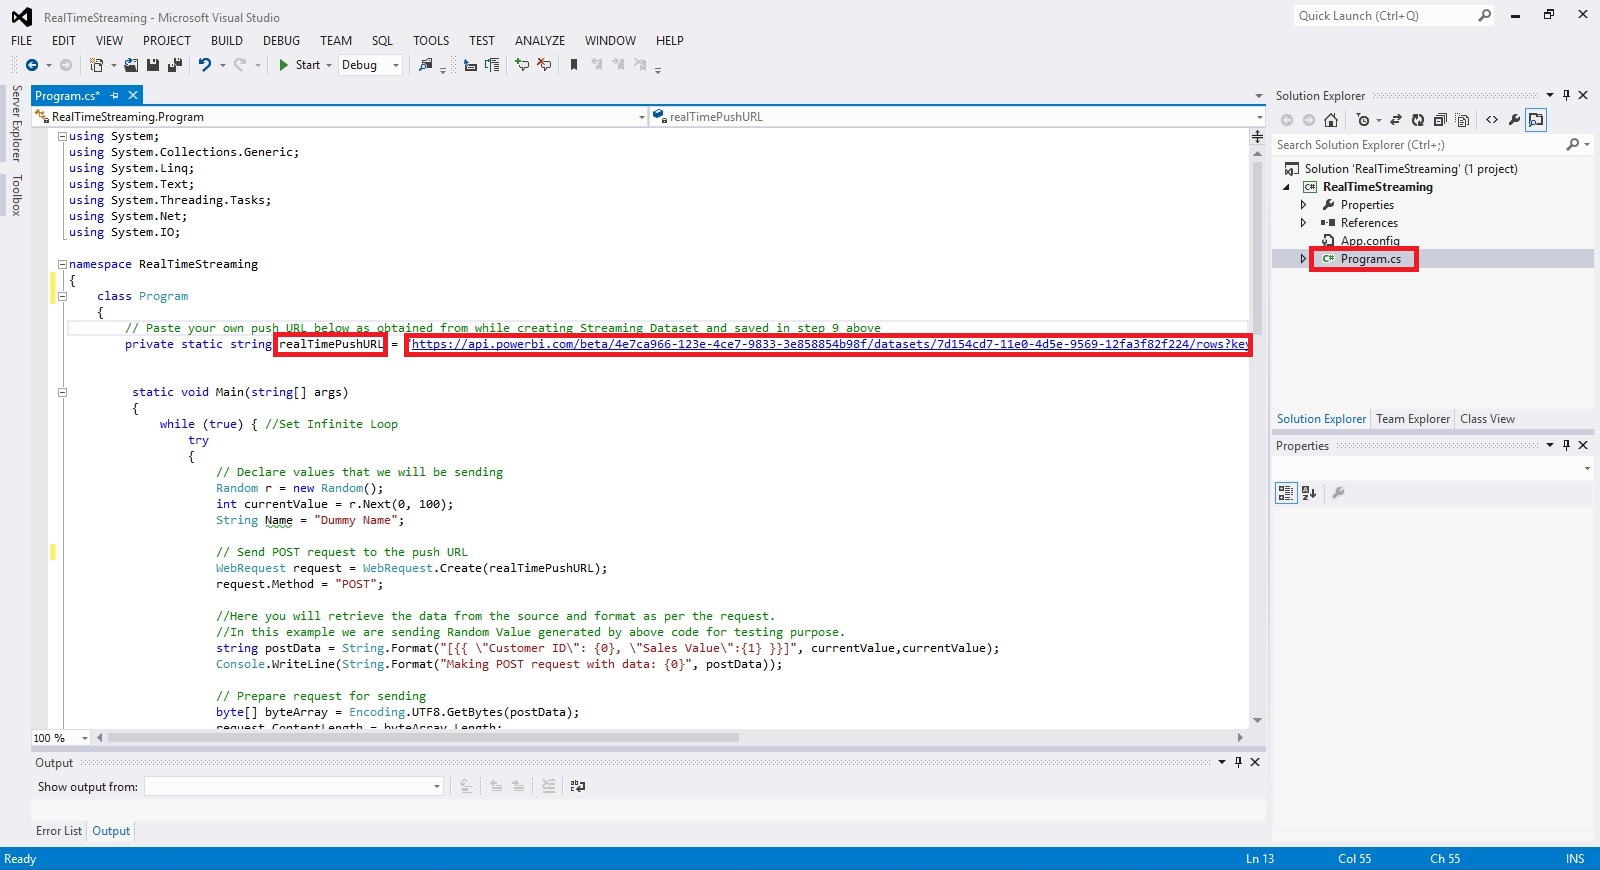
For your easy here is the code of Program.cs below:
using System;
using System.Collections.Generic;
using System.Linq;
using System.Text;
using System.Threading.Tasks;
using System.Net;
using System.IO;
namespace RealTimeStreaming
{
class Program
{
// Paste your own push URL below as obtained from while creating Streaming Dataset and saved in step 9 above
private static string realTimePushURL = “https://api.powerbi.com/beta/4e7ca966-123e-4ce7-9833-3e858854b98f/datasets/7d154cd7-11e0-4d5e-9569-12fa3f82f224/rows?key=mD1nkJOf426PjPPaEQsW9xEg%2FN1EENQ2hRZvXIpHr%2BTXNk3XQpKsR2Jbe5CATiMoLmxjlzSp%2FIMlbe9HL8G4xQ%3D%3D”;
static void Main(string[] args)
{
while (true) { //Set Infinite Loop
try
{
// Declare values that we will be sending
Random r = new Random();
int currentValue = r.Next(0, 100);
String Name = “Dummy Name”;
// Send POST request to the push URL
WebRequest request = WebRequest.Create(realTimePushURL);
request.Method = “POST”;
//Here you will retrieve the data from the source and format as per the request.
//In this example we are sending Random Value generated by above code for testing purpose.
string postData = String.Format(“[{{ \”Customer ID\”: {0}, \”Sales Value\”:{1} }}]”, currentValue,currentValue);
Console.WriteLine(String.Format(“Making POST request with data: {0}”, postData));
// Prepare request for sending
byte[] byteArray = Encoding.UTF8.GetBytes(postData);
request.ContentLength = byteArray.Length;
// Get the request stream.
Stream dataStream = request.GetRequestStream();
// Write the data to the request stream.
dataStream.Write(byteArray, 0, byteArray.Length);
// Close the Stream object.
dataStream.Close();
// Get the response.
WebResponse response = request.GetResponse();
// Display the status.
Console.WriteLine(String.Format(“Service response: {0}”, ((HttpWebResponse)response).StatusCode));
// Get the stream containing content returned by the server.
dataStream = response.GetResponseStream();
// Open the stream using a StreamReader for easy access.
StreamReader reader = new StreamReader(dataStream);
// Read the content.
string responseFromServer = reader.ReadToEnd();
// Display the content.
Console.WriteLine(responseFromServer);
// Clean up the streams.
reader.Close();
dataStream.Close();
response.Close();
}
catch (Exception ex)
{
Console.WriteLine(ex);
}
// Wait 5 second before sending
System.Threading.Thread.Sleep(5000);
} //Infinite Loop ends here.
}
}
}
Compile and Run the Program.

Leave the Program Running and switch to Power BI dashboard. You will see your newly created Tile in previous post will be displaying the Random Value generated by this program updating every 5 seconds.
That’s all with little tweaking to this program you can fetch your data and send the updated data to your Real Time Streaming Dataset.
That’s end to this post.
I will come up with more details in my upcoming posts.
Till then keep Exploring and learning.
Financial Statements and Data Warehousing (Jet Reports)
Learn how a data warehouse makes creating financial statements from multiple systems fast and easy by storing all of your data in a single place that is optimized for end user reporting.
Video-1
Video-2
Assisted Setup (Data Migration) – Madeira
Login to Madeira using your credentials.
From Home page Action Tab Ribbon choose Assisted Setup & Tasks.

From Assisted Setup Window select Migrate Business Data Task to continue.

From Welcome Screen select Next.

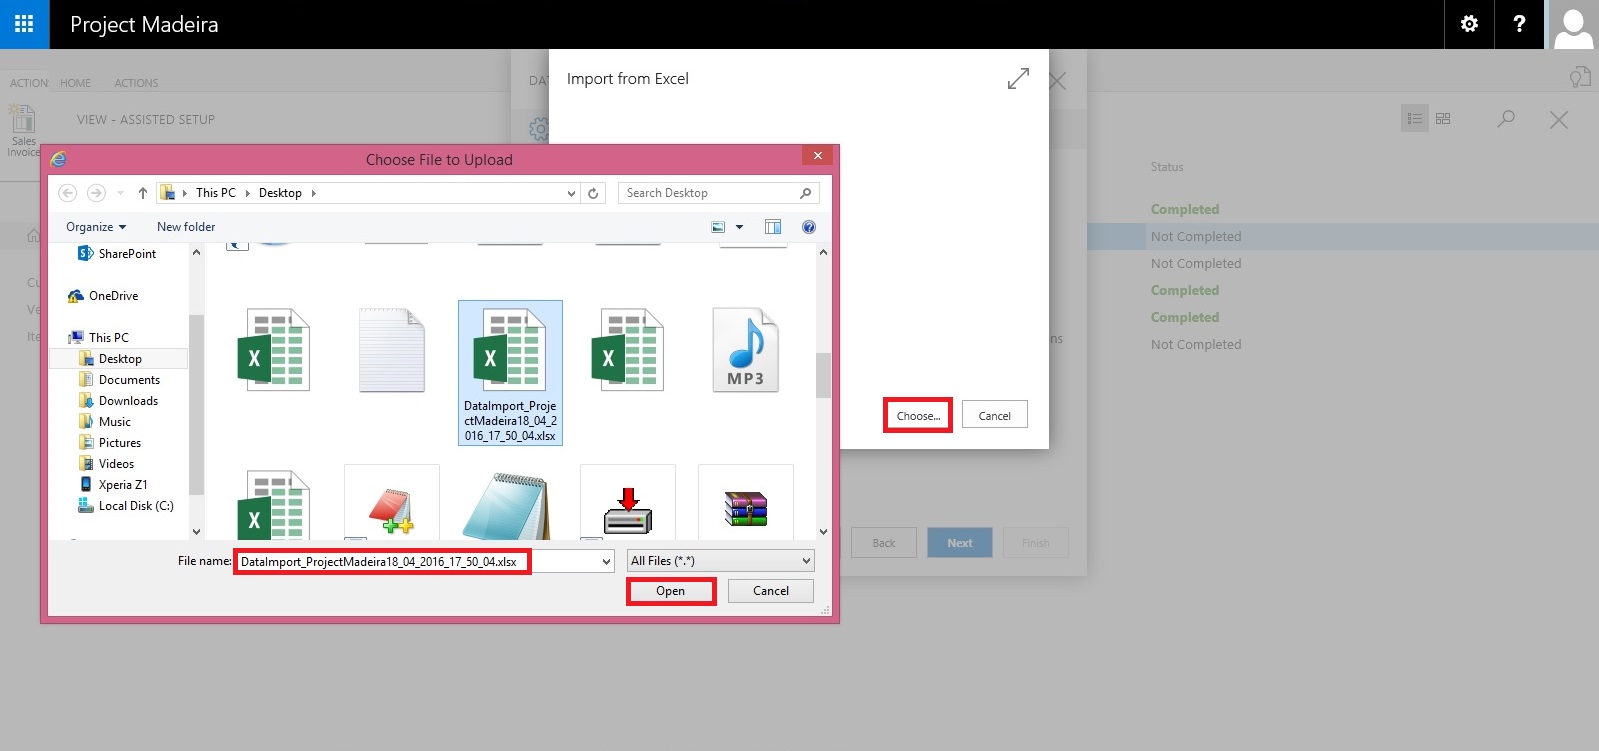
Here you can choose source using which you want to Import Data using Assist Edit Button.

Select Import from Excel option and say OK.

Select Download Template file.

Save the File to desired path.

From Settings Select the Templates you wish to Apply to your Data for Customer, Vendor & Item and choose close to proceed.

Below is the format of Template downloaded in above step. Fill in the data to Import.

When we don’t select any template in above step for Customer, Vendor & Item will give confirmation message as below. Choose Yes to proceed.

From next screen Select choose button to specify the Excel file which we prepared in above step using downloaded Template.
This will fetch the data from the file and show you no of records in each table which is going to be imported.
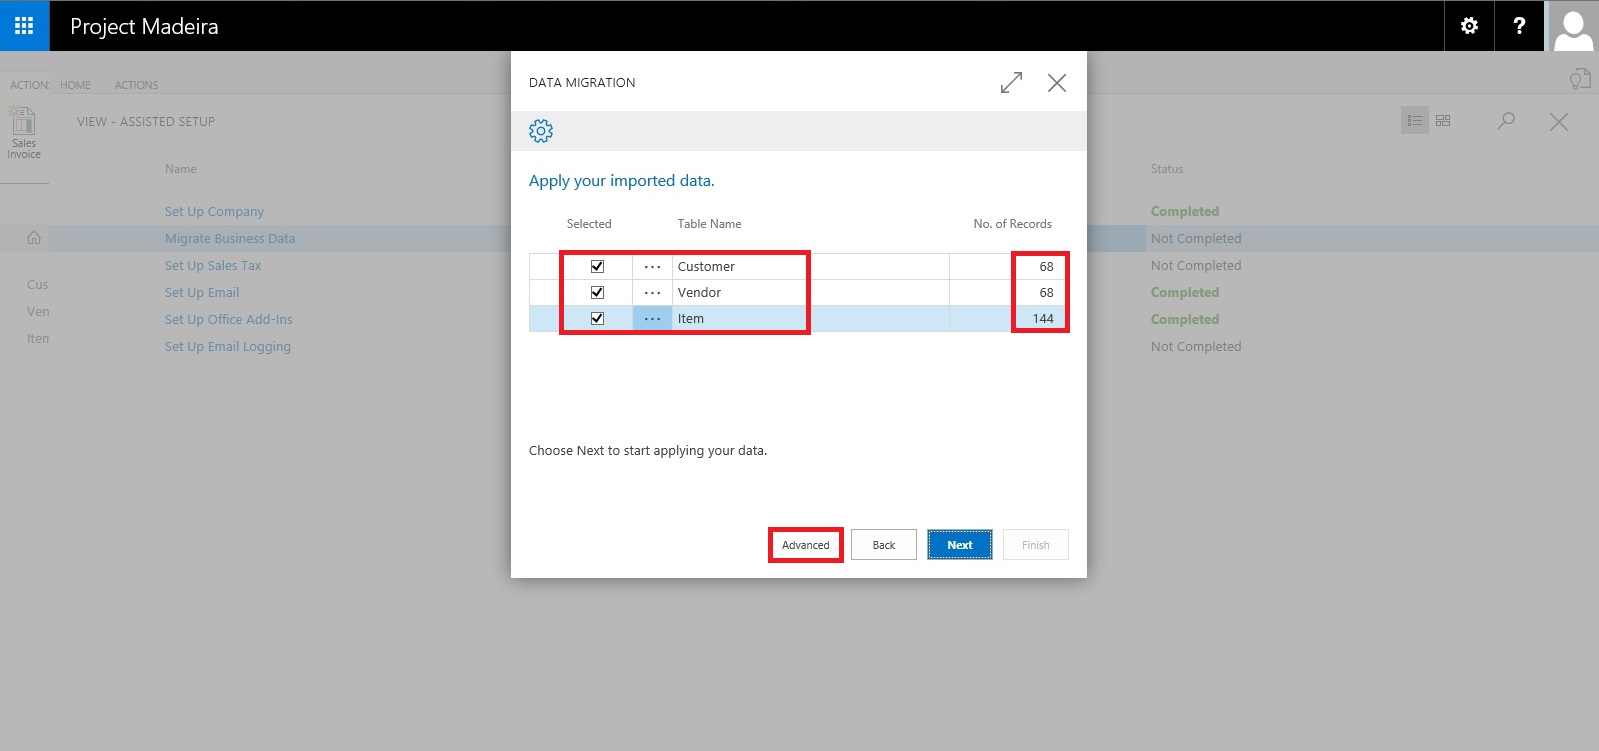
Here if you are familiar with the Rapid Start you can select Advance and perform action accordingly or can skip and proceed to Next Step by selecting Next. Here I am selecting Advance to show the screen.

Confirm with Yes to proceed.

Your Package page will open as shown in above screen, choose Apply Package and handle any import issue with the data to complete the step.

Confirm with Yes to continue.
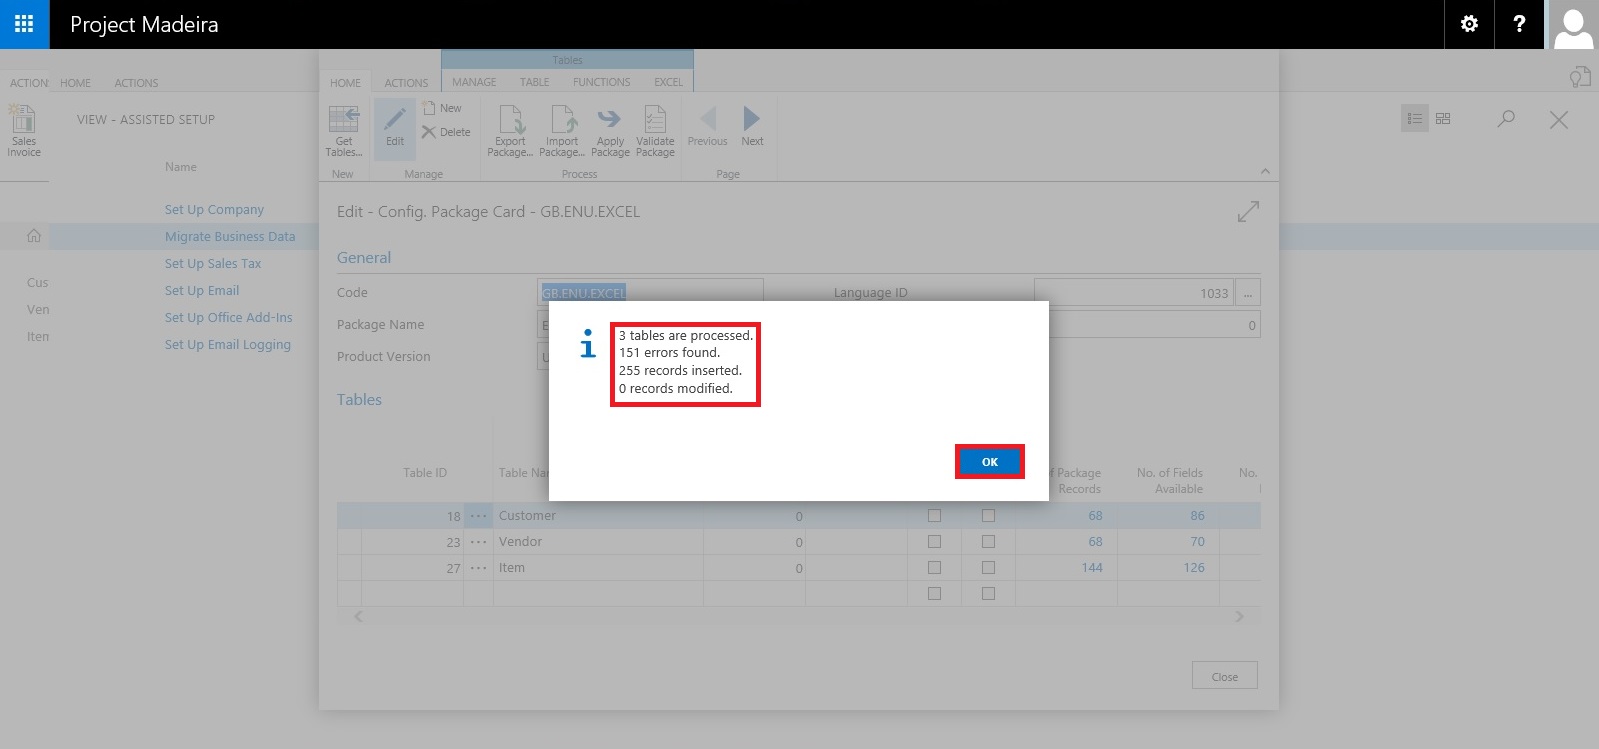
After processing it will show the status of data, review and fix the issues to continue.

You can drilldown and review the issues and take required steps to proceed with issue fixing and importing of data. Here I choose close to return to previous step of simple import without using Package option.

Select Next to continue with next step.
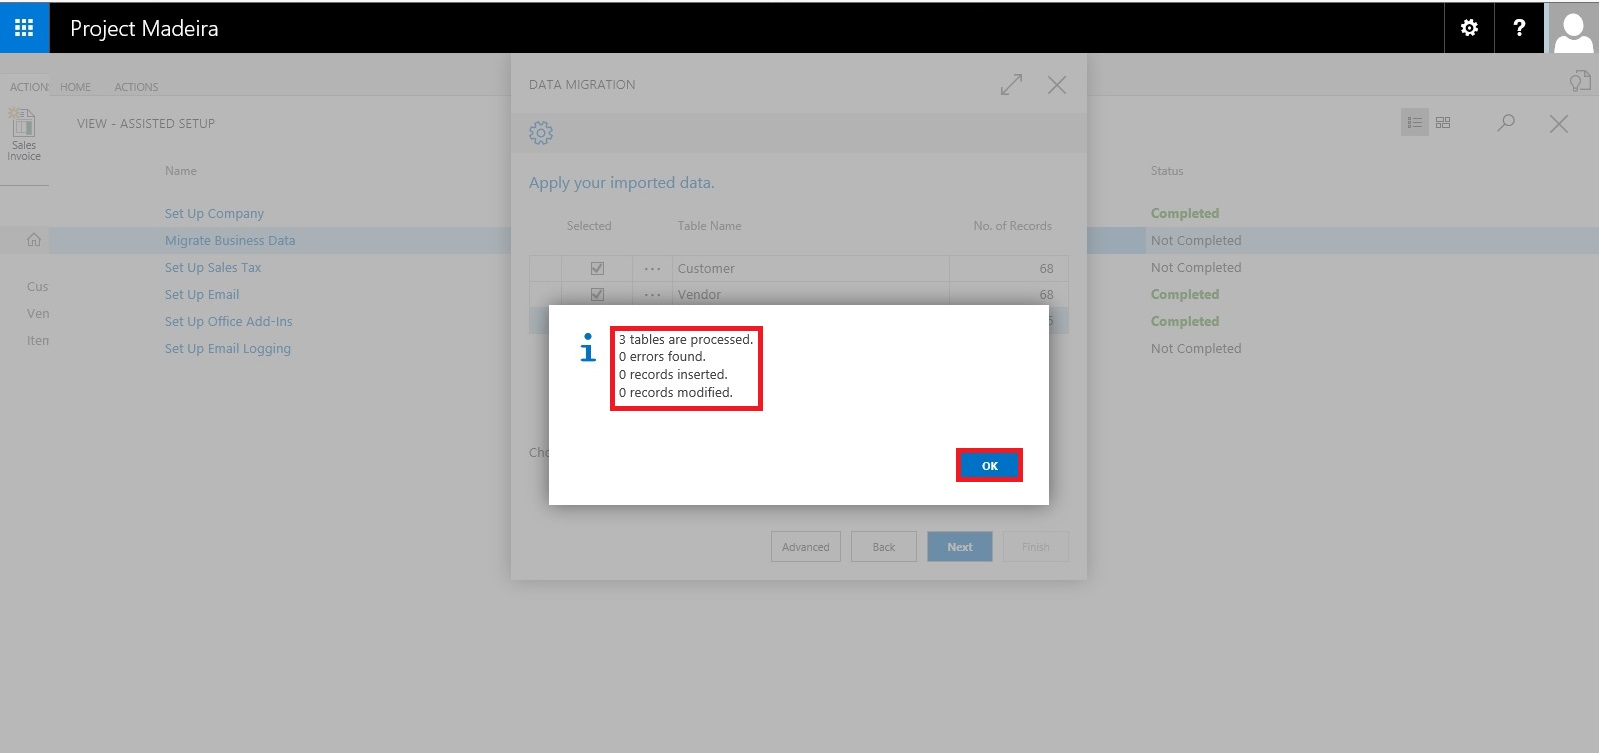
After processing it will show status of data and errors in data. Say OK to continue.
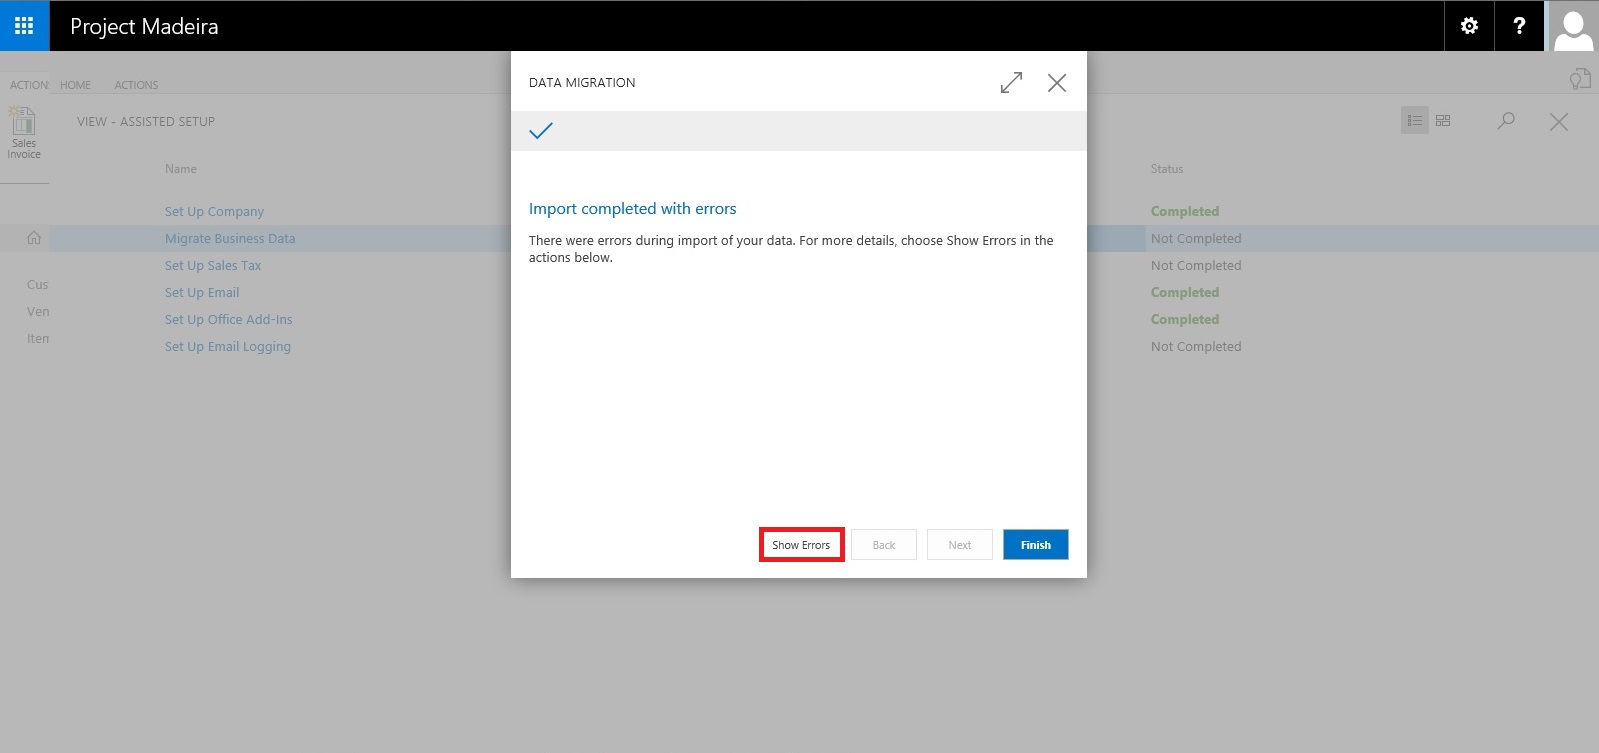
Here we can choose Show Errors to review the Errors.

We find that in my data most of the issues is related to Gen. Bus. Posting Group, Customer Posting Group, Vendor Posting Group, etc… We can fix these issues later, so just respond Close to continue with Next step.
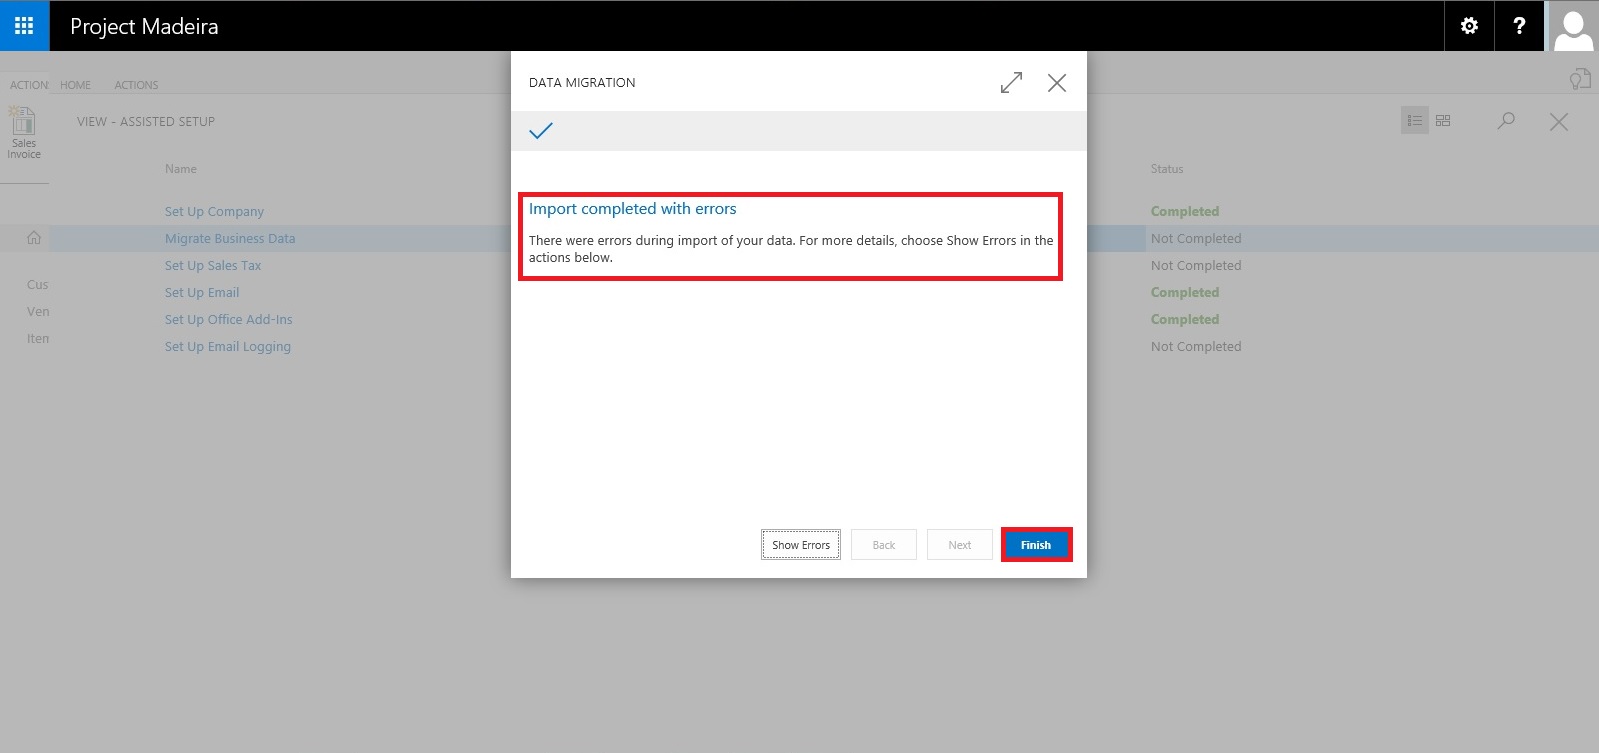
Our data is now Imported with errors, we will take care of issues with data as reviewed above. Respond Finish to complete this step & Process.
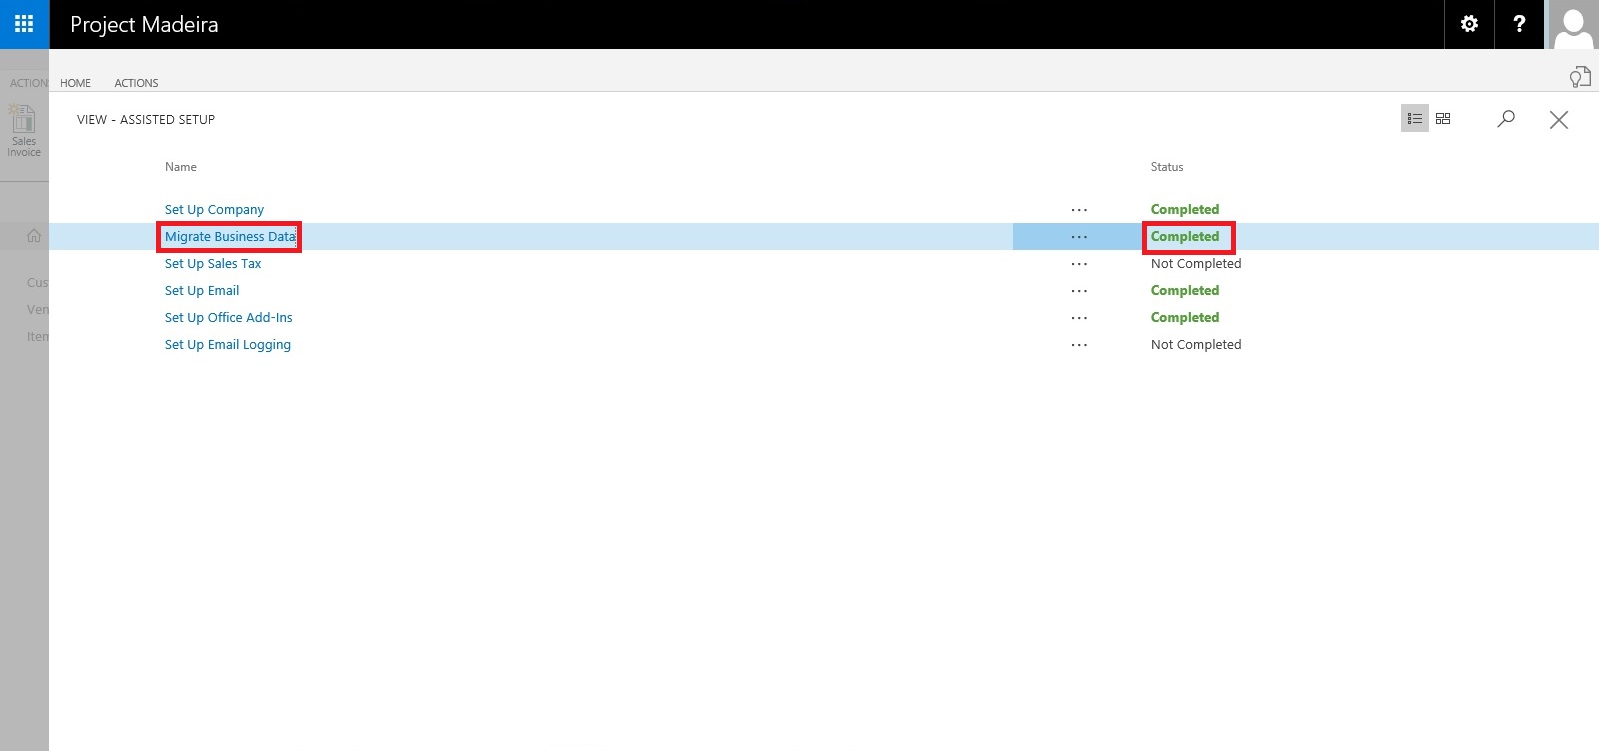
Now you can see this step is marked as completed in Status.
Our data is imported we will access the data and fix the issues accordingly.
I will come up with more details in my upcoming posts.
Till then keep exploring and Learning.
Assisted Setup – Madeira
When you want to explore Project “Madeira” on your own, you can always go back to the Getting Started tour. See in cubes area marked.

At Home page you will find the Assisted Setup & Tasks action. See in Ribbon marked in above screen.
Here you see a list of assisted setup that can help you getting started.
You can migrate data such as vendors, customers, and items from your existing financial system using the Migrate Business Data assisted setup. Once you are done with this piece you are good to go ahead exploring more.
Depending on your need, check if the other assisted setup can help you in any manner.
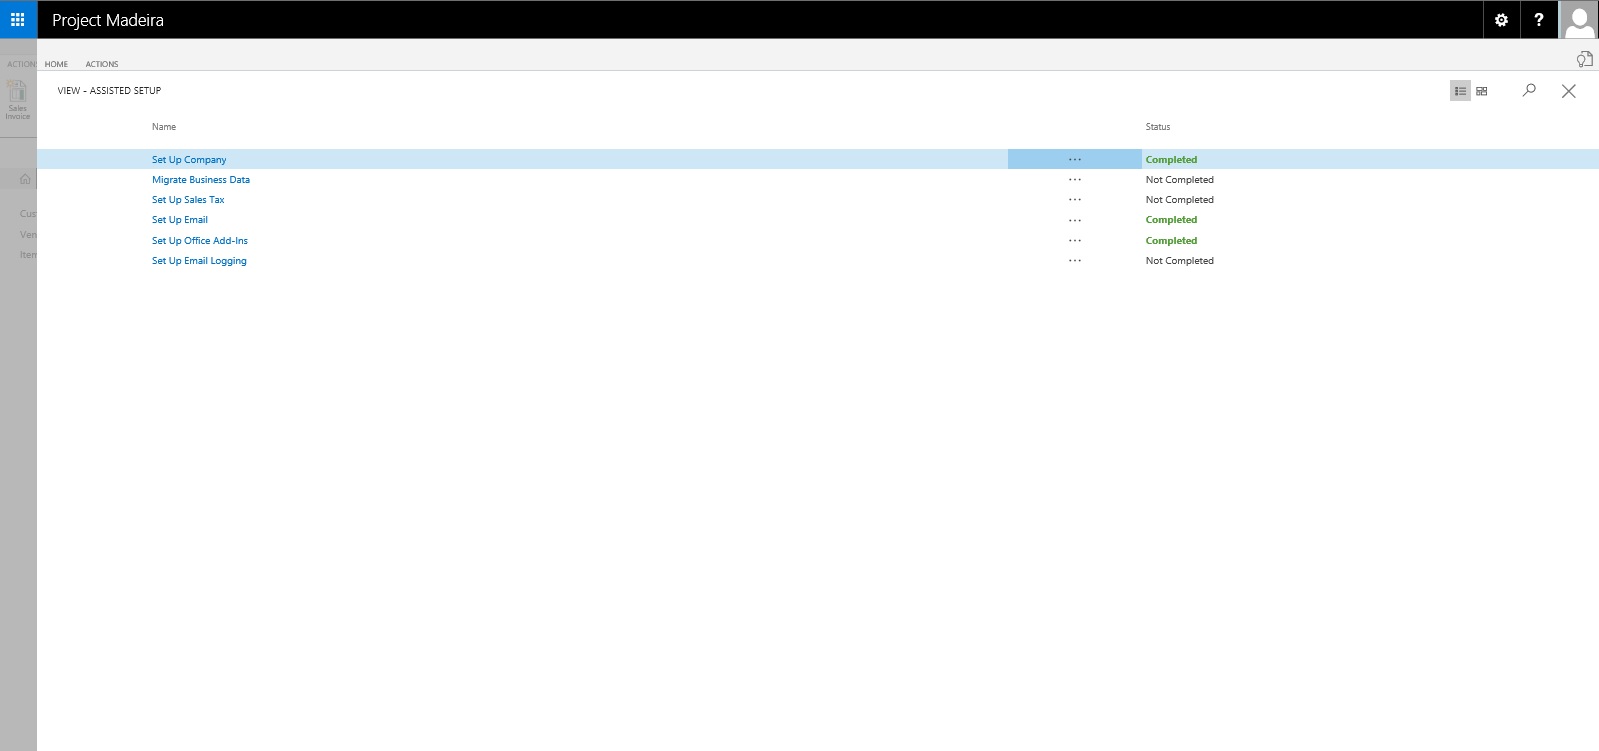
In the Assisted Setup window, you will find the followings:
ASSISTED SETUP
Set Up Company: – Creates a new trial company for you to enter data and try out Project “Madeira”. If you went through the Getting Started tour this step is probably already completed.
Migrate Business Data: – Lets you import your existing company data such as vendors, customers, and items from Excel or QuickBooks.
Set up Sales Tax: – Gets you started with default tax groups and assigning tax area codes that you can assign to customers and vendors in order to automatically calculate sales tax in sales or purchase documents.
Set up Email: – Gets you ready for sending email messages directly from sales orders or contacts in Project “Madeira”.
Set up Office Add-Ins: – Sets up the ability to use and launch Project “Madeira” from Outlook.
Set up Email Logging: – Sets up the capability to log email correspondence in Project “Madeira” to follow up on interactions.
Will come up with more details in my upcoming posts.
Till then keep exploring and learning.
Microsoft Power BI – Part X
Continuing from my previous post. Today we will downloading the dataset into Excel from Power BI Online for analysis.
In case you have missed my previous posts here I present the link to all previous posts below.
Introduction to Power BI and Creating Report from Excel Data, Local Files.
Microsoft Power BI – Part – II
Introduction to few Features of Power BI
Microsoft Power BI – Part – III
Power BI Desktop, Creating Dataset & Reports from In Premise Database installation
Microsoft Power BI – Part – IV
Power BI Gateway usage
Scheduling Refresh of Dataset & Report created using In Premise Database
Microsoft Power BI – Part – VI
Power BI Content Pack
Microsoft Power BI – Part – VII
Power BI Mobile App
Microsoft Power BI – Part – VIII
Power BI Content Pack
Microsoft Power BI – Part – IX
Power BI Publisher for Excel
Login to Power BI using your credentials.

Select the Dataset which you wish to analyse, click the three dots on right and from appearing menu choose ANALYZE IN EXCEL.
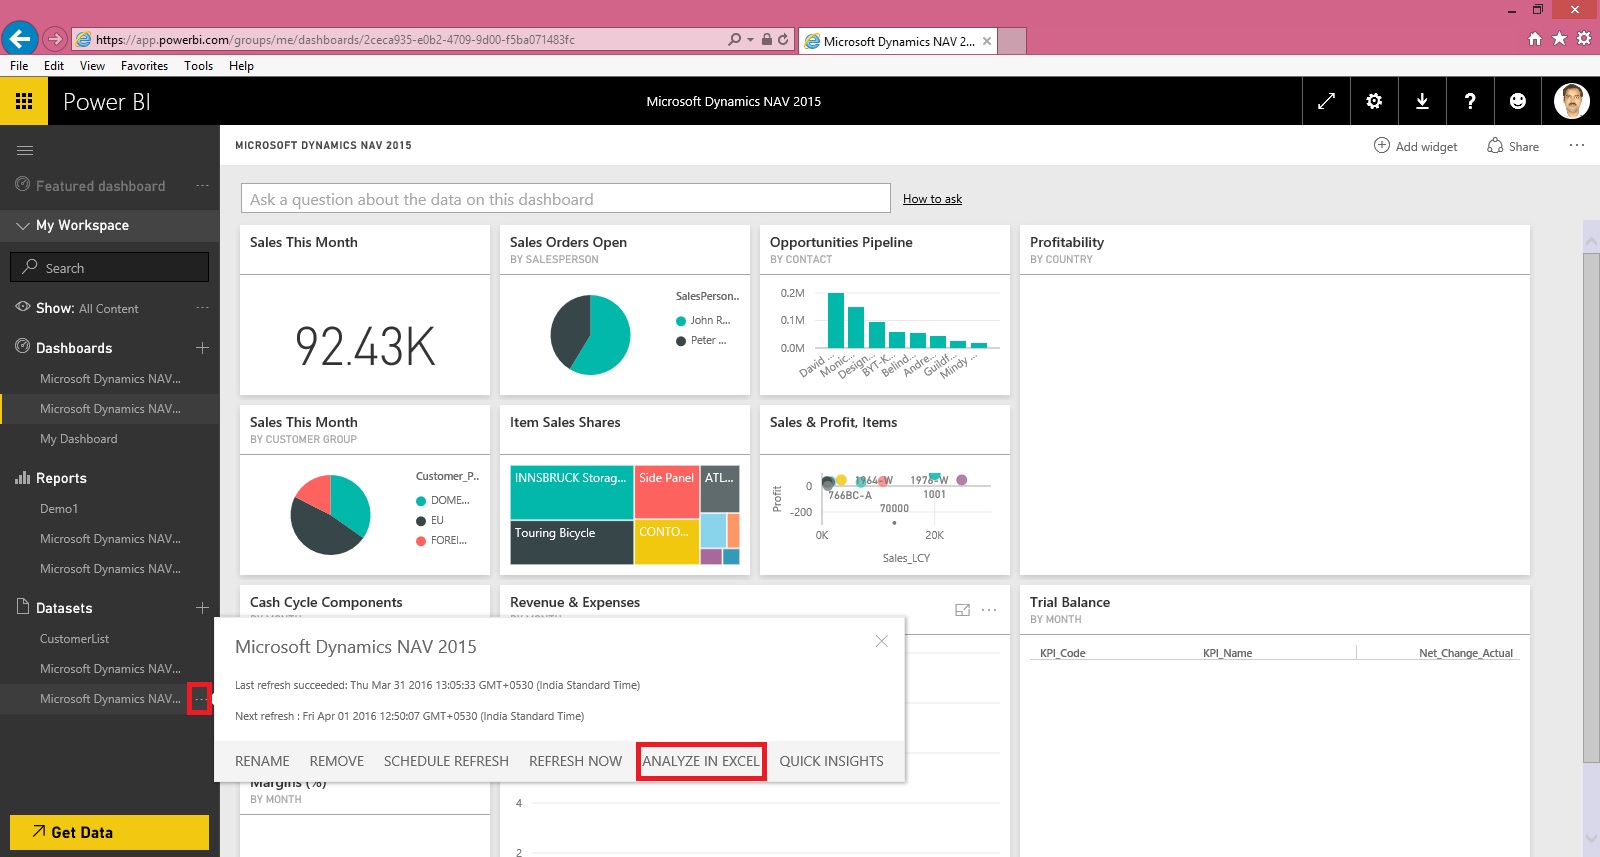
You will be prompted for Analyse in Excel (preview). If you are running first time please install it.
At the same time you will be prompted for (.odc) MS Office Data Connection file to save/open.
Save and then open the File in Excel.

On opening the file you will be prompted for security concern Enable to allow it.

You will be able to see Pivot Table Fields, containing all of the Tables available in the Dataset.

Now you can play with your data to analyse and create Pivot, Charts and share with others or you can Pin back your result to Power BI Dashboards using concept we used in our previous post.
That’s all for today, I will come up with more features in my future posts.
Till then keep practicing & Learning.

You must be logged in to post a comment.