Assist Setup, Assisted Setup, BC18, Business Central, Change Log, Cues, Data, Data Classifications, Dynamics 365, Email, Field Monitoring, Fields, Functional Tips, High-Risk, How To, Information, Monitor Field Change Setup, Notification, Office 365, Office Integration, Outlook, Role Center, Settings, Smtp, Start, Stop, Tip & Tricks

Monitor Field Change in Business Central

Field Monitoring is one of great help for superusers in Business Central. You can now configure a list of fields that contain high-risk and business-critical data that you want to be notified about when they are changed.

Changes to high-risk settings in Business Central can be tracked using the Change Log functionality. But sometime only tracking changes is not sufficient and you expect more like you should be notified of changes in fields that contain high-risk and business-critical data, such as bank account numbers, company name, and addresses.

Now setting a list of fields that contain high-risk and business-critical data is possible and you can be notified about when they are changed.

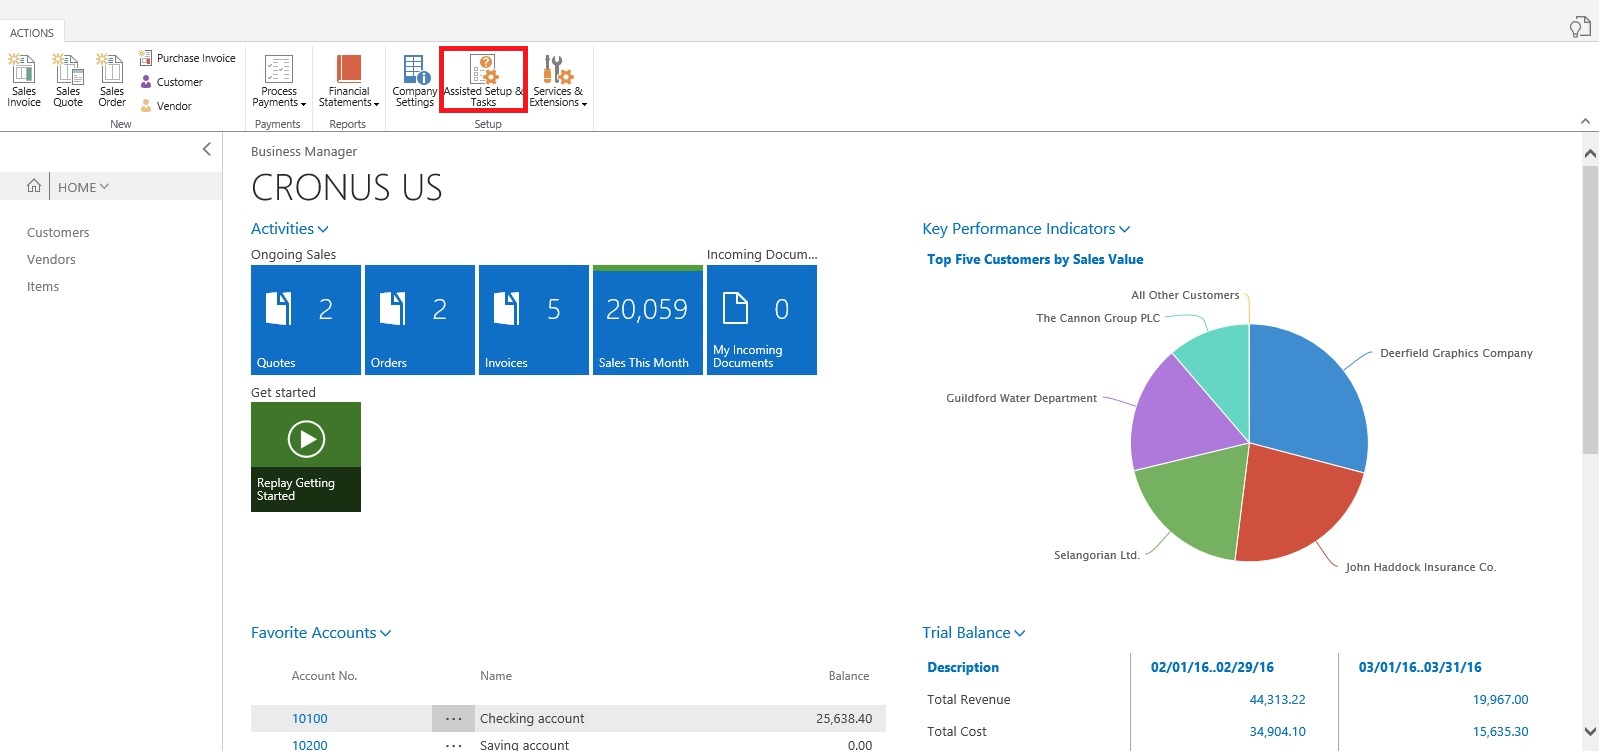
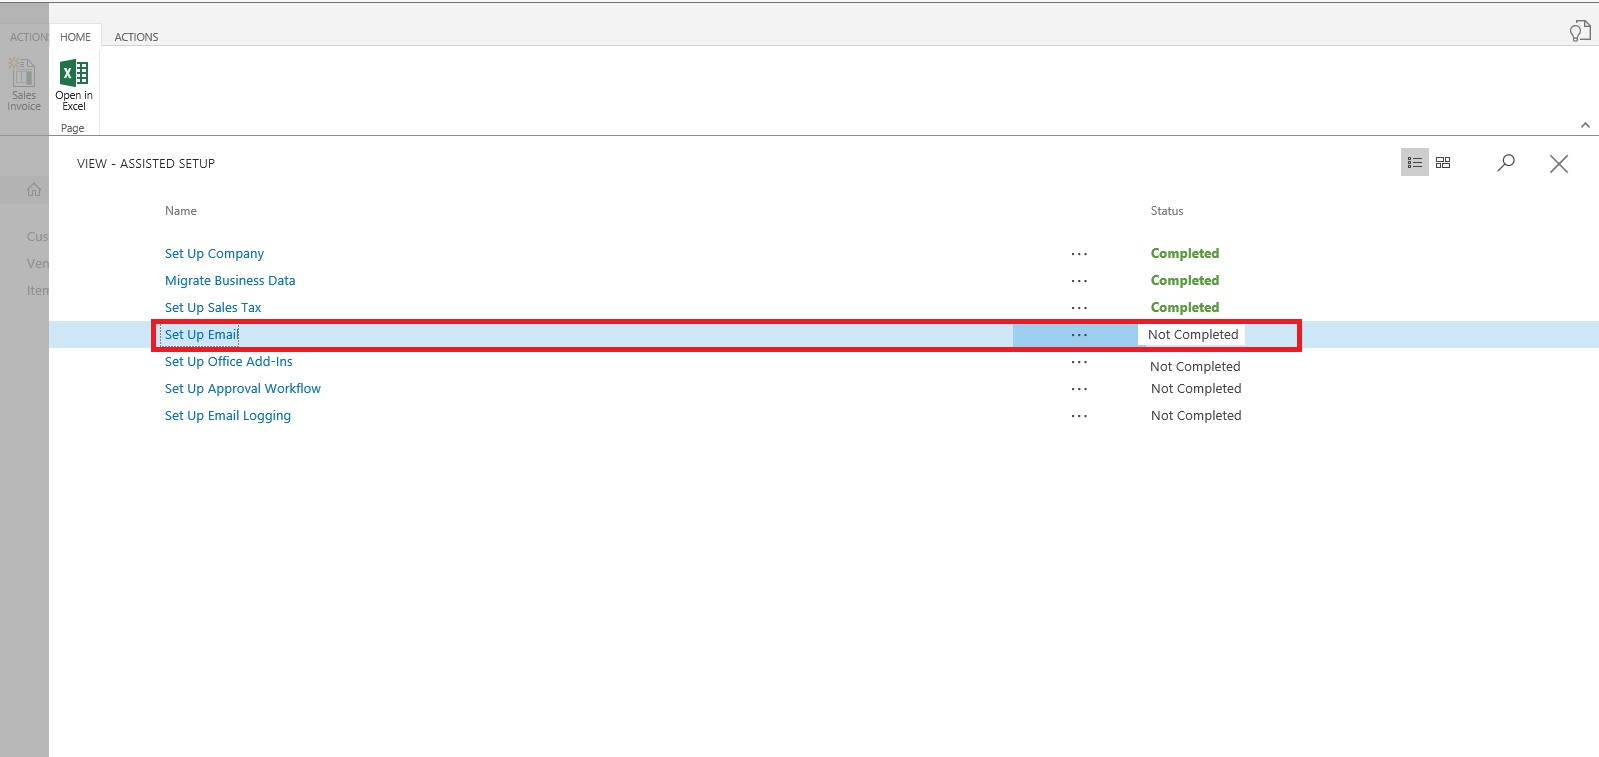
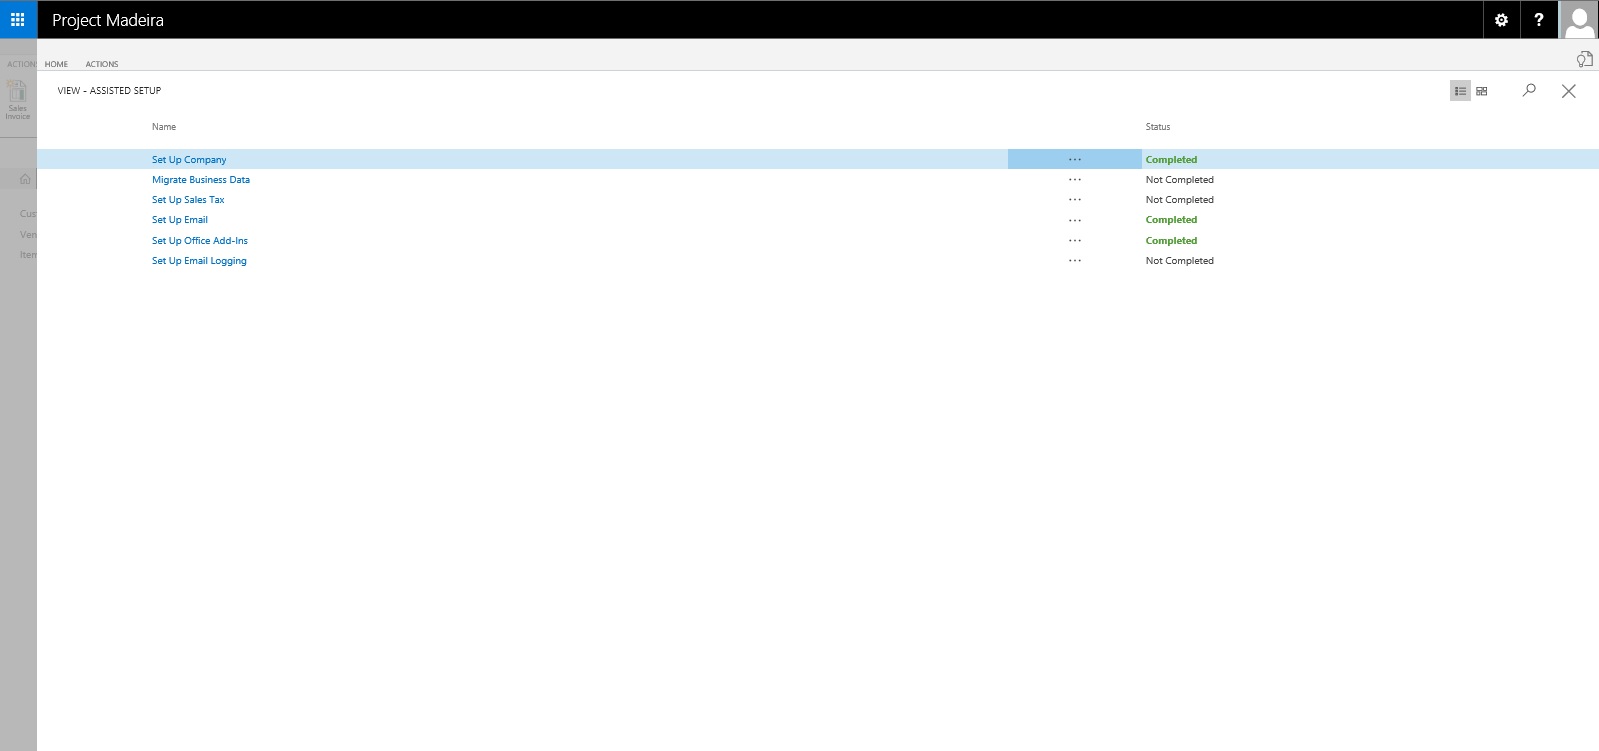
To start with this feature, Look for Assist Setup, I am using BC18 demo database for below steps.

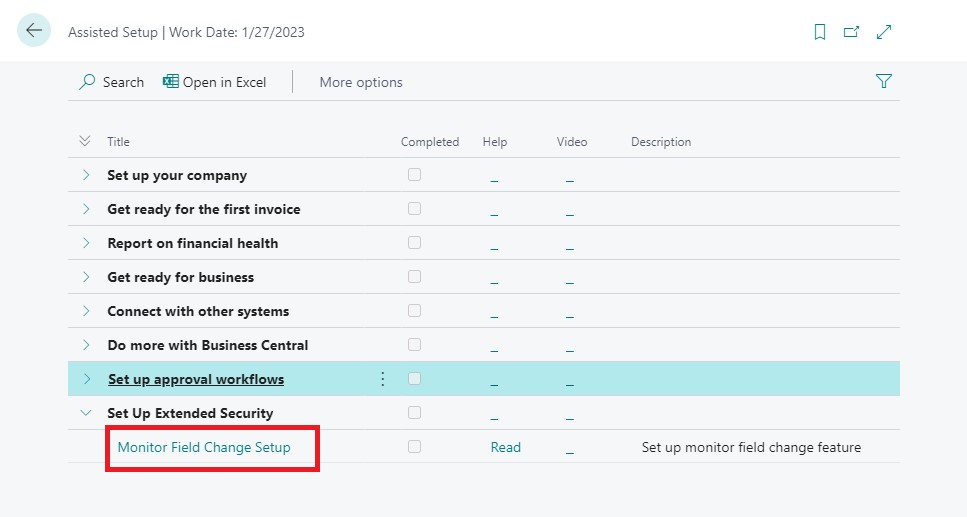
Although it is not necessary to follow Assist Setup, you can do setup from individual pages. But this will ensure you don’t miss any steps.

Click on Next to start with setup. And follow the steps in leading wizard pages.

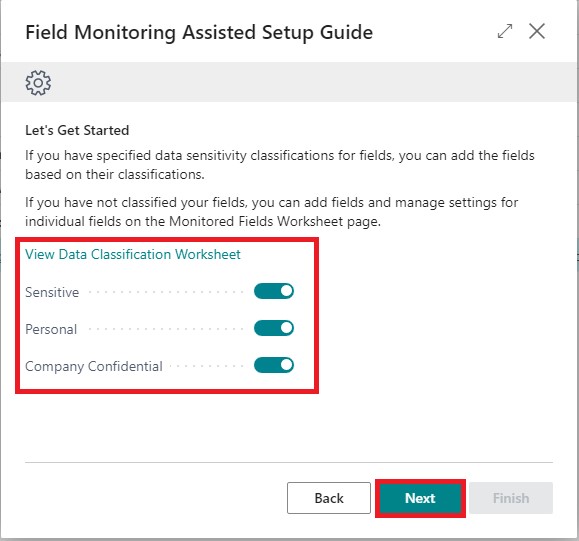
If you wish to use Data Classification and already have performed data classification you can enable or continue with individual fields using Monitored Fields Worksheet, in upcoming Wizard pages.

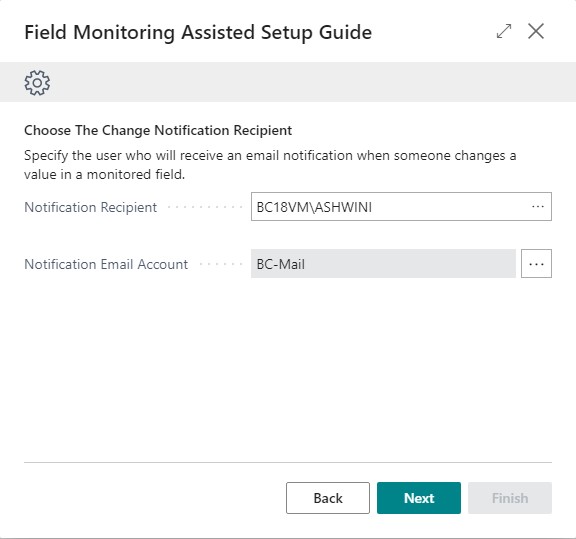
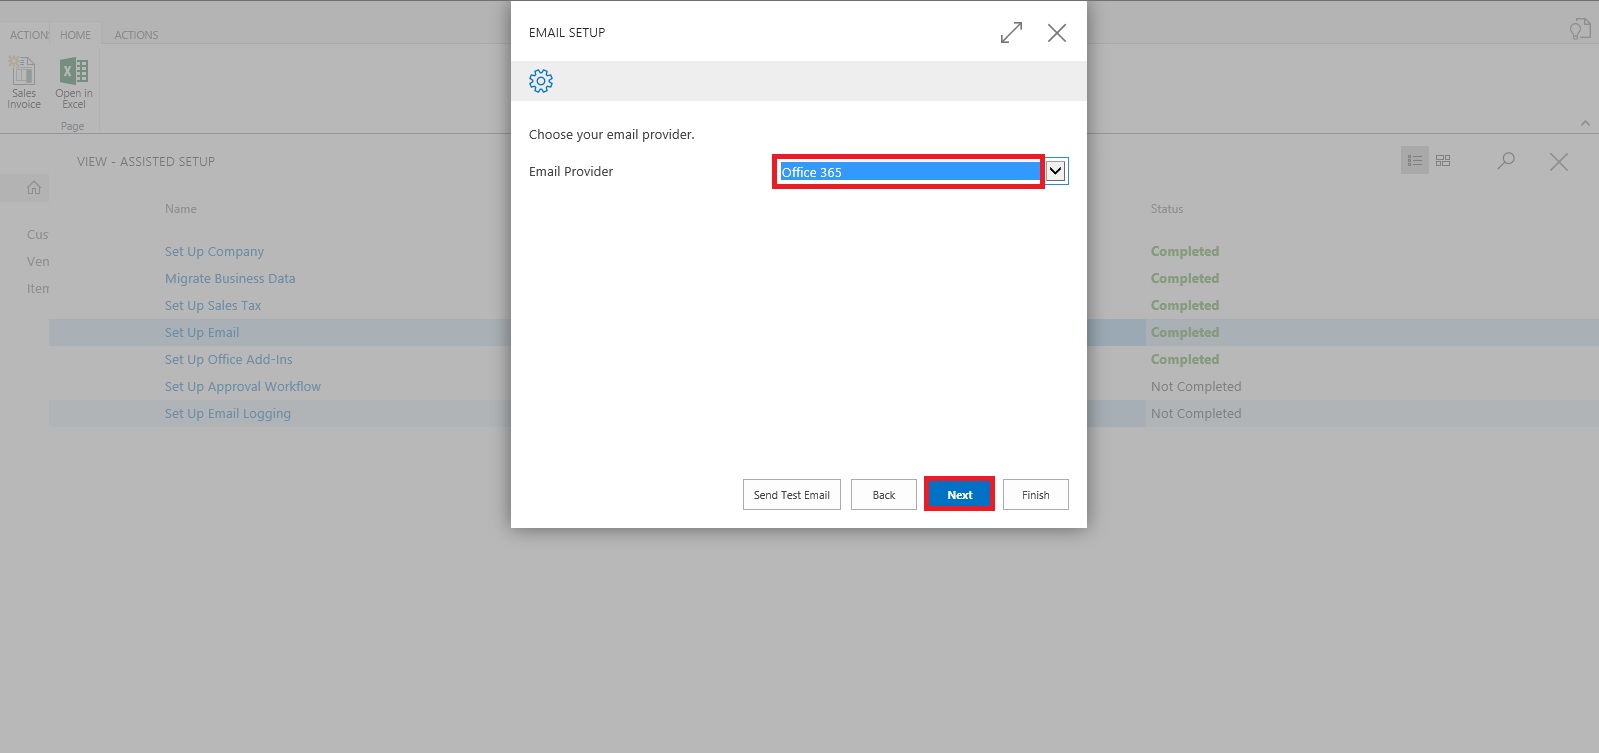
It is necessary to have the Sending and user e-mail setup is completed. Here you can select the email ids as required.

You need to add Fields for monitoring enable and click finish, or you can open the Page later and configure. This will Start the Monitoring and Notification service.

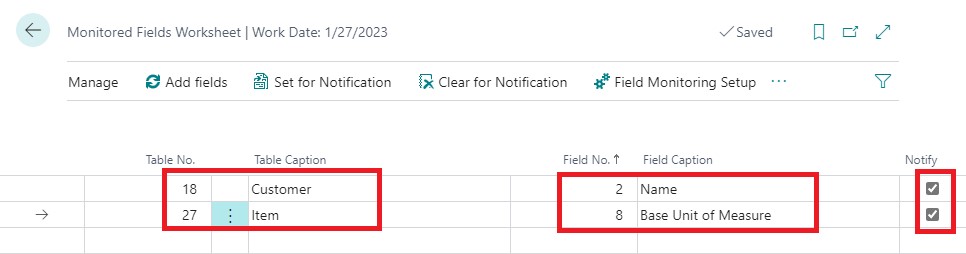
In Next step or you can open this page Monitored Fields Worksheet from Tell Me.

Add your table & fields that you wish to Monitor.

If notify is enabled you will receive the mail, else you can view in Monitored Field Log page. You can use Field Monitoring Setup Page from Action bar, or you can separately open this page from Tell Me.

You need to Start the Field Monitoring Setup, if not already done. If you have used Assist setup it will be Started, in case you are doing Manually from each Page, you will need to visit this Page, Setup your Emails and Start the Service.

Before we Start with Testing, it is strongly recommended you Log Off and Login again to Business Central. As logging starts and ends on Login & Logout of user.

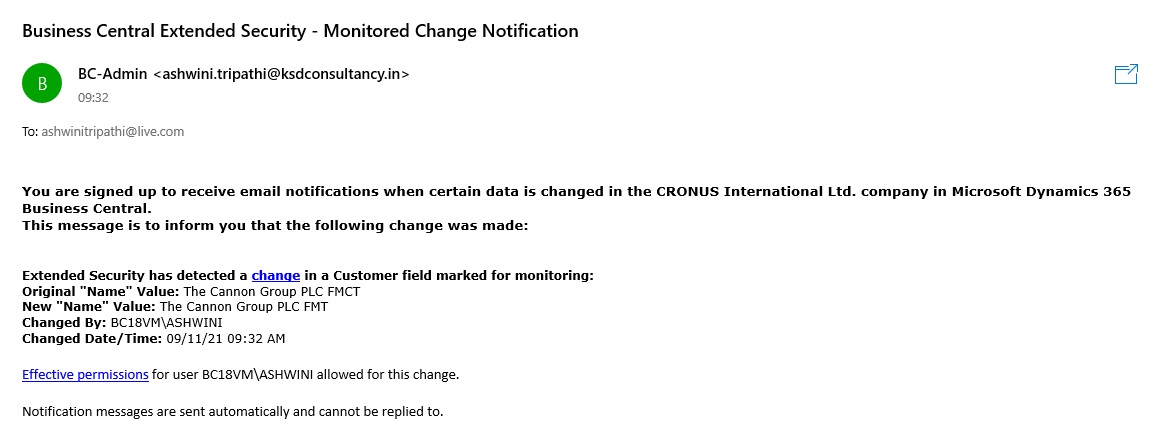
Open the Customer Page and make changes to Name, as above we have setup to log Name field of Customer.

If your all setup is OK you should Receive a mail as below.

Some Pages helpful for Field Monitored Service are:

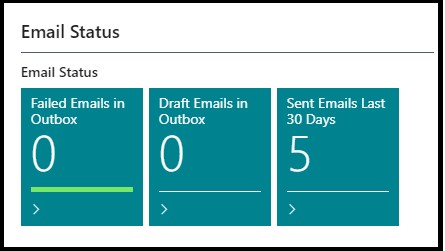
You can Monitor the Mails Status from your Role Centre Cues:

What else you can do for monitoring your data and notifications:

  • If there is a problem sending the email, you can check the detailed information on Email Outbox page.
  • You can view the mail sending record on Sent Emails page.
  • You can view the log of Field Monitoring Setup and Monitoring Fields on Monitored Field Log Entries page.

Hope you enjoyed the information. Will come with more similar information in my next posts. Till then keep exploring, learning and sharing your knowledge with others.

Remain safe, take care of your loved ones, put your mask, maintain safe distance and don’t forget to get vaccinated.

Advertisement
BC18, Business Central, Customer, Document Layout, Dynamics 365, Email, Functional Tips, How To, Information, Office 365, Purchase Documents, Sales Documents, Smtp, Tip & Tricks, Vendor

Customer and Vendor Document Layout in Business Central

In this post we will discuss how to setup sending documents to different contacts, specific contacts to use with certain documents.

I am using BC18 Demo Database.

On Customer Card select Related-> Customer-> Document Layouts.

Here we are setting up different type of document should go to different contacts/e-mail ids.

In above example: Quote will go to my personal id, and Order Confirmation to my organization id.

It is important that email setup is done to use this feature, either is Office 365 or SMTP which ever you use.

Let’s quickly Check the output:

1. Sales Quote

On Quote select Print/Sent-> Send by Email.

2. Order Confirmation

On Sales Order select Print/Send-> Email Confirmation.

You can see different type of documents are picking different e-mail ids of contacts as per our setup done above.

Similarly, you can do for Vendors too:

Hope you enjoyed the information. Will come with more similar information in my next posts. Till then keep exploring, learning and sharing your knowledge with others.

Remain safe, take care of your loved ones, put your mask, maintain safe distance and don’t forget to get vaccinated.

Development Tips, Functional Tips, How To, Maderia, Tip & Tricks

Setup Send Documents by Email in Madeira

To enable emails from within Project “Madeira”, start the Set Up Email assisted setup on the Home page. We have already seen this in our previous post, you can find it here.

To offer your customers to pay for sales electronically using a payment service, such as PayPal, you can also have the PayPal information and hyperlink inserted in the email body. We have already covered this in our previous post, you can find it here.

From all supported documents, you initiate emailing by choosing the Send action, on posted documents, or the Post and Send action, on non-posted documents.

Let us Setup document-specific email body for sales invoices.

From the search page find Report Selections Sales:

SetupEmail-10

Fill the Value as shown in below screen in same sequence.

SetupEmail-11

If you want to offer customers to pay for sales electronically, you can set up the related payment service, such as PayPal, and then have the PayPal information and hyperlink inserted in the email body as well. We have already covered this in our previous post, you can find it here.

Will come up with more details & feature explaination in my upcomming posts.


Development Tips, How To, Information, Instalation & Configuration, Maderia, Office Integration, Tip & Tricks

Assisted Setup (Email) in Madeira

In this post we will discuss how to setup Email.

Its very easy and single user intervention required.

SetupEmail-1

From Action Tab click on Assisted Setup & Task from the ribbon.

SetupEmail-2

On Welcome screen click on Next Button.

SetupEmail-3

Select the Email Provider and click on Next to continue.

SetupEmail-4

Enter your Email id and password, click on Next Button.

SetupEmail-5

That’s it, click on Finish.

SetupEmail-6


SetupEmail-7


Just required to enter Email id and password, setup is done.

Will come with other option in my next post.

Till then keep exploring and learning.


How To, Information, Instalation & Configuration, Maderia, Tip & Tricks

Assisted Setup – Madeira

When you want to explore Project “Madeira” on your own, you can always go back to the Getting Started tour. See in cubes area marked.

AssistSetup-1

At Home page you will find the Assisted Setup & Tasks action. See in Ribbon marked in above screen.

Here you see a list of assisted setup that can help you getting started.

AssistSetup-2

You can migrate data such as vendors, customers, and items from your existing financial system using the Migrate Business Data assisted setup. Once you are done with this piece you are good to go ahead exploring more.

Depending on your need, check if the other assisted setup can help you in any manner.

In the Assisted Setup window, you will find the followings:


ASSISTED SETUP

Set Up Company: – Creates a new trial company for you to enter data and try out Project “Madeira”. If you went through the Getting Started tour this step is probably already completed.

Migrate Business Data: – Lets you import your existing company data such as vendors, customers, and items from Excel or QuickBooks.

Set up Sales Tax: – Gets you started with default tax groups and assigning tax area codes that you can assign to customers and vendors in order to automatically calculate sales tax in sales or purchase documents.

Set up Email: – Gets you ready for sending email messages directly from sales orders or contacts in Project “Madeira”.

Set up Office Add-Ins: – Sets up the ability to use and launch Project “Madeira” from Outlook.

Set up Email Logging: – Sets up the capability to log email correspondence in Project “Madeira” to follow up on interactions.


Will come up with more details in my upcoming posts.

Till then keep exploring and learning.


Corfu Navision 2016, Development Tips, Functional Tips, How To, Layouts, Office Integration, Report, Selection, Word

Modify, Assign and Process Email for Word Forms in Navision 2016

Microsoft Dynamics NAV 2016 offers new functionality with Microsoft Word forms and emailing documents for Customers and Vendors. You can now modify the customer statement report and the vendor remittance report using Microsoft Word. You can also select a specific report format by customer to ease the statement process.

To make this functionality work for you, you need to make sure you have setup the SMTP Mail Setup. You can see my earlier post OFFICE 365 INTEGRATION IN NAV 2015 – Exchange Online this is still valid for Navision 2016.

Recall from my earlier posts, how to work with Word Layouts which I have written for 2015 but those are still valid for 2016 links as below.

Word Document Reports and Custom Layouts

Using Report Selector to run Report

Managing Report Layouts

In Microsoft Dynamics NAV 2016, Microsoft have extended the functionality for Word forms and Email beyond the Sales documents. We now have default Microsoft Word forms for Customer Statements and the Vendor Remittance report.

You can now modify the Word form to meet your needs, assign a custom Word layout to a specified customer or vendor and print or email based on those customer specific selections.

In the Report Layout selection, there is a new report object for the Customer Statement with a default Word report created.

The Mini Statement report (1316) is based on the existing RDLC customer statement but includes a Word report with the same information. You can use Managing Report Layouts to know more details regarding customizing the Layouts.

In Report Selection – Sales, you can set the Customer Statement to use the new report, Mini-Statement – 1316.
Report2016-1

Now your system is setup to use the specified layout for all customers and the statement itself is going to use the new report.

Now that Microsoft Dynamics NAV is setup to use the new report, you can assign a specific report by customer. This will enable you to have multiple formats processed at the same time.

We assigned a custom layout to the customer in the customer card.

Here you set your selection by document type, for example, the sales quote or the customer statement.

You can also enter an email address for the document. So, if the statement goes to your customer’s accounts receivable clerk and the sales quote is sent to the sales manager, you define this information in the Document Layouts page.

The system uses the custom layout when you print the documents instead of emailing them.

Enter multiple email addresses with a semi-colon to separate them.
Report2016-2

You can do this for all customers.

When statements are processed, the report layout used is the one assigned to the customer. If the customer has no custom layouts assigned, the custom layout assigned in the Report Layout Selection is used.

If you go to Customer Statements, you can see that that Output Options are available. This will let you select how you wish to use the document layout settings.
Report2016-3
A checkbox will appear allowing you to print remaining statements. If you mark this checkbox, any statements with an email address in Customer Document Layouts is emailed, and any statements with a custom report layout but no email address will print with that report layout and any customers without any document layout settings will use the company default report from Report Layout Selections.

I will come up with more details in my upcoming posts.