Field Monitoring is one of great help for superusers in Business Central. You can now configure a list of fields that contain high-risk and business-critical data that you want to be notified about when they are changed.
Changes to high-risk settings in Business Central can be tracked using the Change Log functionality. But sometime only tracking changes is not sufficient and you expect more like you should be notified of changes in fields that contain high-risk and business-critical data, such as bank account numbers, company name, and addresses.
Now setting a list of fields that contain high-risk and business-critical data is possible and you can be notified about when they are changed.
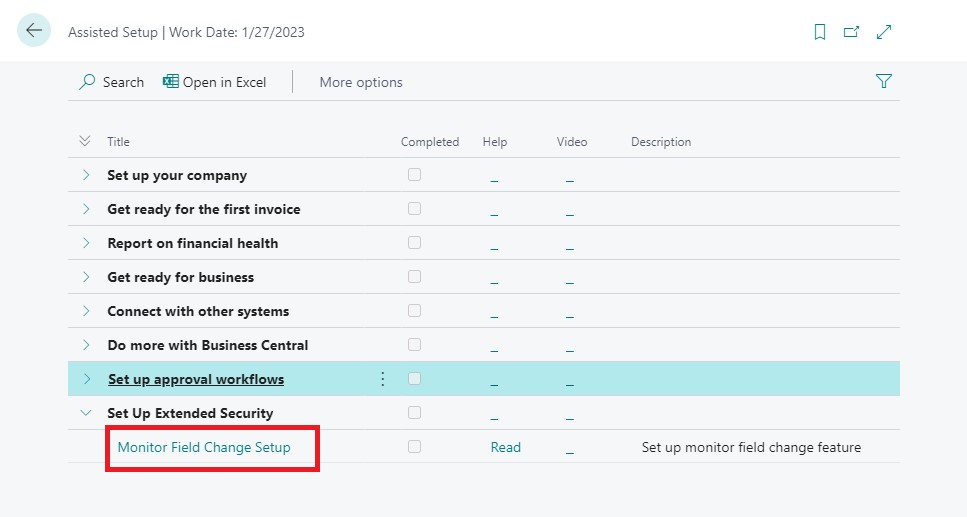
To start with this feature, Look for Assist Setup, I am using BC18 demo database for below steps.
Although it is not necessary to follow Assist Setup, you can do setup from individual pages. But this will ensure you don’t miss any steps.
Click on Next to start with setup. And follow the steps in leading wizard pages.
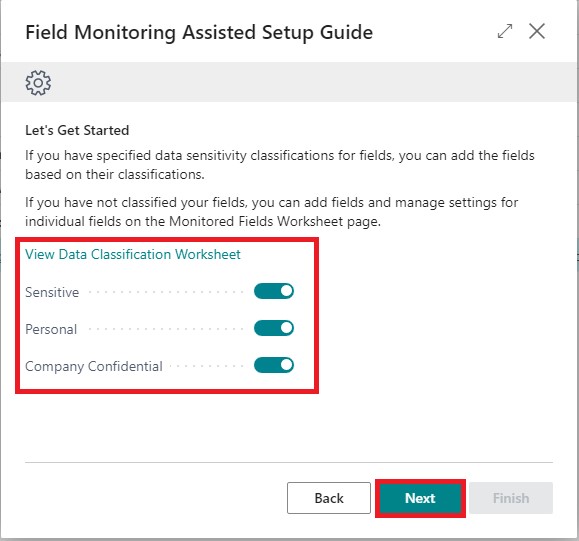
If you wish to use Data Classification and already have performed data classification you can enable or continue with individual fields using Monitored Fields Worksheet, in upcoming Wizard pages.
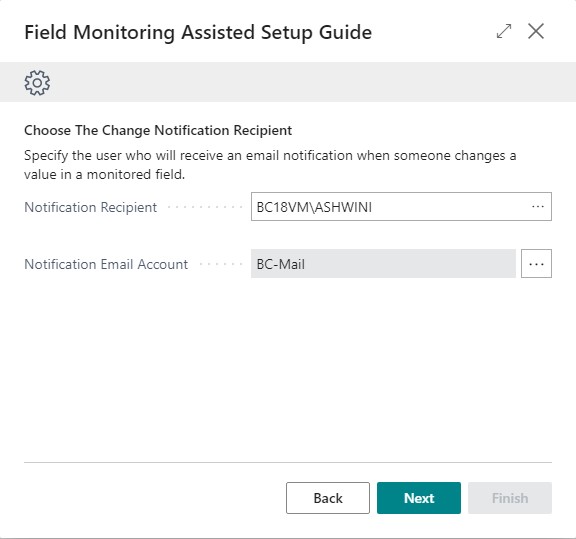
It is necessary to have the Sending and user e-mail setup is completed. Here you can select the email ids as required.
You need to add Fields for monitoring enable and click finish, or you can open the Page later and configure. This will Start the Monitoring and Notification service.
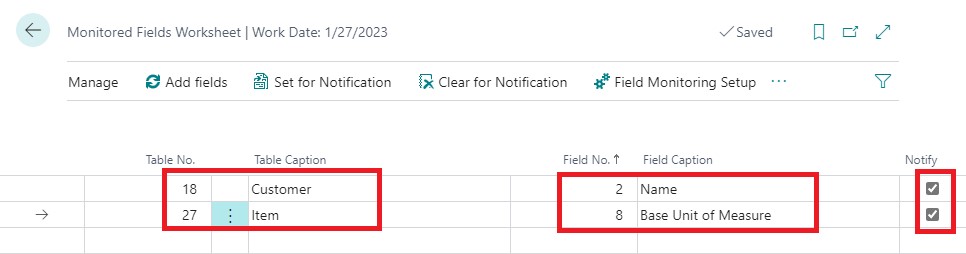
In Next step or you can open this page Monitored Fields Worksheet from Tell Me.
Add your table & fields that you wish to Monitor.
If notify is enabled you will receive the mail, else you can view in Monitored Field Log page. You can use Field Monitoring Setup Page from Action bar, or you can separately open this page from Tell Me.
You need to Start the Field Monitoring Setup, if not already done. If you have used Assist setup it will be Started, in case you are doing Manually from each Page, you will need to visit this Page, Setup your Emails and Start the Service.
Before we Start with Testing, it is strongly recommended you Log Off and Login again to Business Central. As logging starts and ends on Login & Logout of user.
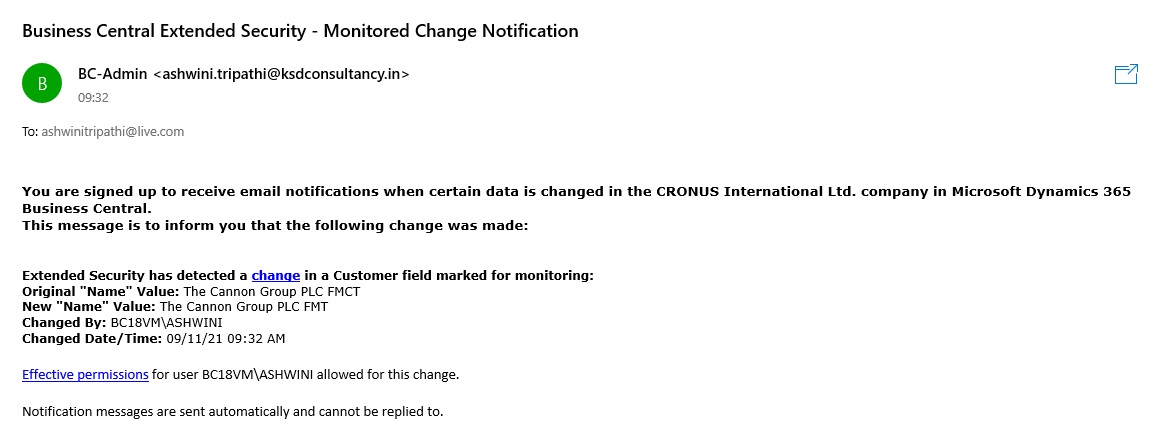
Open the Customer Page and make changes to Name, as above we have setup to log Name field of Customer.
If your all setup is OK you should Receive a mail as below.
Some Pages helpful for Field Monitored Service are:
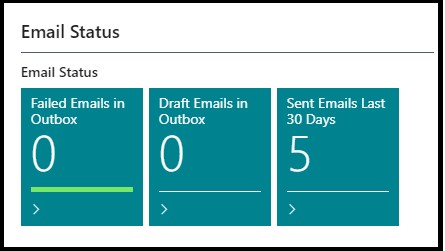
You can Monitor the Mails Status from your Role Centre Cues:
What else you can do for monitoring your data and notifications:
If there is a problem sending the email, you can check the detailed information on Email Outbox page.
You can view the mail sending record on Sent Emails page.
You can view the log of Field Monitoring Setup and Monitoring Fields on Monitored Field Log Entries page.
Hope you enjoyed the information. Will come with more similar information in my next posts. Till then keep exploring, learning and sharing your knowledge with others.
Remain safe, take care of your loved ones, put your mask, maintain safe distance and don’t forget to get vaccinated.
Continuing from where we left in previous post, if not seen you can visit here.
During development, your resource utilization can grow unorganized with old, outdated, and unused components. Where you may require maintenance to manage, free resources and reclaim for other uses.
Let’s learn few commands which will be useful to work and maintain docker containers, images and other resources.
Today we will learn how to organize a Docker environment by removing Docker images, containers, volumes, and networks.
Using these commands makes Docker container management fast and easy.
A container creates a specific environment in which a process can be executed. As we all are aware of many containers are created over time, tested, and uninhibited during the development lifecycle.
Therefore, it’s important to know how to find unnecessary containers and remove them.
First, you will need to list all Docker containers using the command:
docker container ls -a
This will list all running containers, their IDs, names, images, status and other parameters.
Most of the time you are only interested to have list of all the containers only by their numeric ID’s, that you can obtain running the command:
docker container ls –aq
To stop a specific container, enter the following:
docker container stop [container_id]
Replace [container_id] with the numeric ID of the container from your list.
You can enter multiple container IDs into the same command.
To stop all containers, enter:
docker container stop $(docker container ls –aq)
This forces Docker to use the list of all container IDs as the target of the stop command.
To launch or start a single or multiple stopped Docker containers
docker start [options] container_id
List all Docker Resources
Enter the following commands to display resources:
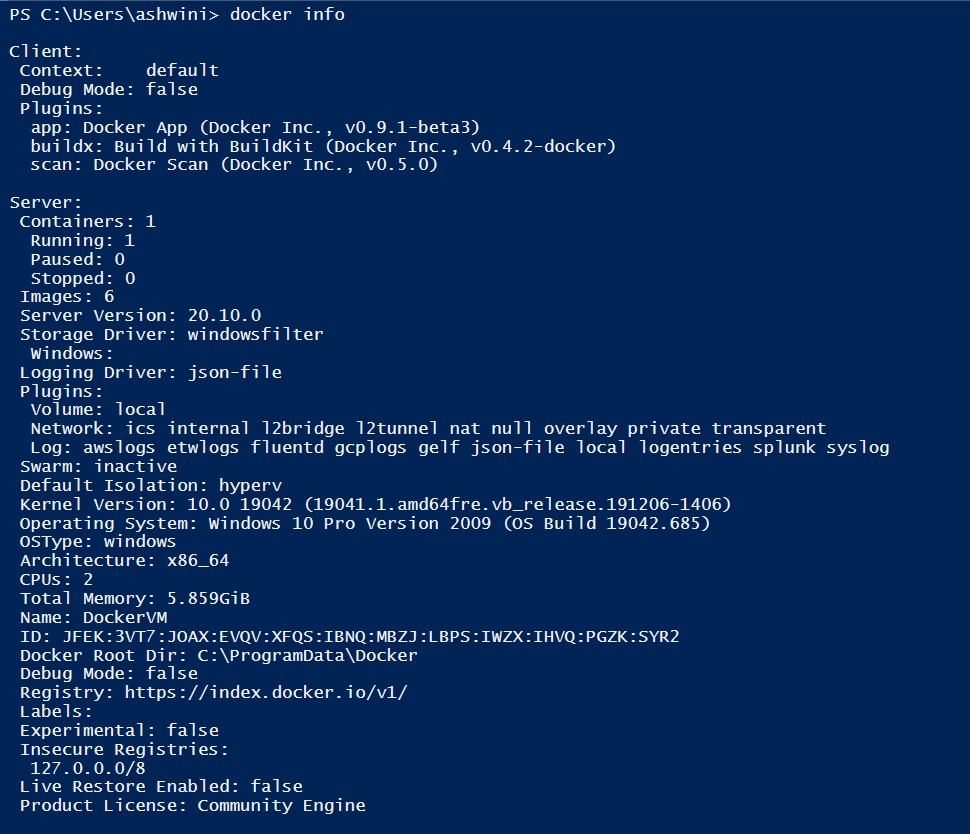
docker info
docker container ls
docker image ls
docker volume ls
docker network ls
The above-mentioned lists number of containers, images, and information about the Docker installation. These commands can help you locate and identify resources that you want to keep, or that you want to delete.
Remove a Stopped Container
To remove a stopped container, use the command:
docker container rm [container_id]
Remove All Stopped Containers
To remove all stopped containers:
docker container rm $(docker container ls –aq)
Remove All Docker Containers
To wipe Docker clean and start from scratch, enter the command:
docker container stop $(docker container ls –aq) && docker system prune –af ––volumes
Let’s decode above command line as:
docker container ls –aq
will list all containers with their numeric ID
docker container stop
will stop all containers obtained from above list
&& docker system prune –af ––volumes
Will remove all stopped containers and volumes
Here (a) indicates this should apply to all containers &(f) without a required confirmation.
How to Remove Docker Images
Docker images are files, which include multiple layers used to run code within a container.
Images may go through many iterations during development. Old and outdated images can clutter your system, taking up storage space and making searches more difficult.
To remove a Docker image, start by listing all the images on your system:
docker image ls
The output displays the locally available Docker images, as seen below.
Make a note of the IMAGE ID – this is the identifier used to remove the image.
Then, remove the unwanted image(s):
docker image rm [image_id1]
Replace [image_id1] with the image ID you pulled from the first command. You can enter a single Image ID, or multiple IDs for removal.
The system may respond to your request with an error message, that there is a conflict and it is unable to remove the repository reference.
This indicates that a container is using the image. You need to remove the container first before you can remove the image.
How to Remove Docker Volumes
A volume is used to store Docker data.
It helps store and organize data outside containers in a way that it’s accessible to multiple containers.
Use the following command to generate a list of all the available Docker volumes:
docker volume ls
Take note of the VOLUME NAME you want to remove.
Then enter:
docker volume rm VolumeName
Make sure to replace VolumeName with the actual name you generated with the previous command.
If the volume is in use by an existing container, the system responds with an error. This means need to remove the container first.
How to Remove Docker Networks
Docker networks allow different containers to communicate with each other freely while also preventing traffic from outside the network. This is typically done with a Docker bridge network.
The prune command removes all unused networks.
Removing a Single Network
Display a list of all existing Docker networks with the command:
docker network ls
Take note of the NETWORK ID – this is the identifier used to remove a specific network. Then, enter:
docker network rm [networkID]
Replace [networkID] with the ID you captured from the first command.
You may receive an error message that says the network has active endpoints. That means that the network is currently in use by containers. You need to remove the containers that are using the network before you can remove the network.
Remove All Unused Docker Objects
The prune command automatically removes all resources that aren’t associated with a container. This is a streamlined way to clean up unused images, containers, volumes, and networks.
In a terminal window, enter the following:
docker system prune
Additional flags can be included:
–a To include stopped containers and unused images
–f Bypasses confirmation dialog
––volumes Removes all unused volumes
Also, you can specify a single type of object to be removed, instead of the entire environment:
docker container prune
docker image prune
docker volume prune
docker network prune
Running docker system prune -a removes both unused and dangling images. Images used in a container, either currently running or exited, will NOT be affected.
Finally, my docker is clean:
May come with more commands and maintenance tips in future post. While writing this post I was using limited resources, so was unable to attach screen shot for each command. In future may add more scenarios.
Like any other software, Docker introduces users to a new range of terminology related to its services. Users need to get familiar with concepts such as Dockerfiles, images, containers, and other Docker-specific words.
Once you have mastered the vocabulary, the next step is to get used to using Docker commands. A list of all the commands and options is quite extensive and would take time to learn them all by heart.
What is Docker?
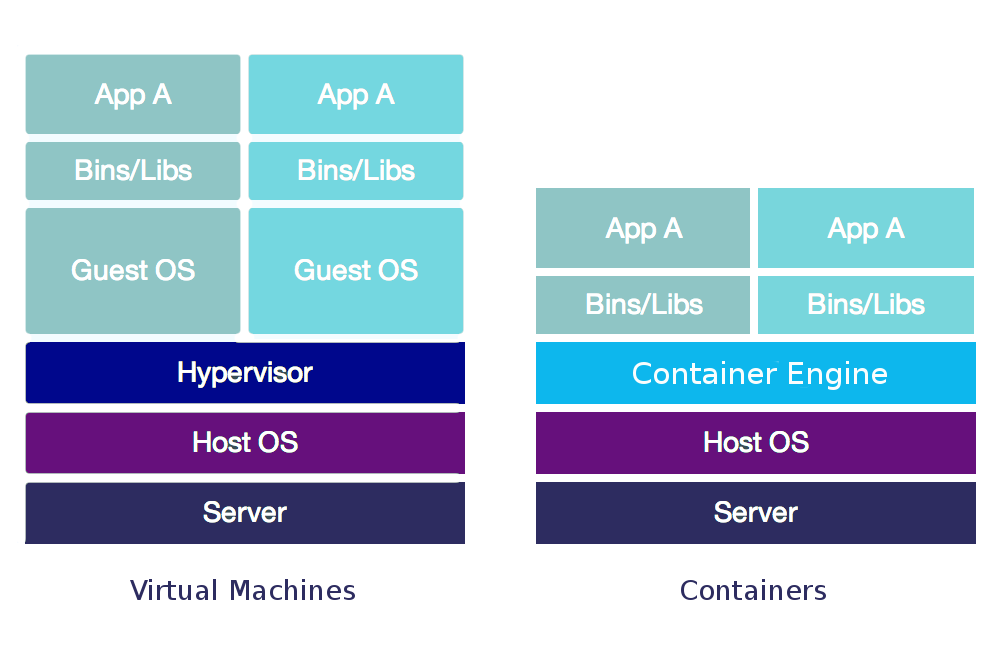
Docker is a popular virtualization tool that replicates a specific operating environment on top of a host OS. It is used by development teams to ensure consistency across different machines. It is a software that offers a set of platform-as-a-service products for developing and deploying applications by packaging software in containers.
What is Container?
A container uses an image of a preconfigured operating system optimized for a specific task. When a Docker image is launched, it exists in a container. For example, multiple containers may run the same image at the same time on a single host operating system.
Containers are designed to provide a self-sufficient environment, with all the libraries and configurations needed for the software to execute.
Containers are lightweight, portable, virtual environments that developers can share without risking inconsistencies in development. Due to these incredibly useful features, now organizations are switching from using virtual machines to Docker containers.
What is Containerization?
Containerization is defined as a form of operating system virtualization, through which applications are run in isolated user spaces called containers, all using the same shared operating system (OS).
No matter if you are new to Docker or already have some experience with containerization, it is always good to have a reference point for all the common Docker commands.
During development, they can grow unorganized with old, outdated, and unused components. Where require maintenance to manage, free resources and reclaim for different uses.
Let’s learn few commands which will be useful to work and maintain docker containers, images and other resources.
We will see few options to list, start, and stop, Docker containers.
The basic format for using docker is:
docker command [options]
To list all running Docker containers
docker ps
To list all containers, both running and stopped
docker ps –a
Since I am having only one container running at moment, so to show difference from previous command I stopped the container.
Now I have started the container and issued same commands as above.
Conclusion:
Docker ps lists only running containers
Docker ps -a lists running and stopped containers.
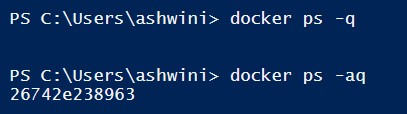
To list containers by their ID
docker ps –q
My Container was running
Remember from above Docker ps -a lists running and stopped containers. My Container is stopped
To list the total file size of each container
docker ps –s
You can check supported options using:
Use the docker stop command to stop a container:
docker stop [option] container_id
By default, you get a 10 second grace period. The stop command instructs the container to stop services after that period. Use the –time option to define a different grace period expressed in seconds:
docker stop –time=20 container_id
To Start Container
docker start container_id
To immediately kill a docker container without waiting for the grace period to end use:
docker kill [option] container_id
To stop all running containers, enter the following:
docker stop $(docker ps –a –q)
The same command could be used with kill. This would stop all containers without giving them a chance to exit.
Don’t forget to check next post where we will discuss about commands helpful in doing maintenance of containers.


You must be logged in to post a comment.