AL, API, Application, AppVersion, BC14, BC17, Business Central, Code, Codeunit, DataVersion, Dependencies, Development Tips, Dynamics 365, Extension, GetCurrentModuleInfo, GetModuleInfo, How To, Information, Instalation & Configuration, Install, Name, on-premises, OnInstallAppPerCompany, Publisher, Tip & Tricks, Version.Create, Visual Studio Code, Wave 1, Wave 2

Extension Install Code

Extension install code is executed when:

  • An extension is installed for the first time.
  • An uninstalled version is installed again.

This gives you control to write different logics for first time installation of extension and reinstallations of uninstalled extensions.

This is achieved by defining Install Codeunit in your Extension.

First thing first:

  1. Subtype property of codeunit need to be set to Install
  2. OnInstallAppPerCompany trigger is triggered when the Extension is Installed first time or subsequent install of same version on Extension.
  3. DataVersion property one of the important properties which tells you what version of data that you’re dealing with.
  4. AppVersionDataVersionDependenciesIDName, and Publisher. These properties are encapsulated in a ModuleInfo data type. You can access these properties by using the NavApp.GetCurrentModuleInfo and NavApp.GetModuleInfo methods.
  5. If the DataVersion property equals Version.Create(0,0,0,0), then it’s the first time that the extension is installed because no data exists in the archive.

Sample codeunit can be similar to below:

codeunit <ID> “Name of Codeunit

{

    // Install Logic

    Subtype = Install;

    trigger OnInstallAppPerCompany();

    var

        myAppInfo: ModuleInfo;

    begin

        NavApp.GetCurrentModuleInfo(myAppInfo);

// Get info about the currently executing module

        if myAppInfo.DataVersion = Version.Create(0, 0, 0, 0) then

// A ‘DataVersion’ of 0.0.0.0 indicates a ‘fresh/new’ install

            HandleFreshInstall

        else

            HandleReinstall;

// If not a fresh install, then we are Reinstalling the same version of the extension

    end;

    local procedure HandleFreshInstall();

    begin

        // Logic to execute on first time this extension is ever installed for this tenant.

        // Some possible usages: – Initial data setup for use

    end;

    local procedure HandleReinstall();

    begin

        // Logic to execute on reinstalling the same version of this extension back on this tenant.

        // Some possible usages: – Data ‘patchup’ work, for example, detecting if new ‘base’

// records have been changed while you have been working ‘offline’.

    end;

}

Happy Learning.

Advertisement
AL, Business Central, C/AL, Development Tips, Events, Extension Package, How To, Information, Modern Development Tool, Publisher, Raise, Subscriber, Tip & Tricks, V2, Visual Studio Code

Event driven Programming – Business Central

You can use events to design your application. Below are the benefits of using this model.

  1. You can lower the cost of code modifications and upgrades.
  2. You can customize functionality without modifying the original application.
  3. Your program will react to specific actions or behaviours of original application.

E-2

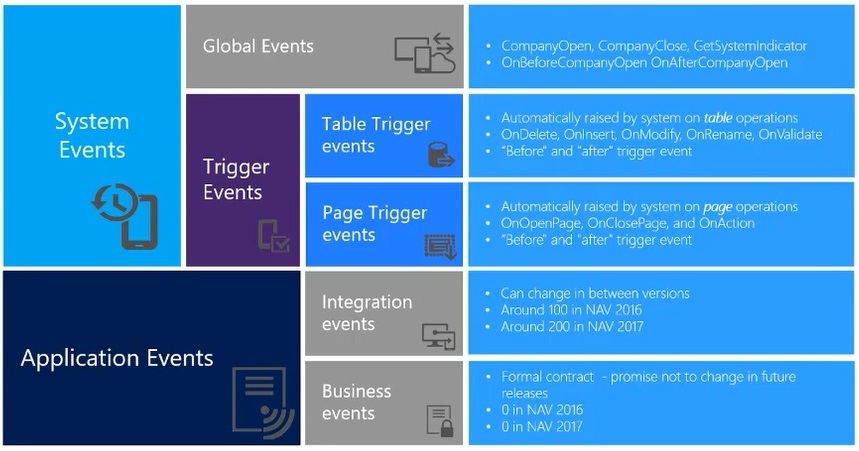
The following table describes all the different event types:

Event types Description
BusinessEvent Specifies the method to be business type event publisher.
IntegrationEvent Specifies the method to be integration type event publisher.
Global Global events are predefined system events.
Trigger Trigger events are published by the runtime.

You program events in the application to run customized behaviour when they occur.

E-1

What are Events?

A thing that happens. Event is declared by an AL method, which is referred to as event publisher function. Publisher method have only signature only and does not execute any code.

Publisher is the object that contains event publisher methods that declares the event. It serves as hook-up point in application, where subscribers use these points to extend the functionality, without even making any changes to the base application.

Only publishing an event do nothing in application, these events must be raised for subscribers to respond.

Especially Business and Integration type events must be published and raised, you need to create event publisher functions and add them to the objects manually.

Trigger events which occurs on Table & Page operations, are automatically published and raised by system at runtime, so no coding is required to publish them.

Subscriber is an AL method that subscribes to even publisher method, and logic to handle the event is implement.

E-3

Creating an event publisher method to publish business and integration events

Creating event publisher method is similar to other methods you define in AL. In addition some specific properties and few restrictions.

  • Can not include any code except comments.
  • You cannot define return values, variables or text constants.

You can define event publisher in any objects new or in existing objects and of any type of objects like codeunit, page or table.

If you define even as local then it will not be available for subscribers.

[IntegrationEvent(IncludeSender,GlobalVarAccess)]

local procedure MyProcedure()

begin

end;

[BusinessEvent(IncludeSender)]

local procedure MyProcedure()

begin

end;

Feel free to add as much of parameters and of any type as required. However it is advised not to include unnecessary parameters to Business events.

Raising Events

You need to modify the application to raise the event where ever it is needed. You call the event publisher method, same way you call any other methods in AL.

When the execution hits the evet publisher method, all event subscriber method that subscribe to the event are executed. Limitation will be you can not specify the order in which subscriber method will run, subscribers will be picked one at a time and in random order.

E-4

Subscriber Method

You can create new or use existing codeunits to define subscriber methods.

[EventSubscriber(ObjectType::Codeunit, Codeunit::, ‘OnSomeEvent’, ‘ElementName’, SkipOnMissingLicense, SkipOnMissingPermission)]

local procedure MyProcedure()

begin

end;

Add code to the method for handling the event.

Don’t worry at this point we will go through complete process programmatically in our next upcoming posts.

How to find which event to subscribe, and where to write our code.

Similar to earlier days we used Code Coverage, same way we have Event Recorder in Business Central.

Search for Event Recorder in RTC or alternatively you can launch from VS Code from Command Palate AL: Open Events Recorder.

Let’s look at a small example of finding Events.

I want to know what all events hit or available to subscribe when Sales-Order is Re-Opened.

Step-1: Open the Event Recorder and Click on Start.

E-5

Step-2: Perform Sales-Order -> Reopen

Step-3: Click on Stop.

E-6

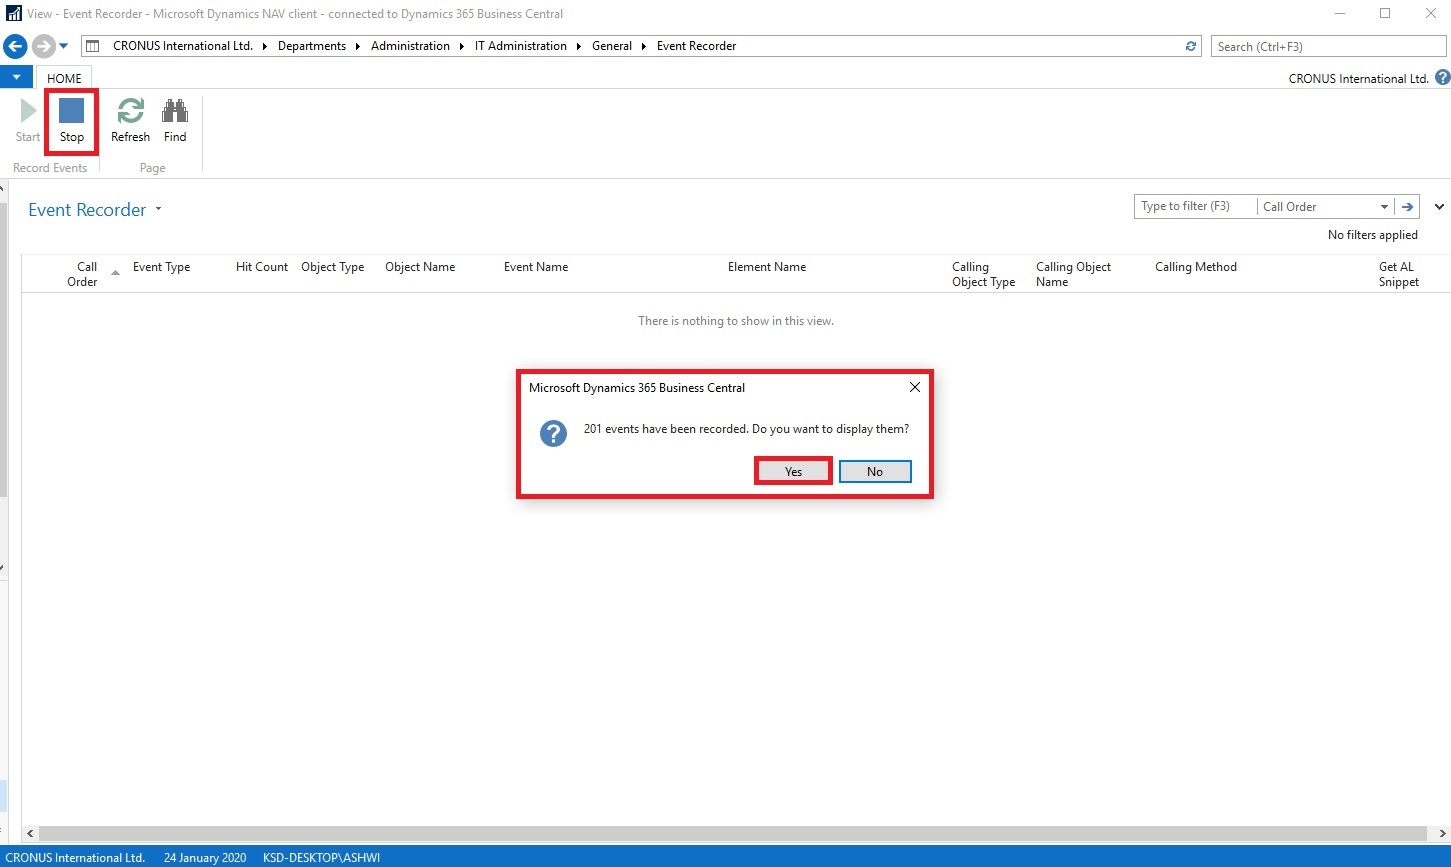
Step-4: Scan from the list of events that you find suitable, to know how to subscribe to that event you can find AL Code. (Get AL Snippet)

E-7

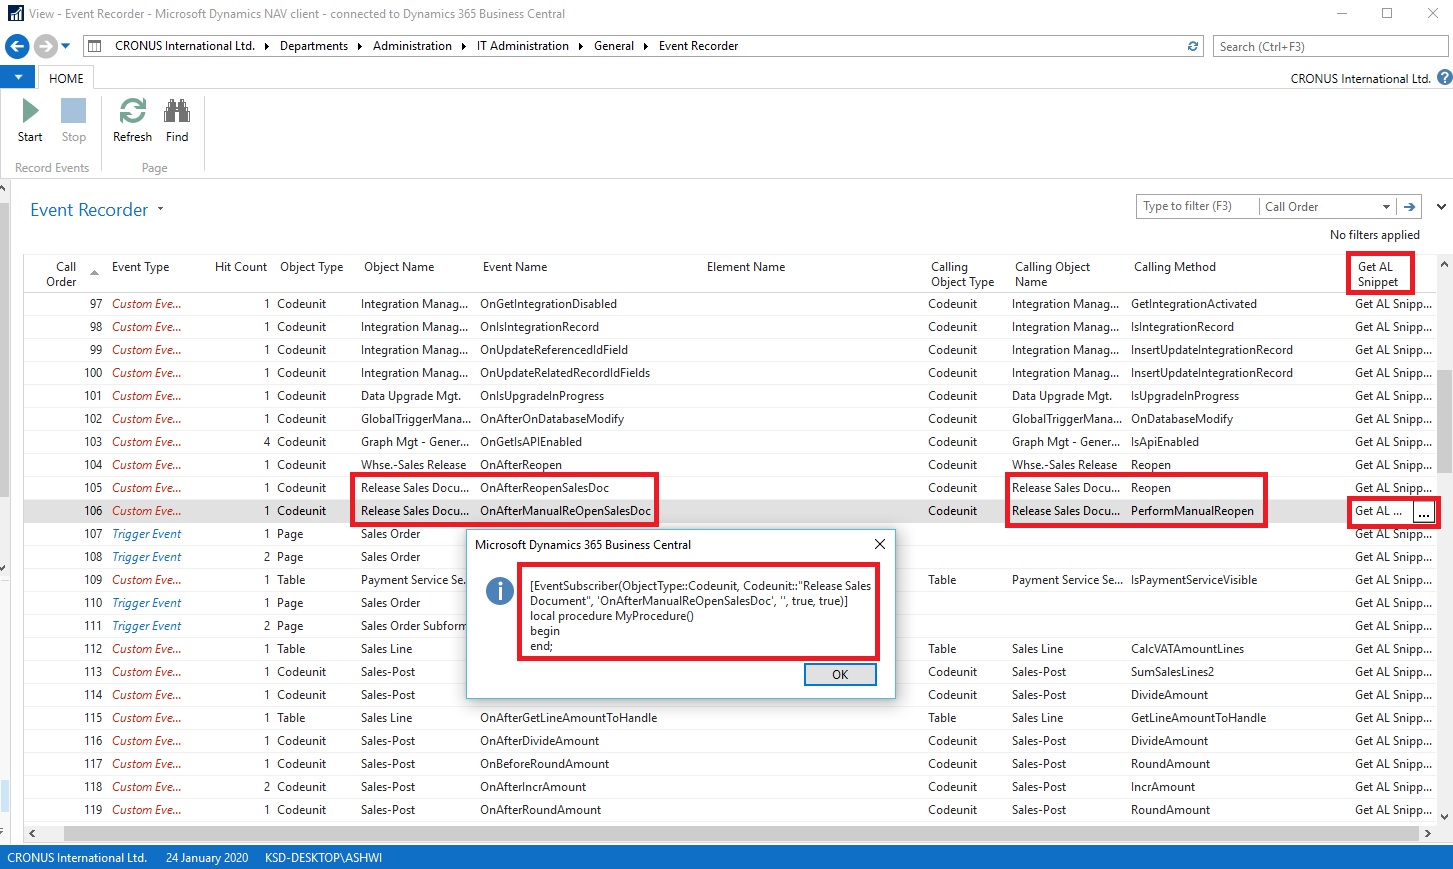
All the recorded events display in the order they were called. The Event Recorder page provides information on the events that were raised including the details whether the raised events were trigger events or custom events. The custom events are either Business Events or Integration Events.

You can identify the Event types, additionally, you can discover which object types and methods raised the events with the details like calling methods, object types, and object names.

Readiness to Event:

  • Redesign your on prem to an event-based approach in C/AL.
  • This will prove to be best preparation for moving to VS Code AL extension.
  • You will be able to find any issues in your code that you need to refactor.
  • Next step will be to Lift your on prem product to VS Code AL extension.
  • Then extension can be published as a MSDY365 Business Central app.

Now you know about basics of Events. Understand Publisher, Raising Events and Subscribing to Events. Also how to trace and find suitable events to subscribe for your customization over base application.

Before we end the post let’s have a Recap to Events

Publish:

  • Announcement by the application
  • Function without code
  • Exposes the event to the outside

Raise:

  • Specifies exactly when the event happens
  • Call to the Publisher Function

Subscribe:

  • React to the event
  • Must be in codeunit, tableextension or pageextension.

Note: Raise order specified in code, Subscribe order undefined.

We will look into practical approach in our next post.


Data, Development Tips, How To, Information, Instalation & Configuration, Replication, SQL, Tip & Tricks

Database Replication – Part V

This post is in continuation to my earlier post. Please check if you missed.

Database Replication – Part I

Database Replication – Part II

Database Replication – Part III

Database Replication – Part IV

As committed in this post we will continue to cover practical approach, Next step from last post.

We will create a subscription using SQL Server Management Studio

To create the subscription

  • Connect to the Publisher in SQL Server Management Studio, expand the server node, and then expand the Replication folder.
  • In the Local Publications folder, right-click the Nav2018ItemTrans publication, and then click New Subscriptions.

DR-39

The New Subscription Wizard launches.

DR-40

  • On the Publication page, select Nav2018ItemTrans, and then click Next.

DR-41

  • On the Distribution Agent Location page, select Run all agents at the Distributor, and then click Next.

DR-42

  • On the Subscribers page, if the name of the Subscriber instance is not displayed, click Add Subscriber, click Add SQL Server Subscriber, enter the Subscriber instance name in the Connect to Server dialog box, and then click Connect.
  • On the Subscribers page, select the instance name of the Subscriber server, and select under Subscription Database.
  • On the New Database dialog box/Select from Drop Down List, enter Nav2018ReplDatabase in the Database name box, click OK, and then click Next.

DR-43

  • In the Distribution Agent Security dialog box, click the ellipsis (…) button, enter <Machine_Name>\repl_distribution in the Process account box, enter the password for this account, click OK.

DR-44

  • Click Next.


DR-45DR-46DR-47DR-48DR-49

  • Click Finish to accept the default values on the remaining pages and complete the wizard.

Setting database permissions at the Subscriber

  • Connect to the Subscriber in SQL Server Management Studio, expand Databases, Nav2018ReplDatabase, and Security, right-click Users, and then select New User.
  • On the General page, in the User type list, select Windows user.
  • Select the User name box and click the ellipsis (…) button, in the Enter the object name to select box type <Machine_Name>\repl_distribution, click Check Names, and then click OK.

DR-50

  • On the Membership page, in Database role membership area, select db_owner, and then click OK to create the user.

DR-51

When setting up SQL Server replication you might see an error message from the Transactional Replication Log Reader Agent which reads like the following.

Error messages:

  • The process could not execute ‘sp_replcmds’ on ”. (Source: MSSQL_REPL, Error number: MSSQL_REPL20011) Get help: http://help/MSSQL_REPL20011
  • Cannot execute as the database principal because the principal “dbo” does not exist, this type of principal cannot be impersonated, or you do not have permission. (Source: MSSQLServer, Error number: 15517) Get help: http://help/15517
  • The process could not execute ‘sp_replcmds’ on ”. (Source: MSSQL_REPL, Error number: MSSQL_REPL22037) Get help: http://help/MSSQL_REPL22037

Often this error message can come from the database not having a valid owner, or the SQL Server is not being able to correctly identify the owner of the database.

Often this is easiest to fix by changing the database owner by using the sp_changedbowner system stored procedure as shown below. The sa account is a reliable account to use to change the ownership of the database to.

USE PublishedDatabase

GO

EXEC sp_changedbowner ‘sa’

GO

Once the database ownership has been changed the log reader will probably start working right away. If it doesn’t quickly restarting the log reader should resolve the problem.

While this does require changes to the production database, there is no outage required to make these changes.

To view the synchronization status of the subscription

  • Connect to the Publisher in SQL Server Management Studio, expand the server node, and then expand the Replication folder.
  • In the Local Publications folder, expand the Nav2018ItemTrans publication, right-click the subscription in the Nav2018ReplDatabase database, and then click View Synchronization Status.

DR-52

The current synchronization status of the subscription is displayed.

DR-53

  • If the subscription is not visible under Nav2018ItemTrans, press F5 to refresh the list.

Validating the Subscription and Measuring Latency

We will use tracer tokens to verify that changes are being replicated to the Subscriber and to determine latency, the time it takes for a change made at the Publisher to appear to the Subscriber.

To insert a tracer token and view information on the token

  • Connect to the Publisher in SQL Server Management Studio, expand the server node, right-click the Replication folder, and then click Launch Replication Monitor.
  • Replication Monitor launches.
  • Expand a Publisher group in the left pane, expand the Publisher instance, and then click the Nav2018ItemTrans publication.
  • Click the Tracer Tokens tab.
  • Click Insert Tracer.
  • View elapsed time for the tracer token in the following columns: Publisher to Distributor, Distributor to Subscriber, Total Latency. A value of Pending indicates that the token has not reached a given point.

DR-54

This way we are done with Database Replication Setup.

Will come up with more topic soon.


Data, Development Tips, How To, Information, Replication, SQL, Tip & Tricks

Database Replication – Part IV

This post is in continuation to my earlier post. Please check if you missed.

Database Replication – Part I

Database Replication – Part II

Database Replication – Part III

As committed in this post we will continue to cover practical approach, Next step from last post.

Publishing Data Using Transactional Replication

We will create a transactional publication using SQL Server Management Studio to publish a filtered subset of the Item table in the Nav 2018 sample database. We will also add the SQL Server login used by the Distribution Agent to the publication access list (PAL).

To create a publication and define articles

Connect to the Publisher in SQL Server Management Studio, and then expand the server node.

Expand the Replication folder, right-click the Local Publications folder, and click New Publication.

DR-24

The Publication Configuration Wizard launches.

DR-25

On the Publication Database page, select Nav 2018 database, and then click Next.

DR-26

On the Publication Type page, select Transactional publication, and then click Next.

DR-27

On the Articles page, expand the Tables node, select the check box for table CRONOUS International Ltd_$Item (dbo). Click Next.

DR-28

On the Filter Table Rows page, click Add.

In the Add Filter dialog box, click the Replenishment System column, click the right arrow to add the column to the Filter statement WHERE clause of the filter query, and modify the WHERE clause as follows:

WHERE [Replenishment System] = 1

Click OK,

DR-29

Click Next.

DR-30

Select the Create a snapshot immediately and keep the snapshot available to initialize subscriptions check box, and click Next.

DR-31

On the Agent Security page, clear Use the security settings from the Snapshot Agent check box.

Click Security Settings for the Snapshot Agent, enter <Machine_Name>\repl_snapshot in the Process account box, supply the password for this account, and then click OK.

DR-32

Repeat the previous step to set repl_logreader as the process account for the Log Reader Agent

DR-33

Click Finish.

On the Complete the Wizard page, type Nav2018ItemTrans in the Publication name box, and click Finish.

DR-34

After the publication is created, click Close to complete the wizard.

DR-35

To view the status of snapshot generation

  • Connect to the Publisher in SQL Server Management Studio, expand the server node, and then expand the Replication folder.

In the Local Publications folder, right-click Nav2018ItemTrans, and then click View Snapshot Agent Status.

DR-36

The current status of the Snapshot Agent job for the publication is displayed. Verify that the snapshot job has succeeded.

DR-37

To add the Distribution Agent login to the PAL

  • Connect to the Publisher in SQL Server Management Studio, expand the server node, and then expand the Replication folder.
  • In the Local Publications folder, right-click Nav2018ItemTrans, and then click Properties.
  • The Publication Properties dialog box is displayed.
  • Select the Publication Access List page, and click Add.

In the Add Publication Access dialog box, select <Machine_Name>\repl_distribution and click OK. Click OK.

DR-38


We will discuss Next step in our upcoming post.


Replication, SQL, Tip & Tricks

Database Replication – Part III

This post is in continuation to my earlier post. Please check if you missed.

Database Replication – Part I

Database Replication – Part II

As committed in this post we will continue to cover practical approach, Next step from last post.

Configuring Distribution

We will configure distribution at the Publisher and set the required permissions on the publication and distribution databases. If you have already configured the Distributor, you must first disable publishing and distribution before you begin this process. Do not do this if you must retain an existing replication topology.

Configuring a Publisher with a remote Distributor is outside the scope of this Post.

If you have connected to SQL Server using localhost rather than the actual server name you will be prompted with a warning that SQL Server is unable to connect to server ‘localhost’. Click OK on the warning dialog. In the Connect to Server dialog change the Server name from localhost to the name of your server. Click Connect.

Configuring distribution at the Publisher

  • Connect to the Publisher in SQL Server Management Studio, and then expand the server node.
  • Right-click the Replication folder and click Configure Distribution.

DR-10

  • The Distribution Configuration Wizard launches.

DR-11

  • On the Distributor page, select ‘ServerName’ will act as its own Distributor; SQL Server will create a distribution database and log, and then click **Next.

DR-12

  • If the SQL Server is not running, on the SQL ServerAgent Start page, select Yes, configure the SQL Server Agent service to start automatically. Click Next.
  • Enter \\<Machine_Name>\repldata in the Snapshot folder text box, where <Machine_Name> is the name of the Publisher, and then click Next.

DR-13

  • Accept the default values on the remaining pages of the wizard.

DR-14DR-15DR-16DR-17DR-18

  • Click Finish to enable distribution.

DR-19

Setting database permissions at the Publisher

  • In SQL Server Management Studio, expand Security, right-click Logins, and then select New Login.

DR-20

  • On the General page, click Search, enter <Machine_Name>\repl_snapshot in the Enter the object name to select box, where <Machine_Name> is the name of the local Publisher server, click Check Names, and then click OK.

DR-21

  • On the User Mapping page, in the Users mapped to this login list select both the distribution and required database (in my case Nav 2018 database).
  • In the Database role membership list select the db_owner role for the login for both databases.
  • Click OK to create the login.

DR-22

  • Repeat steps 1-4 to create a login for the local repl_logreader account. This login must also be mapped to users that are members of the db_owner fixed database role in the distribution and required databases.
  • Repeat steps 1-4 to create a login for the local repl_distribution account. This login must be mapped to a user that is a member of the db_owner fixed database role in the distribution database.
  • Repeat steps 1-4 to create a login for the local repl_merge account. This login must have user mappings in the distribution and required databases.


DR-23


Here we complete configuring our Distribution at Publisher.

We will see next step in our next post.


Replication, SQL, Tip & Tricks

Database Replication – Part II

This post is in continuation to my earlier post. Please check if you missed.

Database Replication – Part I

As committed in this post we will cover practical approach.

Creating Windows Accounts for Replication

We will create a separate Windows account on the local server for the following agents:

Agent Location Account name
Snapshot Agent Publisher <machine_name>\repl_snapshot
Log Reader Agent Publisher <machine_name>\repl_logreader
Distribution Agent Publisher and Subscriber <machine_name>\repl_distribution
Merge Agent Publisher and Subscriber <machine_name>\repl_merge

In my case the Publisher and Distributor share the same instance of SQL Server. The Publisher and Subscriber may share the same instance of SQL Server, but it is not a requirement. If the Publisher and Subscriber share the same instance, the steps that are used to create accounts at the Subscriber are not required.

To create local Windows accounts for replication agents at the Publisher

  • At the Publisher, open Computer Management from Administrative Tools in Control Panel.
  • In System Tools, expand Local Users and Groups.
  • Right-click Users and then click New User.

DR-01

  • Enter repl_snapshot in the User name box, provide the password and other relevant information, and then click Create to create the repl_snapshot account.

DR-02

  • Repeat the previous step to create the repl_logreader, repl_distribution, and repl_merge accounts.

DR-03

DR-04

DR-05

  • Click Close.

DR-06

To create local Windows accounts for replication agents at the Subscriber

If using different computer, else this step can be skipped.

  • At the Subscriber, open Computer Management from Administrative Tools in Control Panel.
  • In System Tools, expand Local Users and Groups.
  • Right-click Users and then click New User.
  • Enter repl_distribution in the User name box, provide the password and other relevant information, and then click Create to create the repl_distribution account.
  • Repeat the previous step to create the repl_merge account.
  • Click Close.

Preparing the Snapshot Folder

To create a share for the snapshot folder and assign permissions

  • In Windows Explorer, navigate to the SQL Server data folder. The default location is C:\Program Files\Microsoft SQL Server\MSSQL.X\MSSQL\Data.
  • In my case I am using SQL Replication folder on C: drive
  • Create a new folder named repldata.
  • Right-click this folder and click Properties.
  • On the Sharing tab in the repldata Properties dialog box, click Share.
  • In the File Sharing dialog box, click Share, and then click Done.

DR-07

  • On the Security tab, click Edit.
  • In the Permissions dialog box, click Add. In the Select User, Computers, Service Account, or Groups text box, type the name of the Snapshot Agent account created in previous step above, as <Machine_Name>\repl_snapshot, where <Machine_Name> is the name of the Publisher. Click Check Names, and then click OK.

DR-08

  • Repeat the previous step to add permissions for the Distribution Agent, as <Machine_Name>\repl_distribution, and for the Merge Agent as <Machine_Name>\repl_merge.
  • Verify the following permissions are allowed:

repl_snapshot – Full Control

repl_distribution – Read

repl_merge – Read

DR-09

  • Click OK to close the repldata Properties dialog box and create the repldata share.

Today we have covered initial setup required to start with SQL Database Replication.

We will continue with next step in our next post.

Replication, SQL, Tip & Tricks

Database Replication – Part I

One of my reader had requested to write post on this topic. I have gone through some posts and prepared a step by step process to demonstrate how we can configure Database Replication in SQL.

I will be covering the topic in couple of posts, this is first post in this series.

Today I will be covering basic theory behind the topic and then move to practical approach in my next post.

Brief extract of Topic

Database replication can be done in at least four different ways:

  • Snapshot replication: Data on one server is simply copied to another server, or to another database on the same server.
  • Merging replication: Data from two or more databases is combined into a single database.
  • Transactional replication: Users receive full initial copies of the database and then receive periodic updates as data changes.
  • Peer-to-Peer publication: Peer-Peer publication enables multi-master replication. The publisher streams transactions to all the peers in the topology. All peer nodes can read and write changes and the changes are propagated to all the nodes in the topology.

A distributed database management system ensures that changes, additions, and deletions performed on the data at any given location are automatically reflected in the data stored at all the other locations. Therefore, every user always sees data that is consistent with the data seen by all the other users.

REPLICATION ENTITIES

SQL Server replication is based on the “Publish and Subscribe” metaphor. Let us look at each of the individual components in detail.

Publisher


  • It is a source database where replication starts. It makes data available for replication.
  • Publishers define what they publish through a publication.

Article


  • Articles are the actual database objects included in replication like tables, views, indexes, etc.
  • An article can be filtered when sent to the subscriber.

Publication


  • A group of articles is called publication.
  • An article can’t be distributed individually. Hence publication is required.

Distributor


  • It is intermediary between publisher and subscriber.
  • It receives published transactions or snapshots and then stores and forwards these publications to the subscriber.
  • It has 6 system databases including distribution.

Subscriber

  • It is the destination database where replication ends.
  • It can subscribe to multiple publications from multiple publishers.
  • It can send data back to publisher or publish data to other subscribers.

Subscription


  • It is a request by a subscriber to receive a publication.
  • We have two types of subscriptions – push and pull.

Push Subscriptions


  • With this subscription, the publisher is responsible for updating all the changes to the subscriber without the subscriber asking those changes.
  • Push subscriptions are created at the Publisher server.

Pull Subscriptions –


  • With this subscription the subscriber initiates the replication instead of the publisher.
  • The subscriptions are created at the Subscriber server.


Detailed Description on Types of Replication

Snapshot Replication

Snapshot replication simply takes a “snapshot” of the data on one server and moves that data to another server (or another database on the same server). After the initial synchronization snapshot, replication can refresh data in published tables periodically—based on the schedule you specify. Although snapshot replication is the easiest type to set up and maintain, it requires copying all data each time a table is refreshed.

Between scheduled refreshes, data on the publisher might be very different from the data on subscriber. In short, snapshot replication isn’t very different from emptying out the destination table(s) and using a DTS package to import data from the source.

Transactional Replication

Transactional replication involves copying data from the publisher to the subscriber(s) once and then delivering transactions to the subscriber(s) as they occur on the publisher. The initial copy of the data is transported by using the same mechanism as with snapshot replication: SQL Server takes a snapshot of data on the publisher and moves it to the subscriber(s). As database users insert, update, or delete records on the publisher, transactions are forwarded to the subscriber(s).

To make sure that SQL Server synchronizes your transactions as quickly as possible, you can make a simple configuration change: Tell it to deliver transactions continuously. Alternatively, you can run synchronization tasks periodically. Transactional replication is most useful in environments that have a dependable dedicated network line between database servers participating in replication. Typically, database servers subscribing to transactional publications do not modify data; they use data strictly for read-only purposes. However, SQL Server does support transactional replication that allows data changes on subscribers as well.

Merge Replication

Merge replication combines data from multiple sources into a single central database. Much like transactional replication, merge replication uses initial synchronization by taking the snapshot of data on the publisher and moving it to subscribers. Unlike transactional replication, merge replication allows changes of the same data on publishers and subscribers, even when subscribers are not connected to the network. When subscribers connect to the network, replication will detect and combine changes from all subscribers and change data on the publisher accordingly. Merge replication is useful when you have a need to modify data on remote computers and when subscribers are not guaranteed to have a continuous connection to the network.

REPLICATION AGENTS

Replication process works in the background with the help of jobs.

These jobs are also called as agents. These jobs internally uses respective .exe files present in …………….. \110\COM folder.

All the agents’ information is present in Distribution db in the following tables.

dbo.MSxxx_agents

dbo.MSxxx_history

Snapshot Agent

  • It is an executable file that prepares snapshot files containing schema and data of published tables and db objects.
  • It stores the files in the snapshot folder, and records synchronization jobs in the distribution database.


Distribution Agent

  • It is used with snapshot and transactional replication.
  • It applies the initial snapshot to the Subscriber and moves transactions held in the Distribution db to Subscribers.
  • It runs at either the Distributor for push subscriptions or at the Subscriber for pull subscriptions.

Log Reader Agent

  • It is used with transactional replication, which moves transactions marked for replication from the transaction log on the publisher to the distribution db.
  • Each db has its own Log Reader Agent that runs on the Distributor and connects to the Publisher.

Merge Agent


  • It is used with merge replication.
  • It applies the initial snapshot to the Subscriber and moves incremental data changes that occur.
  • Each merge subscription has its own Merge Agent that connects to both the Publisher and the Subscriber and updates both.
  • It captures changes using triggers.

Queue Reader Agent


  • It is used with transactional replication with the queued updating option.
  • It runs at the Distributor and moves changes made at the Subscriber back to the Publisher.
  • Unlike Distribution Agent and Merge Agent, only one instance of the Queue Reader Agent exists to service all Publishers and publications for a given distribution db.


We will continue on same topic in my next post.

PowerBI.com, Tip & Tricks

Microsoft Power BI – Part IX

Continuing from my previous post. Today we will see usage of Power BI Publisher for Excel.

In case you have missed my previous posts here I present the link to all previous posts below.

Microsoft Power BI – Part – I

Introduction to Power BI and Creating Report from Excel Data, Local Files.

Microsoft Power BI – Part – II

Introduction to few Features of Power BI

Microsoft Power BI – Part – III

Power BI Desktop, Creating Dataset & Reports from In Premise Database installation

Microsoft Power BI – Part – IV

Power BI Gateway usage

Microsoft Power BI – Part – V

Scheduling Refresh of Dataset & Report created using In Premise Database

Microsoft Power BI – Part – VI

Power BI Content Pack

Microsoft Power BI – Part – VII

Power BI Mobile App

Microsoft Power BI – Part – VIII

Power BI Content Pack

Sharing key Excel insights just got easier. Save snapshots of important PivotTables, Charts, cell ranges, and more from across all of your spreadsheets to a single location quickly with the Power BI publisher for Excel. Simply highlight the elements you want to save, then click the “Pin to” button: now you’ve got a powerful web dashboard that you can share with everyone in your organization.

Let us see how we can use this feature.

Login to Power BI with your credentials.

PowerBI-95

From Download Menu Section choose Power BI Publisher for Excel.

Or visit Link: https://powerbi.microsoft.com/en-us/excel-dashboard-publisher/

PowerBI-96

Select your desired Excel Version 32 or 64 bit as installed on your PC and download the Package.

Close your Excel and Install the Package and follow on screen guide.

After Installation when you open your Excel First time after Installing the Package. You will get similar to below screen.

PowerBI-97

Sign in with your Power BI Credentials.

PowerBI-98


PowerBI-99


PowerBI-100

I have created a Pivot in excel as below which I want to share on my Desktop.

PowerBI-101

Select the Region/Range that you wish to publish from Power BI choose Pin, as shown below.

PowerBI-102

In my case I have already pined so confirmation Dialog Box is taken else it will Pin the Selected Range as a snapshot on selected Workspace.

PowerBI-103

Make sure you select right Workspace before you Pin.

PowerBI-104

After Publishing you will get confirmation as below.

PowerBI-105

Using the Link, Login with your credentials to the Power BI and switch to the Dashboard on which you published.

PowerBI-106

This way you can Pin Snapshot of PivotTables, Charts, cell ranges, and more. You can update existing with new one and manage all your Pins.

PowerBI-107

Save your Excel and Exit.

PowerBI-108

Try useful feature.

I will come up with more details in my future posts.

Till then keep practicing and learning using online Blogs, help and documents.