Data, Data Model, Development Tips, How To, Information, PowerBI.com, Tip & Tricks

Real-Time Dashboard Tile & Streaming Dataset– in Power BI

Power BI have introduced real-time dashboard tiles – a lightweight, simple way to get real-time data onto your dashboard. Real-time tiles can be created in minutes by pushing data to the Power BI REST APIs or from streams you’ve created in Azure Stream Analytics or PubNub, a popular real-time streaming service. Let’s see how we can do in no time.

Login to your Power BI using your credentials.

Go to your dashboard where you wish to add Real Time Streaming Tile, choose “Add a tile”

RealTimeSync-1

Select the “Custom streaming data” option

RealTimeSync-2

Click on Next.

RealTimeSync-3

At first usage you may not be having Streaming Dataset, if you have List will be shown.

Let’s create one for our Example, Click the link – Manage Data.

RealTimeSync-4

Click on Add Streaming Dataset.

RealTimeSync-5

From New Streaming Dataset, Select API and click on Next.

RealTimeSync-6

Add your Dataset Name, Fields and Datatypes.

Once you are done, Click on Create.

RealTimeSync-7

Copy your Push URL, we will require this to push data to Data Stream.

Click On Done.

RealTimeSync-8

Returning to our Previous Step, Now we can see Streaming Dataset Available.

Select your Dataset and Click on Next.

RealTimeSync-9

Select the Type of Visualization you want, and Fields to display.

Click on Next.

RealTimeSync-10

Give Title, Subtitle to your Tile and click on Apply.

RealTimeSync-11

Bravo, you are done, your Tile will be added on your Dashboard.

But hold on, the Value will not come until you add logic to push data to the Tile.

Now we will move to our Next Step, where we will create a program to call Power BI REST API and push Streaming data to our Dashboard. Checkout my next post for same. [App for Power BI REST APIs for Streaming Data]

Till then keep Exploring & Learning. I will return soon with my next post.


Development Tips, Dynamics 365, How To, Information, Maderia, Office Integration, Power Bi Content Pack, PowerBI.com, Tip & Tricks, Troubleshooting Tips, Web Services

Working with Project “Madeira” Content Pack for Power BI

In today’s post we will see how to use Power BI Content Pack for Madeira.

The content pack is preconfigured to work with sales data and financial data from the demonstration company that you get when you sign up for the Project “Madeira” preview.

To see your Project “Madeira” data in Power BI, you must have the following:

  • Access to Project “Madeira”.
  • Access to Power BI.

Before we start with connecting we will collect few information that we will require while connecting the Power BI to fetch data from Madeira.

User Name

Web Service Acess Key

Note down both value, if you don’t have Web Service Access Key Generate one and set appropriate Expiration date or Set Never Expire as shown below.

PowerBi_Madeira-1

Next open the Web Service Page.

Make sure all selected Web Service is running as in below screen.

The data is extracted from your Project “Madeira” company using web services to read live data. In Project “Madeira”, the Web Services window lists the web services that have been set up for you, including the following that are consumed by the content pack in Power BI:

  • ItemSalesAndProfit
  • ItemSalesByCustomer
  • powerbifinance
  • SalesDashboard
  • SalesOpportunities
  • SalesOrdersBySalesPerson
  • TopCustomerOverview

Note: If you change the name of any of these web services, the data will not show up in Power BI.

Note your URL of OData. Edit it to follow the format one shown in below screen.

PowerBi_Madeira-2

Now we have all our required information.

Open Power BI site and Get Data from Services as shown in below screen.

PowerBi_Madeira-3

Select Project “Madeira” Content Pack and click on Get.

PowerBi_Madeira-4

Enter the URL of Web Service we get in above step.

PowerBi_Madeira-5

Select Next.

Select Authentication method as Basic.

In User Name enter your user name as obtained in above step.

For Password ented the Web Service Access Key as obtained in above step.

PowerBi_Madeira-6

Choose Sign In.

After few minutes/seconds churning you will be ready with your first Dashboard from Madeira.

PowerBi_Madeira-7

Troubleshooting

“Parameter validation failed, please make sure all parameters are valid”
If you see this error after you enter your Project “Madeira” URL, make sure the following requirements are satisfied:

“Login failed”
If you get a “login failed” error when you log in to the dashboard, using your Project “Madeira” credentials, then this can be caused by one of the following issues:

  • The account you are using does not have permissions to read the Project “Madeira” data from your account.

    Verify your user account in Project “Madeira”, and make sure that you have used the right web service access key as the password, and then try again.

  • The Project “Madeira” instance that you are trying to connect to does not have a valid SSL certificate. In this case you’ll see a more detailed error message (“unable to establish trusted SSL relationship”).

    Note: Self-signed certificates are not supported.

“Oops”
If you see an “Oops” error dialog after you pass the authentication dialog, this is most frequently caused by a problem connecting to the data for the content pack.

Thats all for today’s post.

I will comeup with more details in my upcomming posts.

Til then keep exploring and learning.


Development Tips, How To, Information, Power Bi Content Pack, PowerBI.com, Tip & Tricks

Microsoft Power BI – My Organization Content Pack Library

Continuing from my previous post. Today we will discuss about Content Pack Library (My Organization) in Power BI.

In case you have missed my previous posts here I present the link to all previous posts below:

Microsoft Power BI – Part – I

Introduction to Power BI and Creating Report from Excel Data, Local Files.

Microsoft Power BI – Part – II

Introduction to few Features of Power BI

Microsoft Power BI – Part – III

Power BI Desktop, Creating Dataset & Reports from In Premise Database installation

Microsoft Power BI – Part – IV

Power BI Gateway usage

Microsoft Power BI – Part – V

Scheduling Refresh of Dataset & Report created using In Premise Database

Microsoft Power BI – Part – VI

Power BI Content Pack

Microsoft Power BI – Part – VII

Power BI Mobile App

Microsoft Power BI – Part – VIII

Power BI Content Pack

Microsoft Power BI – Part – IX

Power BI Publisher for Excel

Microsoft Power BI – Part – X

Analyse in Excel (preview)

PowerBI-47

Login to Power BI using your credentials.

OrgPowerContent-1

Select Get Data.

OrgPowerContent-2

From Content Pack Library section select Get Data under My Organization.

OrgPowerContent-3

Select Create content pack.

OrgPowerContent-4

This is the part where majority of work to be performed.

In First Section – Choose who will have access to this content pack

You have 2 option

  1. You can share with specific users or Groups, since your AD is in sync with your in premise AD you can select them.
  2. You can share with your entire Organization.

Select the Group or Users if you go with first option.

In Second Section – Provide Title for you Content Pack

In Third Section – Provide detailed Description for your content pack.

OrgPowerContent-5

In Fourth Section – You can select Image for your content pack.

Finally in Fifth Section you will define what all content you want to share for the user using this content pack.

Here all available contents are divided under 3 sections (Dashboards, Reports & Datasets).

When you select Dashboard all included Reports and Dataset will be shared by default.

When you select Reports all included Datasets will be shared by default.

When you select Dataset only that will be shared.

You can select combination as you desire.

I will provide write up why we will select selective contents to share with case study, in my future post some time other.

Once you are done with all above step you are good to Publish the Content Pack.

OrgPowerContent-6

If we revisit the Get Data option again for My Organization, we can view our Published Content Pack which we shared with others.

User can customize as per his need and Share with others in form of New Content Pack or as-it-is depends.

Good Example will be we have one Content Pack for My Organization which include all modules Dashboard, Reports and Datasets.

My IT will create Module wise Content Pack (Finance, Sales, Purchase, Warehouse, Manufacturing etc…) and share these content packs with concern department Heads. Further each Heads will create sub-content pack and share with their team with information which is related to them and so on.


That’s all for today, will come up with more information in my future posts.

Till then keep exploring and learning.


PowerBI.com

Microsoft Power BI – Part – I

Dear Friends from quite long time I was wishing to write few blogs on this topic, but due to some limitation I was unable to do so. I will be posting few blogs in this series using which any beginners can practice and have hands on to understand this concept and start using this powerful tool for visuals and reporting.

Microsoft Power BI brings your data to life, transforming your company’s data into rich visuals for you to collect and organize so you can focus on what matters to you.

An Overview:

PowerBI-1

What all you need to get started with creating reports.

To get started first of all we will be required to register our account to PowerBI.com

Go to this Link Power BI

Scroll down on page to find below

PowerBI-2

Here you require your company registered e-mail id, any private e-mail id for example Yahoo, Google, Hotmail etc. will not be acceptable.

Follow the onscreen guide to complete your signup.

Please use this link to access available downloads.

PowerBI-3

As of now we will use highlighted two components. Download and Install them. We will use and explore them in our upcoming posts.

At this step you are ready to start with using Power BI, you can design the Reports & Datasets on your in premise database and publish to Power BI.

We will use these components in our future posts, today we will have a quick report creation using data from Excel as our first Report. Here we go…….


Step 1- Collecting the Data.

Open your Navision and Export some data which we can use to create our first Report.

In my example I am going to Export my Customer List and save the Excel file, make sure your data is saved in Table Format else Power BI will fail to import data.

Step 2- Getting Data in Power BI from Excel using Get Data.

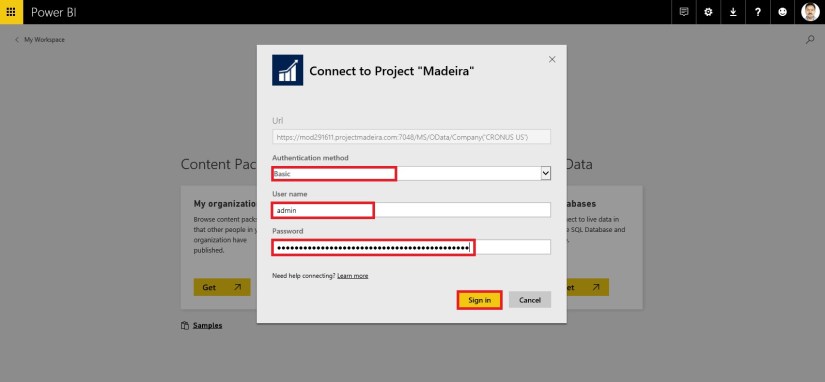
Login to Power BI using your credentials used above to register the Power BI.

From Lading Page perform below step:

PowerBI-4

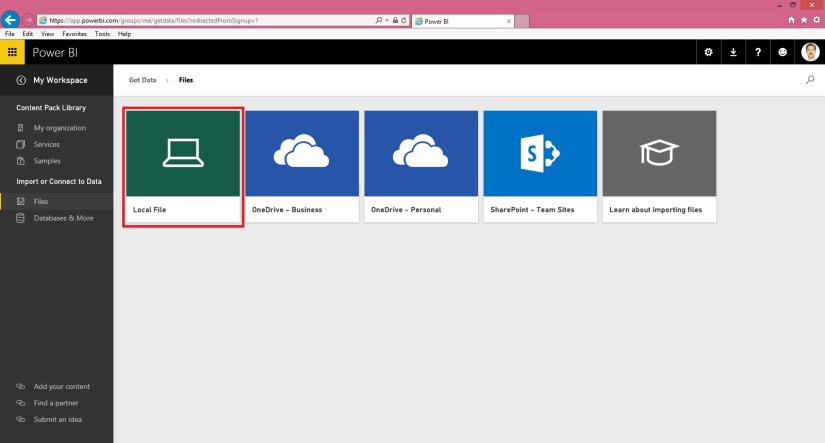
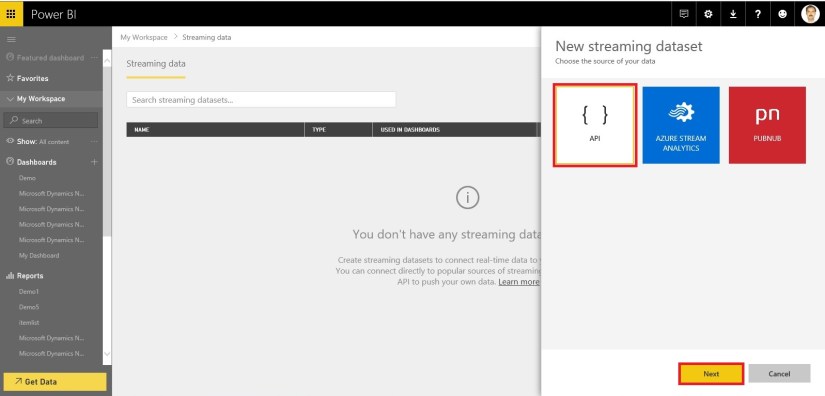
When you click to Get Data you will get options to connect with available data source options.

PowerBI-5

Click Get button as highlighted in above screen shot, as we are connecting the data from Excel file created in above Step.

On Clicking Get Button option available to get file will be displayed, depending upon where you placed your file select the desired option. In my case I have saved the File on My Desktop, so I will be using Local File option.

PowerBI-6


PowerBI-7

Select the desired file having data. In my case Customer List as created in above step.

PowerBI-8

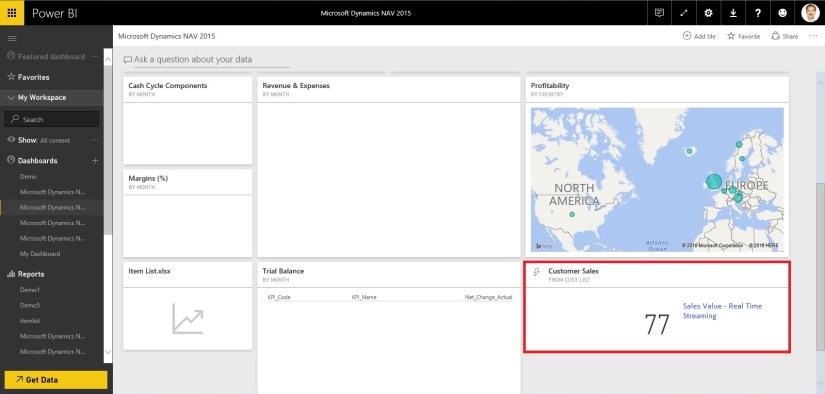
Once done you will see a new Dataset and a Blank Report in Dashboard is added, in my case CustomerList.

Step 3- Analysing Data in Power BI or creating a Visual Report.

Click on the CustomerList dataset

PowerBI-9

This will show you the available Fields as per Excel columns, an available Visualization options.

PowerBI-10

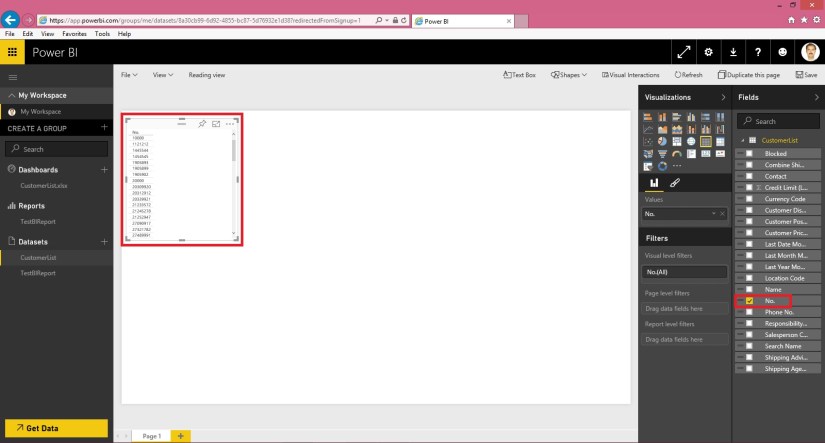
Select the No. Field from the Field List, a list table will be added on the canvas as shown in above screen.

Here say we want to count the no of Unique Customers in the data.

PowerBI-11

From the Values of the Field we will choose Count Option.

At the same time to make data more representable we will choose Card Visualization.

The data will be formatted and displayed as:

PowerBI-12

Next we will add sum summary analysis Data.

PowerBI-13

Here we added two Fields Location (Value = Don’t Summarize) and Name (Value = Count). Visualization = Table.

A new table gets added on the Report Canvas as shown above.

Let’s change the Visualization of above Table to Treemap, the Table will get formatted as:

PowerBI-14

That’s all for today, we will see more features and other available options in our next blog.


Till then practice and read available blog, documentations and help available online.