Development Tips, Dynamics 365, How To, Information, Maderia, Office Integration, Power Bi Content Pack, PowerBI.com, Tip & Tricks, Troubleshooting Tips, Web Services

Working with Project “Madeira” Content Pack for Power BI

In today’s post we will see how to use Power BI Content Pack for Madeira.

The content pack is preconfigured to work with sales data and financial data from the demonstration company that you get when you sign up for the Project “Madeira” preview.

To see your Project “Madeira” data in Power BI, you must have the following:

  • Access to Project “Madeira”.
  • Access to Power BI.

Before we start with connecting we will collect few information that we will require while connecting the Power BI to fetch data from Madeira.

User Name

Web Service Acess Key

Note down both value, if you don’t have Web Service Access Key Generate one and set appropriate Expiration date or Set Never Expire as shown below.

PowerBi_Madeira-1

Next open the Web Service Page.

Make sure all selected Web Service is running as in below screen.

The data is extracted from your Project “Madeira” company using web services to read live data. In Project “Madeira”, the Web Services window lists the web services that have been set up for you, including the following that are consumed by the content pack in Power BI:

  • ItemSalesAndProfit
  • ItemSalesByCustomer
  • powerbifinance
  • SalesDashboard
  • SalesOpportunities
  • SalesOrdersBySalesPerson
  • TopCustomerOverview

Note: If you change the name of any of these web services, the data will not show up in Power BI.

Note your URL of OData. Edit it to follow the format one shown in below screen.

PowerBi_Madeira-2

Now we have all our required information.

Open Power BI site and Get Data from Services as shown in below screen.

PowerBi_Madeira-3

Select Project “Madeira” Content Pack and click on Get.

PowerBi_Madeira-4

Enter the URL of Web Service we get in above step.

PowerBi_Madeira-5

Select Next.

Select Authentication method as Basic.

In User Name enter your user name as obtained in above step.

For Password ented the Web Service Access Key as obtained in above step.
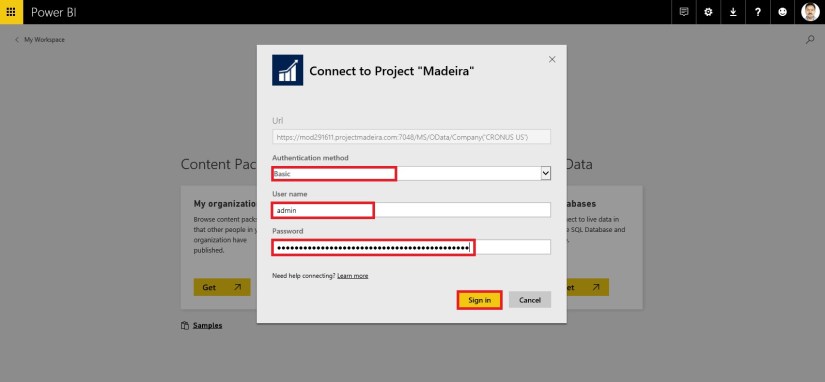
PowerBi_Madeira-6

Choose Sign In.

After few minutes/seconds churning you will be ready with your first Dashboard from Madeira.

PowerBi_Madeira-7

Troubleshooting

“Parameter validation failed, please make sure all parameters are valid”
If you see this error after you enter your Project “Madeira” URL, make sure the following requirements are satisfied:

“Login failed”
If you get a “login failed” error when you log in to the dashboard, using your Project “Madeira” credentials, then this can be caused by one of the following issues:

  • The account you are using does not have permissions to read the Project “Madeira” data from your account.

    Verify your user account in Project “Madeira”, and make sure that you have used the right web service access key as the password, and then try again.

  • The Project “Madeira” instance that you are trying to connect to does not have a valid SSL certificate. In this case you’ll see a more detailed error message (“unable to establish trusted SSL relationship”).

    Note: Self-signed certificates are not supported.

“Oops”
If you see an “Oops” error dialog after you pass the authentication dialog, this is most frequently caused by a problem connecting to the data for the content pack.

Thats all for today’s post.

I will comeup with more details in my upcomming posts.

Til then keep exploring and learning.


Advertisement
Development Tips, Excel, How To, PowerPivot

Troubleshooting: Power Pivot Ribbon Disappears

In rare cases, the Power Pivot ribbon will disappear from the menu if Excel determines that the add-in is destabilizing to Excel. This might occur if Excel closes unexpectedly while the Power Pivot window is open. To restore the Power Pivot menu, do the following:

  • Go to File > Options > Add-Ins.

In the Manage box, click Disabled Items > Go
PowerPivot-29

  • Select Microsoft Office Power Pivot in Microsoft Excel 2013 and then click Enable.

If the previous steps do not restore the Power Pivot ribbon, or if the ribbon disappears when you close and reopen Excel, try the following:

  • Close Excel.
  • Point to Start > Run and then type regedit.
  • In Registry Editor, expand HKEY_CURRENT_USER > Software > Microsoft > Office > 15.0 > User Settings.
  • Right-click PowerPivotExcelAddin and then click Delete.
  • Scroll back up to the top of Registry Editor.
  • Expand HKEY_CURRENT_USER > Software > Microsoft > Office > Excel > Addins.
  • Right-click PowerPivotExcelClientAddIn.NativeEntry.1 and then click Delete.
  • Close Registry Editor.
  • Open Excel.
  • Enable the add-in using the steps at the top of this article.
Troubleshooting Tips

General Troubleshooting Tips

Record Locked by Another User

If you have ended Microsoft Dynamics NAV in busy mode, and then restarted Microsoft Dynamics NAV, you may experience the following error message: “Record locked by another user”. This is caused by a lock on data in a job that is still running on the server.

To release this lock, you must either shut down the SQL server manually, or restart the Microsoft Dynamics NAV Server session using the Microsoft Dynamics NAV Server Administration tool.

Sorting Actions in System Groups

In the Microsoft Dynamics NAV Windows client, you cannot order actions in system groups in the Home tab.

Remove all actions from the group, apply changes, and then add the actions again. This will ensure that metadata is created for all actions and that they can be sorted as you want.

Removing Promoted Actions in Home Tab

In Microsoft Dynamics NAV removing a promoted action in the Home tab, and then re-adding it in the same session will cause duplication of the action.

Remove the action, apply changes, add the action again, and then apply changes. Or, remove the action, add it again in same session, and then apply changes. Remove duplicate instances and apply changes.

Compression Option in IIS

Users may experience slow mobile client responses especially noticeable when they are running with a slow network connection. The reason for the mobile client running slowly can be that the dynamic compression is not enabled on the IIS server.

Configure HTTP compression of dynamic content to use bandwidth more efficiently. Enabling dynamic compression always gives you more efficient use of bandwidth, but if your server’s processor utilization is already very high, the CPU load imposed by dynamic compression might make your site perform more slowly.

You can perform this procedure by using the user interface (UI), by running Appcmd.exe commands in a command-line window, by editing configuration files directly, or by writing WMI scripts.

  1. Open IIS Manager and navigate to the level you want to manage.

  2. In Features View, double-click Compression.

  3. On the Compression page, select the box next to Enable dynamic content compression.

  4. Click Apply in the Actions

The File that You Are Trying to Use Is Too Large

If you are trying to upload a large image file that is larger than 4 MB in size, such as a high-resolution photo, Microsoft Dynamics NAV will give you an error message saying that the file you are trying to upload is too large. This behavior can be changed by modifying the IIS configuration to support large file uploads.

The IIS administrator should make the following changes in the Internet Information Services (IIS) Manager.

  1. Launch the IIS Manager.
  2. In the left pane of the IIS Manager, select the Microsoft Dynamics NAV web site, and choose Request Filtering.
  3. In the Actions pane of the Request Filtering window, choose Edit Feature Settings.
  4. Set the field Maximum allowed content length (Bytes) to an appropriate value, such as 100000000 and choose the OK button.
  5. In the left pane of the IIS Manager, select the Microsoft Dynamics NAV web site, and choose Configuration Editor.
  6. In the Configuration Editor, make sure that the From field is set to Microsoft Dynamics NAV 2013 R2 Web Client Web.config
  7. Set the Section field to system.web/httpRuntime and now a number of properties will appear.
  8. Set maxRequestLength to an appropriate value, such as 100000 (kilobytes) and choose the Apply action on the right.
  9. Close the IIS Manager.

The new settings should take effect immediately without refreshing the IIS or the site.