Azure, Corfu Navision 2016, How To, Information, Instalation & Configuration, Office 365, Office Integration, Tip & Tricks

Configuring Single Sign-On using Office 365 on Navision 2016

Today we will see how we can enable Single Sign-On using Office 365 for Navision 2016.

Before we start we should have Virtual Machine ready on Azure with Navision 2016 installed, Certificates and Nav User is configured. Endpoints are open so that web client can be used from outside Virtual Machine on internet.

It should be hosted on Public IP, then only we will be able to configure it.

For details regarding Azure Subscription you can see my earlier post here.

For details regarding Creating Virtual Machines you can see my earlier post here.

You also need Office 365 Subscription ready for use and you can use the AD of same to configure your Single Sign-On.

Let us start with Admin console of office 365. Click on Azure AD this will create Management Console to work with AD.

SingleSignOn-1

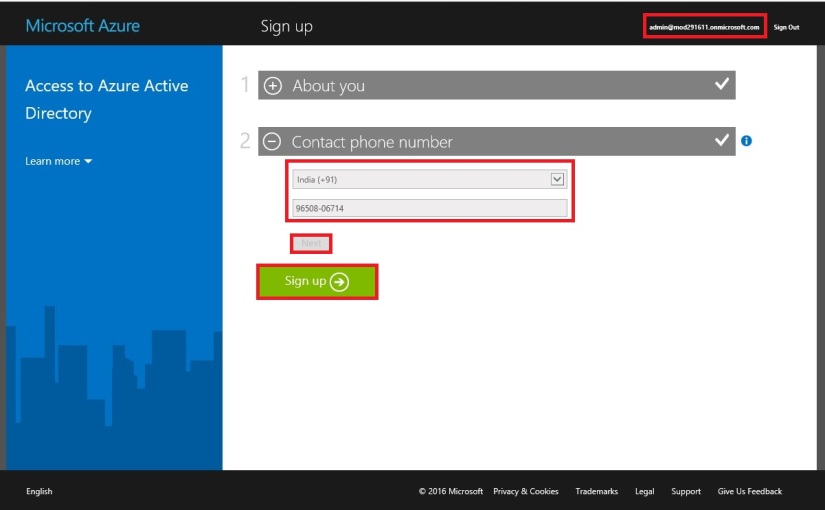
Enter your details and click on Next.

SingleSignOn-2

Enter your details and click on Next, Finally Sign Up.

SingleSignOn-3

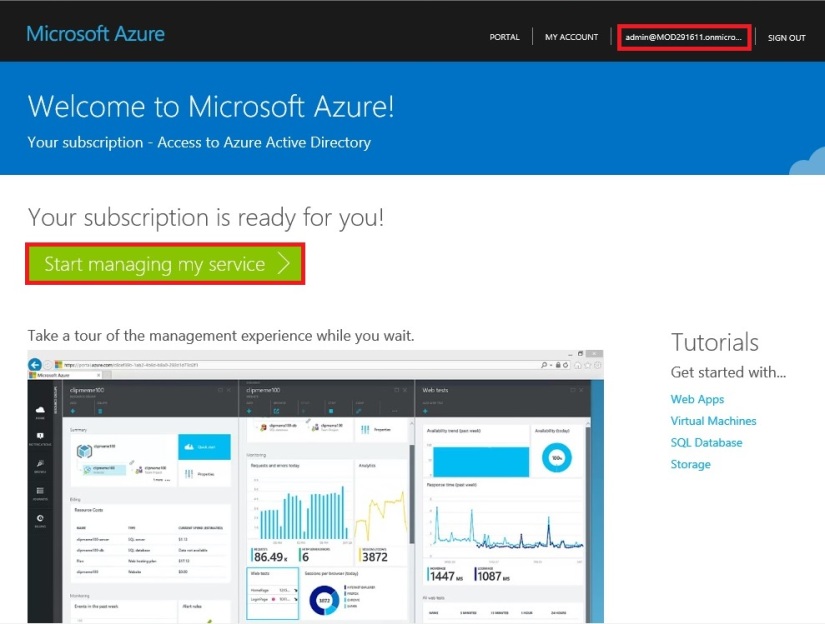
It will take few minutes to configure and make it available for you.

SingleSignOn-4

Once your Subscription is ready click on Start Managing my Service.

SingleSignOn-5

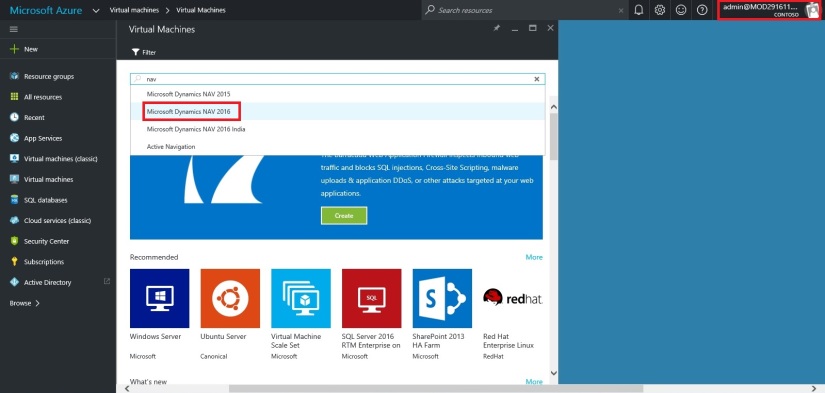
From Management Console click on Virtual Machine, if you dont have already to create one for you.

SingleSignOn-6

Select the Virtual Machine in Search for Microsoft Dynamics Nav 2016.

SingleSignOn-7

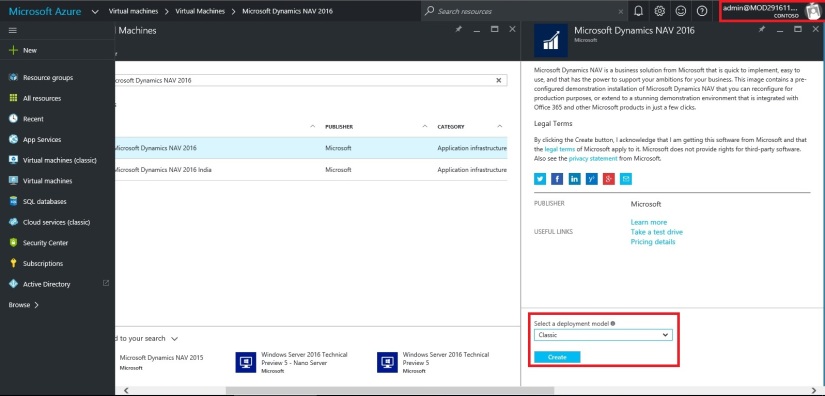
Select the approprite Virtual Machine from the List.

SingleSignOn-8

Enter your details and Create. For more details see the link provided on top of the post.

SingleSignOn-9

Let us return to our AD, Click on Applications. This will List all you Apps currently available with your AD or office 365.

SingleSignOn-10

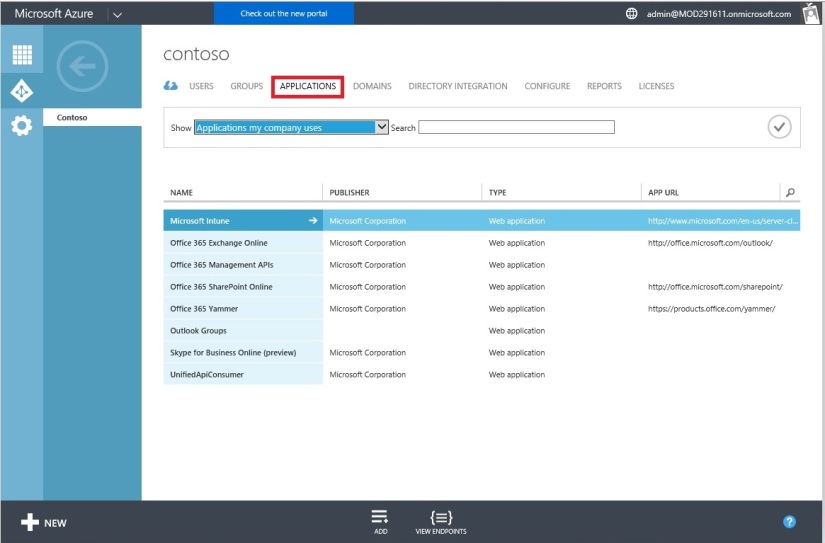
Click on Add to configure your Application.

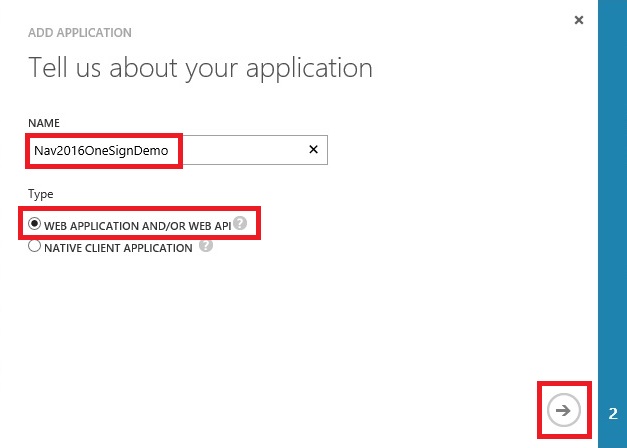
Give a Name and Select Web Application/or Web API, as we are configuring for Web Client today. Click on Next.

SingleSignOn-11

Enter your Web Client URL and Office portal AD URL.  Click on OK.

SingleSignOn-12

Your New application gets registered with your AD.

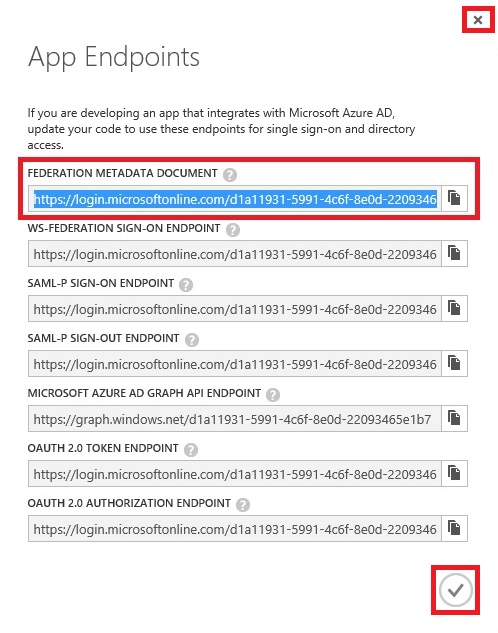
Select the created Application and Click on View Endpoints.

SingleSignOn-13

Copy the Federation MetaData URL and keep it handy at safe place we will require this in our next step. Close the window we are not performing any changes here.

SingleSignOn-14

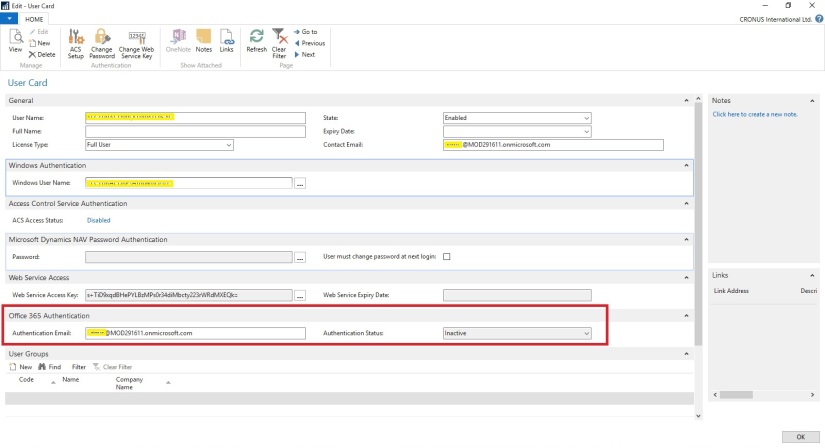
Open your Navision User Card.In Office 365 Authentication enter your Office portal user email id which you will be using for Single Sign-On.

SingleSignOn-15

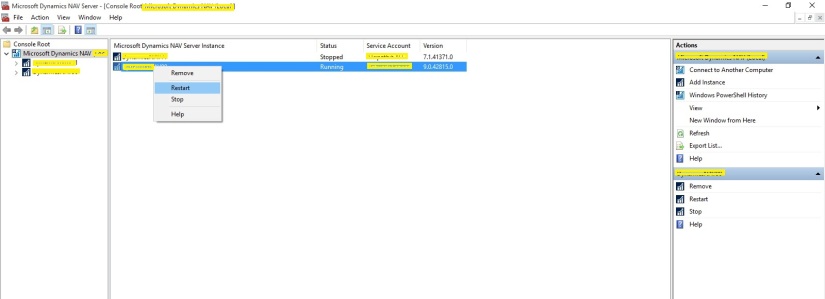
Open your Navision Service Instance configuration and enter Federal MetaData URL which we copied in our previous step.

SingleSignOn-16

Restart you NAV Service.

SingleSignOn-17

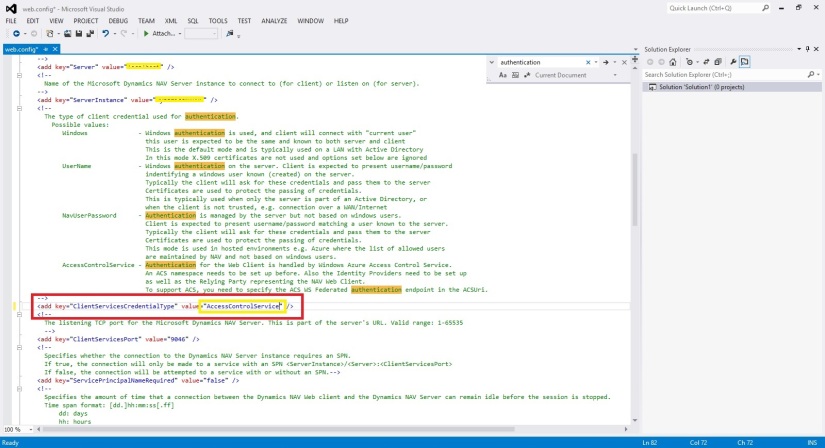
Open the Web Client Folder under your IIS. Edit your Web.config file using prefered Editor.

SingleSignOn-18

Enter you Client Service Credentials as AccessControlService.

SingleSignOn-19

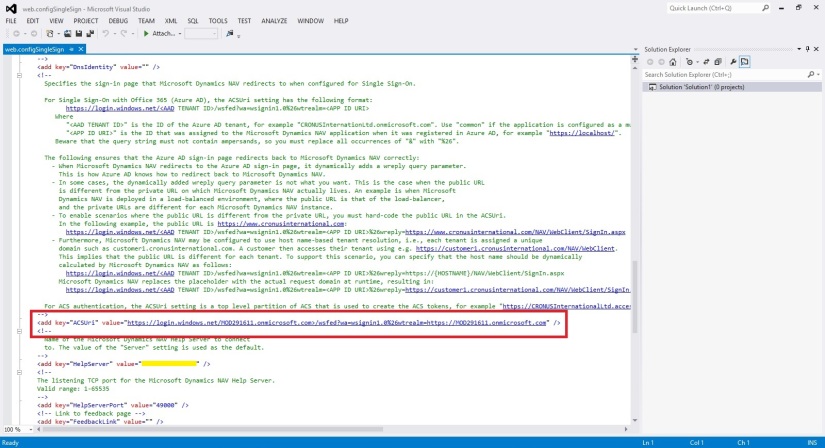
Change value of ACS URI as below. You have full explaination of same in the file itself.

SingleSignOn-20

Thats all, Now you open your web client and you will be redirected to Office 365 Login Page, enter your valid office 365 e-mail user id and password you will be authenticated and Web Client is opened.

Thats all for today, I will come up with moredetails in my upcoming posts.

Till then keep exploring and learning.


Advertisement
Corfu Navision 2016, Development Tips, How To, IIS, Information, Instalation & Configuration

Configuring SSL to Secure the Connection to Microsoft Dynamics NAV Web Client

It is always recommend that you secure Microsoft Dynamics NAV data that is transmitted over the Internet by enabling Secure Sockets Layer (SSL) on the connection to Microsoft Dynamics NAV Web client.

Enabling SSL on a website requires that an SSL certificate is installed on the web server. An SSL certificate is a small file that the web server uses to prove its identity and establish a trusted connection with the browser that is trying to access Microsoft Dynamics NAV Web client.

When a browser connects to the Microsoft Dynamics NAV Web client, the web server replies by sending its certificate to the browser. This certificate contains the web server’s public encryption key and the name of the authority that granted the certificate. The browser verifies the certificate using the authority’s public key.

Note You can configure SSL for the Microsoft Dynamics NAV Web client when you install the Microsoft Dynamics NAV Web Server components.

Obtaining an SSL Certificate

In a production environment, you should obtain an SSL certificate from a certification authority. Some large organizations may have their own certification authorities, and other organizations can request a certificate from a third-party organization. In a test environment or development environment, you can create your own self-signed certificate.

To create a self-signed SSL certificate

Open Internet Information Services (IIS) Manager, on the Start menu, choose Administrative Tools, and then choose Internet Information Service (IIS) Manager.
IIS-1

  • In the Connections pane, choose the top-level node for the server.
  • On the Home page, under IIS, choose Server Certificates, and then in the Actions pane, choose Open Feature.

IIS-2

  • On the Server Certificates page, choose Create Self-Signed Certificate.
  • In the Specify Friendly Name dialog box, type a brief name for the certificate, and then choose the OK button.

IIS-3

The new certificate appears on the Server Certificate page.
IIS-4

Adding an HTTPS Binding That Uses the Certificate on the Microsoft Dynamics NAV Web Client Site

After you get the certificate, you add a binding to the https protocol on the website. When you add the binding, you associate it with the certificate.

To add an https binding with the certificate to the website

  • Open Internet Information Services (IIS) Manager.
  • In the Connections pane, expand the Sites node, and then choose the Microsoft Dynamics NAV Web client site to which you want to add the binding.

By default, the site has the name Microsoft Dynamics NAV 2016 Web Client.

  • In the Actions pane, choose Bindings.

IIS-5

  • In the Site Bindings dialog box, choose Add.
  • In the Add Site Binding dialog box, set the Type field to https.

IIS-6

You can use the default port 443 or change it to another port. If you change it to another port, you will have to provide the port number in the URL when you try to open the client.

  • Set the SSL certificate field to the certificate that you obtained or created for the site.

IIS-7

  • Choose the OK button, and then choose the Close button.

Redirecting HTTP to HTTPS (Optional)

To ensure that users always access the site that is secured with SSL, you can automatically redirect HTTP requests to HTTPS. This means that users do not have to explicitly include https in the URL in the browser.

For example, the nonsecure URL of the Microsoft Dynamics NAV Web client could be

http://mywebclient:8080/DynamicsNAV90/WebClient

The secure URL could be

https://MyWebclient:443/DynamicsNAV90/WebClient

If a user types

http://MyWebclient:8080/DynamicsNAV90/WebClient,

the browser automatically redirects to

https://MyWebclient:443/DynamicsNAV90/WebClient


There are different ways to redirect HTTP requests to HTTPS.

The following procedure describes how to redirect HTTP requests to HTTPS by installing the Microsoft Application Request Routing for IIS 7 and modifying the web.config file for the Microsoft Dynamics NAV Web client.

To redirect HTTP to HTTPS

The web.config file is located in the physical path of the web application on IIS. By default, the path is

%systemroot%\inetpub\wwwroot\[VirtualDirectoryName]\WebClient.

For example, the folder for the default Microsoft Dynamics NAV Web client application is

%systemroot%\inetpub\wwwroot\DynamicsNAV90\WebClient.

  • In the <system.webServer> element, add the following elements.

<rewrite>

<rules>

<rule name=”Redirect to HTTPS”>

<match url=”(.*)” />

<conditions>

<add input=”{HTTPS}” pattern=”off” ignoreCase=”true” />

</conditions>

<action type=”Redirect” url=”https://{SERVER_NAME}/{R:1}” redirectType=”SeeOther” />

</rule>

</rules>

</rewrite>


  • Save the web.config file.


Development Tips, How To

How to: Install a Windows Client Control Add-in Assembly

Microsoft Dynamics NAV Windows client control add-ins are provided in one or more Microsoft Framework .NET-based assemblies, which are .dll files. Control add-in assemblies must be installed on the following computers:

  • Computers that are running the Microsoft Dynamics NAV Windows client. Any Microsoft Dynamics NAV Windows client instance that will use the control add-ins, must be installed with the control add-in assemblies. Control add-in assemblies are not installed with the default Microsoft Dynamics NAV Windows client installation.
  • Computer that is running the Microsoft Dynamics NAV Development Environment. After a control add-in is installed, you use the development environment to register the control add-in the Client Add-in table in the Microsoft Dynamics NAV database and set it up on pages.

Optionally, if a control add-in has the same name as the assembly, you can install the assembly on the computer that is running Microsoft Dynamics NAV Server instead of the client computer.

To install control add-in assemblies on the Microsoft Dynamics NAV Windows client

  • If needed, install the Microsoft Dynamics NAV Windows client on the computer.
  • On the computer that is running the Microsoft Dynamics NAV Windows client, copy the assemblies that contain the control add-ins to the Add-ins folder of the Microsoft Dynamics NAV Windows client installation.
    • By default, the path of this folder is C:\Program Files (x86)\Microsoft Dynamics NAV\80\RoleTailored Client\Add-ins.

You can also include assemblies in a subfolder of the Add-ins folder. This can be useful if you have multiple assemblies and dependencies.

To install control add-in assemblies on the development environment computer

  • If needed, install the development environment on the computer.
  • On the computer that is running the development environment, create a folder named Add-in in the development environment installation folder.
    • By default, the path of this folder is C:\Program Files\Microsoft Dynamics NAV\80\Classic. If the Add-in folder already exists, then ignore this step.
  • Copy the assemblies that contain the control add-ins to the Add-ins folder.

You can also include assemblies in a subfolder of the Add-ins folder. This can be useful if you have multiple assemblies and dependencies.

Installing Control Add-ins on Microsoft Dynamics Server for Automatic Deployment

If a control add-in has the same name as the assembly, then you can install the assembly on computer that is running Microsoft Dynamics NAV Server. When an operation from the client requires the control add-in, Microsoft Dynamics NAV Server automatically deploys the assembly to a temporary folder on the client computer.

For example, if Microsoft Dynamics NAV Windows client opens a page that contains a control add-in, Microsoft Dynamics NAV Server will find the control add-in assembly by name in the Add-ins folder. Then, it deploys the assembly to the client computer in the %TEMP%\Microsoft Dynamics NAV\Add-Ins folder of the user who is running the client. The deployed assembly will be then be used whenever the page is opened.

Similarly, if the development environment requires a control add-in, for example, when you compile an object, then the control add-in assembly will be deployed by the Microsoft Dynamics NAV Server to the local temporary folder for the current user on the computer that is running the development environment.

To be deployed, an assembly must comply with the following Microsoft Dynamics NAV Server configuration settings: Chunk Size, Max Upload Size, and Prohibited File Types.

If the control add-in assembly is updated and its version number changes, Microsoft Dynamics NAV Server will deploy the updated assembly to the client computer the next time that the client requests the assembly. The updated assembly is put in a subfolder of the %TEMP%\Microsoft Dynamics NAV\Add-Ins folder, where the subfolder has the assembly’s version number as its name. This implementation means that you do have to remove the older versions of assemblies that are stored on the client computer.

Before Microsoft Dynamics NAV Server deploys an assembly to a client, the client looks for the assembly in the local Add-ins folder (for example, C:\Program Files (x86)\Microsoft Dynamics NAV\80\RoleTailored Client\Add-ins). If the assembly is not found, then the client will request the assembly from Microsoft Dynamics NAV Server.

To install the control add-in on Microsoft Dynamics NAV Server

  • On the computer that is running the Microsoft Dynamics NAV Server, copy the assembly that contains the control add-in to the Add-ins folder of the Microsoft Dynamics NAV Server installation.

By default, the path is C:\Program Files\Microsoft Dynamics NAV\80\Service\Add-ins.

Development Tips, How To

How to: Set .NET Framework Types to Run on the Microsoft Dynamics NAV Windows Client or Microsoft Dynamics NAV Server Computers

Here is the brief description for how to set .NET Framework objects that are instantiated by DotNet variables to target either the Microsoft Dynamics NAV Windows client or Microsoft Dynamics NAV Server.

By default, a type is set to target Microsoft Dynamics NAV Server. However, you can set the type to target the Microsoft Dynamics NAV Windows client.

Setting the .NET Framework Type to Target the Microsoft Dynamics NAV Windows Client

To set a .NET Framework type instance to target the Microsoft Dynamics NAV Windows client, you must complete the following tasks:

  • Set the DotNet variable for the .NET Framework type to target the Microsoft Dynamics NAV Windows client.
  • Copy the .NET Framework assembly to the computer that is running the Microsoft Dynamics NAV Windows client.

You must copy the assembly to each computer that is running the Microsoft Dynamics NAV Windows client. If the assembly is included in the global assembly cache, then you do not have to do this task.

For the Microsoft Dynamics NAV Web client, you cannot implement Microsoft .NET Framework interoperability objects that target the client.

To set the .NET Framework type to target the Microsoft Dynamics NAV Windows client

  • In Object Designer, open the C/AL code of the Microsoft Dynamics NAV object that uses .NET Framework interoperability.
  • Do one of the following steps:
    • For a global variable, on the View menu, choose C/AL Globals.
    • For a local variable, select the trigger that uses the variable, and then on the View menu, choose C/AL Locals.
    • On the Variables tab, select the DotNet variable, and then on the View menu, choose Properties.
    • In the Properties window, set the RunOnClient property to Yes

To copy a .NET Framework assembly to a computer that is running the Microsoft Dynamics NAV Windows client

    • On the computer that is running the Microsoft Dynamics NAV Windows client, copy the.NET Framework assembly to the Add-ins folder of the Microsoft Dynamics NAV Windows client installation.

By default, the path of this folder is C:\Program Files\Microsoft Dynamics NAV\80\RoleTailored Client\Add-ins or C:\Program Files (x86)\Microsoft Dynamics NAV\80\RoleTailored Client\Add-ins.

You can also put assemblies in a subfolder of the Add-ins folder. This can be useful when you have multiple versions of the same assemblies and dependencies.

Setting the .NET Framework Type to Target Microsoft Dynamics NAV Server

To set a .NET Framework type instance to target Microsoft Dynamics NAV Server, you must complete the following tasks:

  • Set the variable for the NET Framework type to target Microsoft Dynamics NAV Server.
  • Copy the .NET Framework assembly to the computer that is running Microsoft Dynamics NAV Server.

If the assembly is included in the global assembly cache of the computer that is running Microsoft Dynamics NAV Server, then you do not have to do this task.

To set the .NET Framework type to target Microsoft Dynamics NAV Server

  • In the development environment, in Object Designer, open the object that uses the .NET Framework variable.
  • Do one of the following steps:
    • For a global variable, on the View menu, choose C/AL Globals.
    • For a local variable, in the C/AL Editor, select the trigger that uses the DotNet variable, and then on the View menu, choose C/AL Locals.
    • On the Variables tab, select the NET Framework variable type, and then on the View menu, choose Properties.
    • In the Properties window, set the RunOnClient property to No

To copy a .NET Framework assembly to the computer that is running Microsoft Dynamics NAV Server

    • On the computer that is running Microsoft Dynamics NAV Server, copy the.NET Framework assembly to the Add-ins folder of the Microsoft Dynamics NAV Server installation folder.

By default, the path of the Microsoft Dynamics NAV Server installation folder is C:\Program Files\Microsoft Dynamics NAV\80\Service\Add-ins.

You can also put assemblies in a subfolder of the Add-ins folder. This can be useful when you have multiple assemblies and dependencies.

If you are working in the development environment, to compile and test Microsoft Dynamics NAV objects, you must also copy the assembly to the Add-ins folder of the Microsoft Dynamics NAV Windows client installation on the computer that is running the development environment. By default, the path of this folder is C:\Program Files\Microsoft Dynamics NAV\80\RoleTailored Client\Add-ins or C:\Program Files (x86)\Microsoft Dynamics NAV\80\RoleTailored Client\Add-ins.

Development Tips

Page Properties Not Supported by Microsoft Dynamics NAV Web Client

Most page properties that are supported in the Microsoft Dynamics NAV Windows client are also supported in the Microsoft Dynamics NAV Web client.

There are some properties that are not supported by Microsoft Dynamics NAV Web client and other properties that are either partially supported or behave differently in the Microsoft Dynamics NAV Windows client.

Unsupported Properties

The properties that are not supported by the Microsoft Dynamics NAV Web client. When a page that contains an unsupported property is displayed in a browser, the property is ignored. You do not receive an error but the property does not affect the page.

  • ChartPartID Property
  • ColumnSpan Property
  • ControlAddin Property
  • FreezeColumnID Property
  • RowSpan Property
  • RefreshOnActivate Property
  • ShowAsTree Property
  • Style Property
  • StyleExpr Property
  • SystemPartID Property

Partially Supported Properties

The properties that either do not have all the capabilities in the Microsoft Dynamics NAV Web client as they do in Microsoft Dynamics NAV Windows client or they behave differently than in the Microsoft Dynamics NAV Windows client.

  • AssistEdit Property
  • DrillDown Property
  • DrillDownPageID Property
  • GroupType Property
  • Importance Property
  • IndentationControls Property
  • PageType Property
  • PartType Property
Development Tips

Functions Not Supported by Microsoft Dynamics NAV Web Client

Below is the lists the C/AL functions and data types that are not supported or partially supported by Microsoft Dynamics NAV Web client.

Unsupported Functions

Functions that are not supported by the Microsoft Dynamics NAV Web client. If you use a function that is not supported, an error occurs at runtime.

  • CREATE Function (Automation)
  • ISCLEAR Function (Automation)
  • ACTIVATE Function (Debugger)
  • UPDATE Function (Dialog)

Partially Supported Functions

Functions that either do not have all the capabilities in the Microsoft Dynamics NAV Web client as they do in the Microsoft Dynamics NAV Windows client or they behave differently than in the Microsoft Dynamics NAV Windows client.

  • DOWNLOAD Function (File)
  • DOWNLOADFROMSTREAM Function (File)
  • HYPERLINK Function
  • PREVIEW Function (Report)
  • PRINTONLYIFDETAIL Function (Report)
  • REPORT.RUN Function
  • REPORT.RUNMODAL Function
  • UPLOAD Function (File)
  • UPLOADINTOSTREAM Function (File)