Corfu Navision 2016, Development Tips, How To, TryFunction

Using Try Functions in Navision 2016

You may have seen in different programing language concept of try… catch…

The try-catch statement consists of a try block followed by one or more catch clauses, which specify handlers for different exceptions.

When an exception is thrown, the language looks for the catch statement that handles this exception. If the currently executing method does not contain such a catch block, the language looks at the method that called the current method, and so on up the call stack. If no catch block is found, then the language displays an unhandled exception message to the user and stops execution of the program.

The try block contains the guarded code that may cause the exception. The block is executed until an exception is thrown or it is completed successfully.

Although the catch clause can be used without arguments to catch any type of exception, this usage is not recommended. In general, you should only catch those exceptions that you know how to recover from.

A throw statement can be used in a catch block to re-throw the exception that is caught by the catch statement.

You can also re-throw an exception when a specified condition is true.

Now Dynamics Navision 2016 introduces this concept in C/AL in terms of function.

Try functions in C/AL enable you to handle errors that occur in the application during code execution.

For example, with try functions, you can provide more user-friendly error messages to the end user than those thrown by the system.

You can use try functions to catch errors/exceptions that are thrown by Microsoft Dynamics NAV or exceptions that are thrown during .NET Framework interoperability operations.

Try functions catch errors similar to a conditional Codeunit.Run function call, except with the following differences:

Try function calls do not require that write transactions are committed to the database.
Changes to the database that are made with a try function are not rolled back.

Creating a Try Function

To create a try function, add a function in C/AL code of an object (such as a codeunit) as usual, and then set the TryFunction Property property to Yes. A try function has the following restrictions:

In test and upgrade codeunits, you can only use a try function on a normal function type, as defined by the FunctionType Property (Test Codeunits) or FunctionType Property (Upgrade Codeunits).
The try function cannot have a user-defined return value.
Understanding Try Function Behavior and Usage

A function that is designated as a try function has a Boolean return value (true or false). A try function has the construction OK:= MyTryFunction.

If a try function call does not use the return value, the try function operates like an ordinary function and errors are exposed as usual.

If a try function call uses the return value in an OK:= statement or a conditional statement such as IF-THEN, errors are caught.

You can use the GETLASTERRORTEXT Function to obtain errors that are generated by Microsoft Dynamics NAV.

To get details of exceptions that are generated by .NET Framework objects, you can use the GETLASTERROROBJECT Function to inspect the Expection.InnerException property. You can see codeunit 1291 – DotNet Exception Handler.

If you call the GETLASTERRORTEXT function immediately after you call the CLEARLASTERROR function, then an empty string is returned.

The result of the GETLASTERRORCODE Function is not translated into the local language. The result of the GETLASTERRORTEXT function is translated into the local language.

TryFunction usage concept you can find throughout the system especially for Posting Preview, Applying Entries, and Printing Reports etc. in several codeunits.

However to give simple sight on usage of same I am using my below defined example.

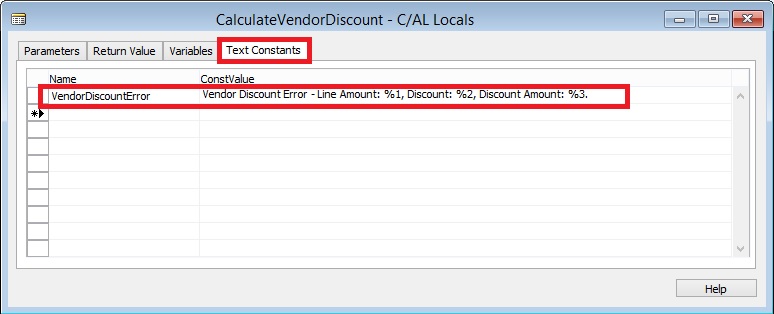
I have created a codeunit with TryFunction to add an Item to Item Table.
TryFunction-1

I created another codeunit with function which calls the above codeunits AddItem function passing parameter to function. Testing it if it is successful or any error occurred while performing the action. 
TryFunction-2
When I execute the second codeunit in first run it says successful as Item dosen’t exists in the table. When I execute for second time it gives error as the item was already added to the table in its first run.
TryFunction-3

Above example also demonstrates the usage of ClearLastError, GetLastErrorCode and GetLastErrorText functions.

Spend some time in scanning other codeunits for better understanding about TryFunctions.

You can see the example provided by Microsoft MSDN also to understand usage of TryFunction.

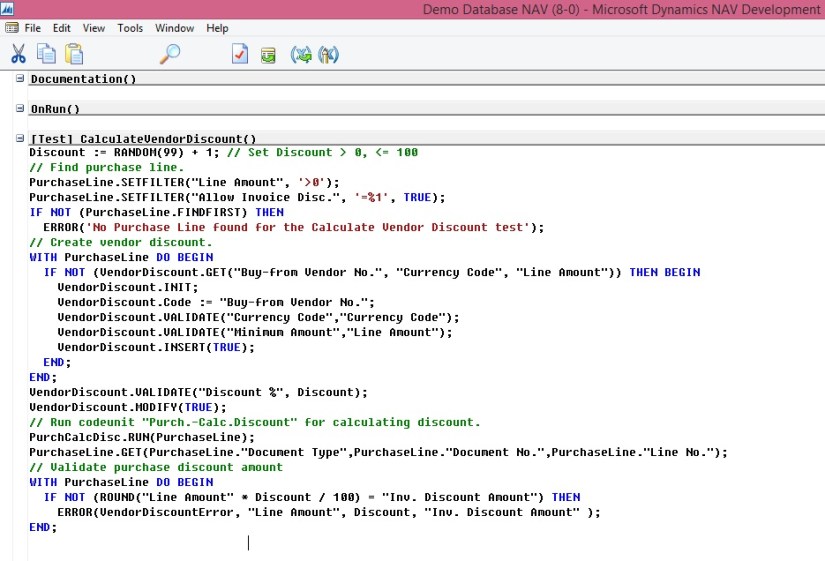
The following example illustrates the use of a try function together with codeunit 1291 DotNet Exception Handler to handle .NET Framework Interoperability exceptions. The code is in text file format and has been simplified for illustration. The CallTryPostingDotNet function runs the try function TryPostSomething in a conditional statement to catch .NET Framework Interoperability exceptions. Errors other than IndexOutOfRangeException type are re-thrown.

[TryFunction]

PROCEDURE TryPosting@1);

BEGIN

CODEUNIT.RUN(CODEUNIT::”Purch.-Post”);

END;

PROCEDURE CallTryPostingDotNet @2();

VAR

MyPostingCodeunit@1 : Codeunit 90;

MyDotNetExceptionHandler@2 : Codeunit 1291;

IndexOutOfRangeException@3 : DotNet ‘mscorlib, Version=4.0.0.0, Culture=neutral, PublicKeyToken=b77a5c561934e089′.System.IndexOutOfRangeException’

BEGIN

IF TryPostSomething THEN

MESSAGE(‘Posting succeeded.’)

ELSE BEGIN

MyDotNetExceptionHandler.Collect;

IF MyDotNetExceptionHandler.TryCastToType(IndexOutOfRangeException) THEN

MESSAGE(‘The index used to find the value was not valid.’)

ELSE

MyDotNetExceptionHandler.Rethrow;

END;

END;

I will come up with more details in my upcoming posts.

Advertisement
Development Tips, Excel, How To, Jet Reports, Office Integration, Report

Using GL Function in Jet Reports

Syntax: =GL (What,Arg1,Arg2,Arg3,..,Arg22)

Purpose: Returns the budget, balance, net change, quantity, debits or credits of the G/L Account of a given company based on filters.

Dynamics NAV Parameter Description
 What NAV: Determines what the GL Function returns. Options are Balance, Budget, Quantity, Credits or Debits Note that the options available for the What argument depend on the Where argument.
 Account NAV: G/L Account Number, Filter or Range. If you specify a single, totaling account, you will get totals. If you specify multiple accounts or a range of accounts, totaling accounts will not be included in the returned number even if the other account(s) have nothing to do with the specified totaling account(s). If the Where argument is “Rows”, “Columns”, or “Sheets”, then the What options are “Accounts” which will give a list of account numbers, “Categories” which will give a list of account category numbers, or “SegX” where X is a segment number and which gives a list of that specific account segment.
StartDate NAV: Specifies the starting date of transactions to include. If you are interested in the balance of an account on a given date, leave StartDate blank. If you are interested in the net change of an account, use Balance and specify both the StartDate and EndDate
 EndDate NAV: Specifies the ending date of transactions to include. Specifying a start period and an end period will give you the net change between the first day of the start period and the last day of the end period. Specifying a start period with no end period will give you the net change between that start date and the present. Specifying no start period will give you the balance/budget as of the end period. Specifying no start period or end period will give you the present balance/budget.
 View NAV: The G/L Analysis View to use. Leave this blank to use balances from the G/L directly. Analysis Views are available in Navision version 3 and later. This field should be blank if you are using objects from an earlier version of Navision.
 Dim1 NAV: Filter for the first dimension of the analysis view. If View is blank, this is the filter for Global Dimension 1. Dimension totaling is handled the same way as Account totaling. In Navision versions before 3.0, Dim1 is used as the Department filter.
 Dim2 NAV: Filter for the second dimension of the analysis view. If View is blank, this is the filter for Global Dimension 2. In versions before 3, this is the Project filter.
 Dim3 NAV: Filter for the third dimension of the analysis view.
 Dim4 NAV: Filter for the fourth dimension of the analysis view.
 BusinessUnit NAV: Filter for the business unit.
 Budget NAV: Budget filter. This is unused unless returning budgets.
 Company NAV: Company Name. This must be spelled the same as it appears in Navision, including case, spaces and punctuation. If this parameter is empty (“”), the default company in the Jet Reports Options/Data Sources Screen is used.
 Reserved NAV: Blank. For backwards compatibility, a Data Source Name as defined in Jet/Options can be used.
 Reserved GP: Specifies filters for specific account segments. You can use either an account argument or segment filters, not both.
 Reserved GP: Specifies filters for specific account segments. You can use either an account argument or segment filters, not both.
 Reserved   GP: Specifies filters for specific account segments. You can use either an account argument or segment filters, not both.
 Reserved GP: Specifies the budget filter, blank for all budgets. Note that budgets are associated with a specific year in Great Plains so if your budget and fiscal year filters do not coincide you will get a 0 value.
 ExcludeClose NAV: “True” to exclude closing date transactions. Defaults to “False”.
 ShowQuery NAV: “True” to show the finhlink string that will be used for drilldown. Defaults to “False”.
 Reserved GP: Company name. If this parameter is blank, the default company is used.
 Data Source Data source name. If this parameter is blank, the default data source is used.

Reports based on the G/L are easy with the GL function.

=GL(What, Account, StartDate, EndDate, View, Dim1, Dim2, Dim3, Dim4, BusinessUnit, Company, Reserved, ExcludeClose, Reserved, Reserved, Reserved, Reserved, Reserved, Reserved, ShowQuery, Reserved, DataSource)

NAV Cronus Examples

To retrieve the balance of G/L account 44100, you would type the following.

=GL(“Balance”,”44100″)

If you wanted to know the net change of account 44100 between 1/1/2002 and 1/31/2002, you would type the following.

=GL(“Balance”,”44100″,”1/1/02″,”1/31/02″)

For G/L Balances with standard NAV:

  • you can filter on the two Global Dimensions for G/L Balances or
  • if using a NAV Analysis View, you can filter on up to 4 dimensions that are tied to that View=GL(“Balance”,”40100″,,,,”USA”,”COPPER”) 
  • Please note that some NAV verticals that allow more than 2 Global Dimensions may not be compatible with the GL function. 
  • For the balance of account “40100” with Global Dimension 1 of “USA” and Global Dim 2 of “COPPER”, you can use the following function.

Stay tuned for how to use GL Function in Jet Reports.

I will come up with more details on this in my upcoming posts.

Development Tips, Excel, How To, Jet Reports, Office Integration, Report

Using NP Function in Jet Reports

Syntax: =NP (What, Arg1, Arg2,…,Arg22)

Purpose: Does various utility functions documented below.

Let’s see what options are available in below table:

What Description/Parameter
“Eval” Evaluate the formula in the Arg1 parameter. The formula must be enclosed in quotes and will be evaluated when the report refreshes.
“DateFilter” Calculates a date filter using the start date and end date specified in the Arg1 and Arg2 parameters.
“Union” Returns (in the form of a Jet-specific list) the Union of two arrays specified in the Arg1 and Arg2 parameters. Note that in versions of Jet Essentials 2015 and earlier, if NP(“Union”) is by itself in a cell, it will only return the first value from the array. For those versions, you must put it inside an NL(“Rows”) in order to correctly return all the data.
“Integers” Returns a string that can be used to generate integers using a Replicator, where Arg1 is the start number and Arg2 is the end number.
“Intersect” Returns (in the form of a Jet-specific list) the intersection of two arrays specified in the Arg1 and Arg2 parameters. Note that in versions of Jet Essentials 2015 and earlier, if NP(“Intersect”) is by itself in a cell, it will only return the first value from the array. For those versions, you must put it inside an NL(“Rows”) in order to correctly return all the data.
“Difference” Returns (in the form of a Jet-specific list) the difference of two arrays specified in the Arg1 and Arg2 parameters. Note that if NP(“Difference”) is by itself in a cell, it will only return the first value from the array. You must put it inside an NL(“Rows”) in order to correctly return all the data.
“Format” Formats an expression with a specific Excel formatting string.  Arg1 is the expression to format such as a date or cell reference, and Arg2 is the Excel formatting string such as “YYYY/MM/DD” for a date formatted with a 4-digit year then a 2-digit month and 2-digit day.
“Join” Joins the elements of the array specified in Arg1 together into a single string separated by the contents of Arg2.
“Split” In versions of Jet Essentials 2015 Update 1 and higher, this function splits the string in Arg1 into a Jet-specific list.
In earlier versions of Jet Essentials, this function splits the string in Arg1 into an array of values. The splitting is delimited by the contents of Arg2. Note that if NP(“Split”) is by itself in a cell, it will only return the first value from the array. You must put it inside an NL(“Rows”) in order to correctly return all the data.
“Codeunit” Evaluates and returns the value returned by the Dynamics NAV code unit function.
“Companies” Returns a list of the companies associated with a data source. Arg1 is a company filter such as A* to return all companies that start with the letter A. Leaving Arg1 blank will return all companies. Arg2 is the data source. Leaving Arg2 blank will return companies from the current data source. Note that you should reference the result of this function in the table argument of an NL replicator function to actually list them out in Excel.
“Dates” Returns a string that can be used to generate dates using a Replicator, where:
Arg1 is the start date
Arg2 is the end date.
Arg3 can be used to specify a period type of Day, Week, Month, Quarter, or Year.  Default is Day.
Arg4 can be set to “True” in order to return the end of each period.  Default is “False”.
“DataSources” Returns an array containing the current user’s Jet data sources.
“Formula” Evaluates the Excel formula contained within Arg1.
“Slicer” Returns an Excel Slicer in Arg1 that can be used as a filter in Jet functions when using a Cube data source.

EVAL

To increase performance, you can reduce cross-sheet references. The following NP evaluates the formula in cell of D5 from a worksheet called Options. =NP(“Eval”,”=Options!$D$5″)

This function is executed once on refreshing the report, rather than for every cell update. =NP(“Eval”,”=Today()”)

Performance can also be increased by not using volatile functions.

DATEFILTER

Results of using the NP(DateFilter) function, which can then be nested in other functions.
NP-1
INTEGERS

This NP(Integers) function will create rows with the numbers 1 through 10. =NL(“Rows”,NP(“Integers”,1,10))

JOIN

The following NP(Join) joins the strings from an array and creates the result “100|200|300|400” for potential use in another function. =NP(“Join”,{“100″,”200″,”300″,”400″},”|”)

SPLIT

The following NP(Split) splits up the string “this|is|an|array” and creates the array {this, is, an, array}. =NP(“Split”, “this|is|an|array”, “|”)

COMPANIES

The following NP(Companies) function lists all the companies for the current data source in rows. =NL(“Rows”,NP(“Companies”))

DATES

The use of NP(Dates) to create a set of column headers for a report. (Dates can also be placed in reverse order by putting the later date in first)
NP-2
DATASOURCES

This NP(DataSources) function will return a list of the data sources in use on the machine it is run on. =NL(“Rows”,NP(“Datasources”))

FORMULA

Used in conjunction with the NL(Table) function to define a calculated column in the table definition. For example: To determine available credit for a customer; if cell E6 contains the credit limit, and cell F6 contains the open credit, then =NP(“Formula”,”=E6-F6″) would be put in the field list of the NL(Table) definition

SLICER

The Slicer function works in conjunction with pivot tables and dashboards to provide information for filters when refreshing reports.
NP-3
Array Calculations

Arrays are lists of data values. You can obtain a string representing such a list from Jet using “Filter” as the What parameter in an NL function. The values in arrays returned by Jet are guaranteed to be unique. The resulting array might be a list of Customers or a list of Invoice Document numbers or any other list of data that match a set of filters. The array calculation operations of the NP function allow you to find different combinations of two arrays.

An example of when you would need an array calculation is listing the invoice document numbers where either the Type on an Invoice Line is “Item” for all item numbers, or the Type is “G/L Account” and the account number is 300. Both the Item numbers and the G/L Account numbers are stored in the same “No.” field, so there is no single set of filters that will create this list of document numbers.

The array operations available in the NP function are “Difference”, “Union” and “Intersect”. The difference between two arrays consists of all of the elements that are in the first array but are not in the second. The union of two arrays consists of a single copy of all of the elements in both arrays with any duplicates eliminated. The intersection of two arrays is the set of elements that are common to both arrays. An example of the results of the array operations are listed in the table below.

Array 1 {100, 200, 300, 400, 500} Array 2 {400, 500, 900, 1000, 2000}
Difference {100, 200, 300}
Union {100, 200, 300, 400, 500, 900, 1000, 2000}
Intersect {400, 500}

=NL(“Rows”, NP(“Union”, NL(“Filter”,”Customer”,”No.”,”Name”,”A*”), NL(“Filter”,”Customer”,”No.”,”Name”,”B*”)))

=NL(“Rows”,”Customer”,”No.”,”Name”,”A*|B*”)

The following formula creates a list down rows of the document numbers of all invoices where either the Type field is “Item”, or it is “G/L Account” and the No. field is 2000.

=NL(“Rows”, NP(“Union”, NL(“Filter”,”Sales Invoice Line”,”Document No.”,”Type”,”Item”), NL(“Filter”,”Sales Invoice Line”,”Document No.”,”Type”,”G/L Account”,”No.”,”2000″)))

You should be cautious using arrays because they are often not the easiest or fastest way to solve a problem. Example 1 is a good example of a query that does not require arrays, and will run much slower if you use them. Also remember that, with Jet Essentials 2015 and earlier, if NP(“Union”), NP(“Intersect”), or NP(“Difference”) are by themselves in a cell they will only return the first value from the array. You must put them inside NL(“Rows”) as in the examples above in order to correctly return all the data.

There are two more array operations that behave a bit differently than those listed above: “Split” and “Join”. “Split” takes two text strings and splits the first string based on the second, resulting in an array. For instance, if you wanted to create a list of account numbers based on the string “1000+2000+3000”, the formula would look like the following.

=NP(“Split”,”1000+2000+3000″,”+”)

The result would be the array {“1000″,”2000″,”3000”}. Note that this must be put inside an NL(“Rows”) as in the Union examples above in order to return all the data.

In the opposite scenario, if you have an array but would like to create a text string by joining each element of that array separated by a given string, you would use the “Join” operation. Using the same array, you can create a string for a filter with array values separated by the “|” character with the following formula.

=NP(“Join”,{“1000″,”2000″,”3000″},”|”)

The result would be the text string “1000|2000|3000”, which is a valid filter that you could pass into an NL function.

For Join and Split, Arg1 of the NP function is the value you want to manipulate and Arg2 is the character by which you want to join or split the value. If you experiment with these operations, you will find that you have an amazing amount of flexibility, especially when you use them in conjunction with the other array calculation formulas listed above.

Please note that the results of an NP(“Join”) may be very large and thus putting it directly inside another function may cause problems with Excels 256 character formula limit as in the following formula.

=NL(“Rows”,NP(“Split”,NP(“Join”,{“some”,”array”,”here”},”|”),”|”))

It is recommended that in a situation like this the NP(“Join”) be placed in a separate cell as in the following.

B2: =NP(“Join”,{“some”,”array”,”here”},”|”)

B3: =NL(“Rows”,NP(“Split”,B2,”|”),”|”))

Stay tuned for usage of NP functions in Jet Reports.

I will come up with more details in my upcoming posts.

Development Tips, Excel, How To, Jet Reports, Office Integration, Report

Using Jet Report NF Function

In my previous post I have explained usage of NL Function, if not seen please check this Link.

The NL function works great if you want a single field from a record, but if you want to retrieve more than one field from the same record, retyping all the filters for each field can be tedious.

The NF function is a shortcut that will return the value of a field in a record. One or more NF functions can be used with a single NL function that has the NL field parameter left blank.
NFFunction-1
NFFunction-2
Similarly we can enter Formula in other cells:
NFFunction-3
The output of Above Report will be as below:
NFFunction-4
You need to press Report or Refresh Button on the Ribbon to view the output of the Report.

If we see in above output column D is not having any valid information for reporting point of view so we can Hide them. Also Colum Headings will add more meaning full information. Let’s do some Formatting to the Report too.

To Return to Designer mode you need to press Design button on Ribbon.
NFFunction-5
The First Row & First Column is reserved for Jet Commands, so don’t use for your data purpose.

The A1 cell is auto populated when you run the Report First time.

The Hide in D1 instructs Jet to Hide this column at Report run.

E3 to G3 I have added the Column Heading for my Data. You can use any Formula or Formatting Supported in Excel.

E5 to G…. is the data area which retrieves the value from database using the Jet Functions.

Let’s See the output of above Report. Press Report or Refresh Button to view the output of the Report or execute the Report.
NFFunction-6
The Report & Refresh button is having different purpose:

Report: Retrieves data from catch, help full in testing report while Designing.

Refresh: Retrieves fresh data from the database, you will get updated data if any between earlier run.

If you closely monitor the Report you will find that the First Row/Column [1] and Column D is hidden from Report output.

If there is no primary key in the table, Jet Reports will give an error message if you leave the Field parameter of the NL blank so you can try leaving the Field blank, then fill in a list of field names if necessary.

See my upcoming posts for more details of NL & NF Functions with more usage.

Development Tips, Excel, How To, Jet Reports, Office Integration, Report

Using Jet Report NL Function

 
Returns fields or record keys from a table based on filters. Duplicates report templates.
 
Note:
If the NL function is making copies of a template, it must be the only function in the cell.
The functions =-NL(“Rows”) and =NL(“Rows”)*-1 are not valid.
 
NLFunction-1
 
Example:

=NL(“Rows”,”Customer”,,”Salesperson Code”,”PS”,”Shipping Agent Code”,”DHL”)

This NL returns the record key for all the Customer with Salesperson Code = ‘PS’ and Shipping Agent Code as ‘DHL’
 
NLFunction-2

If you specify multiple filters, they combine in a logical AND.
 
NLFunction-3

NL Function Parameters & Arguments with brief Description.
 
NLFunction-4
NLFunction-5
NLFunction-6

Navision Cronus NL Function Examples:

This NL that returns the record key for all of the customers in the Customer table who are in the City of Boston with a Balance less than zero

=NL(“Rows”,”Customer”,,”Balance”,”<0″,”City”,”Boston”)

This NL returns the Customer Name from sales quote number 10000. This NL can only return one record so the “What” parameter is blank

=NL(,”Sales Header”,”Name”,”No.”,”10000″,”Document Type”,”Quote”)

This NL returns information for a company other than the default one in the Options screen

=NL(“Rows”,”Customer”,,”0″,”CRONUS USA, Inc.”)

This NL returns information for a company other than the one in the Options screen using a connection other than the default.

=NL(“Rows”,”Customer”,,”0″,”CRONUS USA, Inc.”,”DataSource=”,”2″)

This NL creates sheets called “US”,”CANADA” and “MEXICO” using an array in the table field

=NL(“Sheets”,{“US”,”CANADA”,”MEXICO”})

This NL creates lookup values for use with Report Options for each item in cells F5 through F15.

=NL(“Lookup”,F5:F15,”My Values”)


See my upcoming posts for more details and uses of this function.


Development Tips

Functions Not Supported by Microsoft Dynamics NAV Web Client

Below is the lists the C/AL functions and data types that are not supported or partially supported by Microsoft Dynamics NAV Web client.

Unsupported Functions

Functions that are not supported by the Microsoft Dynamics NAV Web client. If you use a function that is not supported, an error occurs at runtime.

  • CREATE Function (Automation)
  • ISCLEAR Function (Automation)
  • ACTIVATE Function (Debugger)
  • UPDATE Function (Dialog)

Partially Supported Functions

Functions that either do not have all the capabilities in the Microsoft Dynamics NAV Web client as they do in the Microsoft Dynamics NAV Windows client or they behave differently than in the Microsoft Dynamics NAV Windows client.

  • DOWNLOAD Function (File)
  • DOWNLOADFROMSTREAM Function (File)
  • HYPERLINK Function
  • PREVIEW Function (Report)
  • PRINTONLYIFDETAIL Function (Report)
  • REPORT.RUN Function
  • REPORT.RUNMODAL Function
  • UPLOAD Function (File)
  • UPLOADINTOSTREAM Function (File)
Performance

SETAUTOCALCFIELDS Function – in Nav 2015

Sets the FlowFields that you specify to be automatically calculated when the record is retrieved from the database.

[OK :=] Record.SETAUTOCALCFIELDS([Field1,Field2, …])

To remove the automatic calculation setting on a field that you previously set with the SETAUTOCALCFIELDS function, you must call SETAUTOCALCFIELDS without parameters.

If you omit the optional return value and if the record cannot be set to automatically calculate, then a run-time error occurs.

If you include a return value, then you must handle any errors.

You can improve performance by using the SETAUTOCALCFIELDS function before looping through records with FlowFields instead of calling the CALCFIELDS function on each record in the loop.

The automatic calculation setting applies to the fields that you specify until the Record parameter goes out of scope or until you call SETAUTOCALCFIELDS without any parameters.

The fields that you specify in the Field parameters are added to any fields that you previously set with the SETAUTOCALCFIELDS function. Previously set fields are not overwritten when you call SETAUTOCALCFIELDS with different parameters. To clear the list of fields that are automatically calculated, call the SETAUTOCALCFIELDS function without parameters.

If you assign a record to another record variable, then the automatic calculation setting on FlowFields is not transferred with the record.

If you copy a record by using the COPY Function (Record), then the automatic calculation setting on FlowFields is copied with the record.

The Rec and xRec system variables are set to always automatically calculate FlowFields. If you call the NEXT function on Rec or xRec, then FlowFields in the record are automatically calculated.

Below example show how to use the CALCFIELDS function.

// Using CALCFIELDS

IF (Customer.FIND(’-’)=true) THEN

REPEAT

Customer.CALCFIELDS(Balance,”Net Change”);

… // your other codes for processing.

UNTIL (Customer.NEXT=0)

Below example show how you can use the SETAUTOCALCFIELDS function instead of the CALCFIELDS function to improve performance.

// Using SETAUTOCALCFIELDS

Customer.SETAUTOCALCFIELDS(Balance,”Net Change”);

IF (Customer.FIND(’-’)=true) THEN

REPEAT

// Customer.Balance and Customer.”Net Change” have been auto calculated.

… //your rest of the code for processing.

UNTIL (Customer.NEXT=0)

The following example shows how to add fields to the list of automatically calculated FlowFields and how to clear the list of automatically calculated FlowFields

Customer.SETAUTOCALCFIELDS(Balance);

Customer.SETAUTOCALCFIELDS(“Net Change”);

// Above lines are equivalent to the following:

Customer.SETAUTOCALCFIELDS(Balance,”Net Change”);

// To clear the list of automatically calculated FlowFields so that no fields are calculated automatically, use the following code.

Customer.SETAUTOCALCFIELDS();

It is a common task to retrieve data and request calculation of associated FlowFields. The following example traverses customer records, calculates the balance, and marks the customer as blocked if the customer exceeds the maximum credit limit.

Note the below Customer record and associated fields are imaginary.

IF Customer.FINDSET() THEN

REPEAT

Customer.CALCFIELDS(Customer.Balance)

IF (Customer.Balance > MaxCreditLimit) THEN BEGIN

Customer.Blocked = True;

Customer.MODIFY();

END  ELSE IF (Customer.Balance > LargeCredit) THEN BEGIN

Customer.Caution = True;

Customer.MODIFY();

END;

UNTIL Customer.NEXT = 0;

In Microsoft Dynamics NAV 2015, you can do this much faster. First, we set a filter on the customer.

This could also be done in Microsoft Dynamics NAV 2009, but behind the scenes the same code as mentioned earlier would be executed.

In Microsoft Dynamics NAV 2015, setting a filter on a record is translated into a single SQL statement.

Customer.SETFILTER(Customer.Balance,’>%1’, LargeCredit);

IF Customer.FINDSET() THEN REPEAT

Customer.CALCFIELDS(Customer.Balance)

IF (Customer.Balance > MaxCreditLimit) THEN BEGIN

Customer.Blocked = True;

Customer.MODIFY();

END   ELSE IF (Customer.Balance > LargeCredit) THEN BEGIN

Customer.Caution = True;

Customer.MODIFY();

END;

UNTIL Customer.NEXT = 0;

In the previous example, an extra call to CALCFIELDS still must be issued for the code to be able to check the value of Customer.Balance.

In Microsoft Dynamics NAV 2015, you can optimize this further by using the new SETAUTOCALCFIELDS function.

Customer.SETFILTER(Customer.Balance,’>%1’, LargeCredit);

Customer.SETAUTOCALCFIELDS(Customer.Balance)

IF Customer.FINDSET() THEN REPEAT

IF (Customer.Balance > MaxCreditLimit) THEN BEGIN

Customer.Blocked = True;

Customer.MODIFY();

END   ELSE IF (Customer.Balance > LargeCredit) THEN BEGIN

Customer.Caution = True;

Customer.MODIFY();

END;

UNTIL Customer.NEXT = 0;

Report

Usage of RUNREQUESTPAGE, EXECUTE, SAVEAS and PRINT function of Reports Object

Today we will discuss usage of RUNREQUESTPAGE, EXECUTE, SAVEAS and PRINT function of Report Object.

You will be using RUNREQUESTPAGE function to run the request page of desired Report.

We will save the value of Parameters in Table for further use. For this we will require to create a table with below structure let name it as Report Request Parameters.

Create a table called Report Request Parameters that has the following fields.

Field Name Data Type Length
ReportId Integer
UserId Code 100
Parameters BLOB

ReportParameter-1

Then we will use these value with

EXECUTE – To preview the report.

SAVEAS – To save it as pdf file.

PRINT – To print the Report.

To continue with our demo we will require to create a codeunit, let’s name it as Using Report Functions.

We will add the following variables in the C/AL Globals window.

Variable name DataType Subtype Length
ReportParameters Record Report Request Parameters
XmlParameters Text
OStream OutStream
IStream InStream
CurrentUser Code 100
Content File
TempFileName Text

ReportParameter-2

Now we will add the following code to the OnRun trigger of the codeunit.

We will be taking Report 206 as an example for this demo.

ReportParameter-3

You can copy below code for your demo.

// Use the REPORT.RUNREQUESTPAGE function to run the request page to get report parameters

XmlParameters := REPORT.RUNREQUESTPAGE(206);

CurrentUser := USERID;

// Save the request page parameters to the database table

WITH ReportParameters DO BEGIN

// Cleanup

     IF GET(206,CurrentUser) THEN

DELETE;

SETAUTOCALCFIELDS(Parameters);

ReportId := 206;

UserId := CurrentUser;

Parameters.CREATEOUTSTREAM(OStream,TEXTENCODING::UTF8);

MESSAGE(XmlParameters);

OStream.WRITETEXT(XmlParameters);

INSERT;

END;

CLEAR(ReportParameters);

XmlParameters := ”;

// Read the request page parameters from the database table

WITH ReportParameters DO BEGIN

SETAUTOCALCFIELDS(Parameters);

GET(206,CurrentUser);

Parameters.CREATEINSTREAM(IStream,TEXTENCODING::UTF8);

IStream.READTEXT(XmlParameters);

END;

// Use the REPORT.SAVEAS function to save the report as a PDF file

Content.CREATE(‘TestFile.pdf’);

Content.CREATEOUTSTREAM(OStream);

REPORT.SAVEAS(206,XmlParameters,REPORTFORMAT::Pdf,OStream);

Content.CLOSE;

// Use the REPORT.EXECUTE function to preview the report

REPORT.EXECUTE(206,XmlParameters);

// Use the REPORT.Print function to print the report

REPORT.PRINT(206,XmlParameters);

We are done, definitely this will help you doing some useful stuffs in your projects.

Run the Codeunit and see the output. You will get three output

a) Report Output will be saved as pdf, you can specify your custom path to save the file to specified location.

b) Report Print Preview

c) Report will be send for Printing

Development Tips

Creating a Test Codeunit and Test Function

Let’s creates the test function, which tests the Purch-Calc.Discount functionality, to this test codeunit.

To create the test codeunit and test function

  • In the development environment, on the Tools menu, choose Object Designer.
  • In Object Designer, choose Codeunit, and then choose New.
  • On the View menu, choose Properties.
  • In the Properties window, in the Subtype field, select Test to specify that this is a test codeunit.
  • On the View menu, choose C/AL Globals.
  • In the C/AL Globals window, on the Functions tab, enter CalculateVendorDiscount. This is the name of the test function.

TestCU-1

Note
By default, functions that you add to test codeunits have the FunctionType property set to Test.
  • On the Functions tab, choose Locals.
  • In the C/AL Locals window, on the Variables tab, enter the following variables, which you will use in the CalculateVendorDiscount test function.

TestCU-2

Important

Be sure to create these variables on the Variables tab, not on the Parameters tab. If you create them on the Parameters tab, then you get an error when you compile that says the test method signature is invalid

  • In the C/AL Locals window, on the Text Constants tab, in the Name field, enter VendorDiscountError. In the ConstValue field, enter Vendor Discount Error – Line Amount: %1, Discount: %2, Discount Amount: %3.

TestCU-3

  • Close the C/AL Locals window and the C/AL Globals window.
  • In the C/AL Editor, in the CalculateVendorDiscount function, enter the following code.

TestCU-4

You can copy above code from below:

Discount := RANDOM(99) + 1; // Set Discount > 0, <= 100

// Find purchase line.

PurchaseLine.SETFILTER(“Line Amount”, ‘>0’);

PurchaseLine.SETFILTER(“Allow Invoice Disc.”, ‘=%1’, TRUE);

IF NOT (PurchaseLine.FINDFIRST) THEN

ERROR(‘No Purchase Line found for the Calculate Vendor Discount test’);

// Create vendor discount.

WITH PurchaseLine DO BEGIN

IF NOT (VendorDiscount.GET(“Buy-from Vendor No.”, “Currency Code”, “Line Amount”)) THEN BEGIN

VendorDiscount.INIT;

VendorDiscount.Code := “Buy-from Vendor No.”;

VendorDiscount.VALIDATE(“Currency Code”,”Currency Code”);

VendorDiscount.VALIDATE(“Minimum Amount”,”Line Amount”);

VendorDiscount.INSERT(TRUE);

END;

END;

VendorDiscount.VALIDATE(“Discount %”, Discount);

VendorDiscount.MODIFY(TRUE);

// Run codeunit “Purch.-Calc.Discount” for calculating discount.

PurchCalcDisc.RUN(PurchaseLine);

PurchaseLine.GET(PurchaseLine.”Document Type”,PurchaseLine.”Document No.”,PurchaseLine.”Line No.”);

// Validate purchase discount amount

WITH PurchaseLine DO BEGIN

IF NOT (ROUND(“Line Amount” * Discount / 100) = “Inv. Discount Amount”) THEN

ERROR(VendorDiscountError, “Line Amount”, Discount, “Inv. Discount Amount” );

END;

The code in this test function prepares the test data by setting a random discount amount, getting a record from the Purchase Line table that satisfies two filters, and creating a record in the Vendor Invoice Disc. table with the random discount amount.

Next, it runs the Purch-Calc.Discount codeunit, which contains the code that is being tested. Finally, it validates the results of running the Purch-Calc.Discount codeunit and raises an error if the results are not as expected.

Note

This test code does not guarantee that the state of the database after you run the test is the same as the state of the database before you run the test.

  • On the File menu, choose Save.
  • In the Save As window, in the ID field, enter ID. In the Name field, enter TestVendorDiscount. Verify that the Compiled check box is selected, and then choose the OK button.

Now create additional test functions in the TestVendorDiscount test codeunit to test other aspects of vendor discounts.

These test functions should include negative tests, which validate that the code being tested works as intended under failing conditions.

For more details See below posts:

Creating a Test Runner Codeunit
Adding a Test to a Test Runner Codeunit