Azure, Corfu Navision 2016, How To, Information, Instalation & Configuration, Office 365, Office Integration, Tip & Tricks

Configuring Single Sign-On using Office 365 on Navision 2016

Today we will see how we can enable Single Sign-On using Office 365 for Navision 2016.

Before we start we should have Virtual Machine ready on Azure with Navision 2016 installed, Certificates and Nav User is configured. Endpoints are open so that web client can be used from outside Virtual Machine on internet.

It should be hosted on Public IP, then only we will be able to configure it.

For details regarding Azure Subscription you can see my earlier post here.

For details regarding Creating Virtual Machines you can see my earlier post here.

You also need Office 365 Subscription ready for use and you can use the AD of same to configure your Single Sign-On.

Let us start with Admin console of office 365. Click on Azure AD this will create Management Console to work with AD.

SingleSignOn-1

Enter your details and click on Next.

SingleSignOn-2

Enter your details and click on Next, Finally Sign Up.

SingleSignOn-3

It will take few minutes to configure and make it available for you.

SingleSignOn-4

Once your Subscription is ready click on Start Managing my Service.

SingleSignOn-5

From Management Console click on Virtual Machine, if you dont have already to create one for you.

SingleSignOn-6

Select the Virtual Machine in Search for Microsoft Dynamics Nav 2016.

SingleSignOn-7

Select the approprite Virtual Machine from the List.

SingleSignOn-8

Enter your details and Create. For more details see the link provided on top of the post.

SingleSignOn-9

Let us return to our AD, Click on Applications. This will List all you Apps currently available with your AD or office 365.

SingleSignOn-10

Click on Add to configure your Application.

Give a Name and Select Web Application/or Web API, as we are configuring for Web Client today. Click on Next.

SingleSignOn-11

Enter your Web Client URL and Office portal AD URL.  Click on OK.

SingleSignOn-12

Your New application gets registered with your AD.

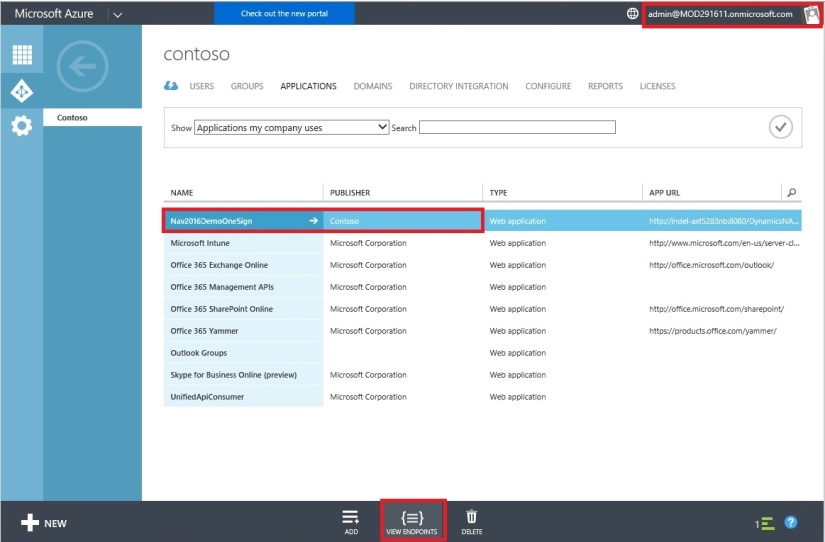
Select the created Application and Click on View Endpoints.
SingleSignOn-13

Copy the Federation MetaData URL and keep it handy at safe place we will require this in our next step. Close the window we are not performing any changes here.

SingleSignOn-14

Open your Navision User Card.In Office 365 Authentication enter your Office portal user email id which you will be using for Single Sign-On.

SingleSignOn-15

Open your Navision Service Instance configuration and enter Federal MetaData URL which we copied in our previous step.

SingleSignOn-16

Restart you NAV Service.

SingleSignOn-17

Open the Web Client Folder under your IIS. Edit your Web.config file using prefered Editor.

SingleSignOn-18

Enter you Client Service Credentials as AccessControlService.

SingleSignOn-19

Change value of ACS URI as below. You have full explaination of same in the file itself.

SingleSignOn-20

Thats all, Now you open your web client and you will be redirected to Office 365 Login Page, enter your valid office 365 e-mail user id and password you will be authenticated and Web Client is opened.

Thats all for today, I will come up with moredetails in my upcoming posts.

Till then keep exploring and learning.


Development Tips, How To, Information, Tip & Tricks, Web Services

Exposing & Consuming the Web service from & inside Navision – Part-4

Continuing from my previous post. Find the link to access the same in case you missed it.

Exposing & Consuming the Web service from & inside Navision – Part-1

Exposing & Consuming the Web service from & inside Navision – Part-2

Exposing & Consuming the Web service from & inside Navision – Part-3


Step 5: Create a Codeunit to test Retrieve the data using above DLL and Send data in XML Format using another Web Service exposed in Dot Net.

How to create WCF Service Application using C#, Publishing it and creating DLL Class Library is out of scope of this document. You may require to take help from guy who are comfortable in .Net technology.

Let’s start with new codeunit, select the available ID in your database and suitable name to save this codeunit.

We will define a Global variable to hold the data we receive from Navision Web Service and pass to Web Service exposed outside Navision.

WebServiceUsage-16

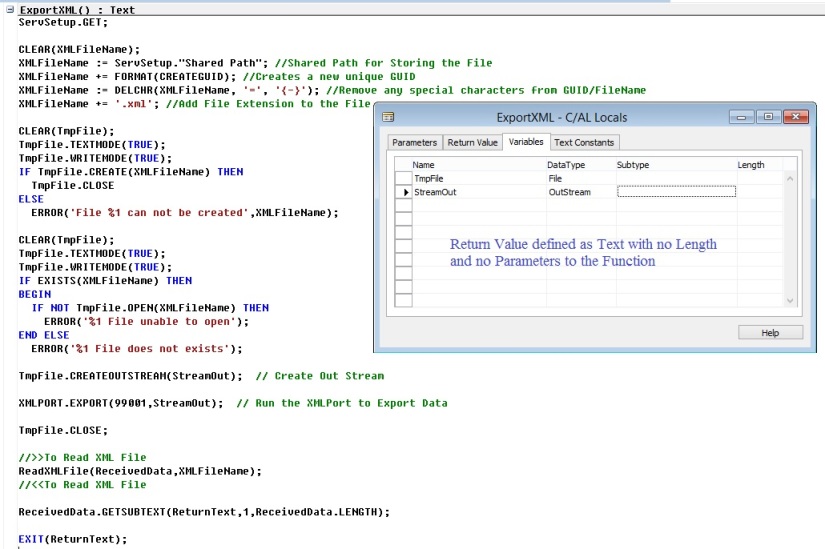
Create a Function to Read/Export the data using Navision Web Service.

Variables defined to the function is also shown in below screen.

We will add the code similar to below. Description provided along with the code in below screenshot.

WebServiceUsage-17

Create a Function to Send Exported data from above function to the Web Service created outside the Navision. Web Service created in DotNet.

Here too we are using DLL file of the Outside Exposed Web Service.

Variables defined to the function is also shown in below screen.

We will add the code similar to below. Description provided along with the code in below screenshot.

WebServiceUsage-18

Now we have our both function ready.

One which Export data consuming the Navision Published Web Service and then read the data in BigText Variable and finally converted to Text variable.

Second one will send data consuming the Web Service Exposed outside Navision created in DotNet. 

Let us test our process if it works as desired.

We will call above both function.

When we call First Web Service as a result we get the XML format file data in my Global defined Text Variable.

We will review the data which we are going to send to Second Web Service on Screen for which we are simply calling the Message.

Finally we will send the data to the Second Web Service, the content of XML file stored in our Global Variable.

Code we use is as below shown screenshot.

WebServiceUsage-19

Save the codeunit and execute, as we have written our test code in Run trigger so we can directly run this codeunit.

The output will be as shown in below screenshots.

Until this step our Data is Exported and data is loaded in Global defined Text variable.

WebServiceUsage-20

Here the content of Text variable is shown in Message window, which we can verify the data which we are going to send to the external Web Service.

WebServiceUsage-21

As a final step we are sending this content to the External Web Service Exposed using DotNet.

WebServiceUsage-22

Verify the data received at the DotNet side. You can program the Second Web Service as save the content on disk as file or perform any processing like inserting those data in some other table or displayed on screen. 

That’s it for this series.

I will be posting couple of more posts on Web Services soon.

Since this was in response of request from one of my reader so I stick to the requirement.

In my other post I will show some different flavour of using the same.

Till then keep exploring and learning.

Will be back with other posts soon.

Development Tips, How To, Tip & Tricks, Web Services

Exposing & Consuming the Web service from & inside Navision – Part-3


Continuing from my previous post. Find the link to access the same in case you missed it.

Exposing & Consuming the Web service from & inside Navision – Part-1

Exposing & Consuming the Web service from & inside Navision – Part-2


Step 4: Create a DLL to use as Add-in to consume the Web Service itself in Navision.

We will start with Class Library Project in Visual Studio.

It’s very simple with few steps to follow, and we will be done with our requirement.

Enter Name and select the path for your project solution folder. In my case I am saving my project to the default location of Visual Studio. And I am naming my project as XMLData.

WebServiceUsage-8

Right click on the project folder and Add Service reference to the project.

WebServiceUsage-9

Enter your Web Service URL and click on GO.

Once your Service is listed, enter the Reference Namespace. And click on OK to add the Service Reference to the project.

WebServiceUsage-10

Click on app.config in Solution browser to open.

Verify your code similar to below.

WebServiceUsage-11

Build your Project to obtain the .dll file.

WebServiceUsage-12

Below screen shows we have no errors and the .dll file is created successfully.

WebServiceUsage-13

Locate the .dll file in your Project folder similar to path shown below. Copy your dll file.

WebServiceUsage-14

Create a folder and paste your .dll file to Service & RTC folder, as shown in below screen.

WebServiceUsage-15


We are ready with the Add-in, which we will use in our next post to consume our service with the help of this dll, and call the method to obtain our file for further processing.

That’s all for this post, I will be back with next post in series soon.

Till then keep practicing.


To be Continued….


Data, Development Tips, How To, Information, Tip & Tricks, Web Services, XMLports

Exposing & Consuming the Web service from & inside Navision – Part-2

Continuing from my previous post. Find the link to access the same in case you missed it.

Exposing & Consuming the Web service from & inside Navision – Part-1


Step 1: Create a XML Port to Export Data in XML Format using XMLPort and save at some specified Location.

Here we will be creating just for demo purpose simple XMLPort for Exporting Data from Navision Database in XML Format.

WebServiceUsage-2

We are using very simple structure for our XMLPort.

Make sure you set the properties accordingly as we are exporting the data in XML Format.

WebServiceUsage-3

Save the XMLPort at available id and suitable name.


Step 2: Create a Codeunit to call XML Port and retrieve data in XML Format in Text Variable.

Here we will create a Codeunit with few helpful functions which will call the XMLPort to Export the data and save in temp file.

Further retrieve the data from the file in XML Format.

Return the data retrieved above to the calling program/ function.

To start with let us start with creating some Global Variables.

WebServiceUsage-4

Next we will add one Function as below.

WebServiceUsage-5

Next we will add one more Function as below.

WebServiceUsage-6

Save the Codeunit at available Id and suitable Name.


Step 3: Expose/Publish the Codeunit as web service.

Open Web Services Page and add your Codeunit created above. Use your relevant ID on which you saved your Codeunit.

WebServiceUsage-7


Tick the Published to Expose the Codeunit as Web Service.

Rest in my Next post.

To Be Continued……

Data, Development Tips, How To, Information, Tip & Tricks, Web Services, XMLports

Exposing & Consuming the Web service from & inside Navision – Part-1

Introduction

Today in reply to one of my reader I am giving here steps how we can Export data using XMLPort and transfer data outside Navision using Web Services.

Lets discuss about the technology before I jump to the solution.

Few full forms which may help understanding while reading this post.

W3C – Web Services Architecture Working Group.

SOAP – Simple Object Access Protocol.

REST – Representational State Transfer.

WSDL – Web Service Description Language.

UDDI – Universal Description, Discovery & Integration.

AWS – Arbitrary Web Services.

XML – Extensible Markup Language.

HTTP – Hypertext Transfer Protocol.


What is Web Service?

W3C defines Web Service as : A software system designed to support interoperable Machine-to-Machine interaction over a network.

Web service can be defined as service offered by an electronic devices to another electronic devices, which communicate with each other over www.

W3C defines web services has an interface described in a machine-process able format WSDL.

Other systems I with the web service in a manner prescribed by its description using SOAP messages, typically conveyed using HTTP with an XML serialization in conjunction with other web-related standards.

Later W3C extended the definition:-

REST – compliant web services, in which the primary purpose of the service is to manipulate representations of web resources using a uniform set of stateless operations.

Arbitrary Web Services –  the services may expose an arbitrary set of operations.

WebServiceUsage-1-2

UDDI  defines which software system need to be contacted for which type of data.

Once the system is discovered to be contacted, the contact is established using SOAP.

Service provider system validate the request by referring the WSDL file, process the request and send the data using SOAP protocol.


Web Service is a method of communication that allows two software system to exchange the data over the internet.

  • Two systems may use different software which could be using different programming languages.
  • Almost all type of software interpret XML tags.
  • Web Services can be used to exchange data between two systems in form XML files.

WebServiceUsage-1-3

XML is used to tag the data.

SOAP is used to transfer the data.

WSDL is used to describe the services available.

UDDI lists what service are available.

Human to machine communication is utilized for machine-to-machine communication, used for transferring machine readable files such as XML & JSON formats.

Web services use SOAP over HTTP protocol, facilitating to use your existing low-cost internet for implementing Web Service.

Rules for communication between two different systems:

All the rules are defined in WSDL file.

  • How request to be send from one system to another.
  • What all parameters need to be send while requesting data.
  • What structure to be used for generating data (Normally data is exchanged in XML format) which is validated against .xsd file.
  • What errors to be generated in case of failure of rule communication set.


Web Services that uses Markup Language:

  • JSON-RPC
  • JSON-WSP
  • Web template
  • Web Service Description Language (WSDL)
  • XML Interface for Network Services (XINS)
  • Web Services Conversation Language (WSCL)
  • Web Services Flow Language (WSFL)
  • WS-Meta data Exchange
  • Representational State Transfer (REST)
  • Remote Procedure Call (RPC)
  • XML Remote Procedure Call (XML-RPC)


No more theories lets come to our point.

There are other ways too to achieve the same, but here I am specific to the requirement to which I am answering.

Requirement is the Data in XML format file will be transmitted using Web Service, We will be using Navision Exposed Web Service to Export data using XMLPort and then send the content by consuming another Web Service exposed in Dot Net which will retrieve the XML content and update in some other system.

Assumption is these two endpoints can be two separate databases in same domain or two different companies of same organization operating at two different location sharing information via Web Services.

For the demo purpose I will be using Navision to publish the service for exporting the data and retrieve the data using Web Service exposed in Dot Net.

Since I have not in depth knowledge of Dot Net codes, so I have asked my college to prepare the Web Service for me and I am simply using it to show how we can do it.

Here I will be getting this done through below 5 Steps.

WebServiceUsage-1

Next Post in this Series will contain:

Step 1: Create a XML Port to Export Data in XML Format using XMLPort and save at some specified Location.

Step 2: Create a Codeunit to call XML Port and retrieve data in XML Format in Text Variable.

Step 3: Expose/Publish the Codeunit as web service.


Next Post in this Series will contain:

Step 4: Create a DLL to use as Add-in to consume the Web Service itself in Navision.


And the Final Post in this Series will contain:

Step 5: Create a Codeunit to test Retrieve the data using above DLL and Send data in XML Format using another Web Service exposed in Dot Net.


Please follow my upcoming post for Walkthrough to get above 5 steps done.

To Be Continued……….


Jet Reports

BI Advantage (Web Based Dashboards ) Jet Reports

Web Based Dashboards Provide Insight from Anywhere

Video-1

Video-2

Corfu Navision 2016, Development Tips, How To, IIS, Information, Instalation & Configuration

Configuring SSL to Secure the Connection to Microsoft Dynamics NAV Web Client

It is always recommend that you secure Microsoft Dynamics NAV data that is transmitted over the Internet by enabling Secure Sockets Layer (SSL) on the connection to Microsoft Dynamics NAV Web client.

Enabling SSL on a website requires that an SSL certificate is installed on the web server. An SSL certificate is a small file that the web server uses to prove its identity and establish a trusted connection with the browser that is trying to access Microsoft Dynamics NAV Web client.

When a browser connects to the Microsoft Dynamics NAV Web client, the web server replies by sending its certificate to the browser. This certificate contains the web server’s public encryption key and the name of the authority that granted the certificate. The browser verifies the certificate using the authority’s public key.

Note You can configure SSL for the Microsoft Dynamics NAV Web client when you install the Microsoft Dynamics NAV Web Server components.

Obtaining an SSL Certificate

In a production environment, you should obtain an SSL certificate from a certification authority. Some large organizations may have their own certification authorities, and other organizations can request a certificate from a third-party organization. In a test environment or development environment, you can create your own self-signed certificate.

To create a self-signed SSL certificate

Open Internet Information Services (IIS) Manager, on the Start menu, choose Administrative Tools, and then choose Internet Information Service (IIS) Manager.
IIS-1

  • In the Connections pane, choose the top-level node for the server.
  • On the Home page, under IIS, choose Server Certificates, and then in the Actions pane, choose Open Feature.

IIS-2

  • On the Server Certificates page, choose Create Self-Signed Certificate.
  • In the Specify Friendly Name dialog box, type a brief name for the certificate, and then choose the OK button.

IIS-3

The new certificate appears on the Server Certificate page.
IIS-4

Adding an HTTPS Binding That Uses the Certificate on the Microsoft Dynamics NAV Web Client Site

After you get the certificate, you add a binding to the https protocol on the website. When you add the binding, you associate it with the certificate.

To add an https binding with the certificate to the website

  • Open Internet Information Services (IIS) Manager.
  • In the Connections pane, expand the Sites node, and then choose the Microsoft Dynamics NAV Web client site to which you want to add the binding.

By default, the site has the name Microsoft Dynamics NAV 2016 Web Client.

  • In the Actions pane, choose Bindings.

IIS-5

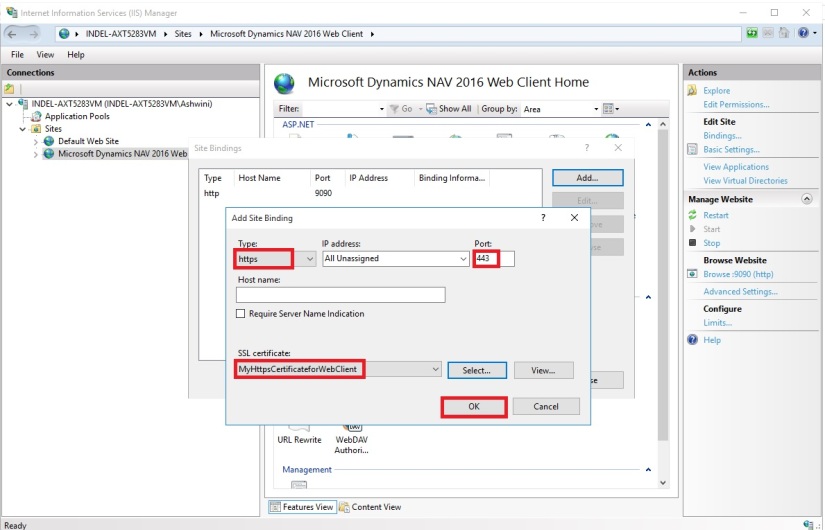
  • In the Site Bindings dialog box, choose Add.
  • In the Add Site Binding dialog box, set the Type field to https.

IIS-6

You can use the default port 443 or change it to another port. If you change it to another port, you will have to provide the port number in the URL when you try to open the client.

  • Set the SSL certificate field to the certificate that you obtained or created for the site.

IIS-7

  • Choose the OK button, and then choose the Close button.

Redirecting HTTP to HTTPS (Optional)

To ensure that users always access the site that is secured with SSL, you can automatically redirect HTTP requests to HTTPS. This means that users do not have to explicitly include https in the URL in the browser.

For example, the nonsecure URL of the Microsoft Dynamics NAV Web client could be

http://mywebclient:8080/DynamicsNAV90/WebClient

The secure URL could be

https://MyWebclient:443/DynamicsNAV90/WebClient

If a user types

http://MyWebclient:8080/DynamicsNAV90/WebClient,

the browser automatically redirects to

https://MyWebclient:443/DynamicsNAV90/WebClient


There are different ways to redirect HTTP requests to HTTPS.

The following procedure describes how to redirect HTTP requests to HTTPS by installing the Microsoft Application Request Routing for IIS 7 and modifying the web.config file for the Microsoft Dynamics NAV Web client.

To redirect HTTP to HTTPS

The web.config file is located in the physical path of the web application on IIS. By default, the path is

%systemroot%\inetpub\wwwroot\[VirtualDirectoryName]\WebClient.

For example, the folder for the default Microsoft Dynamics NAV Web client application is

%systemroot%\inetpub\wwwroot\DynamicsNAV90\WebClient.

  • In the <system.webServer> element, add the following elements.

<rewrite>

<rules>

<rule name=”Redirect to HTTPS”>

<match url=”(.*)” />

<conditions>

<add input=”{HTTPS}” pattern=”off” ignoreCase=”true” />

</conditions>

<action type=”Redirect” url=”https://{SERVER_NAME}/{R:1}” redirectType=”SeeOther” />

</rule>

</rules>

</rewrite>


  • Save the web.config file.


Development Tips, Excel, Instalation & Configuration, Jet Reports, Office Integration, Report

Publishing the Jet Data Source Codeunit to the Web Service

Microsoft Dynamics NAV 2015 includes a “Jet Data Source” codeunit which must be published to enable Jet Essentials or Jet Express to operate. This can be published using the Microsoft Dynamics NAV Role Tailored Client (RTC).

To publish this code unit, inside the RTC go to Departments > Administration > IT Administration > General and select Web Services.

JetExcel-4
Publish the Jet Data Source code unit by selecting New from the Web services ribbon

  • Object Type: Codeunit
  • Object ID: 14125500
  • Service Name: Jet Data Source
  • And check the box to publish.
  • Click OK

Checkout Upcoming posts for more information.

How To, Instalation & Configuration

How to: Enable Web Services for ADCS

To use Automated Data Capture System, you must enable the ADCS web service.

To enable and publish the ADCS web service

Start the RoleTailored client.

In the Search box, enter Web Services, and then choose the related link.

On the Home tab, choose New.

In the Web Services window, enter the following information on a new line:

Field Value
Object Type Codeunit
Object ID 7714
Service Name ADCS

Important: It is required that you name the service ADCS.

Select the Published check box.

Choose the OK button.
ADCS-7
To verify that the web service has been published

In a web browser window, enter a URL in the following format: http://<web services path>/Services. The following example demonstrates the results.

In my case:

http://indel-axt5283n1.tecturacorp.net:8047/DynamicsNAV80/WS/Services

You see the following XML information if the ADCS web service is published.
ADCS-8

To verify that the codeunit is performing as expected, enter a URL in the following format: http://<web services path>/Codeunit/<Service Name>.

http://indel-axt5283n1.tecturacorp.net:8047/DynamicsNAV80/WS/CRONUS%20International%20Ltd./Codeunit/ADCS

Information about the ADCS web service is displayed.

Development Tips

Page Properties Not Supported by Microsoft Dynamics NAV Web Client

Most page properties that are supported in the Microsoft Dynamics NAV Windows client are also supported in the Microsoft Dynamics NAV Web client.

There are some properties that are not supported by Microsoft Dynamics NAV Web client and other properties that are either partially supported or behave differently in the Microsoft Dynamics NAV Windows client.

Unsupported Properties

The properties that are not supported by the Microsoft Dynamics NAV Web client. When a page that contains an unsupported property is displayed in a browser, the property is ignored. You do not receive an error but the property does not affect the page.

  • ChartPartID Property
  • ColumnSpan Property
  • ControlAddin Property
  • FreezeColumnID Property
  • RowSpan Property
  • RefreshOnActivate Property
  • ShowAsTree Property
  • Style Property
  • StyleExpr Property
  • SystemPartID Property

Partially Supported Properties

The properties that either do not have all the capabilities in the Microsoft Dynamics NAV Web client as they do in Microsoft Dynamics NAV Windows client or they behave differently than in the Microsoft Dynamics NAV Windows client.

  • AssistEdit Property
  • DrillDown Property
  • DrillDownPageID Property
  • GroupType Property
  • Importance Property
  • IndentationControls Property
  • PageType Property
  • PartType Property