How To, Information, Instalation & Configuration, Maderia, Tip & Tricks

Using Payment Services – in Madeira

It’s obvious you know we can include link in PDF documents, if you don’t know no issues everything is not known to every one until he uses it or someone inform them. Today we will be learning this feature for making payments using links in your PDF invoices generated from Madeira.

If you had setup the preview this feature is already available in CRONIUS US demo company.

How do we Setup:

Login to Madeira Project using your Credentials.

Click on Search Page from right top corner.

Search for Payment Services page.

PayPalPayment-1


PayPalPayment-2

Open the Page.

Click on Setup and enter your details as shown in above screen.

Click on Maximize button and Show more to see more details.

PayPalPayment-3

Payment Service Link:

In the CRONUS US demonstration company, the payment link inserted into invoices will link to the PayPal test site.

For your actual Company, we will set so that the payment link will point to the real PayPal site, where payments can be made.

It is advisable that not to do this up for the Actual Company until Project “Madeira” is generally available for purchase. And authorized documentation on this feature is released from Madeira.

If you have setup Always Include on Document then you need not to perform any additional step, but in case you want to add the Payments Service Link to individual invoices that too can be done.

Manually Selecting Payment Services:

Open your Invoice on which you want to include this option.

PayPalPayment-4

As you can see in above Invoice no Payment Service is included.

Click on the Lookup on right side of the field.

PayPalPayment-5

Select the Payment Service from the list of available Services, and click on OK.

PayPalPayment-6

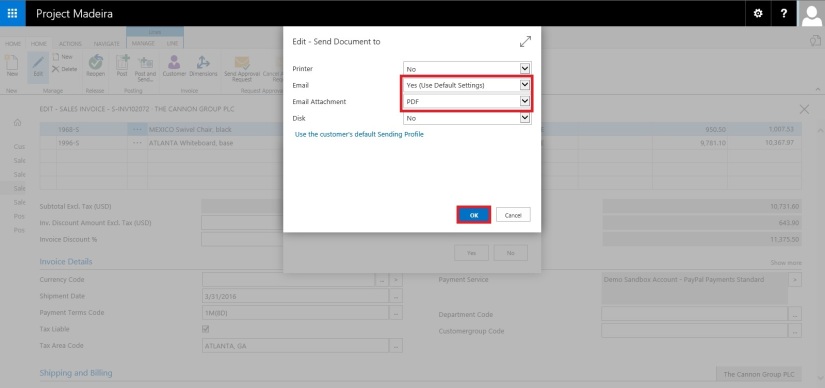
When you send the invoice to your customer the Payment Service Link will be included in the Invoice PDF.

PayPalPayment-7


PayPalPayment-8


PayPalPayment-9


PayPalPayment-10

How it will look in Invoice:

The PDF will contain the link to your selected Payment Service using which your customer can do the payment.

PayPalPayment-11

Stay tuned for more Information in upcoming posts.

Till then keep exploring and learning.


Development Tips, How To, Information, Tip & Tricks, Web Services

Exposing & Consuming the Web service from & inside Navision – Part-4

Continuing from my previous post. Find the link to access the same in case you missed it.

Exposing & Consuming the Web service from & inside Navision – Part-1

Exposing & Consuming the Web service from & inside Navision – Part-2

Exposing & Consuming the Web service from & inside Navision – Part-3


Step 5: Create a Codeunit to test Retrieve the data using above DLL and Send data in XML Format using another Web Service exposed in Dot Net.

How to create WCF Service Application using C#, Publishing it and creating DLL Class Library is out of scope of this document. You may require to take help from guy who are comfortable in .Net technology.

Let’s start with new codeunit, select the available ID in your database and suitable name to save this codeunit.

We will define a Global variable to hold the data we receive from Navision Web Service and pass to Web Service exposed outside Navision.

WebServiceUsage-16

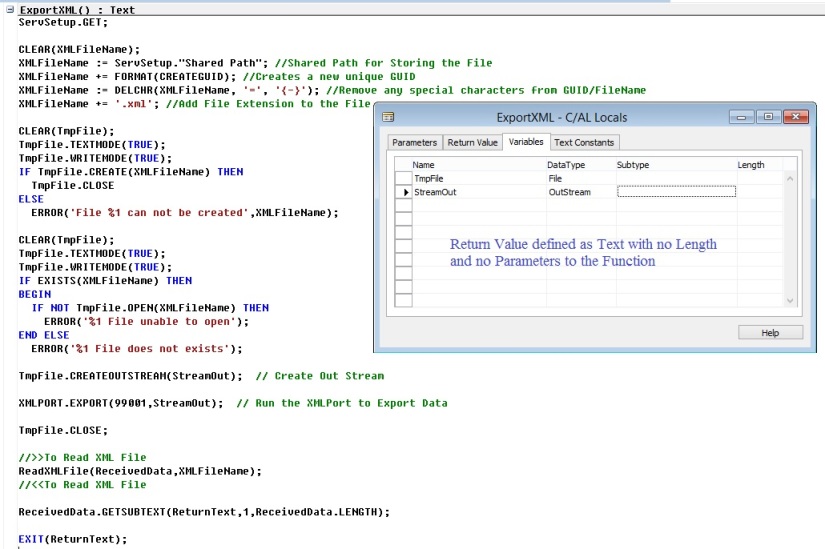
Create a Function to Read/Export the data using Navision Web Service.

Variables defined to the function is also shown in below screen.

We will add the code similar to below. Description provided along with the code in below screenshot.

WebServiceUsage-17

Create a Function to Send Exported data from above function to the Web Service created outside the Navision. Web Service created in DotNet.

Here too we are using DLL file of the Outside Exposed Web Service.

Variables defined to the function is also shown in below screen.

We will add the code similar to below. Description provided along with the code in below screenshot.

WebServiceUsage-18

Now we have our both function ready.

One which Export data consuming the Navision Published Web Service and then read the data in BigText Variable and finally converted to Text variable.

Second one will send data consuming the Web Service Exposed outside Navision created in DotNet. 

Let us test our process if it works as desired.

We will call above both function.

When we call First Web Service as a result we get the XML format file data in my Global defined Text Variable.

We will review the data which we are going to send to Second Web Service on Screen for which we are simply calling the Message.

Finally we will send the data to the Second Web Service, the content of XML file stored in our Global Variable.

Code we use is as below shown screenshot.

WebServiceUsage-19

Save the codeunit and execute, as we have written our test code in Run trigger so we can directly run this codeunit.

The output will be as shown in below screenshots.

Until this step our Data is Exported and data is loaded in Global defined Text variable.

WebServiceUsage-20

Here the content of Text variable is shown in Message window, which we can verify the data which we are going to send to the external Web Service.

WebServiceUsage-21

As a final step we are sending this content to the External Web Service Exposed using DotNet.

WebServiceUsage-22

Verify the data received at the DotNet side. You can program the Second Web Service as save the content on disk as file or perform any processing like inserting those data in some other table or displayed on screen. 

That’s it for this series.

I will be posting couple of more posts on Web Services soon.

Since this was in response of request from one of my reader so I stick to the requirement.

In my other post I will show some different flavour of using the same.

Till then keep exploring and learning.

Will be back with other posts soon.

Development Tips, How To, Tip & Tricks, Web Services

Exposing & Consuming the Web service from & inside Navision – Part-3


Continuing from my previous post. Find the link to access the same in case you missed it.

Exposing & Consuming the Web service from & inside Navision – Part-1

Exposing & Consuming the Web service from & inside Navision – Part-2


Step 4: Create a DLL to use as Add-in to consume the Web Service itself in Navision.

We will start with Class Library Project in Visual Studio.

It’s very simple with few steps to follow, and we will be done with our requirement.

Enter Name and select the path for your project solution folder. In my case I am saving my project to the default location of Visual Studio. And I am naming my project as XMLData.

WebServiceUsage-8

Right click on the project folder and Add Service reference to the project.

WebServiceUsage-9

Enter your Web Service URL and click on GO.

Once your Service is listed, enter the Reference Namespace. And click on OK to add the Service Reference to the project.

WebServiceUsage-10

Click on app.config in Solution browser to open.

Verify your code similar to below.

WebServiceUsage-11

Build your Project to obtain the .dll file.

WebServiceUsage-12

Below screen shows we have no errors and the .dll file is created successfully.

WebServiceUsage-13

Locate the .dll file in your Project folder similar to path shown below. Copy your dll file.

WebServiceUsage-14

Create a folder and paste your .dll file to Service & RTC folder, as shown in below screen.

WebServiceUsage-15


We are ready with the Add-in, which we will use in our next post to consume our service with the help of this dll, and call the method to obtain our file for further processing.

That’s all for this post, I will be back with next post in series soon.

Till then keep practicing.


To be Continued….


Data, Development Tips, How To, Information, Tip & Tricks, Web Services, XMLports

Exposing & Consuming the Web service from & inside Navision – Part-2

Continuing from my previous post. Find the link to access the same in case you missed it.

Exposing & Consuming the Web service from & inside Navision – Part-1


Step 1: Create a XML Port to Export Data in XML Format using XMLPort and save at some specified Location.

Here we will be creating just for demo purpose simple XMLPort for Exporting Data from Navision Database in XML Format.

WebServiceUsage-2

We are using very simple structure for our XMLPort.

Make sure you set the properties accordingly as we are exporting the data in XML Format.

WebServiceUsage-3

Save the XMLPort at available id and suitable name.


Step 2: Create a Codeunit to call XML Port and retrieve data in XML Format in Text Variable.

Here we will create a Codeunit with few helpful functions which will call the XMLPort to Export the data and save in temp file.

Further retrieve the data from the file in XML Format.

Return the data retrieved above to the calling program/ function.

To start with let us start with creating some Global Variables.

WebServiceUsage-4

Next we will add one Function as below.

WebServiceUsage-5

Next we will add one more Function as below.

WebServiceUsage-6

Save the Codeunit at available Id and suitable Name.


Step 3: Expose/Publish the Codeunit as web service.

Open Web Services Page and add your Codeunit created above. Use your relevant ID on which you saved your Codeunit.

WebServiceUsage-7


Tick the Published to Expose the Codeunit as Web Service.

Rest in my Next post.

To Be Continued……

Data, Development Tips, How To, Information, Tip & Tricks, Web Services, XMLports

Exposing & Consuming the Web service from & inside Navision – Part-1

Introduction

Today in reply to one of my reader I am giving here steps how we can Export data using XMLPort and transfer data outside Navision using Web Services.

Lets discuss about the technology before I jump to the solution.

Few full forms which may help understanding while reading this post.

W3C – Web Services Architecture Working Group.

SOAP – Simple Object Access Protocol.

REST – Representational State Transfer.

WSDL – Web Service Description Language.

UDDI – Universal Description, Discovery & Integration.

AWS – Arbitrary Web Services.

XML – Extensible Markup Language.

HTTP – Hypertext Transfer Protocol.


What is Web Service?

W3C defines Web Service as : A software system designed to support interoperable Machine-to-Machine interaction over a network.

Web service can be defined as service offered by an electronic devices to another electronic devices, which communicate with each other over www.

W3C defines web services has an interface described in a machine-process able format WSDL.

Other systems I with the web service in a manner prescribed by its description using SOAP messages, typically conveyed using HTTP with an XML serialization in conjunction with other web-related standards.

Later W3C extended the definition:-

REST – compliant web services, in which the primary purpose of the service is to manipulate representations of web resources using a uniform set of stateless operations.

Arbitrary Web Services –  the services may expose an arbitrary set of operations.

WebServiceUsage-1-2

UDDI  defines which software system need to be contacted for which type of data.

Once the system is discovered to be contacted, the contact is established using SOAP.

Service provider system validate the request by referring the WSDL file, process the request and send the data using SOAP protocol.


Web Service is a method of communication that allows two software system to exchange the data over the internet.

  • Two systems may use different software which could be using different programming languages.
  • Almost all type of software interpret XML tags.
  • Web Services can be used to exchange data between two systems in form XML files.

WebServiceUsage-1-3

XML is used to tag the data.

SOAP is used to transfer the data.

WSDL is used to describe the services available.

UDDI lists what service are available.

Human to machine communication is utilized for machine-to-machine communication, used for transferring machine readable files such as XML & JSON formats.

Web services use SOAP over HTTP protocol, facilitating to use your existing low-cost internet for implementing Web Service.

Rules for communication between two different systems:

All the rules are defined in WSDL file.

  • How request to be send from one system to another.
  • What all parameters need to be send while requesting data.
  • What structure to be used for generating data (Normally data is exchanged in XML format) which is validated against .xsd file.
  • What errors to be generated in case of failure of rule communication set.


Web Services that uses Markup Language:

  • JSON-RPC
  • JSON-WSP
  • Web template
  • Web Service Description Language (WSDL)
  • XML Interface for Network Services (XINS)
  • Web Services Conversation Language (WSCL)
  • Web Services Flow Language (WSFL)
  • WS-Meta data Exchange
  • Representational State Transfer (REST)
  • Remote Procedure Call (RPC)
  • XML Remote Procedure Call (XML-RPC)


No more theories lets come to our point.

There are other ways too to achieve the same, but here I am specific to the requirement to which I am answering.

Requirement is the Data in XML format file will be transmitted using Web Service, We will be using Navision Exposed Web Service to Export data using XMLPort and then send the content by consuming another Web Service exposed in Dot Net which will retrieve the XML content and update in some other system.

Assumption is these two endpoints can be two separate databases in same domain or two different companies of same organization operating at two different location sharing information via Web Services.

For the demo purpose I will be using Navision to publish the service for exporting the data and retrieve the data using Web Service exposed in Dot Net.

Since I have not in depth knowledge of Dot Net codes, so I have asked my college to prepare the Web Service for me and I am simply using it to show how we can do it.

Here I will be getting this done through below 5 Steps.

WebServiceUsage-1

Next Post in this Series will contain:

Step 1: Create a XML Port to Export Data in XML Format using XMLPort and save at some specified Location.

Step 2: Create a Codeunit to call XML Port and retrieve data in XML Format in Text Variable.

Step 3: Expose/Publish the Codeunit as web service.


Next Post in this Series will contain:

Step 4: Create a DLL to use as Add-in to consume the Web Service itself in Navision.


And the Final Post in this Series will contain:

Step 5: Create a Codeunit to test Retrieve the data using above DLL and Send data in XML Format using another Web Service exposed in Dot Net.


Please follow my upcoming post for Walkthrough to get above 5 steps done.

To Be Continued……….


Development Tips, Excel, Instalation & Configuration, Jet Reports, Report

Enable SOAP Services and identify connection parameters

Jet express calls Web Services (SOAP) when running reports or accessing information from

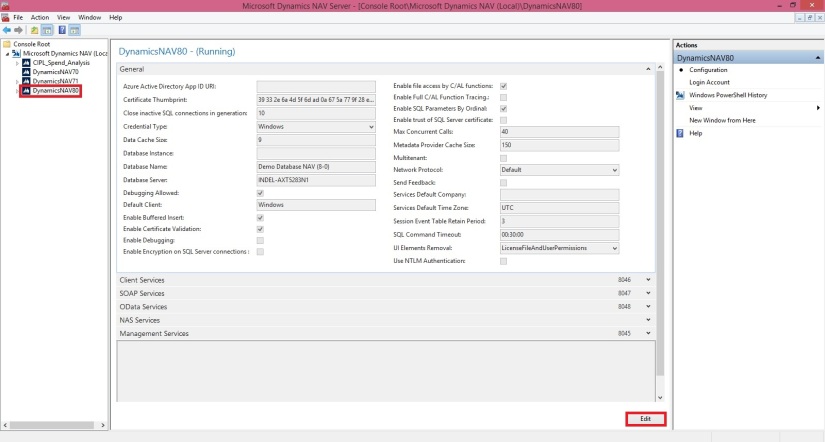
Microsoft Dynamics NAV 2015. Using the Microsoft Dynamics NAV Server Administration Tool select the instance that you want to use and check the box next to Enable SOAP Services.

If Jet Express will be used outside a secure network then SSL should be enabled for the SOAP Services to help provide security and data integrity for data communications.
JetExcel-5
From the Microsoft Dynamics NAV Server Administration Tool record the

  • Credential Type
  • Server Name
  • Instance (note: for performance reasons, it is strongly recommended that a separate instance be created solely for use by Jet Express)
  • SOAP Services Port
  • Whether SSL is enabled for SOAP Services

This information is required for configuring your data source connection in Jet Express on client machines.

Note – You cannot run both Jet Express and Jet Essentials on the same computer.

Checkout Upcoming posts for more information.

How To, Instalation & Configuration

How to: Enable Web Services for ADCS

To use Automated Data Capture System, you must enable the ADCS web service.

To enable and publish the ADCS web service

Start the RoleTailored client.

In the Search box, enter Web Services, and then choose the related link.

On the Home tab, choose New.

In the Web Services window, enter the following information on a new line:

Field Value
Object Type Codeunit
Object ID 7714
Service Name ADCS

Important: It is required that you name the service ADCS.

Select the Published check box.

Choose the OK button.
ADCS-7
To verify that the web service has been published

In a web browser window, enter a URL in the following format: http://<web services path>/Services. The following example demonstrates the results.

In my case:

http://indel-axt5283n1.tecturacorp.net:8047/DynamicsNAV80/WS/Services

You see the following XML information if the ADCS web service is published.
ADCS-8

To verify that the codeunit is performing as expected, enter a URL in the following format: http://<web services path>/Codeunit/<Service Name>.

http://indel-axt5283n1.tecturacorp.net:8047/DynamicsNAV80/WS/CRONUS%20International%20Ltd./Codeunit/ADCS

Information about the ADCS web service is displayed.

Development Tips

Configuring Web Services to Use SSL (SOAP and OData)

Secure Sockets Layer (SSL) is a cryptographic protocol that helps provide security and data integrity for data communications over a network.

By encrypting your Microsoft Dynamics NAV web services using SSL, you make your data and the network more secure and more reliable.

Microsoft Dynamics NAV Web Services and SSL

Microsoft Dynamics NAV supports SSL authentication for SOAP and OData web services.

The server authenticates itself to the client, but the client does not authenticate itself to the server.

When the web service client connects to the Microsoft Dynamics NAV Server instance, the server replies by sending its digital certificate to the client. This certificate contains the server’s public encryption key and the name of the authority that granted the certificate. The client verifies the certificate using the authority’s public key.

We have covered above top related to Creating and Implementing Certificates for Microsoft Dynamics NAV Server. If not seen please follow below links for better understanding:

How to create a root CA and a private key file by using the makecert.exe utility

How to create certificate revocation list for the root certification authority

How to create and install a test certificate for the Microsoft Dynamics NAV Server computer

How to grant access to the certificate’s private key to the service account for the Microsoft Dynamics NAV Server

Implementing Security Certificates.

Configuring Microsoft Dynamics NAV Web Services to Use SSL

The first step is to prepare Microsoft Dynamics NAV to use SSL. This involves configuring the relevant Microsoft Dynamics NAV Server instance to specify SSL.

The following procedure uses Microsoft Dynamics NAV Server Administration tool to configure the Microsoft Dynamics NAV Server instance.

  • Choose the Start button, and in the Search programs and files box, type Microsoft Dynamics NAV Administration, and then choose the related link.
  • In Microsoft Dynamics NAV Server Administration tool, in the left pane, under Console Root, expand the node for the Microsoft Dynamics NAV Server computer. This is typically named Microsoft Dynamics NAV (Local), which is the local computer.

The Microsoft Dynamics NAV Server instances on the computer appear in the left pane and center panes.

In the left pane, choose the relevant instance to display settings for that instance in the center pane.

UseSSL-1

  • At the bottom of the center pane, choose Edit.
  • To configure SOAP web services to use SSL, expand the SOAP Web Services tab, and then select the Enable SSL

Make a note of the port that is used by SOAP web services. You will need the port number later on in this walkthrough.

UseSSL-2

  • To configure OData web services to use SSL, expand the OData Web Services tab, and then select the Enable SSL

Make a note of the port that is used by OData web services. You will need the port number later on in this walkthrough
UseSSL-3

  • Choose Save at the bottom of the center pane.
  • In the right pane, under Actions, choose Login Account.
  • Make a note of the service account information. You will need this information later on in this walkthrough.

UseSSL-4

Configuring the Access Control List and the Web Services Ports for SSL

An access control list (ACL) is part of the Windows security infrastructure and features. The ACL controls who can access resources on a computer.

Note

These procedures use the netsh tool (netsh.exe) for configuring the HTTP server. The netsh tool is supplied with Windows 7 and Windows Server 2008.

By default the netsh tool is located in the c:\Windows\System32 folder.

To configure the ACL

  1. On the computer running Microsoft Dynamics NAV Server, open a command prompt as an administrator as follows:
    1. From the Start menu, choose All Programs, and then choose Accessories.
    2. Right-click Command Prompt, and then choose Run as administrator.
  1. At the command prompt, type the following command to change to the Windows\System32 directory.

cd\Windows\System32

  1. To view the ACL for the web services ports to determine if any entries are already using the relevant host name and port, type the following command:

netsh http show urlacl

  1. Each entry is listed by the Reserved URL field, which has the format http://hostname:port. hostname is the name of the computer running the service and port is the port number the service runs on. A ‘+’ (plus sign) in the Reserved URL field represents localhost, which indicates the computer that you are working on.
  2. By default, SOAP and OData web services in Microsoft Dynamics NAV use ports 7047 and 7048, respectively, and connect to a Microsoft Dynamics NAV Server instance named DynamicsNAV80. The default reserved URL entries for these services are: http://+:7047/DynamicsNAV80/ and http://+:7048/DynamicsNAV80/.
  3. You must delete any entries that use the same port as the SOAP or OData web services.

To delete an entry, type the following command:

netsh http delete urlacl url=http://hostname:Port/NAVserver/

Substitute Port with the port number of the SOAP or OData web service and NAVserver with the name of the Microsoft Dynamics NAV Server instance.

For example, to delete the default entries for SOAP and OData, use the following two commands:

netsh http delete urlacl url=http://+:7047/DynamicsNAV80/

netsh http delete urlacl url=http://+:7048/DynamicsNAV80/

  1. To register the ports for the SOAP and OData web service with https, type the following command for each service:

netsh http add urlacl url=https://hostname:port/navserver user=DOMAIN\user

  1. Substitute the following options with the proper values:
Option Description
hostname The name of the computer running Microsoft Dynamics NAV Server. Use + for localhost.
port The port that is used by the web service.
navserver The name of the Microsoft Dynamics NAV Server instance to use with the web service. The default is DynamicsNAV80.
DOMAIN\username The domain and user name of the service account for Microsoft Dynamics NAV Server. If the service account for Microsoft Dynamics NAV Server is Network Service, then use “NT AUTHORITY\NETWORK SERVICE”.
  1. For example, if the service account for Microsoft Dynamics NAV Server has the domain ABC and the user name xyz, and then the command for the SOAP web service is as follows:

netsh http add urlacl url=https://+:7047/DynamicsNAV80 user=”NT AUTHORITY\NETWORK SERVICE”

  1. If the service account for Microsoft Dynamics NAV Server is Network Service, then the command is as follows:

netsh http add urlacl url=https://+:7047/DynamicsNAV80 user=”NT AUTHORITY\NETWORK SERVICE”

  1. To verify that your port has been registered, repeat step 3.

To configure the port to use the SSL certificate

  1. At the command prompt, type the following command to view the current port configurations:

netsh http show sslcert

  1. All port bindings to SSL certificates are listed. Each entry is indicated by the IP:port field, where IP is the IP address that uses the port (0.0.0.0 indicates all IP addresses) and port is the port number.
  2. If SSL is already configured on the address and port that you want to use for SOAP or OData web services, then use the following command to delete the entry:

netsh http delete ssl ipport=ipaddress:port

  1. Substitute ipaddress and port with the IP address and port number of the entry that you want to delete.
  2. For example, to delete the entry on the default SOAP port, use the following command:

netsh http delete ssl ipport=0.0.0.0:7047

  1. To bind an SSL certificate to the SOAP or OData web service port, use the following command:

netsh http add sslcert ipport=ipaddress:port certhash=thumbprint appid={id}

  1. Substitute the following options with the proper values:
Option Description
ipaddress The IP address that can use the web service. Use 0.0.0.0 to include all IP addresses.
port The port that is used by the web service.
thumbprint The certificate thumbprint that you obtained in previous post.
id A 32-digit hexadecimal number that identifies the Microsoft Dynamics NAV application. The id must be in the format {NNNNNNNN-NNNN-NNNN-NNNN-NNNNNNNNNNNN). If you do not know the appid, then use any value, such as {00112233-4455-6677-8899-AABBCCDDEEFF}.
  1. For example, the following command binds a certificate that has the thumbprint c0d0f27095b03d4317e219841024328cef248779 to port 7047 for all IP addresses:

netsh http add sslcert ipport=0.0.0.0:7047 certhash=c0d0f27095b03d4317e219841024328cef248779 appid={00112233-4455-6677-8899-AABBCCDDEEFF}

Imp Note: – Please replace the port and thumbprint values with your valid values.

Restart the Microsoft Dynamics NAV Server Instance

You can use the Microsoft Dynamics NAV Server Administration Tool to restart the Microsoft Dynamics NAV Server instance.

To restart Microsoft Dynamics NAV Server

  1. In Microsoft Dynamics NAV Server Administration tool, in the left pane, under Console Root, choose the Microsoft Dynamics NAV Server computer.
  2. In the center pane, choose the Microsoft Dynamics NAV Server instance that you have configured, and then in the right pane under Actions, choose Restart.
  3. After the instance restarts, close Microsoft Dynamics NAV Server Administration tool.

Verifying the Configuration

You should now be able to use web services that are encrypted with SSL. To verify this, type the following URL in the address bar for your browser.

https://localhost:7047/DynamicsNAV80/WS/services

The page lists any web services that have been published.