Development Tips, How To, Information, Report, Tip & Tricks

Open Report Design in Visual Studio from Custom Report Layouts

You may have noticed that when we try to edit Report Layout from Custom Report Layouts Page, it always open in Word or Report Builder no direct option to edit it in Visual Studio.

This requirement leaded to the necessity of the below customization, It can be done other ways also but the easiest way to do it one which i am going to discuss in my today’s post. Hope you will like it.

CustRepLayout-1

I have provided with the option where user can select the desired Editor either he wants to open it in Report Builder or Visual Studio.

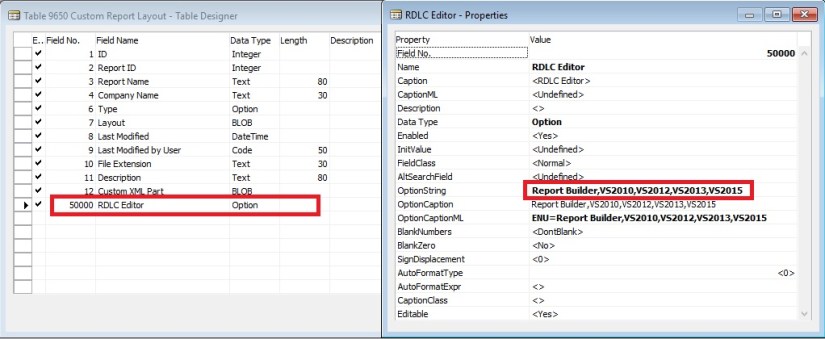
To achieve this i have added one field in Table 9650 – Custom Report Layout with desired options as shown below.

CustRepLayout-2

And made this field available in Page Custom Report Layouts – 9650 as shown below.

CustRepLayout-3

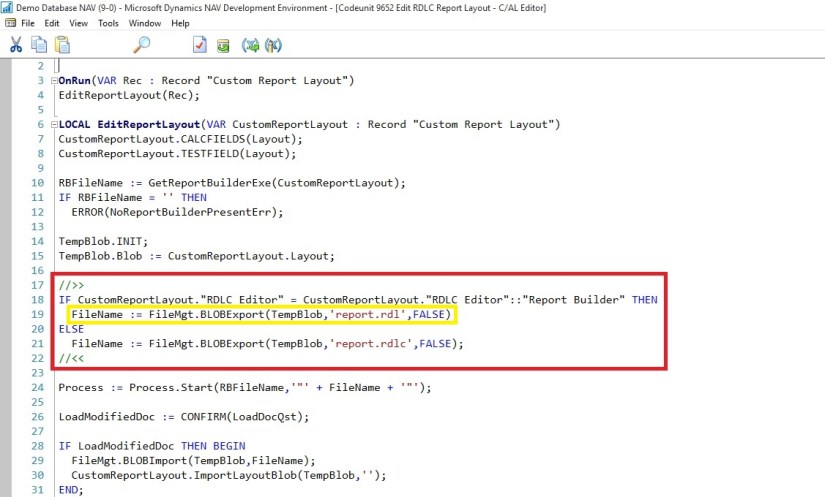
Now in Codeunit 9652 – Edit RDLC Report Layout I have replaced the code shown in Yellow with the code shown in Red box.

CustRepLayout-4

CustRepLayout-5

Thats all, what you are waiting for go-ahead and design the reports in your way.

I will come up with more other topics in my upcomming posts, till then keep practicing and learning.


Advertisement
Report

Word Document Reports and Custom Layouts

Reporting functionality has been greatly improved in Microsoft Dynamics NAV 2015 by adding support for defining report layouts in Word, and enabling end users to create custom RLDC and Word layouts for their reports. These two features make it easier to create visually pleasing document reports, as well as allow end users to modify reports to their liking with as little partner involvement as desired.

Today I am sharing again all the posts from earlier archive, if you missed you can find all of them below.

Soon I will come up with more posts on this topic. Till then go through below links and develop your skills so that we can take up few more complex ones.

  1. How many types of Layout is supported in NAV 2015?
  2. How to. Specify the Default Built-in Report Layout
  3. Import and Export a Word Report Layout
  4. Add Fields from a Report Dataset to a Word Report Layout
  5. Adding Image Fields
  6. Removing Label and Data Fields
  7. To create a Word report layout for a report
  8. Designing Report Layouts from the Microsoft Dynamics NAV Development Environment
  9. Creating my first Word List Report in Navision 2015
  10. To modify the Word report layout
  11. Creating Custom Word Layout for Document Reports in Navision 2015
  12. Creating Word Mail Merge Report in Microsoft Dynamics Navision 2015
  13. The New Report Scheduling feature for end users running reports in Microsoft Dynamics Navision 2015
Report

Creating Custom Word Layout for Document Reports in Navision 2015

Open the MS Office Word.

File -> New and type Invoice in search and press enter to list available Invoice Templates.

Document Reports -1

In my example I am using [Sales Invoice (Blue Border Design)]

Document Reports -2

Select Create to download the template and create a document for you.

Your new document created from this template will look as below:

Document Reports -3

Prepare the Layout by removing extralines as we will be using repeating lines for Lines.

Save your Template.

I have made a copy of Report 206 – Sales – Invoice on new ID say (50005 as Sales – Invoice Word).

This report dosen’t have Word Layout. We will be creating one Customize Layout form above saved Invoice above. [Sales Invoice (Blue Border Design)]

Open Report Layout as shown in below Screen:

Document Reports -4

Document Reports -5

Slect the Report and choose Custom Layout as shown in above screen.

Document Reports -6

In Custom Report Layout Window Click on New.

From window Insert Build-in Layout for Report Select Insert Window Layout and click OK button.

Document Reports -7

From Custom Report Layout window Select Import Layout, Select your word file prepared above and Respond Open to Import.

Document Reports -8

Then, press Edit Layout and prepare layout on Developer tab, find XML Mapping Pane and find your document in Custom XML Part.

Now, you can find all fields from Dataset.

Document Reports -9

Please see below links to complete your report:

Adding image fields

Add fields from a report dataset to a word report layout

Creating my first word list report in Navision 2015

How to specify the default built in report layout

Create a word report layout for a report

Once you are done with your field assignment close the word layout.

Document Reports -10

Select Yes to import changes to the report.

Document Reports -11

Select Run Report to view the output of your report.

Now you are done with your Custom Report Layout.

Please see sections which will be more helpful to complete your task:

Reports

Report

Designing Report Layouts from the Microsoft Dynamics NAV Development Environment

After you have created a dataset for a report, you design the report layout. The report layout determines how the report looks when it is viewed, printed, and saved from the Microsoft Dynamics NAV client. The report layout specifies which fields of the dataset are included in the report and how they are arranged, the format of text that appears on the report (such as font type and color), margins, background images, and more.

You generally display most data in the body of a report, and you use the header to display information before any dataset fields are displayed. For example, you can display a report title, company, and user information in the header of a report.

Report Layout Types

There are two types of report layouts: Word and Client Report Language Definition (RDLC). Word report layouts are based on a Word document (.docx file type) and are created and modified by using Word 2013. RDLC report layouts are .rdlc or .rdl file types that are created and modified by using Visual Studio 2013 or SQL Server Report Builder 3.0.

Built-in and Custom Report Layouts

In the Microsoft Dynamics NAV Development Environment, you can create both an RDLC report layout and Word report layout on a report. These layouts are referred to as built-in layouts because they are part of the report object in the database. This means, for example, if you export the report object as a .fob or .txt file, the RDLC report layout and Word report layout are included. A report can only have one built-in RDLC report layout and one built-in Word report layout. By default, the built-in RDLC report layout is used when the report is run in the Microsoft Dynamics NAV client unless there is only a built-in Word report layout, in which case, the built-in Word report layout is used.

Microsoft Dynamics NAV users can specify whether to use the built-in RDLC or Word report layout on a report from the Microsoft Dynamics NAV Windows client and Microsoft Dynamics NAV Web client. From the client, users can also create custom report layouts that are based on the built-in report layouts. This enables users to have several different layouts for the same report which they can switch among. Custom report layouts are managed from page 9650 Report Layouts in the Microsoft Dynamics NAV client. Unlike built-in report layouts, which are part of the report object, custom report layouts are stored in table 9650 Report Layouts of the database.

Report Layouts in a Multitenant Deployment

In a multitenant Microsoft Dynamics NAV deployment, the built-in report layouts are stored in the application database because they are part of the report objects. Therefore, built-in report layouts are available to all tenants. Custom report layouts are stored in the business data database; therefore they are specific to the tenant. This enables you to create separate report layouts for each tenant.

Report

Add Fields from a Report Dataset to a Word Report Layout

A report dataset can consist of fields that display labels, data, and images. This topic describes procedure for adding fields of a report dataset to an existing Word layout of a report. You add fields by using the Word custom XML part for the report and adding content controls that map to the fields of the report dataset.

To display the Custom XML part for the Report in Word

  1. Open the Word report layout document in Word for editing.
  2. Show the Developer tab in the ribbon of Word.

By default, the Developer tab is not shown in the ribbon.

  1. On the Developer tab, choose XML Mapping Pane.
  2. In the XML Mapping pane, in the Custom XML Part list, choose the XML part for Microsoft Dynamics NAV report. The name of the XML part has the following format:

urn:microsoft-dynamics-nav/reports/report_name/ID

report_name is the name that is assigned to the report as specified by the report’s Name Property.

ID is the identification number of the report.
XMLDataSet
After you select the XML part, the XML Mapping pane displays the labels and field controls that are available for the report.

To add a label or data field

  1. Place your pointer in the document where you want to add the control.
  2. In the XML Mapping pane, right-click the control that you want to add, choose Insert Content Control, and then choose Plain Text.

AddDataField

Note

You cannot add a field by manually typing the dataset field name in the content control. You must use the XML Mapping pane to map the fields.

To add repeating rows of data fields to create a list

  1. If not already existing, add a table row that includes a column for each field that you want repeated.

This row will act as a placeholder for the repeating fields.

  1. Select the whole row.
  2. In the XML Mapping pane, right-click the control that corresponds to the report data item that contains the fields that you want repeated, choose Insert Content Control, and then choose Repeating.

AddRepeatingField

  1. Add the repeating fields to the row as follows:
    1. Place your pointer in a column.
    2. In the XML Mapping pane, right-click the control that you want to add, choose Insert Content Control, and then choose Plain Text.

InsertContentField

  1. For each field, repeat steps a and b.