AL, API, Business Central, Development Tips, Extension Package, Headline, How To, HTTP, Information, JSON, Role Center, Tip & Tricks, V2, Visual Studio Code

Working with Headline Role Center Page and HTTP Call – Business Central

I am again back with my First post of 2019. Hope you all enjoyed New Year Parties.

Wishing you all readers again Happy New Year.

Today we will play around Role Center Headline Page and add our Message to it.

You have below 9 Headline RC Pages.

1440 Headline RC Business Manager
1441 Headline RC Order Processor
1442 Headline RC Accountant
1443 Headline RC Project Manager
1444 Headline RC Relationship Mgt.
1445 Headline RC Administrator
1446 Headline RC Team Member
1447 Headline RC Prod. Planner
1448 Headline RC Serv. Dispatcher

HLRC-1

So let’s start with our task.

Step: 1 –

To be able to complete today’s customization you will require an account to any API weather forecast provider. Here I provide you with the free service, not all features are free, but sufficient to complete our task.

Open https://openweathermap.org/ page and register to the service. You will receive an API key upon sign up. This is required when you make an API Web Service call.

Step: 2 –

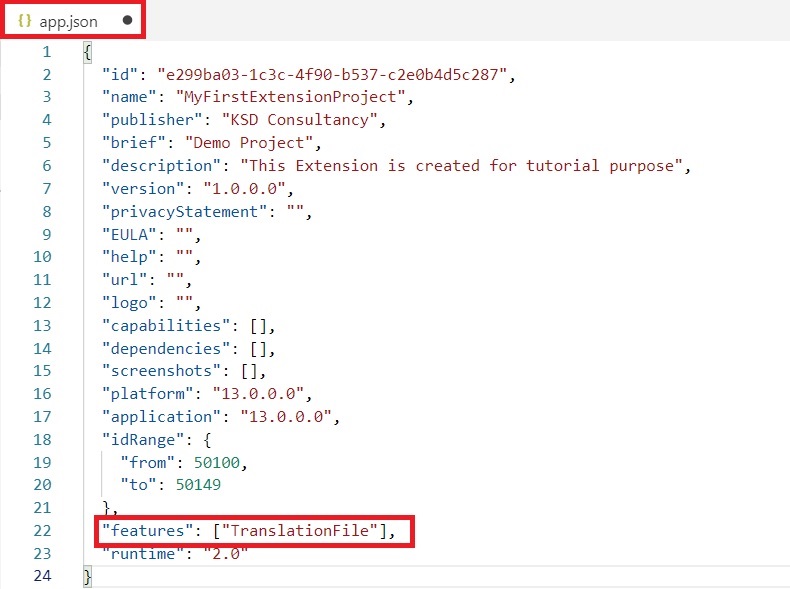
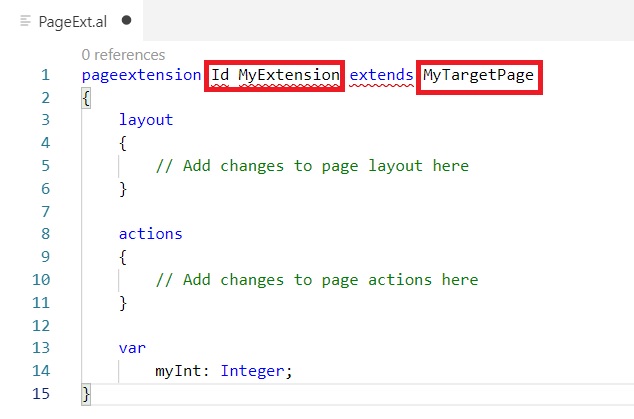
Open your Extension Project and create one New AL file for Page Extension

HLRC-2

We will simply add one field to the Page.

Step: 3 –

This is the main part of this functionality:

We will write a procedure for Querying the current temperature of the city using API call and extract information from the response and add to the Headline.

Response are available in other formats too, but I am using JSON in my example. You can select your format you are comfortable with. You will find all details on the website API section.

Below will be our API call syntax:

http://api.openweathermap.org/data/2.5/weather?q=’ + City +                            ‘&units=metric&APPID=16ea4cf53127aa3baa74d4072381ba62’

To get data in API for current weather in Kelvins do not indicate units parameter into your API call.

To get in Fahrenheit add units=imperial parameter.

To get in Celsius add units=metric parameter.

API Key :- &APPID=16ea4cf53127aa3baa74d4072381ba62 – Compulsory

You will receive JSon response as below:

JSONText Value will be similar to below:

{“coord”:{“lon”:77.41,”lat”:28.67},

“weather”:[{“id”:711,”main”:”Smoke”,”description”:”smoke”,”icon”:”50n”}],

“base”:”stations”,

main“:{“temp“:292.15,”pressure”:1019,”humidity”:48,”temp_min”:292.15,

“temp_max”:292.15},

“visibility”:1800,

“wind”:{“speed”:1,”deg”:210},

“clouds”:{“all”:0},

“dt”:1546432200,

sys“:{“type”:1,”id”:9165,”message”:0.004,”country“:”IN”,”sunrise”:1546393411,

“sunset”:1546430725},

“id”:1271308,

name“:”Ghaziabad”,

“cod”:200}

HLRC-3

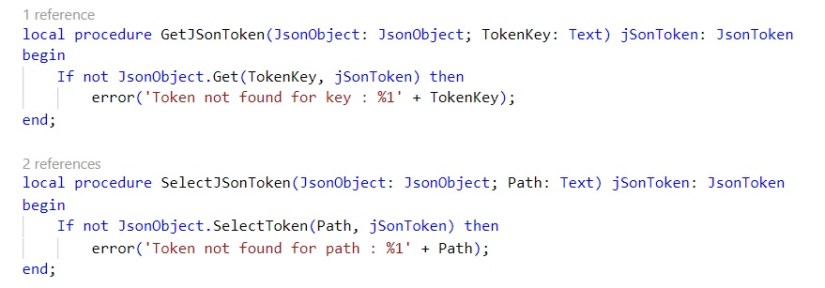
Below is the 2 functions used to extract the Information from JSon Response:

HLRC-4

Step: 4 –

Save and Publish your Extension.

Open Web Client, make sure RC Business Manager profile is selected for your account or whichever Headline RC you have extended for above step.

You will see the Temperature of your selected city, as shown in the beginning of the post.

You can use similar concept to add your customized Headline to your Role Center Page.

See you again in my next post with some other concept, tips & tricks. Till then keep exploring and learning. Take care.

AL, Business Central, Development Tips, File, How To, Information, InStream, Modern Development Tool, OutStream, Tip & Tricks, V2, Visual Studio Code, XMLports

File Handling using Stream – Business Central

Today in this post we will discuss about using Stream to Export or Import Files or in other words File handling using Streams.

First Example I am discussing about is how to Import Image to Item Picture.

First part of the code checks for if any existing Picture in the records Picture field, here we use Count to check, because Picture field is defined as MediaSet can hold multiple picture, so giving warning for Overwrite.

In Second part we are Uploading the Selected Image to the InStream.

Finally we clear the Picture field and load Picture from InStream, here file name will be used as description for the image.  And save the record post importing of the Image.

Below code sequence is self explanatory.

StreamImpImage

In Second example we are Exporting the image from the record, any/all images stored in Picture field of the Item record.

Again we are testing with Count if any Image stored, else flag the Error nothing to Export as record don’t have any picture stored.

As told above since it is MediasSet type so possibility of more than one Image may have been stored, so we setup for loop to access all of them.

In TenantMedia table all Images are stored with unique GUID, so we get them each by Item(index).

Calcfields used to load the content in memory and final checking if it HASVALUE.

We build the filename as Item_Image1.ext, we will look into GetImgFileExt function below.

Next we load the Image in InStream.

Finally we save the Image on disk by specified filename.

StreamExpImg

This below function we use to find right extension of the file from TenantMedia field Mime Type.

StreamGetFileExt

In last and below function we are using TempBlob Table and Stream to handle file.

We create the OutStream of BlobTable Blob Field, set it as destination for my Export XML Port.

Further creating the InStream we are transferring the content of Blob to the File.

StreamExportContact

Hope you will start using this technique in your future projects, when working with File Handling.

We will discuss on other concepts in our upcoming posts.

Not sure if this is my Last post for this year, so wishing you Happy New Year 2019 in advance.

Keep practicing and learning, see you again in my next post.

Till then bye, take good care of your self and remain safe.


AL, Business Central, Development Tips, Extension Package, How To, Information, Language Module, Modern Development Tool, Multilanguage, Tip & Tricks, Translations, V2, Visual Studio Code

Enabling Multilanguage Support to Extensions – Business Central

Microsoft Dynamics 365 Business Central is Multilanguage enabled, which means that you can display the user interface (UI) in different language.

To add a new language to the extension you have built, you must first enable the generation of XLIFF files.

The XLIFF file extension is .xlf.

The support for using the ML properties, such as CaptionML and TooltipML, is being deprecated, so it is recommended to refactor your extension to use the corresponding property, such as Caption or Tooltip, which is being picked up in the .xlf file.

You can use the .xlf translation files approach only for objects from your extension.

It’s an XML-based format used to standardize localization.

Step – 1

To be able to work with translation files, you need to add a Feature to the app.json file.

Trans-1

This Feature is TranslationFile.

Step – 2

When we save our app.json file, we can see immediately that we get some warnings.

Trans-2

This warning is telling us that the Multilanguage syntax is being deprecated and that we have to update to the new syntax.

The new syntax requires us to remove all the ML properties, such as the caption ML and the option caption ML, and we have to use a regular Caption and OptionCaption properties.

We use Labels at place of Text Constants.

Trans-3

Let’s fix these issues. Any ML properties like Caption ML, Option Caption ML or Text Constants. Replace them with Caption and Label.

Before we start some important points:

  • The New translation process decouples translation from development.
  • New Label syntax – Default translation & Some attributes.
  • Translation file can be combined with the extensions to support Multilanguage.
  • Caption & CaptionML cannot be used simultaneously.
  • Label syntax have comment, locked and maxLength optional parameters.
  • Same syntax for Captions and Labels.

Here after fixing the above errors:

Trans-4

All errors resolved from my Project.

In Nutshell use only Caption, OptionCaption & Label, all translation will be done outside developer environment in xlf file, no more defining in objects.

Step – 3

Build your Package, choose AL:Package.

Trans-5

Once your Package is created error free, you will see new Folder Translations with one xlf file is created.

Every time you build your Package this file gets overwritten. So be cautious.

When you perform your translation make a copy of this file and save with new Name then perform your translation.

Means Translation task will be last process in your Extension building process.

If you add more Captions or Labels later then you will have to take care of them and populate in all of your Language translation Files.

No of Languages your extension supports, you will have that much of translation files and is packaged with your package, no separate installation like in older versions is required to enable MultiLanguage.

Step – 4

Let’s see what this xlf file looks like:

Trans-6

It is in xml format.

If you see “<file datatype=”xml”” you will get your Source-language & target-language. Source & Target is set to same Language.

“<trans-unit id” Specifies each of you Caption and Labels defined in you objects.

“<source>” node specifies Caption or Label in source Language.

You will have to add your “<target>” language translation.

Step – 5

Let make copy of this file in all the supported languages you want.

For example:

Trans-7

I have made 2 files en-US & nl-BE. Naming convention is for your understanding purpose only.

Now you can handover these files to translator and he can perform translation in required language outside your development environment.

You code/IP is safe from external agencies whom you give for translation.

Only what is required for this will be:

[1] Update your Target Language in below line as:

<file datatype=”xml” source-language=”en-US” target-language=”en-US” original=”MyFirstExtensionProject”>

To

<file datatype=”xml” source-language=”en-US” target-language=”nl-BE” original=”MyFirstExtensionProject”>

[2] For every

<source>…</source> add <target>…</target>

<source>Loadout Point</source>

<target>Loadout-punt</target>

There are number of tools available on internet which supports xlf file and give ease your work of translation.

Step – 5

Once you are done with your translation, copy all the translated file to the Translation folder and Build your Solution and deploy on Server.

Change the Language of Client to Dutch and run your Object:

Trans-8

I have translated only one caption shown in red-box.

Please read the points mentioned in the post carefully.

Now you can enable MultiLanguage support for your Extensions.

I will come up with some other topic in my future post.

Till then keep exploring and Learning. Take Care of yourself.

AL, Business Central, Development Tips, Events, Extension Package, How To, Information, Modern Development Tool, Notification, Raise, Subscriber, Tip & Tricks, V2, Visual Studio Code

Notifications – Business Central

Today in this post we will discuss about Notification and how to implement.

First let us see, what are Notifications?

  • Non-intrusive message
  • Differs from the message initiated by the MESSAGE method.
  • Contextual
  • You can specify up to 4 actions
  • User can ignore and continue to work, doesn’t lock the user for immediate response.
  • Works with any client

Messages are modal, which means users are typically required to address the message and take some form of corrective action before they continue working. On the other hand, notifications are non-modal. Their purpose is to give users information about a current situation, but do not require any immediate action or block users from continuing with their current task.

Not-1

Tips for Create Notifications

  • Always use a unique ID, can be any GUID
  • ADDACTION points to a function
  • Arguments are case-sensitive literal
  • Functions must be global
  • Function must accept a Notification as parameter
  • Use SETDATA and GETDATA to exchange information between the sending and handling function.

Using Notification and NotificationScope data types and methods you can add code to send notifications to the users.

var

MyNotification : Notification;

Available methods are as below:

Method Description
MESSAGE Specifies the content of the notification that appears in the UI.

MyNotification.Message := ‘This will be shown as Notification’

SCOPE Specifies the scope in which the notification appears.

MyNotification.SCOPE := NOTIFICATIONSCOPE::LocalScope;

SEND Sends the notification to be displayed by the client.

MyNotification.SEND

ADDACTION Adds an action on the notification.

MyNotification.ADDACTION(‘Action 1’, CODEUNIT::”My Action Handler Codeunit”, “RunMyAction1’);

SETDATA Sets a data property value for the notification

MyNotification.SETDATA(‘CustomerNo’,Customer.”No.”);

GETDATA Gets a data property value from the notification.

MYNotification.GETDATA(‘CustomerNo’);

RECALL Recalls a sent notification.

Without going further any more in theory, let’s check how we can enable Notification.

Step – 1

Create a Codeunit to handle the Actions for Notification.

As usual we create a new Codeunit in our Extension Project.

codeunit 50101 NotificationRaiseAndHandel

Step – 2

Raise the Notification

You can Raise the Notification on Specific Page or can subscribe to the Events of that Page and write your code.

I am using the Subscription way to Raise my Notification.

For Demo purpose I am subscribing to OnOpen Event of the Page, in actual you need to decide from which action/event you wish to raise this Notification.

Code are self-explanatory, so no need special commentary.

  • I am checking for Company Info Setup we created in our earlier post if it is complete or not and then inform user about you Company Information is not completed and give him the option if he wish to complete that activity.

[EventSubscriber(ObjectType::Page, Page::”Sales Order”, ‘OnOpenPageEvent’,

”, true, true)]

local procedure CheckCompanyInfo(var Rec: Record “Sales Header”)

var

CompInfo: Record “Company Information”;

MyNotification: Notification;

begin

if compinfo.get then

if (compinfo.name <> ”) and (compinfo.”E-Mail” <> ”) then

EXIT;

MyNotification.Id := FORMAT(CreateGuid, 0, 9);

MyNotification.Scope := NotificationScope::LocalScope;

MyNotification.Message := ‘Company Information Incomplete.’;

MyNotification.AddAction(‘Open Company Information’, 50101,

‘DisplayCompanyInfoWizard’);

MyNotification.Send;

end;

  •  I am checking the Credit Limit of the customer if it is low, attracting attention towards it and giving him chance to update the Credit Limit.

   [EventSubscriber(ObjectType::Page, Page::”Sales Order”, ‘OnOpenPageEvent’,

”, true, true)]

local procedure CheckCreditBalance(var Rec: Record “Sales Header”)

var

Customer: Record Customer;

MyNotification: Notification;

Text001: TextConst ENU = ‘Balance Exceeds Credit Limit.’;

Text002: TextConst ENU = ‘Wish to change Credit Limit?’;

begin

Customer.Get(Rec.”Sell-to Customer No.”);

Customer.CalcFields(“Balance (LCY)”);

if Customer.”Balance (LCY)” > Customer.”Credit Limit (LCY)” then begin

MyNotification.Message(Text001);

MyNotification.Scope := NotificationScope::LocalScope;

MyNotification.SetData(‘CustomerNumber’, Customer.”No.”);

MyNotification.AddAction(Text002, 50101, ‘OpenCustomer’);

MyNotification.Send;

end;

end;

Step – 3

Handle the Action

Write the procedure which will respond to Actions.

   procedure DisplayCompanyInfoWizard(MyNotification: Notification)

var

CompInfo: Record “Company Information”;

begin

Page.Run(Page::CompanyInfoWizard);

end;

   procedure OpenCustomer(MyNotification: Notification)

var

CustomerNo: Text;

Customer: Record Customer;

CustomerCard: Page “Customer Card”;

begin

CustomerNo := MyNotification.GetData(‘CustomerNumber’);

if Customer.Get(CustomerNo) then begin

CustomerCard.SetRecord(Customer);

CustomerCard.RunModal;

end else begin

ERROR(‘Customer %1 not found.’, CustomerNo);

end;

end;

Here is the complete Code:

Not-2

Step – 4

Publish the Extension

To Publish choose AL:Publish from command Pallet.

Step – 5

Test the Solution.

Open the Sales Order Page and you will see the Message as shared above. Keep in mind this is just for demo, this is not the right place from where such Notifications will be raised, in real scenario you need to raise these Notifications from appropriate action/event. Now you know the basics can build your own logic around.

Will come up with some more Development Tips in my future posts.

Enjoy coding and learning. Take Care of yourself.


AL, Business Central, C/AL, Development Tips, Events, Extension Package, How To, Information, Modern Development Tool, Publisher, Raise, Subscriber, Tip & Tricks, V2, Visual Studio Code

Event driven Programming – Business Central

You can use events to design your application. Below are the benefits of using this model.

  1. You can lower the cost of code modifications and upgrades.
  2. You can customize functionality without modifying the original application.
  3. Your program will react to specific actions or behaviours of original application.

E-2

The following table describes all the different event types:

Event types Description
BusinessEvent Specifies the method to be business type event publisher.
IntegrationEvent Specifies the method to be integration type event publisher.
Global Global events are predefined system events.
Trigger Trigger events are published by the runtime.

You program events in the application to run customized behaviour when they occur.

E-1

What are Events?

A thing that happens. Event is declared by an AL method, which is referred to as event publisher function. Publisher method have only signature only and does not execute any code.

Publisher is the object that contains event publisher methods that declares the event. It serves as hook-up point in application, where subscribers use these points to extend the functionality, without even making any changes to the base application.

Only publishing an event do nothing in application, these events must be raised for subscribers to respond.

Especially Business and Integration type events must be published and raised, you need to create event publisher functions and add them to the objects manually.

Trigger events which occurs on Table & Page operations, are automatically published and raised by system at runtime, so no coding is required to publish them.

Subscriber is an AL method that subscribes to even publisher method, and logic to handle the event is implement.

E-3

Creating an event publisher method to publish business and integration events

Creating event publisher method is similar to other methods you define in AL. In addition some specific properties and few restrictions.

  • Can not include any code except comments.
  • You cannot define return values, variables or text constants.

You can define event publisher in any objects new or in existing objects and of any type of objects like codeunit, page or table.

If you define even as local then it will not be available for subscribers.

[IntegrationEvent(IncludeSender,GlobalVarAccess)]

local procedure MyProcedure()

begin

end;

[BusinessEvent(IncludeSender)]

local procedure MyProcedure()

begin

end;

Feel free to add as much of parameters and of any type as required. However it is advised not to include unnecessary parameters to Business events.

Raising Events

You need to modify the application to raise the event where ever it is needed. You call the event publisher method, same way you call any other methods in AL.

When the execution hits the evet publisher method, all event subscriber method that subscribe to the event are executed. Limitation will be you can not specify the order in which subscriber method will run, subscribers will be picked one at a time and in random order.

E-4

Subscriber Method

You can create new or use existing codeunits to define subscriber methods.

[EventSubscriber(ObjectType::Codeunit, Codeunit::, ‘OnSomeEvent’, ‘ElementName’, SkipOnMissingLicense, SkipOnMissingPermission)]

local procedure MyProcedure()

begin

end;

Add code to the method for handling the event.

Don’t worry at this point we will go through complete process programmatically in our next upcoming posts.

How to find which event to subscribe, and where to write our code.

Similar to earlier days we used Code Coverage, same way we have Event Recorder in Business Central.

Search for Event Recorder in RTC or alternatively you can launch from VS Code from Command Palate AL: Open Events Recorder.

Let’s look at a small example of finding Events.

I want to know what all events hit or available to subscribe when Sales-Order is Re-Opened.

Step-1: Open the Event Recorder and Click on Start.

E-5

Step-2: Perform Sales-Order -> Reopen

Step-3: Click on Stop.

E-6

Step-4: Scan from the list of events that you find suitable, to know how to subscribe to that event you can find AL Code. (Get AL Snippet)

E-7

All the recorded events display in the order they were called. The Event Recorder page provides information on the events that were raised including the details whether the raised events were trigger events or custom events. The custom events are either Business Events or Integration Events.

You can identify the Event types, additionally, you can discover which object types and methods raised the events with the details like calling methods, object types, and object names.

Readiness to Event:

  • Redesign your on prem to an event-based approach in C/AL.
  • This will prove to be best preparation for moving to VS Code AL extension.
  • You will be able to find any issues in your code that you need to refactor.
  • Next step will be to Lift your on prem product to VS Code AL extension.
  • Then extension can be published as a MSDY365 Business Central app.

Now you know about basics of Events. Understand Publisher, Raising Events and Subscribing to Events. Also how to trace and find suitable events to subscribe for your customization over base application.

Before we end the post let’s have a Recap to Events

Publish:

  • Announcement by the application
  • Function without code
  • Exposes the event to the outside

Raise:

  • Specifies exactly when the event happens
  • Call to the Publisher Function

Subscribe:

  • React to the event
  • Must be in codeunit, tableextension or pageextension.

Note: Raise order specified in code, Subscribe order undefined.

We will look into practical approach in our next post.


AL, Assisted Setup, Business Central, Development Tips, Extension Package, How To, Information, Tip & Tricks, V2, Visual Studio Code

Creating Assisted Setup in AL for Business Central

Today we will see how we can add our Wizard Page to Assisted Setup.

Continuing from previous post this is the second part as both are inter related.

If you have not gone through earlier post see here how to create Wizard Page for Business Central. Creating a Wizard Page in AL for Business Central

Let’s have some overview why we need assisted setup:

What is Assisted Setup?

  • List of setup scenarios, presented in list form.
  • Uses Wizard Page with relevant options.
  • Display Status of activity, completed or incomplete.
  • Predefined set of setup scenarios. Like E-Mail Setup, Cash Flow Forecast, Approval Workflows, Connection to other entities like CRM connection etc.
  • Possible to add new custom setup scenarios.

AS-1

Today we will see how we can add our Wizard Page for Company Information Setup into this List, and how the Status is updated in this list.

So further not going into theory let’s jump to practical Approach.

To add a New Assisted Setup:

  • 2 tables are involved Assisted Setup & Aggregated Assisted Setup.
  • Need to Subscribe to Event OnRegisteredAssistedSetup and call AddExtensionAssistedSetup.
  • Wizard should update the status in the Assisted Setup table.
  • Subscribe to Event OnUpdateAssistedSetupStatus to store the updated status.
  • Alternatively can determine actual status based on data.

Steps:

Create New Codeunit on available ID and unique name.

Code will be similar to below:

AS-2

Save the file and publish your Extension.

Now you should be able to locate your Wizard as entry ‘Setup Company Information’

AS-3

Click to Run your Company Information Setup Wizard.

AS-4

Complete your Setup by entering information and Click Finish.

AS-5

If you have completed all the step and provided information, your Status should show Completed.

You may need to re-open the Assisted Setup page.

It was just to give you an idea how we can get this done.

You will require to perform other some more steps to get it functioning smooth.

Sometime later will come up with more details.

Explore the existing Setups and can get more insight on the same.

I have given you the start explore learn and reach to conclusion.

See you again with some other topic in my upcoming post. Till then keep exploring and keep learning.

AL, Business Central, Development Tips, Extension Package, How To, Information, Modern Development Tool, Tip & Tricks, V2, Visual Studio Code

AL Basics – Part 5 [Extending Table & Page]

Today we will see in our post how we can extend our Existing Table & Pages.

To be able to follow this steps discussed below you should have gone through my earlier post and your project is ready to continue from where we left in our previous post. If yet not please follow below links and continue their after to this post.

Bare Minimum Steps to Start with fresh Extension Project for Business Central

AL Basics – Part 2 [Table]

AL Basics – Part 3 [Table Continued]

AL Basics – Part 4 [Page]

Since we are going to continue same project, reason why I am asking to have it as we will be referencing to the objects we created in above posts.

Let’s begin with our today’s task.

Create a new .al file, fresh new file. We can write all our code in single file but we are following to have one object per file so that it is easy to manage in future, as any even small customization will involve many of the objects.

First we will extend a Table from Sales Line and add some fields with reference to the existing Table Loadout point we created in our earlier post.

Ext-1

This will give us the basic structure of the Table Extension.

Ext-2

We need to Provide Unique ID, Name of Extended Table & from which Table we want to extend our current Table.

Ext-3

Now Rename & Save your File.

Next we will extend a Page to add this 2 new fields.

Now we will extend a Page from Sales Order Subform and add above fields.

Create a new .al file, fresh new file.

Ext-4

This will give us the basic structure of the Page Extension.

Ext-5

We need to Provide Unique ID, Name of Extended Page & from which Page we want to extend our current Page.

Ext-6

Now Rename & Save your File.

I have added an action to our existing Page Loadout Point List Page to link the Appointment Calendar Setup Page, just for demo purpose, we fill find suitable place to add same in our future post.

Ext-6-1

After this step we are done with one small/basic extension which we can Publish and check the output.

We will see this in our next post.

AL, C/AL, Development Tips, Extension Package, Information, Modern Development Tool, NAV 2016, NAV 2017, NAV 2018, PowerShell, Tip & Tricks, upgrade, V1, V2, Visual Studio Code

Future of Navision is extensions V2?

With the release of Dynamics 365 Business Central a successor of Dynamics NAV, things are going to change. If I am not wrong from year 2020 Modern Development Environment will be the only platform available to developers.

In every NAV upgrades biggest challenge was customizations, since objects are fully accessible to developers, so we customize the solution as we want as a developer spreading unstructured, difficult to maintain, customized code everywhere and in all objects.

The beauty of product is, it is totally customizable and adaptable to customer’s business. Customizing Navision is easy and quick to deploy. C/AL is easy to learn and code.

Due to these heavy customizations and unstructured codes upgrade to new version of the product required long time and efforts. Hard to merge, too much efforts leading to high cost, usually many customer prefer to stay with their current version, and miss new capabilities of product available in future versions of Navision.

With release of NAV 2016 concept of extension was introduced. This introduced the concept of writing code isolated from the core objects and use events to interact with the standard codes. Now create the extension that can be installed or uninstalled any time without affecting the original base layer of the product. We call it extension V1.

These were also developed using C/AL and deployed using PowerShell. But still it always felt like something is missing. Then last year Microsoft came up with release NAV 2018 which introduced second generation of extension, we call it extensions V2.

This introduced completely new development platform based on Visual Studio Code Modern Development Environment. It uses new AL language an evolution of C/AL. Now this will be the future.

Dynamics 365 Business Central platform (on-premise and SaaS) uses this development model. Probably this will be the only development platform available from year 2020.

In Business central base application is now an entire extension based with some system objects in CSIDE, In future release you may not have any more side by side development, you will only be having AL and extensions.


So what next?


  • We should now concentrate on learning VS Code and AL as in future this will be the only way to modify the application.
  • Now we need to make our self-familiar with the Web Client as Windows Client will be obsolete soon.
  • We should start moving our all customization to extensions.
  • Now we should start thinking in direction of AL type customization rather than old C/AL type coding practice.


What do you think?

I will come up with more details as progress in this direction. Till then keep learning and sharing with others.


Development Tips, Dynamics 365, Extension Package, How To, Information, Instalation & Configuration, NAV 2018, Tip & Tricks, Visual Studio Code, What's New

Configuring Visual Studio Code to Use Modern Development Environment with Dynamics NAV 2018

After installing Dynamics NAV 2018, I want to configure Visual Studio Code with Dynamics NAV to use new Development tool.

Before we start lets verify few things and update accordingly.

NDE-1

You can download VS Code from here:-Click to download Visual Studio Code

Install and Launch the Visual Studio Code.

Now Click View -> Extensions.

NDE-2

Click on … to open the extension menu.

Click on Install from VSIX

NDE-3

You can find VSIX file on the installation medium path:

“ModernDev\program files\Microsoft Dynamics NAV\110\Modern Development Environment”

or in the

“C:\Program Files (x86)\Microsoft Dynamics NAV\110\Modern Development Environment”

NDE-4

This will install AL Language Version 0.12.15355

NDE-5

Once the Extension installation is complete, follow below steps

Press Alt+A, Alt+L to trigger the Go! Command

NDE-6

Enter Project Name and Press Enter

NDE-7

Choose “Your own server”

Once you select the “Your own server” you will see a code like below in the “launch.json” file.

NDE-8

Update the information to look similar to below:-

NDE-9

I have updated my ServerInstance as DynamicsNAV110 (you check your instance name if changed while installing server)

I have updated my Authentication as Windows (I am using Windows authentication update what yours use accordingly)

I have added Port as 8049 (please check and use accordingly you are using the port, if using default 7049 then this step not required)

Now save your File. And Press <CTRL + F5>.

NDE-12

Enter your Credentials.

The server url and the web client url are assumed to be the same. That is not the case. The two settings we talked about above, the server url and the developer port number, are the only settings you need in the launch.json.

When VS Code publishes the extension to the NAV server, the NAV server returns the web client url as a response. This url is then opened in the browser. No setting needed in the launch.json at all.

The NAV server reads that setting from the Web Client Base Url server setting.

NDE-13

NDE-11

Your Extension is published, you can verify as below:

NDE-10

Now you are good to go with developing your Extensions using New Modern Development Tool using AL.

I hope this may have clarified your doubt on how VS Code and the NAV server work together!

I will come with more details as I proceed.