AL, Business Central, Development Tips, Events, Extension Package, How To, Information, Modern Development Tool, Notification, Raise, Subscriber, Tip & Tricks, V2, Visual Studio Code

Notifications – Business Central

Today in this post we will discuss about Notification and how to implement.

First let us see, what are Notifications?

  • Non-intrusive message
  • Differs from the message initiated by the MESSAGE method.
  • Contextual
  • You can specify up to 4 actions
  • User can ignore and continue to work, doesn’t lock the user for immediate response.
  • Works with any client

Messages are modal, which means users are typically required to address the message and take some form of corrective action before they continue working. On the other hand, notifications are non-modal. Their purpose is to give users information about a current situation, but do not require any immediate action or block users from continuing with their current task.

Not-1

Tips for Create Notifications

  • Always use a unique ID, can be any GUID
  • ADDACTION points to a function
  • Arguments are case-sensitive literal
  • Functions must be global
  • Function must accept a Notification as parameter
  • Use SETDATA and GETDATA to exchange information between the sending and handling function.

Using Notification and NotificationScope data types and methods you can add code to send notifications to the users.

var

MyNotification : Notification;

Available methods are as below:

Method Description
MESSAGE Specifies the content of the notification that appears in the UI.

MyNotification.Message := ‘This will be shown as Notification’

SCOPE Specifies the scope in which the notification appears.

MyNotification.SCOPE := NOTIFICATIONSCOPE::LocalScope;

SEND Sends the notification to be displayed by the client.

MyNotification.SEND

ADDACTION Adds an action on the notification.

MyNotification.ADDACTION(‘Action 1’, CODEUNIT::”My Action Handler Codeunit”, “RunMyAction1’);

SETDATA Sets a data property value for the notification

MyNotification.SETDATA(‘CustomerNo’,Customer.”No.”);

GETDATA Gets a data property value from the notification.

MYNotification.GETDATA(‘CustomerNo’);

RECALL Recalls a sent notification.

Without going further any more in theory, let’s check how we can enable Notification.

Step – 1

Create a Codeunit to handle the Actions for Notification.

As usual we create a new Codeunit in our Extension Project.

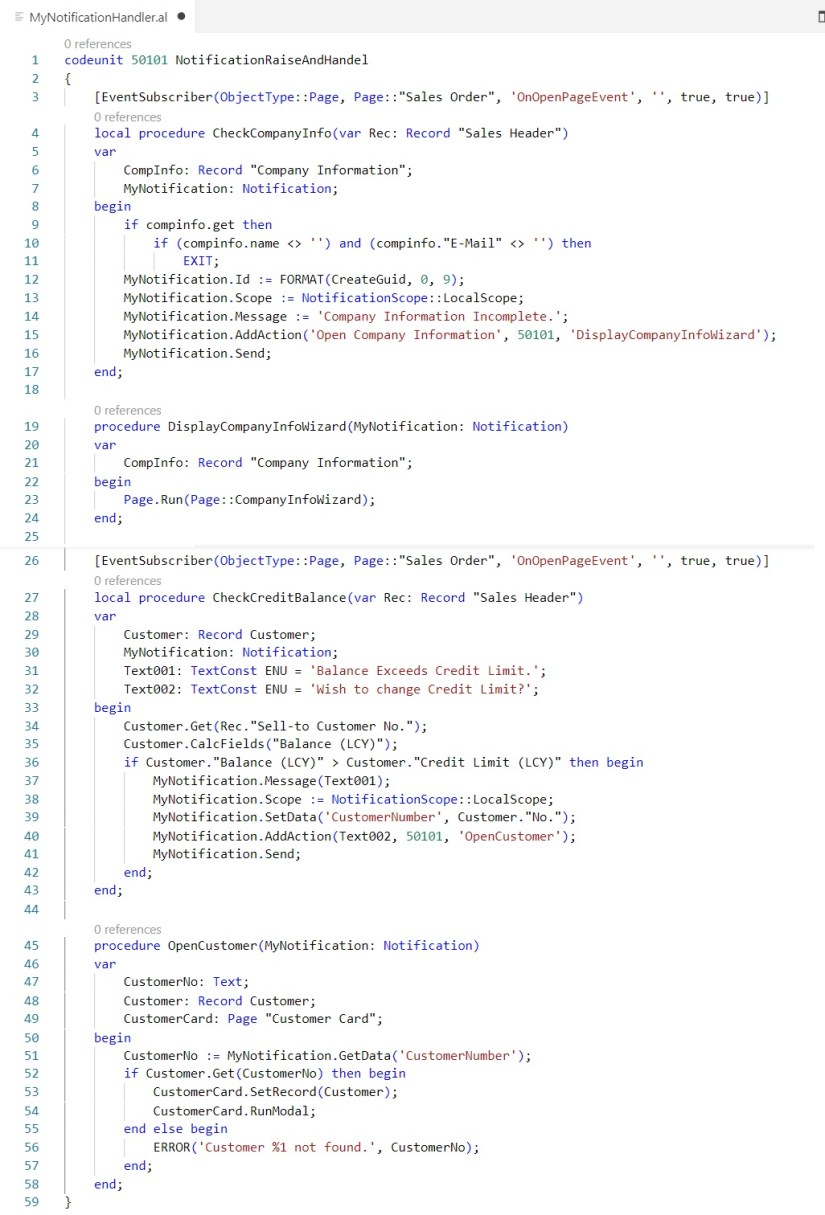
codeunit 50101 NotificationRaiseAndHandel

Step – 2

Raise the Notification

You can Raise the Notification on Specific Page or can subscribe to the Events of that Page and write your code.

I am using the Subscription way to Raise my Notification.

For Demo purpose I am subscribing to OnOpen Event of the Page, in actual you need to decide from which action/event you wish to raise this Notification.

Code are self-explanatory, so no need special commentary.

  • I am checking for Company Info Setup we created in our earlier post if it is complete or not and then inform user about you Company Information is not completed and give him the option if he wish to complete that activity.

[EventSubscriber(ObjectType::Page, Page::”Sales Order”, ‘OnOpenPageEvent’,

”, true, true)]

local procedure CheckCompanyInfo(var Rec: Record “Sales Header”)

var

CompInfo: Record “Company Information”;

MyNotification: Notification;

begin

if compinfo.get then

if (compinfo.name <> ”) and (compinfo.”E-Mail” <> ”) then

EXIT;

MyNotification.Id := FORMAT(CreateGuid, 0, 9);

MyNotification.Scope := NotificationScope::LocalScope;

MyNotification.Message := ‘Company Information Incomplete.’;

MyNotification.AddAction(‘Open Company Information’, 50101,

‘DisplayCompanyInfoWizard’);

MyNotification.Send;

end;

  •  I am checking the Credit Limit of the customer if it is low, attracting attention towards it and giving him chance to update the Credit Limit.

   [EventSubscriber(ObjectType::Page, Page::”Sales Order”, ‘OnOpenPageEvent’,

”, true, true)]

local procedure CheckCreditBalance(var Rec: Record “Sales Header”)

var

Customer: Record Customer;

MyNotification: Notification;

Text001: TextConst ENU = ‘Balance Exceeds Credit Limit.’;

Text002: TextConst ENU = ‘Wish to change Credit Limit?’;

begin

Customer.Get(Rec.”Sell-to Customer No.”);

Customer.CalcFields(“Balance (LCY)”);

if Customer.”Balance (LCY)” > Customer.”Credit Limit (LCY)” then begin

MyNotification.Message(Text001);

MyNotification.Scope := NotificationScope::LocalScope;

MyNotification.SetData(‘CustomerNumber’, Customer.”No.”);

MyNotification.AddAction(Text002, 50101, ‘OpenCustomer’);

MyNotification.Send;

end;

end;

Step – 3

Handle the Action

Write the procedure which will respond to Actions.

   procedure DisplayCompanyInfoWizard(MyNotification: Notification)

var

CompInfo: Record “Company Information”;

begin

Page.Run(Page::CompanyInfoWizard);

end;

   procedure OpenCustomer(MyNotification: Notification)

var

CustomerNo: Text;

Customer: Record Customer;

CustomerCard: Page “Customer Card”;

begin

CustomerNo := MyNotification.GetData(‘CustomerNumber’);

if Customer.Get(CustomerNo) then begin

CustomerCard.SetRecord(Customer);

CustomerCard.RunModal;

end else begin

ERROR(‘Customer %1 not found.’, CustomerNo);

end;

end;

Here is the complete Code:

Not-2

Step – 4

Publish the Extension

To Publish choose AL:Publish from command Pallet.

Step – 5

Test the Solution.

Open the Sales Order Page and you will see the Message as shared above. Keep in mind this is just for demo, this is not the right place from where such Notifications will be raised, in real scenario you need to raise these Notifications from appropriate action/event. Now you know the basics can build your own logic around.

Will come up with some more Development Tips in my future posts.

Enjoy coding and learning. Take Care of yourself.


Advertisement
Application, Area, Development Tips, Extension Package, How To, Information, Library, Machine, Multitenancy, NAV 2017, Notification, Permission, PowerShell, Readiness Library, Series, Tagging, Time, Tip & Tricks, Web Services, What's New

New Changes or features for Developer and IT Pro Changes in Microsoft Dynamics NAV 2017

Although it is too early to discuss on features and capabilities which we are going to get in our new release, we should wait for exact information post release of same.

Here are few extracts from available documents pre-release of the product.

You will find most of the features similar to which we have discussed in our earlier posts for Madeira Preview Project.

New thing is capability of extensions and Web Services are enhanced and programmatically handling Notifications.


Extensions

Dynamics NAV 2017 includes many new capabilities for Extensions:

  1. You can now include reports, XMLports, and queries in your extension along with new custom report templates.
  2. Default or initial data for new tables as part of your extension. These data will be included in the package file (.navx) and inserted into the table at the time of installation of the extension.
  3. You can include translated captions and constants for one or more languages by including object language files in the extension package.
  4. A translation only extension could be built that translates strings for base objects or objects for another extension.
  5. You can include and deploy .NET interop types executed on the server, client-side JavaScript or WinForms extensibility control add-ins.
  6. Extension can include a web service and configure it for the tenant the extension is being installed for in a multitenant deployment.
  7. Two new C/AL functions NAVAPP.RESTOREARCHIVEDATA and NAVAPP.DELETEARCHIVEDATA, you can easily restore or delete archived table data during a reinstall or upgrade of the extension.
  8. Use the NAVAPP.RESTOREARCHIVEDATA function to simply copy the data back from the archive table when special upgrade logic is not required.
  9. Use the NAVAPP.DELETEARCHIVEDATA function in situations where you do not want to restore the archived data for the table.
  10. You can publish an extension to a Dynamics NAV Server instance that is configured with an Azure SQL Database using new parameters added to the Publish-NAVApp cmdlet. The new parameters are used to provide the location and credentials for connecting to an existing Azure SQL database you created.
  11. Users with the appropriate permissions in the application can install and uninstall extensions from the Extensions Management page. The page will display all of the extensions that are currently published.


Web Services in multitenant deployments

You can publish per-tenant web services in situations where a web service has not been published for all tenants of the service.

You can also package and deploy published web services for base objects or extension objects in an extension.

The packaged web services will be published to the tenant for which the extension is being installed.


Notifications in the UI

Dynamics NAV 2017 introduces a programmatic way to send non-intrusive notifications to the UI in the Dynamics NAV Web client.

Notifications provide users with information about a current situation, but do not require any immediate action or block users from continuing with their current task.

In the UI, notifications appear in the Notification bar (similar to validation errors) at the top of the page on which a user is currently working.

Notifications that are defined on sub-pages, for example in parts and FactBoxes, appear in the same Notification bar.

Validation errors on the page will be shown first.

In the development environment, you create notifications in C/AL by using the newNotification and NotificationScope data types and the following functions.

  1. MESSAGE specifies the content of the notification that appears in the UI
  2. SCOPE specifies the scope in which the notification appears, which can be LocalScope or GlobalScope.
  3. A LocalScope notification appears in context of what the user is currently doing, while GlobalScope notifications are not directly related to the current task. Note: GlobalScope is currently not supported.
  4. SEND sends the notification to be displayed by the client.
  5. ADDACTION adds an action on the notification. Actions enable you to create interactive notifications that provide users with different actions that they can take to address the notification, like opening an associated page for modifying data. A notification action calls a function in a codeunit that you define, passing the notification object in the call. You then add business logic to the function for handling the action.
  6. SETDATA and GETDATA set and retrieve a data property value for the notification, which is typically needed when actions are invoked.

The following example illustrates the simplified code for local scope notification that has an action:

VAR

CreditBalanceNotification@1170000000 :Notification;

PROCEDURECreditBalanceCheck@1170000023(Customer@1170000000 : Record 18);

BEGIN

//Create the notification

CreditBalanceNotification.MESSAGE(‘Thecustomer”s current balance exceeds

their credit limit’);

CreditBalanceNotification.SCOPE :=NOTIFICATIONSCOPE::LocalScope;

//Add a data property for the customernumber

CreditBalanceNotification.SETDATA(‘CustNumber’,Customer.”No.”);

//Add an action that calls the ActionHandler codeunit, which you define  in the next step.

CreditBalanceNotification.ADDACTION(‘Gohandle this’,

CODEUNIT::NavExtensionInstallationMgmt, ‘OpenCustomer’);

//Send the notification to the client.

CreditBalanceNotification.SEND;

END;

In the “Action Handler” codeunit, you would add code to handle the action in a global function, called OpenCustomer, which has a Notification data type parameter. You could use the GETDATA function to get the value of the data sent with the notification:

PROCEDUREOpenCustomer@1170000024(theNotification@1170000000 :

Notification);

VAR

CustNo@1170000001 : Code[20];

BEGIN

// Do the code to handle the action.Optionally retrieve data carried by

the notification.

CustNo :=theNotification.GETDATA(‘CustNumber’);

// …

END;


Setup data in the US version

The US version of Dynamics NAV 2017 includes two RapidStart packages that will enable a fast implementation for a new company.

These data packages come with a new Windows PowerShell script to upload to server – and can be enabled for new companies.

Create a new company in the Companies page, and choose the Enable assisted setup field.

Then, use the Import-NAVConfigurationPackageFile cmdlet to import the RapidStart packages.

Then open the new company, the packages are applied, and you will be taken through an assisted setup experience.


Application area tagging

The Application Areas system offers developers, administrators, and users the ability to define differentiated user experiences according to application scope.

By selecting a set of application areas, users only see UI elements that are specific to the application features that they need to perform their tasks.

When companies want to create differentiated user experiences, the Application Areas system should be considered as an option not compulsory to adopt.


Time series library

One of the most popular topics for machine learning is forecasting based on historical data.

Many algorithms are there that can do this, but you do not have to know them, because MS have wrapped them for us.

Five of these algorithms, are wrapped in one Azure ML experiment, added logic that compares different results and returns the best one accompanied by an indicator of the prediction’s quality.

There is also a generic API on top of this that allows Dynamics NAV developers create their own functionality that helps customers find the business-critical information that may be hidden in their database.

You can perform time-series analysis in the familiar development environment.

The time series library is used by the Sales and Inventory Forecast extension.


Source:- https://mbs.microsoft.com/Files/partner/NAV/Readiness_Training/ReadinessTrainingNews/WhatsNewDynamicsNAV2017LimitedBeta.pdf

I will come up with more details in my upcoming posts.