Alert, Development Tips, How To, Information, PowerBI.com, Tip & Tricks

Working with Alerts in Power BI

Knowing about changes to important metrics quickly some time can help you taking quick decisions or help you keep eyes on things you care most.

With data driven alerts in Power BI, you can now get notifications when a metric you care about on your dashboard exceeds a set threshold.

Alert notifications will be sent to you as an email, and appear in your notification center on the web and in mobile apps.

You can set alerts for your numeric tiles featuring cards and gauges only. You have control over how often you want to be notified about your data, and whether you want to receive an email when your data goes beyond the limits you set.

Only you can see the alerts you set, even if you share your dashboard.

Alerts only work on data that is refreshed. When data refreshes, Power BI looks to see if an alert is set for that data. If the data has reached an alert threshold, an alert is triggered.

Alerts only work with numeric data types.

Alerts only work on data that is refreshed. They do not work on static data.

Today we will see how to work with Alert feature in Power BI.

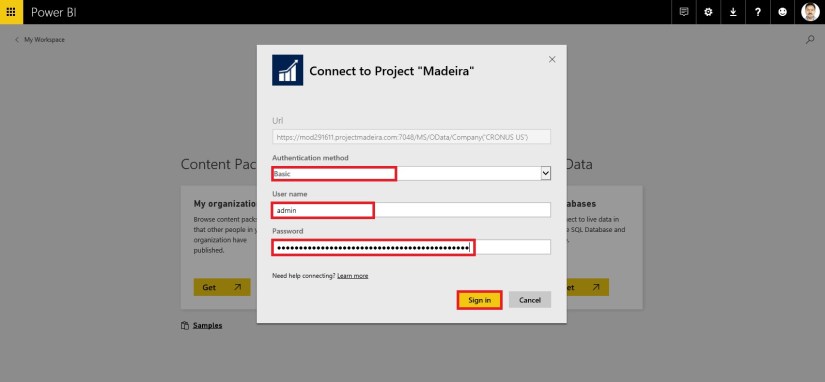
Login to your Power BI using your credentials.

Switch to your Dashboard.

I have one ready to use dashboard from my previous post to show Alert feature I am using the same.

As discussed above it works only for Numeric & Gauges Tiles only, for others you will not get even the Alert option.

Luckily I have one on my Dashboard, if want to learn how to create Numeric Tiles or more details on working with Power BI you can refer to any of my previous posts on Power BI. However you can find here one direct Link to the topic in question.

You see I have selected my Numeric Tile in below screen shot.

DataAlert-1

How to Set Data Alerts:

From a dashboard tile, select the ellipses.

Select the bell icon  to add one or more alerts.

DataAlert-2

Click on Add Alert Rule.

To start, ensure the Active slider is set to ON, and give your alert a title.

DataAlert-3


Set your Condition, Threshold, and Notification Frequency also don’t forget to tick on send me mail too.

Click on Save to save your Alert.


Receiving alerts:

When the data being tracked reaches one of the thresholds you’ve set, several things will happen.

Power BI checks to see if time have lapsed or more than depending on the option you selected since the last alert was sent.

As long as the data is past the threshold, you’ll get an alert every hour or every 24 hours depending on option you selected.

If you’ve set the alert to send you an email, you’ll find something like as shown in below screen, this in your Inbox.


DataAlert-4


Power BI will add a message to your Notification center and adds a new alert icon to the applicable tile as shown in below screen.

DataAlert-5


Access to your Notification.

DataAlert-6


Manage alerts:

There are three ways to manage your alerts:

From the dashboard tile

From the Power BI Settings menu

On an individual tile in the Mobile App

DataAlert-7


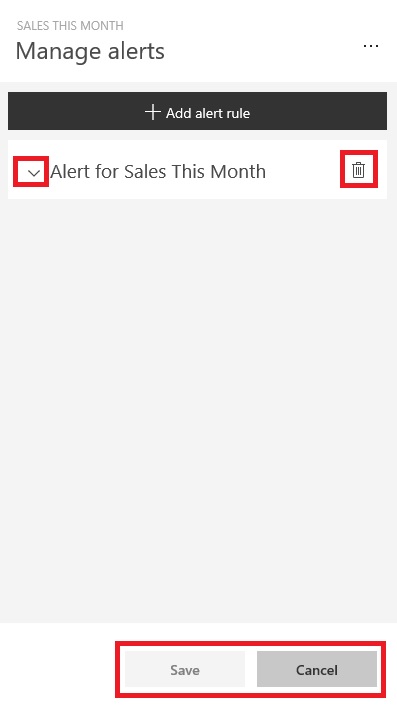
As we have seen above how to create Alerts follow same steps to access Alert Window.

At the Left click on Expand make Necessary Modifications and save.

At the right select the trashcan to delete the Alert.

Select cancel to return to previous window.


DataAlert-8

From here you can turn alerts on and off, open the Manage alerts window to make changes, or delete the alert.


That’s all for today.

I will come up with more details in my upcoming posts.

Till then keep exploring and learning.


Dynamics 365, Functional Tips, How To, Information, Maderia, Tip & Tricks, What's New

Working with Item Attributes in Madeira

In Madeira you can assign item attribute values of different types to your items, which can then be used when searching for items.

Open your Item List/Card and in the right side of the window Factbox you see Item Attributes.

Today in this post we will see how to define, assign and use it for searching the items.

ItemAttribute-1

Either from the List Page or Card Page Select Attributes as shown in below screen shot.

From Home or Action Tab Ribbon.

ItemAttribute-2

It will show you all the Attributes and their Values assigned to the Item.

You can create New Attribute, Click on +New, a New Line will be inserted to Assign Attribute and its Value.

If you wish to create New Attribute for the Item from the Dropdown List click on +New.

ItemAttribute-3

Attribute definition window opens.

Define you New Attribute. Once Attribute is created you need to define available values for the same. In below Screen i have created New Attribute “TopMaterial”.

To define applicable values for this Attribute from Ribbon click on Item Attribute Values.

ItemAttribute-4

In Value window define all the applicable values and close the window.

ItemAttribute-5

You will be returned to the previous Page and you can see your Attribute and Value defined, just we created in our above steps. Click on OK to return to previous page.

ItemAttribute-6

Next we will Assign these Attribute and Values on the Item.

Select the Attribute and Value for the Item as shown in below screen.

After assigning click on OK to close the Page.

ItemAttribute-7

When you return to your Item Card or List Page you will see that your New assigned Attribute and its Value is displayed on Factbox.

ItemAttribute-8

Switch to your Item List Page.

From Ribbon click on Filter on Attribute a Filter window will open.

Select the Attribute and Value for filter that you want to assign.

Click on OK to apply the filter on the page.

ItemAttribute-9

Since we have asigned this Attribute and Value on one Item, It will be filtered and all Items satisfying the filter condition will be displayed.

ItemAttribute-10

The items in the Items window are filtered by the specified item attribute values.

Thats all for this post.

I will comeup with some more details in my upcoming posts.

Till then keep exploring and learning.


Development Tips, How To, Information, Instalation & Configuration, Jet Reports, Office Integration, Report, Tip & Tricks, What's New

Jet Professional 2017 – Introduction and Installation

Why to switch to and What’s New in Jet Professional 2017?

Its valid question same came to my mind also when i heard about new Release.

Then i tried to explore a bit about it and got an information about some exciting features introduced with it. I will discuss as i progress with my evaluation and exploration with these features.

Here i am giving bit overview about some features and limit to Installation topic in this post. If you wish to know more you will have to wait for my next few upcomming posts.

As per Jet Report Sources:

Jet Professional 2017 makes sharing your reports easier than ever before!  

Reporting with (and without) the Jet add-in for Excel

The Jet Web Portal is an online interface that provides an easy-to-manage repository for your organization’s reports.

Using the web interface and Office 365 Online, you can allow any of your network users – whether they have Excel and the Jet add-in installed or not – to view reports directly from their web browser.

Jet Mobile for Jet Enterprise

Jet Professional integrates with the Jet Mobile web client – allowing you to log into one site to see and run all your reports – and to see all of your business intelligence dashboards.

And… Jet Mobile for Jet Enterprise includes many new features – making your dashboards more powerful and even easier to use.

What’s New?

Publishing to the Jet Web Portal

The Jet ribbon within Excel includes the ability to publish your reports to the Jet Web Portal.  The Jet Web Portal provides a manageable repository for your organization’s reports. All your users – whether they have Excel and Jet Professional installed or not – can run and view reports directly from their web browser.

What is Jet Web Portal

Jet Professional 2017 represents a new way to manage, run and view your business reports. Designed for today’s always-connected, always-moving workforce, Jet Professional 2016 introduces a new Information Management System that allows business users access to their business reports using virtually any device through a simple web interface.

As a user, you don’t need to install anything to run and view reports. Within the Jet Web Portal, you can quickly find the report that you’re after, specify report parameters, run the report to get up-to-the-minute data and view it in Excel Online.

With features like sharing, search, version control and report permissions, Jet Professional 2017 is a complete report management system.

Will comeup with more detailed about new features in my upcomming posts.

Let us move to Installation part.

To get the installation file go to this link : https://www.jetreports.com/support/product-downloads/

After downloading you will get the Jet Professional Installation Files.Zip, extract it.

Install-1

Befor you start installation make sure no Excel instance is running on your system.

I am doing simple one system Instalation, will come up with more details and other options later.

Double click to Setup file to begin with installation.

Install-2

If you have Activation code enter it or you can continue and activate later.

Install-3

Select instalation type as desired, i am installing All Components.

Install-4

Select the features you want to install, since i am performing complete install, so i am accepting all as suggested by default.

Install-5

Select the Account to run the service, and don’t forget to select Add rules to Windows Firewall. Rest all as default suggested.

Install-6

Select the SQL Instance for Jet Service Database and login method.

Install-7

Select desired ports and host detail or accept as suggested as default.

Install-8

Enter Jet Service Tier details or accept suggested as default.

Now your pre-configuration part is completed. Click on Install to proceed with Jet Components Instalation.

Install-10

Click on Install to proceed.

Install-11

Click on Finish to exit Instalation wizard, your Jet is now installed with above provided configuration.

Install-12

Next Step is to Activate your Jet Professional.

From Jet Tab on Ribbon select Activate Jet Professional.

choose the desired option.

Install-13

Enter your activation code and click on Next.

Install-14

Copy the message and send to the mentioned e-mail id and click Next.

Install-15

Close to exit.

Wait for the Activation Token, it may take upto 24 hours to receive mail with this code.

Install-16

If you check your Start Menu you will find these components got installed.

Install-17

Once you receive your Tocken.

Launch Excel, From Jet Tab, Click on Help from ribbon and select Activate License.

Install-18

Select Enter provided Activation token.

Install-19

Copy the Token you received via mail here and click on Activate.

Install-20

If every thing is fine you will receive the Activation Successful message.

Now you are ready to start with using Jet Professional.

I will come up with more details on this in my upcomming posts till then keep exploring and learning.


Development Tips, Dynamics 365, How To, Information, Maderia, Office Integration, Power Bi Content Pack, PowerBI.com, Tip & Tricks, Troubleshooting Tips, Web Services

Working with Project “Madeira” Content Pack for Power BI

In today’s post we will see how to use Power BI Content Pack for Madeira.

The content pack is preconfigured to work with sales data and financial data from the demonstration company that you get when you sign up for the Project “Madeira” preview.

To see your Project “Madeira” data in Power BI, you must have the following:

  • Access to Project “Madeira”.
  • Access to Power BI.

Before we start with connecting we will collect few information that we will require while connecting the Power BI to fetch data from Madeira.

User Name

Web Service Acess Key

Note down both value, if you don’t have Web Service Access Key Generate one and set appropriate Expiration date or Set Never Expire as shown below.

PowerBi_Madeira-1

Next open the Web Service Page.

Make sure all selected Web Service is running as in below screen.

The data is extracted from your Project “Madeira” company using web services to read live data. In Project “Madeira”, the Web Services window lists the web services that have been set up for you, including the following that are consumed by the content pack in Power BI:

  • ItemSalesAndProfit
  • ItemSalesByCustomer
  • powerbifinance
  • SalesDashboard
  • SalesOpportunities
  • SalesOrdersBySalesPerson
  • TopCustomerOverview

Note: If you change the name of any of these web services, the data will not show up in Power BI.

Note your URL of OData. Edit it to follow the format one shown in below screen.

PowerBi_Madeira-2

Now we have all our required information.

Open Power BI site and Get Data from Services as shown in below screen.

PowerBi_Madeira-3

Select Project “Madeira” Content Pack and click on Get.

PowerBi_Madeira-4

Enter the URL of Web Service we get in above step.

PowerBi_Madeira-5

Select Next.

Select Authentication method as Basic.

In User Name enter your user name as obtained in above step.

For Password ented the Web Service Access Key as obtained in above step.

PowerBi_Madeira-6

Choose Sign In.

After few minutes/seconds churning you will be ready with your first Dashboard from Madeira.

PowerBi_Madeira-7

Troubleshooting

“Parameter validation failed, please make sure all parameters are valid”
If you see this error after you enter your Project “Madeira” URL, make sure the following requirements are satisfied:

“Login failed”
If you get a “login failed” error when you log in to the dashboard, using your Project “Madeira” credentials, then this can be caused by one of the following issues:

  • The account you are using does not have permissions to read the Project “Madeira” data from your account.

    Verify your user account in Project “Madeira”, and make sure that you have used the right web service access key as the password, and then try again.

  • The Project “Madeira” instance that you are trying to connect to does not have a valid SSL certificate. In this case you’ll see a more detailed error message (“unable to establish trusted SSL relationship”).

    Note: Self-signed certificates are not supported.

“Oops”
If you see an “Oops” error dialog after you pass the authentication dialog, this is most frequently caused by a problem connecting to the data for the content pack.

Thats all for today’s post.

I will comeup with more details in my upcomming posts.

Til then keep exploring and learning.


Development Tips, How To, Information, PowerBI.com, Tip & Tricks

Happy First Birthday to Power BI!

One year ago, on July 24, 2015, the new Power BI service was released, Power BI Desktop, and Power BI Mobile as an innovative cloud-based business intelligence solution.

At the time of the launch, Microsoft Corporate Vice President James Phillips wrote that “Power BI sets the standard for modern business intelligence”.

You can read more on :- https://powerbi.microsoft.com/en-us/blog/happy-first-birthday-to-power-bi/

I have written several posts for beginers you can find here:

In case you have missed my previous posts here I present the link to all previous posts below.

Microsoft Power BI – Part – I

Introduction to Power BI and Creating Report from Excel Data, Local Files.

Microsoft Power BI – Part – II

Introduction to few Features of Power BI

Microsoft Power BI – Part – III

Power BI Desktop, Creating Dataset & Reports from In Premise Database installation

Microsoft Power BI – Part – IV

Power BI Gateway usage

Microsoft Power BI – Part – V

Scheduling Refresh of Dataset & Report created using In Premise Database

Microsoft Power BI – Part – VI

Power BI Content Pack

Microsoft Power BI – Part – VII

Power BI Mobile App

Microsoft Power BI – Part – VIII

Power BI Content Pack

Microsoft Power BI – Part – IX

Power BI Publisher for Excel

Microsoft Power BI – Part – X

ANALYZE IN EXCEL.

Search the Blog site with PowerBI tag and you will find more posts explaing about PowerBI features and capabilities.

I will comeup with more details in my upcoming posts.

Till then keep exploring & Learning.


Functional Tips, How To, Information, Instalation & Configuration, Maderia, Tip & Tricks, What's New

How to Setup Online Bank Feeds in Madeira

You need to be sure : The default company, CRONUS, that launches when you first log in to Project “Madeira” does not have electronic bank feeds enabled. To tryout this feature you must switch to trial Company “My Company“.

In Project “Madeira” you can connect to most of the online banks and download electronic bank feeds for use in bank reconciliation, avoiding tedious, manual reconciliation, reducing errors, and ensuring that your data is refreshed on a frequent basis.

When you log into MyCompany for the first time, a Company Setup wizard will guide you through setting up the basic company information, including using a bank feed service.

Dont forget to select “Use Bank Feed Service” in Company Setup Page to enable this Service.

You can Manage Bank Accounts & Feeds from Bank Account List Page.

BankStatementService-1

If you enable “Use Bank Feed Service” in Company Setup Page, a new section displays in the ribbon as shown in above screenshot with actions so that you can create a new bank account in Project “Madeira” based on the online bank feed, link already existing bank accounts to online bank feeds, unlinking online bank account feeds, or set up automatic download of feeds on a regular schedule.

When you reconcile bank accounts, you can download bank feeds on demand, as well as process automatically downloaded feeds if you have set up already.

In the Payment Reconcilliation Journal, you can import bank statements based on your bank feeds, and Project “Maderia“ will automatically suggest how payments are applied to ledger entries. You can change the application before you post.

Alternatively, you can import bank statements to the Bank Account Reconcilliation window and reconcile the statements with your ledger entries there.

I will come up with more details in my upcoming posts, till then keep practicing and Learning.


Development Tips, How To, Information, Report, Tip & Tricks

Open Report Design in Visual Studio from Custom Report Layouts

You may have noticed that when we try to edit Report Layout from Custom Report Layouts Page, it always open in Word or Report Builder no direct option to edit it in Visual Studio.

This requirement leaded to the necessity of the below customization, It can be done other ways also but the easiest way to do it one which i am going to discuss in my today’s post. Hope you will like it.

CustRepLayout-1

I have provided with the option where user can select the desired Editor either he wants to open it in Report Builder or Visual Studio.

To achieve this i have added one field in Table 9650 – Custom Report Layout with desired options as shown below.

CustRepLayout-2

And made this field available in Page Custom Report Layouts – 9650 as shown below.

CustRepLayout-3

Now in Codeunit 9652 – Edit RDLC Report Layout I have replaced the code shown in Yellow with the code shown in Red box.

CustRepLayout-4

CustRepLayout-5

Thats all, what you are waiting for go-ahead and design the reports in your way.

I will come up with more other topics in my upcomming posts, till then keep practicing and learning.


Dynamics 365, Information, Maderia, Office Integration

Project “Madeira” preview in Canada Released 

Project “Madeira” is a completely reinvented business management solution for small and midsize businesses. Project “Madeira” connects business processes with the productivity tools in Office 365 to help SMBs grow sales, manage finances and streamline operations. Project “Madeira” is public cloud service (Software as a Service) running on Microsoft Azure. Customers can access the service on the Web, or using apps for Windows, iOS or Android devices. 

The service is scheduled to become generallyavailable in the US and Canada in the second half of 2016, with other countries to follow. Project “Madeira” will be released as part ofMicrosoft Dynamics 365. The service is in public preview over the next several months as we collect feedback and fine-tune the user experience.

For full details see below post :-

https://madeira.microsoft.com/en-us/blog/madeira-preview-canada/

Development Tips, How To, Information, Profiles, Tip & Tricks

Setting different Column Layout for different users

On Community Forum i came across one requirement for opening Page with different column on Page for different users.

Here i have given an demo how can be done, but will require some tweaking to achieve the actual result.

I have copied the Customer List Page and removed extra fields.

Playing with columns1

I have added one Field above Repeater so that we can decide which format we want to see on screen. User can enter 1/2/or any other value.

I have created two more variables Set1 and Set2 to show/hide fields as per the value entered in SetSelect.

Assigned the Set1 & Set2 to few columns on the Page Fields to Property Visible.

Set1 to Responsibility Center, Location Code & Currency Code.

Set2 to Post Code, Country/Region Code, Phone No. & Fax No.

Added code on OnOpenPage Trigger to select Default page Format when Page is Opened. This code you will modify as per your requirement like check the User and assign the default Value.

Added Code to SetSelect-OnValidate Trigger to select the required format of Page. You need to modify the code as per your requirement.

Playing with columns2

In this demo if user enter value for SetSelect and you will get different view of same page.

Do some research and design one as per your requirement, this way we need not to create different Pages for different Users. Same Page can serve you different purpose if limited to only different views.

I will come with more information in my upcomming posts.

Till then keep browsing and learning.


Development Tips, Email, Excel, How To, Information, Office Integration, Report, Server, Tip & Tricks

Export Data as CSV and send as Attachment to Mail

One of my Follower/Reader have requested for this post.

This post will explain the the below steps:

  • Export the data of table to csv file format. (I am using XMLPort you can use Excell Buffer or any other method to create the file)
  • Attach to Mail and Send.

Step 1.

Create a XMLPort as below.

CSVAttachment-1

Set the Property of XMLPort.

CSVAttachment-2

Set the Property of Integer Data Item.

CSVAttachment-3

Set the Property of Table DataItem for which data to be exported.

CSVAttachment-4

Set the Captions of the Columns in CSV file.

CSVAttachment-5

Write the code to transfer the value of Table columns.

You may find some extra code adjust accordingly as per your requirement.

CSVAttachment-6

Define a function to Setfilter for data to export.

Adjust the code as per your requirement.

CSVAttachment-7

CSVAttachment-8

Step 2.

Here is the function to Export the data to csv File using above created XMLPort.

This function Saves the file to Shared folder, if required you can use TEMPORARYPATH to save your File.

CSVAttachment-9

Step 3.

Send the File as Attachment to the Mail.

CSVAttachment-10

You make required adjustment as per your requirement.

Make sure in case you are using Shared Folder give necessary rights on folder to Service Account and operating User Accounts.

Please respond did you found useful this information.

Their are other ways to achive the same, this was readyly available with me as i have used in one of my project so shared the same.

Stay tuned for more details in my Up comming posts.