AL, API, Business Central, Development Tips, Extension Package, Headline, How To, HTTP, Information, JSON, Role Center, Tip & Tricks, V2, Visual Studio Code

Working with Headline Role Center Page and HTTP Call – Business Central

I am again back with my First post of 2019. Hope you all enjoyed New Year Parties.

Wishing you all readers again Happy New Year.

Today we will play around Role Center Headline Page and add our Message to it.

You have below 9 Headline RC Pages.

1440 Headline RC Business Manager
1441 Headline RC Order Processor
1442 Headline RC Accountant
1443 Headline RC Project Manager
1444 Headline RC Relationship Mgt.
1445 Headline RC Administrator
1446 Headline RC Team Member
1447 Headline RC Prod. Planner
1448 Headline RC Serv. Dispatcher

HLRC-1

So let’s start with our task.

Step: 1 –

To be able to complete today’s customization you will require an account to any API weather forecast provider. Here I provide you with the free service, not all features are free, but sufficient to complete our task.

Open https://openweathermap.org/ page and register to the service. You will receive an API key upon sign up. This is required when you make an API Web Service call.

Step: 2 –

Open your Extension Project and create one New AL file for Page Extension

HLRC-2

We will simply add one field to the Page.

Step: 3 –

This is the main part of this functionality:

We will write a procedure for Querying the current temperature of the city using API call and extract information from the response and add to the Headline.

Response are available in other formats too, but I am using JSON in my example. You can select your format you are comfortable with. You will find all details on the website API section.

Below will be our API call syntax:

http://api.openweathermap.org/data/2.5/weather?q=’ + City +                            ‘&units=metric&APPID=16ea4cf53127aa3baa74d4072381ba62’

To get data in API for current weather in Kelvins do not indicate units parameter into your API call.

To get in Fahrenheit add units=imperial parameter.

To get in Celsius add units=metric parameter.

API Key :- &APPID=16ea4cf53127aa3baa74d4072381ba62 – Compulsory

You will receive JSon response as below:

JSONText Value will be similar to below:

{“coord”:{“lon”:77.41,”lat”:28.67},

“weather”:[{“id”:711,”main”:”Smoke”,”description”:”smoke”,”icon”:”50n”}],

“base”:”stations”,

main“:{“temp“:292.15,”pressure”:1019,”humidity”:48,”temp_min”:292.15,

“temp_max”:292.15},

“visibility”:1800,

“wind”:{“speed”:1,”deg”:210},

“clouds”:{“all”:0},

“dt”:1546432200,

sys“:{“type”:1,”id”:9165,”message”:0.004,”country“:”IN”,”sunrise”:1546393411,

“sunset”:1546430725},

“id”:1271308,

name“:”Ghaziabad”,

“cod”:200}

HLRC-3

Below is the 2 functions used to extract the Information from JSon Response:

HLRC-4

Step: 4 –

Save and Publish your Extension.

Open Web Client, make sure RC Business Manager profile is selected for your account or whichever Headline RC you have extended for above step.

You will see the Temperature of your selected city, as shown in the beginning of the post.

You can use similar concept to add your customized Headline to your Role Center Page.

See you again in my next post with some other concept, tips & tricks. Till then keep exploring and learning. Take care.

AL, Business Central, Development Tips, Extension Package, How To, Information, Modern Development Tool, Tip & Tricks, V2, Visual Studio Code

AL Basics – Part 5 [Extending Table & Page]

Today we will see in our post how we can extend our Existing Table & Pages.

To be able to follow this steps discussed below you should have gone through my earlier post and your project is ready to continue from where we left in our previous post. If yet not please follow below links and continue their after to this post.

Bare Minimum Steps to Start with fresh Extension Project for Business Central

AL Basics – Part 2 [Table]

AL Basics – Part 3 [Table Continued]

AL Basics – Part 4 [Page]

Since we are going to continue same project, reason why I am asking to have it as we will be referencing to the objects we created in above posts.

Let’s begin with our today’s task.

Create a new .al file, fresh new file. We can write all our code in single file but we are following to have one object per file so that it is easy to manage in future, as any even small customization will involve many of the objects.

First we will extend a Table from Sales Line and add some fields with reference to the existing Table Loadout point we created in our earlier post.

Ext-1

This will give us the basic structure of the Table Extension.

Ext-2

We need to Provide Unique ID, Name of Extended Table & from which Table we want to extend our current Table.

Ext-3

Now Rename & Save your File.

Next we will extend a Page to add this 2 new fields.

Now we will extend a Page from Sales Order Subform and add above fields.

Create a new .al file, fresh new file.

Ext-4

This will give us the basic structure of the Page Extension.

Ext-5

We need to Provide Unique ID, Name of Extended Page & from which Page we want to extend our current Page.

Ext-6

Now Rename & Save your File.

I have added an action to our existing Page Loadout Point List Page to link the Appointment Calendar Setup Page, just for demo purpose, we fill find suitable place to add same in our future post.

Ext-6-1

After this step we are done with one small/basic extension which we can Publish and check the output.

We will see this in our next post.

AL, Business Central, C/AL, Development Tips, Extension Package, How To, Information, Modern Development Tool, Tip & Tricks, V2

AL Basics – Part 3 [Table Continued]

In last post we saw basics of how to Create Table and created a Loadout Point Table.

Today we will continue from where we left in previous post. If you missed previous post you can find here AL Basics – Part 2.

We will create one New Table say Working Calendar Time Slot. Since no new concept used in this table so without explanation I will directly share the final structure of this Table. I am using this table in today’s next Table which I will be creating later below.

So here is the structure of this Table.

TAB2-1

Now coming to today’s topic. Creating Field Triggers & Functions.

I will be creating a new table Appointment Calendar Setup.

Here is the structure of same, and explanation follows after screen shot.

TAB2-2

In this Table the Loadout Point field TableRelation to the Loadout Point table that we created in our previous post.

Similarly the field Start Working Hrs. & End Working Hrs. field, OnValidate() trigger is implemented which call to a function/procedure CreateTimeSlot() defined in this table itself.

Field Start Working Days & End Working Days is defined with option type.

When user Enters the Start Working Hrs. & End Working Hrs. we will create the Time Slot for that Location (Loadout Point).

Finally I have created a local procedure in the table, which as per the information entered it creates the Time Slot in Table we created above Working Calendar Time Slot. Also see I have created few local variables to the function of different types. You can see there is no difference in writing the code, it follows same syntax as in our Navision C/AL. Advanced coding options and what’s new will discuss separately in future posts.

Till here we have our basic structure of our Extension. We will see how to design page in our next post.

We will come with more advance points on Table Later as we proceed in completing our Extension. There is lots of things to share on this topic but sometime later in future posts. First Let us cover all Object Types.

AL, Business Central, Development Tips, Extension Package, How To, Information, Modern Development Tool, Tip & Tricks, V2

AL Basics – Part 2 [Table]

Today we will discuss about tables.

To Create a Table Create filename.al file, as one shown in example. Folder is not compulsory, I am using to just keep my files in arranged way.

TAB-1

You can choose File -> New File or press 【ctrl】+ N or using tool button on Project folder as shown above. Give meaningful name and .al extension is a must.

Once you get your file in editor, you can start coding from scratch or can take the help of Snippet ttable and continue their after.

Let see what happens if I type ttable in the editor window.

TAB-2

As you start typing the assist window will guide you with available options.

You can press anywhere you will get the list of options available for that section.

We will see this in a while.

First let understand different sections in table object where you will write your codes, or set properties etc.

You can remove your Global Variable and Trigger section if you have nothing to define or not required in your case.

TAB-3

Suppose you are in Table property section and want to know what all properties are available in AL you can place your cursor at desired place and press 【ctrl】+ < Space Bar>. A list of options available will be shown to you, you can select required property and complete your syntax.

TAB-4

Similarly you can do in other sections of table structure also, you will always get the list of things you can do in that section.

Let’s complete our one sample table, with few Table Property, Fields and Fields Property, Keys.

TAB-5

This is a sample Table.

I have commented DrillDownPageID & LookupPageID Table Properties as this page are not available at this stage will add later.

I have defined Caption & TableRelation for my field Depot.

Caption for Field “Slot Duration” also Option String and caption for same.

I have defined Primary Key for the table.

I have defined the fieldgroup for Dropdown.

At this moment I don’t want to define Global Variables and Triggers for this table so removed.

We will get into more details in our next post.

AL, Business Central, C/AL, C/AL Editor, Development Tips, Dynamics 365, Extension Package, How To, Information, Instalation & Configuration, Modern Development Tool, Tip & Tricks, V2, What's New

Quick Start with Extensions for Business Central

Today I am going to give you a tip for getting started with Extension Building for Business Central.

As AL have newly introduced so it is going to take time to learn and be comfortable with programming using AL codes.

Best way of learning anything is learning by examples. What if we first learn what will be equivalent to actions we perform in Navision designer.

So to demonstrate this I will start with creating a small customization directly in Navision then convert it to Extension.

Are you ready? Let’s start with this exciting journey of 1-2-3 step.

Step 1.

Saving my Base Line Object (Prior to performing any Modification).

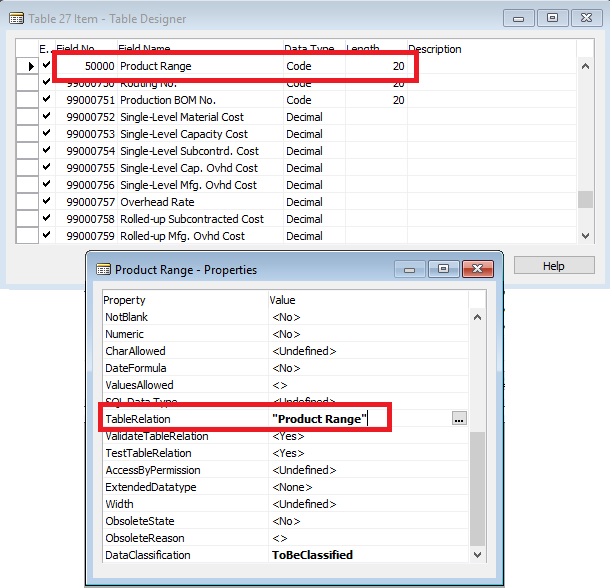
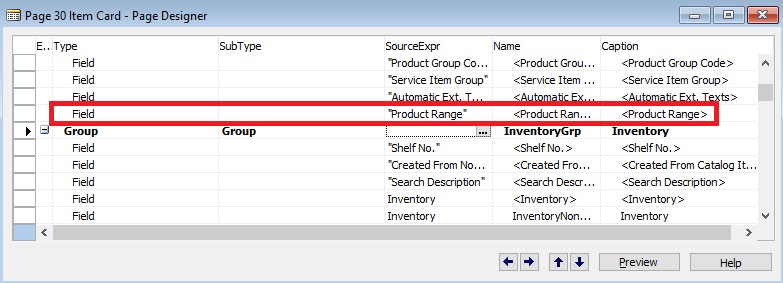
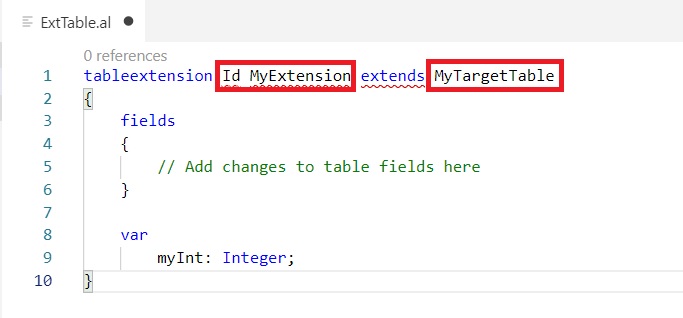
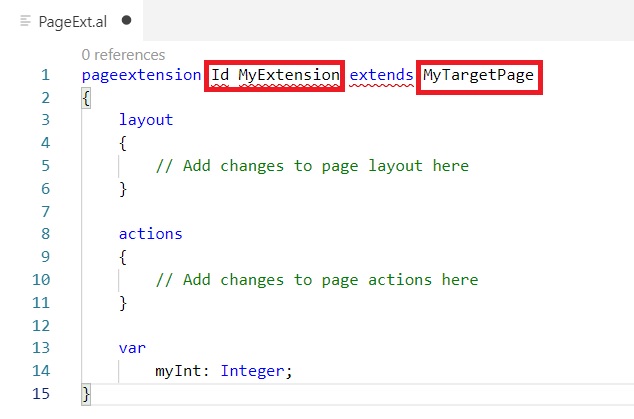
In this example I am going to Modify Table – Item & Page Item Card.

Let’s export this two object as FOB, Later we will require this to revert our customization.

Also export this two objects as txt. This we will require in our Extension building process. But need to follow instructions explained in below step, else this file will be rejected by the tool when we try to convert to AL. Follow the process of exporting text file explained after completing the Customizations in Step 3.

Step 2.

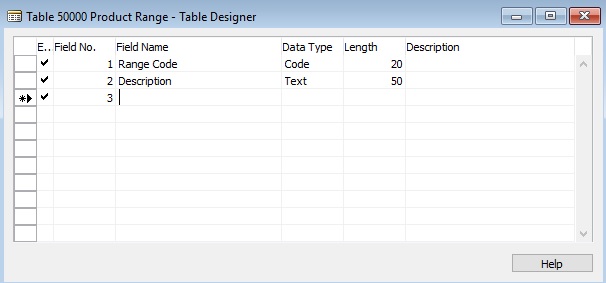
I will create one Table 50000 – Product Range as below:

1

Next I will create one List Page on above Table, Page 50000 – Product Range as below:

2

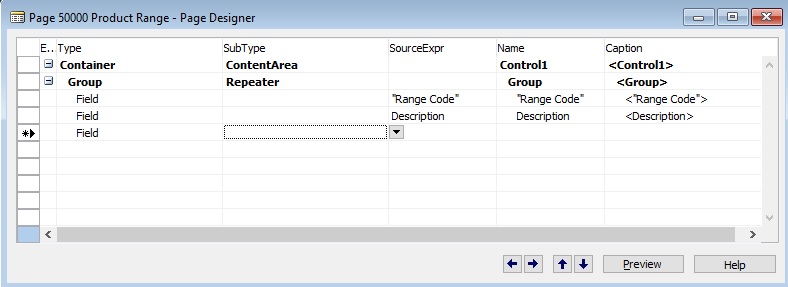
Also will Add Table Property as below to enable Lookup & DrillDown

3

Save your objects.

Now I will add one field to Table Item & Page Item Card as below:

4

5

Now I am done with my all customization and saved my modified & New Objects.

Step 3.

Now we will export these objects All New & Modified into Text File.

But we will not do it from Object designer rather will do it from command prompt.

Preparing for AL Conversion.

Run Command Prompt as Administrator.

Change to RTC folder.

6

Check your folder where you have installed, default location is as one I am using.

You can export all objects in one single file or one file per object. I am exporting one object per file, you can explore command parameter to use accordingly.

I will be using below commands.

First we will create 4 Folders namely Original, Modified, Delta & Result

Note: Make sure ExportToNewSyntax with command parameter is used else txt2al (which we will use below) will reject your files, it is mandatory.

Below command is to export Original objects before modification: (Save in Original Folder)

1. finsql.exe Command=ExportToNewSyntax, File=G:\RND\Txt2ALTest\exportedBaselineObjectsT27.txt, Database=”Demo Database NAV (13-0)”, ServerName=”KSD-DESKTOP” ,Filter=Type=table;ID=27

2. finsql.exe Command=ExportToNewSyntax, File=G:\RND\Txt2ALTest\exportedBaselineObjectsP30.txt, Database=”Demo Database NAV (13-0)”, ServerName=”KSD-DESKTOP” ,Filter=Type=page;ID=30

Below command is for New Objects: (Save in Modified Folder)

3. finsql.exe Command=ExportToNewSyntax, File=G:\RND\Txt2ALTest\exportedNewObjectsT50000.txt, Database=”Demo Database NAV (13-0)”, ServerName=”KSD-DESKTOP” ,Filter=Type=table;ID=50000

4. finsql.exe Command=ExportToNewSyntax, File=G:\RND\Txt2ALTest\exportedNewObjectsP50000.txt, Database=”Demo Database NAV (13-0)”, ServerName=”KSD-DESKTOP” ,Filter=Type=page;ID=50000

Below command is for Modified Objects: (Save in Modified Folder)

5. finsql.exe Command=ExportToNewSyntax, File=G:\RND\Txt2ALTest\exportedModifiedObjectsT27.txt, Database=”Demo Database NAV (13-0)”, ServerName=”KSD-DESKTOP” ,Filter=Type=table;ID=27

6. finsql.exe Command=ExportToNewSyntax, File=G:\RND\Txt2ALTest\exportedModifiedObjectsP30.txt, Database=”Demo Database NAV (13-0)”, ServerName=”KSD-DESKTOP” ,Filter=Type=page;ID=30

Our Next step will be to create DELTA files.

Open Business Central Administration Shell

Import your Microsoft.Dynamics.Nav.Model.Tools Module using below syntax

import-module “C:\Program Files (x86)\Microsoft Dynamics 365 Business Central\130\RoleTailored Client\Microsoft.Dynamics.Nav.Model.Tools.psd1” -force –verb

Execute below Shell Command:

Compare-NAVApplicationObject -OriginalPath G:\RND\Txt2ALTest\Original\*.txt -ModifiedPath G:\RND\Txt2ALTest\Modified\*.txt -DeltaPath G:\RND\Txt2ALTest\DELTA\ -ExportToNewSyntax

7

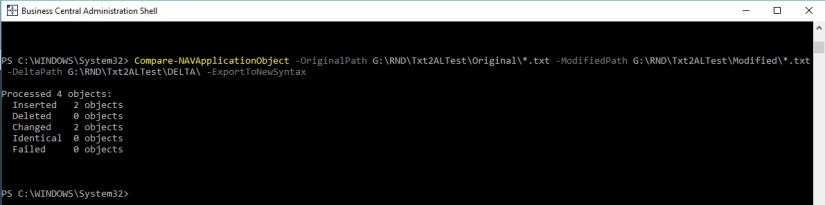
After this process we will get our Delta files in Delta Folder, this will be input to our next command/tool.

Next we will convert Delta File to AL files.

On Command prompt used above run below command: (This is not Shell Window please make sure)

txt2al –source G:\RND\Txt2ALTest\DELTA\ –target G:\RND\Txt2ALTest\RESULT\

8

Here we will get our *.al files. Which will be used for creating extensions.

Step 4.

Perform clean up to the database.

  1. Import the FOB exported in Step one to restore your original Table 27 & Page 30.
  2. Delete New Created Objects.

Now our database in in original state as before performing customization.

Fresh and Clean Business Central Database without any customizations.

Step 5.

In this step we will create extension in VS Code using above obtained *.al file.

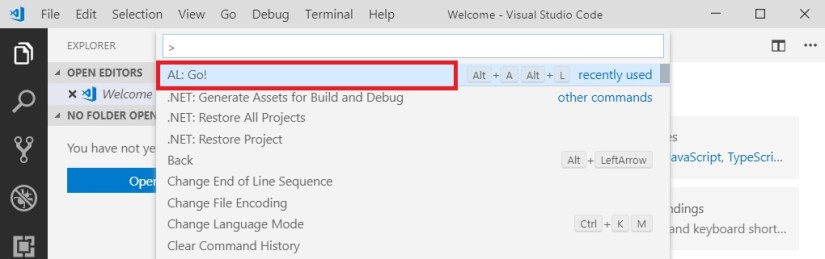
Open VS Code and Press <Ctrl>+<Shift>+<P> and select AL:Go! to create a project Folder

9

Enter your Project Folder and press enter

10

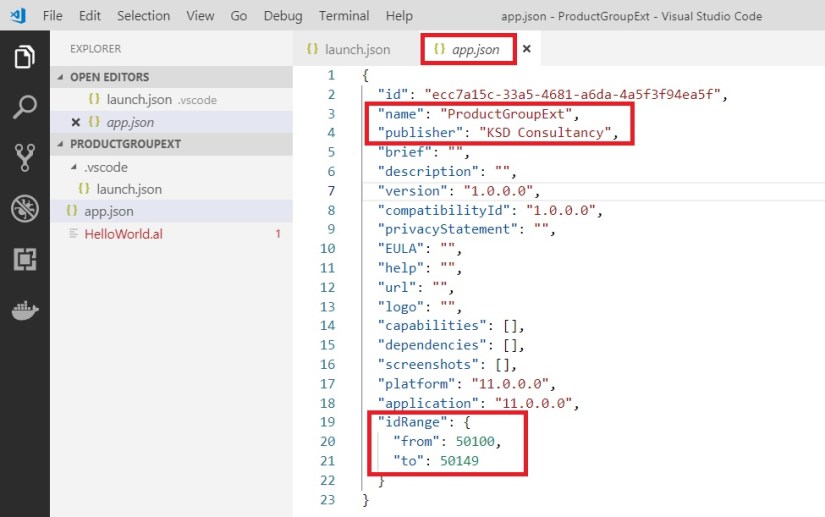
Update your app.json file as below:

Add Name & Publisher, also check available idRange all objects in this project must be in this Range.

11

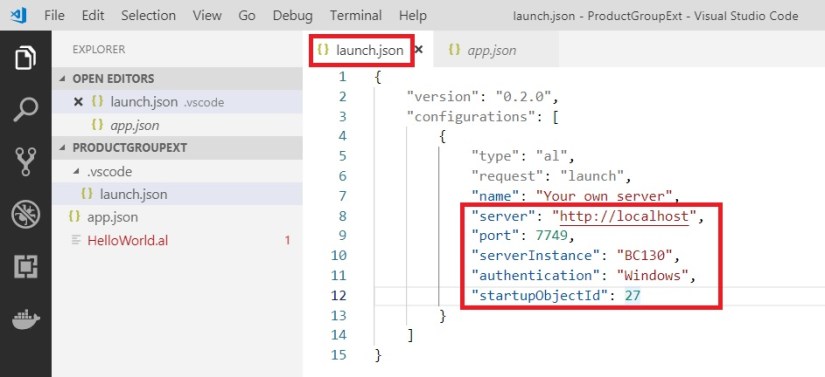
Update your launch.json file with your server & authentication details accordingly:

12

Remove the HelloWorld.al file created by default by right click and select delete.

Now add your created *.al files

13

You can drag and Drop to your Project Folder.

Now you will get errors, to resolve it we need to download our Symbols from Navision.

To download press <Ctrl>+<Shift>+<P> to open command Pallet and select Al: Download Symbols

14

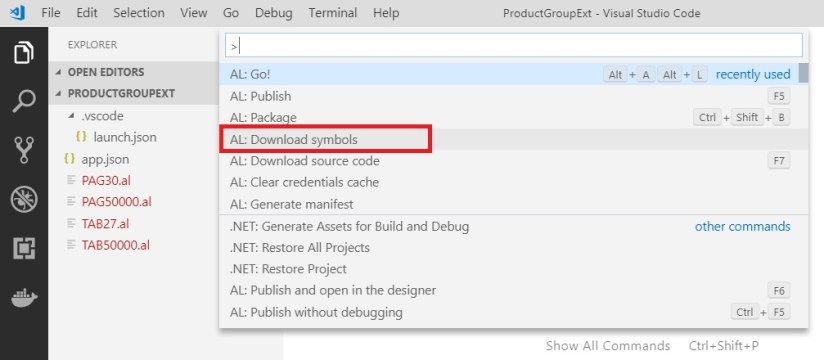
If your server settings in launch.jason is correct your Symbols will get downloaded.

15

Now let resolve any others errors that may have in your *.al Files.

First I will rename my all Files to meaningful name so that in future it is easy to manage.

To do so, right click the File and select Rename, in my case I have renamed as below:

16

Now we will open each file and perform required action to resolve the errors as below.

After changes don’t forget to save your files.

17

18

19

20

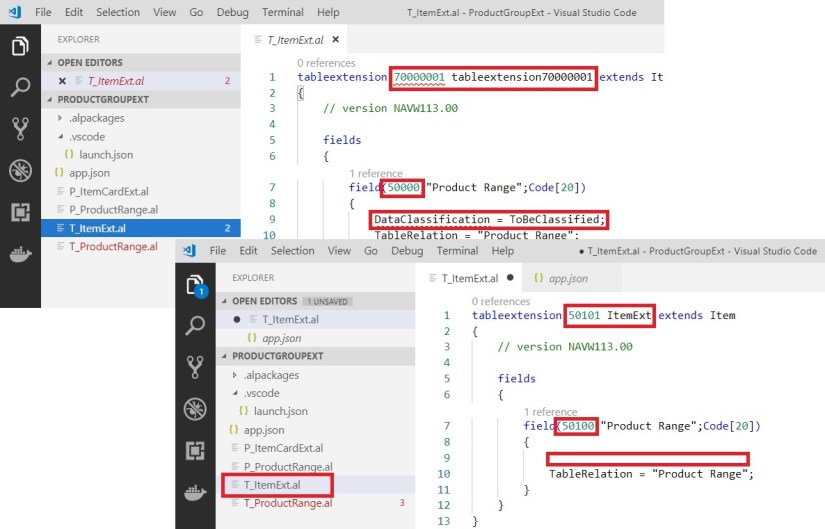
Ensure Object ID you use is within the range of id provided in app.json file. ID is not used in database or any other extensions. Else when you deploy the extension it will give errors, also make sure you give unique object names too.

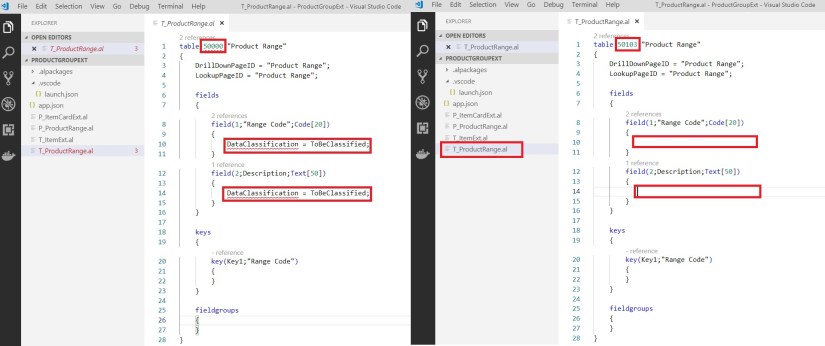
DataClassification property is not available in Al so we removed it.

Now my all objects are error free, and ready to be packaged.

Step 6.

Now we will Deploy & Test our Extension.

To create a package press <Ctrl>+<Shift>+<P> to open command pallet.

21

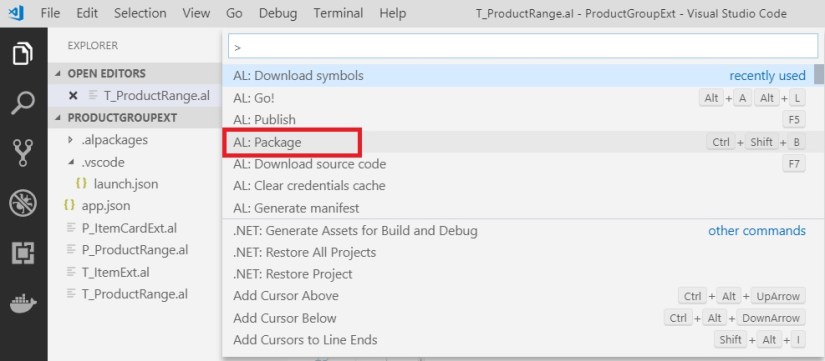
You can choose AL:Publish also it will create package and Publish to the server.

Next you choose AL:Publish to deploy your Extension to the Business Central.

You can verify your Extension from Extension Management Page from Navision Client

22

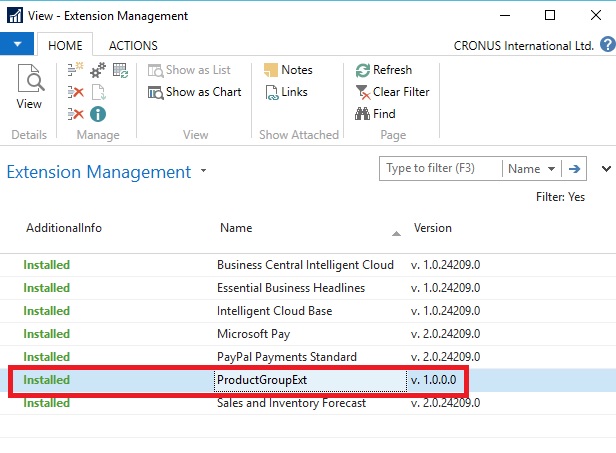
Double click on your extension record to see details:

23

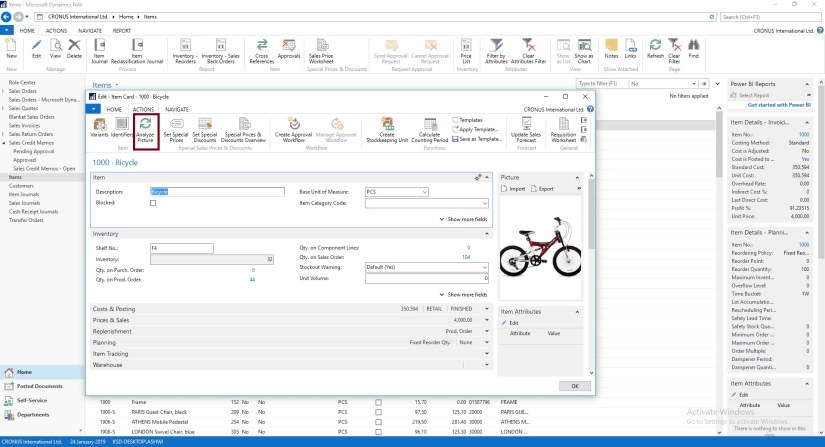
Now let’s see in action our extension.
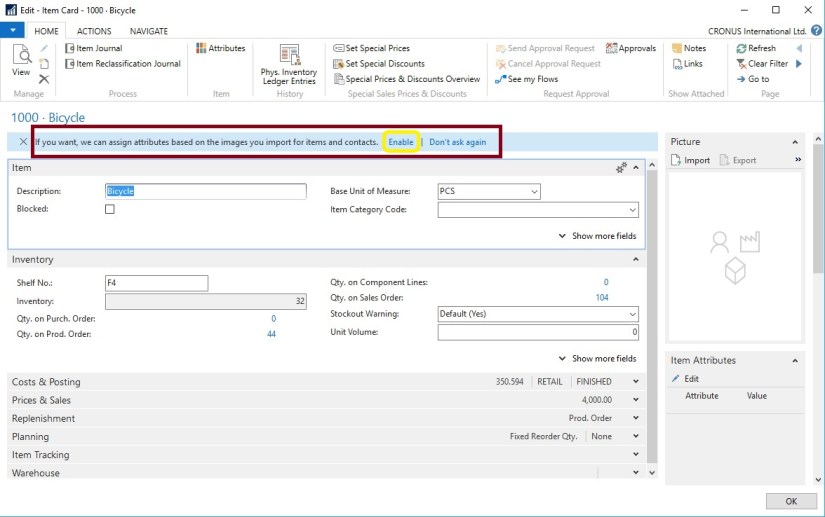
Open Item Card.

24

Congrats, your First Extension is ready to use.

There is lots of many thing to explain, but in single post everything is not possible. I will come up with basic things and creating Extensions from scratch in some other posts.

It was just a quick idea, as everyone is looking option for upgrade so this information may be handy to plan their next move.

We will learn basics of AL and other fundamental things in our upcoming posts.

Before I close this post will like to share few more details to complete this post.

If you check your Navision you will not find any object or additional fields we added in our extension, then where is my data stored?

Let’s have look in SQL.

25

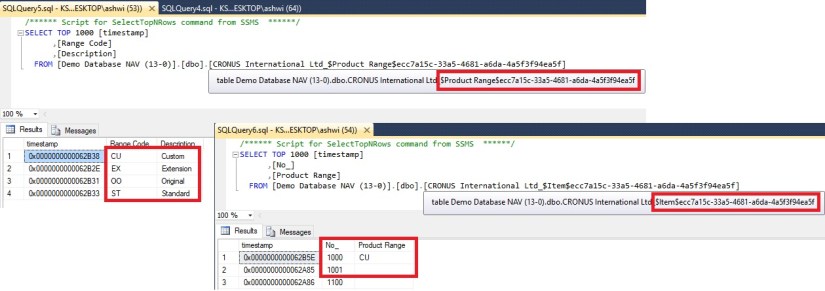
Item Extension & Product Group table is created with your app id of the extension.

We will discuss in more details about other things in details in our next upcoming posts.

Till then keep learning, and stay safe, take care.


Azure, Development Tips, Dynamics 365, Functional Tips, How To, Image Analyzer, Information, Instalation & Configuration, NAV 2018, Tip & Tricks, What's New

Image Analysis feature in Dynamics NAV 2018

In Dynamics NAV 2018, the Image Analyzer extension uses the Computer Vision API to analyze images that are attached to contact persons and items.

For example, this is useful for items because it lets you build up a stockpile of metadata about what you sell and use it to fine-tune search results when someone is browsing your web shop.

Image Analyzer is free in Dynamics NAV, but there is a limit to the number of items that you can analyze during a certain period of time. By default, you can analyze 100 images per month.

After you enable the extension, Image Analyzer runs each time you import an image to an item or contact person. You will see the attributes, confidence level, and details right away, and can decide what to do with each attribute. If you imported images before you enabled the Image Analyzer extension, you must go to the item or contact cards and choose the Analyze Picture action.

Requirements

There are a few requirements for the images:

  • Image formats: JPEG, PNG, GIF, BMP
  • Maximum file size: Less than 4 MB
  • Image dimensions: Greater than 50 x 50 pixels

How to enable Image Analyzer

To enable the Image Analyzer extension, do one of the following:

Method-1 : Open an item or contact card. In the notification bar, choose Analyze Images, and then follow the steps in the assisted setup guide.


IA-1

This will launch Image Analyser assisted setup guide, follow the step.


IA-2

IA-3

IA-4

Once you are done It will import your image for Analysing.

IA-5


Method-2 : Access the Service Connections, and then choose Image Analysis Setup.

IA-5.1

Choose the Enable Image Analyzer check box, and then complete the steps in the assisted setup guide.

IA-5.2

For URL and Key follow these steps:

Click on Computer Vision API Documentation

IA-6

Click on Try Computer Vision API

IA-7

Select your API Computer Vision API and then Get API Key

IA-8

Agree to T & C select your Country/Region and then Next

IA-9

Sign-In with the preferred account sign-in method

IA-10

Once done you will land on page which will have your Endpoint URL and Key

You must add /analyze at the end of the API URI, if it isn’t already there.

IA-11

Enter your Endpoint URL and Key and close the window.

IA-12

Now you import your Image, or select Analyze Picture if already imported

IA-13

This will analyze the Image and provide you with the Attributes.

The Image Analyzer Attributes page displays the detected attributes, the confidence level, and other details about the attribute. Use the Action to perform options to specify what to do with the attribute.


This is how you enable and configure your Image Analyzer Service.


To see how many analyses you have left in the current period

You can view the number of analyses you’ve done, and how many you can still do, in the current period.

Enter Image Analyzer Setup, and then choose the related link.

The Limit type, Limit value, and Analyzes performed provide the usage information.


To stop using the Image Analyzer extension

Enter Service Connections, and then choose Image Analyzer Setup.

Clear the Enable Image Analyzer check box.


I will come with more details as I proceed.


Corfu Navision 2016, Development Tips, Extension Package, How To, Information, Tip & Tricks

How do I: Develop an Extension

You can build extension packages that add functionality to a Microsoft Dynamics NAV deployment.

For Overview, please see my earlier posts Introducing Extensions in Microsoft Dynamics NAV 2016

Like any common functionality you want to roll out to different locations of a same company maintaining Object Set Globally for their Navision deployment.

You can perform conventional Export object and send to different locations, where they import these objects in their databases. Another option is through Extensions. Specially very helpful in Tenant model deployment.

But do the limitations apply as we discussed in my earlier post:

[A] Which Object types you can Include & Restrictions applicable to C/AL code in Extension Packages

[B] Which Properties are Restricted in Extension Packages

Unlike the familiar development and deployment of Microsoft Dynamics NAV functionality, building an extension relies on the exported version of an application to .TXT files.

You can export the application from the development environment, use the development environment commands, or use the Windows PowerShell cmdlet that is available in the Microsoft Dynamics NAV 2016 Development Shell,

Export-NAVApplicationObject.

MS recommend that you create a folder structure that can be leveraged by the cmdlets that you use when you build the extension package. That structure should contain folders for the ORIGINAL object files, MODIFIED object files, and DELTA files. These names match those used as parameters in the application merge utilities.

Recall from my earlier post where we deled with Upgrading the Application Code in Microsoft Dynamics NAV 2016

We used folder structure for placing the objects before we performed action:

“In my example, the UpgradeDemo folder on the C drive contains five folders: ORIGINAL, MODIFIED, TARGET, DELTA, and RESULT. The DELTA and RESULT folders are empty. The ORIGINAL, MODIFIED, and TARGET folders contains one or more text files that contain application objects.”

Similar structure we will be using for creating package. You can follow same for easy reference or you can use your convenient naming convention and structure.

I will come back on this in my future post, what exactly structure I will be using for my walkthrough on Extension.

You can refer to cmdlets we discussed earlier for upgrade and extensions which will be used in rest of the parts of this and upcoming posts while dealing with Extensions.

[A] Helpful PowerShell Commands which you can use for Upgrade Process in Navision 2016

[B] Few Helpful PowerShell Commands which you can use for Upgrade Process in Navision 2016 – Part 2

[C] Useful Windows PowerShell cmdlets for managing Extensions in Dynamics Navision 2016


5 Steps To create an extension

  1. Establish the BASE as TXT files.
  • The foundation for your extension is the exported .txt files of the objects you are modifying.
  • You can export just the objects that you want to modify, or you can export the entire Microsoft Dynamics NAV application.
  • In the Microsoft Dynamics NAV 2016 Development Shell, the Export-NAVApplicationObject cmdlet can automate this process or you can use the export functionality in the development environment.
  • The following example uses this cmdlet to export objects to establish the base for the planned modifications.

Export-NAVApplicationObject -Path ORIGINAL -DatabaseName MyDatabase -DatabaseServer MyDatabaseServer

  • Objects must be exported as .TXT files. You cannot build an extension based on a .FOB file.
  • If you use a source control system, you may want to pull the base .TXT files from there.
  1. Create functionality in the development environment.
  • Use the development environment as usual to create new objects or modify ones to the extent your license allows you.
  • Also don’t forget to reference limitations with Extensions Property and Objects which you can include in Extensions, see above provided link for more details.
  • Keep in mind the following rules as discussed earlier:
  • DO NOT make C/AL code modifications
  • DO use subscribing to events to execute code.
  • DO NOT create new or modified XMLPorts, Queries, or Report.
  • DO NOT change restricted page and table properties.
  • In order to get an easy upgrade experience for your extensions, you cannot modify code the way you do in the traditional customization process.
  • Instead, you extend Microsoft Dynamics NAV functionality by subscribing to programming events that are raised either explicitly in code, or implicitly by the platform.
  • Test your application with the extension added.
  1. Export your changed and added application objects to .TXT files.
  • Export all objects that you added or modified to .TXT files.
  • Use the same export cmdlet from step 1 or manually export within the development environment.
  • They must also be exported as .TXT files and should be placed in a separate directory so that the packaging process can be pointed at them.

Export-NAVApplicationObject -Path MODIFIED -DatabaseName MyDatabase -DatabaseServer MyDatabaseServer

  1. Create DELTA files using the Microsoft Dynamics NAV 2016 Development Shell cmdlets.
  • Extension packages are based on application object deltas. Again, you use the application merge utilities in the Microsoft Dynamics NAV 2016 Development Shell to distil the changes in the form of application object differences that are stored in DELTA files.
  • Creating an extension uses many of the same concepts and tools as you know from application object deltas. You use the Compare-NAVApplicationObject cmdlet to create these delta files.

Compare-NAVApplicationObject -OriginalPath ORIGINAL -ModifiedPath MODIFIED -DeltaPath DELTA

Your delta files must be one-to-one with the objects you have added or modified. You cannot include a single merged delta file. If you output your export file as a single file use the Split-NAVAppplicationObjectFile cmdlet to create the individual files.

  1. Build the extension package.


I will come up with more details in my upcoming posts on this topic.

Corfu Navision 2016, Development Tips, Extension Package, Information, Tip & Tricks

Which Properties are Restricted in Extension Packages

For Overview, please see my earlier posts

Introducing Extensions in Microsoft Dynamics NAV 2016

Which Object types you can Include & Restrictions applicable to C/AL code in Extension Packages

Restricted Properties on Existing Page Modifications

You cannot change the values for the following properties for existing Microsoft Dynamics NAV pages in an extension.

  • AccessByPermission
  • AssistEdit
  • AutoSplitKey
  • CardPageID
  • CharAllowed
  • ContainerType
  • ControlAddIn
  • Data Type
  • DataLength
  • DateFormula
  • DelayedInsert
  • DeleteAllowed
  • DrillDown
  • DrillDownPageID
  • Editable
  • ExtendedDatatype
  • FieldClass
  • GroupType
  • ID
  • InsertAllowed
  • LinkedObject
  • Lookup
  • LookupPageID
  • MaxValue
  • MinValue
  • ModifyAllowed
  • MultipleNewLines
  • Name
  • NotBlank
  • Numeric
  • PageType
  • PartType
  • PasteIsValid
  • Permissions
  • PopulateAllFields
  • RefreshOnActivate
  • SourceExpr
  • SourceTable
  • SourceTableTemporary
  • SourceTableView
  • SubType
  • SystemPartID
  • TableRelation
  • TableType
  • TestTableRelation
  • ValidateTableRelation
  • ValuesAllowed

Most of these are typically not properties changed through customization as they can have a negative effect on the Microsoft Dynamics NAV deployment.


Restricted Properties on Existing Table Modifications

You cannot change the values for the following properties for existing tables and fields in an extension.

Table Properties Field Properties
  • Name
  • DataPerCompany
  • Permissions
  • LookupPageID
  • DrillDownPageID
  • PasteIsValid
  • LinkedObject
  • TableType
  • Name
  • AccessByPermission
  • Compressed
  • Data Type
  • DataLength
  • DateFormula
  • ExtendedDataType
  • FieldClass
  • MaxValue
  • MinValue
  • NotBlank
  • Numeric
  • Owner
  • SQL Data Type
  • SubType (BLOB)
  • TableIDExpr
  • TableRelation
  • TestTableRelation
  • ValidateTableRelation
  • ValuesAllowed Width

You can add table keys, but you cannot delete or modify existing keys.

You can add fields to a table group, but you cannot remove fields or groups.

Corfu Navision 2016, Development Tips, Events, Extension Package

Which Object types you can Include & Restrictions applicable to C/AL code in Extension Packages

For Overview, please see my earlier post Introducing Extensions in Microsoft Dynamics NAV 2016

When you create extension package you can include new as well as modified objects.

In Microsoft Dynamics NAV 2016, these object types can be added and included in an extension:

  • Pages
  • Tables
  • MenuSuites
  • Codeunits

You can modify these existing object types as permitted by your license:

  • Pages
  • Tables
  • Action Items

You will not be able to add or modify any other object types in this version.

You are not allowed to delete any existing objects.

You will also need to be sure not to modify any existing C/AL code, including code in codeunits and in triggers on existing objects.

In case you want to modify existing code, use the new C/AL eventing model.

To know more about Events see by earlier posts:

  1. Events in C/AL Navision 2016
  2. Implementing Events in Navision 2016

This restriction is only on existing code and objects. However New pages, tables, and so on, can contain C/AL code as it is considered part of the new object.