Working with large journals can be cumbersome to correct if you make mistakes.
Earlier we used to do customizations for our customers to get this done. But now this feature is available in the product.
Now with the Wave 2 release of Dynamics Business Central you can use the copy journal function on Posted General Journals.
User have ability to reverse the entries based on posted General Journals.
I am using Accountant Profile.
Search for General Journal Template, make sure you have check mark under Copy to Posted Jnl. Lines for template which you wish to use for this purpose.
Journals-> General Journal
Similarly, the Check mark on Batch which you will use for this purpose.
Search for Posted General Journal
You will find no entries as you can see in previous screenshot for Default Batch Copy to Posted General Journal check mark is clear and any entries posted using that batch is not available.
Now put the Check mark and post the entries.
Now re-open Posted General Journal after posting few entries.
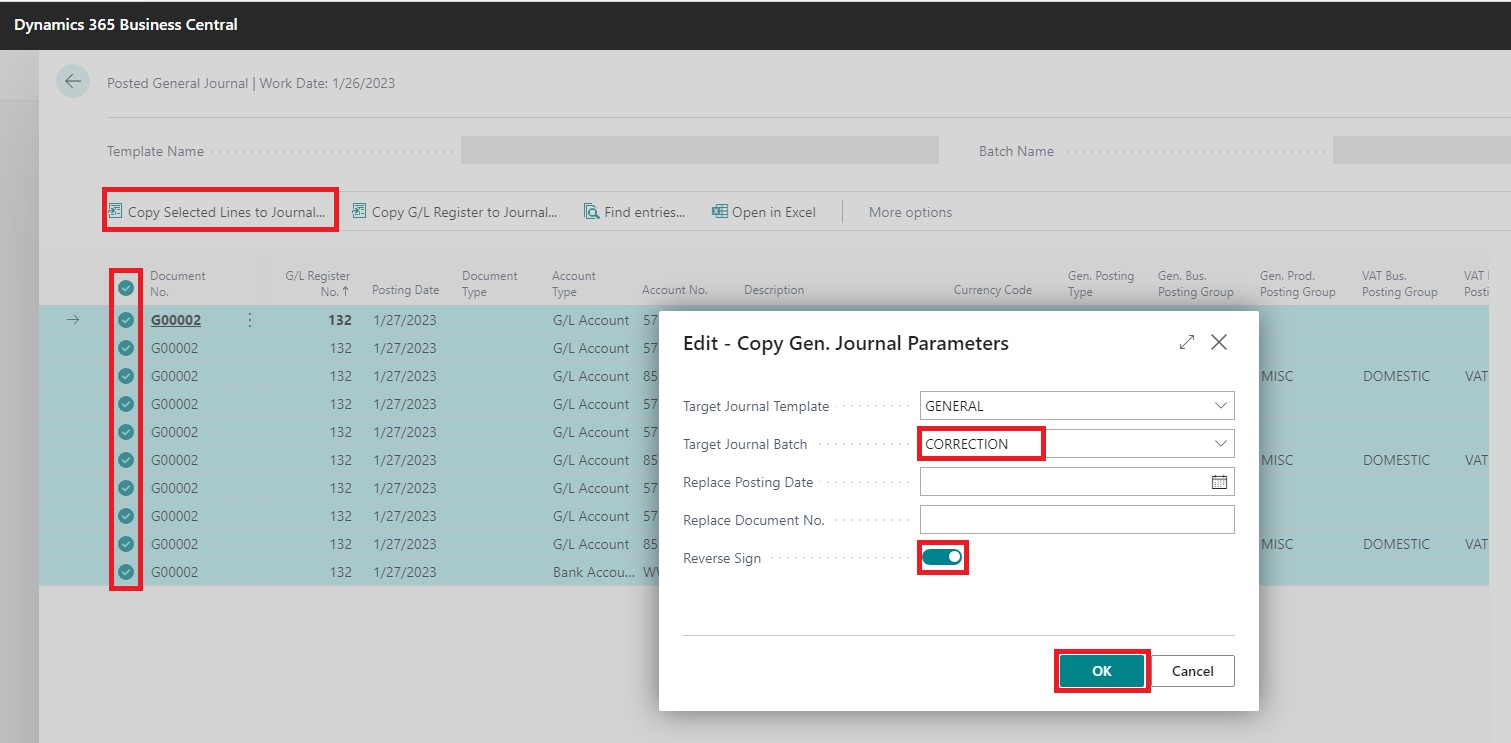
Select the Lines you wish to reverse
Select Copy Selected Line to Journal
Fill the request page, Your Template & Batch to Use, if you wish to change the Posting Date & Document No. If you wish to change the Sign and then press OK.
Your Journal Lines will be created as per the information provided on request page:
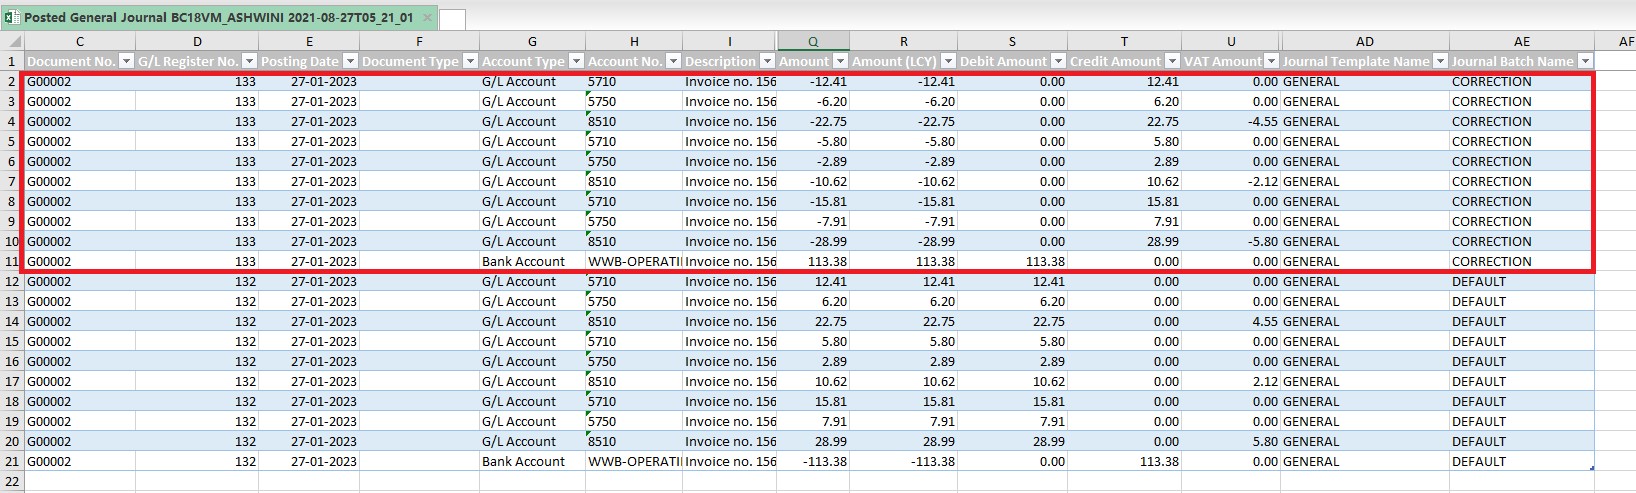
Below is the Screenshot after posting the entries:
I have exported to Excel and hidden few columns to show the output.
Entries marked in red rectangle is the entries posted post above operation and options selected on request page.
So now you know how to use this feature, share with your customers and help to make their life easy. Hope you liked and enjoyed learning this feature.
See you in next post, till then keep exploring, learning and sharing with others.
Now we have YouTube channel too, you can find link on Menu, first ever Dynamics Navision & Business Central Channel in Hinglish. You will get videos of demonstration in Mixed Language English as well as in Hindi. This will help both those who are comfortable with English and also with Hindi. Don’t forget to Subscribe and post your suggestions to improve the channel.
Jet Analytics delivers fast, flexible dashboards and reports in Excel, Power BI, and in the browser. Now you can bring all your data together in one place to enable everyone in the organization to easily perform sophisticated business analysis from anywhere, without technical expertise. Empower users to make better decisions, faster.
This blog shares information on the steps involved to connect Jet Analytics to the Business Central (On-Premise) via Direct SQL Connection
If you have not checked previous blog in this series you can find link here to connect Jet Analytics to the Business Central (Online Tenant).
(On-Premise) via Direct SQL Connection is very straight forward to configure Data Source. Rest steps remains same as in previous post.
Step 1: Right click on the data source and choose “Add SQL Server data source”
Step 2: Key in the SQL Data Source Name, Server Name, Authentication & Database Name to connect.
Leave rest as default & Test Connection.
Here onwards rest steps will be same as in previous post.
Step 3: Right click on the data source and choose “Set up accounts”
You will get (0 selected) at first time in this case this task is already performed so showing count of selected Accounts (Companies in Business Central Database)
Select Template & all desired Companies from the List and hit OK.
Next Sync your Objects:
When first time empty Data Source no objects selected will see Read Objects, In my case the objects are already selected so it shows Synchronize Objects.
Now you can see your table objects in Data Selection Pan.
That’s it for this post rest will discuss in other upcoming posts.
One news I want to share with all readers, now we are Jet Reports Partner, if you have any requirements you can reach to me for License, Deployment, Training or Support.
Jet Analytics delivers fast, flexible dashboards and reports in Excel, Power BI, and in the browser. Now you can bring all your data together in one place to enable everyone in the organization to easily perform sophisticated business analysis from anywhere, without technical expertise. Empower users to make better decisions, faster.
This blog shares information on the steps involved to connect Jet Analytics to the Business Central (Online Tenant)
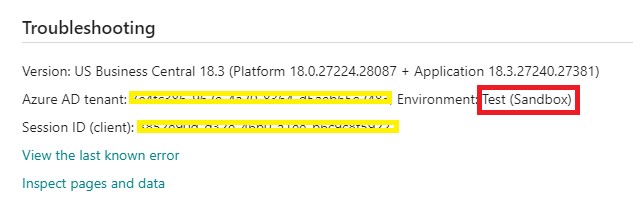
Step 1: Find tenant and environment information
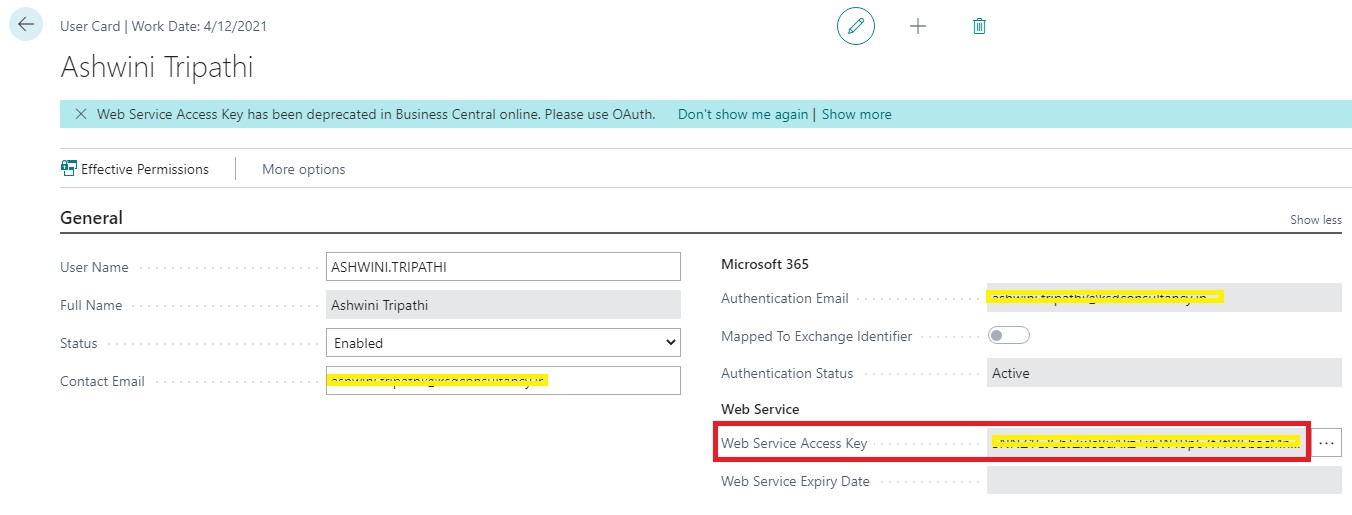
Step 2: Get web services access key
User which will be used to establish the connection to the Business Central data source ensure this user have permission set of either:
SUPER
D365 FULL ACCESS
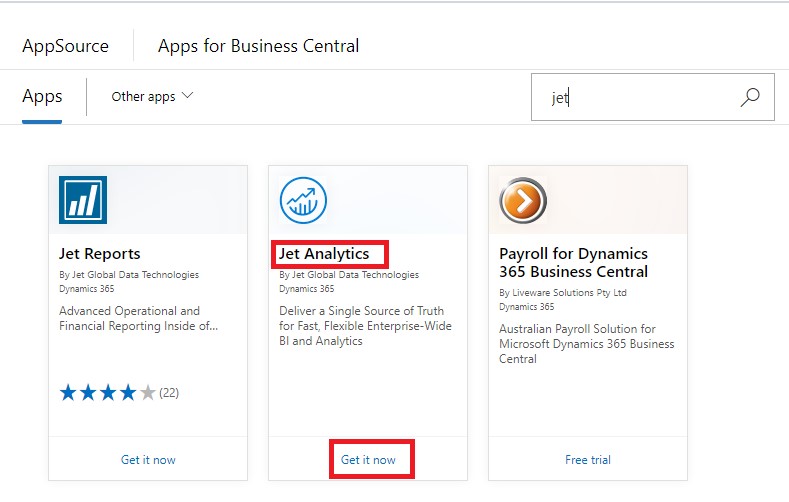
Step 3: Install Jet Analytics Extension
On Extension Management page click Manage → Extension Marketplace And search for Jet Analytics App
Click -> Get it now to deploy the App
Step 4: Verify extension installation
Click Manage and then Deployment Status
Verify that the status is completed.
Step 5: Allow http client requests
Step 6: Configure Business Central data source in Jet Analytics project
Ensure if your Environment Name is other than Production or Sandbox, you will need to manually enter your Environment name. Like in my case it was Test
Next, we will setup Accounts
You will get (0 selected) at first time in this case this task is already performed so showing count of selected Accounts (Companies in Business Central Database)
Select Template & all desired Companies from the List and hit OK.
Now you can see your table objects in Data Selection Pan.
That’s all for this post rest will discuss in other upcoming posts.
One news I want to share with all readers, now we are Jet Reports Partner, if you have any requirements you can reach to me for License, Deployment, Training or Support.
Hi, today I will discuss Web Service with below requirement. You can check other earlier post on this topic using search on right side of this blog page.
I got one request on topic from one of my customer cum blog follower, case study is as follows:
a) Will update Qty to Ship on document using Web Service from other application
b) Update Tracking Line for the Shipment using Web Service from other application
c) Post the Shipment using Web Service from other application
To get this we will create an Extension using VS Code which will have:
a) Codeunit with some functions which will be called using Web Service
b) A XML file to automatically expose above codeunit upon publishing this extension
Let us start how to achieve above requirement:
I have created this in BC16, will be same for other versions too.
Creating a AL Project:
Update your app.json & launch.json as per your environment, authentication, dependencies, port etc.
Creating a Codeunit: (TrackingCodeWS.al)
This function will be used to update “Qty. to Ship” on Sales Line
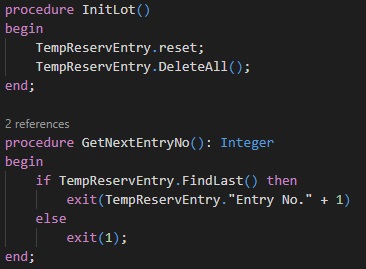
InitLot function as name suggests.
GetNextEntryNo function as name suggests.
It will depend on how you design your codeunit, you may require or not depends on logic how you use them.
AssignLotSalesLine is function which fills the lot details to temp Reservation Entry Table.
CreateReservationEntrySalesLine is the main function which actually makes your Tracking Lines and assign to Sales Line as per information filled in TempReservationEntry table in above function.
PostSalesOrder function is used for posting your Shipment.
Creating XML file to Publish Web Service
This XML file will ensure publishing of Web Service on Install of the Extension. You can directly make entry to Web Service table but benefit of using XML is when to Uninstall your extension the Web Service too will be removed, else if entry made to table you will have to take care to same yourself.
After Install of Extension, your Web Service is automatically Published.
Consume Web Service from Visual Studio
Below is the C# code to consume Web Service created above, you can modify code as per your requirement.
In above code we added Service Reference to Web Service and called functions created in Codeunit.
You can see earlier posts for step wise instruction how to add Web Reference to the Web Service in Visual Studio.
UpdateQtyToShipSalesLine:
Here “1” is used for Document Type = Order,”1008″ is my order no, 10000 is the Line No., 2 is the Quantity to Ship.
AssignLotSalesLine:
“L0001” & “L0002” is my Lot No, Serial No. is blank in this case, 1 is the Quantity, last three parameter is same as in above function call.
PostSalesOrder:
First 2 Parameter is same as above function call Document Type & Order No, third parameter is Ship = TRUE, Fourth Parameter is Invoice = FALSE.
Conclusion
This post gives you overall Idea how you can use Web Service to handle Sales Document from Web Service, you can make required modification to achieve exactly as per your requirement.
Update 17.3 for Microsoft Dynamics 365 Business Central 2020 Release Wave 2 (Application Build 17.3.20605, Platform Build 17.0.20517)
It may be necessary to update your license after you install this hotfix to gain access to new objects that are included in this or a previous update. (This only applies to customer licenses.)
For a list of updates that were released for Microsoft Dynamics 365 Business Central 2020 Release Wave 2, see released updates for Microsoft Dynamics 365 Business Central 2020 Release Wave 2. Updates are intended for new and existing customers who are running Microsoft Dynamics Released Updates for Microsoft Dynamics 365 Business Central 2020 Release Wave 2.
How to obtain the Microsoft Dynamics 365 Business Central 2020 Release Wave 2 files
This update is available for manual download and installation from the Microsoft Download Center.
This gives you control to write different logics for first time installation of extension and reinstallations of uninstalled extensions.
This is achieved by defining Install Codeunit in your Extension.
First thing first:
Subtype property of codeunit need to be set to Install
OnInstallAppPerCompany trigger is triggered when the Extension is Installed first time or subsequent install of same version on Extension.
DataVersion property one of the important properties which tells you what version of data that you’re dealing with.
AppVersion, DataVersion, Dependencies, ID, Name, and Publisher. These properties are encapsulated in a ModuleInfo data type. You can access these properties by using the NavApp.GetCurrentModuleInfo and NavApp.GetModuleInfo methods.
If the DataVersion property equals Version.Create(0,0,0,0), then it’s the first time that the extension is installed because no data exists in the archive.
Sample codeunit can be similar to below:
codeunit <ID> “Name of Codeunit”
{
// Install Logic
Subtype = Install;
trigger OnInstallAppPerCompany();
var
myAppInfo: ModuleInfo;
begin
NavApp.GetCurrentModuleInfo(myAppInfo);
// Get info about the currently executing module
if myAppInfo.DataVersion = Version.Create(0, 0, 0, 0) then
// A ‘DataVersion’ of 0.0.0.0 indicates a ‘fresh/new’ install
HandleFreshInstall
else
HandleReinstall;
// If not a fresh install, then we are Reinstalling the same version of the extension
end;
local procedure HandleFreshInstall();
begin
// Logic to execute on first time this extension is ever installed for this tenant.
// Some possible usages: – Initial data setup for use
end;
local procedure HandleReinstall();
begin
// Logic to execute on reinstalling the same version of this extension back on this tenant.
// Some possible usages: – Data ‘patchup’ work, for example, detecting if new ‘base’
// records have been changed while you have been working ‘offline’.
To define a variable of type Option, you can’t use the OptionMembers property that’s used on a field of data type Option. You need to list the available options as a comma-separated list after your variable definition.
For example:- Color: Option Red,Green,Yellow;
If you want to reuse the same Option type in other objects (like other codeunits, pages, or tables), you have to redefine all available values. Later, if you decide to add an extra value, you need to modify all objects with this extra value. Options in a table are not extendable with a table extension.
Solution to this is now available as enum.
An enum is a separate object with its own number and name. You can use an Enum object in other object without the need to redefine it at each object level. The Enum object can also be extended with enum extensions.
Lets see example defining and using enum.
I have created a EnumDefinition.al to define my custom enum Color.
I have defined one Function SelectColor to access values.
To call the Function and test result created extension of Customer List page and added code to access the value.
Now we can use this Enum throughout the extension in any objects without redefining it as in case of Option.
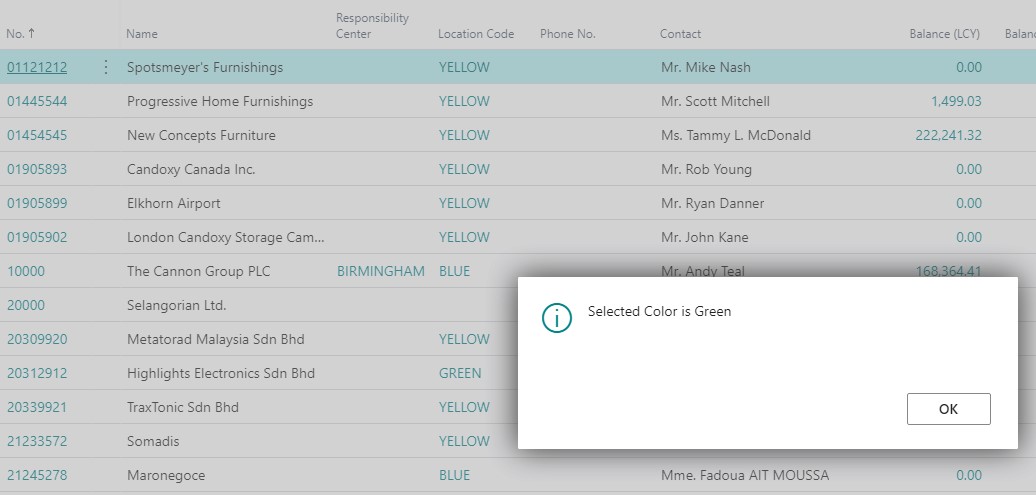
Let’s Publish the extension and see the result.
As you can remember from above code, I have selected color Green and have put the code to call of function on trigger of Customer List page, OnOpenPage.
The Enum object can also be extended with enum extensions.
Extending the Enum
Lets create new Extension, app.json file set dependencies to earlier/above Extension.
Next let’s extend our enum Color.
Next let’s create codeunit for function to access value of enum.
To call the Function and test result created extension of Customer List page and added code to access the value.
Let’s Publish the extension and see the result.
As you can remember from above code, I have selected color Red & Brown and have put the code to call of function on trigger of Customer List page, OnOpenPage.
Red is from earlier defined Color enum (Red, Green, Yellow), & Brown from extended enum (Blue, Black, Brown).
Cumulative Update 60 for Microsoft Dynamics NAV 2016 (Build 51947)
This cumulative update replaces previously released cumulative updates. You should always install the latest cumulative update.
It may be necessary to update your license after you install this hotfix to gain access to new objects that are included in this or a previous cumulative update. (This applies only to customer licenses.)
For a list of cumulative updates that were released for Microsoft Dynamics NAV 2016, see released cumulative updates for Microsoft Dynamics NAV 2016. Cumulative updates are intended for new and existing customers who are running Microsoft Dynamics NAV 2016.
How to obtain the Microsoft Dynamics NAV update files
This update is available for manual download and installation from the Microsoft Download Center.
Prerequisites You must have Microsoft Dynamics NAV 2016 installed to apply this hotfix.
Cumulative Update 47 for Microsoft Dynamics NAV 2017 (Build 30351)
This cumulative update includes all hotfixes and regulatory features that have been released for Microsoft Dynamics NAV 2017, including hotfixes and regulatory features that were released in previous cumulative updates.
This cumulative update replaces previously released cumulative updates. You should always install the latest cumulative update.
It may be necessary to update your license after implementing this hotfix to gain access to new objects included in this or a previous cumulative update (this only applies to customer licenses).
For a list of cumulative updates released for Microsoft Dynamics NAV 2017, see released cumulative updates for Microsoft Dynamics NAV 2017. Cumulative updates are intended for new and existing customers who are running Microsoft Dynamics NAV 2017.
How to obtain the Microsoft Dynamics NAV update files
This update is available for manual download and installation from the Microsoft Download Center.
Prerequisites You must have Microsoft Dynamics NAV 2017 installed to apply this hotfix.
Cumulative Update 34 for Microsoft Dynamics NAV 2018 (Build 44952)
This cumulative update includes all hotfixes and regulatory features that have been released for Microsoft Dynamics NAV 2018, including hotfixes and regulatory features that were released in previous cumulative updates.
This cumulative update replaces previously released cumulative updates. You should always install the latest cumulative update.
It may be necessary to update your license after you install this hotfix to gain access to new objects that are included in this or a previous cumulative update. (This applies only to customer licenses.)
For a list of cumulative updates that were released for Microsoft Dynamics NAV 2018, see released cumulative updates for Microsoft Dynamics NAV 2018. Cumulative updates are intended for new and existing customers who are running Microsoft Dynamics NAV 2018.
How to obtain the Microsoft Dynamics NAV update files
This update is available for manual download and installation from the Microsoft Download Center.
Prerequisites You must have Microsoft Dynamics NAV 2018 installed to apply this hotfix.
Cumulative Update 17 for Microsoft Dynamics 365 Business Central April’19 on-premises (Application Build 14.18.45015, Platform Build 14.0.45012)
This cumulative update replaces previously released cumulative updates. You should always install the latest cumulative update.
It may be necessary to update your license after you install this hotfix to gain access to new objects that are included in this or a previous cumulative update. (This applies only to customer licenses.)
For a list of cumulative updates that were released for Microsoft Dynamics 365 Business Central Spring 2019, see released cumulative updates for Microsoft Dynamics 365 Business Central Spring 2019. Cumulative updates are intended for new and existing customers who are running Microsoft Dynamics Released Cumulative Updates for Microsoft Dynamics 365 Business Central Spring 2019.
Prerequisites You must have Microsoft Dynamics 365 Business Central Spring 2019 installed to apply this hotfix.
Update 15.11 for Microsoft Dynamics 365 Business Central 2019 Release Wave 2 (Application Build 15.11.44966, Platform Build 15.0.44957)
This update replaces previously released updates. You should always install the latest update.
It may be necessary to update your license after you install this hotfix to gain access to new objects that are included in this or a previous update. (This only applies to customer licenses.)
For a list of updates that were released for Microsoft Dynamics 365 Business Central 2019 Release Wave 2, see released updates for Microsoft Dynamics 365 Business Central 2019 Release Wave 2. Updates are intended for new and existing customers who are running Microsoft Dynamics Released Updates for Microsoft Dynamics 365 Business Central 2019 Release Wave 2.
How to obtain the Microsoft Dynamics 365 Business Central 2019 Release Wave 2 files
Prerequisites You must have Microsoft Dynamics 365 Business Central 2019 Release Wave 2 installed to apply this hotfix.
Update 16.6 for Microsoft Dynamics 365 Business Central 2020 Release Wave 1 (Application Build 16.6.17046, Platform Build 16.0.17024)
This update replaces previously released updates. You should always install the latest update.
It may be necessary to update your license after you install this hotfix to gain access to new objects that are included in this or a previous update. (This only applies to customer licenses.) For a list of updates that were released for Microsoft Dynamics 365 Business Central 2020 Release Wave 1, see released updates for Microsoft Dynamics 365 Business Central 2020 Release Wave 1. Updates are intended for new and existing customers who are running Microsoft Dynamics Released Updates for Microsoft Dynamics 365 Business Central 2020 Release Wave 1.
How to obtain the Microsoft Dynamics 365 Business Central 2020 Release Wave 1 files
Cumulative Update 46 for Microsoft Dynamics NAV 2017 (Build 30340)
This cumulative update includes all hotfixes and regulatory features that have been released for Microsoft Dynamics NAV 2017, including hotfixes and regulatory features that were released in previous cumulative updates.
This cumulative update replaces previously released cumulative updates. You should always install the latest cumulative update.
It may be necessary to update your license after implementing this hotfix to gain access to new objects included in this or a previous cumulative update (this only applies to customer licenses).
For a list of cumulative updates released for Microsoft Dynamics NAV 2017, see released cumulative updates for Microsoft Dynamics NAV 2017. Cumulative updates are intended for new and existing customers who are running Microsoft Dynamics NAV 2017.
How to obtain the Microsoft Dynamics NAV update files
This update is available for manual download and installation from the Microsoft Download Center.
PrerequisitesYou must have Microsoft Dynamics NAV 2017 installed to apply this hotfix.
Cumulative Update 33 for Microsoft Dynamics NAV 2018 (Build 44657)
This cumulative update includes all hotfixes and regulatory features that have been released for Microsoft Dynamics NAV 2018, including hotfixes and regulatory features that were released in previous cumulative updates.
This cumulative update replaces previously released cumulative updates. You should always install the latest cumulative update.
It may be necessary to update your license after you install this hotfix to gain access to new objects that are included in this or a previous cumulative update. (This applies only to customer licenses.)
For a list of cumulative updates that were released for Microsoft Dynamics NAV 2018, see released cumulative updates for Microsoft Dynamics NAV 2018. Cumulative updates are intended for new and existing customers who are running Microsoft Dynamics NAV 2018.
How to obtain the Microsoft Dynamics NAV update files
This update is available for manual download and installation from the Microsoft Download Center.
How to install a Microsoft Dynamics NAV 2018 cumulative update
See How to install a Microsoft Dynamics NAV 2018 cumulative update.
PrerequisitesYou must have Microsoft Dynamics NAV 2018 installed to apply this hotfix.
Cumulative Update 16 for Microsoft Dynamics 365 Business Central April’19 on-premises (Application Build 14.17.44663, Platform Build 14.17.44656
This cumulative update replaces previously released cumulative updates. You should always install the latest cumulative update.
It may be necessary to update your license after you install this hotfix to gain access to new objects that are included in this or a previous cumulative update. (This applies only to customer licenses.)
For a list of cumulative updates that were released for Microsoft Dynamics 365 Business Central Spring 2019, see released cumulative updates for Microsoft Dynamics 365 Business Central Spring 2019. Cumulative updates are intended for new and existing customers who are running Microsoft Dynamics Released Cumulative Updates for Microsoft Dynamics 365 Business Central Spring 2019.
How to obtain the Microsoft Dynamics 365 Business Central Spring 2019 files
PrerequisitesYou must have Microsoft Dynamics 365 Business Central Spring 2019 installed to apply this hotfix.
Update 15.10 for Microsoft Dynamics 365 Business Central 2019 Release Wave 2 (Application Build 15.10.44664, Platform Build 15.10.44655)
This update replaces previously released updates. You should always install the latest update.
It may be necessary to update your license after you install this hotfix to gain access to new objects that are included in this or a previous update. (This only applies to customer licenses.)
For a list of updates that were released for Microsoft Dynamics 365 Business Central 2019 Release Wave 2, see released updates for Microsoft Dynamics 365 Business Central 2019 Release Wave 2. Updates are intended for new and existing customers who are running Microsoft Dynamics Released Updates for Microsoft Dynamics 365 Business Central 2019 Release Wave 2.
How to obtain the Microsoft Dynamics 365 Business Central 2019 Release Wave 2 files
PrerequisitesYou must have Microsoft Dynamics 365 Business Central 2019 Release Wave 2 installed to apply this hotfix.
Update 16.5 for Microsoft Dynamics 365 Business Central 2020 Release Wave 1 (Application Build 16.5.15953, Platform Build 16.5.15941)
This update replaces previously released updates. You should always install the latest update.
It may be necessary to update your license after you install this hotfix to gain access to new objects that are included in this or a previous update. (This only applies to customer licenses.) For a list of updates that were released for Microsoft Dynamics 365 Business Central 2019 Release Wave 2, see released updates for Microsoft Dynamics 365 Business Central 2020 Release Wave 1. Updates are intended for new and existing customers who are running Microsoft Dynamics Released Updates for Microsoft Dynamics 365 Business Central 2020 Release Wave 1.
How to obtain the Microsoft Dynamics 365 Business Central 2020 Release Wave 1 files


You must be logged in to post a comment.