Working with large journals can be cumbersome to correct if you make mistakes.
Earlier we used to do customizations for our customers to get this done. But now this feature is available in the product.
Now with the Wave 2 release of Dynamics Business Central you can use the copy journal function on Posted General Journals.
User have ability to reverse the entries based on posted General Journals.
I am using Accountant Profile.
Search for General Journal Template, make sure you have check mark under Copy to Posted Jnl. Lines for template which you wish to use for this purpose.
Journals-> General Journal
Similarly, the Check mark on Batch which you will use for this purpose.
Search for Posted General Journal
You will find no entries as you can see in previous screenshot for Default Batch Copy to Posted General Journal check mark is clear and any entries posted using that batch is not available.
Now put the Check mark and post the entries.
Now re-open Posted General Journal after posting few entries.
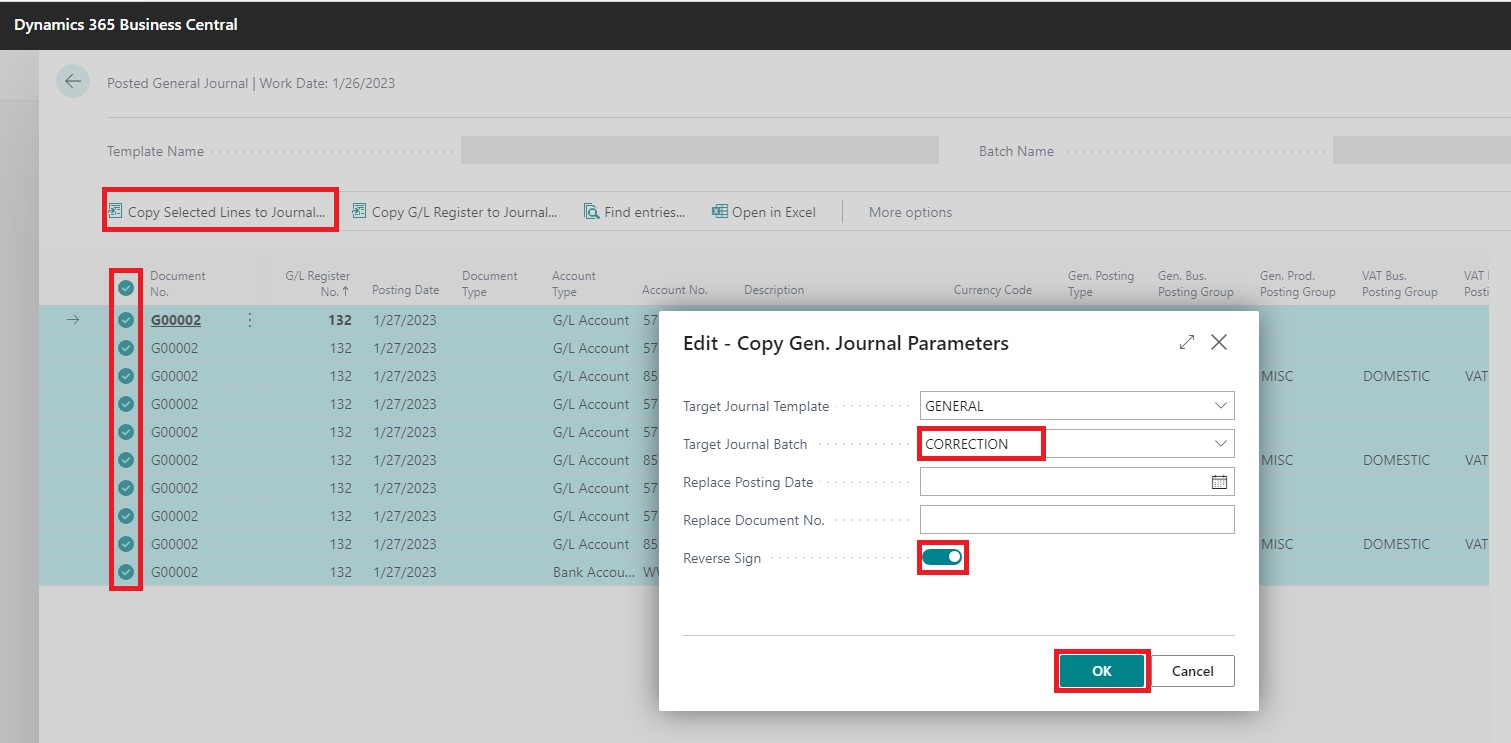
Select the Lines you wish to reverse
Select Copy Selected Line to Journal
Fill the request page, Your Template & Batch to Use, if you wish to change the Posting Date & Document No. If you wish to change the Sign and then press OK.
Your Journal Lines will be created as per the information provided on request page:
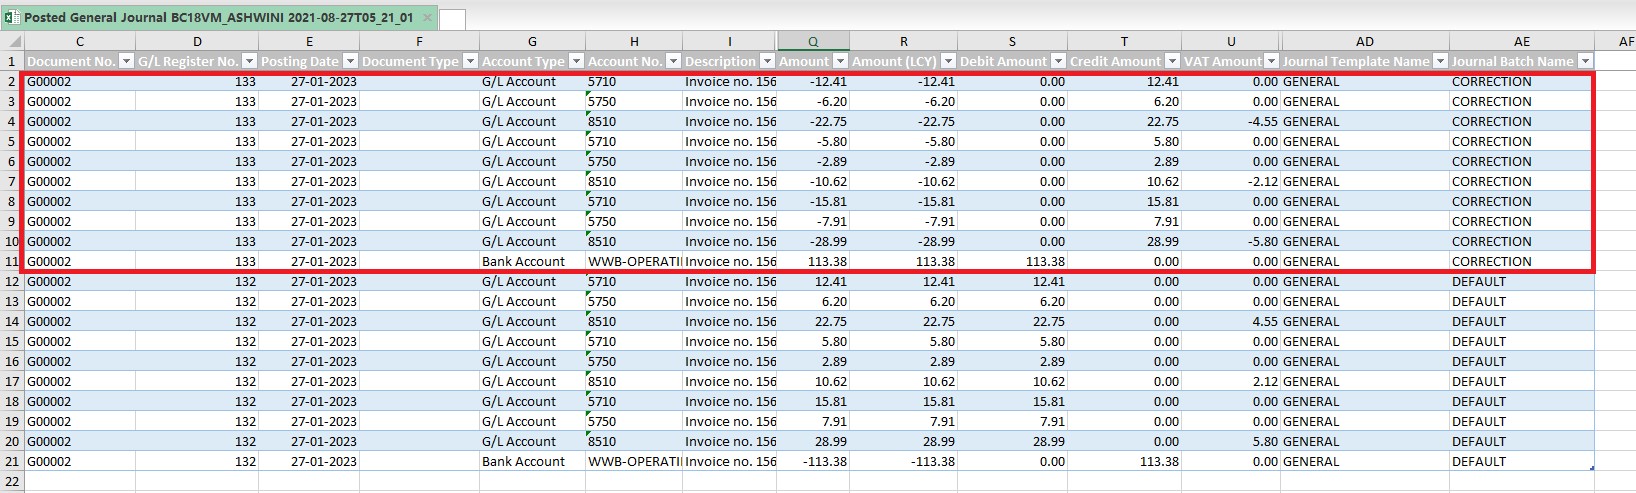
Below is the Screenshot after posting the entries:
I have exported to Excel and hidden few columns to show the output.
Entries marked in red rectangle is the entries posted post above operation and options selected on request page.
So now you know how to use this feature, share with your customers and help to make their life easy. Hope you liked and enjoyed learning this feature.
See you in next post, till then keep exploring, learning and sharing with others.
Now we have YouTube channel too, you can find link on Menu, first ever Dynamics Navision & Business Central Channel in Hinglish. You will get videos of demonstration in Mixed Language English as well as in Hindi. This will help both those who are comfortable with English and also with Hindi. Don’t forget to Subscribe and post your suggestions to improve the channel.
Update 17.5 for Microsoft Dynamics 365 Business Central 2020 Release Wave 2 (Application Build 17.5.22499.22546, Platform Build 17.0.22463.22540)
This update replaces previously released updates. You should always install the latest update.
It may be necessary to update your license after you install this hotfix to gain access to new objects that are included in this or a previous update. (This only applies to customer licenses.)
For a list of updates that were released for Microsoft Dynamics 365 Business Central 2020 Release Wave 2, see released updates for Microsoft Dynamics 365 Business Central 2020 Release Wave 2. Updates are intended for new and existing customers who are running Microsoft Dynamics Released Updates for Microsoft Dynamics 365 Business Central 2020 Release Wave 2.
How to obtain the Microsoft Dynamics 365 Business Central 2020 Release Wave 2 files
This update is available for manual download and installation from the Microsoft Download Center.
You must have Microsoft Dynamics 365 Business Central 2020 Release Wave 2 installed to apply this hotfix.
Update 16.11 for Microsoft Dynamics 365 Business Central 2020 Release Wave 1 (Application Build 16.11.22526, Platform Build 16.0.22511)
This update replaces previously released updates. You should always install the latest update.
It may be necessary to update your license after you install this hotfix to gain access to new objects that are included in this or a previous update. (This only applies to customer licenses.)
For a list of updates that were released for Microsoft Dynamics 365 Business Central 2020 Release Wave 1, see released updates for Microsoft Dynamics 365 Business Central 2020 Release Wave 1. Updates are intended for new and existing customers who are running Microsoft Dynamics Released Updates for Microsoft Dynamics 365 Business Central 2020 Release Wave 1.
How to obtain the Microsoft Dynamics 365 Business Central 2020 Release Wave 1 files
This update is available for manual download and installation from the Microsoft Download Center.
You must have Microsoft Dynamics 365 Business Central 2020 Release Wave 1 installed to apply this hotfix.
Update 15.16 for Microsoft Dynamics 365 Business Central 2019 Release Wave 2 (Application Build 15.16.46612, Platform Build 15.0.46600)
This update replaces previously released updates. You should always install the latest update.
It may be necessary to update your license after you install this hotfix to gain access to new objects that are included in this or a previous update. (This only applies to customer licenses.)
For a list of updates that were released for Microsoft Dynamics 365 Business Central 2019 Release Wave 2, see released updates for Microsoft Dynamics 365 Business Central 2019 Release Wave 2. Updates are intended for new and existing customers who are running Microsoft Dynamics Released Updates for Microsoft Dynamics 365 Business Central 2019 Release Wave 2.
How to obtain the Microsoft Dynamics 365 Business Central 2019 Release Wave 2 files
This update is available for manual download and installation from the Microsoft Download Center.
You must have Microsoft Dynamics 365 Business Central 2019 Release Wave 2 installed to apply this hotfix.
Cumulative Update 22 for Microsoft Dynamics 365 Business Central April’19 on-premises (Application Build 14.23.46611, Platform Build 14.0.46607)
This cumulative update replaces previously released cumulative updates. You should always install the latest cumulative update.
It may be necessary to update your license after you install this hotfix to gain access to new objects that are included in this or a previous cumulative update. (This applies only to customer licenses.)
For a list of cumulative updates that were released for Microsoft Dynamics 365 Business Central Spring 2019, see released cumulative updates for Microsoft Dynamics 365 Business Central Spring 2019. Cumulative updates are intended for new and existing customers who are running Microsoft Dynamics Released Cumulative Updates for Microsoft Dynamics 365 Business Central Spring 2019.
How to obtain the Microsoft Dynamics 365 Business Central Spring 2019 files
This update is available for manual download and installation from the Microsoft Download Center.
You must have Microsoft Dynamics 365 Business Central Spring 2019 installed to apply this hotfix.
Cumulative Update 39 for Microsoft Dynamics NAV 2018 (Build 46609)
This cumulative update includes all hotfixes and regulatory features that have been released for Microsoft Dynamics NAV 2018, including hotfixes and regulatory features that were released in previous cumulative updates.
This cumulative update replaces previously released cumulative updates. You should always install the latest cumulative update.
It may be necessary to update your license after you install this hotfix to gain access to new objects that are included in this or a previous cumulative update. (This applies only to customer licenses.)
For a list of cumulative updates that were released for Microsoft Dynamics NAV 2018, see released cumulative updates for Microsoft Dynamics NAV 2018. Cumulative updates are intended for new and existing customers who are running Microsoft Dynamics NAV 2018.
How to obtain the Microsoft Dynamics NAV update files
This update is available for manual download and installation from the Microsoft Download Center.
You must have Microsoft Dynamics NAV 2018 installed to apply this hotfix.
Cumulative Update 52 for Microsoft Dynamics NAV 2017 (Build 30477)
This cumulative update includes all hotfixes and regulatory features that have been released for Microsoft Dynamics NAV 2017, including hotfixes and regulatory features that were released in previous cumulative updates.
This cumulative update replaces previously released cumulative updates. You should always install the latest cumulative update.
It may be necessary to update your license after implementing this hotfix to gain access to new objects included in this or a previous cumulative update (this only applies to customer licenses).
For a list of cumulative updates released for Microsoft Dynamics NAV 2017, see released cumulative updates for Microsoft Dynamics NAV 2017. Cumulative updates are intended for new and existing customers who are running Microsoft Dynamics NAV 2017.
How to install a Microsoft Dynamics NAV 2017 cumulative update
You must have Microsoft Dynamics NAV 2017 installed to apply this hotfix.
Cumulative Update 65 for Microsoft Dynamics NAV 2016 (Build 52121)
This cumulative update replaces previously released cumulative updates. You should always install the latest cumulative update.
It may be necessary to update your license after you install this hotfix to gain access to new objects that are included in this or a previous cumulative update. (This applies only to customer licenses.)
For a list of cumulative updates that were released for Microsoft Dynamics NAV 2016, see released cumulative updates for Microsoft Dynamics NAV 2016. Cumulative updates are intended for new and existing customers who are running Microsoft Dynamics NAV 2016.
How to obtain the Microsoft Dynamics NAV update files
This update is available for manual download and installation from the Microsoft Download Center.
Hi, today I will discuss Web Service with below requirement. You can check other earlier post on this topic using search on right side of this blog page.
I got one request on topic from one of my customer cum blog follower, case study is as follows:
a) Will update Qty to Ship on document using Web Service from other application
b) Update Tracking Line for the Shipment using Web Service from other application
c) Post the Shipment using Web Service from other application
To get this we will create an Extension using VS Code which will have:
a) Codeunit with some functions which will be called using Web Service
b) A XML file to automatically expose above codeunit upon publishing this extension
Let us start how to achieve above requirement:
I have created this in BC16, will be same for other versions too.
Creating a AL Project:
Update your app.json & launch.json as per your environment, authentication, dependencies, port etc.
Creating a Codeunit: (TrackingCodeWS.al)
This function will be used to update “Qty. to Ship” on Sales Line
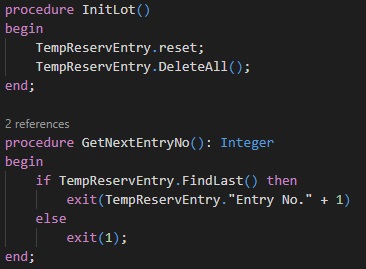
InitLot function as name suggests.
GetNextEntryNo function as name suggests.
It will depend on how you design your codeunit, you may require or not depends on logic how you use them.
AssignLotSalesLine is function which fills the lot details to temp Reservation Entry Table.
CreateReservationEntrySalesLine is the main function which actually makes your Tracking Lines and assign to Sales Line as per information filled in TempReservationEntry table in above function.
PostSalesOrder function is used for posting your Shipment.
Creating XML file to Publish Web Service
This XML file will ensure publishing of Web Service on Install of the Extension. You can directly make entry to Web Service table but benefit of using XML is when to Uninstall your extension the Web Service too will be removed, else if entry made to table you will have to take care to same yourself.
After Install of Extension, your Web Service is automatically Published.
Consume Web Service from Visual Studio
Below is the C# code to consume Web Service created above, you can modify code as per your requirement.
In above code we added Service Reference to Web Service and called functions created in Codeunit.
You can see earlier posts for step wise instruction how to add Web Reference to the Web Service in Visual Studio.
UpdateQtyToShipSalesLine:
Here “1” is used for Document Type = Order,”1008″ is my order no, 10000 is the Line No., 2 is the Quantity to Ship.
AssignLotSalesLine:
“L0001” & “L0002” is my Lot No, Serial No. is blank in this case, 1 is the Quantity, last three parameter is same as in above function call.
PostSalesOrder:
First 2 Parameter is same as above function call Document Type & Order No, third parameter is Ship = TRUE, Fourth Parameter is Invoice = FALSE.
Conclusion
This post gives you overall Idea how you can use Web Service to handle Sales Document from Web Service, you can make required modification to achieve exactly as per your requirement.
Update 17.3 for Microsoft Dynamics 365 Business Central 2020 Release Wave 2 (Application Build 17.3.20605, Platform Build 17.0.20517)
It may be necessary to update your license after you install this hotfix to gain access to new objects that are included in this or a previous update. (This only applies to customer licenses.)
For a list of updates that were released for Microsoft Dynamics 365 Business Central 2020 Release Wave 2, see released updates for Microsoft Dynamics 365 Business Central 2020 Release Wave 2. Updates are intended for new and existing customers who are running Microsoft Dynamics Released Updates for Microsoft Dynamics 365 Business Central 2020 Release Wave 2.
How to obtain the Microsoft Dynamics 365 Business Central 2020 Release Wave 2 files
This update is available for manual download and installation from the Microsoft Download Center.
This gives you control to write different logics for first time installation of extension and reinstallations of uninstalled extensions.
This is achieved by defining Install Codeunit in your Extension.
First thing first:
Subtype property of codeunit need to be set to Install
OnInstallAppPerCompany trigger is triggered when the Extension is Installed first time or subsequent install of same version on Extension.
DataVersion property one of the important properties which tells you what version of data that you’re dealing with.
AppVersion, DataVersion, Dependencies, ID, Name, and Publisher. These properties are encapsulated in a ModuleInfo data type. You can access these properties by using the NavApp.GetCurrentModuleInfo and NavApp.GetModuleInfo methods.
If the DataVersion property equals Version.Create(0,0,0,0), then it’s the first time that the extension is installed because no data exists in the archive.
Sample codeunit can be similar to below:
codeunit <ID> “Name of Codeunit”
{
// Install Logic
Subtype = Install;
trigger OnInstallAppPerCompany();
var
myAppInfo: ModuleInfo;
begin
NavApp.GetCurrentModuleInfo(myAppInfo);
// Get info about the currently executing module
if myAppInfo.DataVersion = Version.Create(0, 0, 0, 0) then
// A ‘DataVersion’ of 0.0.0.0 indicates a ‘fresh/new’ install
HandleFreshInstall
else
HandleReinstall;
// If not a fresh install, then we are Reinstalling the same version of the extension
end;
local procedure HandleFreshInstall();
begin
// Logic to execute on first time this extension is ever installed for this tenant.
// Some possible usages: – Initial data setup for use
end;
local procedure HandleReinstall();
begin
// Logic to execute on reinstalling the same version of this extension back on this tenant.
// Some possible usages: – Data ‘patchup’ work, for example, detecting if new ‘base’
// records have been changed while you have been working ‘offline’.
Continuing from where we left in previous post, if not seen you can visit here.
During development, your resource utilization can grow unorganized with old, outdated, and unused components. Where you may require maintenance to manage, free resources and reclaim for other uses.
Let’s learn few commands which will be useful to work and maintain docker containers, images and other resources.
Today we will learn how to organize a Docker environment by removing Docker images, containers, volumes, and networks.
Using these commands makes Docker container management fast and easy.
A container creates a specific environment in which a process can be executed. As we all are aware of many containers are created over time, tested, and uninhibited during the development lifecycle.
Therefore, it’s important to know how to find unnecessary containers and remove them.
First, you will need to list all Docker containers using the command:
docker container ls -a
This will list all running containers, their IDs, names, images, status and other parameters.
Most of the time you are only interested to have list of all the containers only by their numeric ID’s, that you can obtain running the command:
docker container ls –aq
To stop a specific container, enter the following:
docker container stop [container_id]
Replace [container_id] with the numeric ID of the container from your list.
You can enter multiple container IDs into the same command.
To stop all containers, enter:
docker container stop $(docker container ls –aq)
This forces Docker to use the list of all container IDs as the target of the stop command.
To launch or start a single or multiple stopped Docker containers
docker start [options] container_id
List all Docker Resources
Enter the following commands to display resources:
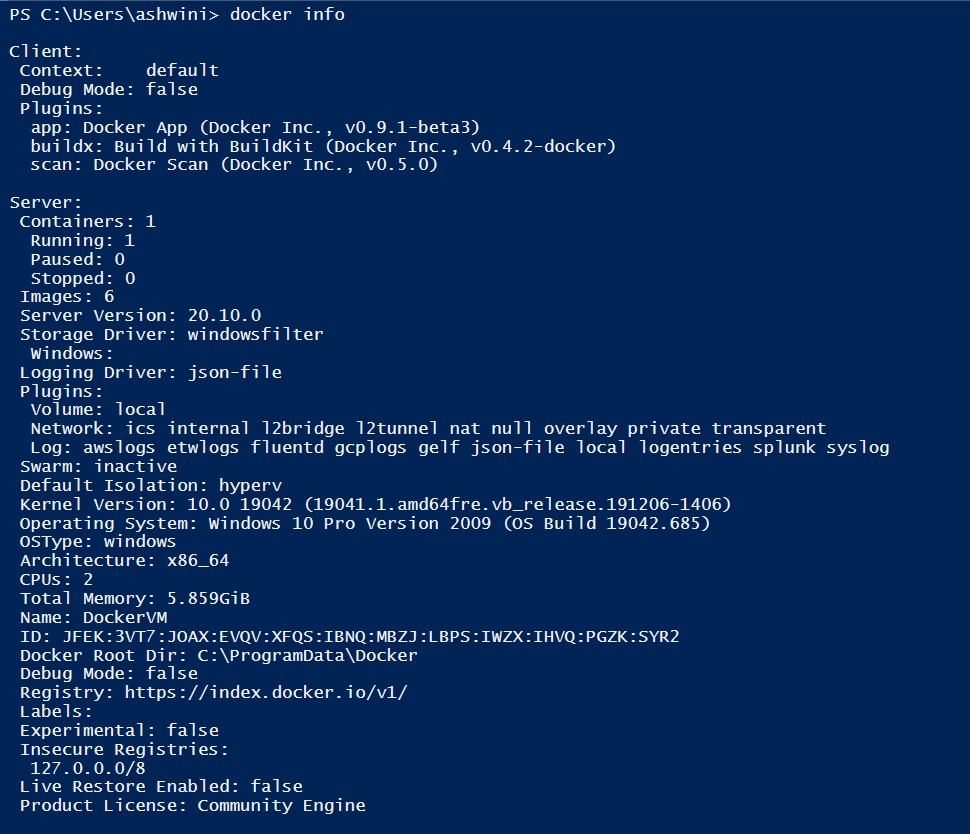
docker info
docker container ls
docker image ls
docker volume ls
docker network ls
The above-mentioned lists number of containers, images, and information about the Docker installation. These commands can help you locate and identify resources that you want to keep, or that you want to delete.
Remove a Stopped Container
To remove a stopped container, use the command:
docker container rm [container_id]
Remove All Stopped Containers
To remove all stopped containers:
docker container rm $(docker container ls –aq)
Remove All Docker Containers
To wipe Docker clean and start from scratch, enter the command:
docker container stop $(docker container ls –aq) && docker system prune –af ––volumes
Let’s decode above command line as:
docker container ls –aq
will list all containers with their numeric ID
docker container stop
will stop all containers obtained from above list
&& docker system prune –af ––volumes
Will remove all stopped containers and volumes
Here (a) indicates this should apply to all containers &(f) without a required confirmation.
How to Remove Docker Images
Docker images are files, which include multiple layers used to run code within a container.
Images may go through many iterations during development. Old and outdated images can clutter your system, taking up storage space and making searches more difficult.
To remove a Docker image, start by listing all the images on your system:
docker image ls
The output displays the locally available Docker images, as seen below.
Make a note of the IMAGE ID – this is the identifier used to remove the image.
Then, remove the unwanted image(s):
docker image rm [image_id1]
Replace [image_id1] with the image ID you pulled from the first command. You can enter a single Image ID, or multiple IDs for removal.
The system may respond to your request with an error message, that there is a conflict and it is unable to remove the repository reference.
This indicates that a container is using the image. You need to remove the container first before you can remove the image.
How to Remove Docker Volumes
A volume is used to store Docker data.
It helps store and organize data outside containers in a way that it’s accessible to multiple containers.
Use the following command to generate a list of all the available Docker volumes:
docker volume ls
Take note of the VOLUME NAME you want to remove.
Then enter:
docker volume rm VolumeName
Make sure to replace VolumeName with the actual name you generated with the previous command.
If the volume is in use by an existing container, the system responds with an error. This means need to remove the container first.
How to Remove Docker Networks
Docker networks allow different containers to communicate with each other freely while also preventing traffic from outside the network. This is typically done with a Docker bridge network.
The prune command removes all unused networks.
Removing a Single Network
Display a list of all existing Docker networks with the command:
docker network ls
Take note of the NETWORK ID – this is the identifier used to remove a specific network. Then, enter:
docker network rm [networkID]
Replace [networkID] with the ID you captured from the first command.
You may receive an error message that says the network has active endpoints. That means that the network is currently in use by containers. You need to remove the containers that are using the network before you can remove the network.
Remove All Unused Docker Objects
The prune command automatically removes all resources that aren’t associated with a container. This is a streamlined way to clean up unused images, containers, volumes, and networks.
In a terminal window, enter the following:
docker system prune
Additional flags can be included:
–a To include stopped containers and unused images
–f Bypasses confirmation dialog
––volumes Removes all unused volumes
Also, you can specify a single type of object to be removed, instead of the entire environment:
docker container prune
docker image prune
docker volume prune
docker network prune
Running docker system prune -a removes both unused and dangling images. Images used in a container, either currently running or exited, will NOT be affected.
Finally, my docker is clean:
May come with more commands and maintenance tips in future post. While writing this post I was using limited resources, so was unable to attach screen shot for each command. In future may add more scenarios.
Today we will learn three types of collections supported by AL.
A collection is a complex type that contains multiple values in one variable.
You can’t have values with different types in the same collection. For example, you can’t add date values in a collection that only allows integer values.
The three types of collections that AL supports are:
Array
List
Dictionary
We will discuss about each type of collections in this post with examples.
Let’s start with most familiar collection we have used with old versions of Navision too, yes you are right, I am talking about Arrays.
Arrays
Arrays are complex variables that contain a group of values with the same data type.
An array holds multiple values, and these values are stored in the elements of the array. You can access these values by using the index, which can also be a value that is stored in another variable. With this design, you can create a loop where you increment a certain variable to loop through every element in an array.
By using the Dimension property, you can define how many dimensions that the array will hold.
When creating a variable of an array data type, you first need to define how many elements that you’ll have in the array. The most commonly used array is the one-dimensional array, which is a list of elements with the same data type.
You can represent an array as a row of values.
To create an array, use the following code:
SalesAmount: array[10] of Integer;
To access an element in an array, use the array element syntax:
SalesAmount[5] := 0;
Unlike other programming languages array index don’t starts with 0 rather with 1. In above example first element will be 1 and last 10.
Having only one element between the square brackets indicates that you are using a one-dimensional array. If you want to have a multi-dimensional array, use a comma-separated list between the brackets, as follows:
SalesAmount: array[6,9] of Integer;
To access an element in an array, use the array element syntax:
SalesAmount[5,3] := 0;
Lists
The List data type can be compared with an array. The List type can only be used with fundamental types and represents a strongly typed list of values that can be accessed by index.
Therefore, you can have a List type of [Integer], but you cannot have a List type of [Blob].
A List data type doesn’t require you to define how many elements you want to store up front (while an Array data type does).
The List data type has some methods that are used frequently. The methods that are available for a List data type will discuss in a later post.
To create a list, use the following code:
CustomerNames: List of [Text];
To access an element in a list, use the following methods:
To store/add values to list
CustomerNames.Add(‘KSD Consultancy’);
CustomerNames.Add(‘Microsoft India’);
CustomerNames.Add(‘Ashwini Tripathi’);
To retrive values from list
CustomerNames.Get(1);
Dictionary
The Dictionary data type represents a collection of keys and values.
Every key that you create in this dictionary must be unique. The main benefit is that you can immediately get the value for a specific key.
The value can be a type, but it can also be a List or another Dictionary data type.
Blow code sequence will give you idea how to use dictionary data type:
//Declaring List
CustomerNamesIN: List of [Text];
CustomerNamesUS: List of [Text];
CustomerNamesCA: List of [Text];
//Declaring Dictionary
CountryWiseCustomer: Dictionary of [Code[20], List of [Text]];
//Assigning values to List
CustomerNamesIN.Add(‘KSD Consultancy’);
CustomerNamesIN.Add(‘Microsoft India’);
CustomerNamesIn.Add(‘Ashwini Tripathi’);
CustomerNamesUS.Add(‘Paul’);
CustomerNamesUS.Add(‘Linda’);
CustomerNamesCA.Add(‘Eddy’);
CustomerNamesCA.Add(‘Mark’);
//Assigning values to Dictionary
CountryWiseCustomer.Add(‘IN’,CustomerNamesIN);
CountryWiseCustomer.Add(‘US’,CustomerNamesUS);
CountryWiseCustomer.Add(‘CA’,CustomerNamesCA);
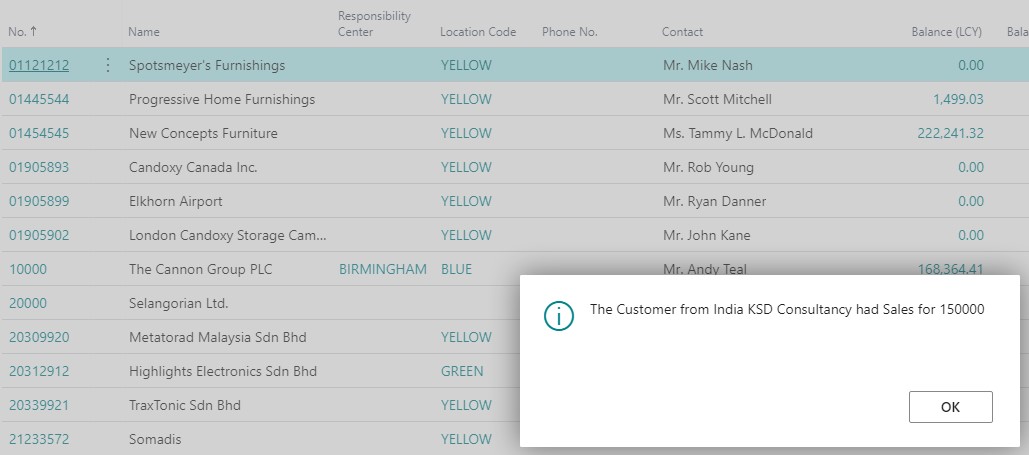
//Retrieving value from Dictionary
CountryWiseCustomer.Get(‘IN’).Get(1);
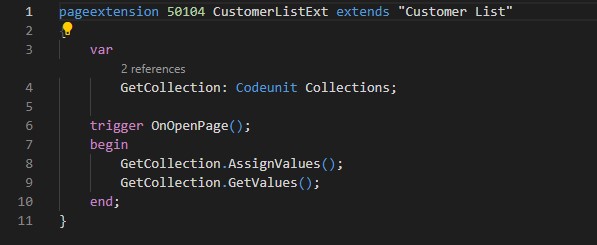
Here is the complete code:
Created new codeunit and declared variables & procedures to manipulate values in Collections.
Added Code to call procedures defined in codeunit, to assign and retrieve values from collections.
Now its time to check output of above code.
Hope you get idea how to work with Collections, you may find more posts in coming days where we may discuss about methods available for collection.
To define a variable of type Option, you can’t use the OptionMembers property that’s used on a field of data type Option. You need to list the available options as a comma-separated list after your variable definition.
For example:- Color: Option Red,Green,Yellow;
If you want to reuse the same Option type in other objects (like other codeunits, pages, or tables), you have to redefine all available values. Later, if you decide to add an extra value, you need to modify all objects with this extra value. Options in a table are not extendable with a table extension.
Solution to this is now available as enum.
An enum is a separate object with its own number and name. You can use an Enum object in other object without the need to redefine it at each object level. The Enum object can also be extended with enum extensions.
Lets see example defining and using enum.
I have created a EnumDefinition.al to define my custom enum Color.
I have defined one Function SelectColor to access values.
To call the Function and test result created extension of Customer List page and added code to access the value.
Now we can use this Enum throughout the extension in any objects without redefining it as in case of Option.
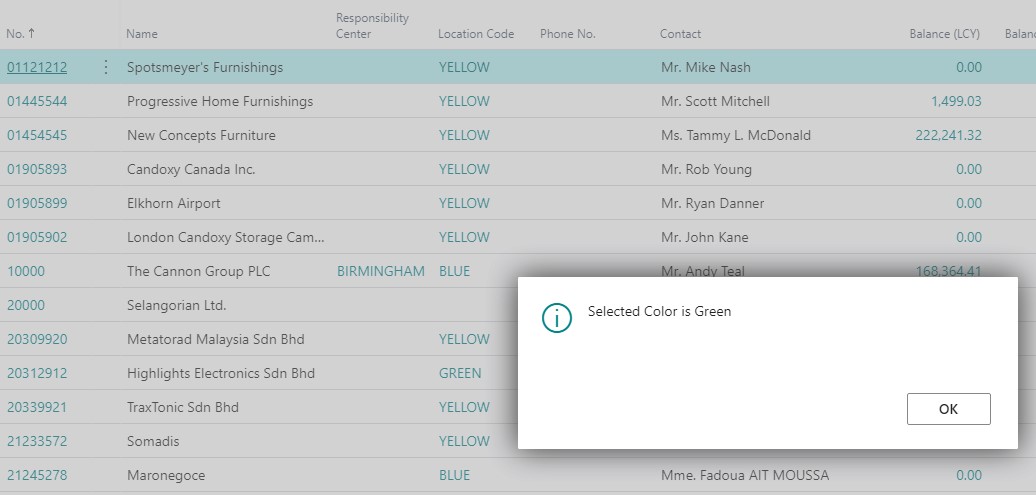
Let’s Publish the extension and see the result.
As you can remember from above code, I have selected color Green and have put the code to call of function on trigger of Customer List page, OnOpenPage.
The Enum object can also be extended with enum extensions.
Extending the Enum
Lets create new Extension, app.json file set dependencies to earlier/above Extension.
Next let’s extend our enum Color.
Next let’s create codeunit for function to access value of enum.
To call the Function and test result created extension of Customer List page and added code to access the value.
Let’s Publish the extension and see the result.
As you can remember from above code, I have selected color Red & Brown and have put the code to call of function on trigger of Customer List page, OnOpenPage.
Red is from earlier defined Color enum (Red, Green, Yellow), & Brown from extended enum (Blue, Black, Brown).
Update 17.2 for Microsoft Dynamics 365 Business Central 2020 Release Wave 2 (Application Build 17.2.19367.19735, Platform Build 17.0.19353.19730)
This update replaces previously released updates. You should always install the latest update.
It may be necessary to update your license after you install this hotfix to gain access to new objects that are included in this or a previous update. (This only applies to customer licenses.)
For a list of updates that were released for Microsoft Dynamics 365 Business Central 2020 Release Wave 2, see released updates for Microsoft Dynamics 365 Business Central 2020 Release Wave 2. Updates are intended for new and existing customers who are running Microsoft Dynamics Released Updates for Microsoft Dynamics 365 Business Central 2020 Release Wave 2.
How to obtain the Microsoft Dynamics 365 Business Central 2020 Release Wave 2 files
This update is available for manual download and installation from the Microsoft Download Center.


You must be logged in to post a comment.